Developing dashboards can be very tedious. So we wanted to provide you with a set of time-saving tips that will make your life a lot easier.
In this big How to do it… section we will cover all tips for this recipe.

When grouping components, you can either group directly from the Object Browser or you can insert a Canvas Container and then drop the objects you want grouped inside the Canvas Container.
Here are some pros and cons of both:
- Grouping objects directly: This is the quickest and easiest way to group objects. However, if you want to move or resize objects within the group, you will need to ungroup everything, adjust the position/size of the objects, and then regroup the objects. You will also need to rename the group again. In addition, if you want to add objects to a group that has Dynamic Visibility set, you will need to manually add Dynamic Visibility onto the new object in the grouping. Finally, when you ungroup and then regroup objects, you will risk running into human errors (setting Dynamic Visibility, layering, and so on).

- Grouping objects using a Canvas Container: This method requires that a user inserts a Canvas Container onto the dashboard, and then drops the grouped objects into it. The benefit here is that you do not have to worry about setting Dynamic Visibility when dropping new objects into the container. In addition, you do not have to ungroup the objects when you want to move or resize the objects. A minor issue with Canvas Containers is that you see the dotted lines around the canvas in the development screen, which is only a minor inconvenience. Also, you will see that the inside of the canvas is shaded so you will not be able to see what the true color looks like during runtime. Finally, using Canvas Containers may increase the file size of your dashboard.

This is a very useful feature. For example, you may have three bar charts and want to resize all the title fonts. Instead of resizing each one individually, you can select each one by holding Ctrl and clicking on each chart from the dashboard canvas, or holding Ctrl and clicking on each chart from the Object Browser. You will now be able to edit items that are common to all the charts (such as the Appearance tab).

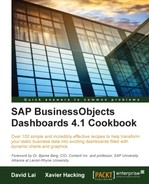
As mentioned in Chapter 7, Dashboard Look and Feel, creating a dashboard that is neatly aligned with charts and components of similar sizing provides a cleaner user experience. Accomplishing this can be a very tedious task when there are many objects involved. Just imagine slowly resizing, aligning, and spacing each and every object manually. Fortunately, we can resize, space, and align objects easily using some of the helpful toolbar functions as shown in the following screenshot:

For example, if you wanted to resize the following bar chart to be exactly the same as the line chart and align the top so that it is equal as well, you would do the following:

- First, select the master object that you want the other objects to follow. In this case, hold Ctrl and select the bar chart first. Then, keep holding Ctrl and select each subsequent object (in this case, the line chart).
- Click on the equal make same size icon. Sometimes, you might want to make objects the same height or width, but in our case, it's both.

- Click on the Align Top icon so that the bar chart becomes aligned with the line chart on the left.

The alignment functions are great for moving components so that they are exactly aligned with one another. However, there are cases when we may want to move a particular object to an exact location. In most cases, we can drag with the mouse, but it is difficult to drag a component to the exact pixel for pinpoint accuracy.
Thus, what a user can do is first drag the component close to the exact position of choice. Then, they can use the arrow keys to slowly move the object to the exact pixel.
The Grid is a helpful mechanism to visually aid developers on the exact pixel location of components. To turn on the Grid, navigate to View | Grid.

You can also set the sizing of each Grid as well as the option to snap objects to the Grid when moving objects around. To set the Grid options, click on File | Preferences | Grid.

Templates are a great way of reusing components such as headers, footers, and color schemes over and over without having to recreate them on every dashboard. However, there are cases where certain charts, selectors, and buttons may be needed in some dashboards.
One neat feature that SAP BusinessObjects Dashboards has is the ability to have another SAP BusinessObjects Dashboards instance open, and then copy the objects from that dashboard to another dashboard currently in development. This is useful if there is formatting and cell binding that can be reused. If there were 20 reusable objects, for example, this would save us a great deal of time by copying and pasting the components instead of recreating each one.

