As shown in the Adding a Mac OS X-looking dock to your dashboard recipe, we can use a Fisheye Picture Menu to emulate a program-dock-type style when selecting items. However, there may be cases where we may want images in different locations that we can click on to perform different actions.

In this recipe, we will go through an example of how to use a push button combined with an Image Component to create a clickable image that can perform actions when clicked.
- Drag an Image Component from the Arts and Backgrounds section of the Components window onto the canvas.
- Open up the image properties window and click on the Import button. Select the image from your computer that you want to show.

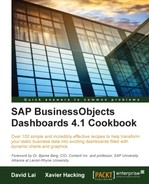
- Drag a Push Button object from the Selectors section of the Components window and put it on top of the image. Then, resize the Push Button so that it is the same size as the image. To make the button the same size as the image, use the sizing icons on the toolbar circled in red, as shown in the following screenshot. Make sure you click on the image first and then on the push button in order for the push button to match the sizing properties of the image, and not the other way round.

- In the Push Button properties, first bind the Source Data and Destination to the appropriate cells. In our example, we want to transfer the table data from the yellow section to the destination section highlighted with a black border. Also, in the Label section, don't forget to delete all text.

- Go to the Appearance tab of the push button and set the Transparency to 100%. Then, uncheck the Show Button Background checkbox.

- Drag a Spreadsheet Table component onto the canvas and bind it to the destination cells D2:E6 of the push button.

- Preview and make sure that when you click on the image, the details of the image show up on the table.

In this recipe, we overlay a Push Button on top of an Image Component. By default, an image component can't perform any actions. However, with an invisible push button on top, it will seem as though we can click on the image to perform an action.
For more information on formatting objects in terms of sizing and alignment and setting the appearance of objects, please read Chapter 7, Dashboard Look and Feel.