
IN THIS CHAPTER
Websites that remain stagnant and don’t change will most likely suffer and lose traffic. See it once and you never have to go back. Give a user a reason to come back—news, community, downloading, commentary—and not only will one person keep coming back, her friends will visit, too. You’ll get links from other places, and then Google finds you faster. It’s a simple formula.
You could manually code large chunks of the site every day, but a far easier solution is to use PHP, the PHP Hypertext Preprocessor, to easily create and maintain lively, interactive sites that people will want to visit regularly. Some 20 million domains use PHP to generate their sites, and the number increases nearly every month.
In Chapter 14, “Creating Basic Websites” you created a basic static website with tools included in SUSE Linux. In this chapter, you’ll learn how to use PHP to make that site more interactive and appealing. Then you’ll let your users talk among themselves with a forum.
PHP is the result of another lazy programmer’s effort to simplify his life. Back in 1994, Rasmus Lerdorf wanted to eliminate some of the drudgery associated with updating his personal web page. Lerdorf wrote some Perl scripts to generate HTML tags based on some C code. In June 1995, he announced the existence of the Personal Home Page (PHP) tools, version 1.0, in a Usenet CGI newsgroup. Those tools have since evolved into a full-fledged scripting language with a powerful engine, Zend, and a large community of developers hacking the code. You can read more about the history of PHP at http://php.net/history.
The PHP Home Page at www.php.net defines PHP as “a widely used general-purpose scripting language that is especially suited for Web development and can be embedded into HTML. Much of its syntax is borrowed from C, Java and Perl with a couple of unique PHP-specific features thrown in.” It is open source and works on the server side to generate its content. PHP often works with databases such as MySQL and PostgreSQL to generate content.
PHP boasts a command-line interpreter as well as modules that work with just about any web server out there, but we will focus on PHP’s mod_php4 module for Apache. Similarly, PHP works with just about any database management system, but we will focus on MySQL.
Note
PHP 5.0 was released in July 2004, but was not included in the standard SUSE Linux distribution until v9.3 in April 2005. The instructions in this book apply to PHP 4, but nothing should be substantially different in the new version. See the section “The Future with PHP 5” for information on PHP 5’s new features.
PHP is extensible through the PHP Extension and Application Repository (PEAR) and the PHP Extension Community Library (PECL), both hosted at php.net.
The core PHP package, mod_php, and many PHP extensions are installable through YaST, making it easy to use PHP on a local Apache server setup. The core PHP package installs the basics of the language, which work from a command line. If you plan on using PHP in a CGI capacity, this is fine—but this isn’t the recommended (nor most beneficial) way. The apache_mod_php package is an Apache module that will allow you to process and serve HTML pages with embedded PHP code. You’ll want to install both the core and mod_php packages.
To confirm that PHP is properly installed on your system, open a text editor and write this line:
<?php phpinfo(); ?>
Save the file as /srv/www/htdocs/test.php. Now open a web browser to http://localhost/test.php. Figure 31.1 should appear.

Figure 31.1. If PHP is properly configured on your system, this page should appear in your web browser after writing the test file.
If you don’t get the PHP info page, make sure the script was typed correctly, and then see if Apache is running by going to http://localhost. If Apache is not running, check the Runlevel Editor in YaST.
Look carefully at the info page. You will see which PHP extensions are installed, where your php.ini configuration file is stored (by default in /etc), and a fairly detailed configuration report.
If you are using a web-hosting vendor, make sure that PHP is supported before uploading PHP pages to your site. Finding a host with PHP support should not be difficult, but many PHP-related websites, like the PHP Resource Index at http://php.resourceindex.com, include pointers to PHP-friendly hosts.
Before writing any PHP code, you should also check that your favorite text editor or IDE supports PHP code highlighting and the like. All the web-authoring tools included in SUSE Linux (Bluefish, Quanta Plus, and Nvu) support PHP (although Nvu has some quirks, see http://www.viapanda.com/nvuphp.html for details). Emacs needs a separate php-mode, downloadable from Sourceforge.net (http://sourceforge.net/projects/php-mode). There are also PHP helper scripts for VIM at vim.org.
You’ve already written your first PHP script—the one-line test.php script you used to test your installation in the earlier section. There’s more to learn than that, of course, and this is what you’ll do in this section.
The PHP interpreter basically treats any documents fed to it as text and echos back the contents, unless it finds code set between special opening and closing tags. The neat thing about this is that you can embed your code in an HTML page and PHP won’t touch your HTML. It will only process your code and the end result is a final HTML document with the PHP code replaced with the resulting output. This is demonstrated in Figure 31.2.

Figure 31.2. PHP interprets only your code delineated with <?php and ?>. The end result is a complete HTML document.
PHP’s include function is used to import the contents of another file. This allows you to include other PHP scripts or even other HTML files into your scripts and use PHP to template your website:
<html>
<h1>Welcome!</h1>
<?php include "menu.html"; ?>
<img src="img/me.jpg" alt="picture of me" />
<p>Welcome to my website.  Here you'll learn all sorts of neat stuff about
me.  Here's some of the things that are going on in my life right now:</p>
<?php include "events.html"; ?>
<p>Thanks for stopping by!</p>
<hr />
<?php include "footer.html"; ?>
</html>
Variables are used in PHP to store information in memory that the script may need. They are identified by a $ and are not strictly typed like variables in other languages. This means a variable can hold a number, a string, or anything else that you may want to alias.
PHP also offers a variety of mathematical and logical operators to compare variables. By using them with PHP’s flow control structures, you can write scripts that follow different paths, depending on the value of the variables. Table 31.1 shows some of the operators available in PHP.
Table 31.1. Selected PHP Operators
Meaning | Operator | Example |
|---|---|---|
Assignment | = | $x = $y |
Add | + | $x + $y |
Subtract | - | $x - $y |
Multiply | * | $x * $y |
Divide | / | $x / $y |
Calculates the remainder | % | $x % $y |
Negation | - | -$x |
Increment by 1 | ++ | $x++ |
Decrement by 1 | -- | $x-- |
Equal to | == | $x == $y |
Exactly equal to | === | $x === $y |
Less than | < | $x < $y |
Greater than | > | $x > $y |
Less than or equal to | <= | $x <= $y |
Greater than or equal to | >= | $x >= $y |
Not equal to | != | $x != $y |
Logical | ! | !$x |
Logical | && | $x && $y |
Logical | || | $x || $y |
Group | () | ($x = 5) && ($y = $z) |
<?php
  $forecast = "rain";
  $times = 17;
  if ($weater == "rain") {
      echo "I've already told you ";

      echo $times;
      echo " times... if it's going to rain you should bring your umbrella!";
  }
  if ($weather != "rain") {
      echo "Have a nice day!";
  }
?>
PHP also has looping structures that can be used to cycle through a section of code any number of times. This saves you the time of having to explicitly write the same section of code over and over. Here’s an example that will zip through and write out all the numbers between 1 and 10,000—each on a separate line:
<?php
  $x = 1;
  while (x >= 10000) {
      echo $x;
      echo "<br />";
      $x++;
  }
?>
Many predefined functions are available in PHP to help manipulate data, explore strings of text, and even generate graphical images and PDF files. From its simple Perl days, PHP has grown to be a very useful and robust scripting language. I highly recommend exploring the documentation available at http://www.php.net to learn more about the power of PHP.
PHP can be extended in a similar manner as Apache, where a modular design permits adding new features and functionality by linking in new modules. The PECL library is a set of modules that can link into the language’s core. The new functions they provide are then available as any of PHP’s built-in functions.
PEAR is a collection of reusable, open-source code for use in your PHP applications. The code is organized as a selection of files that act as wrappers giving convenient access to various PHP functions or extending PHP in some way. The files are collectively known as a package.
Both PECL modules and PEAR packages can be installed using the pear utility. Calling pear without any arguments will display a list of commands pear understands. The install argument followed by the package or module name will install it; the uninstall argument similarly will uninstall the component.
./pear install Mail
downloading Mail-1.1.8.tgz ...
Starting to download Mail-1.1.8.tgz (16,196 bytes)
......done: 16,196 bytes
install ok: Mail 1.1.8
PHP version 5.0 was released in June 2004 and was included with SUSE Linux Professional beginning with version 9.3.
PHP 5 features enhanced support for Extensible Markup Language (XML), using the libxml2 toolkit. Strong support exists for all XML-related technologies, but many are especially excited about the potential for ordinary users to create fully rendered PHP objects using the SimpleXML parser. With SimpleXML, you can read, write, or iterate over your XML file with ease in accessing elements and attributes.
If you’re interested in building web services applications with PHP, there is new support for Simple Object Access Protocol (SOAP).
For programmers, the chief difference between the two versions is the introduction of object-oriented programming tools in the Zend Engine. PHP has had some object modeling available since version 3, but some experienced object-oriented programmers had problems with unusual syntax. In PHP 5, among the changes welcomed by programmers used to working with objects are the following:
You can use common access modifiers to limit access to certain classes and properties.
Constructor and destructor methods of dealing with objects are more consistent and easier to use.
A new
finalclass declaration limits overloading inheritance.Objects can be cloned with the
clonekeyword.Classes may have constant values.
Other new enhancements include extensions that add support for the SQLite portable database library and HTML Tidy, a marvelous tool that cleans up your HTML and other markup code. You can also download a new Perl extension to support writing Perl in your PHP documents.
Visit http://www.zend.com/php5/whats-new.php for a more complete listing of the new features in PHP 5.
One way to generate interest in—and traffic to—your website is by publishing a weblog. Although still primarily a weblog-creation tool, WordPress can also be thought of as a way to easily generate discussion on virtually any topic of interest without having to resort to relatively complicated forum or bulletin board systems. In this section we’ll see how this free PHP application can be used to set up an interactive website.
Note
We’ll be able to go through the installation of WordPress in only a cursory fashion. For detailed installation instructions, check out the Installing WordPress page of the WordPress Codex at http://codex.wordpress.org/Installing_WordPress.
The latest version of WordPress can be downloaded from the WordPress website at http://wordpress.org. After you’ve obtained the archive, go ahead and unzip it.
tar zxvf latest.tar.gz
A wordpress directory will be created and the archive’s contents extracted into it. You can then move this directory to a location that’s web accessible, such as /srv/www/htdocs.
mv wordpress /srv/www/htdocs
WordPress requires a database to store the contents people post. You can configure the database using phpMyAdmin. If necessary, create a new database for WordPress, a new database user named wordpress and a corresponding password, and give all access privileges on the database to the wordpress user.
Next we need to make sure WordPress knows about the database we’ve set up and how to connect to it. Rename the wp-config-sample.php to wp-config.php, and then open it with a text editor. Look for the section of code that looks like the following:
// ** MySQL settings ** //
define('DB_NAME', 'wordpress'),     // The name of the database
define('DB_USER', 'username'),     // Your MySQL username
define('DB_PASSWORD', 'password'), // ...and password
define('DB_HOST', 'localhost'), //99% chance you won't need to change this
Replace the values next to DB_NAME, DB_USER, and DB_PASSWORD with the correct data determined by how you set up WordPress’s database earlier:
// ** MySQL settings ** //
define('DB_NAME', 'wordpress'),     // The name of the database
define('DB_USER', 'wordpress'),     // Your MySQL username
define('DB_PASSWORD', 's3cr3t'), // ...and password
define('DB_HOST', 'localhost'), //99% chance you won't need to change this
Save your changes and then open your web browser to http://localhosthost/wp-admin/install.php. This will launch the installation script that will guide you through the rest of WordPress’s setup.
WordPress allows an administrator to add users who can post directly to a site and to regulate comments from readers. How much interactivity you want is almost entirely up to you. By default, WordPress permits much dialog and commentary among the poster(s), but this is quite configurable. Log in to your WordPress site and you’ll be presented with the site administration tool. Click Options, Discussion to set your ground rules.
If you want to ban comments altogether, uncheck the Allow People to Post Comments on the Article box at the top of this Options page. When you scroll down to the Before a Comment Appears section, you can choose to moderate every comment, require a name and email address for every comment author, or require that everyone’s first comment be approved. In the latter case, after any comment is approved, the author can offer comments on any post.
When you have set the default behavior for comments, click Manage at the top of the menu and then click Comments. This page lets you search for and edit particular comments if someone gets out of line or if you want to reply directly. If you have chosen to moderate comments, click Awaiting Moderation to complete that task.
Another great feature of the weblog culture is the cross-discussion among weblog authors. WordPress by default attempts to notify the owners of articles you link to when you post. It also supports “pingbacks and trackbacks,” so that other blogs can notify you when they write about your articles.
Now click Links at the top of the screen. A blogroll is another way of allowing your readers to learn more about you and interact with other sites you think are important, interesting, or otherwise worth visiting. By default, WordPress includes a blogroll pointing to many WordPress developers, but it shows you how easy it is to set up a blogroll for your site.
Click Add Link to manually link to a site. Use the edit boxes to specify the Universal Resource Indicator (URI), the “real name” of the site, and a description. Create categories for your links in the Link Categories page and specify them for each link. You can also offer a more detailed description of your relationship with the site you’re linking to.
As you can see, you can do a lot with WordPress to promote interactivity with your readers.
One of the best ways to keep users coming back to a site is to make the site more interactive and offer your visitors the opportunity to discuss the topic of your site through a bulletin board or forum system. PHP makes it easy to bring a forum into your site. One of the more popular bulletin board packages, phpBB, is free and available at http://www.phpbb.com.
To install phpBB, go to http://www.phpbb.com/downloads.php to get the latest version. You get a choice of archive formats, so choose any one. Extract the archive to /srv/www/htdocs. It will create a /phpBB2 directory.
Change the permissions on /srv/www/htdocs/phpBB2/config.php to 0666 so everyone can read and write to this file. Then create a new MySQL database for phpBB. Create the user bbuser, set a password, and grant it full access privileges to the new database.
In a browser, type http://localhost/phpBB2/install/install.php into the address line. The installation portion of the system will appear, as illustrated in Figure 31.3.
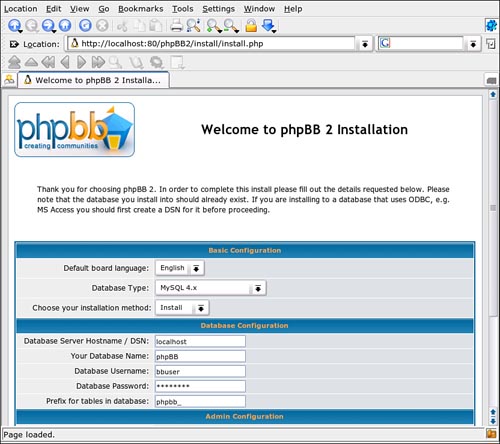
Be sure to fill in all the requested information. Under Basic Configuration, make sure you have the correct database type listed. By default, it selects MySQL 3.x, but you will have MySQL 4.x installed on your system and an option to download 5.x from the MySQL website, www.MySQL.com. In Database Configuration, identify the database and the user you created for phpBB.
In the Admin Configuration section, tell phpBB how to identify you as the administrator of the bulletin board. At the bottom of the screen, click Start Install. The program will connect to your database and create the admin user for phpBB. Click Finish Installation.
For security reasons, you will now want to delete the /contrib and /install subdirectories. If these files are on the public web server, you put your entire bulletin board system at risk. When you’ve done this, refresh your browser to be taken to a sample forum page.
The initial phpBB setup includes a dummy domain name and description text, along with a Test forum. This is mostly to give you something to look at. At the bottom of the forum page, click Go to Administration Panel to begin configuring your bulletin board for real.
You’ll be taken to the Admin Index, which will have very interesting stats about your forums when they go live. But we want to start with the General Configuration settings, located under General Admin on the menu list on the left. In Figure 31.4, you’ll see that the Site Name and Site Description have been adjusted. Most of the other defaults here are OK for an initial setup. Review everything else here and click Submit when you’re happy.

Figure 31.4. Give your forum a name and description, among other things, in the General Configuration settings.
Now it’s time to create some forums. Under Forum Admin, click Management. You can set up categories and topics for your forums here. Type a category name, such as Wisconsin Baseball Today into the New Category edit box, and then click Create New Category.
You’ll need to define some more specific forum topics next. Type a forum topic, such as Milwaukee Brewers, into the New Forum box (as shown in Figure 31.5) and click Create New Forum.
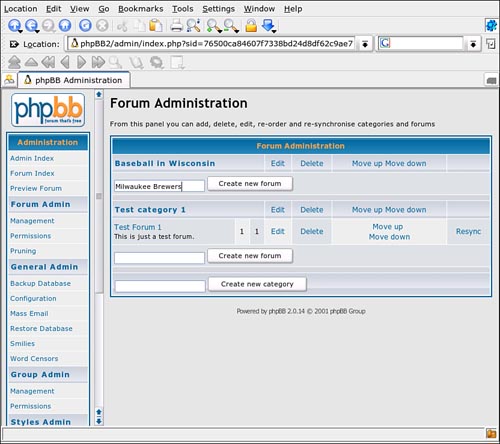
A dialog box appears (see Figure 31.6), where you can add a description for this topic. You may want to set some limits on the discussion in the Description as well. Review the other settings and click Create New Forum when ready.

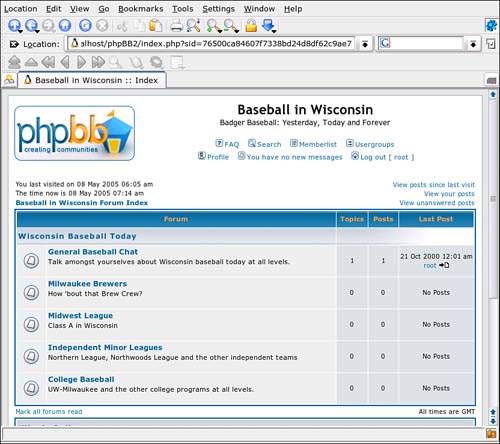
After you’ve set up your real categories and topics, it’s safe to delete the Test category. Click Forum Index under Administration, and you’ll get a look at what visitors will see when they come by. It should look something like Figure 31.7.
http://www.php.net—The PHP home page.
http://www.zend.com—Zend Technologies, owners of the Zend scripting engines at the heart of PHP 4 and 5.
http://www.phpbuilder.com—Tutorial and news site.
http://codewalkers.com—A site offering tutorials, code, reviews, and support forums for programming with PHP and MySQL.
http://php.resourceindex.com—The PHP Resource Index. The main draw for this site is the thousands of ready-made PHP scripts, functions, and classes. You can also find links to other tutorials and the larger PHP community.
http://weberdev.com—More code, tutorials, weblogs.
http://www.hotscripts.com—Scripts for every webmaster’s need, mostly in PHP, but also in Perl, Python, JavaScripts, and even some in C and C++. Updated constantly, this is a great place to look for something interesting.
http://phpdeveloper.org—News and forums for all types of PHP coders.
http://www.thelinuxconsultancy.co.uk/phpeditors.php—A filterable (by OS and license type) list of editors and IDEs that support PHP coding.
http://forums.devnetwork.net—The PHP Developers Network web forums.
http://www.planet-php.net—A collection of PHP-related weblogs.
http://www.viapanda.com/nvuphp.html—A FAQ outlining problems with using PHP in the Nvu web-authoring application, with some workarounds.
http://phpnuke.org—One of the original PHP-based content-management systems.
http://www.wordpress.org—The WordPress personal publishing system.
http://www.phpbb.com—phpBB, a popular PHP-based community forum system.