
IN THIS CHAPTER
The Internet is not just a place to visit. More than ever, it’s a place to contribute to.
SUSE Linux can help you build your space on the web. There are tools for everyone to create impressive sites, regardless of your skill level and interest in learning the technology behind it.
The weblog revolution has changed the way many people think about the Internet. The rise of personal weblogs (blogs) has transformed how people communicate with each other, and how they relate to the world—or at least the part of the world that’s online.
In this chapter, you will explore the tool choices available to you for producing web pages. Then you’ll build a basic informational website with Quanta Plus. We will then explore the various Linux tools for making a personal weblog.
The Linux web developer can choose among several good tools. What you choose depends on your skill level and what your comfort level with writing raw HTML is.
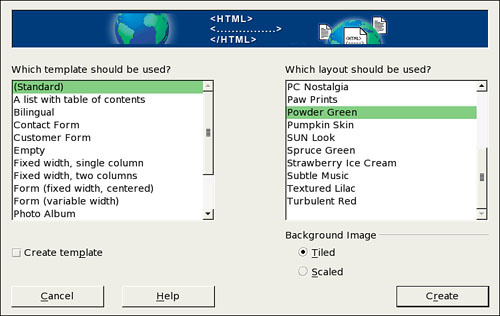
For the absolute web page beginner, there’s nothing better than OpenOffice.org’s Writer/Web. OOo offers basic templates (called AutoPilots) for creating several types of pages, including various forms, two-column layouts, and even a photo album style. From the File menu, go to AutoPilot, Web Page. Figure 14.1 shows the Web Page AutoPilot dialog box.
Note
There are many schools of thought which question whether a beginner is better served by a set of templates or by learning the basic HTML tags. AutoPilot, and similar programs, are useful to a point, but you should still consider studying the basics of HTML if you expect to move beyond the very basics with your web skills.
Many of the background layouts are somewhat garish and difficult to read, but they give you something to start with. Unlike Microsoft Word, Writer/Web delivers very clean and standards-based HTML code.
The standard web page AutoPilot delivers easily editable code for any basic page, with links and navigation graphics, which you can see in Figure 14.2.

Figure 14.2. Even a default OpenOffice.org template gives you plenty to work with. Note the navigation graphics, links, and Last Changed notice.
A nice touch is the Last Changed note at the bottom of the page. This tells your visitors that the information on your site is current, or perhaps that it is not.
The other office suites included with SUSE Linux all let you write HTML documents, but only OOo helps the novice with something to play with and learn from.
The advantage of using a word processor such as OOo for website creation is that it’s a familiar environment. Paragraph styles transfer easily from a standard document to the web, and for the most part it is more WYSIWYG (what you see is what you get) than a specialized editor.
Where the office suites fall short compared to more specialized web-development tools is in creating projects that link pages together in a coherent site. Applications such as Quanta and Bluefish offer advantages that we will explore later.
An alternative to word processors are the browser-based page-creation tools. The genesis for these was Netscape’s early decision to include Composer in its suite of Internet tools. This tool is still present in the official Netscape Communicator suite and with its open source Mozilla sibling.
When the Mozilla project decided to break the components of the Netscape suite into sleeker, faster individual applications that still worked well together, some thought Composer might die. Coming to its rescue was Michael Robertson and his team from Linspire (formerly Lindows). They have shepherded the development of a new, simple page-creation tool called nvu (pronounced N-View). It fills the need for a simple tool for new users who don’t need to build massive sites with lots of Flash and glitter, but have something to contribute.
Next up on the scale are the special tools created for making websites. Like Microsoft FrontPage or Macromedia Dreamweaver, these applications handle all the relevant tasks in building a professional website, with the advantage of being free.
Two of these have become the standard applications for Linux web developers:
Other tools that have gained some traction recently are Screem and Ginf; the latter pulled its name from the ever-reflexive GNU naming convention, “Ginf is not FrontPage.”
One difference between the Linux development tools and the Windows products mentioned earlier: These tools are proudly non-WYSIWYG, at least by default, preferring to show you the code first and testing the appearance later. What this means is that you have to know at least a little bit about HTML tagging and how it works before using these tools successfully.
In our forthcoming example, we will not dwell extensively on what specific tags mean, but you will get a sense of how tagging works.
Quanta is not as ruthlessly anti-WYSIWYG as Bluefish, though. With version 3.3, Quanta introduced the VPL (Visual Page Layout) editor, which can display in place of or in a dual view with the default (aka Source) editor. This is still a little buggy, but not bad for a first version.
This is not to say that the only help you get from these tools are some extra toolbars that add a tag when you tell it. Quanta comes with an assortment of templates to handle all the basics of page creation, as you can see in Figure 14.3. No navigation tools are included, though.

One thing you get with a web tool that you can’t get with an ordinary word processor is the support for a variety of web technologies. It is often as easy to create an interactive PHP-based site, or any of several varieties of XML, as it is a static HTML page, if you know what you’re doing.
Both tools will also display your pages in most, if not all, prominent Linux web browsers. Bluefish and Quanta each handle this differently, however. Quanta displays pages in its own internal browser and in Konqueror, Mozilla, Netscape, Opera, and Lynx (a text-based browser). Bluefish handles Mozilla, Netscape, Opera, Galeon, and the GNOME default browser. You can add other browsers in the external preferences dialog box. Of course, you must have each browser installed on your system for this feature to work.
Tip
Do you want to test your pages on Microsoft Internet Explorer without leaving Linux? This is not easy, but it is possible.
Internet Explorer will run under Wine, the Windows emulator, but it takes some work. After installing Wine (via YaST), download Hajime Segawa’s script to install Internet Explorer and Windows Media Player from http://sidenet.ddo.jp/winetips/config.html.
Extract the tarball to your home directory, and then read the readme.en file for instructions in how to run the script. When the script is finished, it opens a confirmation page in Internet Explorer, so you know you have a working copy on your system.
Now add Internet Explorer to the browser list in Quanta or Bluefish.
In Bluefish, go to Edit, Preferences, External Programs. At the top you’ll see the browser list. See the line with the Add button? Type
Internet Explorerthere. Under Command, typewine iexplore %s(for the current file). Click Add and this will appear in the browser list. Click OK to confirm.In Quanta, go to Settings, Configure Actions. Expand the All tree and you will see the View with (browser) settings. This is what you’ll base your new action on. Click New Action. Settings are as follows:
Type: Script
Text: View with Internet Explorer (You can choose an icon, too.)
ToolTip (optional): View with Internet Explorer
Shortcut (Custom): Alt+Shift+F6 (All the others are variations on F6.)
Detailed Settings:
sh %scriptdir/externalpreview.sh %pid wine iexplore(To save typing, copy and paste from one of the other Views with choices, and then addwine iexploreto the end.)
Both Quanta and Bluefish come with ample documentation for the product and reference manuals for HTML and PHP. Quanta also includes references for JavaScript and cascading style sheets (CSS).
You know that a real Linux geek doesn’t need a GUI tool to write for the web. It is just markup—hypertext markup at that. Maybe all you need is a text editor and a tag reference guide. Rest assured that every text editor included with SUSE Linux is fully capable of producing perfect HTML code just the way you like it.
Emacs, as per its reputation, not only comes with a web browser, but also has a major mode for Standard Generalized Markup Language (SGML), which means it will help you write to any Document Type Definition (DTD): HTML, XHTML, XML, and so on. Open or create any file with an HTML extension and Emacs will add the relevant menus to your display. All these things work in Xemacs as well.
Vim has a Convert-to-HTML syntax file called 2HTML. Jedit also has a Code2HTML plug-in and plug-ins that will insert tags into your text.
So you have a lot of knowledge about something and you think other people might be interested. There’s no reason not to put up a website with all the stuff you know.
In this section, we will work with Quanta to draw up a site with a few basic pages of information about baseball in Wisconsin.
Ideally, before you build your site, you should do some planning. Most importantly, you have to think about where to store your site; that is, you have to select a web host to keep your pages up. Chances are your ISP offers you some free space, and there are always the free web hosts such as GeoCities, Angelfire, and the like. If you’re serious about building a web resource site, you will want to register your domain name and should consider paying for a host. A good web-hosting company will work hard to keep those servers running and your site available to web surfers around the globe.
Another option, particularly if you have a high-speed, always-on connection, would be to host your own site. SUSE Linux includes the Apache web server, so updating your site is a trifling matter. This would be a reason to get a static IP address from your ISP, because your site’s availability would be hit-and-miss if the world’s DNS servers had to re-locate your site every time you rebooted and got a new DHCP address. For our example, we will self-host the site. See Chapters 26, “Managing Your Apache Web Server,” and 27, “Managing Domain Names,” for more information on Apache and domain names.
The next thing to consider is what type of information you want to have on your site and how the pages will be organized. A mind-mapping tool like View Your Mind or a flow-charting tool like Dia or Kivio may help you think this out, but quite often, it’s time for the old pencil and paper to work its magic.
Our site will have a home page that mostly links to subpages for NCAA Division 1 college baseball, minor league teams in the state, and the state’s only Major League franchise, the Milwaukee Brewers. We’ll have a history page, for information related to the Milwaukee Braves, the defunct minor league franchises, and the Milwaukee Bears of the Negro National League. Finally, we’ll have a listing of folks with Wisconsin ties in the Baseball Hall of Fame in Cooperstown, NY. Figure 14.4 shows a very rough Kivio site plan diagram.

Now it’s time to build the site.
The first task in creating our site in Quanta is to create a new project. Go to Project, New Project, and the wizard dialog box shown in Figure 14.5 appears.
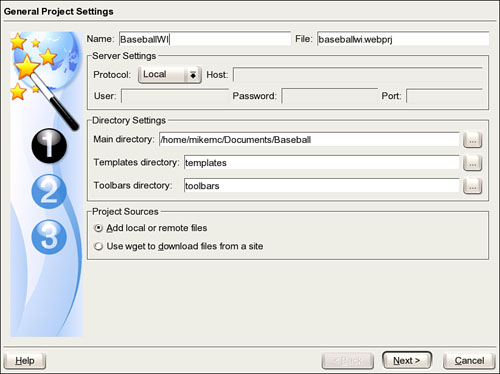
Name the project and Quanta fills in the filename. If you already know who your web host is, adjust the Server Settings so Quanta can immediately upload updated files when you ask it. Set the Main Directory; you can store your working files anywhere, but the Documents folder is a fine place. The Templates and Toolbars directories will be placed underneath the Main Directory, although if you have multiple projects going, you may want to have only one of each of these. Finally, if you have an existing site that you want to pull into Quanta, choose Use wget to Download Files from a Site in the Project Sources area. Click Next to locate existing source pages.
What’s on the second page (see Figure 14.6) is determined by how you answered the Project Sources question on the first page. Because we have no existing files to bring into the project, there’s nothing to do.

Check the Insert Files box at the top, and then add selected files or the entire folder with the appropriate buttons at the bottom.
If you select the option to pull existing files online in the first screen, the New Project Wizard will ask where to look in the Site Source line (unless you’ve already identified the server in the first screen) and generate a wget command. You can edit the options if you want (run wget -h from a shell to see all the options for this program), but clicking Start will retrieve all the files in your site.
When you’ve pulled all the existing files into the project, click Next. Your last task is to tell Quanta what type of site you’re building. You may also identify yourself (or anyone else) as the site author.
In Figure 14.7, you can see the varieties of DTDs you can use for any given site. For our example, we will use the default HTML 4.0 (Transitional), but you can always select something different from the drop-down menu. We will also stick with the default encoding; you’ll rarely have to change that. Also check the Insert global templates box; this will give you quick access to different options for your site. Click Finish to complete your new project.

Figure 14.7. Quanta lets you select from different DTDs to describe the type of site you’re putting up.
The first page in any website is the Index page, where people wind up if they access your domain name. Creating a new project does not automatically open a new page in Quanta, so we need to do that. There are three ways to do this:
To open a blank page with no header information, click the
New Pagetoolbar icon (or go toFile,New).Click the
Templatesicon from the vertical toolbar located to the left of the editor. Go toPages,HTML_4.01,Basic. Double-click to create the page. You can then fill in the page title yourself.Use the
Quick Startdialog box. Click the first icon in the Standard toolbar above the editor space. This dialog box (see Figure 14.8) lets you define nearly everything about your page layout.

Enter the title of this page—that is, the title people will see at the top of the browser window when they visit (and also what comes up when they search for your page). Beside the default options, we have also entered keywords, which will help search engines identify the topics the site is about. Separate words and phrases here with commas. Don’t overload this tag; if you have more than a few items here, a search engine’s spider may decide you’re trying to skew the results too heavily, and it may ignore you entirely.
Quanta makes it pretty easy for multiple authors to work on a site. As you can see, you can change several project defaults for each page from this dialog box, including the DTD, the base directory, and the author. If you don’t check the boxes, Quanta will create the page using the Project defaults.
When you’ve finished with the page settings, click OK to confirm. Quanta may ask you if you want the new page to be part of the current project. You should see the editor page looking a lot like Figure 14.9.

Caution
The project must be open before you run the Quick Start dialog box, otherwise you won’t get the page created properly unless you identify the base directory where the templates are stored.
Adding content is simple. Use the existing toolbars to tag paragraphs either before or after writing your text. Use the Visual Page Layout WYSIWYG editor to see how it looks while you’re still working. You can edit from either the Source or the VPL editor. Figure 14.9 shows the start of our page in the VPL editor.
When you’ve got a page ready, test it in several browsers to make sure it looks good for everyone. Using the Lynx browser will also indirectly tell you how usable your site is for a blind person using a page reader.
When your site is ready, press F8 (or go to Project, Upload Project) to put your handiwork where people can see it. This dialog box shown in Figure 14.10 comes up.

Select (or define) a host server in the Profile Name box. Select the files to upload from the main window (all are selected by default) and click Proceed. Quanta will connect with and upload your files and give you a progress report at the bottom of the screen.
Weblogging, or just plain blogging, has been around for a relatively long time. The practice managed to claw its way into broad public consciousness in 2004, to the point of being a candidate for TIME Magazine’s Person of the Year.
Some observers believe that weblogs represent a new form of journalism, as ordinary folks bring their life experiences and perspectives to bear on events large and small and have a potentially global audience to read what they say.
Bloggers use their sites in all sorts of ways, serious and trivial:
Online personal journals, to keep friends and family posted on the latest news.
A place to share new information (often gleaned from the web itself) about a shared passion.
Businesspeople are increasingly using blogs to communicate with employees and customers.
People on the scene at business or technology conferences and similar events report, often in real time, on what’s happening to inform those who couldn’t be there.
Political commentators of nearly every persuasion imaginable share news, gossip, and commentary on current events.
Journalists—professional, amateur, and in between—share information about stories they cover that may not make it into the paper or on the air.
Blogs can be one person’s project or have multiple authors. They can be on one topic, broad or narrowly defined, or they can be on whatever pops into an author’s head. There are great blogs and poor blogs in all categories. Some are read by thousands every day, but most are read by only a few.
Whatever you want to do with your blog, about the only rule that matters is that a blog home page features posts in reverse chronological order, with the most recent posts at the top of the page. Other characteristics that help differentiate blogs from ordinary websites include the following:
Blog posts are usually archived and have a link to the URL where the post will be archived when it floats off the home page. This URL, called a permalink, is done because bloggers often link to other blog posts to comment on them. With permalinks, and a similar process called TrackBacks, readers can then follow the “conversation” between two or more blogs on the same topic.
Blogs often have sidebars, called blogrolls, with listings of the bloggers’ favorite blogs and other websites.
Bloggers were among the first to use an XML technology called Really Simple Syndication (RSS) or a competing technology, Atom, to make postings easily accessible. More traditional news outlets are now adding these XML feeds to their sites, and browsers (Firefox, Opera) and portal sites (Yahoo!) are including RSS and Atom readers in their products. See the next section for more on syndication.
Most blogs encourage interaction between reader and writer. Some blogs permit readers to comment on posts directly on the page. This practice has decreased as spammers began inundating popular bloggers’ pages with their wares, but has not disappeared completely.
Not every blog has all these features, and some sites that have these features are not blogs.
Blogging, because it’s on the web, is an activity that isn’t terribly concerned with operating systems. Many blogs are written directly in a blogger’s browser and hosted on the same site. Many bloggers, though, want to separate the writing from the posting, and so use editing tools that run locally on a desktop or laptop and then upload pages to a remote site, just like regular websites.
In this section, we’ll review some of the more popular tools that Linux users blog with along with a quick review of some of the popular blog hosts (like Blogger, Typepad, and LiveJournal) that welcome bloggers with all operating systems to participate.
SUSE Linux does not include specific blogging tools in the distribution, although the Quanta team wants you to know that one of the biggest “A-list” blogs, WilWheaton.net, is produced with its tool. Some tools are easy to install; others require a little bit of database or Apache savvy.
Blosxom is an incredibly easy blog-creation tool written by Rael Dornfest, one of the blog founding fathers. Blosxom (pronounced “blossom”) is a simple CGI script that sits on your web server and turns ordinary text files into blog posts.
For those with simple blogging needs (mostly plain text, with the occasional hand-created link and styled text), Blosxom is perfect. But don’t think that it’s just for basic users. With Blosxom’s plug-in architecture and easily modified configuration dialog box, you can accomplish many things with your blog.
Blosxom runs as a Common Gateway Interface (CGI) script on your web server, so if you want your blog live on the web at all times, you need to have a host that permits running CGI scripts (most do). You may want to experiment with several tools before settling on one, though. For this, you have the capability to run Apache on your own SUSE Linux Professional system. See Chapter 26 for a more detailed explanation of Apache.
To try Blosxom on your own Apache server, follow these steps to install:
Go to http://www.blosxom.com/downloads/blosxom.zip to download Blosxom.
Extract blosxom.cgi into the
~/public_html/cgidirectory and make it executable (chmod 755).Create a local directory to store your Blosxom posts; Blosxom recommends
~/blosxom, but you can choose anything you like.Open
blosxom.cgiin a text editor to configure your blog. The first 10 entries in the script describe what Blosxom should do. Name your blog. Give it a description, which can be prosaic (this blog is about growing marigolds) or creative (ruminations on canine lycanthropy and other wizardly things). Set the language. Tell the script where to look for posts (the directory you selected in step 3). You can probably leave the remainder of the entries with their default settings, but consult the manual if you want to know more.Write a test post. Open your text editor and write something. Save it with a .txt extension into the posting directory.
Open your favorite web browser and go to the directory where
blosxom.cgilives, such ashttp://home/<username>/public_html/cgi/blosxom.cgi
Your test post should appear, with your blog’s title and description, along with the date and time of your post.
For more information on working with your blog, visit the http://www.blosxom.com site.
Movable Type (MT) is considered by many to be the gold-standard weblog application. It has a reputation of being somewhat difficult to install, but it has so many features, it’s worth the moderate pain. Many of the more technical-oriented blogs run MT, as do quite a few businesses and news organizations.
Typepad is the Blogger-type hosting service set up by Movable Type’s developers. Typepad makes it easy to produce a high-quality MT-type blog without having to manage the installation. They’ve even made it a going concern by charging a minimal monthly fee ($4.95 as this is written) for basic users.
MT runs on just about every platform and can use any web server or database application you prefer. There is a free version for personal use, but if you want to have multiple authors for your blog, you’ll need a paid version (less than $100).
WordPress is a very popular system, but a little complex to run. It is driven by a MySQL database, which must be running before you get started. Chances are your web host will support database-driven sites, but you should check in advance.
Similarly, if you want to try out WordPress on your local system first, you will have to get MySQL and PHP set up and running. Use YaST to install the PHP and MySQL packages. See Chapter 29, “Managing Databases,” for more information on setting up MySQL.
To set up WordPress
Go to http://wordpress.org/latest.tar.gz to download the current version.
Extract the tarball to any directory (your home directory will do nicely, as it will create a WordPress directory).
Create a new MySQL database. From a root shell, type
/usr/bin/mysqladmin -p create wordpress.Log in to the WordPress database:
/usr/local/mysql/bin/mysql -p -u rootGive the WordPress user access to the WordPress database:
GRANT ALL PRIVILEGES ON wordpress TO wpress@localhost IDENTIFIED BY wppass; GRANT ALL PRIVILEGES ON wordpress TO wpress IDENTIFIED BY wppass;. When this is completed, typeexitto return to the shell.Either from the shell or your favorite file manager, copy the contents of the WordPress directory that you created in step 2 to the
~/public_htmlhome directory. If you already have content there (or want your blog to be part of your larger site), copy the whole directory over.Open your favorite browser and go to the directory where you extracted WordPress to:
http://localhost/wp-admin/install.php. The install screens check that everything is in order and will occasionally ask you a question.WordPress generates a password for the administrator in the install process. Log in to post. You’ll see a very nice interface that’s pretty straightforward. Fire away!
The WordPress website offers, among other things, plug-ins and templates to further customize your experience.
The biggest and best-known blogging services generally offer both live-in-your-browser posting and free storage space on their servers for your blog. Some offer the option to email posts, which can be a handy device. Here’s a quick overview of what you can do with these services.
Blogger (www.blogger.com)
The best known, and still the easiest way to get started in the blogosphere. Basic accounts are free, and there are lots of templates to choose from.
In many ways, Blogger is the America Online of the weblog industry; it’s where people get started. Blogger blogs run the gamut of styles, but lean toward the personal-journal end of the spectrum.
There are three ways to post. The web-based interface, and using email are the standard ways; you can also create an audio-post via telephone.
LiveJournal (www.livejournal.com)
LiveJournal started as a way for a group of friends to keep each other posted on their lives. It grew into a large, but still by-invitation-only, community of all kinds of journal-keepers. Today, anyone can get a LiveJournal account and start blogging.
LiveJournals are best known for their mood-indicator and other colorful graphics and lists of connections between users. The LiveJournal code is open source software (visit www.livejournal.org to contact the development team or download the source).
You can post via the web interface or use one of several Linux clients (Kluje for KDE, Logjam and Drivel for GNOME). They also have clients for personal digital assistants (Palm and PocketPC) and cell phones.
As you travel around the Web, you may have seen the little orange rectangles marked XML on certain pages. This is especially true for weblog sites, but increasingly true on regular news sites (CNET News.com, BBC News, Christian Science Monitor, CNN, and Alternet, among others) as well. Perhaps you’ve clicked the button and saw the equivalent of an HTML source page and wondered what that was for. What you’re really seeing is a new way of delivering news and information to you: headline (or full text) syndication of website content.
Publishing a syndicated version of your blog is a great way to gain readers. Most blogging software does this by default, and it is otherwise easy to set up. With syndication, readers can find your blog through blog-search sites like Weblogs.com, Daypop, Feedster, Bloglines, and Syndic8. As a blog reader, syndication also simplifies building collections of blogs to read.
Syndication is about delivering information (also called newsfeeds, or just plain feeds) from your site to other sites or applications. When you syndicate your site, you can deliver just headlines, full-text rendering of your postings, or some portion of them. Applications called aggregators, or feedreaders, ping the server periodically (typically hourly) to see what’s new and deliver new content to readers who have subscribed to your feed.
There are two popular formats to syndicate with: RSS and Atom. This is another religious war you can choose to participate in, or not. RSS (also known as Rich Site Summary) is the older format. Development of this format is run by Dave Winer of Userland Software. A group of developers/bloggers decided that RSS wasn’t providing the features they wanted and developed the Atom standard. Some blog software supports one standard or the other, some support both. All the aggregators support both standards.
Only recently have dedicated newsfeed aggregators begun appearing in Linux. The latest versions of the Firefox and Opera browsers both have aggregators built in. Akregator for KDE is gaining converts, and there are also several excellent online aggregators.
When Firefox arrives at a site with a syndicated feed, an orange button lights up in the lower-right corner of the browser. Click it to create what they call a “Live Bookmark.” This is stored with the rest of your bookmarks. When you go to a Live Bookmark, it looks like a folder with the orange icon, with headlines inside the folder. Click a link to go to the permalinked page for that headline.
Opera reads RSS feeds through its built-in mail reader. Subscribing to a feed is as easy as clicking the XML button on a site. Opera will ask you if you want to subscribe; click Yes, and the current headlines will appear. Opera will check for new headlines when it opens.
Akregator is joining the Kontact personal information management suite with KDE 3.4 and is already in pretty good shape. It integrates with Konqueror, but opens articles in its own browser window, rather than having to open Konqueror separately.
If you switch between computers and operating systems frequently, you might like an online aggregator. The best of these is at http://www.bloglines.com. Bloglines works with most browsers (with the exception of Konqueror, which doesn’t like the script Bloglines uses to display your feeds). You can organize your feeds into subject folders and add and remove feeds with ease. Bloglines will even look at your current feed lineup and offer recommendations for new blogs that might interest you.
http://www.openoffice.org—Participate in and get help from the OpenOffice.org project.
http://www.nvu.com/—The nvu (N-View) project for a Mozilla-based web-authoring tool.
http://quanta.sourceforge.net—Quanta Plus project page for the KDE web-authoring tool.
http://kdewebdev.org—The KDE WebDev suite site, for Quanta and its subsidiary tools.
http://bluefish.openoffice.nl—Bluefish, the GTK-based web-authoring tool.
http://bfwiki.tellefsen.net—The Bluefish Wiki, where the development team keeps the rest of us posted on what’s happening.
http://www.screem.org—A GNOME/GTK editor for HTML and XML files.
http://www.ndeepak.info/stuff/vtu/ginf—“Ginf is not FrontPage,” another effort to simplify web authoring.
http://webmonkey.wired.com/webmonkey—The all-purpose online web-design school. Tutorials on various web technologies for all skill levels, from basic HTML to Apache to ColdFusion. Like Wired magazine, occasionally the pages lean to the illegible.
http://webdesign.about.com—Down-to-earth advice about website design. Free online classes in HTML and cascading style sheets, too.
http://radio.weblogs.com/0124049—Notes from the Metaverse, the author’s technology weblog. Lots of links and news related to open source software and SUSE Linux.
http://www.planetsuse.org—Planet SUSE, a group blog of SUSE Linux developers.
http://directory.google.com/Top/Computers/Internet/On_the_Web/Weblogs/Tools—The current directory of blogging tools and services. You’ll find something useful here.
http://www.blosxom.com—Download and learn about Blosxom, the CGI-based blogging tool.
http://www.billstclair.com/blogmax—The Blogmax extension for Emacs.
http://wordpress.org—WordPress blog and content-management tool. Very busy and helpful support forums.
http://www.blogger.com—Still the easiest and cheapest way to start blogging. Now managed by Google.
http://www.sixapart.com—The company behind Movable Type and Typepad. Access either product from the company blog page.
http://www.livejournal.com—LiveJournal is a place for more personal blogs and building communities of kindred bloggers.
http://radio.weblogs.com/0102385/2003/04/24.html#a329—A description of how to run the Windows blog program Radio Userland under Wine.
http://akregator.sourceforge.net/index.php—The Akregator feedreader for KDE.