
IN THIS CHAPTER
Squeezing extra performance out of your hardware might sound like a pointless task, given how inexpensive hard drives and memory have become over time. To a certain degree this is true, for most folks at least. But as we’ve said before, Linux users are tinkerers at heart. Many of us will gladly spend hours to make our computers work harder, faster, and smarter. Like the amateur auto mechanics of generations past, a cottage industry of overclockers and performance zealots has risen among the hordes of geekdom. And with the capability that Linux and other open-source software gives you to look under the hood and see for yourself what’s going on, you can find the way to squeeze that last bit of juice out of an application.
The amount of benefit you can get by optimizing your system varies, depending on what kinds of tasks you are trying to perform. Even with all the shortcuts built in to any modern word processor, no software tricks will make your fingers type any faster in OpenOffice.org under SUSE Linux than in Microsoft Word in Windows. In the next few pages, we will look at ways to get a little more oomph out of your SUSE Linux system.
You should understand that optimization is not an absolute term. You can do almost anything to improve performance for a computer or specific application, and still have room to get even more out of it. But after a while, the law of diminishing returns starts kicking in, and you start working too hard to get not much back. So use these tips and methods, but remember that the reason you want to improve your performance is not for its own sake. You want to get some work done, too.
Nowhere else is the auto mechanic metaphor more appropriate than among the folks who muck around at the lowest levels of their systems. These are the folks who break down specification lists and performance metrics and consider them all a challenge to get more out of them than they were promised. This section is for these folks.
Before you undertake any of this type of work with Linux, keep a couple things in mind. First, perform a benchmark on your system before you start tweaking it. A good package to use for this task is hdbench, available from http://www.hdbench.net. Another good benchmarking tool is bonnie. The bonnie utility is available on your SUSE Linux CDs.
Many other packages are available as well. If you visit http://www.freshmeat.net, you can search for the term “benchmark” and find a variety of packages. If you happen to be a programmer, you can probably develop your own benchmarking tests, and perhaps you want to offer those to the Linux community after they’ve been tested a few times on your own system.
Second, tweak one thing at a time. If something bad happens (and tweaking is all about finding the limits, after all), make it something that’s easy to trace. Log in your book what works, what doesn’t work, and what breaks. Then move on to the next thing.
If you’re going to find the limits of your system, have two things ready at all times: a good backup of your important data and the batch of six boot floppy disks to rescue your system if you need to. If you haven’t yet, go to the YaST System page and launch the Create a Boot, Rescue, or Module Floppy module to perform this absolutely essential task.
Let’s begin by discussing how to optimize the services running on your system.
One of the most basic (and most frequently overlooked) tasks in optimizing the performance of a Linux system is to scrutinize the services it’s running. Put very simply, the more services you have running, the slower the system will perform.
SUSE Linux is a true multitasking operating system. It’s capable of running many process at the same time on a single CPU. However, the process of suspending one running process and running another one places a heavy load on the system CPU. The more times this happens, the slower the system runs. You can monitor how frequently this happens using the vmstat utility from the shell prompt. Sample output from vmstat is shown in Figure 32.1.

Notice under the System heading that there are two columns: in and cs. The in column displays the number of interrupt requests (either hardware or software generated) the CPU has processed each second. The cs column displays the number of context switches the CPU has had to deal with each second.
Note
An interrupt is a signal received by the CPU indicating that something (usually hardware) in the system needs its attention. A context switch occurs when the CPU has to suspend one running process and run another. Both of these events are CPU intensive.
A certain number of these events is unavoidable. For example, every time you move the mouse or type a key on the keyboard, you generate an interrupt request. However, the number of these events, especially context switches, can be reduced by running only those services that you actually need.
When your system was installed, the installation program made many assumptions about what services should be automatically run at boot. Most of these services are necessary for your system to run properly. However, some of them aren’t. To see what’s running on your system, open YaST and navigate to the System, System Service (runlevel) module, as shown in Figure 32.2.

For example, notice in Figure 32.2 that the Postfix MTA (Mail Transfer Agent) is configured to automatically start at runlevels 3 and 5. Postfix is a popular email daemon that is widely implemented by many organizations to provide a powerful mail solution.
However, on your personal SUSE Linux system, there’s a pretty good chance that you don’t need it, especially if you’re using an external ISP for email services. In this case, you can stop the Postfix MTA and configure it to not start at boot, thereby reducing the load on your CPU. In this example, you can stop the service by entering rcpostfix stop at the shell prompt. Then you can use the Runlevel Editor in YaST to disable Postfix at boot.
Caution
Don’t get too carried away shutting down services. You might be tempted to stop services that you don’t recognize. Most of these services actually are needed for your system to run properly. Only disable a service after you have thoroughly researched what it does and are confident that it isn’t required.
We begin this exercise by calling attention to a native SUSE Linux tool called PowerTweak. The Linux version of this application began life when SuSE engineer David Jones began work on a PCI Bridges kernel hack and later heard that the developer of a Windows shareware program called PowerTweak was looking for someone to port the tool to Linux. The deal was made, and PowerTweak was brought to Linux.
The program became a YaST module in SUSE Linux v8.1 and has been there ever since. Like the /etc/sysconfig Editor module (from which it steals its user interface), PowerTweak allows you to change assorted settings in the kernel, file system, network, and swap file to improve performance. The difference between the two modules is that PowerTweak writes its own configuration file, /etc/powertweak/tweaks, and then runs a daemon to implement the changes you make. This makes it a little easier to back out if a change breaks your system.
Figure 32.3 displays the PowerTweak module interface. To open it, go to the YaST System page and click PowerTweak. If you don’t have the appropriate packages installed already, YaST asks if you want to install them (there’s an extras package, too, with additional goodies).

In the left pane of the PowerTweak window is a tree full of devices and items you can tweak. Select one to display and edit in the right pane. There is guidance on what to do, to a varying degree, for each item in the display window. To make a change, type the value you want into the Edit box. Sometimes a drop-down menu will appear to direct your changes.
Click Finish to approve the change or Abort to leave without making changes.
For example, suppose your SUSE Linux system gets a lot of heavy use. You start seeing errors indicating that the system is running out of file handles. You do some research and discover that this can be alleviated by increasing the value of the fs/file-max parameter. To do this, you would complete the following:
Start YaST and select System, PowerTweak.
Navigate to VFS Subsystem, Core, fs/file-max. The screen in Figure 32.4 is displayed.
In the Setting Of field, enter a new value for fs/file-max. In this case, the default value of 4096 will be increased to 12066.
Select Finish.
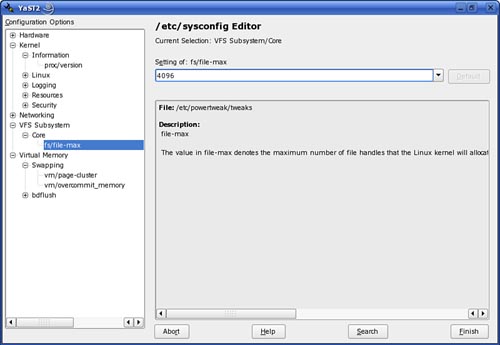
With any parameter displayed in PowerTweak, you can view a description of what the parameter does along with a possible range of values you can use.
With this in mind, let’s next look at tuning the performance of the hard disk drives in your system.
In addition to managing running processes and using PowerTweak, you should also consider tuning the performance of the hard disk drive in your SUSE Linux system. Input/output operations on the hard drive represent some of the most time-intensive operations your Linux kernel will have to complete as it goes about its business. Because of these, hard disk operations can become a significant bottleneck in your system.
The slow speed of hard disk operations are because hard disk drives themselves are inherently slow when compared to other storage devices such as RAM or SRAM cache. A hard disk drive is composed of mechanical devices—motors, platters, and actuator arms—that require a certain amount of time to complete their tasks.
However, there are some things you can do improve the performance of the drives in your system. The first aspect you need to consider is the type of drive you use in your computer. Let’s talk about this topic next.
Not all hard disk drives are the same. The quality of the drive you choose can make a big difference in the overall performance of your system. When selecting a drive, you should keep the following points in mind:
Drive Interface—Most desktop systems sold today use Integrated Drive Electronics (IDE) hard drives. (The newer generation of IDE drives are called Advanced Technology Attachment [ATA] drives.) These drives are inexpensive to manufacture and can store a large amount of data, hence their popularity.
Unfortunately, IDE/ATA drives have some serious shortcomings that you should keep in mind. First, the IDE controller on the master drive requires a lot of CPU time to read or write data. Although IDE drives may have a high data-transfer rate, the CPU is going to have to do a lot of work to make it happen.
Second, remember that each IDE channel on your system (the primary and the secondary channels) can each have two IDE devices connected to it, resulting in a total of four drives in a typical system. Keep in mind that many different types of IDE drives have been manufactured over the years. Early IDE drives transmitted data at around only 15MBps. Later-generation IDE drives can transfer data at speeds up to 133MBps. If you connect an older, slower drive to an IDE channel with a newer drive, the newer drive will slow down to the speed of the old drive. The entire channel will operate at the speed of the slowed device connected to it.
Finally, attaching two devices to the same IDE/ATA channel can slow things down because a single drive controller must manage two devices. If you choose to use IDE/ATA, you will get the best performance if you install a single device on each channel.
If you want the best performance possible from your disk subsystem, you should consider using either a Serial ATA (SATA) or Small Computer System Interface (SCSI) disk controller and drive. Both of these systems address many of the shortcomings of IDE and provide better performance.
Data Transfer Rate—Over the years, many types of hard disk interfaces have been manufactured. Some interfaces are faster than others with respect to the amount of data they can transfer. If you choose to use an IDE/ATA disk interface, be sure to select either an ATA100 or ATA133 system.
If you choose SCSI, you might find your choices a little more complicated. Over the years, a variety of SCSI standards have been implemented, including SCSI I, SCSI II, and SCSI III. Within the SCSI II and III standards, you can choose from Fast, Wide, and Fast/Wide options. Although the variations can get confusing, you’ll get the best performance from a SCSI III Fast/Wide adapter and hard disk combination.
If you go with SATA, you can choose between SATA150, which transfers data at 150MBps, and SATA300, which transfers data at 300MBps. As with the other disk options, the faster the drive and controller, the faster the performance of your system.
Disk Rotation Speed—Remember that hard disks are mechanical devices. The speed at which data can be read or written is heavily dependent on how fast the platters inside the disk rotate. The faster the rotation speed, the faster data can be read or written. Low-end, inexpensive drives rotate at around 3500 RPMs. Midrange disks rotate at around 5000 RPMs. Fast disks rotate at 7200 or even 10000 RPMs. The faster the rotation, the better your system performance will be.
After you’ve selected the best drive for your system, you can then tune your drive for its best performance. Let’s talk about how to do this next.
One way to tune your hard drive involves adjusting the settings in your BIOS. Every BIOS seems different, and in any case is not Linux, so consult your motherboard manual before proceeding. Take every precaution, and make sure the BIOS sees all your drives. Change one setting at a time.
Linux does offer a limited means to interact with BIOS settings during the boot period (mostly to override them).
Other options include these commands, which can be used to force IDE controllers and drives to be optimally configured. Your mileage may vary, but they have worked for some. You can get more information in the Bootprompt HOWTO at the Linux Documentation Project. Consider the following:
idex=dmaThis will force DMA support to be turned on for the primary IDE bus, where x=0, or the secondary bus, where x=1.
idex=autotuneThis command will attempt to tune the interface for optimal performance.
idex=ata66If you have ATA66 drives and controllers, this command will enable support for them.
hdx=ide-scsiThis command will enable SCSI emulation of an IDE drive. This is required for some CD-RW drives to work properly in Write mode, and it might provide some performance improvements for regular CD-R drives as well.
idebus=xxThis can be any number from 20–66; autodetection is attempted, but this can set it manually if dmesg says that it isn't autodetected correctly, or if you have it set in the BIOS to a different value (overclocked). Most PCI controllers will be happy with 33.
pci=biosirqSome motherboards might cause Linux to generate an error message saying that you should use this. Look in dmesg for it; if you do not see it, you don't need to use it.
These options can be sent to the kernel at startup by pressing F2 at the GRUB menu and entering them in the Boot Options Field. You can also use the YaST Bootloader module to insert these parameters into /boot/grub/menu.lst. To do this, complete the following:
Run YaST and navigate to System, bootloader.
In the Section Management tab, select the menu item you want to add these options to.
Select Edit.
In the Other Kernel Parameters field, enter the option you want to include.
Select OK.
Select Finish.
You can also use the hdparm utility to tune your drive. Let’s talk about how to do that next.
The hdparmutility can be used by the SuperUser to set and tune the settings for IDE hard drives. You would do this to tune the drives for optimal performance.
Once a kernel patch and associated support program, hdparm is now included with SUSE Linux. You should only experiment with the drives mounted read-only because some settings can damage some file systems when used improperly. Evidence of this can be seen when typing the hdparm command without any arguments. This displays the program’s help; look at all the options marked DANGEROUS:
hdparm - get/set hard disk parameters - version v5.9

Usage:  hdparm  [options] [device] ..

Options:
 -a   get/set fs readahead
 -A   set drive read-lookahead flag (0/1)
 -b   get/set bus state (0 == off, 1 == on, 2 == tristate)
 -B   set Advanced Power Management setting (1-255)
 -c   get/set IDE 32-bit IO setting
 -C   check IDE power mode status
 -d   get/set using_dma flag (0/1)
 --direct  use O_DIRECT to bypass page cache for timings
 -D   enable/disable drive defect management
 -E   set cd-rom drive speed
 -f   flush buffer cache for device on exit
 -g   display drive geometry
 -h   display terse usage information
 -i   display drive identification
 -I   detailed/current information directly from drive
 --Istdin  reads identify data from stdin as ASCII hex
 --Istdout writes identify data to stdout as ASCII hex
 -k   get/set keep_settings_over_reset flag (0/1)
 -K   set drive keep_features_over_reset flag (0/1)
 -L   set drive doorlock (0/1) (removable harddisks only)
 -M   get/set acoustic management (0-254, 128: quiet, 254: fast) (EXPERIMENTAL)
 -m   get/set multiple sector count
 -n   get/set ignore-write-errors flag (0/1)
 -p   set PIO mode on IDE interface chipset (0,1,2,3,4,...)
 -P   set drive prefetch count
 -q   change next setting quietly
 -Q   get/set DMA tagged-queuing depth (if supported)
 -r   get/set device  readonly flag (DANGEROUS to set)
 -R   register an IDE interface (DANGEROUS)
 -S   set standby (spindown) timeout

 -t   perform device read timings
 -T   perform cache read timings
 -u   get/set unmaskinq flag (0/1)
Note
Setting the -u option to 1 can result in a significant boost in the performance of the system. However, some IDE drives don’t support this parameter.
 -U   un-register an IDE interface (DANGEROUS)
 -v   defaults; same as -mcudkrag for IDE drives
 -V   display program version and exit immediately
 -w   perform device reset (DANGEROUS)
 -W   set drive write-caching flag (0/1) (DANGEROUS)
 -x   tristate device for hotswap (0/1) (DANGEROUS)
 -X   set IDE xfer mode (DANGEROUS)
 -y   put IDE drive in standby mode
 -Y   put IDE drive to sleep
 -Z   disable Seagate auto-powersaving mode
 -z   re-read partition table
As you can see, the general format of the command is this:
hdparm <option> <device>
This tests an IDE hard drive:
hdparm -tT /dev/hda
Be sure to replace /dev/hda with the mount point of your hard drive (usually with a number added, such as dev/hda1). hdparm will then run two tests—cached reads and buffered disk reads. A good IDE hard drive should be getting 400–500MB/sec for the first test and 20–30MB/sec for the second. Note your scores, and then try this command:
hdparm -a16 -d1 -u1 -c1 /dev/hda
After you’ve made these changes (take another look at the help to see what you’re doing), test the drive again. The numbers should increase. If so, run this command:
hdparm -a16 -d1 -u1 -c1 -k1 /dev/hda
The -k1 option saves the settings, and uses them on subsequent boots.
Read over the man page for more information about the multitude of options previously listed. Be aware that the SUSE engineers do their best to optimize all the settings before shipping the distribution. Because they cannot anticipate every configuration, however, it’s worth a try to see what you can get on your own, if you’re so inclined.
You can also increase performance by disabling file access time. Let’s look at how to do that next.
Whenever Linux reads a file, it changes the last access time—known as the atime. This is also true for your web server. If you are getting hit by 50 requests per second, your hard drive will be updating the atime 50 times a second. If you don’t really need to know when a file was last accessed, you can disable atime by modifying /etc/fstab to include the noatime attribute for the file system.
With an ext2/ext3 file system, you can also use the chattr (change attribute) command to turn off atime changes by directory with this command:
chattr -R +A <directory_path>
The -R switch makes the command operate recursively through the subdirectories of the specified directory.
With this in mind, let’s now discuss how to spread out the disk load on your system.
With a Linux system, certain directories and partitions are used more heavily than others. These include the swap partition, /var, /tmp, and /home. Placing all these on the same hard disk can slow down performance.
To increase performance, they should be spread across multiple hard disk drives. If possible, the performance can be increased by installing multiple hard drives in your system and creating separate partitions for /var, /tmp, and /home, distributing them (along with the swap partition) across the drives.
Note
In an ideal world, you would place each of these partitions on a separate hard drive to achieve the maximum level of performance.
Doing this distributes the read/write load across multiple drives, allowing multiple operations to occur simultaneously.
http://www.coker.com.au/bonnie++—
bonnie, a benchmarking tool for Linux file systems, with links to similar tools for RAID systems and SMTP servers.http://powertweak.sourceforge.net—The home of Linux PowerTweak. Some history, and an overview of the project.