
IN THIS CHAPTER
The domain name system (DNS) is the lifeblood of the Internet. Without DNS, we would all be forced to remember TCP/IP addresses to get to websites, get to our email, buy merchandise, or look up information in a search engine. To go to www.novell.com to learn more about SUSE, for example, you would have to remember 130.57.4.27. Why attempt to remember a set of numbers such as this when you can remember www.novell.com/linux? The DNS brings a level of simplicity into surfing the Web and doing work with SUSE Linux. In this chapter we will learn how DNS is used with SUSE Linux. Of course, there are ways around this—by editing your HOSTS file, for example, to make the lack of DNS bearable by adding a local DNS database to your personal system—but for the most part, if you don’t want to update this file each time you want to use DNS, make certain you implement a DNS server in your enterprise so that you can remember www.novell.com, instead of 130.57.4.27.
In Chapter 12, “Connecting to the Internet,” you learned how to connect to the Internet. In Chapter 25, “Setting Up Networks and Samba,” you learned about TCP/IP fundamentals. In this chapter, you will build on the concepts of the Internet and TCP/IP and learn about the DNS, how it is configured on your SUSE Linux system, and how to modify it if needed. In this chapter, you will also learn how to set up SUSE Linux as a DNS client in YaST, edit DNS configuration files, use tools such as nslookup to gather information, and finally, learn the fundamentals of using Linux as a DNS server.
The DNS is a distributed and hierarchical database whose function is to resolve hostnames to IP addresses. As mentioned earlier, this is really the only reason DNS is used. As a matter of fact, using DNS adds latency and complexity to any configuration management you need to do, such as changing the DNS information itself. Because the DNS database is “distributed,” those changes need to replicate through the DNS system, whether it is hosted locally within your network privately, whether it is a public DNS server communication with other public DNS servers to replicate changes, or a hybrid of both. DNS is worth every ounce of issue you may derive from it, so let’s start by taking a look at how to configure it locally on your SUSE Linux system so that you can use and test it.
In the following example and illustration, DNS will be shown step by step and simplified as much as possible, although entire books are dedicated to the subject because of its depth and complexity.
In this example, your hostname is the website www.novell.com. Suppose that you would like to visit the Linux section of the website to find out more about SUSE Linux. The website’s IP address is 130.57.4.27. You are currently on a home laptop running SUSE Linux. You open a web browser (Konqueror, for example) and attempt to visit the www.novell.com site by entering the easy-to-remember Uniform Resource Locator (URL) of www.novell.com. Consider the following steps, shown in Figure 27.1, that are taken when you enter a domain name into your web browser:
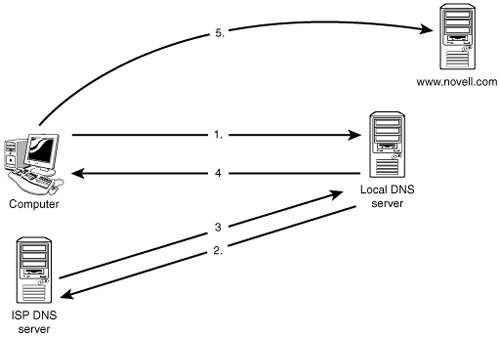
Your local system (with help from you, of course) wants to get to www.novell.com. To do this, it needs to know what Novell’s website IP address is and because it does not, it asks its locally configured hosts file to resolve the DNS name—novell.com. This local system currently does not have any entries in the hosts file; therefore, the manually configured DNS server (the local DNS server) will attempt to resolve it.
This is the first time this site has been requested; therefore, the domain is unknown by the local DNS server and the request needs to be “forwarded” from the local DNS server to the ISP’s DNS server, which does know that www.novell.com resolves to 130.57.4.27. The ISP’s DNS servers are public servers.
After the full URL of http://www.novell.com is placed in the Location field, requested by Konqueror, and resolved to an IP address of 130.57.4.27, that information is then cached in the local DNS server so that if this request is again brought up, it will be quicker to resolve.
Now that www.novell.com has been resolved to the local DNS server, the answer of 130.57.4.27 is given to the client.
The client now can connect via the Internet to the www.novell.com website and browse it for SUSE Linux help or other information.
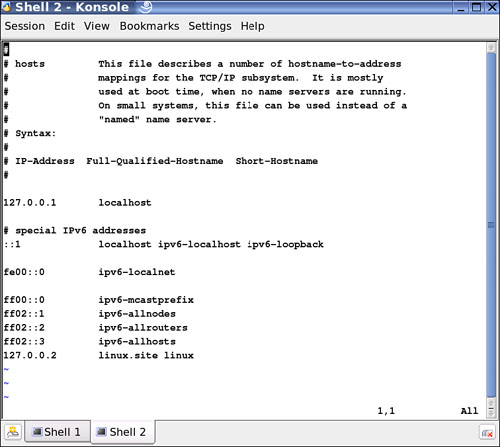
In this scenario, you had a DNS server and a DNS client. In this chapter you will learn about both—how to set up and install SUSE Linux to handle both tasks. The DNS client is the host that is requesting DNS information that is provided by a DNS database, either local to the system itself (hosts), as shown in Figure 27.2, or on a server configured to provide such information. First, let’s view the local database on the SUSE Linux system. You can find the hosts file off of the root of the operating system, in the etc directory. (Later in this chapter, you will learn how to configure this with YaST.)
The server with BIND installed is called a DNS server. Let’s continue discussing what DNS is, its inner workings, and how it works with Linux.
After you understand how the DNS is used for communication, you should also understand how it’s entered as a URL into a computer web browser such as Konqueror. Figure 27.3 shows a standard web browser with a URL inserted.
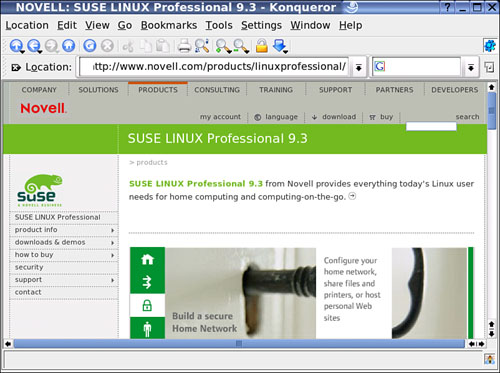
To understand the DNS, you have to understand what it is you are looking for when you enter a URL such as the one shown here. For instance, the URL for Novell’s home page for SUSE Linux is found in the location field as the following:
http://www.novell.com/products/linuxprofessional/
Because URLs and web browsing are not this chapter’s focus, let’s just quickly review them so we can get into DNS in more detail. First is the protocol that you will be using, which is HTTP (Hypertext Transfer Protocol).
HTTP is nothing more than a protocol that is used to transmit files over the World Wide Web (WWW) using port 80. The entry www.novell.com is a fully qualified domain name, or FQDN. An FQDN consists of a host, a domain name, and a top-level domain (TLD). These are all shown in the URL www.novell.com. In this example, www is the host (this entry is not always required), novell is the second-level domain, and the .com is the TLD. Although it’s not seen, a period also follows .com, which would make the FQDN appear as www.novell.com. The trailing period shows the root. You do not have to add this period, but it’s okay if you do. Most people don’t even know that it exists. Some browsers append the entry, some ignore it; either way, it works.
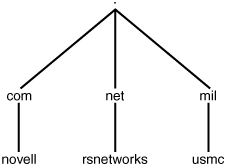
TLDs are explained as follows. In Figure 27.4, you can see a few TLDs with second-level domains following.
For this example, take a look at the following three URLS:
http://www.novell.com
http://www.rsnetworks.net
http://www.usmc.mil
You may see after you enter some of the URLs (www.usmc.mil, for example) that although it works, it is replaced by a different URL in the Location field of your web browser. In this example, www.usmc.mil has been redirected to a new, longer URL. Both URLs lead to the home page, or index page, of the website; the URL is being redirected by the web server’s internal configuration.
In these examples, the highest level of the DNS hierarchy is Root. A single period (.) represents the Root domain, as shown in the illustration.
You can also see that the TLD is .com, .net, and .mil. In the early 1980s, about a half-dozen main TLDs were designated for use. Domain names may be registered in three of the most commonly used TLDs, which are .com, .net, and .org. There are many others, but most serve limited purposes. Table 27.1 lists some of the most common TLDs.
Table 27.1. Common Top-Level Domains
Note
The original seven TLD were .com, .edu, .gov, .int, .mil, .net, and .org. In 2001 and 2002, the other entries were introduced. In addition to these, countries have always had TLDs available for their use as well—.au for Australia, and so on. In recent years, a few countries have opted to make their domains available for use by anyone—these include .tv for Tuvalu, .ws for Western Samoa, and .cc for the Cocos Islands.
Note that these are just guidelines; you can purchase and use just about any URL as long as it is available. You may find, just by the fact that the domain name is not available for sale, that many of your good ideas for names are already taken.
Note
You can find more information on TLDs at the following URL: http://www.icann.org/tlds/.
Now you should feel very comfortable with the DNS hierarchy when you see a URL such as www.novell.com.
DNS maps friendly names to IP addresses. It is similar to a phone book, pairing hostnames and IP addresses much in the same way as people’s names are paired with their telephone numbers. The internal structure of that phone book is the DNS hierarchy. Now that you understand how DNS is structured, let’s dive into the internals of it.
The DNS database contains zones. These are called zone files, which contain resource records (explained in the next section). A DNS zone file is also a database. There are two standard zone types: forward lookup zones and reverse lookup zones. A forward lookup zone allows for a resource name to IP address resolution—for example, looking up the IP address of www.novell.com.
A reverse lookup zone, if you haven’t already guessed, does the opposite, which is allowing for IP address to resource name resolution—for example, determining a hostname from only the IP address. Both zones need to be built, created, and managed by a system administrator. The reverse lookup zone is contained in a domain known as in-addr.arpa.
When you’re building a DNS infrastructure, after you have the TLD, the second-level domain, and a zone database created on the DNS server, it’s important to then add records to it. Records are nothing more than files that hold data that the DNS server queries. Each domain that is created always contains resource records containing information about the DNS infrastructure you are managing, especially by default. Some records are made by default when you install DNS for the first time. There are many types of DNS database records. The most common database record is the A (Address) record, which maps a hostname and an IP address. This is the primary method of DNS resolution. A records are responsible for most of the DNS communication and resolution in use with DNS. The DNS forward lookup zones are populated with a variety of resource records. The most common resource records are listed in Table 27.2.
Table 27.2. Commonly Used DNS Records
Now that you understand the fundamentals of DNS and how it works for you as a client, let’s look at how to configure it on SUSE Linux.
Configuring DNS with YaST is an easy process when you configure the client. Remember from our earlier discussion that the DNS resolution process is used for simplicity, allowing a client to use an easy-to-remember name instead of what it really needs to use, which is the IP address. You use the domain name; the client (when configured properly) gets that information from its local database (hosts) or from an external distributed one, such as DNS. To configure your client with DNS, you will need to know the following from your ISP or your local systems administrator:
The IP address of the DNS server(s)
The correct domain name(s)
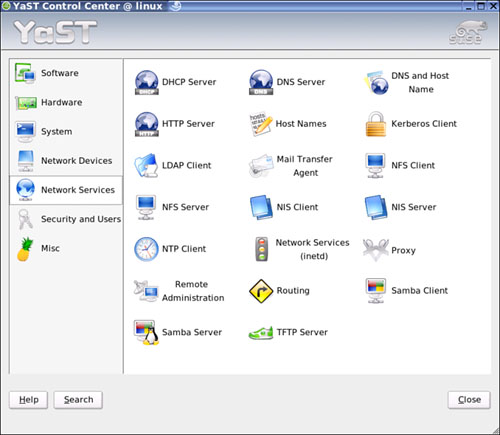
That’s it! It’s that simple to set up DNS on your local client. It’s even easier if you have Dynamic Host Configuration Protocol (DHCP) in use. DHCP can be used to automatically update the DNS information on your client if you have a DHCP server installed on your network, or if your ISP (most likely the case) provides you with the DNS information you need through the DHCP server you get your initial IP address from when you connect to a network. To configure DNS manually, use the following steps. To get to the DNS configuration pages, simply open YaST and navigate to the Network Services menu in the YaST Control Center, as shown in Figure 27.5.
Make sure you are logged in as Root or are able to use the root account to make your changes. When you open YaST, YaST will take a moment to initialize its network configuration. After it is completed, if this is the first time you are entering this section of YaST, you may be prompted to edit DNS information manually. A warning will pop up to let you know that although you may be getting ready to make a manual entry, the DNS information was already configured by DHCP, as shown in Figure 27.6.

You can choose to either Accept or Modify the contents. Accepting will gray out all configurable sections except for the host and domain name sections at the top of the DNS configuration window. If you click Modify, you will be given a chance to edit the settings manually. If you are unsure of what you are doing, you may want to write down the settings you are changing so that you have a way to get back to the original configuration. If you change your DNS settings, it’s likely you will no longer be able to access the Internet anymore from your SUSE Linux system. To manually change the settings, select Modify and insert the information you desire, such as a new hostname and domain name for your computer, or the Name Server list and domain search listing you have laid out in Figure 27.7.
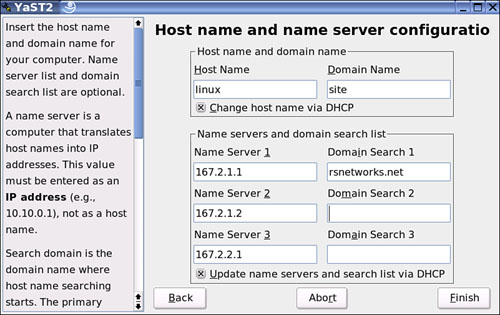
A name server is a computer that translates hostnames into IP addresses, and that is what the three name servers seen here are doing. If you remember the example in the beginning of this chapter, this section should make more sense—you are configuring the client to get its information from one of the three servers listed here. Why three? Usually you would have a primary, a secondary, and a tertiary name server to get information from. For disaster recovery purposes it’s common to have more than one single DNS server to rely on. Relying on a single DNS server means all your eggs are in one basket, and if an egg cracks, you are out of name resolution! As you can see from this simple example, it’s common to have multiple DNS server settings to rely on.
Note
Although I have manually changed these settings, I have also left the check box checked to Update Name Servers and Search List via DHCP solely because that’s how it’s configured currently in a SOHO. You would want to remove this setting if you were manually adding your servers and did not want it overwritten by a DHCP server configuration.
The domain search list is the list of domain names where hostname searching begins—and hopefully ends with the proper name resolution applied to the client. You can add multiple names in the search list, although it’s commonly seen, and used, with only one domain name. That’s it! Make sure that you click the Finish button at the bottom of the Host Name and Name Server Configuration window. When you finish, you will be able to use those settings when attempting to resolve names on the Internet, such as www.novell.com.
Multiple files on your SUSE Linux system will allow you to modify DNS information. To work with the hosts file, which we have already discussed and worked with in the /etc directory, we will look at how to use YaST to make those same changes. As you saw earlier, open YaST and navigate to the Network Services menu in the YaST Control Center. Then select Host Names. A dialog box opens as shown in Figure 27.8.

In this section you can change the hosts file from YaST, whereas we saw it edited in the vi editor before. You can do either, whichever is easier for you, depending on which tool you feel the most comfortable using to make your edits. If you are new to Linux, you should attempt to learn both, although the YaST way is easier than the vi editor at the shell prompt.
To test your new DNS configuration, you can either attempt to access the Internet, or if you want to be a little more technical, you can use tools such as nslookup or dig. In this section of the chapter, you’ll take a look at both tools.
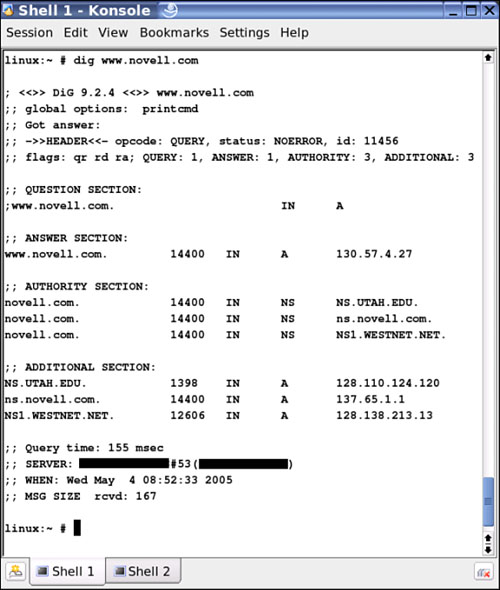
The dig tool has been around for a long time on Unix systems and serves a very important function. The dig tool stands for Domain Internet Groper. dig is a Unix-based program that allows users to learn information from a DNS site by querying it. You can see from Figure 27.9 that dig has, in fact, found quite a bit of information on www.novell.com.
Note
In Figure 27.9, the default gateway address has been blackened out to protect the identity of the system. You will not see a black bar on your screen as you do here.
You can also use nslookup, a tool that you may be familiar with when using Microsoft Windows products, such as Windows XP. SUSE Linux also uses the nslookup command as follows:
linux:~ # nslookup
> www.novell.com
Server:         167.2.1.1
Address:        167.2.1.1#53
The nonauthoritative answer follows:
Name:   www.novell.com
Address: 130.57.4.27
The next step is to use the set command, which will show you all of your DNS server assignments. By typing set all, you can see your primary, secondary, and other DNS servers, as well as other settings changes you can make with this command:
> set all
Default server: 167.2.1.1
Address: 167.2.1.1#53
Default server: 167.2.1.2
Address: 167.2.1.2#53

Set Options
  novc                  nodebug         nod2
  search                recurse
  timeout = 0           retry = 2       port = 53
  querytype = A         class = IN
  srchlist = rsnetworks.net
> exit
You can type exit and select a carriage return to quit. This will bring you back to the Linux prompt so you can work again at the shell prompt. These tools will help you to verify and test your DNS service, either locally or against a DNS server.
Now that you understand some of the fundamentals of the DNS and have learned how to configure it on a client and test it, it’s time to delve into the real power of SUSE Linux and turn it into a DNS server.
Before we dig (pun intended) deeper into how to configure DNS as a server-based service on your SUSE Linux system, a word on the service itself—BIND.
BIND stands for Berkeley Internet Name Domain or Daemon. BIND is software developed by the University of California at Berkeley, as the name implies. BIND is a full service DNS solution that allows clients to get name resolution information as requested. Although an entire book can be dedicated to Unix- and Linux-based DNS, for purposes of this chapter, we will not get too involved with BIND’s history and current status. In this section we will cover the basics. If you want more information, the following URLs explain DNS, BIND, and how to configure BIND to the smallest detail:
BIND is one of the most used and commonly seen forms of DNS on the Internet today. In fact, most service providers use only BIND because of their lack of trust and the proprietary nature of the Windows-based DNS server products.
Now that you are familiar with BIND, let’s look at how to configure your system with it. Up until now you have worked with SUSE Linux as a client of DNS. Next, you will make SUSE Linux function as the server that the clients query to get their DNS resolution information. Let’s look at how this is done.
First, you need to verify that DNS is installed on your SUSE Linux system. To verify, open up YaST. On the left pane of the YaST Control Center, select Software. Then select Install and Remove Software. In Figure 27.10, you can see under the Network Services section that BIND is either installed, or it is not. Here, for this example, it has already been installed.

After DNS is installed, open YaST if it is not already opened; select the DNS Server icon that will allow you to configure DNS settings on your SUSE Linux system.
Next, you need to configure DNS. To configure DNS manually you can use YaST to install the base system and then configure it as well. To get to the DNS configuration pages, open YaST and navigate to the Network Services menu in the YaST Control Center.
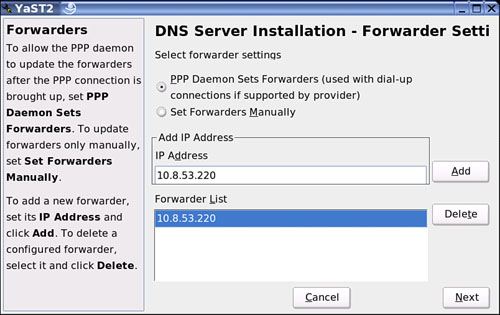
You can use the DNS Server section of YaST to configure a DNS server for your local network. When you start the module for the first time, a wizard will prompt you about making changes on your forwarder. A forwarder is used to send your request to the next server that will be able to answer the request and then cache it on the forwarding server, which will most likely be “Internet facing” and have a publicly assigned IP address.
Next, consider the following. Because you’ve set up the client, you are now setting up the server. If you remember from previous examples, the DNS server, if not a root server, will still need to get its information from a public Internet-based DNS server. The server you are creating now with your SUSE Linux system is a local DNS server that will be used in your local environment (or network), and it will have to query another DNS server for its name resolution information because it is not a public Internet-based DNS server. You can, in fact, set it up as an Internet-based DNS server, but because doing so is outside the scope of this book, this chapter will not be able to cover all those details in depth. There are many more steps to configuring a DNS solution, and there are many ways you can set it up, allowing you to meet just about any name resolution scenario placed before you.
To set your SUSE Linux system as a Local DNS server, you can bypass the forwarder configuration by clicking Next. You do not have to set a forwarder. Remember, a forwarder is nothing more than setting your local DNS server as a nonroot DNS server that will query a root server if it does not know the answer to a query. When you starting the module for the first time, see the dialog box shown in Figure 27.11, DNS Server Installation—Forwarder Settings.
Click Next to enter the other DNS server configuration settings areas, such as where you will build new A records.
After you have clicked Next, you will be shown the DNS Zone section where you can add a new zone. A default of example.com is shown in Figure 27.12.
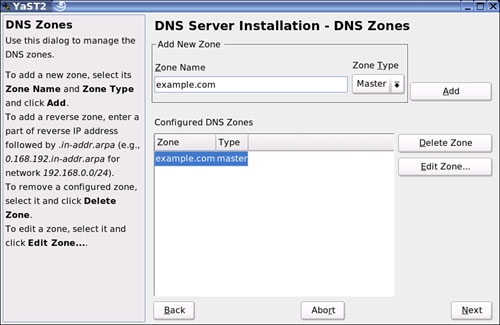
This particular dialog box consists of several parts and is responsible for managing of zone files, adding new zones, or removing a zone. To add a zone, add or change the current zone name of example.com. The type of zone will be the master because it’s the first zone you are making. After you make more zones, you will be given an option to make a slave domain. A slave is a DNS server that will get its main information from the master server. Read and writes can be done on the master; the slave is read-only and gets its configuration information from the master.
To add a reverse zone you have to know to add the extension to your zone, such as 10.1.1.in-addr.arpa. The name must end in .in-addr.arpa and you will need to add this manually. Select Edit Zone to configure other settings of an existing zone. To remove a zone, you can select Delete Zone. If you decide to edit a zone, you can select Edit Zone.
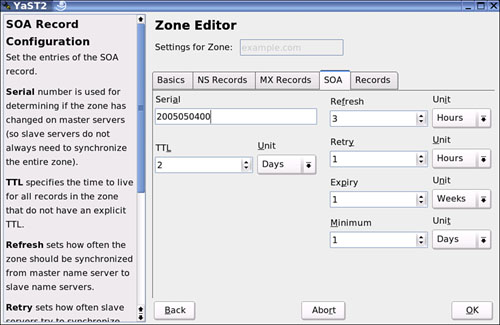
Inside the zone, you can change many settings, such as adding records. To add a simple A record so you can have basic name resolution, click the Records tab and add a new resource record. (Resource records were covered earlier in the chapter; now you can add one manually.) To add a record, add the hostname (without the domain name) to the Record Key. The Type is an A record (the Domain Name Translation). The Value is the IP address you want to use. By clicking Add, you will have successfully added your first resource record beyond what may have been made during the installation, such as the SOA record, or Start of Authority, which is a record that will indicate the start point or point of originating authority for information stored in the zone just created. The SOA resource record is the first record created when adding a new zone. This is a great example of a record that is made for you (see Figure 27.13).
Now that you understand how to add records and adjust the zone file database, click Back to go back to the original DNS Zones configuration page. You can also click OK to finish, but you are not quite finished with your configurations.
Clicking Next from the DNS Zones dialog box will bring you to the Finish Wizard. The reason why you didn’t want to bypass this screen by clicking OK is that you want to modify the DNS server startup options and behavior. For instance, do you want the server started now, or when you boot up? Or do you want to set it for manual start? Either way, you can adjust these settings in the DNS Server Installation Finish Wizard. When you’re done, click Finish to run your new DNS server. You can also click Expert Options to get more options to choose from, including a section where you can adjust your logging settings, which is covered next.
Now that you have your DNS Server installed, you will want to set up logging so you can help find problems and aid your troubleshooting process if needed. It’s recommended to turn on logging only as needed, but as long as you are checking often and saving old log files, checking them and analyzing them for issues or problems, you can leave it on.
There are many things you can log, as shown in Figure 27.14, and there are multiple options you can choose from.
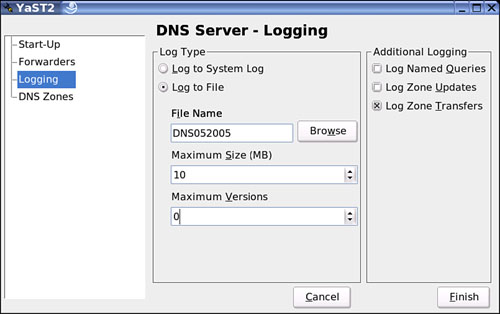
To specify the location where the logging data is stored, look under Log Type in the DNS Server Logging dialog box. By clicking the Browse button, you can select a new location to store the file. It’s recommended that you click Browse anyway and make a new directory called DNSLOG, for example, so that you can save all your files in one location. As a handy side note, from the example shown here, I have named the file in a way that dates it, because if you save files, you will need a way to recall what files have what information in them. You’ll also need to know when they were created so that you have a way to track back to a specific time or date. Either way, make sure you have a system in place that allows you to organize your data so that it’s easy to retrieve.
If you choose Log to a System Log, you can now log to the system log, which is stored in /var/log/messages. Also, make sure you set the log correctly, including its size, which should be set to about 5–10MBs, depending on how much information you want to store based on your logging selections. Zone transfers are the only entries to be logged, and they are being logged to an independent file named DNS052005, which stands for DNS log, 05 (month of May), and the year 2005. You can use any example that comes to mind, or use this one if it works for you and your business or personal needs.
Remember that DNS is nothing more than a naming system and protocol used not only by companies worldwide in their internal networks, but also for the publicly accessible Internet. DNS is used to add a human quality to finding data on the network—www.novell.com or 130.57.4.27—as mentioned earlier. However, www.novell.com is much easier to remember than a set of numbers. You can move Domain Names around easily, but IP addresses are not so portable.
There is much to know about DNS; like SUSE Linux, you can set up the system as a DNS client or a DNS server. YaST will help you configure both.
http://www.tldp.org/HOWTO/DNS-HOWTO.html#toc1—The Linux Documentation Project. This is an in-depth DNS HOWTO with DNS general information as well.
http://www.isc.org/index.pl?/sw/bind/—Internet Systems Consortium, Inc. (ISC) is a nonprofit public benefit corporation dedicated to supporting the infrastructure of the universal connected self-organizing Internet. This is an in-depth DNS/BIND HOWTO with DNS/BIND general information as well.
http://www.arin.net—American Registry for Internet Numbers. A nonprofit registry responsible for the administration and registration of Internet Protocol (IP) numbers in North and South America, South Africa, the Caribbean, and all other regions administered currently managed by Network Solutions, Inc.
http://www.isc.org/bind.html—Berkeley Internet Name Domain information direct. BIND software, developed by the University of California at Berkeley, implements a DNS server and a resolver library that enables clients to store and retrieve resources or objects and share this information with other resources on the network. This link covers BIND in detail.
http://www.iana.org/—Internet Assigned Numbers Authority. IANA is a government-funded authority that assigns and distributes international domain names and IP numbers or Internet addresses and oversees the Internet software protocols of the officially sanctioned root servers.
http://www.internic.net/—A registry responsible for name assignment within the following TLDs: COM, EDU, NET, GOV, and ORG.