
IN THIS CHAPTER
Before it was known for almost anything else, Linux made its name in networking. Your Linux computer can connect with almost any operating system under the sun—MacOS (both flavors), all Unix flavors, and even Windows (with Samba’s help). Linux servers can be easily and quickly deployed in heterogeneous networks and will run pretty much forever without a crash or reboot.
SUSE Linux differs from SUSE Linux Enterprise Server (SLES) mostly in that SLES tends to offer a more server-friendly implementation—often with older but more stable packages. SUSE Linux has more than enough power and flexibility to manage your home or small-to-medium business servers. This chapter will help you get going.
You will learn some basic Linux networking concepts and how to configure your network interface cards (NICs) and other network devices with YaST.
Unix networking is based on the same stack of protocols that powers the Internet (well, perhaps it’s the other way around): the Transmission Control Protocol/Internet Protocol (TCP/IP) suite. In addition to the two namesake protocols, the TCP/IP suite includes the User Datagram Protocol (UDP).
The purpose of these protocols is to move data around in packets. These are tiny little chunks of data created at the transmitting end and moving at the speed of light toward the receiving machine. Packets move faster and more accurately to their destination than one hunk of data would. Under TCP/IP, all data travels via IP packets from one IP address to another IP address.
IP packets wouldn’t be able to travel very far if there was no way for two machines to connect with each other. TCP provides that connection-based protocol. When a TCP connection is made, the data stream is broken up by IP into packets, and it travels to the second machine. TCP then reassembles the packets back into a whole stream, figures out what type of data it is, and approaches the appropriate port for that data type (port 110 for POP email servers, as an example).
Where does UDP fit in the scheme of things here? It is a connectionless protocol. Applications that use UDP just choose a destination and start sending. UDP is usually used for small amounts of data or on fast and reliable networks. Some peer-to-peer networks also use UDP.
One thing to get straight at the beginning: local area network (LAN) addressing is distinct from Internet addressing, even if they are based on the same protocol stack. This can lead to some level of confusion, in part because in Unix, even a standalone computer that never interacts with another machine still has a loopback IP address.
Internet IP addresses (also known as “public” IP addresses) are assigned by an addressing body like the American Registry for Internet Numbers (ARIN), which is the body for the United States. Internet Service Providers (ISPs) and other entities requiring blocks of IP addresses apply to ARIN and similar institutions. The addressing body then assigns the requested blocks, which are, in turn, assigned to the ISP’s subscribers. These addressing bodies are needed because every machine on the Internet at a given moment requires a distinct IP address. You’ll see later, when you learn about DHCP, that one IP address can be any number of physical machines.
LAN IP addresses are assigned by the system administrator so that each physical machine attached to the network has a distinct address. As a result, your computer can have three identities or addresses at once: its loopback address (the one-computer network), its LAN address (and if a computer can connect to several networks, it can have several LAN addresses), and its public Internet address.
Learn more about setting up loopback connections in Chapter 12, “Connecting to the Internet.”
Standard TCP/IP addressing under version 4 of the protocol is expressed as a series of 4 decimal numbers separated by dots, as in 187.0.15.255. These represent a 32-bit binary value, and each of the four sets of numbers are called an octet. Each octet includes a number range from 0 to 255. The first octet usually signifies what class the network belongs to. There are three classes of networks:
Class A networks have a first octet in the range of 1–126, and the last three octets define the host. Each Class A network has up to 16,777,214 hosts. Of these, the 10 octet is reserved for local networks (127.0.0.0 is reserved for the loopback range).
Class B networks have a first octet in the range of 128–191. In this range, the 128 octet is also reserved for local networks. The first two octets belong to the network, the last two to the host. There are 16,382 Class B networks, with 65,534 possible hosts.
Class C networks have a first octet in the range of 192–223. In this range, the 192 octet is also reserved for local networks. The first three octets belong to the network, with only the last octet belonging to the host. Thus, there are 2,097,150 possible Class C networks, but each network can have only 254 hosts.
Two other network classes are irrelevant to this discussion. Class D network addresses are reserved for multicast addresses, and Class E addresses are experimental.
These classes are standard, but a netmask also defines your network class. The netmask shows what part of an IP address represents the network and which represents the host. Common netmasks for the different classes are the following:
Class A 255.0.0.0
Class B 255.255.0.0
Class C 255.255.255.0
There’s more information on netmasks in the “Network Organization” section later in the chapter.
The allocation of IPv4 addresses is reaching the breaking point. Class A networks are full. Class B is nearly there, and you can guess where Class C is, too. Something needed to be done, and it was. Welcome Internet Protocol, version 6.
Note
Many years ago, it was thought that we would run out of IP addresses in a very short time. This led to the need and demand for IPv6. What was not anticipated or foreseen, though, was the creation and widespread adoption of technologies such as Network Address Translation, which enable multiple clients to share the same IP address. Because of their extensive use, the transition to IPv6 has moved much slower than it otherwise would have.
It’s easy to see the need for IPv6. Just think of how many different machines you use to access the Internet today: desktop PC, laptop, personal digital assistant, or cell phone with email and Web access. Thinking about getting a Voice over IP (VoIP) phone? Now consider the prospect of widespread Internet use in the global South: Brazil, China, India, South Africa. All these devices need addresses, not to mention the “smart houses” and web-enabled refrigerators the dreamers have speculated about.
IPv6 fixes this problem by using 128-bit addresses using hexadecimal numbers, producing a truly mammoth number, equaling 3.4×1038 potential addresses. Instead of four octets, IPv6 addresses has eight hexadecimal groups. Four groups belong to the network and four groups to the host.
Like the global transition to the metric system, moving to IPv6 has been a long process. The initial standard was adopted in 1994, but the vast majority of Internet connections still use the old standard. Many networking utilities, firmware, and parts of some (non-Linux) operating systems will need rewriting to fully support IPv6.
You can use IPv6 to set up your internal network. SUSE Linux supports IPv6 and includes many utilities to use the new network. Consult the Linux+IPv6 HOWTO at http://www.tldp.org/HOWTO/Linux+IPv6-HOWTO for more information.
Network servers rarely have just one dedicated task. For example, web servers handle standard pages and secure pages, and perhaps an FTP volume as well. For this reason, applications are assigned ports by the Internet Assigned Numbers Authority (IANA) to make “direct” connections for specific services. These ports help TCP/IP distinguish services so data gets to the right application. You’ve seen references to these ports elsewhere in this book: Web browsers access port 80, POP email clients look for port 110 to get mail, FTP servers use port 21, and BitTorrent uses port 6881. You can see these common ports in the /etc/services file and online at http://www.iana.org/assignments/port-numbers.
As a system administrator, you can assign ports on your server to different applications by editing its configuration file. This can occasionally thwart remote attacks on a common port, but it requires you to notify your legitimate remote users to connect to the new port instead of the common port.
Organizing your addressing becomes more problematic the bigger your network gets. If you have fewer than 254 devices needing an IP address, you’re pretty much home free with a Class C network. But after that it can get interesting. There are some workarounds, though, which is what this section is about.
Class A and B networks can include separate networks called subnets. These subnets are specified in the second (in Class A networks) or third (Class B) octets. One computer with an address of 172.19.25.0 and another of 172.19.120.5 would be on the same Class B network (172.19), but on different subnets. These two computers would need a router or switch to communicate. Subnets can be useful to separate workgroups.
Subnet masks, or just plain netmasks, are used by TCP/IP to show which octets are owned by the network and which are owned by the host. You saw the standard netmasks earlier in the chapter. You can use customized netmasks to organize subnets to fit your needs. Even if you have a single Class C address, you can use netmasks to create subnets: Make that last octet a number greater than zero.
NAT is a service that makes it possible for a server to translate between hosts on a network using private addresses and one or more public addresses. Usually, the router running NAT services all the clients on a network segment and shares a single registered IP address among all of them. This allows the hosts to essentially hide behind the router and a firewall is created at the network layer.
Standalone PCs require several hardware devices to network with other PCs, servers, peripherals, and the outside world. This section reviews the most essential and explains how to get it going on your system.
Unless a computer can interface with a network, there is no network. That’s what NICs are for. Each NIC has a unique address known as the Media Access Control (MAC) address that identifies the NIC. This hardware address is used by DHCP and several other protocols to identify a machine. NICs come in several flavors, depending on the method (or topology) they use to connect with other NICs. With the exception of some wireless NICs, SUSE Linux supports nearly every card on the market, regardless of topology. These topologies are discussed in the sections that follow.
One of the older networking technologies, developed by IBM. As you would think, the network is set up in a ring, with each host passing around a single token. When a host receives the token, it can transmit data. The maximum transfer speed of a token ring NIC is 16Mbps (16 million bits per second). It uses an unshielded twisted pair (UTP) cable.
There are other forms of Ethernet NICs, but this was the standard for a long time. Ethernet hosts link in a star pattern to a hub at the center. The hub must be within 100 meters of any host. Data goes through the hub to all the hosts, but packets are processed only by the appropriate host. Transfer speed is 10Mbps. 10BaseT also uses UTP cable.
This simple upgrade to the 10BaseT standard is easy for administrators to handle, offering much faster transfer rates than 10BaseT with little more exertion than replacing NICs and hubs. As you might guess, 100BaseT NICs have a transfer speed of 100Mbps. It requires Category 5 UTP cable.
If you are building a network for the first time or have a big budget, you should consider these cards. Fiber optic cable is relatively expensive, but it delivers data much faster. This is due, in part, to fiber’s capability to transmit digital data directly, without needing to convert to analog for transmission across metal wires. Gigabit Ethernet delivered over fiber optic cable transfers data at 1000Mbps.
With all the hype and discussion of wireless networking, it’s easy to forget that wired networks are still faster. Nonetheless, the convenience and cost can make wireless very attractive even for networking desktop PCs. This is especially true for new networks where the wiring is not already in place.
As with any new technology, Linux support is not 100% there yet, but it is catching up quite nicely. There’s more on wireless networking later in this chapter.
In practical terms, there are two general types of network cables in use today: UTP and fiber optic. Six categories of UTP cable are available, and each has a different purpose:
Category 1—Your telephone wire, used for voice transmission.
Category 2—A token ring cable, with transfer speed of 4Mbps.
Category 3—A 10BaseT cable, with transfer speed of 10Mbps.
Category 4—For modern token ring networks, transfer speed is 16Mbps.
Category 5—The most widely used UTP cable today. Transfer speed is up to 100Mbps.
Category 6—This cable also has a transfer speed of 100Mbps and comes in two forms: stranded, for runs up to 25 meters, and solid, for up to 100 meters.
Fiber optic cable is used frequently in wide area networks (WANs) because it will transmit data up to 62 miles at 100Mbps. It is free of electromagnetic interference, and it is more secure.
Hubs connect several hosts in a star network topology. They can have any number of connection ports, but typically they come in 4-, 8-, 16-, 24- and 48-port configurations. Hubs allow you to easily expand a network. Need more connections? Just buy another hub. Hubs can even connect with other hubs through an uplink port; the connected hubs then act as a single hub. Troubleshooting problems is also a little easier because if one host goes down, it doesn’t take the whole network with it.
Routers and bridges connect your network to its subnets and to other networks. They do this using different methods.
Bridges, or dumb gateways, connect subnets, relaying information without any filtering. This lack of filtering makes it a bad way to connect to the Internet. All the data traveling through those pipes at any given moment don’t really belong on your network. Bridges are useful if one subnet is getting overburdened with traffic, though. Another subnet can lighten the load.
Routers are designed to connect networks to other networks and the Internet. They filter data so you can block certain ports that you don’t need. Routers tend to be more expensive than bridges, but for home and small business use, DSL packages often come with routers for around $100.
In SUSE Linux, hardware detection is largely automated. During the initial installation, YaST recognizes your NIC and other hardware and initializes it.
If YaST does not automatically identify your card, you can set this up manually in the Network Cards module. Open YaST, go to Network Devices, Network Cards. The Configuration screen pops up, with any detected cards in the bottom half. Click Configure to set up the new card. Figure 25.1 appears.
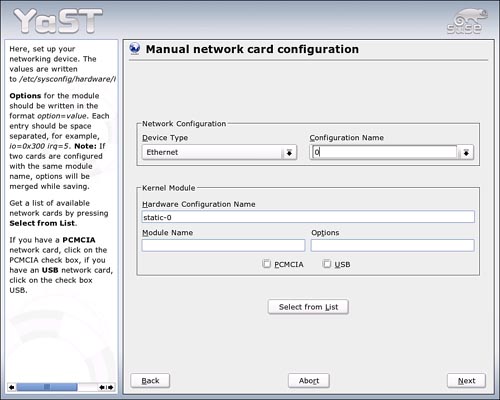
Click Select from List to locate your card from a list. Doing this identifies the kernel Module Name to load. If your card is not on the list, consult your NIC’s manual for configuration information. If your NIC is connected either by PCMCIA (typical for laptops) or USB, click the appropriate box. Click Next to continue.
In this screen, you’ll set up your addressing. Figure 25.2 shows a NIC configured for DHCP.
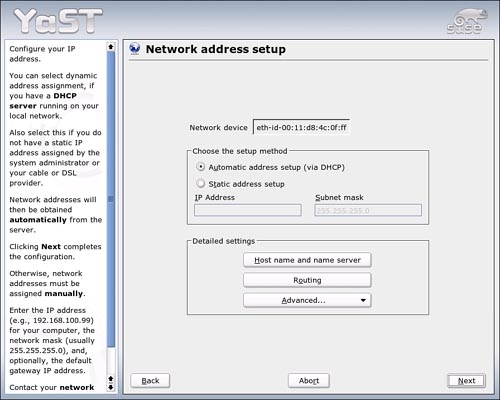
Figure 25.2. Addressing for this card is handled by DHCP. You can also use this screen to set up a static address or configure this machine as a router.
To set up the NIC with a static address, click the appropriate button. Enter the static address; you’ll see the subnet mask is set for 255.255.255.0 by default. You can change this if you like.
Click Host Name and Name Server to give the machine a name on the network and, identify a domain name server (DNS). Figure 25.3 will appear. Change settings and click OK.

Figure 25.3. Give this machine a name and identify a domain name server for its Internet connection.
Note
You can also access this screen through the DNS and Host Name module under YaST Network Services.
In the Advanced Settings, you can set a Maximum Transfer Unit (MTU) for this card, choose when to load the NIC if you don’t want to start at boot, and allow users to adjust NIC settings in the Detailed Settings menu. You can also add multiple addresses through aliases. Unless you have specific reasons for doing any of the above, you shouldn’t, because the defaults will work well.
Click Next to return to the main screen and click Finish to confirm your settings. You will need to reboot to activate your card.
As you might guess, DHCP allows a network administrator to configure TCP/IP parameters for each host on the network when the host connects to the network. The network administrator can assign an IP address to a NIC, set DNS entries, and configure default routing and gateway information for each host. In this section, you’ll learn how to use DHCP to assign an IP address, and how to set up a DHCP server with YaST.
DHCP basically holds identifying information for each client that might connect to the network, and so offers persistent storage of network parameters. This information typically includes Subnet, hostnames and addresses, and specific hardware addresses.
DHCP also allocates temporary and permanent IP addresses to clients and hosts. A temporary assignment is called a lease. When a lease elapses, a client can ask for an extension or return it to the server. DHCP can also allocate infinite leases for permanent connections, assuming it has enough addresses to spare.
For the network administrator, DHCP simplifies life immensely because it automates the allocation of IP addresses. No more accidentally assigning duplicate addresses or worrying about managing a limited number of available addresses.
During installation, YaST will set up DHCP for your system when it configures the NIC. This actually puts an entry into your /etc/sysconfig/network file. You can access and change some settings in the DNS and Host Name module in YaST Network Services.
You can set up a DHCP server on the system in YaST Network Services as well. Click the module to begin the process. This module sets up the /etc/dhcpd.conf file.
If you don’t already have the DHCP Server package installed, you’ll be prompted to insert the SUSE Linux installation media to install the package. Then the Configuration Wizard begins. In the first screen, you’ll be asked which network interface to use for your server. Select one and click Next. Figure 25.4 will appear.

The essential information to be entered here is the domain name this server will administer, the IP addresses for the DNS server(s) you’re using, and the default gateway. As you see here, the default lease time for each host is 4 hours. This is adjustable here. If you want DHCP to handle addressing for your print server, enter its information here, too. Click Next to continue.
This screen (Figure 25.5) gives the server the address block it has to work with. Enter the first and last addresses it can assign. You can also adjust the default lease time and set a maximum time beyond which extensions cannot be granted. Click Next to continue.

In the last wizard screen, you’ll be asked whether to start the server on boot or only when you ask it to start. To start the server, click Detailed Settings and then click Start DHCP Server Now. Click Finish to exit the wizard.
The Network File System (NFS) is a way for different computers on the same network to share files transparently, as if volumes and directories were all on the same computer. If a user happens to work on multiple machines, NFS allows that user to log in and access the home directory using any computer on the network.
Any computer on the network can have an NFS server, an NFS client, or both. The necessary packages are installed by default with SUSE Linux.
To start the NFS Server on any network computer, run the NFS Server module in YaST Network Services. On the first screen, click Start NFS Server and check the Open Port in Firewall box, if necessary. Click Next to identify (export) directories to other machines.
To include a directory on the server, click Add Directory in the middle of the screen. Enter the full path of the directory or browse to it. Click OK and you will see some options. By default, all hosts on the network can see this directory, but you may limit that.
The options box includes the default permissions: ro (read-only), root_squash (prevents Root from another machine from changing permissions on your files), and sync (which requires the server to save a file before replying to a client request for it). Other options can be set here; consult man exports to see them.
Adding shared directories from an NFS Server to work on a particular machine is a snap in YaST.
Open the NFS Client module in Network Services. Click Add. Figure 25.6 appears.

Enter the NFS server hostname (or click Choose to search for servers on the network). Select a shared directory in the Remote Filesystem box and name a mount point (perhaps /nfs) on your local system. Click OK to confirm your choices, and click Finish to edit your /etc/fstab file to include the remote directory among the mount options for this machine.
It may not be inevitable anymore, but there just might be one computer, or 100, running Microsoft Windows on your network. Despite vastly different file systems, it is possible, even easy, to enable those Windows machines to access files on the Linux machines. Samba uses the Server Message Block (SMB) protocol to perform this miracle. As far as the Windows PCs are concerned, you even have a C drive.
Samba is a very complex application with excellent documentation. The Samba HOWTO Collection and Reference Guide runs nearly 600 pages. Samba Unleashed is more than double that. The complexity comes from having an impressive amount of options.
Running a default Samba installation is pretty simple, however. It’s like a lot of Linux applications. You can tweak Samba endlessly to make it work exactly the way you want, or you can just let it do its thing.
On the positive side, Samba functionality is installed and enable by default with SUSE Linux. In Konqueror, you can change the location to smb://windowshost and see the shared resources available to you there without further intervention necessary. You can easily manage Samba settings through YaST beneath Network Services.
If a bare minimum installation of the operating system was done, and not all of the necessary Samba components were installed on your workstation, you can always start YaST, choose Software, Install and Remove Software, and search for the Samba packages.
SUSE Linux uses xinetd, the eXtended Internet Services Daemon, to secure network services and keep the bad guys out.
xinetd is a more secure version of the original Internet Services Daemon, inetd. It is designed in particular to protect your network from denial of service (DoS) attacks. A DoS attack occurs when someone tries to saturate a server’s resources with repeated requests for services. You can limit the number of incoming connections with xinetd to something manageable.
To configure xinetd, go to the YaST Network Services page and select the xinetd module. YaST is actually reading from and writing to the /etc/xinetd.conf configuration file. Here you can set up your access control lists to allow (or deny) particular IP addresses and domain names from making requests on your network.
You can also restrict access to only some services with xinetd.
As an administrator, you should always know the services that you are offering the reason for such. Security on a server and security on a workstation are often approached from two different angles—this need not be the case, but it does provide two opposing views of how to approach the issue.
On a server, often all services are turned off and then only the ones that are needed are turned on. For example, as the server needs to host a web, appropriate services for that are turned on. If someone balks that they cannot access something they have a legitimate need to, and it is ascertained that they should be able to do so, then the appropriate services for that are turned on as well. Services are enabled one at a time as needed until it is known exactly what the server needs and this becomes the set of offerings.
With a workstation, often you start with a host of services enabled. You then start turning them off one a time until you get to the point where you are unable to do a task and enable the one in question once more.
Both approaches work and are useful in different scenarios. The key to both is careful research and good documentation.
http://arin.net—The American Registry for Internet Numbers, the body that assigns public IP addresses for the United States.
http://www.ietf.org/rfc.html—Search for, or get a list of, Internet Engineering Task Force Requests for Comment.
http://www.deepspace6.net—A resource clearinghouse for information on Linux and the new Internet Protocol. Good links and documentation pages.
http://www.tldp.org/HOWTO/Linux+IPv6-HOWTO—The Linux IPv6 HOWTO.
http://www.ietf.org/rfc/rfc2460.txt—The IPv6 Standard document.
http://linuxreviews.org/features/ipv6—Interesting article on “Why You Want IPv6.”
http://www.iana.org/assignments/port-numbers—Learn what ports are assigned to what applications at the Internet Assigned Numbers Authority site.
http://directory.google.com/Top/Computers/Software/Internet/Servers/Address_Management/Dynamic_DNS_Services/—The place to find Dynamic DNS service providers.
http://www.isc.org/sw/dhcp—The keepers of the SUSE Linux default DHCP server package and the optional client. You can view the current DHCP README file online at the ISC site.
http://dhcp-monger.est-unique.net/wakka.php?wiki=Welcome—The DHCP-Mongers Wiki. Read man pages, search the mailing lists, submit new information.
http://nfs.sourceforge.net—The Network File System project page, including FAQ list.
http://www.samba.org—The Samba home page. See the HOWTO collection and Samba-By-Example Guide in the Documentation section.
http://www.wi-fizone.org—Find a wireless hotspot wherever you may be at this site, sponsored by the WiFi Alliance trade group.
http://standards.ieee.org/getieee802—Get the official IEEE standard document for any 802.xx networking specification here. This runs the gamut from Ethernet (802.3) to WiFi (802.11) and beyond.
http://portal.suse.com/sdb/en/2002/11/wavelan.html—Wireless network setup from the SUSE Support Database.
http://www.hpl.hp.com/personal/Jean_Tourrilhes/Linux/Wireless.html—Much good material on Linux Wireless Networking.
http://www.securityfocus.com/unix—This comprehensive security site offers security news, mailing lists, and even some firewall rule sets.
http://www.linuxsecurity.com—Get the weekly Linux Advisory Watch and Linux Security Week newsletters to keep up with the latest information and patches. Tutorials for beginners and articles for security professionals.
http://www.insecure.org—The home of the nmap security scanner.
http://www.ethereal.com—The freeware Ethereal network protocol analyzer and packet sniffer.