
IN THIS CHAPTER
As it has over the last decade, the Internet is a prime driver of computer sales all over the world. People want to get access to the treasures of the World Wide Web, send email and instant messages to friends and family, learn more about this spam thing they keep hearing about—well, maybe not that.
With all due respect to the SUSE employees in Germany, it is difficult to imagine Linux existing without the Internet bringing together programmers from around the world to work on the kernel and all the other packages that make Linux what it is today. For that reason alone, it makes sense that making a connection to the Internet is a priority and a relatively simple proposition in SUSE Linux.
SUSE Linux provides many tools to access and manage your Internet experience. In the next few chapters, we’ll go over the ways to create websites, manage email, upload and download files, and collaborate with others using Instant Messaging, mailing lists, Usenet news, Wikis, and video conferencing.
In this chapter, we will focus on the basics of getting connected, be it through an ordinary dial-up modem or a high-speed Digital Subscriber Line (DSL).
If you already have an Internet connection running under Windows, it is best to gather some information beforehand to make your Linux Internet setup go a little easier. There are still not enough Linux users for many ISPs to pay attention to. Some ISPs remain ignorant of or hostile to the Linux users they already have. This leads to a general lack of Linux support, especially from the main players.
This means you are not likely to get a shiny CD from your ISP with everything to get you started, but YaST will be there as always to handle that function. The things you need to know most are the following:
How your IP address is determined—Static or Dynamic (DHCP).
The IP address(es) for your Domain Name System (DNS) server, especially for dynamic connections.
The DNS names and IP addresses for your mail and news servers.
The dial-up phone number for your ISP if you’re using a dial-up connection.
Your credentials, such as your username and password.
Every computer connected to the Internet must have a unique Internet Protocol (IP) address. If everyone who wanted to connect to the Internet required a unique machine to provide that IP address, an ISP would have to buy a separate machine with a separate IP address for every subscriber. Because that is not feasible, and because most people use a dial-up connection that is not always on, a solution was worked out. The vast majority of standard ISP connections use the Dynamic Host Configuration Protocol (DHCP) to assign each logged-in user with an unoccupied server.
Note
You’ll learn more about TCP/IP and DHCP networking in Chapter 25, “Setting Up Networks and Samba.”
An ISP will then get a range of IP addresses that allow it to connect to the Internet. As a user about to configure your system, you may need to find out what that range is. Often this will be in your ISP’s documentation booklet. If it’s not there and you have a Windows XP box already connected, check the Network Connections in your Control Panel. You should see your connection listed. Double-click to open it, and then click the Support tab. This will tell you whether you are using DHCP for access or DNS service and should tell you all the necessary IP address(es).
You can also get to this information from a Windows command prompt. Go to Programs, Accessories, and then Command Prompt. Type ipconfig and you will get the IP Address, Subnet Mask, and Default Gateway addresses. This command is the Windows analog to the Linux ifconfig utility, which you will learn more about in the next section and in Chapter 25.
If you have a high-speed connection, you may receive a static IP, but even these are often handled by DHCP. Regardless of your connection type, many ISPs will offer you a static IP address, for a price. Unless you want to directly host a server (mail, FTP, DNS), this is not required.
Before setting up any kind of Internet connection, you’ll need to create a dummy interface that the TCP/IP protocol uses to determine the network capability of your machine. This is called the loopback (lo) interface, or localhost. Many network-aware applications reference this interface as well, so it is important.
What is a loopback interface? To a Linux networking driver, this is a network composed of exactly one computer. The kernel loops back network traffic to and from itself using the 127.0.0.1 IP address.
SUSE Linux should create the localhost interface during the initial installation. To confirm this, open a root console and run the ifconfig utility to identify your setup. Running this command should generate a response similar to this:
lo        Link encap:Local Loopback
          inet addr:127.0.0.1  Mask:255.0.0.0
          inet6 addr: ::1/128 Scope:Host
          UP LOOPBACK RUNNING  MTU:16436  Metric:1
          RX packets:2187 errors:0 dropped:0 overruns:0 frame:0
          TX packets:2187 errors:0 dropped:0 overruns:0 carrier:0
          collisions:0 txqueuelen:0
          RX bytes:114362 (111.6 Kb)  TX bytes:114362 (111.6 Kb)
This output tells you that the local loopback interface is active and is assigned the standard IP address for local connections, 127.0.0.1, and a broadcast mask of 255.0.0.0 is used. You even take a small peek into the future, as this version of ifconfig lists an Ipv6 address of ::1/128. This next version of the Internet Protocol (IP version 6) offers exponentially more IP address space than the existing IP version 4.
In the off chance localhost was not created during your SUSE Linux installation, it is easy to do yourself.
The localhost interface address is stored in a text file called /etc/hosts. This file stores all network IP address and hostname information. The kernel and other network utilities reads this to understand how this computer is connected to others.
Tip
You can also access and edit the Hosts file in YaST. Go to Network Services, then Hosts. Add, edit, or delete hosts here.
When you open this file, you will see a comment that describes the file and the syntax you should follow: IP-Address [tab] Full-Qualified-Hostname [tab] Short-Hostname.
If localhost is not already there, you may add this line:
127.0.0.1 localhost
You can leave the Short-Hostname blank. Save and exit. Reopen your root console and use ifconfig and route to create the interface:
ifconfig lo 127.0.0.1
This puts the localhost interface in memory, as with all other Linux network interfaces, like an Ethernet (eth0) or dial-up (ppp0) interface.
route add 127.0.0.1 lo
This adds the IP address to a routing table the kernel’s networking code uses to track routes to different addresses.
Test the new connection by running ifconfig again.
You should now be able to run your own loopback test by trying to ping localhost. You should see something like this (we’ll use the -c option to count out 3 packets to send):
 # ping -c 3 localhost
PING localhost (127.0.0.1) 56(84) bytes of data.
64 bytes from localhost (127.0.0.1): icmp_seq=1 ttl=64 time=0.087 ms
64 bytes from localhost (127.0.0.1): icmp_seq=2 ttl=64 time=0.087 ms
64 bytes from localhost (127.0.0.1): icmp_seq=3 ttl=64 time=0.081 ms

--- localhost ping statistics ---
3 packets transmitted, 3 received, 0% packet loss, time 2000ms
rtt min/avg/max/mdev = 0.081/0.085/0.087/0.003 ms
We have completed our prerequisites; now it’s time to take on the main course.
Setting up a dial-up Internet connection under Linux used to be somewhat difficult without a deep knowledge of computer hardware, but YaST has greatly simplified this for the SUSE Linux user.
When you set up a dial-up connection, you’re really just using several Internet standard protocols to enable your modem to connect to the ISP through an ordinary phone line. Most dial-up Internet connections use the Point-to-Point Protocol (PPP) because ISPs have found it a fast, efficient way to use TCP/IP over serial (that is, modem) lines. PPP is designed for two-way networking. The TCP/IP protocol suite moves the data.
If you couldn’t really conceive of Linux as a successful operating system without the Internet, why was it so hard to set up a dial-up connection in Linux? It’s true that Unix (and its Linux cousin) was network-aware from the very beginning, but these were assumed to be machines networked with wires and cards that could have static IP addresses. These workstations were located at research universities, corporate offices, and science labs, where users might log off the network, but the computer would always be there. Unix (and Linux) wasn’t ready for computers that had intermittent connections. The protocols for personal computers to connect were kludged together and eventually made to work.
You may not need to entirely understand PPP anymore to dial up to the Internet, but following is a quick primer.
Setting up a dial-up connection is really installing the pppd daemon on your system. This daemon controls the use of PPP. Launching your connection runs two other processes.
The high-level data link control (HDLC) protocol controls the flow of information between your computer and your ISP’s server, and the chat routine communicates with the modem, dials the number, and reports on the status of your connection (or occasional lack thereof).
If you want to confirm that pppd is installed, log in as SuperUser (su) and run pppd with the --help argument. You’ll see the many parameters you can use to tune your connection, but veering from the defaults can be risky.
Caution
Some modems still have a software interface that will not work under Linux. See Chapter 2, “Preparing to Install SUSE Linux,” for more information on Winmodems.
YaST’s Network Devices section manages setup wizards for several types of network connections:
Modem
Network card
ISDN
Fax
Phone answering machine
DSL
Although very similar, there are some distinctions. In this section, we’ll cover the modem connection. The DSL connection will be in the next section, and the other networking protocols will be covered in Chapter 25.
Begin by opening YaST. In KDE, go to the Kicker menu and choose System, then YaST. You’ll be asked for the Root password and YaST will load. Click Network Devices. You’ll see the six items previously listed. Click Modem to set up your connection.
YaST should have detected your modem, but you can easily do this if it hasn’t. Click Configure under the top screen to launch the Modem Wizard. The first screen should look like Figure 12.1.

This screen sets the mount point for the modem and a few initial settings. Using the default /dev/modem mount point is the easiest and should always work, but you can choose a different point from the drop-down menu. If you are in an office where you need to dial 9 to make an outside call, set the Dial Prefix. Modern phone systems nearly always use Tone dialing, so don’t change this setting unless you are certain. If you don’t like to hear the white noise that accompanies a connecting modem, turn the speaker off (although while you’re doing the initial setup, it’s a good idea to leave it on until you have confirmed that everything is working properly). If you have call waiting or some other service that changes your dial tone, you may want to uncheck the Detect Dial Tone box so the modem always dials. Only check the Details button if you need to change the default initialization string. When you’re finished, click Next to set up your ISP. YaST pulls up a list of Providers in several countries that you can select from. In Figure 12.2, we’ve selected Earthlink as our provider. Notice that the screen displays the provider’s website and support line. If your provider is not listed, click New to add it. Click Next to identify the phone number and other access settings.

Figure 12.3 shows the ISP configuration screen. You should know at least one local access number for your ISP. Enter it here, along with your username and password. If you want to enter your ISP password each time you dial up, check the Always Ask for Password box. Click Next to configure your connection.

The final configuration screen (see Figure 12.4) defines how you want to manage your connection. The key question to answer here is whether you want applications to be able to start a dial-up connection. This can be a nice thing when you ask your mail client to check mail and it dials up, but can be annoying if, for example, SUSEWatcher wants to check for system updates at 2 a.m. daily and the modem speaker wakes you up. It is also not good if your ISP charges by the minute and an automatic connection does not hang up after completing its task.

Figure 12.4. In this screen, tell SUSE Linux whether you want applications to dial-up automatically or only when you ask.
By default, Dial on Demand is turned off. Check the box to activate this feature. You need to identify at least one name server (which you should have from your ISP).
Check the Activate Firewall box to prevent all incoming connections from attacking your computer. The Idle Timeout tells how long to wait for a dead connection to revive. By default, if the modem receives no data from the server for five minutes (300 seconds), it will hang up. You can adjust this time to be longer or shorter using the drop-down menu. Setting the Timeout at 0 means the modem will never hang up unless you tell it to.
If you have a static IP address, click the IP Details button to configure it. Uncheck the Dynamic IP box, and enter the static IP address in the Local IP Address box. Click OK to return to the previous screen. Click Next to complete the setup. You should now see your modem and provider listed in the appropriate windows. Should you have multiple ISPs, you must configure each separately. Click Add to start the wizard again.
When you click Finish, your new settings will be saved and you’ll be asked to set up your mail account. See Chapter 15, “Managing Email Servers,” for the details of this setup.
Test your new connection in KDE by running KInternet, or in GNOME by running GNOME PPP. It should use the new settings to dial up your ISP and get you going.
Tip
Another way to test your modem is through a terminal program such as minicom. This program is not installed by default, but if you are having problems connecting with your ISP, running minicom can help you troubleshoot problems with your modem.
Install minicom through YaST, and then run minicom from the shell with the -s argument to set your modem’s serial port:
minicom -s
Tell minicom which serial port your modem is using, and then return to the main screen. Now you can send AT commands (check your modem documentation for examples) and see how the modem responds.
SUSE Linux supports all flavors of DSL connections, and they can all be set up in the YaST DSL configuration dialog boxes. DSL service generally provides 128KBps to 1.0MBps transfer speeds, transmitting over copper phone lines from a Central Office (CO) to individual subscribers, like you. Many DSL services offer asymmetric speeds, usually offering higher download speeds than upload.
DSL connections require you to have an Ethernet network interface card (NIC) in your computer. If you have multiple computers on a LAN that want to share the connection, you’ll need to have at least one other NIC on the machine managing the connection.
Depending on your ISP, you may have a static IP address or use DHCP to assign a new IP address; it also uses a slightly different protocol called PPP Over Ethernet (PPPoE). This is difficult to configure manually through the shell, but YaST greatly simplifies this task.
Setting up a DSL connection in YaST is very similar to setting up a modem connection. Begin by opening YaST. In KDE, go to the Kicker menu and choose System, then YaST. You’ll be asked for the Root password and YaST will load. Click Network Devices. Click DSL to set up your connection.
The hardware devices involved in a DSL connection are a DSL modem and a network card (usually Ethernet). YaST handles configuring both of these in a DSL Devices page. When you open the DSL configuration page, YaST should have detected your devices during the install, but you can easily do this if it hasn’t. Click Add under the top screen to launch the DSL Device Wizard. The first screen should look like Figure 12.5.
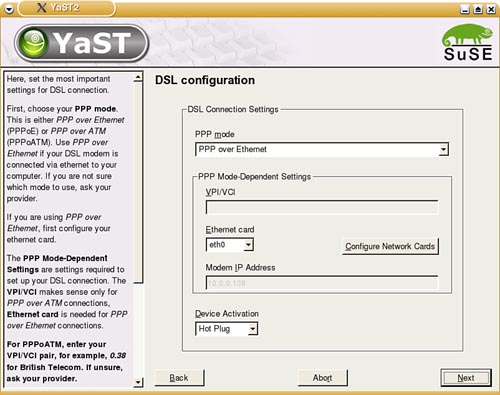
Figure 12.5. The first DSL configuration screen lets you identify the type of connection and the Ethernet card.
Note
To check or edit your existing DSL settings, select the device and click Edit. It will display the same options as the Add screen.
By default, YaST selects PPP Over Ethernet as the default PPP Mode. If your Ethernet card is not listed, you will need to set it up. Click Configure Network Cards to do so.
At first, you will see the overview screen. Figure 12.6 shows you this dialog box. If your card is not listed, click Add to open the configuration dialog box.
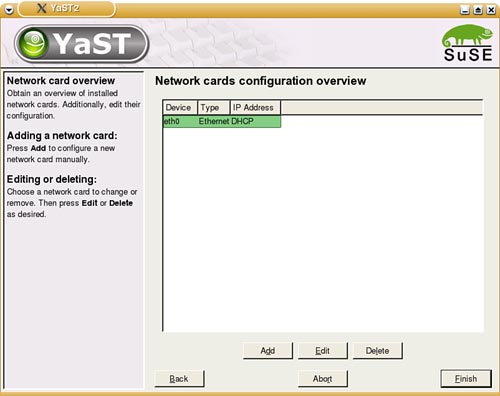
Figure 12.6. Use the Edit button on the Network Cards Configuration Overview page to change the existing settings for your DSL card, or use Add to define a new or undetected card.
The configuration dialog box (see Figure 12.7) sets up your DSL card. It should be labeled as either eth0 or eth1, depending on whether you have an Ethernet LAN card installed in addition to the DSL card.

Setting up for a static IP address is easy. Click the appropriate option button and enter your primary address and subnet mask. If your ISP uses DHCP to set addresses on bootup, you will need to configure other items on this screen.
Click DHCP Client Options and confirm that Host Name to Send is set to AUTO unless your ISP has specified a hostname. If your card is acting as a router, you may also want to look at the Routing page. You want to enable IP forwarding in this case.
Click Next to save your settings and return to the Network Card overview page, and click Finish to return to the DSL Setup page. When you’re finished setting up your hardware, click Next to set up your ISP.
YaST pulls up a much smaller list of DSL Providers in several countries that you may select from in a screen like the one shown in Figure 12.2. If your provider is not listed, click New to add it. Click Next to set your username and password.
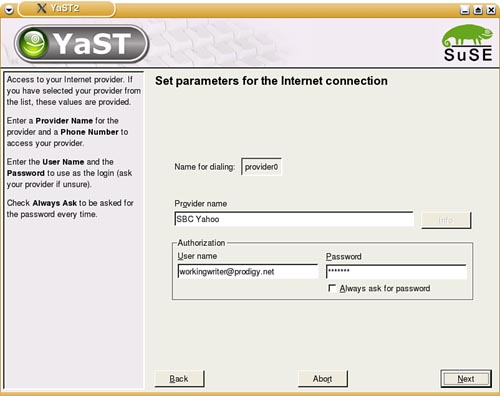
Figure 12.8 shows the ISP configuration screen. Enter your username and password. A DSL connection is always on, but when you reboot, the connection is dropped. If you want to enter your ISP password each time you connect, check the Always Ask for Password box. Click Next to configure your connection.
The final DSL provider configuration screen, which is identical to Figure 12.4, defines how you want to manage your connection. There is no real need to set up Dial on Demand, as you are always on. Similarly, you need not worry about the Idle Timeout setting. Do check the Activate Firewall box to prevent all incoming connections from attacking your computer.
If you have a static IP address, click the IP Details button to configure this. Uncheck the Dynamic IP box and enter the static IP address in the Local IP Address box. Click OK to return to the previous screen. Click Next to complete the setup.
When you click Finish, your new settings will be saved and you’ll be asked to set up your mail account. See Chapter 15 for the details of this setup.
So you’re traveling with your SUSE Linux laptop and want to connect to your hotel’s wireless network. This can be a problem, but the hurdles can be overcome.
You have basically three problems to deal with when trying to connect to a wireless network:
Making sure your card is supported, and the proper drivers and firmware are in place.
Locating the access point.
Configuring a profile.
This section will cover each of these issues.
The first issue can be the easiest to solve. Linux supports many different wireless cards, although not always with every feature that the card supports. Firmware (system code that communicates directly with the card) often must be downloaded separately from a Linux distribution. You can download firmware for ACX100, ACX111, and PrismQT cards directly through YaST Online Update, but these packages do not come with the distribution.
Most wireless card manufacturers still produce only Windows drivers, which can present a major headache for non-Windows users. Too often this requires manual setup and configuration of your network configuration file, ifcfg-eth2. This task, however, has been simplified. A second package, ndiswrapper, installable through YaST lets you use the Windows drivers directly in Linux.
To make this work, you need the *.inf driver file. If your laptop dual-boots, this file is likely in the WindowsSystem folder. It may also have come on a CD with the card, and is otherwise downloadable from the manufacturer’s website.
Note
Downloadable hardware drivers often appear as *.exe files. Usually this is just a self-extracting archive. To pull the INF file out of the archive, you may need to run the program in Wine, Crossover Office, or Windows itself before using ndiswrapper to use the driver in Linux.
Once you have the INF file, open a shell as the SuperUser, and navigate to the directory where the INF file is. Run this command to confirm that ndiswrapper can identify the driver:
ndiswrapper –l <driverfilename>.inf
You should see a message confirming that ndis installed, and the driver is present.
Now you need to make the kernel recognize the driver. This is done through modprobe.
modprobe ndiswrapper
The final step is to add these two commands to your rc.local configuration file. The kernel will now load the driver each time at boot.
Ideally with your drivers in place, you should now be able to scan the area for a nearby access point. If your wireless interface point is eth2, you can just type iwlist eth2 scan from the shell. You would then need to use iwconfig to configure your connection.
There is a KDE tool that can simplify this process, however. The Wireless Assistant will perform the scan and connect you. Download the Wireless Assistant SUSE Linux package from http://linux01.gwdg.de/~pbleser/rpm-navigation.php?cat=/Network/wlassistant and install it through YaST. You can also use apt if you have the suser-guru repository in your sources.list.
Launch Wireless Assistant from the KDE Kicker menu, or run it from the shell with wlassistant. The first time, it checks for your active network card. The card name should appear in the Device line at the top of the Wireless Assistant screen. It will then scan the area for access points, and display the results of the scan in the main window. Look carefully, as you will also learn the quality of the wireless signal with a star ranking. The WEP column indicates whether a connection supports the relatively secure Wireless Encryption Protocol. This requires a password, but is still a big improvement over allowing open access to whatever comes across the network transom (including any passwords you may send out while you’re surfing the Web).
Click the access point you want, and you will be prompted for the Root password on your system. Enter it, click OK, and you’re connected.
YaST can help you connect to your wireless network as well. If you know the network you want to connect to, using YaST will set things up for you. In YaST, go to Network Devices, then Wireless Network Card. Figure 12.9 will appear.

At the top of the screen is the network Operating Mode. Nearly all the time, you want to choose Managed mode, as this is a connection with a wireless access point. An ad-hoc network is a peer-to-peer setup with no access point, and Master mode sets up your machine as an access point.
The next line indicates the name of the network you want to connect to. In wireless networking, access points are identified with an Extended Service Set Identifier (ESSID). You should enter the name of your network here, otherwise the card will select the first access point it finds.
The last section deals with authenticating yourself to the network. There are three types of wireless networks, “open” networks that are open to anyone (and that means anyone) without authentication. Generally speaking, you want to leave these networks to the bad guys who will invariably find them. WEP, or “shared key” authentication, is the prevalent, if not superior, option with many wireless networks. When severe holes were found in WEP, a new secure protocol was developed for wireless networks, WiFI Protected Access (WPA). This protocol is still not widely used, but is supported by the Linux kernel and SUSE Linux.
Select the appropriate protocol from the Authentication Mode drop-down menu, then define your pass-key using the mode buttons and the Encryption Key edit box. Selecting a passphrase is the best way to proceed, if you want to have more control over your security. If you select Passphrase, enter a word or a character string from which a key is generated according to the length previously specified. ASCII requests an input of 5 characters for a 64-bit key and 13 characters for a 128-bit key. For Hexadecimal, enter 10 characters for a 64-bit key or 26 characters for a 128-bit key in hexadecimal notation.
Tip*
Tips on creating passwords and passphrases are located in Chapter 19, “Managing Users, Managing Security.”
You may keep up to four different keys to encrypt the transmitted data. Click Multiple Keys to enter the key configuration dialog. By default, this is set for 128-bit security, but you can lower the level to 64 bit here (not that you should).
In the list area at the bottom of the dialog, up to four different keys can be specified for your computer to use for the encryption. Press Set as Default to define one of them as the default key. Unless you change this, YaST uses the first entered key as the default key. If the standard key is deleted, one of the other keys must be marked manually as the default key.
You should now be successfully connected to your wireless network.
The lack of official Linux support by the big players in the Internet access business can be a problem, but it can be sidestepped. Many connection problems can be solved by carefully reviewing the documentation in the YaST windows. Others can be solved by the many HOWTO documents at the Linux Documentation Project site, including the ones listed in the Reference section that follows. As always, consult with your Linux User Group (see the “Getting Help: Documentation and Other Sources,” section in Chapter 1: “Welcome to SUSE Linux,”) to identify Linux-friendly ISPs in your neighborhood.
Dial-up connection problems are usually temporary or involve user error. So before you harass the tech support folks, make sure you haven’t fallen into one of these traps.
If you connect but can’t log in successfully, your password could be mistyped. Remember that passwords are case sensitive.
If the phone number and password are both right, but you still can’t log in, check the authentication protocol.
If nothing works, check the power cords. Is the modem plugged in and connected to the PC with the right jack in the right hole? Things do come loose.
If everything works properly under Windows on your dual-boot system, but nothing works in Linux, you probably have a Winmodem. Try the Linmodem drivers, or go out and buy a hardware modem.
This one’s good for both dial-up and DSL: If nothing works, and it worked a few minutes/hours ago, and there’s no smoke coming out of your machine, it could be a problem at the ISP. If it’s a big ISP, they’ll know about a glitch quickly. If they’re a mom-and-pop local operation, call to report if it just happened; otherwise, give them some time to fix it. Call if the problem persists for hours.
If you log in okay, but can’t browse the Web, it could be a DNS problem. Double-check your DHCP settings and then contact the ISP.
When you contact your ISP, and you know they don’t support Linux, try to explain the context of the problem outside of the operating system. It helps to know the Windows counterparts of the Linux (or YaST) dialog boxes you’re working with (the Internet Connection Wizard, Network Neighborhood, and the like).
http://www.tldp.org/HOWTO/HOWTO-INDEX/hardware.html#HWMODEMS—Linux Documentation Project modems HOWTOs. What you need to know, sometimes in excruciating detail, about ordinary modems, Winmodems, DSL modems, and cable modems. Some of it is outdated, but the revision dates are always posted here.
http://axion.physics.ubc.ca/ppp-linux.html—Trying to set up PPP manually? This is the place to go, as W. G. Unruh has worked hard to troubleshoot many PPP problems.
http://cdb.suse.de—The SUSE Hardware database. Check here to see if your modem is officially supported. If your DSL modem is not listed here, don’t assume that it won’t work. There are not many to choose from.
http://linmodems.org—A place to learn about software-driven “Winmodems” and attempts to support them in Linux.
http://start.at/modem—Winmodems Are Not Modems. A large list of modem models to check for Linux compatibility.
http://www.swcp.com/~jgentry/pers.html—The Linux Dialin Server Setup Guide. A step-by-step approach to setting up your dial-in server.