
This book has shown you how to customize and extend SharePoint using templates, Web Parts, and other techniques. If you wish to move your development efforts to another SharePoint farm, there is a mechanism provided, which enables a smooth transfer and installation—SharePoint solution packages.
In this chapter you'll learn about SharePoint solution packages and features, and how to create them. You will also see how Visual Studio 2010 supports developing for SharePoint 2010. After a deeper look at sandboxed solutions—a new feature of SharePoint 2010—you will learn how to deploy a solution package using stsadm and the new PowerShell cmdlets for SharePoint. If you have created your own solution packages for SharePoint 2007, the last section may be of relevance—it describes how to upgrade your existing solutions to SharePoint 2010, and how to integrate the new features of SharePoint 2010 in your solutions.
At a glance this chapter covers
SharePoint solution packages and features
An introduction to sandboxed solutions
How to create SharePoint solution packages and features
How to deploy SharePoint solutions using
stsadmand PowerShell cmdletsHow to upgrade existing solution packages to SharePoint 2010
SharePoint features enable you to deploy applications and functions to a SharePoint site. Features are typically deployed as part of a solution package.
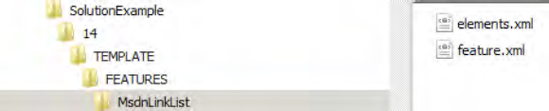
Features can contain templates, list definitions, event handlers, workflows, customizations, and other items. On the front-end web server, each feature is stored in its own subfolder within the folder %SharePointRoot%TEMPLATEFEATURES (see Figure 9-1).
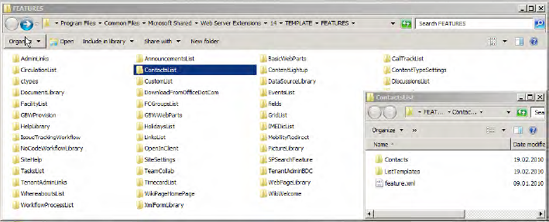
When you open a features folder (e.g., ContactsList) in Windows Explorer, you can explore the typical structure of a feature. In the root of a feature is a file named feature.xml, which defines the feature. Listing 9-1 shows a simple example of a feature.xml file.
Example 9.1. Example of a feature.xml File
<?xml version="1.0" encoding="utf-8" ?>
<Feature  xmlns="http://schemas.microsoft.com/sharepoint/"
                   Id="A7CEA23C-A1FD-4c1a-A62E-1F523FBE3D5A"
                   Scope="Web"
                   Title="Msdn Links List"
                   Description="Creates a List for MSDN links"
                   Version="1.0.0.0">
   <ElementManifests>
     <ElementManifest Location="elements.xml"/>
   </ElementManifests>
</Feature>
Table 9-1 describes the elements in this file.
Table 9.1. Elements and Attributes of the feature.xml File
Description | |
|---|---|
| The root node |
| The namespace of the XML |
| The GUID that identifies the feature in SharePoint |
| The scope of the feature (see Table 9-2) |
| The title of the feature shown in the feature list |
| Explains what the feature does |
| The version of the feature |
| Node for the referenced |
| References an |
| Defines where the referenced |
Features can provide their functions to different scopes, as listed in Table 9-2.
Table 9.2. Scopes of a Feature
Scope | Description |
|---|---|
| The feature will be available in the entire server farm. |
| The feature will be available for all web sites in a web application. |
| The feature will be available for all web sites in a site collection. |
| The feature will be available on a single web site. |
In the feature.xml, another file is referenced in the ElementManifest node: elements.xml.
Listing 9-2 shows an example of an elements.xml file.
Example 9.2. Example of an elements.xml File
<?xml version="1.0" encoding="utf-8" ?>
<Elements xmlns="http://schemas.microsoft.com/sharepoint/">
<ListInstance
                                Url="Lists/MsdnLinks"
                                Title="MsdnLinks"
TemplateType="103"
FeatureId="00BFEA71-2062-426C-90BF-714C59600103"
OnQuickLaunch="TRUE"/>
</Elements>This elements.xml defines a ListInstance for links. When you activate the feature, a new list will be created, as defined in the elements.xml. Table 9-3 explains the nodes and attributes in the example elements.xml:
Table 9.3. Elements and Attributes of the Example elements.xml File
Element or Attribute | Description |
|---|---|
| The file's root node |
| The namespace of the XML |
| A SharePoint item to be deployed through the feature |
| The URL relative to the URL of the site collection |
| The title displayed in the UI |
| The type of |
| The GUID that identifies the feature containing the template |
| Element that, if set to |
The elements.xml file in the example contains the element ListInstance, which creates a new list when you activate the feature. There are many other feature element types you can use. Table 9-4 summarizes the options.
Table 9.4. Feature Element Types
Type | Description |
|---|---|
| Specifies a list definition that is available as an option for creating lists |
| Creates a list instance using a list template |
| Defines the properties of a site column |
| Defines a content type |
| Specifies files with which to provision SharePoint web sites within an element manifest |
Defines an extension to the UI, such as a button on a ribbon or a link on a site settings page | |
| Contains the core definition for a grouping of custom actions |
| Describes an event receiver for handling list item events |
| Defines a workflow |
The section "How To: Creating a Solution Package Step by Step" examines in detail the individual steps required to create a feature. In addition, Chapter 7 includes several examples using the different element types.
If you create customizations and extensions for SharePoint, there are many items that need to be deployed: assemblies, resource files, features, images, application pages, site definitions, and so on. Imagine a scenario with three systems: development, staging, and production. There needs to be an easy way to deploy these files to the different systems.
SharePoint 2007 introduced solution packages, a powerful deployment tool. Using solution packages enables a developer or SharePoint administrator to transport and install extensions and customizations to other SharePoint servers. Solution packages can be deployed using the command-line tool stsadm or PowerShell cmdlets (see Figure 9-2).
A solution package is stored as a cabinet (CAB) file, with the file extension .wsp. This file contains all the files to be deployed. If you rename the file extension to .cab, you can open the solution and explore its content. Figure 9-3 shows the files and folders of an example WSP solution file.
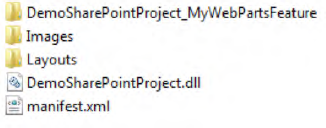
In general, a solution package has the following structure, as illustrated in Figure 9-4:
A manifest file is in the root, where normally a .NET assembly is located too.
Subdirectories contain features, deployment files, definitions, and configurations.
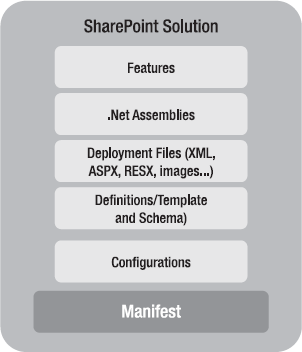
The structure inside the WSP file defines the final structure in the file system of your SharePoint solution. The manifest file defines the inner structure of the solution. The manifest file is a XML file named manifest.xml. See Listing 9-3 for an example.
Example 9.3. Example of a manifest.xml file
<?xml version="1.0" encoding="utf-8"?>
<Solution
xmlns="http://schemas.microsoft.com/sharepoint/"
SolutionId="c6bee3ac-bc38-48f3-9adf-7a5c8b97eaa7">
  <Assemblies>
    <Assembly
Location="SharePointProject15.dll" DeploymentTarget="GlobalAssemblyCache">
      <SafeControls>
        <SafeControl Assembly="SharePointProject15, Version=1.0.0.0,
Culture=neutral, PublicKeyToken=ce72b677bc54dfc7" Namespace="SharePointProject15.VisualWebPart2" TypeName="*" />
      </SafeControls>
    </Assembly>
  </Assemblies>
  <TemplateFiles>
    <TemplateFile Location="CONTROLTEMPLATESSharePointProject15VisualWebPart2

VisualWebPart2UserControl.ascx" />
  </TemplateFiles>
  <FeatureManifests>
    <FeatureManifest Location="SharePointProject15_WebPartsFeature.xml" />
     </FeatureManifests>
</Solution>
Table 9-5 describes each node of the manifest.xml file shown in Listing 9-3.
Table 9.5. Elements and Attributes of the Example manifest.xml File
Element or Attribute | Description |
|---|---|
| Specifies the top-level element for a solution manifest file |
| Specifies the XML namespace |
| Specifies the GUID of the solution identifying the package in SharePoint |
| Specifies the assemblies to include in the solution |
| Specifies an assembly to include in the solution |
| Specifies the safe controls of an assembly that are included in a solution |
| Adds or removes a control assembly from the safe controls list for a solution |
| Specifies the template files to include in the solution |
| Specifies a template file to include in the solution |
| Specifies the features to include in the solution |
| Specifies a feature to include in the solution |
Because a solution package is stored as a cabinet file, you can use the utility makecab.exe to create such a cab (WSP) file. A data definition file (DDF) contains the instructions required by makecab to create the WSP file. This includes
The name of the WSP file
The location of the source files
The location of the new WSP file
All files that are in the solution package
Listing 9-4 gives an example of a DDF. The comments in the listing explain the usage of the commands.
Example 9.4. An Example DDF
.OPTION EXPLICIT                                    ; Generate errors on variable typos
;
.Set CabinetNameTemplate=MsdnLinkList.wsp ; The name of the WSP file
.set DiskDirectoryTemplate=CDROM                   ; All cabinets go in a single directory
.Set CompressionType=MSZIP                              ;
.Set Cabinet=on                                         ;
.Set Compress=on                                                   ;
.Set DiskDirectory1=.                                ; Use the specified directory for output
;
;*** Disable size limits for wsp (cab) files ;
;
.Set CabinetFileCountThreshold=0
.Set FolderFileCountThreshold=0
.Set FolderSizeThreshold=0
.Set MaxCabinetSize=0
.Set MaxDiskFileCount=0
.Set MaxDiskSize=0
;
;*** Files to zip                                              ;
;
"D:SolutionExample14TEMPLATEFEATURESMsdnLinkListelements.xml" "MsdnLinkListelements.xml"
"D:SolutionExample14TEMPLATEFEATURESMsdnLinkListfeature.xml" "MsdnLinkListfeature.xml"
"D:SolutionExamplemanifest.xml" "manifest.xml"
Solution packages can deploy the following items:
Site definitions
Feature definitions and their corresponding element definitions and files
Web Part files
Template files and root files
Resource files
Assemblies
Code access security policies
Farm administrators deploy solution packages to a web server. These solutions have full access to the server object model, and there are no usage limits. SharePoint 2010 introduces an additional type of solution package called sandboxed solution. A sandboxed solution can be deployed by a site collection admin to a site Solution Gallery. These solutions have limited access to the server object model—they can be validated and monitored.
Before SharePoint 2010, the farm administrator had to trust custom code running on the server. That meant having to perform lengthy tests and code reviews before custom code was allowed to run on the server, which cost a lot of time and money.
With SharePoint 2010, Microsoft introduced the concept of sandboxing user code, which allows for isolation and resource limitations regarding memory, CPU, database query count, and time. This means that users can add and consume custom solutions safely without impacting overall farm performance and stability. This new solution type addresses key scenarios that include the ability to use custom Web Parts and event receivers.
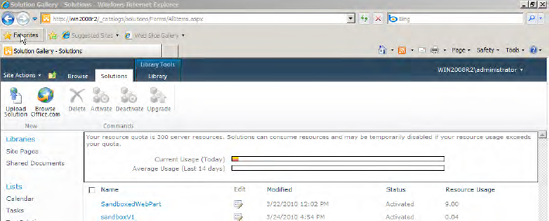
Sandboxed solutions run with lower trust for hosted environments, for testing foreign solutions, and for secured production servers. A sandboxed solution cannot access the full SharePoint object model; it is limited to a subset of the Microsoft.SharePoint namespace. Sandboxed solutions run in a safe and monitored process with restricted access to resources. A SharePoint admin is enabled to monitor and validate these solutions. Sandboxed solutions address hosted SharePoint solutions, such as SharePoint Online, which is hosted in the cloud. They enable you to extend a hosted SharePoint solution with your own secure code. A SharePoint installation contains a Solution Gallery, which stores sandboxed solutions for further installation and activation. To peruse this gallery, click Site Settings on the Site Actions menu. On the settings page, click Solutions under the Galleries section (see Figure 9-5).
You are restricted with regard to the SharePoint items you can deploy with a sandboxed solution and the code you can write in it.
Using a sandboxed solution you can deploy the following SharePoint items:
In general, with a sandboxed solution you can't deploy files to disk. This means you can't deploy the following SharePoint items:
Visual Web Parts (they contain web controls that have to be deployed to disk)
Business data connectivity models
Application pages
User controls
Files included in mapped folders, such as
IMAGESorLAYOUTS
You can do the following things with your code in a sandboxed solution:
Read and write to lists and libraries within the same site collection
Access a large subset of the
Microsoft.SharePointnamespace. All the classes belowSPSiteare available:SPSite,SPWeb,SPList, andSPListItem.Run client-side code (i.e., Silverlight and JavaScript—including usage of jQuery library)
Some aspects of custom code are not allowed in the sandbox:
Call web services in an intranet or over the Internet
Access data outside the site collection where the solution has been deployed
Read and write files with your code
Run code that is not marked to allow partially trusted callers (code with restricted rights may call full-trust code if it is marked with the appropriate attribute)
Use objects above
SPSite(e.g.,SPFarm)Use security-related functions (
RunWithElevatedPreviledgesand otherSPSecuritymethods)
Tip
For a complete reference to the sandboxed API, see www.microsoft.com/downloads/ details.aspx?FamilyID=f0c9daf3-4c54-45ed-9bde-7b4d83a8f26f&displaylang=en.
The structure of a sandboxed solution is very similar to a farm solution. The main differences lie in the way the solution is deployed.
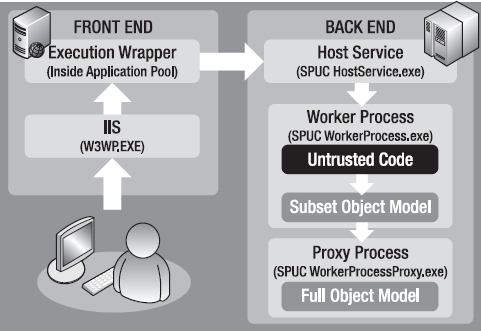
A sandboxed solution can run with full trust when it is deployed as full trust, or with partial trust when the solution is deployed at the site collection scope. Depending on how the solution is deployed, it can be hosted by different services. The Microsoft SharePoint Foundation Sandboxed code execution host service (SPUserCodeV4) executes the user code (code in your sandboxed solution) in the sandbox. This service consists of the following three processes:
The user code service (SPUCHostService.exe) decides whether you can run sandboxed solutions on the server on which this service is running. Your sandboxed solution code runs in the sandboxed worker process (SPUCWorkerProcess.exe). This is in contrast to having the code of a full-trust solution run inside of w3wp.exe. SPUCWorkerProcessProxy exposes a subset of the SharePoint API. If a method is not exposed, you cannot use it in the sandboxed solutions.
The life cycle of a sandboxed solution consists of the following stages: upload, activation, deactivation, and deletion (as shown in Figure 9-7), as well as an optional stage, upgrade.
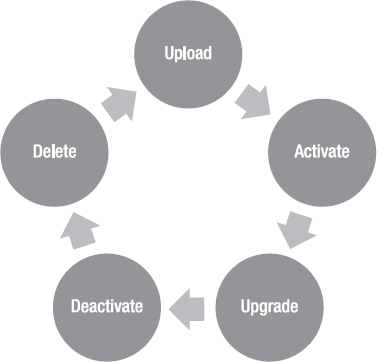
Table 9-6 describes each stage:
Table 9.6. Stages in the Life Cycle of a Sandboxed Solution
Stage | Description |
|---|---|
Upload | |
Activate | Validates the selected solution is validated. If this is successful, the solution is activated to run the code it contains and make its features available for activation. Features with a scope of |
Deactivate | Disables the code of the solution and ensures that the contained features are no longer available. |
Delete | Removes the solution from the Solution Gallery. |
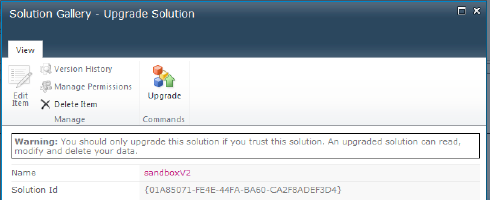
Upgrade | Uses the selected solution to upgrade a previously installed version of the solution that is still active. |
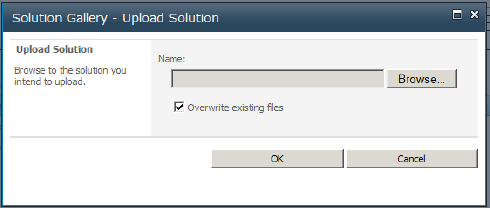
To manage sandboxed solutions in your site collection, open the Solution Gallery by clicking Site Settings from the Site Actions menu. Then, on the settings page, click Solutions in the Galleries section, and the Solution Gallery will appear (see Figure 9-5, shown previously). In the Solution Gallery, you can upload, activate, upgrade, deactivate, and delete your solutions.
To upload a WSP file, select the Solution tab and click the Upload button. Choose the location of your file and upload it, as shown in Figure 9-8. The next step is to activate the solution, at which point your solution is validated through the solution validators. Once it is validated, the solution will be activated to run the code that it contains, and the site-scoped features will be activated automatically. (You need to activate web-scoped features on each web site separately.)
When you create a new version of an active solution running in your site collection, you can easily upgrade the previous version to the newer one.
For a successful upgrade, two things are important:
Both the old and new versions must contain the same solution ID
The solution files must have different names, such as
solution-v1.wspandsolution-v2.wsp.
If version 1 is active and you upload version 2, SharePoint will recognize the new version of the solution (because both solutions have the same ID, but different hash codes) and ask if you want to upgrade. Alternatively, you can just upload version 2 and choose Upgrade at a later date. Interesting, you can also switch back to version 1 after version 2 has been installed, meaning that you can perform a downgrade as well. When you upgrade a solution, it is validated through the solution validators, too.
Note
You can also use PowerShell to manage sandboxed solutions via command-line scripts. For instance, the Add-SPUserSolution cmdlet uploads a new user solution package to the Solution Gallery:
Add-SPUserSolution -LiteralPath C:MySandboxedSolution.wsp -Site http://DemoSite
Unfortunately, stsadm does not support the new sandboxed solutions feature.
A SharePoint administrator can measure the performance of a sandboxed solution. SharePoint administrators can assign resources with the UI in Central Administration.
You can access the quotas from the Application Management page. In the site collection section, click Configure Quotas and Locks (see Figure 9-10). First, select the site collection you wish to edit. In the site quota section, you can set the user resource quota properties.
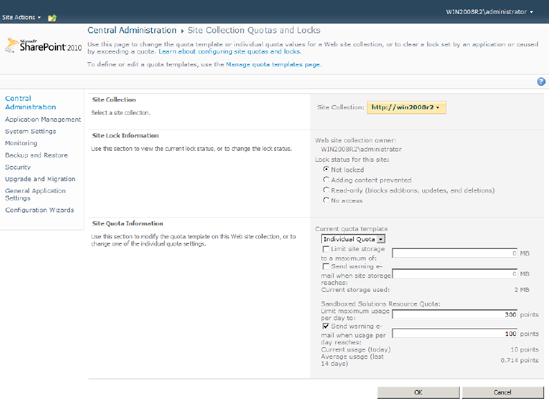
You can limit the site storage and enable a daily resource use limit in points. Points are calculated based on a number of performance indicators such as CPU execution time, memory usage, database query time, abnormal termination, critical exceptions, unhandled exceptions, and data marshalling size. For a detailed view of the performance indicators, enter the command [Microsoft.SharePoint.Administration.SPUserCodeService]::Local.ResourceMeasures at the SharePoint management shell. Alternatively, you can use PowerShell, if you load the SharePoint snap-in (Add-PSSnapin Microsoft.SharePoint.PowerShell) before entering your command (see Figure 9-11).
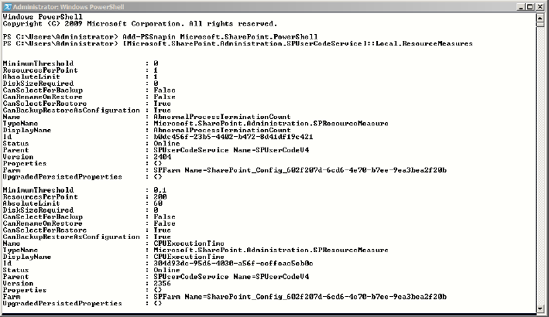
This will show the details on each indicator. Table 9-7 lists these performance indicators.
Table 9.7. Performance Indicators
Indicator | Resources per Point | Description |
|---|---|---|
| 1 | Number of abnormally terminated sandboxed solution processes |
| 3600 | Amount of time the CPU spends executing instructions |
| 3600 | Number of fatal errors |
| 100 | Number of solution invocation events |
85 | Percent of CPU usage by solution | |
| 100000000000 | Number of solution CPU cycles |
| 10000 | Number of Windows handles |
| 10000000 | Memory consumed for input/output (I/O) |
| 10000 | Thread count in the overall processes |
| 100000000 | Memory consumed |
| 20 | Number of SharePoint database queries |
| 120 | Elapsed time to execute query |
| 50 | Number of unhandled exceptions |
| 2 | Number of unresponsive processes |
If a sandboxed solution hits the defined resource limits, it is shut down.
If a special solution uses too many resources or causes too many errors, the SharePoint farm administrator may want to block the solution. In order to block it, go to Central Administration
The monitoring and blocking of a solution is used for already deployed solutions. Another line of defense is the validation of sandboxed solutions before execution.
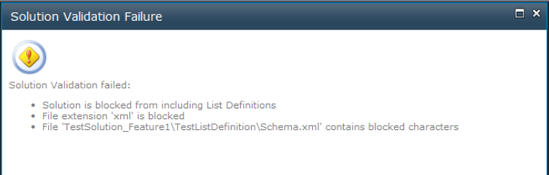
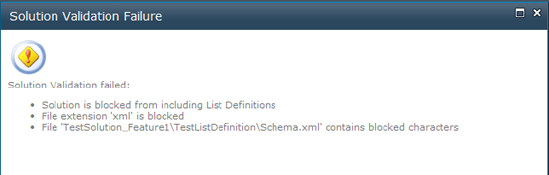
Farm administrators can deploy solution validators to their farm. These validators always run when a sandboxed solution is activated or upgraded. When a solution fails validation, an error message is shown to the user and the solution is not activated (see Figure 9-12). If a validator is added after solution has been activated, the solution validator will be called the next time the solution is executed. For more information on how to develop and deploy your own validators, see the section "How-to for creating a Sandboxed Solution".
The sandbox provides sufficient functionality for most applications required at a site collection level. But what if you need to perform a function that exceeds the security restrictions of a sandbox? If you want your application to reach outside the sandbox for such operations as web service calls and database access, you have the option of creating a full-trust proxy.
A full-trust proxy enables you to extend the boundaries of a sandboxed solution when necessary. It is a special class library that's deployed to the GAC and runs under full trust.
Since the assembly runs under full trust, you can create a proxy operation that calls a web service or has access to other data sources that are not accessible for a sandboxed solution. Your proxy exposes a method that can be called by the sandboxed user code to perform a specific task, such as reading data from data sources outside the site collection of your sandboxed solution.
The purpose of a full-trust proxy is to break your architecture down into two major pieces:
One part that runs completely as a sandboxed solution (limited by the sandbox to the usual list definitions, fields, content types, Web Parts, and so forth).
A custom API you build using full-trust proxies that the sandbox solutions can use (providing access to web services and other data, and permitted to use the full SharePoint API).
Figure 9-13 illustrates this architecture.

Using Full-trust proxies, you weaken slightly the security of sandboxed solutions, but you still have much more control over the called code than you do with normal full-trust solutions.
Warning
The proxy has to be registered by a farm administrator and is accessible to the whole farm, which means that all developers who know about the assembly, class, and method can use the method. You need to be cognizant of this when considering the methods to expose in the proxy. Try to keep them to a minimum.
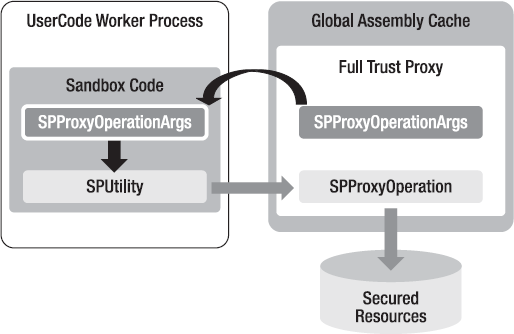
You can write your own full-trust proxies by creating one or two class libraries containing the following classes:
A class that inherits from
Microsoft.SharePoint.UserCode.SPProxyOperation: This class will be used to execute operations that are normally disqualified for sandboxed solutions.A second class that inherits from
Microsoft.SharePoint.UserCode.SPProxyOperationsArgs: This class will be passed to theExecutemethod of theSPProxyOperationclass.
Both classes have to be deployed to the GAC and registered in SharePoint.
Then you can call the class that inherits from SPProxyOperation from your sandboxed code.
Figure 9-14 illustrates this approach.
Tip
Create your full-trust proxies as farm solutions, which are registered using feature activation and unregistered using deactivation of the feature. Then the farm administrators can enable and disable them.
Later, in the section "Creating a Sandboxed Solution using Visual Studio 2010," you will learn how to construct such a full-trust proxy.
Windows PowerShell is the command-line interface and scripting language that was developed specifically for system administration and is used for SharePoint 2010 administration (see Figure 9-15).
With Windows PowerShell, administrators have a powerful tool for scripting and shell administration. PowerShell follows a completely new paradigm as compared to other shells like bash or cmd.exe. While those shells accept and return text, Windows PowerShell uses .NET objects as input and output, since it is based on an object model supported by the .NET Common Language Runtime (CLR). This is an immense change that offers more control, efficiency, and productivity to developers and administrators.
Windows PowerShell introduces the concept of cmdlets (aka commandlets). A cmdlet is a simple command-line tool that is integrated into the shell and executes a single function. You can use a single cmdlet, but their power is more obvious when used together to perform complex tasks or automated administration.
PowerShell comes with a large collection of built-in cmdlets. A cmdlet is a simple command used for interaction with a managed application (including the operating system). PowerShell runs cmdlets as instances of .NET classes focused on the simple cmdlet model. Cmdlets return objects instead of text. The output can be forwarded (piped) to other cmdlets. This way you can combine cmdlets. You provide the parameters, validate the values, and set details for objects and layout; and PowerShell does the remaining work—parsing parameters, binding values, and formatting and displaying the output. You can create your own cmdlets and share them with others as needed.
Tip
For more information about developing custom cmdlets, visit http://msdn.microsoft.com/en-us/magazine/cc163293.aspx.
Windows PowerShell supports a completely interactive environment, similar to other shells. If you enter a command at the input prompt, the command will be processed and the output displayed in the shell window. You can send the output from a command to a file or printer, or you can use a pipe operator (|) to send it to another command. For example, you can use the command Get-Command -Noun SP* to get all commands containing a noun starting with SP. Then you can use the pipe operator to send it to the cmdlet measure-object to count the number of search results.
A new language, the PowerShell scripting language, has been introduced for PowerShell for the following reasons:
Windows PowerShell needed a language to manage .NET objects
The language had to support complex tasks
The language had to meet the conventions for other languages used in .NET programming, such as C#
If you repeat the same commands frequently, it is useful to save the commands in a file and execute the file. Such a file is called a script.
Windows PowerShell offers complete script support. You can run a script by entering the name of the script at the prompt. The file extension for PowerShell scripts is .ps1.
Although scripts are very useful, they can also be used to spread harmful code. Execution policies in PowerShell specify which scripts may be run and whether they must be digitally signed. For security reasons, PowerShell does not allow you to execute a script by double-clicking the file, as you can with .bat or .vbs files.
For scripting purposes, PowerShell 2.0 comes with the PowerShell Integrated Scripting Environment (ISE). This application enables you to run commands, and write, test, and debug scripts in a user-friendly environment. ISE is a WPF application and requires .NET 3.5.
ISE offers the following:
A command pane for running interactive commands, just as in the Windows PowerShell console. Simply type a command and press Enter, and the output will appear in a separate output pane.
A script pane to compose, edit, debug, and run functions and scripts.
Multiple tabs, each with its own command and script pane to allow you to work on several tasks independently.
The ability to edit text in complex scripts.
The ability to extend every aspect of ISE through its underlying scripting object model with your own code.
Separate profiles. You can create a PowerShell profile and add aliases, functions, and variables to it. Every time PowerShell starts, these settings are loaded.
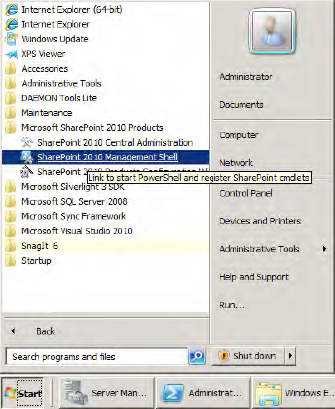
To start administering SharePoint 2010 with PowerShell, launch the SharePoint 2010 management shell (see Figure 9-17) from the Start menu, under All Programs
The management shell is actually just a PowerShell console that preloads the SharePoint PowerShell snap-in. When you look at the target for the shortcut, you should see the following:
C:WindowsSystem32WindowsPowerShellv1.0PowerShell.exe -NoExit  "
& ' C:Program FilesCommon FilesMicrosoft SharedWeb Server
Extensions14CONFIGPOWERSHELLRegistration\sharepoint.ps1 ' "
A peek inside the SharePoint.ps1 file (see Figure 9-18) reveals the secret:
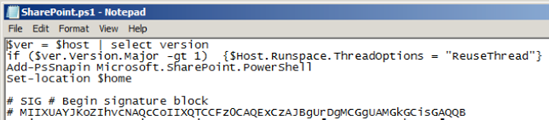
The SharePoint.ps1 script runs the Add-PsSnapin cmdlet to load the new SharePoint 2010 cmdlets, as shown in Figure 9-19. It also changes the threading model of PowerShell so that commands are processed in the same thread. This is important for the disposal of disposable objects, which is important when you are working with SharePoint objects such as SPWeb. Knowing the sharePoint.ps1 script and its contents, you can easily load any PowerShell console (i.e., either the native PowerShell console or another editor such as the PowerShell ISE) and administer SharePoint 2010. To do so, run the sharepoint.ps1 script or enter the following commands:
$ver = $host | select version
if ($ver.Version.Major -gt 1)  {$Host.Runspace.ThreadOptions = "ReuseThread"}
Add-PsSnapin Microsoft.SharePoint.PowerShell
Set-location $homeSharePoint ships with hundreds of SharePoint PowerShell commands out of the box. To compile a list of these cmdlets, enter the following at the shell:
Get-Command -PSSnapin Microsoft.SharePoint.PowerShell | select Name
This command returns the names of all the installed SharePoint PowerShell cmdlets. As usual, the naming convention for the commands is: [Verb]-SP[Noun]. To obtain the exact number of cmdlets, use the following command:
Get-Command -PSSnapin Microsoft.SharePoint.PowerShell | measure-object

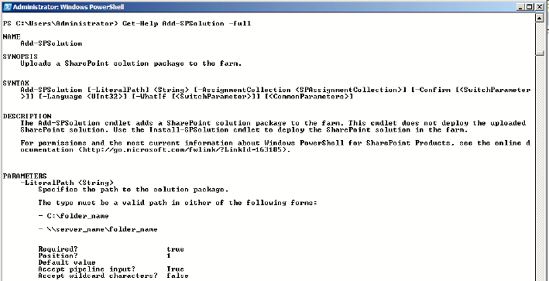
If you want to get more information about a cmdlet, you can use the built-in help:
Get-Help <cmdlet>
To get more information, add the parameters –full or –detailed (see Figure 9-20).
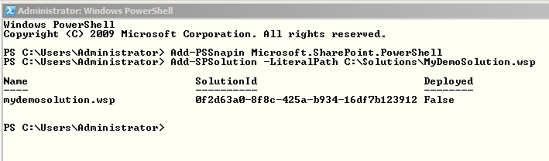
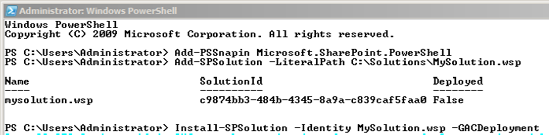
To deploy a farm solution, you first need to upload the solution to the farm. This is accomplished with the Add-SPSolution cmdlet:
Add-SPSolution -LiteralPath C:MySolution.wsp
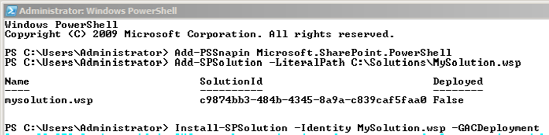
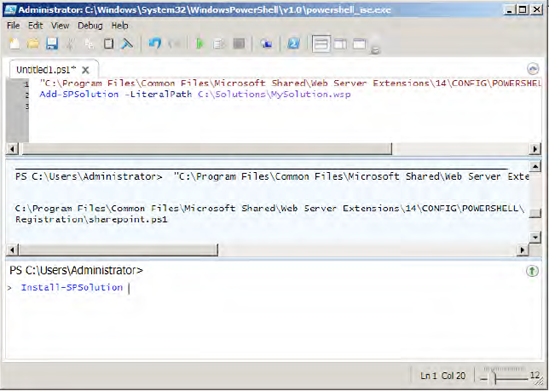
Now the solution package is in the solution store of the farm, but it is not yet deployed. To deploy it, execute the command as shown in Figure 9-21:
Install-SPSolution -Identity MySolution.wsp -GACDeployment
Eventually it will become necessary to remove the solution from the farm. To achieve this, you will have to first have to uninstall the solution:
Uninstall-SPSolution -Identity SolutionName
Then you can remove the solution:
Remove-SPSolution -Identity SolutionName
This deletes the solution package from the solution store.
As an alternative to using stsadm, you can use SharePoint PowerShell cmdlets for sandboxed solution deployment.
You can use the Add-SPUserSolution cmdlet to upload a new user solution package to the Solution Gallery as follows:
Add-SPUserSolution -LiteralPath C:MySandboxedSolution.wsp -Site http://DemoSite
However, this cmdlet does not activate the uploaded user solution. Use the Install-SPUserSolution cmdlet to activate the user solution in the site collection, like this:
Install-SPUserSolution -Identity MySandboxedSolution -Site http://DemoSite
The Install-SPUserSolution cmdlet activates a user solution in a site collection.
If you have to remove a solution from the Solution Gallery, the user solution must be inactive. To handle this, you can use the Uninstall-SPUserSolution cmdlet, which deactivates a user solution on a site collection. It also removes the included features from the site collection features.
You can use the Remove-SPUserSolution cmdlet to remove a user solution from the Solution Gallery as follows:
Remove-SPUserSolution -Identity MySandboxedSolution.wsp -Site sitename
After creating a WSP solution package file, you can deploy it onto a SharePoint server. One option for this task is the command-line tool stsadm.
By default you can find the SharePoint admin tool stsadm.exe in the folder %SharePointRoot%Bin. stsadm enables a SharePoint administrator to manage administrative tasks for SharePoint via the command line and write batch files and scripts for these tasks. stsadm offers access to operations and parameters that are not accessible via Central Administration. Important examples of this are the following operations:
There are two major requirements for running stsadm:
You must run
stsadmon the server you are managing.You have to be a member of the local group Administrators.
Note
If you are already familiar with stsadm and like it, you can continue using it for SharePoint 2010. But note that since Microsoft's introduction of the new PowerShell cmdlets for SharePoint administration, stsadm exists only for backward compatibility.
To deploy a solution package, you need to add the WSP file to the configuration database. You can do this with the stsadm operation addsolution:
stsadm -o addsolution -filename C:MySolution.wsp
This command adds the solution to the configuration database, but does not deploy it. To deploy the solution package, you have to execute the deploysolution command:
stsadm -o deploysolution -name MySolution.wsp -immediate -allowGacDeployment -force
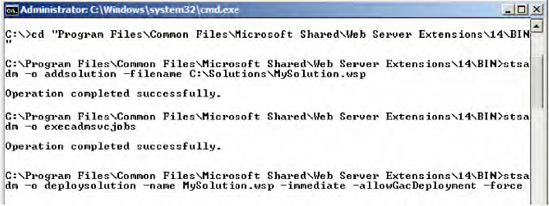
When you issue deployment commands to stsadm, these commands are executed asynchronously via a timer job. This way, solution packages can be deployed to several servers in a farm. After the deployment of a solution, SharePoint forces a reset of IIS. Because this causes problems when the server is used, you can set a parameter to schedule the deployment for a period when demand is low (such as nighttime). If you create a deployment script, you may prefer to run the tasks synchronously, such as addsolution and deploysolution. To do this, you can use the command execadmsvcjobs. This command executes all commands immediately instead of waiting for execution by the timer job, as shown in Listing 9-5 and Figure 9-22.
Example 9.5. Adding and Deploying a Solution
SET STSADM="C:Program FilesCommon FilesMicrosoft Sharedweb server extensions14BINstsadm.exe"
%STSADM% -o addsolution -filename c: MySolution.wsp
%STSADM% -o execadmscvjobs
%STSADM% -o deploysolution -name MySolution.wsp -immediate -allowGacDeployment -force
%STSADM% -o execadmscvjobs
Particularly during development, but also for normal deployments, it can become necessary to remove a deployed solution. You can achieve this with the stsadm operations retractsolution and deletesolution, as shown in Listing 9-6.
When deploying the solution package the included features are installed, too. However, you have to activate the features in a separate step. To do this, execute the activatefeature operation of stsadm, as follows:
stsadm -o activatefeature
You can also install a feature without activating it, as follows:
stsadm -o installfeature
Tip
See http://technet.microsoft.com/en-us/library/cc263384.aspx for a complete reference for stsadm operations and properties.
The following example shows the steps needed to build a solution package. This example creates a simple solution package for deploying a feature that creates a list called MsdnLinks, which contains interesting MSDN links.
Note
Visual Studio is not used for this example. Since Visual Studio generates many XML files in the background, it can be difficult to understand in detail how it actually creates a solution package. Instead, in this example, every step is performed manually so that you can better understand what happens. This example is designed to show you the individual steps required to assemble a solution package.

Begin by constructing a folder structure in a working folder, as shown in Figure 9-24. This structure should be similar to the structure of the SharePoint folders in %SharePoint Root%.
The list for the MSDN links will be created when you activate the MsdnLinks list. To do this, you must first build a feature that creates a list based on the SharePoint list type linksList (TemplateType="103").
Go to the MsdnLinksList folder and create two XML files: feature.xml and element.xml. feature.xml is the main file (see Listing 9-7). The attribute ID contains a unique GUID, which identifies the feature in the farm. The Scope attribute specifies the level at which you can activate and use the feature. In this case it is Web, for deployment on a single web site. feature.xml references the element manifest file (see Listing 9-8) containing the real function of the feature.
Example 9.7. feature.xml
<?xml version="1.0" encoding="utf-8" ?>
<Feature
                xmlns="http://schemas.microsoft.com/sharepoint/"
                Id="A7CEA23C-A1FD-4c1a-A62E-1F523FBE3D5A"
                Scope="Web"
                Title="Msdn Links List"
                Description="Creates a List for MSDN links"
                Version="1.0.0.0">
                <ElementManifests>
                                <ElementManifest Location="elements.xml"/>
                </ElementManifests>
</Feature>
Tip
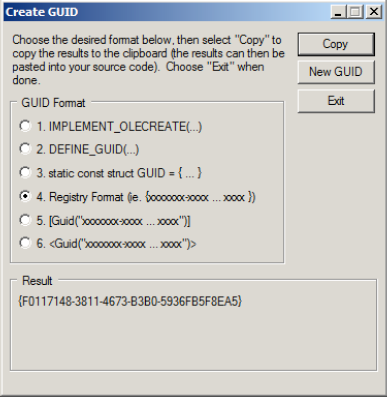
SharePoint uses GUIDs to identify features, solutions, and so forth. To this end, the GUID generator tool in the Windows SDK is very useful for creating valid GUIDs (see Figure 9-25). Always click New GUID to be sure the GUID is really unique.
In our example, the element manifest forces SharePoint to create a new link list called MsdnLinks. The attributes TemplateType and FeatureID point to the link list that is the template for the list. Setting the attribute OnQuickLaunch to true makes the list visible in the Quick Launch menu of your web site.
After you've built the feature, you can create the manifest.xml file in the SolutionExample folder. The manifest.xml file (see Listing 9-9) is an installation instruction for SharePoint. It informs SharePoint how to use and where to install the files contained in the solution package. The ID of the solution identifies your solution package as unique in SharePoint.
In this example, the feature manifest references the feature.xml file to deploy the new feature.
Example 9.9. manifest.xml
<?xml version="1.0" encoding="utf-8"?>
<Solution
xmlns:xsi="http://www.w3.org/2001/XMLSchema-instance"
xmlns:xsd="http://www.w3.org/2001/XMLSchema"
xmlns="http://schemas.microsoft.com/sharepoint/"
SolutionId="05FB6131-4714-403b-B3AA-C73C5C535AC3">
  <FeatureManifests>
    <FeatureManifest Location="MsdnLinkListfeature.xml" />
  </FeatureManifests>
</Solution>The next step is to write the SolutionExample.ddf file (see Listing 9-10) in the SolutionExample folder. This file contains all the instructions for makecab.exe to create your WSP file.
Example 9.10. The DDF
.OPTION EXPLICIT                                     ; Generate errors on variable typos
;
.Set CabinetNameTemplate=MsdnLinkList.wsp  ; The name of the WSP file
.set DiskDirectoryTemplate=CDROM                    ; All cabinets go in a single directory
.Set CompressionType=MSZIP                               ;
.Set Cabinet=on                            ;
.Set Compress=on                                                    ;
.Set DiskDirectory1=.                                 ; Use the specified directory for output
;
;*** Disable size limits for wsp (cab) files ;
;
.Set CabinetFileCountThreshold=0
.Set FolderFileCountThreshold=0
.Set FolderSizeThreshold=0
.Set MaxCabinetSize=0
.Set MaxDiskFileCount=0
.Set MaxDiskSize=0
;
;*** Files to zip                                              ;
;
"D:SolutionExample14TEMPLATEFEATURESMsdnLinkListelements.xml" "MsdnLinkListelements.xml"
"D:SolutionExample14TEMPLATEFEATURESMsdnLinkListfeature.xml" "MsdnLinkListfeature.xml"
"D:SolutionExamplemanifest.xml" "manifest.xml"
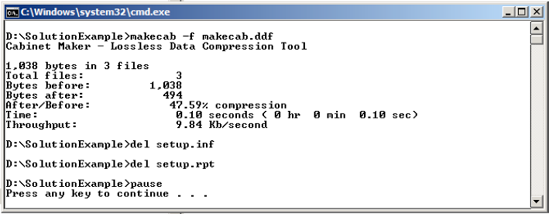
Now you have created all the files to build the solution package. To create the CAB-based solution package, run the command-line tool makecab.exe.
The DDF is needed for the creation of the WSP file using makecab.
At the command line, enter the following command to create the WSP:
makecab -f SolutionExample.ddf
MakeCAB generates three files:
The setup.rpt file contains information about the total files included in the WSP file, how much data was compressed, and the time taken to compress the data. The setup.inf file contains information about the cabinet file that was created, and also contains a list of the files included in the WSP file. The MsdnLinkList.wsp file the your solution package you can deploy to SharePoint. The setup.rpt and setup.inf files are not important for your solution package, so you can delete them.
To make the MakeCAB step easier and repeatable, write a batch file, as shown in Listing 9-11.
The output is shown in Figure 9-26.
The WSP file MsdnLinkList.wsp should now exist in the SolutionExample folder. Now the solution package is ready for deployment using stsadm or PowerShell cmdlets.
The previous example outlined the necessary steps to create a solution package. However, if you want to create a solution package containing many features, assemblies, and so on, this process will become quite complex and difficult. Therefore, Visual Studio 2010 aids the developer in building flexible SharePoint solution packages.
You can easily start assembling SharePoint solutions using Visual Studio 2010, provided that you have set up a SharePoint 2010 development environment with the following:
A 64-bit operating system (Windows Server 2008, Windows 7, or Windows Vista)
SharePoint Foundation or SharePoint Server 2010
Visual Studio 2010
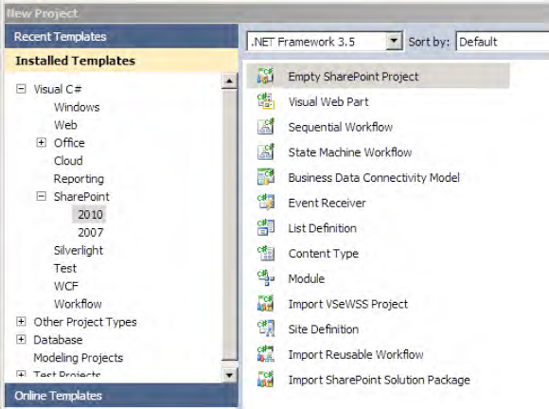
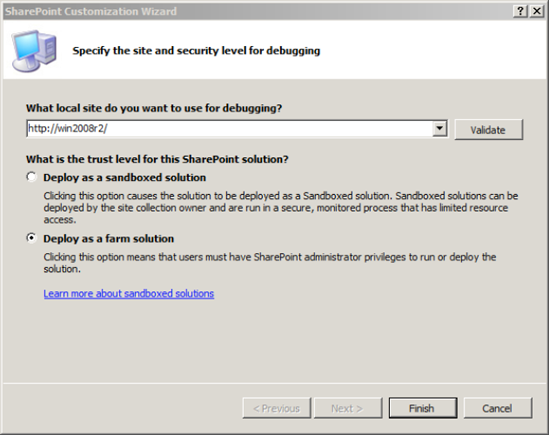
Start Visual Studio 2010 and create a new project. Visual Studio 2010 includes many project templates for SharePoint solutions, as shown in Figure 9-27. The result of every project template is a WSP solution package. In this example, choose the Empty SharePoint Project template. Set the name, location, and solution name of your project and click OK. This starts the SharePoint Customization wizard, as shown in Figure 9-28.
The wizard (Figure 9-28) asks for the URL of a SharePoint you can use for debugging your new solution. By default, Visual Studio proposes your local SharePoint installation. Click Validate to check that the URL is valid and the SharePoint site is available.
The security level for your solution is also configurable. In this instance, choose "Deploy as a farm solution," and click Finish to initialize your project in Visual Studio.
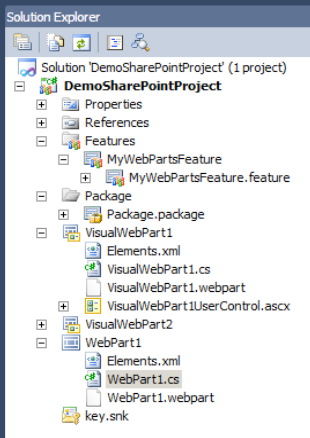
Once the project is established, you will see its predefined structure—there is a folder for the features and one for the package (see Figure 9-29).
You can extend your project with
SharePoint items, such as Web Parts and list definitions
Mapped folders, such as layouts (for application pages and more) and images
Additional features and feature receivers
To add a new SharePoint item, right-click the Project and choose Add

Add two more Web Parts using the same approach. Now you should have three Web Parts in your project.
Each Web Part has its own folder. A feature named Feature 1 was automatically created when you added the first Web Part, and all subsequent SharePoint items were added to this feature. (For more information about using the different SharePoint items in your project, review Chapter 7.)
Perhaps you would prefer to use more than one feature to deploy your SharePoint items, though. You can add a new feature by right-clicking the features folder and selecting Add Feature. When you right-clicking the features folder, you can add an event receiver or resource to the feature (as explained in Chapter 3).
The name Feature 1 doesn't provide much information about the content of a features folder. Right-click the Feature 1 folder, choose Rename, and enter a more descriptive name, such as MyWebPartsFeature.
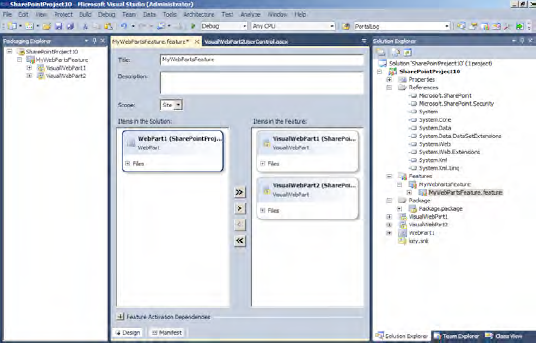
Double-click a features folder to open the Feature Designer, as illustrated in Figure 9-31. In the Feature Designer are three zones: the header, a middle part, and the footer. In the header you can edit the following general information:
The title and description of your feature, which are displayed in the feature administration.
The scope of your feature. Depending on the scope, you can see the appropriate SharePoint items in your solution.
In the center pane of the Feature Designer you can add items to or remove items from your feature. In the footer are advanced options—here you can specify a list of features on which the activation of the current feature depends. Clicking the + to the left of Feature Activation Dependencies opens a menu to define these. Click Add to add a dependency. You can choose a dependency on a feature in your solution, or add a custom feature activation dependency by entering the title, feature ID, and description. In the dependency list you can select a dependency and remove it. If it is a custom one, you can also edit it. If you want to look behind the scenes, you can switch from design view to manifest view. Here you'll see a preview of the generated manifest, and you'll have the opportunity to edit the template for the generated manifest. Advanced users can ignore the generated XML and edit the manifest directly in the XML editor, as shown in the following exercise.
To edit the next feature, double-click the next features folder in Solution Explorer, or double-click the feature in the Packaging Explorer next to the Feature Designer (see Figure 9-31).
If the Feature Designer is enabled, you can also edit the feature properties when you opened the designer. In the Property window you can edit the Properties shown in Table 9-8. If the window is not open, press F4 to display it.
Table 9.8. Feature Properties
Property | Description |
|---|---|
Activate on Default | Indicates whether the feature is activated during installation. |
Always Force Install | Indicates whether the feature should be installed by force, even if the feature is already installed. |
Auto Activate in Central Admin | Indicates whether the feature is activated by default for administrators. |
Creator | The developer who created the feature. |
Default Resource File | The central resource file for retrieving feature resources. |
Deployment Path | The path within the package to which the feature will be deployed. |
Description | Indicates what the feature does. |
Feature Id | The SharePoint ID of the feature. |
Image Alt Text | The text for the image associated with the feature. |
Image Url | The relative URL of the image associated with the feature. |
Is Hidden | Indicates whether the feature is visible in the list of available features to activate. |
Receiver Assembly | The fully qualified name of the assembly that contains the event receiver for the feature. |
Receiver Class | The class name of the event receiver for the feature. |
Require Resources | Indicates whether SharePoint checks for resources for a particular language and culture. |
Scope | The context in which a feature is activated. |
Solution Id | Specifies the ID of the SharePoint server where the feature will be installed (Microsoft internal use only) |
Title | The title of the feature (limited to 255 characters) |
UIVersion | Specifies a string that indicates the compatible versions of the site. |
The fully qualified name of the assembly containing the feature event receiver that handles custom upgrade actions. | |
Upgrade Actions Receiver Class | The class name of the feature event receiver that handles custom upgrade actions. |
Version | Specifies a |
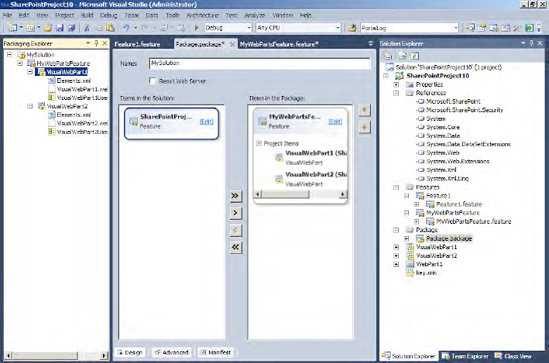
When you double-click the root node in the Packaging Explorer or the package folder in Solution Explorer, you open the designer for your package, as shown in Figure 9-32.
Here you can enter the name of your package (WSP) file and force a reset of the web server after deployment. As described previously, from the Feature Designer you can assign items in your solution such as mapped folders and features to your package.
At the bottom of the designer are three buttons: Design, Advanced, and Manifest.
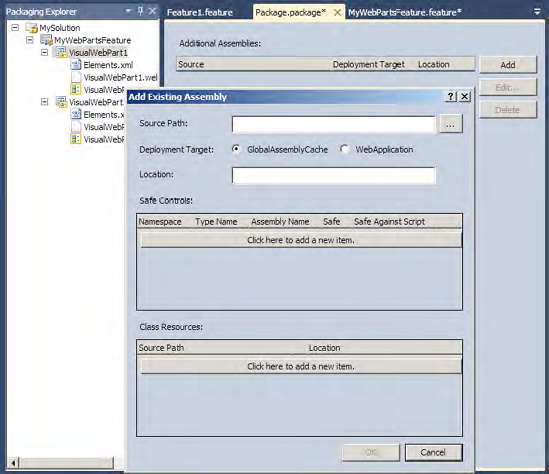
From the Advanced menu, you can add, edit, or delete additional assemblies, as shown in Figure 9-33. You have to decide whether to deploy the assembly to the GAC or the bin folder of the web application. Here you can also add safe controls and class resources.
When you click the Manifest button, you can preview the generated manifest, edit the template, or edit the complete manifest. You should be familiar with this procedure from the Feature Designer. You can also edit the manifest manually, as described in the previous exercise. If the package designer is enabled, you can also edit the package properties when you open the designer. In the Properties window (which you can open by pressing F4), you can edit the properties shown in Table 9-9.
Table 9.9. Package Properties
Property | Description |
|---|---|
Deployment Server Type | The type of server that will host the package: |
Description | The description of the package |
Name | The name of the package (WSP) file |
Receiver Assembly | The fully qualified name of the assembly that contains the event receiver for the package |
Receiver Class | The class name of the event receiver for the package |
Reset Web Server | Indicates whether IIS will be restarted after installing the package |
Reset Web Server Mode On Upgrade | Indicates how IIS will be restarted after upgrading the package: |
Solution Id | The ID of the package |
Title |
To set the project properties, select the project's root node in Solution Explorer, right-click, and select Properties. Alternatively, you can select the node and press Alt+Enter. You should be familiar with most of the tabs, except the new SharePoint tab. Select this tab now. As shown in Figure 9-34, you can enter pre- and post-commands to run on the command line—these include commands to copy files, start or stop services, and force an iisreset call. More interesting is the Active Deployment Configuration selection. Out of the box, Visual Studio comes with two configuration options: Default and No Activation. Select an entry and click View to explore these configurations.
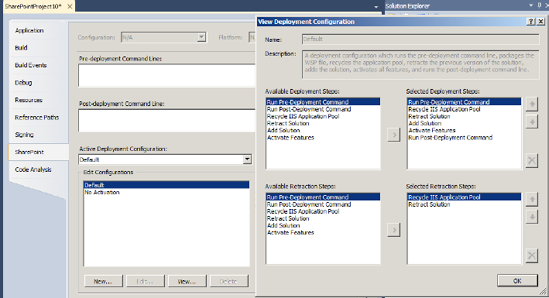
The No Activation deployment configuration executes the following steps:
Running the predeployment command line
Packaging the WSP file
Recycling the application pool (if you're deploying a full-trust solution)
Retracting the previous version of the solution
Adding the solution
Running the postdeployment command line
The Default configuration does the same and also activates all features.
If you don't want to use the existing static configurations, click New to add your own deployment configuration. In general, the build and package steps are performed before every configuration—you can't edit this. Table 9-10 lists the available deployment and retraction steps. Using the pre- and postdeployment commands, you can extend these steps with your own custom actions. If this is insufficient, you can develop your own steps and add them using Visual Studio Extensions.
Tip
If you want to create your own deployment steps, there is a helpful walkthrough on MSDN at http://msdn.microsoft.com/en-us/library/ee256698(VS.100).aspx.
Table 9.10. Available Deployment and Retraction Steps for Deployment Configuration
Description | |
|---|---|
Run Pre-Deployment Command | Runs any specified commands before the deployment starts |
Run Post-Deployment Command | Runs any specified commands after the deployment ends |
Recycle IIS Application Pool | Recycles the application pool of your SharePoint web application in IIS |
Retract Solution | Retracts a previously installed version of your solution by deactivating, retracting, and deleting it from the local SharePoint site |
Add Solution | Adds and installs your solution to the local SharePoint site |
Activate Features | Activates all features in your solution for the local SharePoint site |
In the Properties window you can also set some properties for your project. Here you can choose the active deployment configuration, too. Other properties you can edit include
Assembly deployment target: GAC or bin folder
Include assembly in package
Startup item
Do you recall the wizard at the beginning of the How-To where you specified the local site for debugging and where you decided whether you want to deploy the solution as full trust or sandboxed? Here in the Properties window you can also change those settings.
To debug, press F5, click the Debug button, or click Debug on the build menu. This will build your project. Once the build has completed, the solution package will be created and deployed onto your development SharePoint site. You set the URL of this server in the wizard at the beginning of the project or in the project Properties window. You can follow the process in the Output window of Visual Studio.
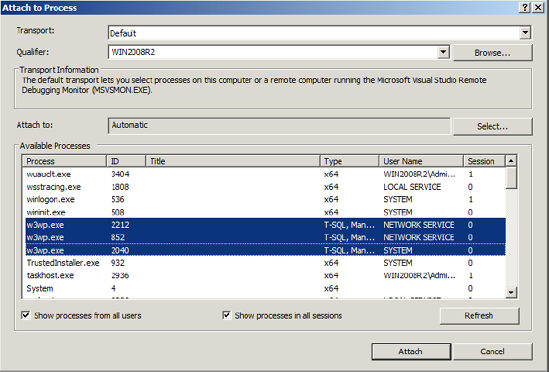
Visual Studio will start Internet Explorer, which loads the URL of your SharePoint for debugging. You can now test your newly developed features inside SharePoint. The debugger is automatically attached to the IIS process w3wp.exe and Internet Explorer so that you can debug your solution. Your deployment configuration affects whether all features are activated by default, or whether you have to activate them manually. If you want to debug your code in a feature receiver when a feature is activated, set a breakpoint on the relevant line. When the feature is activated, the debugger will stop at this breakpoint. If you want to debug code that is already deployed, you can similarly set a breakpoint, and then click Attach to Process in the Tools menu of Visual Studio. Then select the w3wp.exe process to debug your solution in SharePoint, as shown in Figure 9-35.
To provide the solution package for deployment on other systems, you need to pass the newly generated WSP file to these systems.
In the debugging process, you have already created a solution file. Examine the Output window or the project properties output path to find the location of the file. Alternatively, you can force Visual Studio to create a solution package. To do so right-click the project and click Package, or click Package in the build menu. If you want the WSP file copied to a special folder, you can change the output path in the build settings, or better still, insert a copy command as a predeployment command line in the SharePoint tab of your project properties:
xcopy "$(TargetDir)*.wsp" C:Solutions /Y
To customize this packaging step further, you can define your own deployment configuration (as described previously in the "Project Properties and Deployment Configuration" section). The solution package is now ready for deployment using stsadm, PowerShell cmdlets, or the object model.
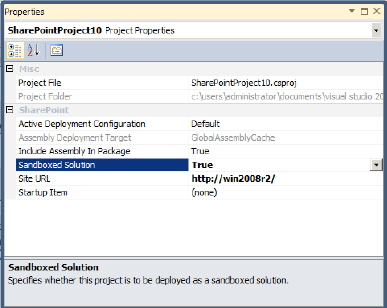
When you create a new SharePoint 2010 Project in Visual Studio 2010, the wizard will ask whether you want to create a sandboxed solution or a full-trust solution.
By default, Sandboxed is selected if the type of solution can be deployed as sandboxed.
You can also set this project property later, in the project properties window (see Figure 9-36).
While developing your sandboxed solution, remember the restrictions mentioned earlier. Visual Studio supports the writing valid code for sandboxed solutions by filtering IntelliSense.
Tip
Visual Studio compiles your code against the full version of SharePoint API, but at runtime your code runs against the reduced, sandboxed API. To ensure that your solution only contains valid code for a sandboxed solution you can use a workaround for compile-time checking: delete the Microsoft.SharePoint.dll reference on [SharePoint Root]UserCodeassembliesMicrosoft.SharePoint.dll. However, please note that this workaround is only for checking; remember to reset the reference when building the solution package for deployment.
To create your first sandboxed solution, choose the Empty SharePoint Project template in Visual Studio 2010. Set the name to, say, SandboxedWebPart and the solution name to SandboxedSolutionDemo. Next, choose "deploy as sandboxed solution." For this demo, add a Web Part to your solution—right-click the project and add a Web Part named SandboxDemoWebPart.
Warning
Take care you don't select a visual Web Part. You can't use visual Web Parts in a sandboxed solution. They contain web controls, which have to be deployed to disk. This is not allowed for sandboxed solutions.
Open the .cs code file of your Web Part to edit it. Listing 9-12 shows sample code.
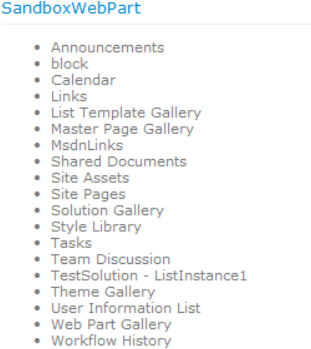
This code enables your Web Part to show all lists in your site collection in a bulleted list. When completed, the final Web Part should appear similar to Figure 9-37.
Example 9.12. Web Part Code
using System;
using System.Diagnostics;
using System.ComponentModel;
using System.Web.UI.WebControls;
using System.Web.UI.WebControls.WebParts;
using Microsoft.SharePoint;
using Microsoft.SharePoint.Utilities;

namespace Apress.SP2010.SandboxedWebPart.SandboxWebPart
{
    [ToolboxItemAttribute(false)]
    public class SandboxWebPart : WebPart
    {
private ListBox myListsBox = new ListBox();
private Label result = new Label();
public SandboxWebPart()
{
try
{
using (SPWeb site = SPContext.Current.Site.RootWeb)
{
SPListCollection lists = site.Lists;
foreach (SPList list in lists)
{
myListsBox.Items.Add(list.Title);
}
}
}
catch (Exception ex)
{
result.Text = ex.Message;
}
}
protected override void CreateChildControls()
{
this.Controls.Add(myListsBox);
this.Controls.Add(result);
base.CreateChildControls();
}
}
}During development, Visual Studio 2010 automatically builds the solution package, deploys it, and activates it in the Solution Gallery when you start debugging by pressing F5.
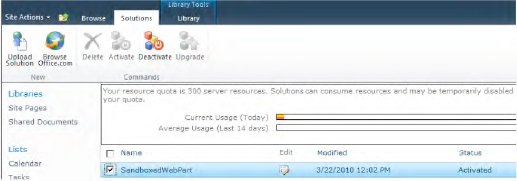
If you browse to the Solution Gallery, you can see your new solution activated (see Figure 9-38). When you start debugging, Visual Studio automatically attaches the debugger to SPUCWorkerProcess.exe to debug your solution.
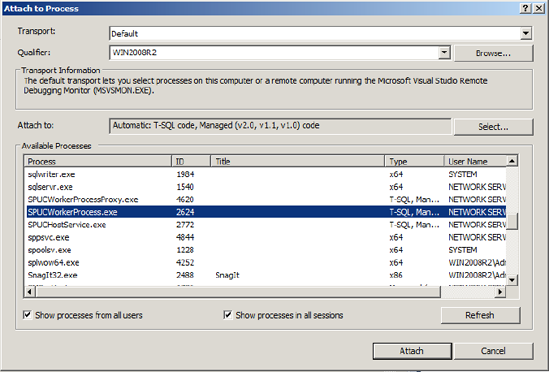
If you want to debug an already deployed sandboxed solution, you need to attach to SPUCWorkerProcess.exe manually, as shown in Figure 9-39.
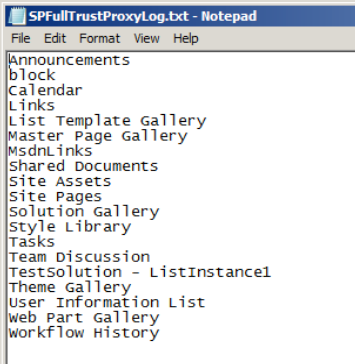
If you want to extend the capabilities of your sandbox, you can create a full-trust proxy for your sandboxed solution. The full-trust proxy in the following example extends the previous sandboxed Web Part example. The proxy writes the names of the lists in your site collection to a log file (see Figure 9-40) on disk.
To do so, you need to
Create a full-trust proxy class library
Deploy this DLL to the GAC
Register the full-trust proxy in SharePoint
Extend the sandboxed solution with the full-trust proxy
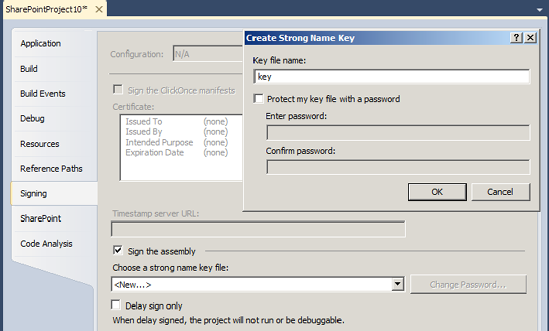
The full-trust proxy is a DLL you have to deploy to the GAC. To build one, add a class library project to the existing SharePoint solution you started earlier for the sandboxed Web Part. Call it, for example, FullTrustProxy. The default framework for a new class library project is the new .NET 4.0 Framework, so you need to set the target framework to .NET 3.5 in the project properties. Otherwise, you'll be unable to reference the project in your SharePoint 2010 projects, because SharePoint 2010 is based on .NET 3.5. The assembly has to be signed when you deploy it to the GAC. To sign it, go to the Signing tab in the project properties (see Figure 9-41) and check the "Sign the assembly" check box. In the window that appears, enter a name for the key file, uncheck "Protect my key file with password," and click OK. Then add a reference to Microsoft.SharePoint.dll.
The next step is to add two class files:
FullTrustProxyArgs.cs, a class that inherits fromMicrosoft.SharePoint.UserCode.SPProxyOperationsArgs(this just passes arguments)FullTrustProxyOps.cs, which inherits fromMicrosoft.SharePoint.UserCode.SPProxyOperationand does the work
The FullTrustProxyArgs class delivers the parameters needed by the FullTrustProxyOps class, as shown in Listing 9-13.
Example 9.13. FullTrustProxyArgs Class
using System;
using System.Reflection;
using Microsoft.SharePoint.UserCode;

namespace Apress.SP2010.FullTrustProxy
{
    [Serializable]
    public class FullTrustProxyArgs : SPProxyOperationArgs
    {
        public string FileContents { get; set; }
public string FullTrustProxyOpsAssemblyName
{
get
{
// Return the full assembly name, like "FullTrustProxy,
// Version=1.0.0.0, Culture=neutral,
// PublicKeyToken=29d96910438b4111";
return Assembly.GetExecutingAssembly().FullName;
}
}
public string FullTrustProxyOpsTypeName
{
get
{
return "Apress.SP2010.FullTrustProxy.FullTrustProxyOps";
}
}
public FullTrustProxyArgs()
{
}
public FullTrustProxyArgs(string fileContents)
{
this.FileContents = fileContents;
}
}
}The FullTrustProxyOps class implements the operations to be executed by the full-trust proxy.
In the example, in Listing 9-14 the proxy writes a string to a log file in the temp folder. Figure 9-40 shows the output of the proxy operation. It is important to allow partially trusted callers for the assembly so that the sandboxed code can call the proxy.
Example 9.14. FullTrustProxyOps Class
using System;
using System.IO;
using System.Security;
using Microsoft.SharePoint.UserCode;

[assembly: AllowPartiallyTrustedCallers()]
namespace Apress.SP2010.FullTrustProxy
{
    public class FullTrustProxyOps : SPProxyOperation
    {
        public override object Execute(SPProxyOperationArgs args)
        {
            if (args != null)
            {
         string tempPath = Environment.GetEnvironmentVariable("TEMP", EnvironmentVariableTarget.Machine);

                FullTrustProxyArgs fileArgs = args as FullTrustProxyArgs;
                FileStream fStream =
new FileStream(tempPath + @"SPFullTrustProxyLog.txt",
FileMode.Append);
fStream.Write(System.Text.ASCIIEncoding.ASCII.GetBytes(
fileArgs.FileContents), 0,
fileArgs.FileContents.Length);
fStream.Flush();
fStream.Close();
return fileArgs.FileContents;
}
else return null;
}
}
}Your first full-trust proxy is now complete. But before you can use it, you need to deploy it to the GAC.
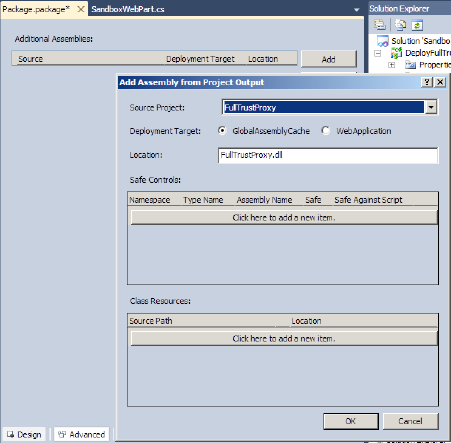
Add a new empty SharePoint project called DeployFullTrustProxy to your open Visual Studio solution. It must be deployed as full trust. Set a reference to the project output of the class library project. The solution is used to deploy and register the DLL. Open the package designer and click the Advanced button. Here, you add the project output of the class library project, as shown in Figure 9-42.
Before you can use the full-trust proxy, you need to register the DLL in SharePoint.
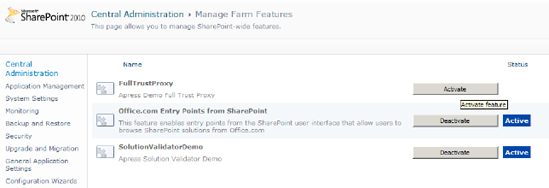
The best way to do this is to use a feature receiver so that the farm administrator can activate and deactivate the full-trust proxy in Central Administration, as shown in Figure 9-43.
Add a feature with the scope of Farm, and a feature event receiver to the project. The feature will be used to register your proxy as SPProxyOperationType in SharePoint (see Listing 9-15).
Example 9.15. Feature Event Receiver
using System;
using System.Runtime.InteropServices;
using Microsoft.SharePoint;
using Microsoft.SharePoint.Administration;
using Microsoft.SharePoint.UserCode;
using Apress.SP2010.FullTrustProxy;

namespace Apress.SP2010.DeployFullTrustProxy.Features.Feature1
{
    [Guid("65a428e1-c14a-4f9c-b7fe-9dbac8e830d4")]
    public class Feature1EventReceiver : SPFeatureReceiver
    {
        // Handle the event raised after a feature has been activated
        public override void FeatureActivated(SPFeatureReceiverProperties
                                               properties)
        {
            try
            {
                SPUserCodeService userCodeService = SPUserCodeService.Local;
                if (userCodeService != null)
                {
                    SPProxyOperationType operation =
                        new SPProxyOperationType(
                            new FullTrustProxyArgs().FullTrustProxyOpsAssemblyName,
                            new FullTrustProxyArgs().FullTrustProxyOpsTypeName);
userCodeService.ProxyOperationTypes.Add(operation);
userCodeService.Update();
}
}
catch
{
// Exception handling
}
}
// Handle the event raised before a feature is deactivated
public override void FeatureDeactivating(
SPFeatureReceiverProperties properties)
{
try
{
SPUserCodeService userCodeService = SPUserCodeService.Local;
if (userCodeService != null)
{
SPProxyOperationType operation = null;
foreach (SPProxyOperationType operationType in
userCodeService.ProxyOperationTypes)
{
if (operationType.AssemblyName.Equals(new
FullTrustProxyArgs().FullTrustProxyOpsAssemblyName,
StringComparison.CurrentCultureIgnoreCase))
{
operation = operationType;
break;
}
}
if (operation != null)
{
userCodeService.ProxyOperationTypes.Remove(operation);
userCodeService.Update();
}
}
}
catch
{
// Exception handling
}
}
}
}Now the proxy is completed. You could build, package, and deploy the solution containing your full-trust proxy. However, the proxy is only one half of the scenario; it's just a tool to achieve the goal of extending the boundaries of a sandboxed solution, which we'll describe next.
In the next step, you will extend your sandboxed solution to use the proxy.
Add a reference in the SandboxedWebPart project named to the project output of the proxy class library project. In the next step, edit the code of the existing Web Part (see Listing 9-12) in the project. Listing 9-16 shows the new code of the Web Part in bold. The proxy call consists of two simple lines: first you create a new instance of FullTrustProxyArgs and deliver the parameter string as the argument for the proxy, and then you call the proxy operation with SPUtility.ExecuteRegisteredProxyOperation. That's it.
Example 9.16. Web Part Code
using System; using System.Diagnostics; using System.ComponentModel; using System.Web.UI.WebControls; using System.Web.UI.WebControls.WebParts;using Apress.SP2010.FullTrustProxy;using Microsoft.SharePoint; using Microsoft.SharePoint.Utilities; namespace Apress.SP2010.SandboxedWebPart.SandboxWebPart { [ToolboxItemAttribute(false)] public class SandboxWebPart : WebPart {private string myLists;private ListBox myListsBox = new ListBox(); private Label result = new Label(); public SandboxWebPart() { try { using (SPWeb site = SPContext.Current.Site.RootWeb { SPListCollection lists = site.Lists; foreach (SPList list in lists) { myListsBox.Items.Add(list.Title);myLists += list.Title + Environment.NewLine;} } FullTrustProxyArgs proxyArgs = new FullTrustProxyArgs(myLists);SPUtility.ExecuteRegisteredProxyOperation(proxyArgs.FullTrustProxyOpsAssemblyName,proxyArgs.FullTrustProxyOpsTypeName,proxyArgs);} catch (Exception ex) { result.Text = ex.Message; } } protected override void CreateChildControls()
{
            this.Controls.Add(myListsBox);
            this.Controls.Add(result);
            base.CreateChildControls();
        }
    }
}
Now you are ready for a test flight. Deploy both solutions to your development SharePoint.
If you want to check that your full-trust proxy is registered correctly in SharePoint, you can enter the following command at the SharePoint management shell or PowerShell:
[Microsoft.SharePoint.Administration.SPUserCodeService]::Local.ProxyOperationTypes.
If your full-trust proxy was registered, your output should look similar to that shown in Figure 9-44.
Insert the Web Part into a web site and test the full-trust proxy. The Web Part should display all the lists in the site collection. In addition, you will find a file called SPFullTrustProxyLog.txt created by the proxy in the temp folder.

Farm administrators can proactively deploy solution validators to their farms. These validators always run when a sandboxed solution is activated or upgraded. You can easily create your own solution validator by performing the following steps:
Writing a solution validator class
Creating an error page
Deploying the solution validator to the GAC
Registering the solution validator in SharePoint
Start with a new Empty SharePoint project and name it SolutionValidatorDemo. Choose "Deploy as farm solution" in the wizard. Then add a class with the name SolutionValidator to your project. This file will contain your validator, as shown in Listing 9-17. It shows the general structure of a solution validator and gives examples of how to validate. You can validate an assembly and a solution.
Example 9.17. Solution Validator
using System;
using System.Collections.ObjectModel;
using System.Reflection;
using System.Runtime.InteropServices;
using System.Text;
using Microsoft.SharePoint;
using Microsoft.SharePoint.Administration;
using Microsoft.SharePoint.UserCode;

namespace Apress.SP2010.SolutionValidatorDemo
{
    [Guid("481823F5-75A7-4EF8-8A4B-11C4D52D1014")]
    public class SolutionValidator : SPSolutionValidator
    {
        private const string strValidatorName = "My Solution Validator";
        // Help method to validate the content of files in the solution
        private byte[] LoadBytes(ReadOnlyCollection<byte> bytes)
        {

            byte[] fileBytes = new byte[bytes.Count];
            int count = 0;
            foreach (byte b in bytes)
            {
                fileBytes[count] = b;
                count++;
            }

            return fileBytes;
        }
        // Help method to validate features in the solution
        private bool CheckForFeature(string fileContents, string type)
        {
            string EorF = "<Elements";

            if (type.Equals("ReceiverAssembly"))
                EorF = "<Feature";

            if (fileContents.Contains(EorF) && fileContents.Contains("<" + type))
            {
                return true;
            }

            return false;
        }

        public SolutionValidator()
        {

        }

        public SolutionValidator(SPUserCodeService userCodeService)
            : base(strValidatorName, userCodeService)
        {
            this.Signature = 1983;
        }

        public override void ValidateAssembly(
             SPSolutionValidationProperties properties, SPSolutionFile assembly)
        {
            properties.ValidationErrorUrl =
"/_layouts/SolutionValidatorDemo/SolutionValidationErrorPage.aspx";
bool valid = true;
// Block Solutions containing assemblies named "TestSolution"
string blockAssemblyName ="TestSolution";
// Block Solutions containing assemblies with the Public Key Token
string blockPKT = "29d96910438b4111";
byte[] fileBytes = LoadBytes(assembly.OpenBinary());
Assembly a = Assembly.Load(fileBytes);
string[] assemblyFullName = a.FullName.ToLower().Split(','),
string assemblyName = assemblyFullName[0];
string version = assemblyFullName[1].Replace("version=", "").Trim();
string culture = assemblyFullName[2].Replace("culture=", "").Trim();
string publicKeyToken = assemblyFullName[3].
Replace("publickeytoken=", "").Trim();
// Validate AssemblyName
if (assemblyName.Equals(blockAssemblyName.ToLower()))
{
valid = false;
properties.ValidationErrorMessage += "Assembly name '"
+ assemblyName + "' not valid. ";
}
// Validate PublicKeyToken
if (publicKeyToken.Equals(blockPKT.ToLower()))
{
valid = false;
properties.ValidationErrorMessage += "Assembly PublicKeyToken '"
+ publicKeyToken + "' not valid. ";
}
if (!valid)
{
properties.ValidationErrorUrl += "?ErrorMessage="
+ properties.ValidationErrorMessage;
}
properties.Valid = valid;
}
public override void ValidateSolution(
SPSolutionValidationProperties properties)
{
properties.ValidationErrorUrl =
"/_layouts/SolutionValidatorDemo/SolutionValidationErrorPage.aspx";
bool valid = true;
string blockSolutionID = "{3CCB9CAF-54A7-42FF-A03F-F6D6D881BC70}";
string[] blockFileName = {"SandboxedWebPart","Test"};
string[] blockFileExt = { "xml", "jpg","webpart" };
string[] blockFileContent = { "Sand", "box"};
ReadOnlyCollection<SPSolutionFile> files = properties.Files;foreach (SPSolutionFile file in files)
{
// Block Filenames
foreach (string filename in blockFileName)
{
if (file.Location.ToLower().Equals(filename))
{
valid = false;
properties.ValidationErrorMessage += "Filename '"
+ filename + "' is blocked. ";
}
}
// Block FileExtensions
foreach (string ext in blockFileExt)
{
if (file.Location.ToLower().EndsWith(ext))
{
valid = false;
properties.ValidationErrorMessage += "File extension '"
+ ext + "' is blocked. ";
}
}
if (file.Location.ToLower().EndsWith("xml"))
{
byte[] fileBytes = LoadBytes(file.OpenBinary());
string fileContents = ASCIIEncoding.ASCII.GetString(fileBytes);
// Check for file content
foreach (string content in blockFileContent)
{
if (fileContents.ToLower().Contains(content))
{
valid = false;
properties.ValidationErrorMessage += "File '"
+ file.Location + "' contains blocked characters. ";
}
}
// Check for features like ContentType, CustomAction, Workflow,
// Receivers, ReceiverAssembly, ListTemplate, Module,
// Field, and WebPart
if (CheckForFeature(fileContents, "ListTemplate"))
{
valid = false;
properties.ValidationErrorMessage = "Solution is blocked
from including List Definitions. ";
}}
}
// Block SolutionID
if (properties.SolutionId.Equals(new Guid(blockSolutionID)))
{
valid = false;
properties.ValidationErrorMessage += "SolutionID is not valid. ";
}
// Block SolutionID stored in SharePoint list
string strListName = "block";
using (SPSite site = properties.Site)
{
SPList list = site.OpenWeb().Lists.TryGetList(strListName);
if (list!=null)
{
SPListItemCollection items = list.GetItems();
foreach (SPListItem item in items)
{
if (properties.SolutionId.Equals(new Guid(item.Title)))
{
valid = false;
properties.ValidationErrorMessage += "SolutionID is not
valid. ";
break;
}
}
}
}
if (!valid)
{
properties.ValidationErrorUrl += "?ErrorMessage=" +
properties.ValidationErrorMessage;
}
properties.Valid = valid;
}
}
}If a solution is not valid, you can display an error message. If you wish, you can define your own custom error page, such as the one shown in Figure 9-45.
To construct this, add a new application page called SolutionValidationErrorPage.aspx to your project. Listing 9-18 shows example code for your error page.
Example 9.18. Custom Error Page: SolutionValidationErrorPage.aspx
<asp:Content ID="Main" ContentPlaceHolderID="PlaceHolderMain" runat="server">
     Solution Validation failed: <%= this.ErrorMessage %>
</asp:Content>
<asp:Content ID="PageTitle" ContentPlaceHolderID="PlaceHolderPageTitle"
             runat="server">
      Solution Validation Failure
</asp:Content>
<asp:Content ID="PageTitleInTitleArea"
             ContentPlaceHolderID="PlaceHolderPageTitleInTitleArea" runat="server" >
      Solution Validation Failure
</asp:Content>
To display the error message of the validator, retrieve the message from the url parameter, as shown in Listing 9-19.
Example 9.19. Custom Error Page CodeBehind
using System;
using Microsoft.SharePoint.WebControls;
namespace Apress.SP2010.SolutionValidatorDemo.Layouts.SolutionValidatorDemo
{
    public partial class SolutionValidationErrorPage : LayoutsPageBase
    {
        public string ErrorMessage= String.Empty;

        protected void Page_Load(object sender, EventArgs e)
        {
            if (Request.QueryString["ErrorMessage"] != null)
            {
                this.ErrorMessage = Request.QueryString["ErrorMessage"].ToString();
            }
        }
} }
When you have finished developing your validator, you can deploy it as a farm feature as follows:
Add a new feature to your SharePoint project.
Set the scope to
Farm.Add a feature event receiver. Once the receiver contains code like that shown in Listing 9-20, you can simply activate and deactivate your solution validator with the feature using Central Administration (see Figure 9-43).
Warning
When you deploy a restrictive solution validator to your development machine, remember to deactivate it when you want to resume developing sandboxed solutions.
Example 9.20. Feature Event Receiver
using System;
using System.Runtime.InteropServices;
using System.Security.Permissions;
using Microsoft.SharePoint;
using Microsoft.SharePoint.Security;
using Microsoft.SharePoint.Administration;
namespace Apress.SP2010.Features.SolutionValidatorFeature
{
[Guid("2a4d3a6b-ab9c-4008-9408-26dd4cd1f6d8")]
public class SolutionValidatorFeatureEventReceiver : SPFeatureReceiver
{
public override void FeatureActivated(
SPFeatureReceiverProperties properties)
{
SPUserCodeService.Local.SolutionValidators.Add(
new SolutionValidator(SPUserCodeService.Local));
}
public override void FeatureDeactivating(
SPFeatureReceiverProperties properties)
{
SPUserCodeService.Local.SolutionValidators.Remove(
new Guid("481823F5-75A7-4EF8-8A4B-11C4D52D1014"));
}
}
}Now you are ready to test this. Deploy your solution to your development machine.
If you want to check whether your solution validator was registered in SharePoint, you can enter the following command at the SharePoint management shell or PowerShell:
[Microsoft.SharePoint.Administration.SPUserCodeService]::Local.SolutionValidators.
If your solution validator was registered correctly, the output should appear similar to that shown in Figure 9-46.
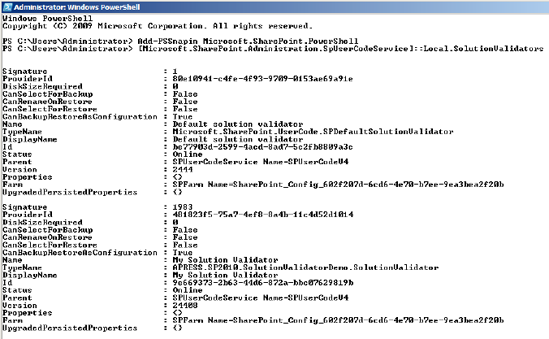
Tip
On CodePlex is the Generic Solution Validator at http://spgenericvalidator.codeplex.com/. You can install this validator on your SharePoint 2010 server to set solution validation settings on a config page in your site collection.
If you have already customized and extended SharePoint 2007, you have probably created your own solutions. If you want to use your solutions in SharePoint 2010, one option is to use backward compatibility mode. If you wish to edit your solutions in Visual Studio 2010, however, we recommend you upgrade them.
SharePoint 2010 comes with a UI compatibility mode for SharePoint 2007 for backward compatibility.
If you upgrade your SharePoint 2007 farm to SharePoint 2010, backward compatibility mode is active by default. If you want to use the SharePoint 2010 UI, you can activate the new experience for every site collection, or for a single site in the site settings (Site Collection AdministrationSupported User Experiences). You can also activate backward compatibility mode via the API; set the UI version to 3 for compatibility mode and to 4 for the SharePoint 2010 UI, as shown in Listing 9-21.
Example 9.21. Activating Backward Compatibility Mode
public class UIModeFeatureEventReceiver : SPFeatureReceiver
{
   public override void FeatureActivated(SPFeatureReceiverProperties properties)
   {
            // Feature is scoped at Web, so the parent type is SPWeb
            using (SPWeb web = properties.Feature.Parent as SPWeb)
            {
                web.UIVersion = 3;
                web.Update();
            }
    }
   public override void FeatureDeactivating(
                                          SPFeatureReceiverProperties properties)
   {
       // Feature is scoped at Web, so the parent type is SPWeb
            using (SPWeb web = properties.Feature.Parent as SPWeb)
            {
                web.UIVersion = 4;
                web.Update();
            }
   }
}If you wish to use the new SharePoint 2010 features and develop your solutions with Visual Studio 2010, it is necessary to upgrade your existing solutions. The following are some important reasons to upgrade:
New APIs (
Microsoft.SharePoint.Linq.dll,Microsoft.SharePoint.Client.dll,Microsoft.SharePoint.Taxonomy.dll) vs. old API (Microsoft.SharePoint.dll)Deprecated APIs
LINQ to SharePoint
Client APIs
New technologies available: Silverlight, AJAX, and JSON
New UI: ribbon, pop-ups, CSS
Business Connectivity Services (BCS)
Changed paths (14 hive instead of 12 hive)
Sandboxed solutions
Depending on how you created your existing solutions, there are different options for migrating them to Visual Studio 2010 and SharePoint 2010:
Upgrading a Visual Studio Extensions for Windows SharePoint Services (VSeWSS) 2005/2008 solution
Upgrading a WSP package
Upgrading a custom solution
For SharePoint 2007 development with Visual Studio 2005 or 2008, Microsoft offered VSeWSS 3.0. If you have created your solutions with VSeWSS, you can upgrade them to a Visual Studio 2010 solution.
Unfortunately, you can't open a VSeWSS project directly with Visual Studio 2010. If you try to do so, you'll get the following error message: "The project type is not supported by this installation." However, Microsoft offers an additional project template as an extension for Visual Studio 2010 (VSIX) that allows the importing of existing VSeWSS projects. You have to download and install this tool separately, as described in the next exercise.
INSTALLING THE IMPORT VSEWSS PROJECT VISUAL STUDIO TEMPLATE
Download the
VSeWSS_Upgrade_Sample_Beta_20100108.msiinstaller fromhttp://download.microsoft.com/download/3/0/2/3022725B-53C6-413A-B624-B3DBC480E3BA/VSeWSS_Upgrade_Sample_Beta_20100108.msi.Install the package.
If Visual Studio 2010 is open, close it.
By default, a second installer package and a readme file will be installed to
C:Program Files (x86)MicrosoftVSeWSS Upgrade. Run the second package from this folder.Open a command prompt as administrator and switch to the Visual Studio 2010 IDE folder (the default location is
C:Program Files (x86)Microsoft Visual Studio 10.0Common7IDE), and then rundevenv /installvstemplates.Open Visual Studio 2010 and create a new SharePoint 2010 Project. The Import VSeWSS Project template should be available now (see Figure 9-47).
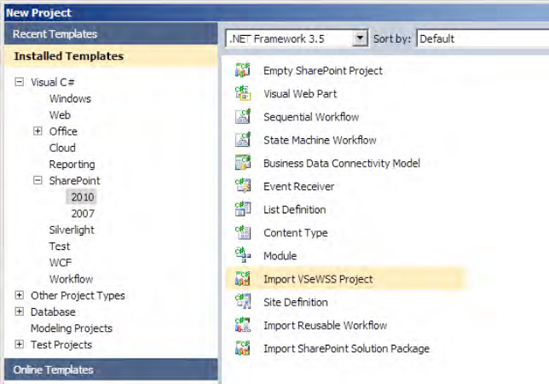
This additional template enables you to import VSeWSS projects version 1.1 and above into a new Visual Studio 2010 SharePoint project, including your Visual Basic or C# code.
The import process converts the existing structure of your VSeWSS project as closely as possible to the new Visual Studio 2010 layout. This also means that you'll have one SharePoint item per feature, because VSeWSS had a one-to-one approach. Since Visual Studio 2010 is more flexible, allowing you to arrange multiple artifacts per feature, you can rearrange the features later.
When you choose the template, the wizard will also ask you for the security level setting. This time, full trust is the default. You should take this option, because the old solutions were also full trust. If you want to deploy your imported solution as a sandboxed solution in the future, you can change this setting in the project properties, as shown in the "Sandboxed Solutions" section earlier in the chapter (also see Figure 9-36). However, remember the restrictions of sandboxed solutions before taking this step.
When the import has finished, take a look at the Output window and the error list in Visual Studio 2010. In the Output window, choose Show Output from SharePoint Tools
to display a log of the import process and some extra information. This includes advice about what you need to do next. In the error list, you may also find messages and warnings concerning the import.
The import process handles a number of problems that can occur while importing the source project:
The source solution can contain artifacts whose handling has changed in SharePoint 2010, such as themes.
The source solution can be corrupt in many ways. The readme file delivered with the VSeWSS Import tool describes several scenarios.
For example, when you import a SharePoint 2007 theme, the import process detects this theme and displays a message explaining that the handling of themes has been changed in SharePoint 2010 and providing a pointer to solve the problem. You should check and fix the following:
The assembly name and default namespace of your project
Referenced assemblies or projects
Web references (ASMX) and service references (WCF)
During the import the default namespace of your old project is also imported. But the assembly name can differ from the source assembly name if your new project does not have the same name. Check this in the project properties, too.
The VSeWSS import process converts only the VSeWSS project. It does not import referenced projects that were part of the source solution. You need to add the referenced projects again to the solution and reference the output in the SharePoint project, or reference the resulting assemblies. References to Microsoft.SharePoint.* and Microsoft.Office.* assemblies are automatically updated from version 12 to version 14.
If your VSeWSS project contains web or service references, the files created by adding and updating these references are imported and the project will still build. But they are not added as web or service references to the project, so you can't update them. Hence, you should remove the files and add the web and service references again manually.
Visual Studio 2010 enables you to redesign the structure of your package and your features. Using the Package Explorer, features and assemblies can be easily added to or removed from your package. With the Feature Designer you can add multiple SharePoint items to one feature, remove them, and rename them. (The previous section "How To: Creating a Solution Package Using Visual Studio 2010" contains the details.)
For all other projects deployed via WSP files, upgrading a WSP package may be the best option. To upgrade a WSP-packaged solution, import it into Visual Studio 2010. This option can also be used to import and edit solutions created with SharePoint Designer 2010.
The import wizard gives you the option to choose which items of the solution you want to import (see Figure 9-48). Based on the chosen parts, Visual Studio creates a new project structure and inserts the chosen items. The tool only imports the XML files, images, and other files that are included in your WSP file. Since a WSP file doesn't contain your source code, you have to import your code manually and set the correct namespaces. The following exercise will guide you through the WSP import process.
IMPORTING A WSP FILE
Open Visual Studio 2010 and create a new project using the Import SharePoint Solution Package template.
Set the name, location, and solution name of the project. Then click OK.
Choose or enter the URL of the local site for debugging, and choose "Deploy as a farm solution" as the trust level for the solution.
Browse to the path of the existing WSP file and choose it. Click Next.
Select the items from the WSP file you want to import. Click Finish to start the import.
Visual Studio should indicate the progress of the import and that the import was successful. Now you should see all the selected items of your old WSP file in Solution Explorer for your new Visual Studio 2010 project.
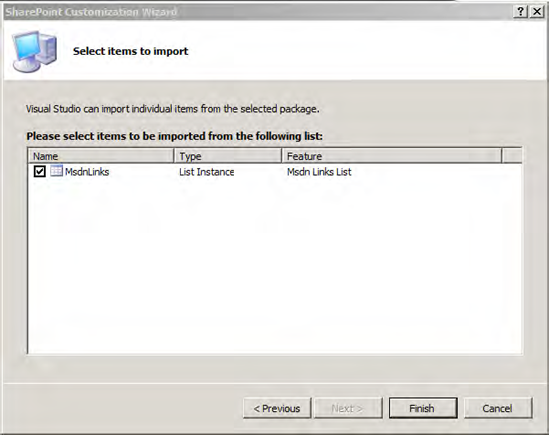
When the import has finished, examine the Output window and the error list as described in the previous section. Since your code is not imported from a WSP file, it needs to be imported manually.
In this context, you should check and fix the following:
The assembly name and default namespace of your project
Referenced assemblies or projects
Web references (ASMX) and service references (WCF)
Your custom code import
You can redesign your solution easily using the Package Explorer and the Feature Designer. After the import, the features folders will be named Feature 1, Feature 2, and so on. You should rename them in Solution Explorer.
Although importing VSeWSS projects and WSP packages can help greatly, in some cases you may have to explore other ways of upgrading your solutions to Visual Studio 2010 and SharePoint 2010.
This will become necessary in the following scenarios:
If you haven't used VSeWSS
If you didn't deploy your solutions through WSP files
If you don't want to use a VSeWSS or WSP import
If you have used your own installer or script
In these cases you need to create an empty SharePoint 2010 solution project and insert the items from the old project, as shown in the following exercise. (The section "How to: Creating a Solution Package Using Visual Studio 2010" may help you, too.)
MANUAL UPGRADE OF A SOLUTION
Open Visual Studio 2010 and create a new project using the Empty SharePoint Project template.
Set the name, location, and solution name of the project. Then click OK.
Choose or enter the URL of the local site for debugging, and choose "Deploy as a farm solution" as the trust level for the solution. Then click Finish.
Set the assembly name and default namespace to match your preupgrade project.
Build the skeleton of your project: right-click your project, select Add

Organize the SharePoint items of your solution with the Feature Designer and the Package Explorer.
Add assemblies, assembly references, or references to project output, web, or service references.
Copy the content, such as images and other resources, from the source mapped folders to the new ones.
Import your code.
In general your custom assemblies for SharePoint 2007 also run in SharePoint 2010. There are three different types:
Code that runs within IIS
Code that runs within the timer service
Code that runs outside of IIS
Code for SharePoint 2007 that runs within IIS will work in SharePoint 2010 without recompilation. If your code runs within the timer service (such as workflows, feature receivers, and timer jobs), you have to compile it for SharePoint 2010. It's the same with code that utilizes the SharePoint object model and runs outside of IIS in a service or console application: you need to recompile or provide binding redirects. Thinking of deprecated APIs, it's recommended that you always import your source code into your SharePoint/Visual Studio 2010 projects and recompile it.
In SharePoint 2010, numerous APIs of previous versions have been deprecated. But don't worry: most deprecated types and methods are still available in SharePoint 2010. Microsoft will not invest in these APIs in the future, so you should use the newer alternatives. While recompiling your code in Visual Studio 2010, compiler warnings will tell you which elements are deprecated and which newer alternatives are available. When you edit your code, IntelliSense will also indicate deprecated types and methods, as shown in Figure 9-49.
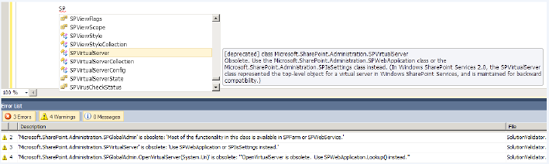
Most deprecated types and methods are in the Microsoft.SharePoint.Portal namespace. In fact, with a few exceptions, the entire namespace has been made obsolete. Other examples of deprecated types and methods are shown in Table 9-11.
Table 9.11. Examples of Deprecated Types and Methods
Namespace | Deprecated Type or Method |
|---|---|
|
|
|
|
|
|
|
|
|
|
|
|
You can find a complete list of deprecated types and methods in SharePoint 2010 at http://code.msdn.microsoft.com/sps2010deprecated. (For more information about the API see Chapters 2 and 3 of this book.)
Tip
Microsoft published a whitepaper entitled "Redeploying Customizations and Solutions in SharePoint Foundation 2010 and SharePoint Server 2010," which you can find at http://msdn.microsoft.com/en-us/library/ee662217%28office.14%29.aspx.
This chapter introduced SharePoint solution packages provided with SharePoint to deploy customizations and extensions. You learned about solution packages and features and how to create and use them, including the different ways you can deploy a solution package (via stsadm, PowerShell, or the UI). This chapter also introduced the new SharePoint 2010 feature of sandboxed solutions. Finally, you got an overview on how to upgrade your existing solution packages from SharePoint 2007 to SharePoint 2010.