
This chapter will give you ideas about several core tasks that could be performed using the administrative API. At first glance, the SharePoint API and the object model behind it can be intimidating. The platform is complex, huge, and at times confusing, and there isn't an obvious a set of best practices beyond the simple, entry-level examples that explain the first steps.
Often, developers start with SharePoint by supporting the administration of conventionally designed SharePoint applications. Administrative tasks are also a good place to begin learning the internals of the API from the ground up.
In this chapter you'll learn
Why you should automate administrative tasks
How to create the necessary objects
How to maintain the
web.configsettings programmatically
You'll also find code samples for a collection of common tasks in this chapter.
Chapter 1 outlined everything you need to establish a working environment for your applications. While regular SharePoint applications, Web Parts, and features run inside SharePoint, administrative tasks can run standalone. While they execute against an existing server and on the server, they are separate from SharePoint—being perhaps a console task, a web application, or even a WPF solution. For some such tasks there is no alternative to such a standalone approach. Creating a new web site in SharePoint can't be accomplished from a feature, which requires an existing web site. The final choice of the type of application is up to you. A few recommendations may assist with your decision:
Use a console application if you plan to run tasks automatically—in batch files, for instance. Experienced administrators generally favor a console-based approach. This enhances what you get through
stsadmand PowerShell.Use a WPF or Windows Forms application if you need
A very advanced UI containing many distinct options, or heavily graphical output, such as charts
To monitor an important parameter and track its state over time
High security over who is allowed to access or run the application
For most other cases, a web application is the best solution. It provides a graphical UI and is easy to deploy. You can reach a broader audience and add more features from time to time just by adding pages. The lack of instant response could be overcome with techniques like Ajax, though; a Windows application would always run more smoothly here.
A SharePoint feature is the best option if you want to allow site users or site administrators to execute basic administrative tasks. Usually such features simplify regular tasks or aggregate several frequently launched tasks together into one action. There is a danger, though, in exposing the administrative API to people who may be unaware of the consequences: tread carefully!
You may be wondering why you should bother programming things you can already program using Central Administration or the Site Settings dialogs. Besides, many scripting tasks are better accomplished with stsadm or PowerShell.
There are several good reasons for automating certain tasks using the API. For one, stsadm does not provide a UI. As a scripting tool, it's extremely powerful; however, if you perform an operation repeatedly, it's hard to process return values, error prompts, success messages, and so forth, and assemble a useful report from them all. Even Central Administration is suboptimal if you want to create hundreds of sites or, for example, provision a Web Part to 1,500 existing web sites, each with a slightly different setting.
There are several more advantages of using the API as well. Sooner or later you will start writing site templates for your installation. Customized site templates allow users to build enterprise-specific sites with special features for fulfilling certain tasks. Creating, maintaining, and deploying site templates is challenging work. It is not best practice to customize existing templates. Internally, SharePoint holds the definition of the templates in the database. Your customized version of such an STP file is merely a collection of changes. At runtime, the server merges the existing template with your data (i.e., a merge between content from the database and the file system). As you might imagine, this process can take time. In addition, your definitions may grow unexpectedly. Imagine you need to add a few simple definitions to the onet.xml file, each requiring hundreds of lines. Five additional definitions and a few requirements later, and you face 3,000 lines of XML.
When developers first consider SharePoint, the XML-based configuration seems to be a boon. With IntelliSense, editing such files seems to be a task that even those who don't speak C# fluently could manage. However, sooner or later, depending on how quickly new requirements are added, your solution becomes unworkable.
The answer to all this is the SharePoint API and the deployment framework. The deployment framework consists of two major parts—solutions and features. Solutions contain the distributed parts, assemblies, XML files, resources, and data. A feature is similar to a solution and frequently distributed as a solution. However, it has several ways it can be managed by the SharePoint UI. Users with administrative privileges can activate and deactivate features. The developer of the feature can run code whenever it's activated or deactivated. The feature runs inside SharePoint and has full access to the API.
There are, though, some administrative tasks that are beyond the scope of a feature. For instance, if you wish to configure a farm or create a new web site, you can't use a feature, because features are designed to run inside an already existing site. In those situations, the administrative tasks require a standalone solution. Despite the availability of the stsadm program, or the PowerShell equivalent—and both are adept for such tasks—a more interactive approach would be an advantage. Besides, despite the vast number of features stsadm provides, it still lacks support for some of the tasks you may eventually need. Again, this is where again the SharePoint API appears to be the most flexible and powerful option.
Large SharePoint installations typically include multiple servers. Often they are configured to form a farm, while other installations may require separate servers. To distribute templates among your computing center, automation tasks are essential.
Typical tasks include the creation of web applications and sites, and provisioning of web sites. The internal steps for building a new web application are as follows:
Create a unique entry in the configuration database and assign a GUID.
Create a web site in IIS and configure it.
Create the root folder where the pages and resources will be stored.
Create an application pool in IIS and assign it to the web site.
Configure authentication and encryption as required by the administrator.
Create the first content database for this web application.
Assign the search service.
Define the public name visible in Central Administration.
Create the first site inside the web—the root site that's always required.
Configure the web to apply the settings specified by the creator.
There are several optional tasks that might also take place. For example, you can assign alternative URLs to your application. Obviously, executing all these tasks manually could be complicated, error-prone; automating them with a more sophisticated, interactive process provides a significant productivity gain. Now that you have persuaded yourself that it's an advantage to program against the administrative object model, let's start writing code.
The SPFarm object is one key entry point into the object model. For administrative tasks, the code to obtain an SPFarm object looks like this:
SPFarm farm = SPWebServices.AdministrationService.Farm;
Given an SPFarm object, you can now undertake the necessary tasks. To create and maintain a web, use the SPWebApplicationBuilder class. Running its Create method, an SPWebApplication object is returned, which gives you further access to the freshly created web. The example shown in Listing 17-1 reveals how to construct a new web. It consists of a simple console application with fixed values that performs the creation. Consider using parameters in real life applications.
Example 17.1. Console to Create a New SharePoint Web
using System;
using System.Collections.Generic;
using System.Linq;
using System.Text;
using Microsoft.SharePoint.Administration;
namespace Apress.SP2010.NewWeb
{
    class Program
    {
        static void Main(string[] args)
        {
            string WebName = "Test";   // Change before execute
            int port = 999;                          // Change before execute
            SPFarm farm = SPWebService.AdministrationService.Farm;
            SPWebApplicationBuilder builder = new SPWebApplicationBuilder(farm);
            builder.ApplicationPoolUsername = "Administrator";
            builder.ApplicationPoolPassword = new System.Security.SecureString();
            builder.ApplicationPoolPassword.AppendChar('S'),
            builder.ApplicationPoolPassword.AppendChar('h'),
            builder.ApplicationPoolPassword.AppendChar('a'),
            builder.ApplicationPoolPassword.AppendChar('r'),
            builder.ApplicationPoolPassword.AppendChar('e'),
            builder.ApplicationPoolPassword.AppendChar('P'),
            builder.ApplicationPoolPassword.AppendChar('o'),
            builder.ApplicationPoolPassword.AppendChar('i'),
            builder.ApplicationPoolPassword.AppendChar('n'),
            builder.ApplicationPoolPassword.AppendChar('t'),
            builder.ApplicationPoolPassword.AppendChar('2'),
            builder.ApplicationPoolPassword.AppendChar('0'),
            builder.ApplicationPoolPassword.AppendChar('1'),
            builder.ApplicationPoolPassword.AppendChar('0'),
            builder.ApplicationPoolId = String.Format("AppPool_{0}", WebName);
            builder.DatabaseName = String.Format("SPContentDB_{0}", WebName);
            builder.Port = port;
            builder.Create();
        }
    }
}
When you deal with administrative tasks, you will frequently need to assign passwords. This is a critical aspect, as unencrypted passwords in code create a security hole. For this reason, the SharePoint API forces you to use System.Security.SecureString when handling passwords. This class ensures that the password values cannot be extracted from the memory while your code is running. However, if an attacker gets the compiled code, storing passwords in the code does not hide it. If you're wondering how someone could get access to your highly secured enterprise network, remember that several people—administrators, developers, and managers—may have access to the servers on which your code is running, or at least to the development machines. Also, your code could spread over time and eventually slip into an unsecured domain. You must ensure that your passwords remain completely secure. So, while the following code may look smart, it's actually quite dangerous from a security standpoint:
string password = "SharePoint2010";
foreach (char c in password)
{
    builder.ApplicationPoolPassword.AppendChar(c);
}
The variable password is now in memory, and as long as the garbage collector doesn't clean up this section of memory, the string is readable from a sniffer tool. This might sound not obvious, but it's a common method if the sources and assemblies are not reachable.
Another issue is with the various GUIDs SharePoint uses. You must either reference the right GUID or create a new one. In code, you can generate a new GUID easily in one line:
Guid guid = Guid.NewGuid();
To check what GUIDs already exist, ask the configuration database. (See the section "Retrieving the Configuration Database" near the end of this chapter for more details.)
Having created a new SPWebApplication object, the next step is to configure it. Once you have made all your configuration changes to the new SPWebApplication, call the Update method to persist the settings and update the server farm.
Large enterprises require an amazing number of site collections. Imagine a company with dozens of divisions split into hundreds of independent departments. Each department can run one or more site collections for its specific purpose. The management of hundreds of site collections is a challenging task for administrators; significantly automating that task saves time and money. Creating site collections programmatically ensures that their internal structures will be well defined and will strictly adhere to the enterprise policies.
For administrative purposes you need to think about automation tasks. Using XML (see Listing 17-2) to define the configuration for an action is a common approach.
Example 17.2. XML File for a Site Collection Definition
<?xml version="1.0" encoding="utf-8" ?>
<SiteDefinition>
  <Url>/sites/BlankInternetSite</Url>
  <Title>Generated Site</Title>
  <Description>This site is being genereated by a script.</Description>
  <LCID>1033</LCID>
  <WebTemplate></WebTemplate>
  <OwnerLogin>Administrator</OwnerLogin>
  <OwnerName>Administrator</OwnerName>
  <OwnerEmail>[email protected]</OwnerEmail>
</SiteDefinition>
Tip
If the XML file is part of your project, you can set the value of the file's "Copy to output Directory" property to "Copy always." Visual Studio will copy the file to the output folder alongside the freshly compiled executables.
A console application—see Listing 17-3—is used to read this file (assuming it's in the same folder as the executable).
Example 17.3. A Console Application That Creates a Site Collection from an XML file
using System;
using System.Collections.Generic;
using System.Linq;
using System.Text;
using Microsoft.SharePoint;
using Microsoft.SharePoint.Administration;
using System.Xml.Linq;

namespace Apress.SP2010.CreateSiteCollection
{
    class Program
    {
        static void Main(string[] args)
        {
            System.Environment.ExitCode = CreateSiteCollection();
        }

        private static int CreateSiteCollection()
        {
            try
            {
                string srvUrl = "http://sharepointserve";
                using (SPSite site = new SPSite(srvUrl))
                {
                    // Current collection
                    SPSiteCollection coll = site.WebApplication.Sites;
                    XDocument definition = XDocument.Load("SiteDefinition.xml");
                    XElement root = definition.Element("SiteDefinition");
                    SPSite newSite = coll.Add(
                        root.Element("Url").Value,
                        root.Element("Title").Value,
                        root.Element("Description").Value,
                        Convert.ToUInt32(root.Element("LCID").Value),
                        (String.IsNullOrEmpty(root.Element("WebTemplate").Value) ?
                                        null : root.Element("WebTemplate").Value),
                        root.Element("OwnerLogin").Value,
                        root.Element("OwnerName").Value,
                        root.Element("OwnerEmail").Value
                        );
                    return 0;
                }
            }
            catch (Exception ex)
            {
                Console.WriteLine(ex.Message);
                return 1;
            }
        }
    }
}
The application does not output anything—the return value is merely used to let it run as part of a batch file. After executing this script, which will take a while, you can open the site. If you didn't provide a template, the user will be prompted to select one (see Figure 17-1). (However, this user will have to have an appropriate permission level to do this.)
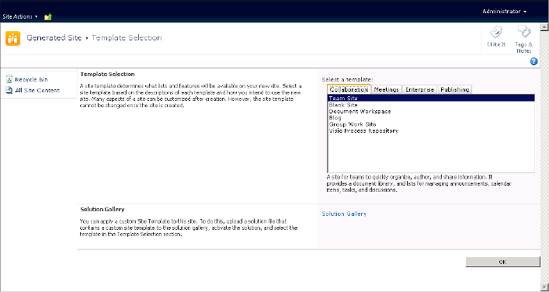
To provide a valid template, you must use the internal name, as defined in %SharePointRoot%/TEMPLATES/SiteTemplates. The AdventureWorks example template, for instance, has the internal name BLANKINTERNET. In XML, the element would look like this:
<WebTemplate>BLANKINTERNET</WebTemplate>
You can extend this example by investigating the other overloads provided by the Add method of the SPSiteCollection class.
When you create a new site collection, it automatically contains one web site: the root web. However, you can create any number of web sites within the site collection to further structure the content. The main reason to create subwebs is to break role inheritance and assign different permissions to users working with particular webs.
From an object model viewpoint, each web site corresponds to an SPWeb object. You need to provide an existing site collection, represented by an SPSite object, to which your new web site will be added. This solution follows a similar approach to the previous example and uses an XML file to define the parameters.
Example 17.4. XML File for a Web Using the Blog Template
<?xml version="1.0" encoding="utf-8" ?>
<SiteDefinition>
  <Url>InternetBlog</Url>
  <Title>Generated Site</Title>
  <Description>This site is being genereated by a script.</Description>
<LCID>1033</LCID>
  <WebTemplate>Blog</WebTemplate>
  <UniquePermissions>False</UniquePermissions>
  <ConvertIfThere>False</ConvertIfThere>
</SiteDefinition>
The code assumes that you have a site collection already. (If you have executed the examples in the order they appear in the book, you should have one.)
Example 17.5. A Console Application That Generates a New Web
using System;
using System.Collections.Generic;
using System.Linq;
using System.Text;
using System.Xml.Linq;
using Microsoft.SharePoint;
using Microsoft.SharePoint.Administration;

namespace Apress.SP2010.CreateWeb
{
    class Program
    {
        static void Main(string[] args)
        {
            System.Environment.ExitCode = CreateWeb();
        }

        private static int CreateWeb()
        {
            try
            {
                string srvUrl = "http://sharepointserve/sites/BlankInternetSite";
                using (SPSite site = new SPSite(srvUrl))
                {
                    // Current collection
                    XDocument definition = XDocument.Load("WebDefinition.xml");
                    XElement root = definition.Element("SiteDefinition");
                    SPWeb newWeb = site.AllWebs.Add(
                        root.Element("Url").Value,
                        root.Element("Title").Value,
                        root.Element("Description").Value,
                        Convert.ToUInt32(root.Element("LCID").Value),
                        (String.IsNullOrEmpty(root.Element("WebTemplate").Value) ?
                                        null : root.Element("WebTemplate").Value),
                        Boolean.Parse(root.Element("UniquePermissions").Value),
                        Boolean.Parse(root.Element("ConvertIfThere").Value)
                        );
                    return 0;
                }
            }
            catch (Exception ex)
            {
                Console.WriteLine(ex.Message);
return 1;
}
}
}
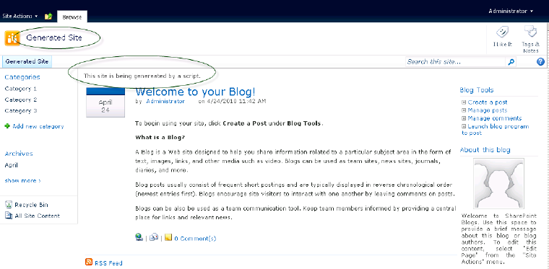
}The XML file references the Blog template. The Url is relative to your current site collection. In the example, the absolute address of the new blog is
http://sharepointserve/sites/BlankInternetSite/InternetBlog/default.aspx
The settings provided by the XML appear in the web, as shown in Figure 17-2.
Creating and removing objects is a frequent task when administering a SharePoint farm. Another is maintaining the configuration in order to handle all the requests users may make.
Each site includes a property bag, which is widely used internally by SharePoint. However, there is no reason why you cannot also use this property bag to store common settings related to a site. You can regard the bag as an application settings collection, equivalent to what you would normally define in a web.config or app.config file. As in the configuration files, the settings are a collection of key/value pairs.
The properties you use for your own purpose should be clearly distinguishable from those used internally. The best way to achieve this is by adding a unique prefix, such as myprop_. You access the properties through the Properties property of the SPWeb object.
The code shown in Listing 17-6 uses the site collection previously created in this chapter to add a private value to the property bag.
Example 17.6. Creating a Custom Site Property
using System;
using System.Collections.Generic;
using System.Collections.Specialized;
using System.Linq;
using System.Text;
using Microsoft.SharePoint;
using System.Collections;

namespace Apress.SP2010.ReadAddModifyProperties
{
    class Program
    {

        const string PREFIX = "myprop_";

        static void Main(string[] args)
        {
            using (SPSite site =
                  new SPSite("http://sharepointserve/sites/BlankInternetSite/"))
            {
                using (SPWeb web = site.RootWeb)
                {
                    foreach (DictionaryEntry entry in web.Properties)
                    {
                        Console.WriteLine("{0} = {1}", entry.Key, entry.Value);
                    }
                    string key = PREFIX + "AutoCreator";
                    if (!web.Properties.ContainsKey(key))
                    {
                        web.Properties.Add(key,
                            String.Format("Created by {0} at {1}",
                            Environment.UserName,
                            DateTime.Now));
                        web.AllowUnsafeUpdates = true;
                        web.Properties.Update();
                    }
                }
            }
            Console.ReadLine();
        }
    }
}
The code displays the existing properties first. To see your new property you must execute the application twice (see Figure 17-3 for the second output). Because this code changes site settings, the AllowUnsafeUpdates property must first be set to true. An additional reset is not required. With the call of the Update method of the Properties collection, the new property is persisted to the site. Calling SPWeb's Update method has no effect here.
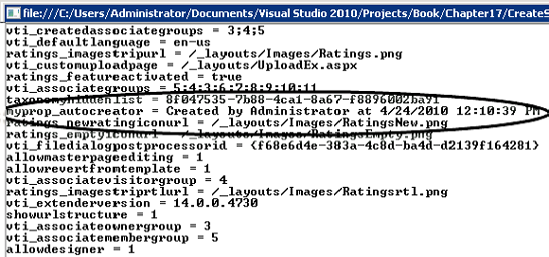
You can now use your custom properties in your code by accessing the Properties collection.
Since SharePoint is built on top of ASP.NET, that means that the distinct configuration method for ASP.NET, the web.config file, plays a pivotal role. As a developer you consider this file part of your project, along with the central web.config file that configures the server, and optionally those sections dedicated to parts of your application. Maintaining, deploying, and reverting configuration file settings are common tasks. Handling the settings in configuration files and providing deployment strategies for them works well for small implementations. However, once your SharePoint farm starts growing, things become more difficult. Not only does the number of settings increase, but the sheer volume of files also makes it hard to find the specific entry to modify for the desired effect. Configuration files form a hierarchy, and the flexible model allows subsequent files to overwrite settings, replacing those added at higher levels. More confusing, settings at higher levels can define themselves as not overwritable to prevent unpredictable changes. The result is that the final values for settings are sometimes hard to explicitly predict, leading to yet another administrative nightmare.
Using the API is much more powerful and opens up the opportunity to confidently maintain configuration settings throughout a farm. Servers added to the farm receive the current settings automatically, and SharePoint ensures that the settings match. In particular, the SafeControl setting, which registers Web Parts as safe to use by end users, can drive you crazy. Whenever a Web Part is deployed, all web.config files in the farm must be updated. Moreover, even a simple change in the version number to get the latest update necessitates changes across the farm. If the Web Part is deployed as part of a feature, either the feature must change the settings, or some manual action must be performed to do so. That's certainly not the picture of an easy-to-administer server farm—missing an obscure step can cause your features to stop working.
The entry point into the web.config configuration is the SPWebConfigModification class. This class is related to SPWebApplication. This means that each web application has its own list of modifications. The SPWebConfigModification class is useful if you have particular entries that you'd like to set. The settings are stored in the content database and applied to existing web.config files. If a new server is added or a new web.config appears, SharePoint ensures that the registered changes are applied automatically. However, for this to happen, there are some preconditions to be met and several aspects to consider:
The modification store contains all changes—not just yours, but also all those made by any other application for the current web.
Every modification has an owner, each with a corresponding
Ownerproperty. In fact, this is a unique string that identifies the owner, and you're free to use any name for it. We suggest using the assembly or feature name. (You could also use a GUID for the entry name, but this would make reading such entries much harder.)Removing changes is easier if you can refer to the owner. If you change a value and remove it later, the original value will be restored. Therefore, you can regard removing as a undo step. This implies that you are not forced to remember the previous settings to restore them later. That's rather useful when a feature sets values, as once it's deactivated, the remove step will restore the previous settings. Reassigning the values explicitly would issue another register cycle, and this could confuse the configuration store. Hence, undo is the better option.
You should connect modifications to features. If the feature has no other task, you can hide it. Using features guarantees the distribution of the modifications across all servers in the farm without any additional code.
To change the settings of an existing entry is easy using this class. The addressing of such entries is straightforward—it uses XPath to navigate within the XML—provided you have a working knowledge of XPath. To access an entry, you can start with the following code:
SPWebConfigModification mod = new SPWebConfigModification();
The object created by this expression has several additional options (see Table 17-1).
Table 17.1. Properties That Modify the Element-Changing Procedure
Property | Description |
|---|---|
| Gets or sets the name of the attribute or section node to be modified or created. This is an XPath expression relative to the parent node. The parent is specified by the |
| Gets or sets the XPath expression that is used to locate the node that is being modified or created. The expression can address either a node or an attribute, depending on what you'd like to change or get. |
| Specifies a unique string to register the modifications against a person, application, process, or whatever is responsible. This is important for ensuring that subsequent changes made by others do not scramble your settings. |
Accepts values within a range of 0 to 65,536. If the same setting is applied multiple times, a lower sequence number is applied first. | |
| Specifies the type of modification. An Ensures that the node exists. If it does not, it creates the node.
|
| Specifies the value to be written, |
| Returns a collection of modified fields as key/value pairs. |
Some typical scenarios should clarify things. Imagine you want to set the error handling and show all exceptions, instead of a short, meaningless message. The following entry in web.config would do the trick:
<configuration>
   <system.web>
      <customErrors mode="Off">
   <system.web>
<configuration>
You can access this entry and effect this change in code:
private void ExtendErrorSettings()
{
   SPWebApplication web = new SPSite(txtUrl.Text).WebApplication;
   var mod = new SPWebConfigModification();
   mod.Name = "mode";
   mod.Path = "//system.web/customErrors";
   mod.Owner = "WebConfigSettings.aspx";
   mod.Sequence = 0;
   mod.Type = SPWebConfigModification.SPWebConfigModificationType.EnsureAttribute;
   mod.Value = "Off";
   web.WebConfigModifications.Add(mod);
   web.Farm.Services.GetValue<SPWebService>().ApplyWebConfigModifications();
   web.Update();
}
The complete sample code contains a web form that enables you to enter the application's address in a TextBox named txtUrl. The name of the ASPX page is used as the owner's name.
Warning
In the code snippet, the current Context is set to null. This is required if and only if you run a separate ASP.NET application to launch the code. Internally, SharePoint checks whether an HttpContext exists and, if there is one, tries to retrieve the current web from it. If the application runs outside the context of SharePoint, this fails. It works fine within a console application, however. Here, the HttpContext is null, and the internal code checks this and skips the steps that rely on it.
You might consider adding code to restore the HttpContext object, if it is required in subsequent steps made on the same page.
Removing the setting is as straightforward as creating it:
private void RemoveErrorSettings()
{
    SPWebApplication web = new SPSite(txtUrl.Text).WebApplication;
    var coll = from c in web.WebConfigModifications
               where c.Owner.Equals("WebConfigSettings.aspx")
               select c;
    if (coll.Count() > 0)
    {
        for (int i = coll.Count() - 1; i >= 0; i--)
        {
            // Ensure that we remove from end
            SPWebConfigModification mod = coll.ElementAt(i);
            web.WebConfigModifications.Remove(mod);
        }
        // If run outside SharePoint, this line is required
        HttpContext.Current = null;
        web.Farm.Services.GetValue<SPWebService>().ApplyWebConfigModifications();
        web.Update();
    }
}
Here, we use a LINQ statement to retrieve the modifications for a particular owner. The collection's elements are removed immediately, so you can't loop using a foreach statement. Instead, the for loop ensures that the elements are deleted by removing the elements in order from last to first.
The modification process is performed by a timer job, and runs quickly but not immediately. If you call the ApplyWebConfigModifications method several times, you could encounter an exception that says, "A web configuration modification is already running." As a best practice you should aggregate all modifications together and call the method only once. Assembling several settings and deploying them as one feature is an acceptable strategy. Creating a number of separate features is harder work and causes more stress for the system.
The configuration changes are stored in the Objects table of the configuration database. You can retrieve the stored values via the following SQL statement:
SELECT * FROM Objects WHERE Name LIKE 'WebConfigChanges%'
You can find the changes easily. However, the values stored in the database are out of sequence. Instead, it seems like they are stored in the database in descending order based on the SPWebConfigModification.Name property. Changing the Name and Value properties leads to a sequence like this:
Name = "remove[@sequence='" + sequence + "']"
Value = "<remove verb='*' path='*.asmx' />"
Name = "add[@sequence='" + sequence + "']"
Value = "<add verb='*' path='*.asmx' validate='false'
              type='System.Web.Script.Services.ScriptHandlerFactory, "
              + Constants.AJAXExtensionsAssembly + "' />"
The add[@path='*.asmx'] code will always come before the remove[@path='*.asmx'] part, even if you put the remove part in the collection first and give it a lower sequence number.
You can use the Sequence property to resolve this issue. If you increment the sequence number for each change, you can use this as the key to finding the node. This will put in order all items that have the same tag, but still doesn't fix the ordering for items with different tag names. (Plus, adding this extra attribute isn't the cleanest code, either.)
Features are a core concept of SharePoint. It is common to create site collections and provide users a collection of features that add particular functionality. If you build many features, you can employ hidden features to deploy support documents, for example. However, hidden features are not visible in the UI, and if it fails you need code or stsadm to remove the feature. To handle this issue, building your own administration environment could be a good idea.
This example shows you how to build a simple WPF application to handle features. It's not as attractive as it could be, but it should give you an idea of how to handle features at different scopes (see Figure 17-4).
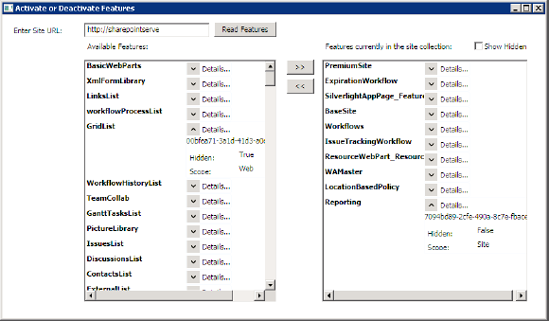
The WPF application (see Listing 17-7) is composed of two parts: the XAML that defines the UI and binding and the code-behind that retrieves the data and handles user actions.
Example 17.7. XAML Code for the Application's UI
<Window x:Class="ActivateFeatures.MainWindow"
        xmlns="http://schemas.microsoft.com/winfx/2006/xaml/presentation"
        xmlns:x="http://schemas.microsoft.com/winfx/2006/xaml"
        Title="Activate or Deactivate Features" Height="487" Width="831">
    <Grid>
        <TextBox Height="23" HorizontalAlignment="Left" Margin="124,12,0,0"
                 Name="txtUrl" VerticalAlignment="Top" Width="191" />
        <Label Content="Enter Site URL:" Height="23" HorizontalAlignment="Left"
               Margin="12,12,0,0" Name="label1"
               VerticalAlignment="Top" Width="106" />
        <Button Content="Read Features" Height="23" HorizontalAlignment="Left"
                Margin="321,11,0,0" Name="btnRead"
                VerticalAlignment="Top" Width="95" Click="btnRead_Click" />
        <ListBox Height="368" ItemsSource="{Binding}" HorizontalAlignment="Left"
                 Margin="124,68,0,0" Name="lstFarm"
                 VerticalAlignment="Top" Width="292">
            <ListBox.ItemTemplate>
                <DataTemplate>
                    <StackPanel Orientation="Horizontal">
                        <TextBlock Text="{Binding DisplayName}" Height="21"
                                   Margin="0,0,0,0" Width="150"
                                   FontWeight="Bold" VerticalAlignment="Top" />
                        <Expander Header="Details..." Margin="0,0,0,0"
                                  BorderThickness="1"
                                  BorderBrush="AliceBlue"
                                  VerticalAlignment="Top">
                            <Grid Width="160">
                                <Grid.ColumnDefinitions>
                                    <ColumnDefinition />
                                    <ColumnDefinition />
                                </Grid.ColumnDefinitions>
                                <Grid.RowDefinitions>
                                    <RowDefinition Height="21" />
                                    <RowDefinition Height="21" />
                                    <RowDefinition Height="21" />
                                </Grid.RowDefinitions>
                                <TextBlock Text="{Binding Id}" Grid.ColumnSpan="2"
                                           Grid.Row="0" Grid.Column="0" />
                                <Label Content="Hidden:" Grid.Row="1"
                                       Grid.Column="0" VerticalAlignment="Top" />
                                <TextBlock Text="{Binding Hidden}" Grid.Row="1"
                                            Grid.Column="1" />
                                <Label Content="Scope:" Grid.Row="2" Grid.Column="0"
                                       VerticalAlignment="Top"/>
                                <TextBlock Text="{Binding Scope}" Grid.Row="2"
                                           Grid.Column="1"/>
                            </Grid>
                        </Expander>
                    </StackPanel>
                </DataTemplate>
            </ListBox.ItemTemplate>
</ListBox>
<ListBox Height="368" HorizontalAlignment="Left" Margin="485,68,0,0"
Name="lstSite" VerticalAlignment="Top" Width="312">
<ListBox.ItemTemplate>
<DataTemplate>
<StackPanel Orientation="Horizontal">
<TextBlock Text="{Binding DisplayName}" Width="150"
Margin="0,0,0,0" FontWeight="Bold"
VerticalAlignment="Top"/>
<Expander Header="Details..." BorderThickness="1"
BorderBrush="AliceBlue" Margin="0,0,0,0"
ExpandDirection="Down" VerticalAlignment="Top">
<Grid Width="160">
<Grid.ColumnDefinitions>
<ColumnDefinition />
<ColumnDefinition />
</Grid.ColumnDefinitions>
<Grid.RowDefinitions>
<RowDefinition Height="21" />
<RowDefinition Height="21" />
<RowDefinition Height="21" />
</Grid.RowDefinitions>
<TextBlock Text="{Binding Id}" Grid.ColumnSpan="2"
Grid.Row="0" Grid.Column="0" />
<Label Content="Hidden:" Grid.Row="1"
Grid.Column="0" VerticalAlignment="Top" />
<TextBlock Text="{Binding Hidden}" Grid.Row="1"
Grid.Column="1" />
<Label Content="Scope:" Grid.Row="2" Grid.Column="0"
VerticalAlignment="Top"/>
<TextBlock Text="{Binding Scope}" Grid.Row="2"
Grid.Column="1"/>
</Grid>
</Expander>
</StackPanel>
</DataTemplate>
</ListBox.ItemTemplate>
</ListBox>
<Label Content="Available Features:" Height="28" HorizontalAlignment="Left"
Margin="124,36,0,0" Name="label2"
VerticalAlignment="Top" Width="106" />
<Label Content="Features currently in the site collection:" Height="28"
HorizontalAlignment="Left" Margin="485,36,0,0"
Name="label3" VerticalAlignment="Top" Width="229" />
<Button Content=">>" Height="23" HorizontalAlignment="Left"
Margin="431,68,0,0" Name="btnAdd"
VerticalAlignment="Top" Width="42"
IsEnabled="{Binding ElementName=listBox1, Path=SelectedIndex}"
Click="btnAdd_Click" />
<Button Content="<<" Height="23" HorizontalAlignment="Left"
Margin="431,97,0,0" Name="btnRemove" VerticalAlignment="Top"
Width="42" Click="btnRemove_Click" />
<CheckBox Content="Show Hidden" Height="16" HorizontalAlignment="Left"
Margin="716,41,0,0" Name="checkBox1" VerticalAlignment="Top"IsChecked="True" Checked="checkBox1_Checked"
Unchecked="checkBox1_Checked" />
</Grid>
</Window>This UI is shown in Figure 17-4 already filled with sample data. For clarity, the exception handling is omitted. The basic functionality is quite simple (see Listing 17-8). The left-hand list shows the available features. An Expander element is used to display a feature's scope, ID, and whether it's hidden. The right-hand list presents the currently activated features. The check box in the upper-right corner allows the user to hide or show features defined as hidden.
Example 17.8. Code for the Application
using System;
using System.Collections.Generic;
using System.Linq;
using System.Text;
using System.Windows;
using System.Windows.Controls;
using System.Windows.Data;
using System.Windows.Documents;
using System.Windows.Input;
using System.Windows.Media;
using System.Windows.Media.Imaging;
using System.Windows.Navigation;
using System.Windows.Shapes;
using Microsoft.SharePoint.Administration;
using Microsoft.SharePoint;

namespace Apress.SP2010.ActivateFeatures
{
    /// <summary>
    /// Interaction logic for MainWindow.xaml
    /// </summary>
    public partial class MainWindow : Window
    {

        SPSite site;
        SPWeb web;

        public MainWindow()
        {
            InitializeComponent();
            txtUrl.Text = "http://sharepointserve";
        }

        private void ReadSource()
        {
            if (!String.IsNullOrEmpty(txtUrl.Text.Trim()))
            {
                try
                {
                    site = new SPSite(txtUrl.Text);
                    web = site.RootWeb;
var features = from f in site.Features
where f.Definition.Hidden == checkBox1.IsChecked
select f.Definition;
lstSite.ItemsSource = features;
var farmdefs = from f in SPFarm.Local.FeatureDefinitions
where (f.Scope == SPFeatureScope.Web
|| f.Scope == SPFeatureScope.Site)
&& !features.Contains(f)
select f;
lstFarm.ItemsSource = farmdefs;
}
catch (Exception ex)
{
MessageBox.Show(ex.Message, "Error", MessageBoxButton.OK);
}
}
}
private void btnRead_Click(object sender, RoutedEventArgs e)
{
ReadSource();
}
private void btnAdd_Click(object sender, RoutedEventArgs e)
{
if (lstFarm.SelectedIndex != −1)
{
SPFeatureDefinition definition =
lstFarm.SelectedItem as SPFeatureDefinition;
if (definition.Scope == SPFeatureScope.Site)
{
site.Features.Add(definition.Id);
}
if (definition.Scope == SPFeatureScope.Web)
{
web.Features.Add(definition.Id);
}
ReadSource();
}
}
private void btnRemove_Click(object sender, RoutedEventArgs e)
{
if (lstSite.SelectedIndex != −1)
{
SPFeatureDefinition definition =
lstSite.SelectedItem as SPFeatureDefinition;
site.Features.Remove(definition.Id);
ReadSource();
}
}
private void checkBox1_Checked(object sender, RoutedEventArgs e)
{ReadSource();
}
}
}The two buttons in the middle of the screen add or remove features. An add is performed by adding a feature definition to the site or web's Feature property. A remove is the reverse. The data source used to bind to the lists uses LINQ to select the desired data.
Not all tasks are primarily for administrators. Reading information about a site's current structure is a common way to create smarter controls. The SPSiteDataQuery class is a good entry point for information retrieval projects. The class is available for sandboxed solutions. To work with the class, you assign CAML queries as strings to the appropriate properties, as shown in Listing 17-9.
Example 17.9. Data Retrieval with a Web Part
public class ContactViewer : WebPart
{
   private GridView grid;

   protected override void CreateChildControls()
   {
      base.CreateChildControls();
      // Add an instance of the GridView control
      this.grid = new GridView();
      this.Controls.Add(this.grid);
   }

   protected override void RenderContents(HtmlTextWriter writer)
   {
      SPWeb web = SPContext.Current.Web;
      SPSiteDataQuery query = new SPSiteDataQuery();

      // Ask for all lists created from the contacts template
      query.Lists = "<Lists ServerTemplate="105" />";

      // Get the Title (Last Name) and FirstName fields
      query.ViewFields = @"<FieldRef Name='Title' />
                           <FieldRef Name='FirstName' Nullable='TRUE'/>";

      // Set the sort order
      query.Query = @"<OrderBy>
                        <FieldRef Name='Title' />
                      </OrderBy>";

      // Query all web sites in this site collection
      query.Webs = @"<Webs Scope='SiteCollection' />";

      DataTable dt = web.GetSiteData(query);
      DataView dv = new DataView(dt);
// Set up the field bindings
BoundField boundField = new BoundField();
boundField.HeaderText = "Last Name";
boundField.DataField = "Title";
this.grid.Columns.Add(boundField);
boundField = new BoundField();
boundField.HeaderText = "First Name";
boundField.DataField = "FirstName";
this.grid.Columns.Add(boundField);
this.grid.AutoGenerateColumns = false;
this.grid.DataSource = dv;
this.grid.DataBind();
this.grid.AllowSorting = true;
this.grid.HeaderStyle.Font.Bold = true;
this.grid.RenderControl(writer);
}
}To check the internal configuration, you can gather values from the configuration database directly. This is useful for checking what IDs or GUIDs are already in use on your farm, to help administration tools checking out references, for instance. The code shown in Listing 17-10 demonstrates this approach.
Example 17.10. Retrieving Values from the Configuration Database
using System;
using Microsoft.SharePoint;
using Microsoft.SharePoint.Administration;

namespace Apress.SP2010.ConfigDatabase
{
    class Program
    {
        static void Main(string[] args)
        {
            using (SPSite site = new SPSite("http://sharepointserve"))
            {
                SPContentDatabase cb = site.ContentDatabase;
                Console.WriteLine("Content Database: {0}", cb.DisplayName);
                Console.WriteLine("Connection String: {0}",
                                              cb.DatabaseConnectionString);
                Console.WriteLine("Size: {0} Bytes", cb.DiskSizeRequired);
                foreach (SPSite s in cb.Sites)
                {
                    Console.WriteLine(" Sites: {0}", s.Url);
}
}
Console.ReadLine();
}
}
}Beginning from the root site collection, the SPContentDatabase object is retrieved. The object contains several methods and properties. In this example, the name, current size, and database connection string are output, as shown in Figure 17-5. In addition, the foreach loop retrieves all the other site collections that store their data in the same content database.

In this chapter you learned about programming administrative tasks. Several classes are provided by the API to support you're ability to create command-line tools, Web Parts, and applications that help users perform particular administrative actions. Several administrative help maintain the systems, and get information about the health and internal state beyond what the UI and Central Administration allow.
In an ASP.NET environment, the web.config file plays a significant role. Manipulating this file gives an administrator full control over an application's behavior. Mistakenly changing configuration elements can cause general failure. Automate such manipulation tasks to avoid human errors and reduce the risk of an outage of a production system.