
In this chapter we focus on the client object model introduced in SharePoint Foundation 2010. There are three new object models for interacting with SharePoint sites in different scenarios: the two managed code models for .NET and Silverlight, and the JavaScript object model. We cover two basic techniques in this chapter:
Using JavaScript that executes in the browser
Using code that executes in a .NET managed application
With these new object model implementations, it is much easier to build fast and robust applications that interact with SharePoint sites. Imagine you want to build a Silverlight application that displays data from SharePoint lists. In previous SharePoint versions, the only way to access SharePoint list items was to implement a web service call and handle all the asynchronous data retrieval via hand-coded routines. With SharePoint 2010 you get a client object model, specially customized for use in Silverlight applications, to access SharePoint list data. A similar situation arises if you are using JavaScript (Ajax) in your application and you want to access list items from a SharePoint site. There is a JavaScript object model equivalent to the other client models, and you don't have to deal directly with web services and their internal implementation.
The client object model can be used in much the same manner as the well-known server object model—get an SPWeb object instance and access its properties, such as SPWeb.Lists and SPWeb.Users.
The examples within this chapter are mainly focused on the .NET managed code and the JavaScript object models. Code that executes in a Microsoft Silverlight application (for Silverlight version 2.0 onward) works similarly to the managed code that the regular .NET Framework provides. However, the current development stage of the client libraries seems to be far behind the .NET Framework. To express the differences explicitly, we dedicate a whole chapter (Chapter 13) to Silverlight and the client object model support available there.
The new JavaScript, .NET managed, and Silverlight client object models each provide a subset of the server object model that is defined in Microsoft.SharePoint.dll.
There are objects that correspond to the major objects in the server-side object model. Because the primary goal is to improve the security and performance, the client object model focuses on the most relevant APIs for client-side development, and does not contain all the types and properties that are implemented in the server-side model. The limited scope of the client object model reduces the size of the client libraries and thus reduces the download time in the Silverlight and JavaScript contexts.
The new object models are designed to minimize the number of round trips that must be implemented for custom actions, such as web service requests. The object model provides a consistent, easy-to-use, object-oriented system for interoperating with SharePoint data from a remote client or server.
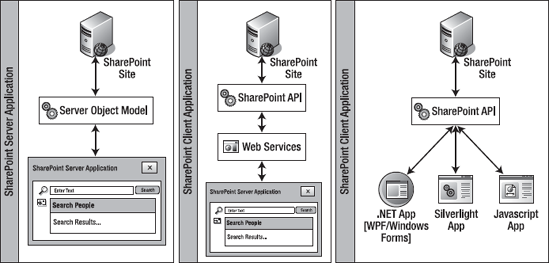
Figure 12-1 shows three ways to access SharePoint data. In the left pane, a SharePoint application page or Web Part runs on the server and interacts with the server object model directly. This is the traditional server-side approach. In previous SharePoint versions—without the client object model—you had to use web services to access SharePoint data, as you can see in the middle of the figure. The client object model is illustrated in the right pane. It allows .NET managed applications, Silverlight applications, and browser-based JavaScript applications to interact with a SharePoint site.
All three client object models are very similar. They offer the same object model hierarchy, data retrieval semantics, client objects, and exception-handling methods. If you are already familiar with the server-side SharePoint API, you can quickly adapt to using the client object model in your own applications.
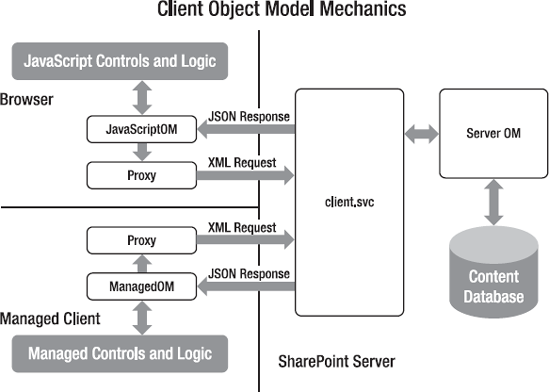
To use the client object models, you need to reference certain proxy files: JS files for JavaScript, and managed DLL files for Silverlight or .NET client applications. The raw data requested from the server is returned in compacted JavaScript Object Notation (JSON) format. The proxy classes parse the JSON data and deserialize it into appropriate objects. As a developer, you merely utilize the client object model. It transparently uses asynchronous data access to optimize the performance of complex operations and queries. An overview of the client object model architecture is illustrated in Figure 12-2.
The first task with the client object model is to reference local copies of the DLL or JS files. Of course, this can also be performed on a remote computer on which SharePoint 2010 is not installed.
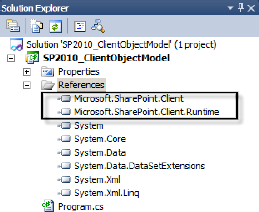
To develop a custom Windows application, you need to reference two DLLs:
These files are usually installed into this directory:
%ProgramFiles%Common FilesMicrosoft Sharedweb server extensions14ISAPI
In Figure 12-3, the two referenced .NET managed code libraries are shown for a new Windows console application.
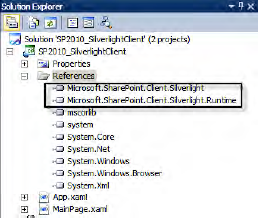
To develop a Silverlight application, you need to use the following two assemblies:
The SharePoint installer puts these files into a special scripts folder, which is the standard folder for hosting assemblies used in Silverlight:
%ProgramFiles%Common FilesMicrosoft Sharedweb server extensions14TEMPLATELAYOUTSClientBin
Figure 12-4 shows a Silverlight project with referenced client libraries in Solution Explorer in Visual Studio 2010. For the cases in which the statements are not valid for both .NET and Silverlight, we give the Silverlight statements as well. The examples and code snippets, however, require different techniques to get them running under the particular framework. For more information on how to deal specifically with the Silverlight client object model, see Chapter 13.
The JavaScript client object model consists of several JS files that are all installed into the LAYOUTS folder under the path %ProgramFiles%Common FilesMicrosoft Sharedweb server extensions14TEMPLATELAYOUTS:
All JavaScript files are available in two versions: one with compressed files for production use and one with a .debug.js extension for development and debugging. The files for debugging are readable and thus larger in size than the files for production use. Compression involves removing all line breaks and replacing several longer variable names with shorter ones to optimize the overall size of the files. For example, the file SP.js (380KB) is nearly 40 percent smaller than SP.debug.js (559KB).
To use these JavaScript files in your SharePoint application pages or Web Parts, you need to include these scripts by using the tag <SharePoint:ScriptLink>, as follows:
<SharePoint:ScriptLink runat="server" Name="sp.js" Localizable="false" LoadAfterUI="true" />
The web control ensures that the JavaScript file is loaded, including all dependencies. Note that the client computer using the JavaScript object model must support the minimum set of requirements needed for ASP.NET AJAX and SharePoint 2010. The supported browsers (with their minimum version numbers) are Microsoft Internet Explorer 7, Firefox 3.5, and Safari 4.0.
Tip
The "Development Best Practices" section later in this chapter explains how to set up Visual Studio 2010 to work with JavaScript and how to use IntelliSense.
There are two core namespaces for the client object model. The Microsoft.SharePoint.Client namespace is used for the .NET managed and Silverlight APIs. SP is the core namespace for the JavaScript object model.
In addition to the core namespaces, SharePoint provides the namespaces shown in Table 12-1.
Table 12.1. Additional SharePoint Client Object Namespaces
JavaScript | |
|---|---|
|
|
| |
| |
| |
| |
| |
| |
|
|
|
|
Clearly, Table 12-1 shows that the JavaScript client object model contains more elements than the .NET managed code and Silverlight APIs. The additional namespaces in JavaScript mostly cover functionality to access SharePoint UI elements such as the ribbon bar.
Table 12-2 compares the more important client objects and their corresponding classes.
Table 12.2. Comparison of SharePoint Main Objects Between Client Object Models
Server | .NET Managed Code and Silverlight | JavaScript |
|---|---|---|
|
|
|
|
|
|
|
|
|
|
|
|
|
|
|
|
|
|
Table 12-2 shows that the SharePoint administration objects (e.g., Microsoft.SharePoint.Administration) are not supported by the client API. Only the basic objects to work with site collections (Site), sites (Web), lists (List), list items (ListItem), and fields (Field) are supported. But that's sufficient to access SharePoint data.
The ClientContext class is the entry point for programming with the client object model. It behaves very similarly to the server-side SPContext object, and it ensures that there is a single object as a starting point for working with the client object model. The following examples demonstrate the use of the ClientContext class with .NET managed code (marked with [.NET]), Silverlight (marked with [Silverlight]), and JavaScript (marked with [JavaScript]).
[.NET]
ClientContext clientContext = new ClientContext("http://servername");

[Silverlight]
ClientContext clientContext = new ClientContext("http://servername");

[JavaScript]
var clientContext = new SP.ClientContext("/siteCollection/site");
The examples create an instance of the ClientContext class for a specific site. Usually, the ClientContext constructor takes a URL parameter to get the connection to a web site or site collection. In the Silverlight managed code implementation, it is also possible to ignore the URL and instead access the ClientContext.Current property to get the ClientContext of the current site. This instantiation only works if the Silverlight application runs directly within SharePoint, such as within a Web Part. In JavaScript, this works in much the same way, and you have two options to get a ClientContext of the current site: either via the SP.ClientContext.get_current property or through the empty version of the SP.ClientContext constructor:
[.NET]
ClientContext clientContext = new ClientContext.Current;

[Silverlight]
var clientContext = SP.ClientContext.get_current();

[JavaScript]
var clientContext = new SP.ClientContext();
A very important subject when using the ClientContext class is authentication. There are three possible authentication modes:
DefaultAnonymousFormsAuthentication
By default, the managed client object models authenticate users via their current Windows credentials (NTLM and Kerberos). Optionally, you can define another authentication mode (e.g., Anonymous) to access a SharePoint site that needs no authentication or FormsAuthentication if the SharePoint site uses form-based authentication. When using form-based authentication, you have to supply a username and a password to the ClientContext instance. Internally, SharePoint first calls the Authentication web service to obtain the authentication cookie before making the requested object model calls. When using JavaScript, you don't have to worry about the correct authentication mode because JavaScript itself already runs in an authenticated page.
If you want to use anonymous authentication from .NET managed code, you have to set the AuthenticationMode property of the client context instance:
clientContext.AuthenticationMode = ClientAuthenticationMode.Anonymous
When connecting to a SharePoint site with Forms Authentication enabled, you also have to set the FormsAuthenticationLoginInfo property:
clientContext.AuthenticationMode = ClientAuthenticationMode.Anonymous
clientContext.FormsAuthenticationLoginInfo =
                               new FormsAuthenticationLoginInfo("user","password")
Warning
The Silverlight object model does not offer the property ClientContext.AuthenticationMode. If you build a Silverlight application that runs within the SharePoint context, it automatically uses the information of the current user, and it works well. However, it is not possible to use the Silverlight client object model with anonymous authentication. Also, building standalone Silverlight applications that connect to SharePoint sites is not supported. For more details, see Chapter 13.
When working with ClientContext instances, you are also working with client objects. A client object is any object that inherits from Microsoft.SharePoint.Client.ClientObject (.NET managed code and Silverlight) or SP.ClientObject (JavaScript). All SharePoint objects on the client side (e.g., Site, Web, List, and ListItem) are inherited from ClientObject.
It is important to know that client objects initially have no data—they are essentially empty objects. To populate them with data, you first have to define what data should be retrieved. After this you can query the server for the defined data. The response populates the client objects with this data. Using the client object model to load and query data is explained in detail in the next two sections: "Working with Data" and "Data Loading and Querying."
In contrast to client objects, there are value objects that inherit from Microsoft.SharePoint.Client.ClientValueObject (.NET managed code and Silverlight) and SP.ClientValueObject (JavaScript). As mentioned, objects such as Site, Web, List, and ListItem are client objects; however, values of list items, such as FieldLookupValue, are value objects. You can view value objects as simple model classes that contain properties but no methods. Value objects behave like C# structs and usually contain a set of primitive types, such as string or int.
As you will see in the examples that follow, the SharePoint client object model has a built-in "intelligence" for dealing with objects. The aim was to make using the client object model as easy as possible. For example, consider a client-side process that creates a list and then adds a new list item to that list. Normally you would do that with two separate operations: one that creates a list and another that adds an item to that list (where the list is identified by a newly generated ID). The client object model allows you to load these dependent operations into a single batch queue that is executed with only one call to the SharePoint server.
The client object model handles the complexity of retrieving and using the new object identity (in the example of creating a new list, this is the newly assigned ListID). You don't have to worry about creating a list, getting the ListID, and adding an item to that list. The result is that using the client object model is very much like the more familiar server-side object model. Thus, you can write more complex operations before starting a round trip to the server.
The only thing you have to remember is that such chained operations are only possible within the same ClientContext instance. Separate contexts do not automatically handle the object identity. This means that you should, as much as possible, ensure that only one ClientContext instance exists in your code.
Using the client object model to retrieve data from SharePoint is not difficult, but first you need to understand the underlying principles. Client-side data retrieval is not as straightforward as when using the server-side object model. Listings 12-1 and 12-2 illustrate this.
Example 12.1. Retrieving the Web Object and Printing Out the Title
class Program
{
    static void Main(string[] args)
    {
        ClientContext ctx = new ClientContext("http://clserver");
        Web web = ctx.Web;
        ctx.Load(web);
        ctx.ExecuteQuery();
        Console.WriteLine(web.Title);
    }
}
The example in Listing 12-1 uses the .NET managed code client object model to access a specific SharePoint site. It loads the Web object, executes a query, and finally writes out the Title property of the retrieved Web object. Listing 12-2 shows the equivalent code for the JavaScript API.
Example 12.2. Retrieving the Web Object and Displaying the Title in an Alert Box
<script type="text/javascript">
    var web = null;
    function showWebTitle() {
        var ctx = new SP.ClientContext.get_current();
        web = ctx.get_web();
        ctx.load(web);
        ctx.executeQueryAsync(onSucceededCallback, onFailedCallback)
    }

    function onSucceededCallback(sender, args) {
        alert('Title: ' + web.get_title());
    }

    function onFailedCallback(sender, args) {
        alert('Request failed. ' + args.get_message() + '
' + args.get_stackTrace());
    }

</script>
Listing 12-2 uses asynchronous methods (ClientContext.executeQueryAsync) to retrieve the data from SharePoint. Asynchronous data retrieval is always necessary when using the JavaScript client object model, because otherwise the browser would freeze until the server responded or timed out. In contrast to the JavaScript object model, the .NET managed code client object model only offers a synchronous method, ClientContext.executeQuery. If you want asynchronous calls in your Windows client applications, you can easily accomplish this by implementing your own thread handling. When using asynchronous data retrieval, you have to define two delegates (Silverlight) or callback methods (JavaScript) that are executed when the request to the remote server finishes (see onSucceededCallback and onFailedCallback).
The most important point to understand is the combination of loading and querying data. These are two separate tasks that comprise one operation:
Loading data means you inform the client object model about operations that you want to perform. Operations include, for example, accessing properties of objects (such as
Site,Web,List,ListItem, orField), defining CAML queries that you want to run, and manipulating (inserting, updating, or deleting) list items.Querying data takes your loaded operations and sends them to the SharePoint server. Note that no network access occurs until you call
ExecuteQueryorExecuteQueryAsync. Until that point, data loading only registers requests without executing them.
The loading method for objects or collections uses the LINQ lambda expression syntax. To load objects, collections, or data, you use the Load and LoadQuery methods:
void Load<T>(T clientObject, params
             System.Linq.Expressions.Expression<Func<T,object>>[] retrievals)
The LoadQuery method returns an IEnumerable and is defined with your choice of two constructors:
IEnumerable<T> LoadQuery<T>(IQueryable<T> clientObjects)
IEnumerable<T> LoadQuery<T>(ClientObjectCollection<T> clientObjects)
For the JavaScript client object model, the two corresponding methods are
Load(clientObject)
LoadQuery(clientObjectCollection, expression)
The LoadQuery method works in much the same way as the Load method, but it allows the client to process the queries more efficiently. As the preceding definitions indicate, the LoadQuery method has a syntax that differs from the Load method. The main difference is that the Load method populates the client object or client object collection that is passed into it. (In the examples shown in Listings 12-1 and 12-2, the Load method simply populates the properties of the Web object.) The LoadQuery method instead returns an entirely new collection of client objects. To get a clarification of these differences, examine the following examples for .NET managed code. They both write the same result to the console.
In Listing 12-3, the Load method is initialized with the instance ctx.Web.Lists. After the query execution, the client object instance ctx.Web.Lists is populated with data and can be directly accessed.
Example 12.3. Retrieving the Number of Lists via the Load Method
class Program
{
static void Main(string[] args)
{
ClientContext ctx = new ClientContext("http://server");
ctx.Load(ctx.Web.Lists);
ctx.ExecuteQuery();
Console.WriteLine("" + ctx.Web.Lists.Count);
Console.ReadLine("Press RETURN...");
}
}Listing 12-4, which follows, uses the LoadQuery method, which is also initialized with the ctx.Web.Lists object. However, after the query is executed, the lists are returned as a completely new client object collection. If you try to directly access the property ctx.Web.Lists.Count, a CollectionNotInitialized exception is raised. This implies that, unlike in Listing 12-3, the original ctx.Web.Lists property has not been populated. Instead, a new allLists collection has been created and populated.
Example 12.4. Retrieving the Number of Lists via the LoadQuery Method
class Program
{
     static void Main(string[] args)
     {
        ClientContext ctx = new ClientContext("http://server");
        IEnumerable<List> allLists = ctx.LoadQuery(ctx.Web.Lists);
        ctx.ExecuteQuery();
        Console.WriteLine("" + allLists.Count());
        Console.ReadLine("Press RETURN...");
    }
}
The advantage of LoadQuery over the Load method is its flexibility, especially when working with more than one query. It gives you better control over memory consumption, and query processing is more efficient. Consider garbage collection: the Load method populates objects that reside within the ClientContext instance. Those objects can only be cleaned up when the ClientContext instance is destroyed. Conversely, objects created by LoadQuery are separate from the ClientContext instance and can be destroyed much more readily, for example by setting them to NULL. In addition, if you want to query the same object collection multiple times and retain separate results for each query, this query will fail when using the Load method. To examine this point, try to query for all unhidden lists and then query all hidden lists (see Figure 12-5).

To overcome this issue you have to use LoadQuery, as shown in Listing 12-5.
Example 12.5. Querying the Same Lists with Two Different Queries
class Program
{
    static void Main(string[] args)
    {
        ClientContext ctx = new ClientContext("http://clserver");

        IEnumerable<List> shownLists = ctx.LoadQuery(
            ctx.Web.Lists.Include(list => list.Title).Where(list => !list.Hidden));

        IEnumerable<List> hiddenLists = ctx.LoadQuery(
            ctx.Web.Lists.Include(list => list.Title).Where(list => list.Hidden));

        ctx.ExecuteQuery();

        foreach (var list in shownLists)
            Console.WriteLine("shown list -> " + list.Title);
        foreach (var list in hiddenLists)
            Console.WriteLine("hidden list -> " + list.Title);
    }
}
The example in Listing 12-5 defines two queries on the ctx.Web.Lists collection. One query queries all lists where the Hidden property is false, and the other returns all lists where the Hidden property is true. Finally, the Title property of the lists is written out to the console.
When using the various client object models, be aware that there are some small differences, especially between the managed code and JavaScript implementations.
The constructors of the ClientContext class are different among the three client object models. For JavaScript you have to provide a server-relative URL:
[JavaScript]
var clientContext = new SP.ClientContext("/mySiteCollection/mySite");
When working with the managed object models for Windows or Silverlight applications, you need to use either an absolute URL or an object of type System.Uri:
[.NET]
ClientContext clientContext = new ClientContext("http://servername");

[Silverlight]
ClientContext clientContext = new ClientContext("http://servername");Keep in mind that between the managed object model and the JavaScript object model, there are some differences regarding the data types. Most of the data types behave similarly to each other, but there are some language-specific particularities, like the NaN (Not a Number) value in JavaScript, which has no equivalent in managed code. On the other hand, complex list objects like StringCollection in managed code do not exist on the JavaScript side and therefore are implemented as normal arrays—in our example, as string[].
When using JavaScript you do not need to worry about authentication because the page that runs your JavaScript is already authenticated either by Windows Authentication or Forms Authentication. If you are using the managed object models and you want to use Forms Authentication instead of Windows Authentication, use code like this:
[.NET]
clientContext.FormsAuthenticationLoginInfo = new
FormsAuthenticationLoginInfo("user","password");Before you can use the JavaScript object model on a page, you have to ensure that the page contains the FormDigest web control. This web control inserts a security validation token within the form of an ASPX page. When making a call to the server—for example, to retrieve data—this token will also be included and validated by the server. A security token is specific to a user, site, and time period—thus, it expires after a configurable time interval.
<SharePoint:FormDigest runat="server" />
The output of the FormDigest control in a rendered ASPX page looks like:
<input type="hidden" name="__REQUESTDIGEST" id="__REQUESTDIGEST"
value="0x2FCF84AE7A97855C64D0A9620C39B3ECA66695C4A1B087A570C01DD1EE0E
426B6B3D9B716E9D8128B86D9E28FE6BA7B16BDB13F5C7991DFA830285453A9E6103,
20 Dec 2009 16:35:48 -0000" />
Using the FormDigest to validate requests prevents attacks wherein a user is tricked into posting data to the server.
As you have learned in this section, there are a few differences between the managed object models used for Windows and the JavaScript object model. The main differences are summarized in Table 12-3.
Table 12.3. Main Differences Between SharePoint Objects Models
Category | .NET Managed Code | JavaScript |
|---|---|---|
Constructor URL | Absolute URL | Server-relative URL |
Data types |
|
|
Forms authentication | Explicit | Integrated |
Form digest | Not required | Needs |
Within the JavaScript client object model, there is an important framework introduced with SharePoint 2010: the Dialog framework. This framework is a set of JavaScript classes that are used for displaying dialogs.
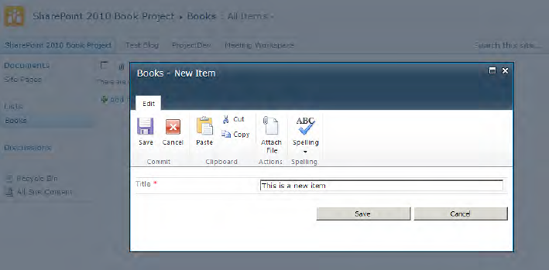
Modal pop-up dialogs are an integral component of the SharePoint 2010 user interface. They allow users to perform actions without losing the underlying information. For example, if you are working with items, the display, edit, and new forms are displayed in a pop-up dialog (see Figure 12-6). The background appears darkened (creating a lightbox effect) and thus inactive, so the user is forced to deal first with the dialog before returning to the original page.
Some important usability improvements with the SharePoint 2010 user interface include
Reduced page transitions and postbacks to keep the user in context
Heavy use of modal dialogs
Improved use of modal dialogs (e.g., offering the ability to maximize, close, and move them)
Modal pop-up dialogs are easily created using JavaScript. From a technical perspective, the Dialog framework consists of a single JavaScript library, SP.UI.Dialog.js. (The corresponding fully readable library is SP.UI.Dialog.debug.js.) Listing 12-6 shows how to display an external web page as pop-up dialog.
Example 12.6. Opening an External Web Page as a Pop-Up Dialog with JavaScript
function showDialog() {
var options = {
url: 'http://sharepoint2010.microsoft.com',
width: 700,
title: 'Microsoft SP2010',
allowMaximize: true,
showClose: true
}
SP.UI.ModalDialog.showModalDialog(options);
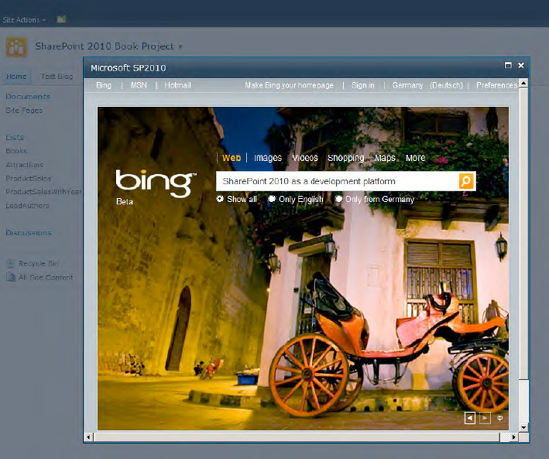
}Before you call SP.UI.ModalDialog.showModalDialog, you have to define some options, such as the URL, dialog width, dialog title, and behavior of the maximize and close buttons. The result is shown in Figure 12-7.
The possible options that can be passed to the function SP.UI.ModalDialog.showModalDialog are summarized in Table 12-4.
Table 12.4. Options for Function showModalDialog
Description | |
|---|---|
| Specifies the absolute or relative URL for the page to be displayed within the pop-up |
| Contains HTML content to be displayed within the pop-up if the |
| Defines the title of the dialog |
| Defines the dialog width in pixels |
| Defines the dialog height in pixels |
| Indicates whether the dialog can be maximized ( |
| Indicates whether the maximize box in the upper-right corner should be displayed ( |
| Indicates whether the close box in the upper-right corner should be displayed ( |
| Points to a function that should be called when the dialog is closed |
To interact with the data or the result of a dialog, the Dialog framework provides callback mechanisms. Listing 12-7 shows an example of using callbacks.
Example 12.7. Using Callbacks with JavaScript
function myCallback(dialogResult, returnValue) {alert('I am back!')}function showDialog() { var options = { url: 'http://sharepoint2010.microsoft.com', width: 700, title: 'Microsoft SP2010', allowMaximize: true, showClose: true,dialogReturnValueCallback:myCallback} SP.UI.ModalDialog.showModalDialog(options); }
The options instance that is used for calling the showModalDialog function contains a reference (dialogReturnValueCallback) to the function myCallback. Immediately after the dialog is closed, this function will be called and an alert box displayed.
The example in Listing 12-7 uses a very simple callback without utilizing the two callback parameters dialogResult and returnValue. These two parameters are very important for interacting with the data of a dialog. The SP.UI.DialogResult enumeration used for the dialogResult parameter is defined as follows:
SP.UI.DialogResult.prototype = {
    invalid: −1,
    cancel: 0,
    OK: 1
}
The returnValue parameter can contain any value. For example, if you edit an item within a pop-up dialog, you could return the ID of that item when leaving the dialog. Then the underlying callback handler would be able to update the display of this item. To control the dialog via JavaScript, you need to use the property window.frameElement. This property is automatically stored by the Dialog framework in the window context. The reason for this is that this context is also accessible by external pages loaded within an IFRAME element. Those pages don't have to implement SharePoint JavaScript files because they can simply access the window.frameElement and its functions. Some important functions for finishing dialogs are listed in Table 12-5.
Table 12.5. Functions of window.frameElement for Finishing Dialogs
Function | Parameters | Description |
|---|---|---|
| -- | Closes the dialog and returns |
|
| Closes the dialog and returns |
|
| Closes the dialog with |
|
| Closes the dialog with a dialog result and a return value. |
| -- | Navigates to the parent page. |
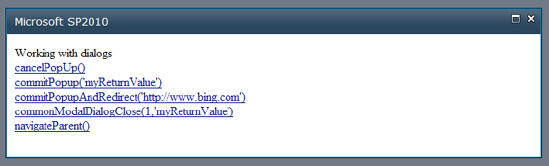
For a demonstration of the functions listed in Table 12-5, take a look at Listing 12-8. There is a very simple HTML page that contains several links with JavaScript. This HTML page can be opened from within SharePoint by using SP.UI.ModalDialog.showModalDialog (see Figure 12-8).
Example 12.8. Working with Dialogs and Return Values
<html>
  <body>
    Working with dialogs
    <br />
<a href="javascript:window.frameElement.cancelPopUp()">cancelPopUp()</a><br />
<a href="javascript:window.frameElement.commitPopup('myReturnValue')">
commitPopup('myReturnValue')</a><br />
<a href="javascript:window.frameElement.commitPopupAndRedirect('http://www.bing.com')">
commitPopupAndRedirect('http://www.bing.com')</a><br />
<a href="javascript:window.frameElement.commonModalDialogClose(1,'myReturnValue')">
commonModalDialogClose(1,'myReturnValue')</a><br />
<a href="javascript:window.frameElement.navigateParent()">navigateParent()</a><br />
</body>
</html>After clicking a link, the defined callback function is executed, and depending on the called function, the parameters dialogResult and returnValue are filled and passed to the callback function.
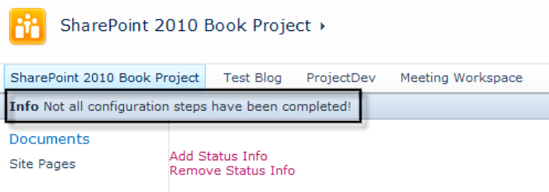
The Dialog framework enables you to build SharePoint application pages that can be opened both as normal ASPX pages and also as pop-up dialog pages. Good examples of this behavior are the form pages for lists and document libraries: NewForm.aspx, EditForm.aspx, and DispForm.aspx. If you open the forms page directly by typing in the URL, it looks like Figure 12-9.
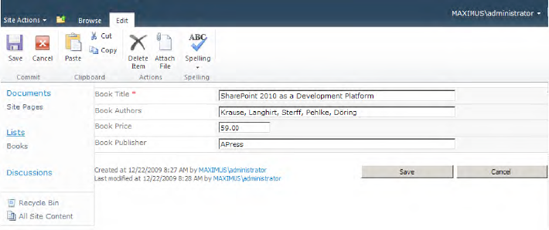
Notice the navigation column on the left side and also the information about the current user in the upper-right corner. If you open the same page within a pop-up dialog, its appearance changes slightly, as you can see in Figure 12-10.
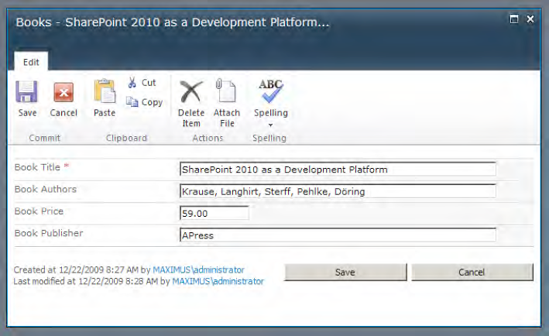
The difference between Figures 12-9 and 12-10 is the omission of the left navigation and the current user information. The page detects whether it is being opened directly or within a pop-up dialog. The detection is based on the query string parameter that is automatically added by the Dialog framework when opening a new dialog via its URL. The complete URL for the dialog in Figure 12-10 is
http://[servername]/Lists/Books/EditForm.aspx?ID=1&IsDlg=1
The URL query string parameter IsDlg passes the information to the ASPX page. The evaluation of this parameter is encapsulated in the central SPContext class as the property IsPopUI, and can be used as follows:
SPContext.Current.IsPopUI
With this property, it is easy to implement different behaviors. The example in Listing 12-9 shows the assignment of different JavaScript code to the OnClientClick event of a cancel button.
Example 12.9. Implementing Different Behavior for Pop-Up Dialogs (C#)
String redirectUrl = "http://www.bing.com";
if (SPContext.Current.IsPopUI)
{
     button.OnClientClick = "window.frameElement.cancelPopUp();return false;";
}
else
{
      button.OnClientClick = "STSNavigate(redirectUrl);return false;";
}
You can also perform a similar test using plain JavaScript, either by parsing the query string parameter IsDlg directly from the document.location.search property, or by checking whether the window.frameElement object exists (see Listing 12-10).
Example 12.10. Implementing Different Behavior for Pop-Up Dialogs (JavaScript)
var redirectUrl = "http://www.bing.com";
var button = document.getElementById('myButton'),

if (window.frameElement)
{
     button.onclick = new Function("window.frameElement.cancelPopUp();return false;");
}
else
{
      button.onclick = new Function("STSNavigate(redirectUrl);return false;");
}
In addition to its ability to modify the behavior of existing elements, such as button events, the Dialog framework has built-in functionality to automatically hide complete sections when displaying a page through a pop-up dialog. You can design your pages to display either inside a dialog or as a normal application page. The visibility for HTML elements is controlled by a CSS class called s4-notdlg. This class can be used to hide some HTML sections when a page is shown within a dialog. The preceding example of EditForm.aspx (see Figure 12-10) uses that to hide the left navigation and the information about the current user. Inspecting the assigned master page (v4.master) shows that the CSS class s4-notdlg is used in several lines to hide particular regions (see Figure 12-11).
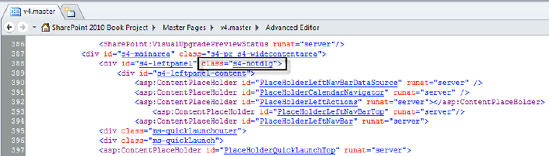
Internally, the implementation is very simple. The SharePoint:CssLink web control, which is usually used in SharePoint master pages, ensures that in dialogs, the CSS file dlgframe.css is included. This CSS file defines some classes that override the default properties. For s4-notdlg, it contains the following line:
.ms-dialog .s4-notdlg { display:none !important}This line hides all HTML elements that are assigned to the CSS class s4-notdlg. Simply use this CSS class in your own master pages or application pages to control the visibility of your pop-up dialogs. You don't have to implement your own logic to show and hide elements depending on the context in which a page is loaded.
With SharePoint 2010, two new user interface elements have been introduced: the status bar and the notification area. The objective with those two elements is to give users information without distracting them (see Figure 12-12).
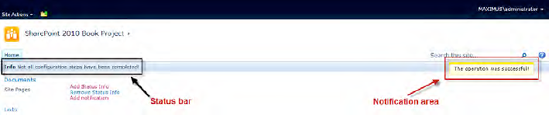
The status bar is intended to display persistent information, such as messages about state. For example, the status bar would be the appropriate place to display warning messages regarding the configuration of your SharePoint application. Table 12-6 contains a list of functions for working with the status bar.
Table 12.6. Functions of the Status API (SP.UI.Status)
Parameters | Description | |
|---|---|---|
|
| Adds a status line to the status bar. The parameter |
|
| Updates the content of an existing status line. The status line is identified by the |
|
| Removes a status line identified by |
|
| Removes all status lines and hides the status bar if the |
|
| Sets the primary color of a status line identified by |
The example in Listing 12-11 shows how to use the status API. It assumes you have an application page and use the PlaceHolderMain content placeholder for your code.
Example 12.11. Application Page That Uses the Status API
<asp:Content ContentPlaceHolderId="PlaceHolderMain" runat="server">

    <script language="javascript" type="text/javascript">
        function addStatusInfo() {
            var myStatusId = SP.UI.Status.addStatus("Info", "Not all configuration steps have
been completed!",true);
        }

        function removeStatusInfo() {
            SP.UI.Status.removeAllStatus(true);
        }
    </script>

    <br /><br />
    <a href="javascript:addStatusInfo()">Add Status Info</a> <br />
    <a href="javascript:removeStatusInfo()">Remove Status Info</a> <br />

</asp:Content>
The code declares two JavaScript functions, one to add a new status line and one to remove all status lines. Both of these functions can simply be called through HTML links (see Figure 12-13).
The notification area is intended to be used for transient messages such as messages that occur after an operation. An example would be the message "The item has been saved" after a saving operation. Table 12-7 contains a list of functions for using the notification bar.
Table 12.7. Functions of the Notification API (SP.UI.Notify)
Function | Parameters | Description |
|---|---|---|
|
| Adds a notification to the notification area. The notification message is contained in the parameter |
|
| Removes a notification by its |
Using the notification API is quite similar to using the status API. The example in Listing 12-12 contains code to add a notification within a custom application page.
Example 12.12. Application Page That Uses the Notification API
<asp:Content ContentPlaceHolderId="PlaceHolderMain" runat="server">

  <script language="javascript" type="text/javascript">
function addNotify() {
      var myNotifyId = SP.UI.Notify.addNotification("The operation was successful!", false);
    }

  </script>

  <br /><br />
  <a href="javascript:addNotify()">Add notification</a>

</asp:Content>
The code adds a notification to the page if the user clicks the "Add notification" link. The notification appears on the screen with a small animation from the right-hand side. After 3 seconds it disappears automatically because the isSticky parameter is set to false. If the isSticky parameter were set to true, the notification would remain visible until removed via the removeNotification function. Figure 12-14 shows the custom application page containing the notification.

At first glance, client-side development seems to be quite simple. The examples are mostly easy to understand and follow. But using the SharePoint client object model requires both a good understanding of the concept and of some rules and best practices. The concept behind the client object model can be compared to SQL-like programming: first you define a query, and after that you can execute it. Only then are you able to access the data. The main difference here is that you are working with the object model instead of writing a SQL query string. Many developers are not familiar with that concept, so there may be a learning curve before they're able to adopt the client object model and write clean and efficient code.
This section tries to shine a light on the client object model development. Wrapped into many useful examples, a lot of best practices are explained.
If you wish to develop a Windows or Silverlight application using the managed client object model, it's no challenge to set up the project within Visual Studio. The problems arise if you want to use the JavaScript client object model, for example, within your custom application pages or Web Parts. The vital factor is the lack of support for SharePoint JavaScript IntelliSense within Visual Studio. Visual Studio of course has built-in support for JavaScript IntelliSense, but only when it can access the necessary files.
One reason for Visual Studio's ignorance of the JavaScript files is the lack of support for the SharePoint web control <SharePoint:ScriptLink>, which enables JavaScript files to be loaded.
When Visual Studio encounters the following code line, it is unaware that the referenced file should be used to provide IntelliSense support:
<SharePoint:ScriptLink runat="server" Name="sp.js" Localizable="false" LoadAfterUI="true" />
Visual Studio only supports normal HTML tags for JavaScript, such as the following:
<script type="text/javascript" src="sp.js" />
Hence, if you want IntelliSense support in your application pages, you have to make sure that Visual Studio gets what it expects.
Because Visual Studio needs normal HTML script tags for its JavaScript background compiler to generate IntelliSense information, simply place all the necessary JavaScript files within appropriate script tags (notice the absolute path to the 14 hive in Listing 12-13). Because SharePoint does not like JavaScript files to be referenced multiple times, you need to ensure that those development-environment-only script tags are not visible after rendering the ASPX page. This can be accomplished by wrapping the script tags in a PlaceHolder control that is invisible at runtime.
Example 12.13. Enabling IntelliSense for SharePoint's JavaScript Client Object Model
<asp:PlaceHolder runat="server" Visible="false">
<script type="text/javascript"
src="file://{path to 14 hive}TEMPLATELAYOUTSMicrosoftAjax.js" />
<script type="text/javascript"
src="file:// {path to 14 hive}TEMPLATELAYOUTSSP.Runtime.debug.js" />
<script type="text/javascript"
src="file:// {path to 14 hive} TEMPLATELAYOUTSSP.debug.js" />
<script type="text/javascript"
src="file:// {path to 14 hive}TEMPLATELAYOUTSSP.Core.debug.js" />
<script type="text/javascript"
src="file:// {path to 14 hive} TEMPLATELAYOUTSSP.Ribbon.debug.js" />
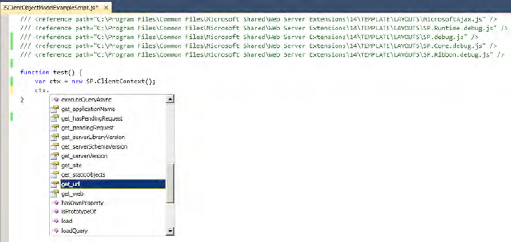
</asp:PlaceHolder>As you can see in Listing 12-13, along with the SharePoint JavaScript files, you also have to reference the file MicrosoftAjax.js. It is also very important to take care with the order of the JavaScript files, because some have dependencies on others. For example, the file SP.Runtime.debug.js contains base classes that are used within SP.debug.js. If you change the loading order of these files, your IntelliSense output will contain only a subset of all the functions and properties. Figure 12-15 shows the working IntelliSense support for SharePoint 2010 in Visual Studio 2010.

It's also important to reference the .debug.js files, because these files contain more readable information than their compressed versions. This is especially helpful if you call functions with named parameters. A comparison of Figures 12-16 and 12-17 demonstrates this point. In Figure 12-16, IntelliSense proposes the two parameters succeededCallback and failedCallback for the method executeQueryAsync.

In Figure 12-17, the compressed JavaScript files without the .debug.js extension are used. IntelliSense proposes only the parameters b and c for the same method call. This is not useful at all.
The previous section described a workaround for enabling JavaScript IntelliSense within ASPX application pages. But you don't always develop JavaScript directly within an application page. Imagine that you're writing a JavaScript library that encapsulates the data access for your application and you wish to use this library in more than one custom application page. Usually you'd write your library in a JS file. Unfortunately, the problem with using IntelliSense arises here, too.
To overcome that, you can use the reference directive that enables Visual Studio to establish a relationship between the script you are currently editing and other scripts. One or more <reference> directives have to be added to the top of your JavaScript library (see Listing 12-14).
Example 12.14. Using the Reference Directive in a JavaScript Library (.js)
/// <reference path="MyScript.js" />
function test() {
                ...
}
This basic example tells the Visual Studio IntelliSense background compiler to process the script MyScript.js so that all declared functions are recognized and can be used within the example function test. Because of the three prefixed slashes, the JavaScript interpreter recognizes the <reference> directives as comments and ignores them.
With this strategy, it's very easy to integrate full Visual Studio IntelliSense support for SharePoint client object libraries. Just add references to the SharePoint JavaScript libraries, as described in the previous section (see Listing 12-15).
Example 12.15. Using the Reference Directive in a JavaScript Library (.js) for SharePoint 2010
/// <reference path="{path to 14 hive}TEMPLATELAYOUTSMicrosoftAjax.js" />
/// <reference path="{path to 14 hive}TEMPLATELAYOUTSSP.Runtime.debug.js" />
/// <reference path="{path to 14 hive} TEMPLATELAYOUTSSP.debug.js" />
/// <reference path="{path to 14 hive}TEMPLATELAYOUTSSP.Core.debug.js" />
/// <reference path="{path to 14 hive} TEMPLATELAYOUTSSP.Ribbon.debug.js" />
Now you have full IntelliSense support in your custom JavaScript libraries too, as shown in Figure 12-18.
This section provides a number of real-world code examples using the SharePoint client object model. All the examples are explained and presented in both managed C# and JavaScript code.
When working with the client object model, most developers soon face some strange and unexpected error messages thrown by their own code. Those developers are usually very familiar with the server-side object model and they try to write code in the same style. The client object model has a different philosophy, and this requires different programming techniques. Simply keep cognizant of one key concept of the client model: every object is empty and its data has to be loaded first, before any properties can be accessed.
This section describes some of the common pitfalls when working with the client object model.
Developers coming from the server side tend to forget the load-query-access cycle for the client object model. Look at the incorrect code in Listing 12-16.
Example 12.16. Incorrect Code: Accessing a Property That Has Not Been Loaded (C#)
public void Example01_Incorrect()
{
     ClientContext ctx = new ClientContext("http://clserver");
     Web oWeb = ctx.Web;
     Console.WriteLine(oWeb.Title + " " + oWeb.Description);
}
This code throws an exception (PropertyOrFieldNotInitializedException) because the property oWeb.Title has not been loaded yet. Remember that you have to tell the client object model what you want, via the Load method. Then you need to initiate a round trip to the server to query for the data by using the executeQuery method. A working version of the code is displayed in Listing 12-17.
Example 12.17. Correct Code: Accessing a Property (C#)
public void Example01()
{
   ClientContext ctx = new ClientContext("http://clserver");
   Web oWeb = ctx.Web;
   ctx.Load(oWeb, w => w.Title, w => w.Description);
   ctx.ExecuteQuery();
   Console.WriteLine(oWeb.Title + " " + oWeb.Description);
}
The Load method is initialized with the oWeb object and a lambda expression that selects the Title and Description properties to be loaded. When you call ExecuteQuery, the requested data is retrieved from the server. The Title and Description properties of the oWeb object are populated with the data from the server and can be accessed. The corresponding JavaScript code is shown in Listing 12-18.
Example 12.18. Correct Code: Accessing a Property (JavaScript)
<script type="text/javascript">
    var web = null;

    function showWebTitle() {
        var ctx = new SP.ClientContext.get_current();
        web  = ctx.get_web();
        ctx.load(web, "Title", "Description");
        ctx.executeQueryAsync(
            Function.createDelegate(this, this.onSucceededCallback),
            Function.createDelegate(this, this.onFailedCallback));
    }

    function onSucceededCallback(sender, args) {
        alert('Title: ' + this.web.get_title());
    }

    function onFailedCallback(sender, args) {
        alert('Request failed. ' + args.get_message() + '
' + args.get_stackTrace());
    }
</script>
The JavaScript example in Listing 12-18 uses an asynchronous pattern, so you need to implement the two callback functions: onSucceededCallback and onFailedCallback. JavaScript does not support C# lambda expressions, so the syntax to select single properties is a little different. The JavaScript load function supports multiple parameters containing field names. To retrieve the Title and Description properties, you can use the following code:
ctx.load(web, "Title", "Description")
To better understand what happens behind the scenes, use tools like Fiddler to inspect the HTTP protocol. The XML that is passed by the executeQuery or executeQueryAsync method to the client.svc service on the server looks like Listing 12-19.
Example 12.19. XML Request to Retrieve Two Properties of a Web Object
<Request xmlns="http://schemas.microsoft.com/sharepoint/clientquery/2009"
        SchemaVersion="14.0.0.0" LibraryVersion="14.0.4536.1000"
        ApplicationName="Javascript Library">
  <Actions>
    <Query Id="6" ObjectPathId="2">
      <Query SelectAllProperties="false">
        <Properties>
          <Property Name="Description" ScalarProperty="true" SelectAll="true" />
          <Property Name="Title" ScalarProperty="true" SelectAll="true" />
        </Properties>
      </Query>
    </Query>
  </Actions>
  <ObjectPaths>
    <Identity Id="2" Name="740c6a0b-85e2-48a0-a494-e0f1759d4aa7:web:1039552e-a1b2-4ddd-b1e7-cbe9bab90a1c" />
  </ObjectPaths>
</Request>
The XML requests the two properties Title and Description for the web with ID 1039552e-a1b2-4ddd-b1e7-cbe9bab90a1c. The response from the client.svc service is sent back in JSON format, as shown in Listing 12-20.
Example 12.20. JSON Response Containing Two Properties of a Web Object
[{
"SchemaVersion":"14.0.0.0",
"LibraryVersion":"14.0.4536.1000",
"ErrorInfo":null
},6,{
"_ObjectType_":"SP.Web",
"_ObjectIdentity_":"740c6a0b-85e2-48a0-a494-e0f1759d4aa7:web:1039552e-a1b2-4ddd-b1e7-cbe9bab90a1c",
"Description":"Start page for the SharePoint 2010 development book project",
"Title":"SharePoint 2010 Book Project"
}]
The JSON response contains the values of the two requested properties (Title and Description) and is used by the JavaScript client object model to populate the oWeb object.
Instead of defining only the properties you wish to retrieve, it is also possible to retrieve all the properties of an object. After retrieving a whole object, without defining explicitly which properties should be retrieved, you would usually expect that all available properties of the retrieved object contain values. But unfortunately this is not the case. The main client objects such as Site and Web have some properties that have to be explicitly requested in order for them to be retrieved by a query (see Listing 12-21).
Example 12.21. Example for Retrieving All Properties of a Web Object
public void Example02()
{
    ClientContext ctx = new ClientContext("http://clserver");
    Web oWeb = ctx.Web;
    ctx.Load(oWeb);
    ctx.ExecuteQuery();
    Console.WriteLine(oWeb.Title + " " + oWeb.Description);
}
After looking at this code, a developer might assume that the oWeb object has been populated with all available properties. But, if you try, for example, to access the property HasUniqueRoleAssignments, a PropertyOrFieldNotInitializedException exception will be thrown. When trying the same with JavaScript and using Fiddler to detect what happens in the background, you will get an XML request such as that shown in Listing 12-22.
Example 12.22. XML Request for All Properties of a Web Object
<Request xmlns="http://schemas.microsoft.com/sharepoint/clientquery/2009"
                SchemaVersion="14.0.0.0" LibraryVersion="14.0.4536.1000"
                ApplicationName="Javascript Library">
<Actions>
<ObjectPath Id="1" ObjectPathId="0" />
<ObjectPath Id="3" ObjectPathId="2" />
<Query Id="4" ObjectPathId="2">
<Query SelectAllProperties="true">
<Properties />
</Query>
</Query>
</Actions>
<ObjectPaths>
<StaticProperty Id="0" TypeId="{3747adcd-a3c3-41b9-bfab-4a64dd2f1e0a}"
Name="Current" />
<Property Id="2" ParentId="0" Name="Web" />
</ObjectPaths>
</Request>The XML requests all properties (SelectAllProperties=true) of the oWeb object. The JSON response is shown in Listing 12-23.
Example 12.23. JSON Response Containing All Properties of a Web Object
[{
"SchemaVersion":"14.0.0.0",
"LibraryVersion":"14.0.4536.1000",
"ErrorInfo":null
},1,{
"IsNull":false
},3,{
"IsNull":false
},4,{
"_ObjectType_":"SP.Web",
"_ObjectIdentity_":"740c6a0b-85e2-48a0-a494-e0f1759d4aa7:web:1039552e-a1b2-4ddd-b1e7-cbe9bab90a1c",
"Description":"Start page for the SharePoint 2010 development book project",
"Created":"/Date(1258929292000)/",
"LastItemModifiedDate":"/Date(1261475758000)/",
"RecycleBinEnabled":true,
"Title":"SharePoint 2010 Book Project",
"ServerRelativeUrl":"u002f",
"Id":"/Guid(1039552e-a1b2-4ddd-b1e7-cbe9bab90a1c)/",
"SyndicationEnabled":true,
"AllowRssFeeds":true,
"QuickLaunchEnabled":true,
"TreeViewEnabled":false,
"Language":1033,
"UIVersion":4,
"UIVersionConfigurationEnabled":false,
"AllowRevertFromTemplateForCurrentUser":true,
"AllowMasterPageEditingForCurrentUser":true,
"ShowUrlStructureForCurrentUser":true
}]
At first glance, the JSON response contains all properties of the Web object. But on closer inspection, it is apparent that at least two properties are missing: EffectiveBasePermissions and HasUniqueRoleAssignments. To retrieve these two properties, you have to explicitly declare them in the Load method.
Table 12-8 lists the properties that are not retrieved by default. The difference between .NET managed code and Silverlight properties and the JavaScript properties is only the first letter of the property names (lowercase in JavaScript and uppercase in .NET managed code).
Table 12.8. Objects and Properties Not Retrieved by Default
Object | .NET/Silverlight Properties | JavaScript Properties |
|---|---|---|
|
|
|
|
|
|
|
|
|
|
|
|
|
|
|
As explained earlier, there are client objects and value objects. Client objects are Site, Web, List, and ListItem. Value objects have properties but do not have methods. SharePoint treats all primitive types, such as string or int, as value objects.
It's very important to recall that the client object model treats these objects differently. There are two important things to remember in this regard:
Client objects can be used across methods in a query.
Value objects cannot be used across methods in a query.
To understand the first statement, consider a simple scenario where you need to get a list item from a list via a client object model (see Listing 12-24).
Example 12.24. Using Client Objects Across Methods
public void Example03()
{
    ClientContext ctx = new ClientContext("http://clserver");
    Web oWeb = ctx.Web;
    List oList = oWeb.Lists.GetByTitle("Books");
    ListItem oListItem = oList.GetItemById(1);
    ctx.Load(oListItem);
    ctx.ExecuteQuery();

    Console.WriteLine(oListItem["Title"] + " " + oListItem["Book_Authors"]);
}
The code in Listing 12-24 obtains a Web client object, then a List client object, and then a ListItem client object. Although it may seem that those objects call real functions (GetByTitle and GetItemById), the returned client objects are empty and all their properties are uninitialized. Only when the oListItem client object is loaded and executed does the oListItem object contain real values or value objects. To clarify this quite intelligent behavior of the client object model, you don't have to make a server round trip to get the Web object, another round trip to get the List, and another to get the ListItem. Instead, you only make one call to the server.
In contrast, here is another example for value objects. Assume you want to get a list item from a list that is named like the Title property of the Web object. For example, the title of the Web object is Books, and you want to get a list with the name Books. Listing 12-25 shows an invalid effort to code this.
Example 12.25. Incorrect: Using Value Objects Across Methods
public void Example04_Incorrect()
{
    ClientContext ctx = new ClientContext("http://clserver");
    Web oWeb = ctx.Web;
    List oList = oWeb.Lists.GetByTitle(oWeb.Title);
    ListItem oListItem = oList.GetItemById(1);
    ctx.Load(oListItem);
    ctx.ExecuteQuery();

    Console.WriteLine(oListItem["Title"] + " " + oListItem["Book_x0020_Authors"]);
}
While executing this code, the familiar PropertyOrFieldNotInitializedException is thrown at the line List oList = oWeb.Lists.GetByTitle(oWeb.Title). This happens because you try to access a property or value object that has not been loaded and queried. It is not possible to use such value objects across methods. To overcome this issue, you have to put in a server round trip to populate the Title property of the oWeb object before you can use it for the second server call as shown in Listing 12-26:
Example 12.26. Correct: Using Value Objects Across Methods
public void Example04_Correct()
{
    ClientContext ctx = new ClientContext("http://clserver");
    Web oWeb = ctx.Web;
ctx.Load(oWeb, w => w.Title);ctx.ExecuteQuery();List oList = oWeb.Lists.GetByTitle(oWeb.Title);ListItem oListItem = oList.GetItemById(1); ctx.Load(oListItem); ctx.ExecuteQuery(); Console.WriteLine(oListItem["Title"] + " " + oListItem["Book_x0020_Authors"]); }
Both examples (Listings 12-25 and 12-26) demonstrate the use of client objects and value objects. As a developer you always have to take care about the loading and executing sequence of the client object model.
This section demonstrates the client-side use of the SPWeb object, best known from the server-side:
How to retrieve site and web properties
How to retrieve certain properties only
How to update properties
How to create new web sites
A basic example of retrieving all properties of the Web and Site objects passes the two objects to the Load method and then initiates the query execution via ExecuteQuery or executeQueryAsync (see Listings 12-27 and 12-28).
Example 12.27. Retrieving Site and Web Properties (C#)
public void Example05()
{
    ClientContext ctx = new ClientContext("http://clserver");
    Site oSite = ctx.Site;
    Web oWeb = ctx.Web;
    ctx.Load(oSite);
    ctx.Load(oWeb);
    ctx.ExecuteQuery();

    Console.WriteLine(oSite.Url + " " + oWeb.Title);
}
Example 12.28. Retrieving Site and Web Properties (JavaScript)
function example05() {
    var ctx = new SP.ClientContext.get_current();

    this.site = ctx.get_site();
    this.web = ctx.get_web();
ctx.load(this.site);
ctx.load(this.web);
ctx.executeQueryAsync(
Function.createDelegate(this, this.onSucceededCallback),
Function.createDelegate(this, this.onFailedCallback));
}
function onSucceededCallback(sender, args) {
alert('Site-URL: ' + this.site.get_url() + '
Web-Title: ' + this.web.get_title());
}
function onFailedCallback(sender, args) {
alert('Request failed. ' + args.get_message() + '
' + args.get_stackTrace());
}Warning
Keep in mind that not all available properties are populated with values. There are some properties that have to be requested explicitly. Check Table 12-8 for an overview of properties that are not populated with values by default.
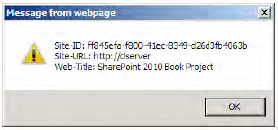
To reduce the amount of data transferred from server to client, you can specify precisely the properties you want to be populated with data. Listings 12-29 and 12-30 both return only the Url and Id properties of the Site object and the Title property of the Web object.
Example 12.29. Retrieving Only Some Site and Web Properties (C#)
public void Example06()
{
    ClientContext ctx = new ClientContext("http://clserver");
    Site oSite = ctx.Site;
    Web oWeb = ctx.Web;
    ctx.Load(oSite, s => s.Id, s => s.Url);
    ctx.Load(oWeb, w => w.Title);
    ctx.ExecuteQuery();

    Console.WriteLine("Site-ID: " + oSite.Id + "
Site-URL: " + oSite.Url
      + "
Web-Title: " + oWeb.Title);
}
The console output of Listing 12-29 looks like this:
Site-ID: ff845efa-f800-41ec-8349-d26d3fb4063b
Site-URL: http://clserver
Web-Title: SharePoint 2010 Book Project
Instead of lambda expressions, with JavaScript you have to define the properties as function parameters, as shown in Listing 12-30.
Example 12.30. Retrieving Only Some Site and Web Properties (JavaScript)
function example06() {
    var ctx = new SP.ClientContext.get_current();
    this.site = ctx.get_site();
    this.web = ctx.get_web();
    ctx.load(this.site, "Id", "Url");
    ctx.load(this.web, "Title");
    ctx.executeQueryAsync(
        Function.createDelegate(this, this.onSucceededCallback),
        Function.createDelegate(this, this.onFailedCallback));
}

function onSucceededCallback(sender, args) {
    alert('Site-ID: ' + this.site.get_id() + '
Site-URL: ' + this.site.get_url()
     + '
Web-Title: ' + this.web.get_title());
}
The resulting alert box for Listing 12-30 is shown in Figure 12-19.
Modifying the properties of a web site or another client object is similar to retrieving data. Instead of using the Load or LoadQuery methods, you call the Update method. After that, remember that the modification will not be sent back to the server until ExecuteQuery or ExecuteQueryAsync is executed (see Listings 12-31 and 12-32).
Example 12.31. Updating Web Site Properties (C#)
public void Example07()
{
    ClientContext ctx = new ClientContext("http://clserver/blog");
    Web oWeb = ctx.Web;
    oWeb.Title = "This is a new title";
    oWeb.Description = "This is a new description";
    oWeb.Update();
    ctx.ExecuteQuery();
}
Example 12.32. Updating Web Site Properties (JavaScript)
function example07() {
    var ctx = new SP.ClientContext.get_current();
    this.web = ctx.get_web();
    this.web.set_title("This is a new title");
    this.web.set_description("This is a new description");
    this.web.update();
    ctx.executeQueryAsync(
        Function.createDelegate(this, this.onSucceededCallback),
        Function.createDelegate(this, this.onFailedCallback));
}To create a new web site, you need a client object called WebCreationInformation that contains a set of properties for the new web site. Listing 12-33 creates a new team site using the team site web template STS#0.
Example 12.33. Creating a New Web Site (C#)
public void Example08()
{

    string siteUrl = "http://clserver";
    string tsDescription = "A new Team site.";
    int tsLanguage = 1033;
    string tsTitle = "Team Site";
    string tsUrl = "teamSite";
    bool tsInheritPermissions = false;
    string webTemplate = "STS#0";

    ClientContext ctx = new ClientContext(siteUrl);
    Web oWebsite = ctx.Web;

    WebCreationInformation webCreateInfo = new WebCreationInformation();
    webCreateInfo.Description = tsDescription;
    webCreateInfo.Language = tsLanguage;
    webCreateInfo.Title = tsTitle;
    webCreateInfo.Url = tsUrl;
    webCreateInfo.UseSamePermissionsAsParentSite = tsInheritPermissions;
    webCreateInfo.WebTemplate = webTemplate;

    Web oNewWeb = oWebsite.Webs.Add(webCreateInfo);

    ctx.Load(oNewWeb,
           website => website.ServerRelativeUrl,
           website => website.Created);

    ctx.ExecuteQuery();
Console.WriteLine("Web-Url: {0} Web-Created: {1}",
oNewWeb.ServerRelativeUrl, oNewWeb.Created);
}The creation of a new site requires an instance of the WebCreationInformation class that is passed as a parameter to the Web.Webs.Add method. After the site creation is executed using the ExecuteQuery method, the two properties of the oNewWeb object, ServerRelativeUrl and Created, are populated with values, as shown in Listing 12-34.
Example 12.34. Creating a New Web Site (JavaScript)
function example08() {

    var siteUrl = '/';
    var tsDescription = 'A new Team site.';
    var tsLanguage = 1033;
    var tsTitle = 'Team Site';
    var tsUrl = 'teamSite';
    var tsInheritPermissions = false;
    var webTemplate = 'STS#0';

    var ctx = new SP.ClientContext(siteUrl);
    this.oWeb = ctx.get_web();

    var webCreateInfo = new SP.WebCreationInformation();
    webCreateInfo.set_description(tsDescription);
    webCreateInfo.set_language(tsLanguage);
    webCreateInfo.set_title(tsTitle);
    webCreateInfo.set_url(tsUrl);
    webCreateInfo.set_useSamePermissionsAsParentSite(tsInheritPermissions);
    webCreateInfo.set_webTemplate(webTemplate);

    this.oNewWeb = this.oWeb.get_webs().add(webCreateInfo);
    clientContext.load(this.oNewWeb, 'ServerRelativeUrl', 'Created'),

    ctx.executeQueryAsync(
        Function.createDelegate(this, this.onSucceededCallback),
        Function.createDelegate(this, this.onFailedCallback));
}

function onSucceededCallback(sender, args) {
    alert('Web-Title: ' + this.oNewWeb.get_title() + " created at " + this.oNewWeb.get_created());
}
The JavaScript example is very similar to the C# example. There are no major differences to be taken into account.
Various tasks concerning lists are demonstrated in this section:
How to retrieve all the SharePoint lists in a web site
How to retrieve list schema information
How to create a new SharePoint list
How to modify an existing SharePoint list
How to delete a SharePoint list
You can retrieve all the lists for a web site using the property Web.Lists. You just have to load and query the list collection and iterate through the lists (see Listing 12-35).
Example 12.35. Retrieving All the Lists for a Web Site (C#)
public void Example09()
{
    ClientContext ctx = new ClientContext("http://clserver");
    ListCollection oListColl = ctx.Web.Lists;

    ctx.Load(oListColl);
    ctx.ExecuteQuery();

    foreach (List oList in oListColl)
    {
        Console.WriteLine("Title: " + oList.Title);
    }
}
The corresponding JavaScript implementation in Listing 12-36 is similar to the managed code example. The main difference is the iteration through the results. Because JavaScript has no built-in mechanism to handle enumerations, the client object model extends JavaScript so that you can access the lists through an iterator.
Example 12.36. Retrieving All the Lists for a Web Site (JavaScript)
function example09() {
    var ctx = new SP.ClientContext.get_current();
    this.oListColl = ctx.get_web().get_lists();
    ctx.load(this.oListColl);

    ctx.executeQueryAsync(
        Function.createDelegate(this, this.onSucceededCallback),
        Function.createDelegate(this, this.onFailedCallback));
}

function onSucceededCallback(sender, args) {
var listEnum = this.oListColl.getEnumerator();while (listEnum.moveNext()) {var oList = listEnum.get_current();alert(oList.get_title()); } }
Both examples return all the lists containing all properties. To reduce the number of properties, you should explicitly define only those properties you really need. For collections this can be done using LINQ in combination with the Include expression:
[C#]
ctx.Load(oListColl, lists => lists.Include(list => list.Title, list => list.Id));
Because LINQ is not available in JavaScript, there is a LINQ-like syntax implemented for including selected properties:
[JavaScript]
ctx.load(this.oListColl, 'Include(Title, Id)'),
Information about the various fields of a list is obtained via the List.Fields property (see Listings 12-37 and 12-38).
Example 12.37. Retrieving List Schema Information (C#)
public void Example10()
{
    ClientContext ctx = new ClientContext("http://clserver");
    FieldCollection oFldColl = ctx.Web.Lists.GetByTitle("Books").Fields;
    ctx.Load(oFldColl);
    ctx.ExecuteQuery();

    foreach (Field oFld in oFldColl)
    {
        Console.WriteLine("InternalName: " + oFld.InternalName
                +  ", DataType: " + oFld.FieldTypeKind);
    }
}
Example 12.38. Retrieving List Schema Information (JavaScript)
function example10() {
    var ctx = new SP.ClientContext.get_current();
    this.oFldColl = ctx.get_web().get_lists().getByTitle('Books').get_fields();
    ctx.load(this.oFldColl);
    ctx.executeQueryAsync(
            Function.createDelegate(this, this.onSucceededCallback),
            Function.createDelegate(this, this.onFailedCallback));
}

function onSucceededCallback(sender, args) {
    var fieldEnum = this.oFldColl.getEnumerator();
while (fieldEnum.moveNext()) {
var oField = fieldEnum.get_current();
alert("InternalName: " + oField.get_internalName()
+ ", DataType: " + oField.get_fieldTypeKind());
}
}Creating a new SharePoint list requires an instance of the ListCreationInformation class. At a minimum, you need to define the Title and the TemplateType properties. Furthermore, the list fields have to be added. In the following examples, the fields are defined in XML and added to the list using the AddFieldAsXml method (see Listings 12-39 and 12-40).
Example 12.39. Creating a New List (C#)
public void Example11()
{
    ClientContext ctx = new ClientContext("http://clserver");
    Web oWeb = ctx.Web;

    ListCreationInformation listCreationInfo = new ListCreationInformation();
    listCreationInfo.Title = "MyBooks";
    listCreationInfo.TemplateType = (int)ListTemplateType.GenericList;

    List oList = oWeb.Lists.Add(listCreationInfo);
    ctx.Load(oList);

    String fldAuthorsXml = "<Field DisplayName='Authors' Type='Text' />";
    String fldPublisherXml = "<Field DisplayName='Publisher' Type='Text' />";
    String fldPriceXml = "<Field DisplayName='Price' Type='Currency' />";

    oList.Fields.AddFieldAsXml(fldAuthorsXml, true, AddFieldOptions.DefaultValue);
    oList.Fields.AddFieldAsXml(fldPublisherXml, true, AddFieldOptions.DefaultValue);
    oList.Fields.AddFieldAsXml(fldPriceXml, true, AddFieldOptions.DefaultValue);
    oList.Update();

    ctx.ExecuteQuery();
    Console.WriteLine("List " + oList.Title + " has been created successfully.");
}
Example 12.40. Creating a New List (JavaScript)
function example11() {
    var ctx = new SP.ClientContext.get_current();
    this.oWeb = ctx.get_web();

    var listCreationInfo = new SP.ListCreationInformation();
    listCreationInfo.set_title('MyBooks'),
    listCreationInfo.set_templateType(SP.ListTemplateType.genericList);

    this.oList = this.oWeb.get_lists().add(listCreationInfo);
    ctx.load(this.oList);
var fldAuthorsXml = "<Field DisplayName='Authors' Type='Text' />";
var fldPublisherXml = "<Field DisplayName='Publisher' Type='Text' />";
var fldPriceXml = "<Field DisplayName='Price' Type='Currency' />";
this.oList.get_fields().addFieldAsXml(fldAuthorsXml, true,
SP.AddFieldOptions.defaultValue);
this.oList.get_fields().addFieldAsXml(fldPublisherXml, true,
SP.AddFieldOptions.defaultValue);
this.oList.get_fields().addFieldAsXml(fldPriceXml, true, SP.AddFieldOptions.defaultValue);
this.oList.update();
ctx.executeQueryAsync(
Function.createDelegate(this, this.onSucceededCallback),
Function.createDelegate(this, this.onFailedCallback));
}
function onSucceededCallback(sender, args) {
alert("List " + this.oList.get_title() + " has been created successfully.");
}Modifying a property of an existing SharePoint list can be accomplished easily by setting the property to a new value and calling Update. The examples in Listing 12-41 and 12-42 demonstrate how to update list properties, and also how to add a new field to a list and customize its field properties. If you examine the source code you will notice the use of the ClientContext.Cast method. After calling this method, the field that has been added as XML can be used a type of class FieldMultiLineText. A normal cast does not work.
Example 12.41. Modifying Existing Lists (C#)
public void Example12()
{
    ClientContext ctx = new ClientContext("http://clserver");
    List oBooksList = ctx.Web.Lists.GetByTitle("MyBooks");

    // Update list description
    oBooksList.Description = "This is a new description";
    oBooksList.Update();

    // Add a field and change its properties
    String fldCommentXml = "<Field DisplayName='Comment' Type='Note' />";
    Field fldComment = oBooksList.Fields.AddFieldAsXml(
                                           fldCommentXml,
                                           true,
                                           AddFieldOptions.DefaultValue);

    FieldMultiLineText fldCommentCasted =
                          ctx.CastTo<FieldMultiLineText>(fldComment);
    fldCommentCasted.RichText = false;
fldCommentCasted.NumberOfLines = 10;fldCommentCasted.Update();ctx.Load(fldCommentCasted); ctx.ExecuteQuery(); Console.WriteLine(fldCommentCasted.Title); }
The JavaScript code also requires an explicit casting of the newly added field. Only after using the clientContext.castTo function can the specific properties, such as set_richText and set_numberOfLines, be accessed (see Listing 12-42). Otherwise JavaScript throws the following error: "Object doesn't support this property or method."
Example 12.42. Modifying Existing Lists (JavaScript)
function example12() {

    var ctx = new SP.ClientContext.get_current();
    this.oBooksList = ctx.get_web().get_lists().getByTitle("MyBooks");

    // Update list description
    this.oBooksList.set_description = "This is a new description2";
    this.oBooksList.update();

    // Add a field and change its properties
    var fldCommentXml = "<Field DisplayName='Comment' Type='Note' />";
    this.fldComment = oBooksList.get_fields().addFieldAsXml(fldCommentXml, true,
              SP.AddFieldOptions.defaultValue);

    this.fldCommentCasted = ctx.castTo(this.fldComment, SP.FieldMultiLineText);
    this.fldCommentCasted.set_richText(false);
    this.fldCommentCasted.set_numberOfLines(10);
    this.fldCommentCasted.update();

    ctx.load(this.fldCommentCasted);

    ctx.executeQueryAsync(
    Function.createDelegate(this, this.onSucceededCallback),
    Function.createDelegate(this, this.onFailedCallback));

}

function onSucceededCallback(sender, args) {
    alert("Field " + this.fldComment.get_title() + " has been created successfully.");

}Deleting objects is quite simple—you just need to call DeleteObject and execute the server round trip. The examples in Listings 12-43 and 12-44 demonstrate the deletion of a list called MyBooks.
Example 12.43. Deleting a List (C#)
public void Example13()
{
    ClientContext ctx = new ClientContext("http://clserver");
    List oBooksList = ctx.Web.Lists.GetByTitle("MyBooks");
    oBooksList.DeleteObject();
    ctx.ExecuteQuery();
    Console.WriteLine("List deleted!");
}
Example 12.44. Deleting a List (JavaScript)
function example13() {
    var ctx = new SP.ClientContext.get_current();
    var oList = ctx.get_web().get_lists().getByTitle('MyBooks'),
    oList.deleteObject();
    ctx.executeQueryAsync(
            Function.createDelegate(this, this.onSucceededCallback),
            Function.createDelegate(this, this.onFailedCallback));
}

function onSucceededCallback(sender, args) {
    alert('List deleted!'),
}Querying and accessing list items is one of the most common scenarios when working with the SharePoint client object model. The examples in this section demonstrate a number of operations with list items:
How to retrieve all the items in a SharePoint list
How to retrieve list items using CAML queries
How to create new list items
How to update list items
How to delete list items
The retrieval of all items in a list is generally not recommended for performance reasons, especially if the list contains many items. Only if you access a very small list, such as a list containing a few configuration items, is it reasonable to use an empty CamlQuery instance, as shown in Listing 12-45.
Example 12.45. Retrieving All the Items in a List (C#)
public void Example14()
{
    ClientContext ctx = new ClientContext("http://clserver");
List oBooksList = ctx.Web.Lists.GetByTitle("Books");
CamlQuery caml = new CamlQuery();
ListItemCollection allBooks = oBooksList.GetItems(caml);
ctx.Load(allBooks);
ctx.ExecuteQuery();
foreach (ListItem li in allBooks)
{
Console.WriteLine("ID: " + li.Id + ", Title=" + li["Title"]);
}
}The JavaScript code in Listing 12-46 looks very similar. The only real difference concerns reading the list item properties. For managed C# code you can simply use ListItem["propertyName"], whereas in JavaScript you have to use an extra function get_item: ListItem.get_item("propertyName").
Example 12.46. Retrieving All the Items in a List (JavaScript)
function example14() {
    var ctx = new SP.ClientContext.get_current();
    var oBooksList = ctx.get_web().get_lists().getByTitle('Books'),
    var caml = new SP.CamlQuery();
    this.allBooks = oBooksList.getItems(caml);
    ctx.load(this.allBooks);

    ctx.executeQueryAsync(
            Function.createDelegate(this, this.onSucceededCallback),
            Function.createDelegate(this, this.onFailedCallback));
}

function onSucceededCallback(sender, args) {
    var enumerator = this.allBooks.getEnumerator();
    while (enumerator.moveNext()) {
        var listItem = enumerator.get_current();
        alert("ID: " + listItem.get_id() + ", Title: " +
                       listItem.get_item("Title"));
    }
}Using CAML queries to retrieve list items is the best practice. The filtering of list items is performed on the server, and you can be sure that only relevant data is transmitted to the client. The following example goes a step further and defines, beyond the CAML query, which properties should be returned. This is accomplished using the Include clause of the LINQ expression within the Load method (see Listing 12-47).
Example 12.47. Retrieving List Items Using CAML (C#)
public void Example15()
{
    ClientContext ctx = new ClientContext("http://clserver");
List oBooksList = ctx.Web.Lists.GetByTitle("Books");
CamlQuery caml = new CamlQuery();
caml.ViewXml = "<View><Query><Where><Eq><FieldRef Name='Publisher'/>" +
"<Value Type='Text'>APress</Value></Eq></Where></Query></View>";
ListItemCollection allBooksFromAPress = oBooksList.GetItems(caml);
ctx.Load(allBooksFromAPress, books => books.Include(
book => book.Id,
book => book["Title"],
book => book["Publisher"]
));
ctx.ExecuteQuery();
foreach (ListItem li in allBooksFromAPress)
{
Console.WriteLine("ID: " + li.Id + ", Title=" + li["Title"] + ",
Publisher: "
+ li["Book_x0020_Publisher"]);
}
}The examples in Listings 12-47 und 12-48 query for all list items whose Publisher field contains the value APress. Only three properties are retrieved and displayed: Id, Title, and Publisher. Although it is not possible to use LINQ in JavaScript, you can use the implemented Include expression to define which fields you do want to be populated.
Example 12.48. Retrieving List Items Using CAML (JavaScript)
function example15() {
    var ctx = new SP.ClientContext.get_current();
    var oBooksList = ctx.get_web().get_lists().getByTitle('Books'),
    var caml = new SP.CamlQuery();
    caml.ViewXml = "<View><Query><Where><Eq><FieldRef Name='Publisher'/>" +
        "<Value Type='Text'>APress</Value></Eq></Where></Query><View>";

    this.allBooksFromAPress = oBooksList.getItems(caml);
    ctx.load(this.allBooksFromAPress, "Include(Id, Title, Publisher)");

    ctx.executeQueryAsync(
            Function.createDelegate(this, this.onSucceededCallback),
            Function.createDelegate(this, this.onFailedCallback));
}

function onSucceededCallback(sender, args) {
    var enumerator = this.allBooksFromAPress.getEnumerator();
    while (enumerator.moveNext()) {
        var li = enumerator.get_current();
        alert("ID: " + li.get_id() + ", Title: " + li.get_item("Title")
                + ", Publisher: " + li.get_item("Publisher"));
    }
}To create a new list item with the client object, use the List.AddItem method. As with creating webs and lists, a list item also has its own ListItemCreationInformation class (see Listings 12-49 and 12-50).
Example 12.49. Creating a New List Item (C#)
public void Example16()
{
    ClientContext ctx = new ClientContext("http://clserver");
    List oBooksList = ctx.Web.Lists.GetByTitle("Books");

    ListItemCreationInformation itemCreationInfo =
                                new ListItemCreationInformation();
    ListItem newListItem = oBooksList.AddItem(itemCreationInfo);

    newListItem["Title"] = "SharePoint 2010 Book";
    newListItem["Authors"] = "Krause, Langhirt, Sterff, Pehlke, Doering";
    newListItem["Publisher"] = "APress";
    newListItem["Price"] = 59;

    newListItem.Update();

    ctx.ExecuteQuery();
    Console.WriteLine("Book added successfully!");
}
In JavaScript you need to use the set_item function instead of directly accessing an item in an array, as shown in Listing 12-50.
Example 12.50. Creating a New List Item (JavaScript)
function example16() {
    var ctx = new SP.ClientContext.get_current();
    var oBooksList = ctx.get_web().get_lists().getByTitle('Books'),

    var itemCreationInfo = new SP.ListItemCreationInformation();
    this.newListItem = oBooksList.addItem(itemCreationInfo);
    this.newListItem.set_item("Title","SharePoint 2010 Book");
    this.newListItem.set_item("Authors",
                              "Krause, Langhirt, Sterff, Pehlke, Doering");
    this.newListItem.set_item("Publisher","APress");
    this.newListItem.set_item("Price", 59);
    this.newListItem.update();

    ctx.executeQueryAsync(
            Function.createDelegate(this, this.onSucceededCallback),
            Function.createDelegate(this, this.onFailedCallback));
}
function onSucceededCallback(sender, args) {
alert('Book added successfully'),
}Updating a list item works in exactly the same way (see Listings 12-51 and 12-52).
Example 12.51. Updating a List Item (C#)
public void Example17()
{
    ClientContext ctx = new ClientContext("http://clserver");
    List oBooksList = ctx.Web.Lists.GetByTitle("Books");
    ListItem listItem = oBooksList.GetItemById(2);

    listItem["Title"] = "SharePoint 2010 Bookx";
    listItem["Authors"] = "Krause, Langhirt, Sterff, Pehlke, Doering";
    listItem["Publisher"] = "APress";
    listItem["Price"] = 59;

    listItem.Update();
    ctx.ExecuteQuery();

    Console.WriteLine("Book updated successfully!");
}
Example 12.52. Updating a List Item (JavaScript)
function example17() {
    var ctx = new SP.ClientContext.get_current();
    var oBooksList = ctx.get_web().get_lists().getByTitle('Books'),
    this.listItem = oBooksList.getItemById(2);

    this.listItem.set_item("Title", "SharePoint 2010 Book2");
    this.listItem.set_item("Authors", "Krause, Langhirt, Sterff, Pehlke, Doering");
    this.listItem.set_item("Publisher", "Apress");
    this.listItem.set_item("Price", 59);

    this.listItem.update();

    ctx.executeQueryAsync(
            Function.createDelegate(this, this.onSucceededCallback),
            Function.createDelegate(this, this.onFailedCallback));
}

function onSucceededCallback(sender, args) {
    alert('Book updated successfully'),
}Deleting a list item also works in the same manner as the previous examples (see Listings 12-53 and 12-54).
Example 12.53. Deleting a List Item (C#)
public void Example18()
{
    ClientContext ctx = new ClientContext("http://clserver");
    List oBooksList = ctx.Web.Lists.GetByTitle("Books");
    ListItem listItem = oBooksList.GetItemById(3);
    listItem.DeleteObject();

    ctx.ExecuteQuery();

    Console.WriteLine("Book item deleted successfully!");
}
Example 12.54. Deleting a List Item (JavaScript)
function example18() {
    var ctx = new SP.ClientContext.get_current();
    var oBooksList = ctx.get_web().get_lists().getByTitle('Books'),
    var listItem = oBooksList.getItemById(2);
    listItem.deleteObject();

    ctx.executeQueryAsync(
            Function.createDelegate(this, this.onSucceededCallback),
            Function.createDelegate(this, this.onFailedCallback));
}

function onSucceededCallback(sender, args) {
    alert('Book deleted successfully'),
}Working with users, groups, and roles, and dealing with their permissions for SharePoint elements, can be quite complex. In former SharePoint versions, the only way to affect the security was to use the provided security web services. With SharePoint 2010, the client object model dramatically simplifies working with security settings. For third-party applications, no matter if they are written as Windows or Silverlight applications, it's very easy to access the SharePoint security model and to build extended functionality on it. This section contains examples of how the client object model can deal with security.
How to add users to a SharePoint group
How to retrieve members of a SharePoint group
How to create a role
How to add a user to a role
How to create a new SharePoint group and assign the group to a role
How to break the security inheritance
Adding a user to a SharePoint group is a common task, particularly in conjunction with creating a web site. The following example shows two ways to add a user to a group. The first one uses the Group.Users.AddUser method, which expects a User instance of an existing user. The second method adds a new user to a group by using the UserCreationInformation class. The new user is identified by its LoginName. If the user already exists in the site collection, the user is added to the group anyway. The examples in Listings 12-55 and 12-56 require a valid group within the property Web.AssociatedMemberGroup to exist; thus, the default group at the time of the web site creation has not been removed.
Example 12.55. Adding Users to a SharePoint Group (C#)
public void Example19()
{
    ClientContext ctx = new ClientContext("http://clserver");
    Group membersGroup = ctx.Web.AssociatedMemberGroup;

    // Add existing user to membersGroup
    User currentUser = membersGroup.Users.AddUser(ctx.Web.CurrentUser);

    // Add new user to membersGroup
    UserCreationInformation userCreationInfo = new UserCreationInformation();
    userCreationInfo.Email = "[email protected]";
    userCreationInfo.LoginName = @"MAXIMUSjkrause";
    userCreationInfo.Title = "Joerg Krause";
    User newUser = membersGroup.Users.Add(userCreationInfo);

    ctx.Load(currentUser);
    ctx.Load(newUser);
    ctx.Load(membersGroup);
    ctx.ExecuteQuery();

    Console.WriteLine("The users " + currentUser.LoginName
        + " and " + newUser.LoginName
        + " have been added to group '" + membersGroup.Title
        + "'.");
}
Example 12.56. Adding Users to a SharePoint Group (JavaScript)
function example19() {
    var ctx = new SP.ClientContext.get_current();
    this.membersGroup = ctx.get_web().get_associatedMemberGroup();

    // Add existing user to membersGroup
    this.currentUser = this.membersGroup.get_users().
                                    addUser(ctx.get_web().get_currentUser());

    // Add new user to membersGroup
    this.userCreationInfo = new SP.UserCreationInformation();
    this.userCreationInfo.set_email("[email protected]");
    this.userCreationInfo.set_loginName("MAXIMUS\jkrause");
this.userCreationInfo.set_title("Joerg Krause");this.newUser = this.membersGroup.get_users().add(this.userCreationInfo);ctx.load(this.currentUser); ctx.load(this.newUser); ctx.load(this.membersGroup); ctx.executeQueryAsync( Function.createDelegate(this, this.onSucceededCallback), Function.createDelegate(this, this.onFailedCallback)); } function onSucceededCallback(sender, args) { alert("The users " + this.currentUser.get_loginName() + " and " + this.newUser.get_loginName() + " have been added to group '" + this.membersGroup.get_title() + "'."); }
To get a list of all users that are members of a specified group, you can use the Group.Users collection (see Listings 12-57 and 12-58).
Example 12.57. Retrieving Group Members (C#)
public void Example20()
{
    ClientContext ctx = new ClientContext("http://clserver");
    Group membersGroup = ctx.Web.AssociatedMemberGroup;
    UserCollection allUsersOfGroup = membersGroup.Users;
    ctx.Load(allUsersOfGroup);

    ctx.ExecuteQuery();

    foreach (User user in allUsersOfGroup)
    {
        Console.WriteLine("ID: " + user.Id + ", LoginName=" + user.LoginName);
    }
}
Example 12.58. Retrieving Group Members (JavaScript)
function example20() {
    var ctx = new SP.ClientContext.get_current();
    var membersGroup = ctx.get_web().get_associatedMemberGroup();
    this.allUsersOfGroup = membersGroup.get_users();
    ctx.load(allUsersOfGroup);

    ctx.executeQueryAsync(
            Function.createDelegate(this, this.onSucceededCallback),
Function.createDelegate(this, this.onFailedCallback));
}
function onSucceededCallback(sender, args) {
var enumerator = this.allUsersOfGroup.getEnumerator();
while (enumerator.moveNext()) {
var user = enumerator.get_current();
alert("ID: " + user.get_id() + ", LoginName: " + user.get_loginName());
}
}Defining your own roles, also known as permission levels, is a common task when dealing with complex security requirements. With the client object model, you can easily define your own roles and assign them to SharePoint users or groups. The examples in Listings 12-59 and 12-60 show how to create a new role.
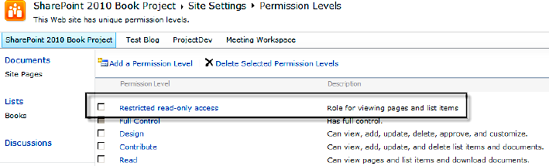
Example 12.59. Creating a Role (C#)
public void Example21()
{
    ClientContext ctx = new ClientContext("http://clserver");
    Web oWeb = ctx.Web;

    BasePermissions basePerms = new BasePermissions();
    basePerms.Set(PermissionKind.ViewListItems);
    basePerms.Set(PermissionKind.ViewPages);

    RoleDefinitionCreationInformation roleCreationInfo =
            new RoleDefinitionCreationInformation();
    roleCreationInfo.BasePermissions = basePerms;
    roleCreationInfo.Description = "Role for viewing pages and list items";
    roleCreationInfo.Name = "Restricted read-only access";
RoleDefinition roleDef = oWeb.RoleDefinitions.Add(roleCreationInfo);
Ctx.Load(roleDef);
ctx.ExecuteQuery();
Console.WriteLine("New role '" + roleDef.Name +
"' has been successfully created.");
}Example 12.60. Creating a Role (JavaScript)
function example21() {
    var ctx = new SP.ClientContext.get_current();
    this.oWeb = ctx.get_web();

    var basePerms = new SP.BasePermissions();
    basePerms.set(SP.PermissionKind.viewListItems);
    basePerms.set(SP.PermissionKind.viewPages);

    var roleCreationInfo = new SP.RoleDefinitionCreationInformation();
    roleCreationInfo.set_basePermissions(basePerms);
    roleCreationInfo.set_description("Role for viewing pages and list items");
    roleCreationInfo.set_name("Restricted read-only access");
    roleCreationInfo.set_order(1);

    this.roleDef = this.oWeb.get_roleDefinitions().add(roleCreationInfo);
    ctx.load(this.roleDef);

    ctx.executeQueryAsync(
            Function.createDelegate(this, this.onSucceededCallback),
            Function.createDelegate(this, this.onFailedCallback));
}

function onSucceededCallback(sender, args) {
    alert("New role '" + this.roleDef.get_name() +
          "' has been successfully created.");
}Assigning SharePoint users or groups to roles is shown in Listings 12-61 and 12-62.
Example 12.61. Adding a User or Group to a Role (C#)
public void Example22()
{
    ClientContext ctx = new ClientContext("http://clserver");
    Web oWeb = ctx.Web;

    Principal oUser = oWeb.CurrentUser;

    RoleDefinition oRoleDef =
oWeb.RoleDefinitions.GetByName("Restricted read-only access");RoleDefinitionBindingCollection roleDefinitionBindingColl =new RoleDefinitionBindingCollection(ctx);roleDefinitionBindingColl.Add(oRoleDef);RoleAssignment oRoleAssignment =oWeb.RoleAssignments.Add(oUser, roleDefinitionBindingColl);ctx.Load(oUser, user => user.Title);ctx.Load(oRoleDef, role => role.Name);ctx.ExecuteQuery(); Console.WriteLine("User '" + oUser.Title + "' assigned to role '" + oRoleDef.Name + "'."); }
Example 12.62. Adding a User or Group to a Role (JavaScript)
function example22() {
    var ctx = new SP.ClientContext.get_current();
    this.oWeb = ctx.get_web();

    this.oUser = oWeb.get_currentUser();
    this.oRoleDef =
        this.oWeb.get_roleDefinitions().getByName("Restricted read-only access");
    var roleDefinitionBindingColl =
                               SP.RoleDefinitionBindingCollection.newObject(ctx);
    roleDefinitionBindingColl.add(this.oRoleDef);
    var oRoleAssignment = this.oWeb.get_roleAssignments().add(
                                           this.oUser, roleDefinitionBindingColl);

    ctx.load(this.oUser, "Title");
    ctx.load(this.oRoleDef, "Name");

    ctx.executeQueryAsync(
            Function.createDelegate(this, this.onSucceededCallback),
            Function.createDelegate(this, this.onFailedCallback));
}

function onSucceededCallback(sender, args) {
    alert("User '" + this.oUser.get_title() + "' assigned to role '" +
          this.oRoleDef.get_name() + "'.");
}
As you can see, the RoleAssignments.Add (in JavaScript, RoleAssignments.add) method takes a Principal object as a parameter. The Principal class serves as the base class for both users (User) and groups (Group). So, you can assign either a user or a group to a role.
The examples in this section demonstrate the creation of a new SharePoint group, using the GroupCreationInformation class. The Contributors role is then assigned to this new group (see Listings 12-63 and 12-64).
Example 12.63. Creating a New SharePoint Group and Assigning It to a Role (C#)
public void Example23()
{
    ClientContext ctx = new ClientContext("http://clserver");
    Web oWeb = ctx.Web;

    GroupCreationInformation groupCreationInfo = new GroupCreationInformation();
    groupCreationInfo.Title = "My Custom Contributor Group";
    groupCreationInfo.Description = "This group has contributor rights.";
    Group oGroup = oWeb.SiteGroups.Add(groupCreationInfo);

    RoleDefinitionBindingCollection roleDefinitionBindingColl =
        new RoleDefinitionBindingCollection(ctx);
    RoleDefinition oRoleDefinition =
        oWeb.RoleDefinitions.GetByType(RoleType.Contributor);

    roleDefinitionBindingColl.Add(oRoleDefinition);
    oWeb.RoleAssignments.Add(oGroup, roleDefinitionBindingColl);

    ctx.Load(oGroup, group => group.Title);
    ctx.Load(oRoleDefinition, role => role.Name);

    ctx.ExecuteQuery();

    Console.WriteLine("Group " + oGroup.Title + " created and assigned to role "
        + oRoleDefinition.Name);
}
Example 12.64. Creating a New SharePoint Group and Assigning It to a Role (JavaScript)
function example23() {
    var ctx = new SP.ClientContext.get_current();
    this.oWeb = ctx.get_web();

    var groupCreationInfo = new SP.GroupCreationInformation();
    groupCreationInfo.set_title("My Custom Contributor Group");
    groupCreationInfo.set_description("This group has contributor rights.");
this.oGroup = oWeb.get_siteGroups().add(groupCreationInfo);var roleDefinitionBindingColl =SP.RoleDefinitionBindingCollection.newObject(ctx);this.oRoleDefinition =oWeb.get_roleDefinitions().getByType(SP.RoleType.contributor);roleDefinitionBindingColl.add(this.oRoleDefinition);this.oWeb.get_roleAssignments().add(this.oGroup, roleDefinitionBindingColl);ctx.load(this.oGroup, "Title"); ctx.load(this.oRoleDefinition, "Name"); ctx.executeQueryAsync( Function.createDelegate(this, this.onSucceededCallback), Function.createDelegate(this, this.onFailedCallback)); } function onSucceededCallback(sender, args) { alert("Group '" + this.oGroup.get_title() + "' created and assigned to role '" + this.oRoleDefinition.get_name() + "'."); }
In SharePoint, by default all elements (such as Web, List, and ListItem) rely on role inheritance. That means that permissions are inherited from top to bottom. A user has the same permissions on a list item as on a list, because the list item inherits its permissions from the list. There are scenarios, though, in which this default role inheritance is not desirable and has to be broken—for example, if you want a list item to be accessed only by special users or groups. The example in this section shows how to break the role inheritance of a list item and assign special permissions to it. Figures 12-21 and 12-22 show the list item permissions before and after breaking the role inheritance.
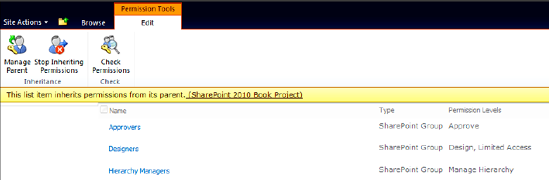
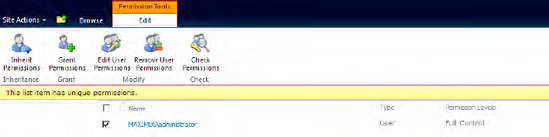
Figure 12.22. List item permissions after breaking the inheritance and adding a user (MAXIMUSadministrator) with full control to the list item
The examples shown in Listings 12-65 and 12-66 get a list item with ID=1 from the list Books and break its role inheritance without copying the inherited permissions or clearing the child scope.
Example 12.65. Breaking the Role Inheritance (C#)
public void Example24()
{
    ClientContext ctx = new ClientContext("http://clserver");
    Web oWeb = ctx.Web;

    List booksList = oWeb.Lists.GetByTitle("Books");
    ListItem bookToSecure = booksList.GetItemById(1);

    // Break role inheritance for this list item and
    // don't copy the inherited permissions
    bookToSecure.BreakRoleInheritance(false, false);

    // Assign the current user as Administrator
    RoleDefinitionBindingCollection roleDefinitionBindingColl =
        new RoleDefinitionBindingCollection(ctx);
    roleDefinitionBindingColl.Add(
        oWeb.RoleDefinitions.GetByType(RoleType.Administrator));

    bookToSecure.RoleAssignments.Add(oWeb.CurrentUser, roleDefinitionBindingColl);

    ctx.ExecuteQuery();
}
The method BreakRoleInheritance takes two Boolean parameters: copyRoleAssignments and clearSubScopes. The first parameter indicates whether all permissions from the parent object should be copied to the element on which the BreakRoleInheritance method is executed. The second parameter specifies whether unique permissions of the child elements should be cleared.
Example 12.66. Breaking the Role Inheritance (JavaScript)
function example24() {
    var ctx = new SP.ClientContext.get_current();
    this.oWeb = ctx.get_web();
var booksList = this.oWeb.get_lists().getByTitle("Books");
var bookToSecure = booksList.getItemById(1);
// Break role inheritance for this list item and
// don't copy the inherited permissions
bookToSecure.breakRoleInheritance(false, false);
// Assign the current user as Administrator
var roleDefinitionBindingColl =
SP.RoleDefinitionBindingCollection.newObject(ctx);
roleDefinitionBindingColl.add(
oWeb.get_roleDefinitions().getByType(SP.RoleType.administrator));
bookToSecure.get_roleAssignments().add(
oWeb.get_currentUser, roleDefinitionBindingColl);
ctx.executeQueryAsync(
Function.createDelegate(this, this.onSucceededCallback),
Function.createDelegate(this, this.onFailedCallback));
}There are a few reasons for accessing Web Parts via the client object model. A good example is a Windows application, such as SharePoint Designer, that provides surfaces for modifying or adding Web Parts to existing pages. Another scenario, using the JavaScript client object model, could be the implementation of a custom ribbon control for inserting predefined Web Parts to pages. Offering some practical examples, this section provides a good entry into the interaction of the client object model and Web Parts.
How to update the title of a Web Part
How to add a Web Part to a page
How to delete a Web Part from a page
To access a Web Part, you need an instance of the LimitedWebPartManager class. You get it for a defined SharePoint Web Part page (such as default.aspx) via the Web.GetFileByServerRelativeUrl method. The following example shows how to access a Web Part on a page and how to update the Title property. Figure 12-23 shows the example Web Part on the page before updating the title. In Figure 12-24 the title has been updated.
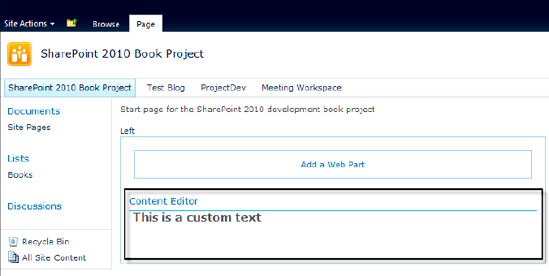
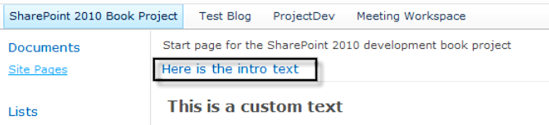
To modify Web Parts you first have to load a page containing Web Parts. Then you can change a Web Part and its properties as needed. Finally, call the SaveWebPartChanges method on the WebPartDefinition object to persist your changes (see Listing 12-67).
Example 12.67. Updating a Web Part Title (C#)
public void Example25()
{
    ClientContext ctx = new ClientContext("http://clserver");
    Web oWeb = ctx.Web;

    File oFile = oWeb.GetFileByServerRelativeUrl("/default.aspx");
    LimitedWebPartManager limitedWebPartManager =
        oFile.GetLimitedWebPartManager(PersonalizationScope.Shared);

    ctx.Load(limitedWebPartManager.WebParts,
             wps => wps.Include(wp => wp.WebPart.Title));
ctx.ExecuteQuery();
if (limitedWebPartManager.WebParts.Count == 0)
throw new Exception("No web parts found");
WebPartDefinition oWebPartDef = limitedWebPartManager.WebParts[0];
oWebPartDef.WebPart.Title = "Here is the intro text";
oWebPartDef.SaveWebPartChanges();
ctx.ExecuteQuery();
}The JavaScript code works similarly, but there is one difference to accommodate: you need two callback methods, as shown in Listing 12-68. One is called first to update the title property (changeWebPartTitle), and the other is called after updating the property (onSucceededCallback).
Example 12.68. Updating a Web Part Title (JavaScript)
function example25() {
    this.ctx = new SP.ClientContext.get_current();
    this.oWeb = ctx.get_web();

    var oFile = oWeb.getFileByServerRelativeUrl("/default.aspx");
    this.limitedWebPartManager =
        oFile.getLimitedWebPartManager(SP.WebParts.PersonalizationScope.shared)

    this.ctx.load(this.limitedWebPartManager.get_webParts(),
                  "Include(WebPart.Title)");

    this.ctx.executeQueryAsync(
            Function.createDelegate(this, this.changeWebPartTitle),
            Function.createDelegate(this, this.onFailedCallback));
}

function changeWebPartTitle() {

    if (this.limitedWebPartManager.get_webParts().get_count() == 0) {
        alert("No web parts found"); return;
    }

    var oWebPartDef = this.limitedWebPartManager.get_webParts().get_item(0);
    oWebPartDef.get_webPart().set_title("Here is the intro text 2");
    oWebPartDef.saveWebPartChanges();

    this.ctx.executeQueryAsync(
            Function.createDelegate(this, this.onSucceededCallback),
            Function.createDelegate(this, this.onFailedCallback));
}

function onSucceededCallback(sender, args) {

}
Warning
The client object model currently only allows changing common Web Part properties such as Title, TitleUrl, Subtitle, and Hidden. Actually, there is no way to change specific Web Part properties such as the Content property of a Content Editor Web Part. Those changes can only be done using server-side code.
Adding a Web Part to a page is straightforward, and again requires an instance of LimitedWebPartManager. The new Web Part has to be added via its XML definition. To extract the XML for an existing Web Part, you can use the export function, as shown in Figure 12-25.

Note
In contrast to the server side, the client object model does not know the Web Part classes available on the server. When working with the client object model, you have to use the XML Web Part definition to add a new Web Part to a page. There are no Web Part classes implemented on the client side.
This examples shown in Listings 12-69 and 12-70 add a new Content Editor Web Part to the default.aspx page.
Example 12.69. Adding a Web Part to a Page (C#)
public void Example26()
{
    ClientContext ctx = new ClientContext("http://clserver");
    Web oWeb = ctx.Web;

    File oFile = oWeb.GetFileByServerRelativeUrl("/default.aspx");
    LimitedWebPartManager limitedWebPartManager =
        oFile.GetLimitedWebPartManager(PersonalizationScope.Shared);

    string xml = @"
    <?xml version=""1.0"" encoding=""utf-8""?>
    <WebPart xmlns:xsi=""http://www.w3.org/2001/XMLSchema-instance""
             xmlns:xsd=""http://www.w3.org/2001/XMLSchema""
             xmlns=""http://schemas.microsoft.com/WebPart/v2"">
<Title>My new web part</Title><FrameType>Default</FrameType> <Description></Description> <IsIncluded>true</IsIncluded> <ZoneID></ZoneID> <PartOrder>0</PartOrder> <FrameState>Normal</FrameState> <Height /> <Width /> <AllowRemove>true</AllowRemove> <AllowZoneChange>true</AllowZoneChange> <AllowMinimize>true</AllowMinimize> <AllowConnect>true</AllowConnect> <AllowEdit>true</AllowEdit> <AllowHide>true</AllowHide> <IsVisible>true</IsVisible> <DetailLink /> <HelpLink /> <HelpMode>Modeless</HelpMode> <Dir>Default</Dir> <PartImageSmall /> <MissingAssembly>Cannot import this Web Part.</MissingAssembly> <PartImageLarge>/_layouts/images/mscontl.gif</PartImageLarge> <IsIncludedFilter /><Assembly>Microsoft.SharePoint, Version=14.0.0.0, Culture=neutral,PublicKeyToken=71e9bce111e9429c</Assembly><TypeName>Microsoft.SharePoint.WebPartPages.ContentEditorWebPart</TypeName><ContentLink xmlns=""http://schemas.microsoft.com/WebPart/v2/ContentEditor"" /><Content xmlns=""http://schemas.microsoft.com/WebPart/v2/ContentEditor""><![CDATA[<b>This is my custom editor web part!</b>]]></Content><PartStorage xmlns=""http://schemas.microsoft.com/WebPart/v2/ContentEditor""/> </WebPart>";WebPartDefinition oWebPartDef = limitedWebPartManager.ImportWebPart(xml);limitedWebPartManager.AddWebPart(oWebPartDef.WebPart, "Left", 1);ctx.ExecuteQuery(); }
Example 12.70. Adding a Web Part to a Page (JavaScript)
function example26() {

    this.ctx = new SP.ClientContext.get_current();
    this.oWeb = ctx.get_web();

    var oFile = oWeb.getFileByServerRelativeUrl("/default.aspx");
    this.limitedWebPartManager =
        oFile.getLimitedWebPartManager(SP.WebParts.PersonalizationScope.shared);
var xml = "<?xml version="1.0" encoding="utf-8"?>" +
"<WebPart xmlns:xsi="http://www.w3.org/2001/XMLSchema-instance"" +
" xmlns:xsd="http://www.w3.org/2001/XMLSchema"" +
" xmlns="http://schemas.microsoft.com/WebPart/v2">" +
"<Title>My new web part</Title>" +
"<FrameType>Default</FrameType>" +
"<Description></Description>" +
"<IsIncluded>true</IsIncluded><ZoneID></ZoneID><PartOrder>0</PartOrder>" +
"<FrameState>Normal</FrameState><Height />" +
"<Width /><AllowRemove>true</AllowRemove>" +
"<AllowZoneChange>true</AllowZoneChange>" +
"<AllowMinimize>true</AllowMinimize>" +
"<AllowConnect>true</AllowConnect><AllowEdit>true</AllowEdit>" +
"<AllowHide>true</AllowHide><IsVisible>true</IsVisible>" +
"<DetailLink /><HelpLink />" +
"<HelpMode>Modeless</HelpMode><Dir>Default</Dir><PartImageSmall />" +
"<MissingAssembly>Cannot import this Web Part.</MissingAssembly>" +
"<PartImageLarge>/_layouts/images/mscontl.gif</PartImageLarge>" +
"<IsIncludedFilter />" +
"<Assembly>Microsoft.SharePoint, Version=14.0.0.0, Culture=neutral, " +
"PublicKeyToken=71e9bce111e9429c</Assembly>" +
"<TypeName>Microsoft.SharePoint.WebPartPages.ContentEditorWebPart" +
"</TypeName>" +
"<ContentLink " +
"xmlns="http://schemas.microsoft.com/WebPart/v2/ContentEditor" />" +
"<Content " +
"xmlns="http://schemas.microsoft.com/WebPart/v2/ContentEditor">" +
"<![CDATA[<b>This is my custom editor web part!</b>]]></Content>" +
"<PartStorage " +
"xmlns="http://schemas.microsoft.com/WebPart/v2/ContentEditor" />" +
"</WebPart>";
var oWebPartDef = this.limitedWebPartManager.importWebPart(xml);
this.limitedWebPartManager.addWebPart(oWebPartDef.get_webPart(), "Left", 1);
this.ctx.executeQueryAsync(
Function.createDelegate(this, this.onSucceededCallback),
Function.createDelegate(this, this.onFailedCallback));
}
function onSucceededCallback(sender, args) {
}The examples in this section show how to remove a Web Part from a page (see Listings 12-71 and 12-72).
Example 12.71. Deleting a Web Part from a Page (C#)
public void Example27()
{
    ClientContext ctx = new ClientContext("http://clserver");
    Web oWeb = ctx.Web;

    File oFile = oWeb.GetFileByServerRelativeUrl("/default.aspx");
    LimitedWebPartManager limitedWebPartManager =
        oFile.GetLimitedWebPartManager(PersonalizationScope.Shared);

    ctx.Load(limitedWebPartManager.WebParts);
    ctx.ExecuteQuery();

    if (limitedWebPartManager.WebParts.Count == 0)
        throw new Exception("No web parts found");

    WebPartDefinition oWebPartDef = limitedWebPartManager.WebParts[0];
    oWebPartDef.DeleteWebPart();

    ctx.ExecuteQuery();
}
Accomplishing this in JavaScript is similar to changing Web Part properties. Again, you need two callback functions: one for querying the Web Parts on a page and another for deleting a Web Part (see Listing 12-72).
Example 12.72. Deleting a Web Part from a Page (JavaScript)
function example27() {
    this.ctx = new SP.ClientContext.get_current();
    this.oWeb = ctx.get_web();

    var oFile = oWeb.getFileByServerRelativeUrl("/default.aspx");
    this.limitedWebPartManager =
        oFile.getLimitedWebPartManager(SP.WebParts.PersonalizationScope.shared)

    this.ctx.load(this.limitedWebPartManager.get_webParts());

    this.ctx.executeQueryAsync(
            Function.createDelegate(this, this.deleteWebPart),
            Function.createDelegate(this, this.onFailedCallback));
}

function deleteWebPart() {

    if (this.limitedWebPartManager.get_webParts().get_count() == 0) {
        alert("No web parts found"); return;
    }

    var oWebPartDef = this.limitedWebPartManager.get_webParts().get_item(0);
    oWebPartDef.deleteWebPart();

    this.ctx.executeQueryAsync(
           Function.createDelegate(this, this.onSucceededCallback),
           Function.createDelegate(this, this.onFailedCallback));
}
function onSucceededCallback(sender, args) {
}The previous sections contain many basic examples of working with the client object model. When developing professional applications, you quickly come to a point where you have to handle more complex requirements. This section some contains advanced coding examples that may help you in such situations:
How to use exception-handling scope
How to use conditional scope
How to access large lists
Dealing with exceptions can become very complex. The example in Listing 12-73 shows how you might use exceptions when working with the client object model. The example queries a list named NonExistentList and updates its Description property. When executing this code for the first time and assuming that the list does not exist, an exception will be thrown when calling ExecuteQuery. This exception will be caught, and within the catch block, this list will be created. Then, in the finally block, the list description property will be updated again.
Example 12.73. Using Normal Exception Handling—Not Recommended! (C#)
public void Example28a()
{
    ClientContext ctx = new ClientContext("http://clserver");

    // Get list NonExistingList and update its description
    List myList = ctx.Web.Lists.GetByTitle("NonExistentList");
    myList.Description = "This is a new description";
    myList.Update();

    try
    {
        ctx.ExecuteQuery();
    }
    catch (Exception)
    {
        // Create new list NonExistingList
        ListCreationInformation listCreationInfo = new ListCreationInformation();
        listCreationInfo.Title = "NonExistingList";
        listCreationInfo.Description = "Created within catch block";
        listCreationInfo.TemplateType = (int)ListTemplateType.GenericList;
        List oList = ctx.Web.Lists.Add(listCreationInfo);

        ctx.ExecuteQuery();
}
finally
{
// Update description of list NonExistingList
myList = ctx.Web.Lists.GetByTitle("NonExistingList");
myList.Description = "This is a description created by the final block";
myList.Update();
ctx.ExecuteQuery();
}
}In the worst case, this example needs three server requests: one to query for the list, another to create the list, and a final one to update the description of this list. To overcome the need for multiple server requests, depending on exceptions, an ExceptionHandlingScope class has been introduced. This class includes methods to wrap code in a scope and handle exceptions that occur within the batch processing of the commands given to the ClientContext instance. Take a look at Listing 12-74. It is functionally equivalent to Listing 12-73, but requires only a single request to the server.
Example 12.74. Using Exception-Handling Scope (C#)
public void Example28b()
{

    ClientContext ctx = new ClientContext("http://clserver");
    ExceptionHandlingScope exScope = new ExceptionHandlingScope(ctx);

    using (exScope.StartScope())
    {
        using (exScope.StartTry())
        {
            // Get list NonExistingList and update its description
            List myList = ctx.Web.Lists.GetByTitle("NonExistingList");
            myList.Description = "This is a new description";
            myList.Update();
        }

        using (exScope.StartCatch())
        {
            // Create new list NonExistingList
            ListCreationInformation listCreationInfo =
                                                new ListCreationInformation();
            listCreationInfo.Title = "NonExistingList";
            listCreationInfo.Description = "Created within catch block";
            listCreationInfo.TemplateType = (int)ListTemplateType.GenericList;
            List oList = ctx.Web.Lists.Add(listCreationInfo);
        }

        using (exScope.StartFinally())
        {
            // Update description of list NonExistingList
            List myList = ctx.Web.Lists.GetByTitle("NonExistingList");
            myList.Description = "This is a description created by the final block";
myList.Update();
}
}
ctx.ExecuteQuery();
}The code looks much cleaner than Listing 12-73. The whole client code block is wrapped within an ExceptionHandlingScope.StartScope method, which defines the beginning of the client object operations. Then, each logical block (i.e. the blocks that retrieve, create, and update the list) is wrapped into its own scope operation (StartTry, StartCatch, and StartFinally). Only if an exception occurs within the StartTry code block will the StartCatch block be executed. The StartFinally code block will always be executed, irrespective of whether an exception occurs. In JavaScript code the exception handling looks quite similar, as shown in Listing 12-75.
Warning
The program code wrapped in ExceptionHandlingScope methods such as StartTry, StartCatch, or StartFinally is always executed. Because the client object model collects the operations to be executed in a kind of queue, the ExceuteQuery method will decide internally whether to execute some client object operations.
Example 12.75. Using Exception-Handling Scope (JavaScript)
function example28()
{
    this.ctx = new SP.ClientContext.get_current();
    var exScope = new SP.ExceptionHandlingScope(this.ctx);

    var startScope = exScope.startScope();

        var tryScope = exScope.startTry();
            // Get list NonExistingList and update its description
            var myList = ctx.get_web().get_lists().getByTitle("NonExistingList");
            myList.set_description("This is a new description");
            myList.update();
        tryScope.dispose();

        var catchScope = exScope.startCatch();
            // Create new list NonExistingList
            var listCreationInfo = new SP.ListCreationInformation();
            listCreationInfo.set_title("NonExistingList");
            listCreationInfo.set_description("Created within catch block");
            listCreationInfo.set_templateType(SP.ListTemplateType.genericList);
            ctx.get_web().get_lists().add(listCreationInfo);
        catchScope.dispose();

        var finallyScope = exScope.startFinally();
            // Update description of list NonExistingList
            var myList = ctx.get_web().get_lists().getByTitle("NonExistingList");
myList.set_description("This is a description created
by the final block");
myList.update();
finallyScope.dispose();
startScope.dispose();
this.ctx.executeQueryAsync(
Function.createDelegate(this, this.onSucceededCallback),
Function.createDelegate(this, this.onFailedCallback));
}The usage of the ExceptionHandlingScope in JavaScript is nearly the same as in C#. Because there is no using construct in JavaScript, you have to dispose of the scope objects manually by calling scope.dispose.
In addition to ExceptionHandlingScope, the client object model provides another helpful construct: ConditionalScope. This scope is created using a Boolean LINQ expression. The client object model operations, wrapped in the scope, are only executed if the Boolean LINQ expression is true.
Note
The JavaScript client object model does not include an equivalent for the ConditionalScope class in the .NET managed and Silverlight client object models.
The example in Listing 12-76 retrieves a list and then creates a ConditionalScope instance with the following condition:
oList.BaseTemplate == (int)ListTemplate.GenericList
Consequently, the code within the scope.StartScope method block is only executed if the list is of type ListTemplateType.GenericList.
Example 12.76. Using Conditional Scope (C#)
public void Example29()
{
    ClientContext ctx = new ClientContext("http://clserver");
    Web oWeb = ctx.Web;
    List oList = oWeb.Lists.GetByTitle("Books");

    ConditionalScope scope = new ConditionalScope(ctx,
        () => oList.BaseTemplate == (int)ListTemplateType.GenericList);

    using (scope.StartScope())
    {
        // This code executes only if the list Books is of BaseType GenericList
        ctx.Load(oList, list => list.Title);
    }
ctx.ExecuteQuery();
if (scope.TestResult.Value == true)
{
Console.WriteLine("List '" + oList.Title + "' is of type 'GenericList'");
}
}Finally, by using the Boolean result value in scope.TestResult.Value, you can access the loaded list property Title. The ConditionalScope construct is intended for scenarios where you want to minimize the server round trips, and where it is possible to determine, prior to retrieving values, whether or not queries should be executed.
Warning
Some actions, such as setting properties or invoking methods, are not allowed inside a conditional scope.
Handling lists containing several thousand list items has become quite normal in professional SharePoint usage scenarios. A common problem when working with large lists is the number of items to return in one query. The example in this section demonstrates how a paging mechanism with CAML can be implemented so that only a manageable quantity of items is returned. The first code section adds 20 items to the Books list. Multiple CAML queries are then executed within a loop (while(true)). The loop is executed until the ListItemCollectionPosition property of the returned ListItemCollection is NULL, indicating that there are no more results (see Listing 12-77).
Example 12.77. Paging a Large List (C#)
public void Example30()
{
    ClientContext ctx = new ClientContext("http://clserver");
    Web oWeb = ctx.Web;
    List oList = oWeb.Lists.GetByTitle("Books");

    // Adding some items to the list
    ListItemCreationInformation newItem = new ListItemCreationInformation();
    for (int i = 0; i < 20; i++)
    {
        ListItem listItem = oList.AddItem(newItem);
        listItem["Title"] = "New Book " + i;
        listItem.Update();
    }
    ctx.ExecuteQuery();


    ListItemCollectionPosition itemPosition = null;
    while (true)
{
CamlQuery camlQuery = new CamlQuery();
// Setting the item position
camlQuery.ListItemCollectionPosition = itemPosition;
// Creating a CAML query with RowLimit=3
camlQuery.ViewXml = @"<View>"
+ "<ViewFields><FieldRef Name='Title'/></ViewFields>"
+ "<RowLimit>3</RowLimit>"
+ "</View>";
// Query and retrieve data
ListItemCollection listItems = oList.GetItems(camlQuery);
ctx.Load(listItems);
ctx.ExecuteQuery();
// Store position for next iteration
itemPosition = listItems.ListItemCollectionPosition;
// Print book titles to the console
foreach (ListItem listItem in listItems)
Console.WriteLine(" Book: " + listItem["Title"]);
// Exit this loop when no more pages are available
if (itemPosition == null) break;
Console.WriteLine(itemPosition.PagingInfo);
Console.WriteLine();
}
}The console output of Listing 12-77 is reproduced in Figure 12-26. The JavaScript implementation works very similarly.
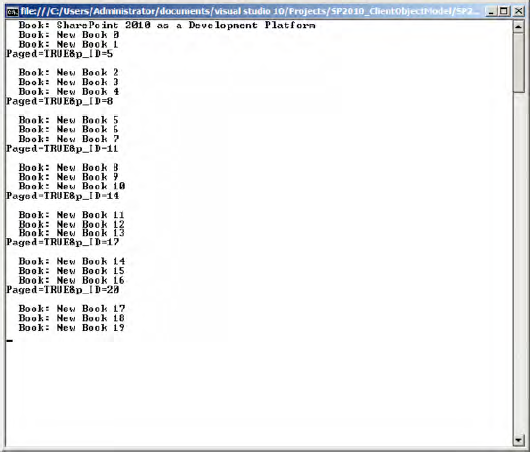
This chapter covered the SharePoint 2010 client object model. It showed how client applications can be built using the .NET managed code model for .NET Windows applications or Silverlight applications. It also described in detail the use of the client object model for JavaScript.
You also learned about the two important frameworks for JavaScript: the Dialog framework and the Status and Notification framework. More than 30 real-world detailed examples and code snippets demonstrated how to develop code with the client object model.