
In this chapter we focus on the extension of SharePoint's UI using Silverlight. Silverlight is a platform and browser-independent implementation similar to WPF (Windows Presentation Foundation). Primarily, it's a browser plug-in that executes XAML (Extensible Application Markup Language) and code in a sandbox-like environment. The power and programming model of Silverlight together with the tight integration in SharePoint make it a first-choice tool to create business applications that were formerly built as Windows Forms programs.
In this chapter you will learn
The architecture of Silverlight and the common programming style
How to host Silverlight and deal with security issues
How to integrate Silverlight projects into your SharePoint development experience
How to access SharePoint data from Silverlight using the client object model
This chapter is not intended to teach Silverlight from the ground up, nor is it dedicated to the client object model. (For the latter, refer to Chapter 12.)
Strictly speaking, Silverlight is an autonomous technology that is independent of .NET. Silverlight uses its own runtime, which is available as a browser plug-in and a standalone runtime. Silverlight is a UI technology that far exceeds what you know from HTML, DHTML, and JavaScript. It has no dependencies on a specific browser, operating system, or processor architecture.
Common elements and the UI framework are based on XAML and use a similar approach to WPF. However, it is not a subset of WPF, and it is independent of it. From a developer's point of view, though, WPF and Silverlight are closely related technologies—if you know one, you know much about the other.
Note
Even though Silverlight 4 is currently available, in this chapter we'll focus on the basic features available in version 3, too. Version 3 is the first version that is sufficiently complete to create real business applications, so we don't need to focus on the enhancements in version 4 with respect to SharePoint integration. However, version 4 has a number of significant features, such as printing and client device support, that make it the best choice for your project.
Most of the support you need to work with Silverlight is provided by Visual Studio 2010 out of the box. Moreover, you don't need to install anything additional to host and use applications created with Visual Studio within SharePoint.
For a professional Silverlight development experience, we recommend you take a look at the free Silverlight Toolkit at http://silverlight.codeplex.com/. Microsoft posts new development cycles in early stages here regularly. Some of the controls appear later in the next release. This has happened already during the move from Silverlight 3, where some of the toolkit's controls are now available in the Silverlight 4 release.
Silverlight is not just a technology. It's also a way to interactively access content and media. You can create rich, platform-independent applications. Integrating Silverlight with SharePoint enables you to create Windows-like applications with comprehensive UIs, and still benefit from zero deployment. All this is built from a single development environment and with one set of programming languages (i.e., C#, and for certain tasks JavaScript). The big picture of the architecture is shown in Figure 13-1.
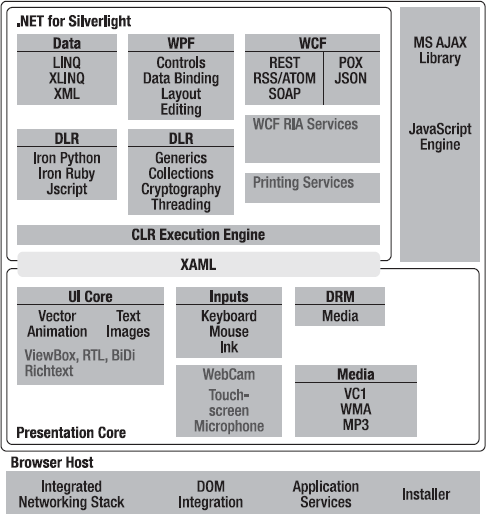
At first glance, the client libraries appear to be merely a condensed version of the .NET Framework. However, the selection is quite clever, and you'll rarely miss anything you know from .NET. There are a few differences that can be annoying, and these differences highlight the fact that it's not a subset—it is in fact an independent framework.
The Silverlight framework is installed on the client as a plug-in. Some assemblies are only loaded when first requested from the server, to minimize the size of the initial download. The client now includes core components for Windows controls, network functions, base class libraries, garbage collection, and of course a CLR. Additional and optional components include assemblies from the SDK, LINQ to XML, syndication (RSS/Atom) support, XML serializing, and support for dynamic languages through the Dynamic Language Runtime (DLR). The DLR supports client programming using languages such as IronPython and IronRuby.
Essentially, the Silverlight CLR looks the same as the .NET CLR. Memory management, garbage collection, exception handling, and type safety are all handled in the same general manner.
The core libraries contain functions for string manipulation, regular expressions, input and output operations, reflection, collections, and localization. Some special libraries accompany this:
LINQ to XML: This allows you to access XML files using LINQ, serialize objects as XML, and deserialize such data back into objects.
RSS/Atom: This provides support for WCF services using HTTP or HTTPS. This includes RSS, Atom, JSON, POX (Plain Old XML), and SOAP services.
UI controls: These are very similar to WPF and use the same XAML dialect for a declarative programming style. Controls such as
Button,Calendar,CheckBox,DataGrid,DatePicker,HyperlinkButton,ListBox,RadioButton, andScrollViewerare included.Windows Media components: There are several powerful controls within the presentation core to manage media, such as video and audio streams, on the client.
Silverlight has strong support for media and can access human interface devices, such as a mouse. Silverlight 4 has added support for webcam, microphone, and printer devices.
VC1, WMV, WMA, and MP3: The presentation core renders images in various formats, and handles vector graphics, animations, and text. Furthermore, you can play videos and audio in such formats as VC1 and WMV, and play back audio encoded with WMA or MP3.
XAML: The language that defines controls, a layout manager, and data binding support to create rich UIs. If you know XAML from WPF, it's easy to work with Silverlight.
DRM (digital rights management): The integrated media player supports rights management so that media can be played with such restrictions.
There is no Silverlight without XAML. Silverlight pushes the UI envelope and enables creating sophisticated UIs. (From the user's perspective, the success of each enhancement you build will be judged on your UI design.) This section introduces creating a UI for SharePoint, such as a Web Part.
Tip
If you need more detailed information, please refer to a book dedicated to Silverlight, such as Pro Silverlight 3 in C#, by Matthew MacDonald (Apress, 2009).
In simple terms, you can consider XAML to be a method to serialize objects with all their properties. It provides a way to divide the business logic from the UI. XAML is based on XML and describes a UI declaratively. It extends XML in a way as well, as the inner structure of attributes and the naming schema of elements have special meaning that's well defined. Technically, XAML represents an object hierarchy, which means it can express whatever you can describe using classes and properties in classic programming languages such as C#.
XAML is used to describe the appearance, behavior, and properties of UI elements such as buttons. Everything you see is an element. That includes, for instance, such things as simple text. You often have two ways to describe elements: either declaratively as a single element, or through extended attributes.
The declarative approach looks like elements in HTML:
<Button >
</Button>
Many elements can contain other elements. A grid can contain buttons, for instance. If an element has no child elements, the short syntax is equally valid:
<Grid>
   <Button />
</Grid>
The attribute syntax uses attributes to further describe an element. To name an element, the Name or x:Name attribute is employed. Naming techniques are briefly described in the sidebar "Confusing Name vs. x:Name Resolver," later in this section.
As another example, the attribute Background defines the background:
<Grid Name="LayoutRoot" Background="White">
   <Button Name="NiceButton" Background="Green" />
</Grid>
However, elements such as a grid can be amazingly complex. With dozens of attributes, grids can be hard to read and impossible to format properly. Therefore, you can use the element property syntax that expresses attributes with complex values as child elements:
<Rectangle  Width="100"  Height="100">
  <Rectangle.Fill>
    <SolidColorBrush Color="Blue"/>
  </Rectangle.Fill>
</Rectangle>
This example creates a 100-by-100-pixel rectangle. It is filled with a solid brush. The property Fill is assigned the color blue. This format is optional for simple attributes and mandatory for complex values that you can't express as strings. This syntax avoids using impractical object formatters serializing .NET objects in ways that humans reading the code can't interpret well.
Some of these attributes accept collections. For example, gradients may accept more than one value. A gradient collection includes all stop points where the value changes.
<LinearGradientBrush>
  <LinearGradientBrush.GradientStops>
    <GradientStop Offset="0.0" Color="Red" />
    <GradientStop Offset="1.0" Color="Blue" />
  </LinearGradientBrush.GradientStops>
</LinearGradientBrush>
The parser will implicitly recognize the collection. However, you can also explicitly add the appropriate collection element:
<LinearGradientBrush> <LinearGradientBrush.GradientStops><GradientStopCollection><GradientStop Offset="0.0" Color="Red" /> <GradientStop Offset="1.0" Color="Blue" /></GradientStopCollection></LinearGradientBrush.GradientStops> </LinearGradientBrush>
This simply improves readability; it does not change the code produced by the parser. In the same way, designer tools may output different markup than what you would write by hand. This sometimes makes it hard to read and understand code you did not write.
The previous sample looks rather verbose. Since all the values are unambiguous, you may presume that there is an implicit way to create elements, which is true:
<LinearGradientBrush>
  <GradientStop Offset="0.0" Color="Red" />
  <GradientStop Offset="1.0" Color="Blue" />
</LinearGradientBrush>
For experienced developers, the next example looks better because it is clearly laid out. A StackPanel element creates a stack of elements—one above another. The explicit and complete declaration looks like this:
<StackPanel>
  <StackPanel.Children>
    <UIElementCollection>
       <TextBlock>Hello</TextBlock>
       <TextBlock>World</TextBlock>
    </UIElementCollection>
  </StackPanel.Children>
</StackPanel>
However, the implicit declaration is cleaner:
<StackPanel>
  <TextBlock>Hello</TextBlock>
  <TextBlock>World</TextBlock>
</StackPanel>
You have to know while writing XAML code that a StackPanel does not have a child element or property that takes a collection of TextBlock elements. The earlier code reveals that it has a property Children that takes an object of type UIElementCollection, which is obviously a parent in the TextBlock's inheritance hierarchy. IntelliSense is not so much help during your coding experience either, as it gives often far more options than you need.
There is no UI without interaction. Interaction means that events are fired from user operations—most commonly mouse clicks and key presses—and that handlers perform some custom action in direct response. You can declare the standard click event for a Button element like this:
<Button x:Name="MyButton" Width="60" Height="20" Click="MyButton_Click">
      <TextBlock x:Name="MyButtonCaption">Click Me</TextBlock>
</Button>
Just like in ASP.NET, you need to add code to the code-behind file associated with your XAML to create the handler:
private void MyButton_Click(object sender, RoutedEventArgs e)
{
   MyButtonCaption.Text = "Clicked";
}
Alternatively, you could add the same handler in your code, in the same style as any .NET event handler:
public Page()
{
   InitializeComponent();
   MyButton.Click +=new RoutedEventHandler(MyButton_Click);
}
Routed Events
The Silverlight event model is more sophisticated than the event model in ASP.NET. Some events support so-called routing. To understand this, you need to know that UI elements can form a stack—elements within elements, many levels deep. For example, a Canvas can contain a Grid, which may have some cells that have TextBox and Button elements. Each element may have the ability to receive a left mouse button click, for instance. The element next to the surface receives an event, such as a mouse click. This element may route the event to the elements underneath it. It depends on what you want to do and what, if any, element in the hierarchy handles this event. Not all events support routing. In Silverlight, support for routing is provided by these events:
KeyDownKeyUpGotFocusLostFocusMouseLeftButtonDownMouseLeftButtonUpMouseMoveBindingValidationError
The routing of events from the surface (canvas) to the top element is called bubbling up—just like a bubble in water. Since several elements in a sequence of events can typically handle a particular event, the Handled property is there to inform the other elements that the event has been handled—it stops events from bubbling up. Following is an example:
private void BubbleUp_MouseMove(object sender, MouseButtonEventArgs e)
{
   e.Handled = true;
   string msg = "x:y = " + e.GetPosition(null).ToString();
   msg += " from " + (e.OriginalSource as FrameworkElement).Name;
   StatusText.Text = msg;
}
If there are no other handler methods, there is no need to cancel bubbling. Thus, routed events are easier than you might imagine at first.
Laying out elements on a screen may sound easy. But when you consider the vast number of properties you can set for each element, it quickly becomes complex. A layout manager is used to arrange the elements. Silverlight has three such managers: the canvas layout manager, the grid layout manager, and the stack panel manager. You can nest these within each other to create complex layouts.
Grid Layout
Grid layout has the appearance and behavior of a table. If you understand HTML tables, then you should easily understand the essentials of grid layout. When you first define a grid, it has one cell. The basic template for a new Silverlight application within Visual Studio uses exactly this approach to produce a simple layout container, as follows:
<Grid x:Name="LayoutRoot" Background="White">
   <Button x:Name="MyButton" Width="60" Height="20" Click="MyButton_Click" >
   </Button>
</Grid>
Of course, you can also define any number of rows and columns. Extended attributes such as Grid.ColumnSpan used in child elements modify the layout.
<Grid ShowGridLines="True" x:Name="LayoutRoot" Background="White" >
<Grid.RowDefinitions>
<RowDefinition />
<RowDefinition />
<RowDefinition />
</Grid.RowDefinitions>
<Grid.ColumnDefinitions>
<ColumnDefinition />
<ColumnDefinition />
</Grid.ColumnDefinitions>
<Button x:Name="MyButton" Width="60" Height="20" Content="Click Me"
Click="MyButton_Click" Grid.Column="1" Grid.Row="1" />
<TextBlock x:Name="StatusText" Grid.ColumnSpan="2" />
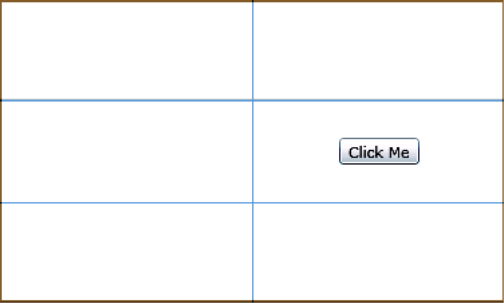
</Grid>Column and row definitions add elements within the grid. The ShowGridLines property is very helpful—it reveals the layout, even at design time (see Figure 13-2). You can remove the gridlines later when the page layout is completed.
The previous examples have cells of uniform size. However, you can set the cell size relative to its neighbors or to absolute values. Child elements can be defined in any order. The specific cell in which they appear is determined using the Grid.Row and Grid.Column attributes.
The next example shows how to specify explicit widths and heights:
<Grid>
  <Grid.RowDefinitions>
      <RowDefinition />
      <RowDefinition Height="20" />
      <RowDefinition />
    </Grid.RowDefinitions>
    <Grid.ColumnDefinitions>
      <ColumnDefinition Width="40"/>
      <ColumnDefinition />
    </Grid.ColumnDefinitions>
</Grid>
The rows and columns that do not have assigned values use the remaining space equally. Using the explicit value Auto ensures that the cell is extended until all elements fit into it. Relative values use an asterisk to express relationships:
<Grid ShowGridLines="True" x:Name="LayoutRoot" Background="White" >
<Grid.RowDefinitions>
<RowDefinition Height="3*" MinHeight="30" MaxHeight="600"/>
<RowDefinition Height="20" />
<RowDefinition Height="*"/>
</Grid.RowDefinitions>
<Grid.ColumnDefinitions>
<ColumnDefinition Width="40"/>
<ColumnDefinition />
</Grid.ColumnDefinitions>
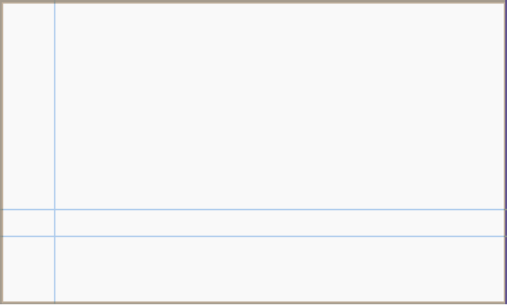
</Grid>The value 3* means that this row takes a space that is three times what it would take if the space were shared equally. A single * simply indicates "the remaining space" (see Figure 13-3).
Canvas Layout
A canvas is used to arrange elements in absolute positions. The tricky aspect is that each element passes its positional data to the layout manager instead of having its own properties, such as Top and Left. Instead, Canvas.Top and Canvas.Left are used:
<Canvas Background="White">
    <Rectangle Canvas.Left="50" Canvas.Top="50" Width="120" Height="60" >
      <Rectangle.Fill>
        <LinearGradientBrush>
          <GradientStop Offset="0.0" Color="White" />
          <GradientStop Offset="1.0" Color="Black" />
        </LinearGradientBrush>
      </Rectangle.Fill>
    </Rectangle>
</Canvas>
You can read this syntax as "layout manager, place me at x,y." The result is displayed in Figure 13-4.

The StackPanel Layout
This is the simplest manager. It forms a stack of elements, one after another. The stack starts at the top border.
<StackPanel Orientation="Vertical" >
<Button Width="90" Content="Hello World 1"></Button>
<Button Width="90" Content="Hello World 2"></Button>
<Button Width="90" Content="Hello World 3"></Button>
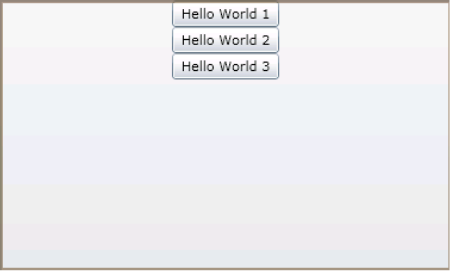
</StackPanel>The Orientation attribute can orient the stack from left to right, instead of the default, top to bottom (the default is shown in Figure 13-5).
Silverlight applications are independent of the .NET Framework. As a result, you can use the Silverlight version you prefer. Currently, Silverlight 3 and the next major release, Silverlight 4, are both available. Whether you use .NET 3.5 for your SharePoint applications is immaterial. The following description and examples run equally well with Silverlight 3 and Silverlight 4.
There is no explicit configuration step for Silverlight. SharePoint uses Silverlight internally, and you can use it without configuring any further settings. However, there are some security settings to consider, because Silverlight applications run on the client, and you need to ensure that it has appropriate access rights.
One of the first things you should decide upon when using Silverlight is where to place the XAP files, which are the files by which Silverlight applications are deployed. XAP files are zipped containers that contain the XAML code, the compiled assembly, any additional assemblies you have referenced in your project, and a manifest file. XAP files are usually placed in one of the following:
A document library
The 14 hive, somewhere in the
LAYOUTSfolderA local directory (within
C:inetpubwwwrootwssVirtualDirectories) or the globalClientBindirectory (within theLAYOUTSfolder)
Putting the XAP files in a document library is usually the most flexible option, as you have a simple UI to manage the XAP files used within all your applications. In the 14 hive, you should place the files in TEMPLATELAYOUTS, within a separate folder to avoid conflicts with other applications. Placing them in the ClientBin directory is best practice, however, as it gives the XAP files a distinct location.
By default, you can call from your Silverlight application to services within the same domain. This can cause problems, because the current domain is where the executable (XAP) originated, and the domain where the service is running may not necessarily be the same.
If your XAP file is placed at http://sharepointserve/XapFiles/app1.xap, then the following service locations will result in cross-domain security issues:
https://sharepointserve: Different protocol (HTTPS instead of HTTP)http://my.sharepointserve: Different subdomain (my)http://sharepointserver: Different host (servevs.server)http://sharepointserve:8080: Different port (80 is the default port)
Silverlight clients are powerful applications. Even if you intend to support your own clients only, technically any Silverlight application can potentially access your services. The cross-domain access, outlined previously, can be benign—or malicious, if an attacker tries to get access. A client-access policy file is used to control what particular actions clients are allowed to perform to what specific addresses. The client-access file is read by the client and probably cached. If you plan to change the settings, we recommend that you switch off browser caching to prevent the browser from persisting an out-of-date version. If you wish to host services with different security claims, consider placing them in different domains. This allows you to use different domain-based security policies (see Listing 13-1).
Example 13.1. A clientaccesspolicy.xml File That Allows Access to Services From Any Domain
<?xml version="1.0" encoding="utf-8"?>
<access-policy>
  <cross-domain-access>
    <policy>
      <allow-from http-request-headers="*">
        <domain uri="*"/>
      </allow-from>
      <grant-to>
        <resource path="/" include-subpaths="true"/>
      </grant-to>
    </policy>
  </cross-domain-access>
</access-policy>
Tip
The complete schema of the clientaccesspolicy.xml can be found at http://msdn.microsoft.com/en-us/library/cc645032(v=VS.95).aspx.
Listing 13-2 shows a sample client-access policy file from Microsoft's Contoso samples that illustrates several interesting points.
Example 13.2. A ClientAccessPolicy.xml File That Supports Two Policies
<?xml version="1.0" encoding="utf-8"?>
  <access-policy>
    <cross-domain-access>
      <policy>
        <allow-from http-request-headers="SOAPAction">
          <domain uri="*"/>
        </allow-from>
        <grant-to>
          <resource path="/services/" include-subpaths="true"/>
        </grant-to>
     </policy>
      <policy >
        <allow-from http-methods="*">
          <domain uri="www.contoso.com"/>
</allow-from>
<grant-to>
<resource path="/services/" include-subpaths="true"/>
</grant-to>
</policy>
</cross-domain-access>
</access-policy>The example has two policies. The first enables GET and POST requests from all callers to the path within the current domain. The Content-type header of each request must be set to SOAPAction. This is a common way to restrict calls to only the specific headers your application supports. The second policy permits all HTTP verbs to access the specified domain including the service path. As shown, several attributes allow wildcards. Wildcards are allowed on each level. If you want to allow all protocols, * will accomplish that, while http://* will allow all domains with the HTTP protocol. Even a subdomain can be expressed by using something like http://*.mydomain.com.
Note
You may have heard that you should add a similar file to manage client access policies called crossdomain.xml. This file indeed has the same intention; however, it is dedicated to supporting Adobe Flash applications. If you plan to create a pure Silverlight environment, you won't need such a file.
Placing the ClientAccessPolicy.xml
The first question arises when you try to copy the clientaccesspolicy.xml file somewhere. The position of the XAP files is unimportant, as it is the page that calls them. Silverlight establishes its own request channel to the server. This goes to the root of that web if the page that hosts your application is running within a specific web. To reach this, you need to deploy your clientaccesspolicy.xml file to the virtual directory—for example:
c:inetpubwwwrootwssvirtualdirectories80
If you receive a security exception when running a Silverlight application, you can use Fiddler to check the requests your client made. This usually reveals where the plug-in is looking for the file.
As explained earlier, Silverlight cannot make cross-domain requests. If your application needs to communicate with a server on another domain, its requests must first be sent to a request-forwarding handler that is in the same domain as the application. The handler can then repackage the request and send it to the destination in the external domain.
Creating a request forwarder is a common task. Most of the logic needed by the handler is in the RequestForwarder class. The handler class you create is a kind of wrapper around this class. A handler can be built using the Generic Http Handler template. The complete code is shown in Listing 13-3.
Example 13.3. A Forwarder Handler to Overcome Cross-Domain Blocking
<%@ WebHandler Language="C#" Class="SharePointForwarder" %>
using System;
using System.Web;
using Microsoft.SharePoint.Client;
public class ToSharePointForwarder : IHttpHandler
{

  public bool IsReusable
  {
    get { return false; }
  }
  public void ProcessRequest (HttpContext context)
  {
    RequestForwarder forwarder = new RequestForwarder(context);
    if (!String.IsNullOrEmpty(forwarder.Url))
    {
        forwarder.WebRequest.Credentials
            = new System.Net.NetworkCredential("MySilverlightApp",
                                                "username",
                                                "password");
        forwarder.ProcessRequest();
    }
  }
}
In fact, the only operation the handler performs is adding proper network credentials—Silverlight isn't permitted to add these to the requests automatically. The handler must now be activated using External Application XML through the External Application Provider (EAP). The RequestForwarder class is defined in Microsoft.SharePoint.Client.dll. Hence, this assembly must be referenced in the project.
The markup that controls the EAP provides information to SharePoint about a Silverlight application that is hosted in a Web Part. It is only required if the Silverlight application is hosted on a different domain and accesses data from the SharePoint web site, as shown in the previous section. The information in the markup consists of
Information about the Silverlight application and the credentials it uses to retrieve data from the SharePoint web sites services
Properties that describe the Web Part that hosts the Silverlight application
Custom information that can be used if you provide a custom EAP
There are several ways to assign the markup to the Web Part. If you plan to deploy the Web Part to end users, the EAP XML file must be deployed as a file. The users will need some instruction on how to modify and add it using the SharePoint UI. This might require local modifications to this file. You can also use the Application XML property within the Web Part markup of a module, available in a feature definition (elements.xml) or site definition (onet.xml) file respectively. You can set the ApplicationXml property programmatically in a FeatureInstalled or FeatureActivated event handler, which provides the most flexibility but requires the most effort. It is, however, the preferred method for developers.
The basic structure of an EAP XML file is shown in Listing 13-4.
Example 13.4. A Typical EAP XML File (from MSDN/Contoso Project)
<?xml version='1.0' encoding='utf-16'?>
<applicationParts xmlns='http://schemas.microsoft.com/sharepoint/2009/fluidapp'>
<applicationPart>
    <metaData>
      <applicationId>00000000-0000-0000-0000-000000000000</applicationId>
      <applicationUrl>http://www.contoso.com/someapplication.xap</applicationUrl>
      <principal>domainusername</principal>
      <sharepointRequestHandlerUrl>/sp.ashx</sharepointRequestHandlerUrl>
    </metaData>
    <data>
      <webPartProperties>
        <property name='Title'>Title</property>
        <property name='Description'>Description</property>
        <property name='WindowlessMode'>TRUE</property>
        <property name='Height'>200px</property>
        <property name='Width'>100px</property>
        <property name='HelpUrl'>
           http://www.contoso.com/someapplication/help.aspx
        </property>
        <property name='HelpMode'>Modal</property>
        <property name='Direction'>NotSet</property>
        <property name='MinRuntimeVersion'>3.0</property>
      </webPartProperties>
      <customProperties>
        <property name='CustomPropertyName'>CustomPropertyInfo </property>
      </customProperties>
    </data>
  </applicationPart>
</applicationParts>
If you plan to add this as part of either element.xml or onet.xml, you must treat it as embedded XML. That means that the tags do not match the CAML schema, and must be escaped using the < and > literal entities within a CDATA section, as shown in Listing 13-5.
Example 13.5. An Embedded EAP XML File
<AllUsersWebPart WebPartZoneID="Top_Right" WebPartOrder="2">
<![CDATA[
<webParts>
<webPart xmlns="http://schemas.microsoft.com/WebPart/v3">
<metaData>
<type name="Microsoft.SharePoint.WebPartPages.SilverlightWebPart,
Microsoft.SharePoint, Version=14.0.0.0, Culture=neutral,
PublicKeyToken=94de0004b6e3fcc5" />
<importErrorMessage>Cannot import this Web Part.</importErrorMessage>
</metaData>
<data>
<properties>
<property name="ChromeType" type="chrometype">Default</property>
<property name="Height" type="unit">600px</property>
<property name="Url" type="string" />
<property name="HelpMode" type="helpmode">Navigate</property>
<property name="ApplicationXml" type="string">
<?xml version="1.0" encoding="utf-8"?>
<applicationParts xmlns="http://schemas.microsoft.com/sharepoint/2009/fluidapp">
<applicationPart>
<metaData><applicationId>
00000000-0000-0000-000000000000-0000
</applicationId>
<applicationUrl>
http://server/ClientBin/SomeApplication.xap
</applicationUrl>
<principal>domainContosoApp</principal>
<sharepointRequestHandlerUrl>
/ReqForwarder.ashx
</sharepointRequestHandlerUrl>
</metaData>
</applicationPart>
</applicationParts></property>
<property name="Hidden" type="bool">False</property>
<property name="Title" type="string" />
</properties>
</data>
</webPart>
</webParts>
]]>
</AllUsersWebPart>While this may look strange, it's a common technique you can find in several onet.xml files that ship with SharePoint. A description of each of the EAP XML file's elements is given in Table 13-1.
Table 13.1. The EAP XML file's Elements
Element | Description |
|---|---|
| GUID of the application |
| Element that defines one external application |
| Root element |
| Absolute URL to the Silverlight XAP file |
| Properties that a custom EAP supports |
| Root element for additional data |
| Container for metadata |
| User account including the domain name, such as |
| Any public property that the Web Part base class provides |
| The HTTP handler that forwards the request from the outside world into SharePoint |
| Root element for the Web Part configuration section |
Once your Silverlight application (XAP file) is completed and deployed where a client can read it, you need to decide where to use it. What sort of project type you use for the Silverlight project (refer to Figure 13-6) doesn't matter. Hence, none of the options shown have any advantage for SharePoint projects. You don't even need to host the XAP file. However, it's sometimes helpful to debug your code outside of SharePoint.
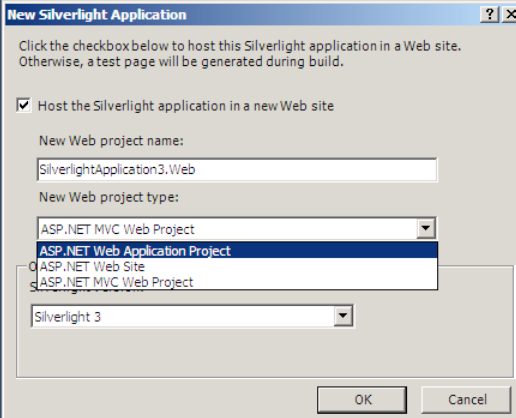
For pure Silverlight projects, it's OK to uncheck the "Host the Silverlight application in a new Web site" option shown in Figure 13-6. If you debug such a project, Visual Studio will use a static HTML file to host the control. Hosting and debugging in the context of a static HTML file is a lean and fast way to develop isolated Silverlight applications. In the project settings, you should additionally consider changing the output path that the XAP file is copied to or adding a postbuild command that copies the file where SharePoint can find it. For hosting purposes, these three options are available:
In an application page
In a Web Part
As a list object/control or custom field type
Using the Silverlight Web Part is the easiest way to integrate Silverlight with SharePoint. It's new in SharePoint 2010 and provides simple integration without any additional effort. However, it does have some limitations. The underlying class is marked sealed, so you can't extend the existing class. We'll examine some ways in this chapter to overcome this limitation.
Using Silverlight within a Web Part is good for small solutions. It is even good if you want your users have the power to use one or another piece of Silverlight. For a complete application made with Silverlight an application page is the better choice. Because the built-in Web Part can't be used you must create a few lines of code to get your application running as shown in Listing 13-6.
Example 13.6. An Application Page Skeleton
<%@ Assembly Name="$SharePoint.Project.AssemblyFullName$" %>
<%@ Import Namespace="Microsoft.SharePoint.ApplicationPages" %>
<%@ Register TagPrefix="SharePoint" Namespace="Microsoft.SharePoint.WebControls"
             Assembly="Microsoft.SharePoint, Version=14.0.0.0, Culture=neutral,
                       PublicKeyToken=71e9bce111e9429c" %>
<%@ Register TagPrefix="Utilities" Namespace="Microsoft.SharePoint.Utilities"
             Assembly="Microsoft.SharePoint, Version=14.0.0.0, Culture=neutral,
                       PublicKeyToken=71e9bce111e9429c" %>
<%@ Register TagPrefix="asp" Namespace="System.Web.UI"
             Assembly="System.Web.Extensions, Version=3.5.0.0, Culture=neutral,
                       PublicKeyToken=31bf3856ad364e35" %>
<%@ Import Namespace="Microsoft.SharePoint" %>
<%@ Assembly Name="Microsoft.Web.CommandUI, Version=14.0.0.0, Culture=neutral,
                   PublicKeyToken=71e9bce111e9429c" %>

<%@ Page Language="C#" AutoEventWireup="true" CodeBehind="SilverlightPage.aspx.cs"
         Inherits="Apress.SP2010.SilverlightApps.
                   Layouts.SilverlightAppPage.SilverlightPage"
         DynamicMasterPageFile="˜masterurl/default.master" %>

<asp:Content ID="PageHead" ContentPlaceHolderID="PlaceHolderAdditionalPageHead"
             runat="server">
    <script type="text/javascript" src="Silverlight.js"></script>
    <script type="text/javascript">
        function onSilverlightError(sender, args) {
            var appSource = "";
            if (sender != null && sender != 0) {
                appSource = sender.getHost().Source;
            }

            var errorType = args.ErrorType;
            var iErrorCode = args.ErrorCode;

            if (errorType == "ImageError" || errorType == "MediaError") {
                return;
            }

            var errMsg = "Unhandled Error in Silverlight Application "
                       + appSource + "
";

            errMsg += "Code: " + iErrorCode + "
";
            errMsg += "Category: " + errorType + "
";
            errMsg += "Message: " + args.ErrorMessage + "
";

            if (errorType == "ParserError") {
errMsg += "File: " + args.xamlFile + "
";
errMsg += "Line: " + args.lineNumber + "
";
errMsg += "Position: " + args.charPosition + "
";
}
else if (errorType == "RuntimeError") {
if (args.lineNumber != 0) {
errMsg += "Line: " + args.lineNumber + "
";
errMsg += "Position: " + args.charPosition + "
";
}
errMsg += "MethodName: " + args.methodName + "
";
}
throw new Error(errMsg);
}
</script>
</asp:Content>
<asp:Content ID="Main" ContentPlaceHolderID="PlaceHolderMain" runat="server">
<div id="silverlightControlHost">
<object data="data:application/x-silverlight-2,"
type="application/x-silverlight-2" width="100%" height="100%">
<param name="source" value="ClientBin/HelloWorld.xap"/>
<param name="onError" value="onSilverlightError" />
<param name="background" value="white" />
<param name="minRuntimeVersion" value="3.0.40818.0" />
<param name="autoUpgrade" value="true" />
<a href="http://go.microsoft.com/fwlink/?LinkID=149156&v=3.0.40818.0"
style="text-decoration:none">
<img src="http://go.microsoft.com/fwlink/?LinkId=161376"
alt="Get Microsoft Silverlight"
style="border-style:none"/>
</a>
</object>
<iframe id="_sl_historyFrame"
style="visibility:hidden;height:0px;width:0px;border:0px">
</iframe>
</div>
</asp:Content>
<asp:Content ID="PageTitle" ContentPlaceHolderID="PlaceHolderPageTitle"
runat="server">
Application Page Silverlight HelloWorld
</asp:Content>
<asp:Content ID="PageTitleInTitleArea"
ContentPlaceHolderID="PlaceHolderPageTitleInTitleArea"
runat="server">
Application Page Silverlight HelloWorld
</asp:Content>To run Silverlight, you need a container to host the plug-in. This is the <div> container with the ID of silverlightControlHost. The JavaScript in the head area serves as an interface to the browser's UI, while the Silverlight.js file is responsible for loading and invoking the code. The JavaScript shown exposes error messages to the browser. This is necessary in case the plug-in can't produce any useful UI. The link around the <img> element with the URL pointing to go.microsoft.com produces the alternative HTML shown when the Silverlight plug-in is not present, and offers the user the option to download the plug-in. However, you can place any HTML here, such as another version of your application not using Silverlight.
Warning
Downloading the Silverlight plug-in from any source other than Microsoft is not permitted. This ensures that users get the latest version at any time, including the most recent security updates.
The XAP file (ClientBin/HelloWorld.xap in the example) is defined in a <param> element. The <object> tag inside the <div> element passes parameters to the application. Table 13-2 shows the available options.
Table 13.2. Parameter Options to Control the Silverlight Plug-In
Parameter | Description |
|---|---|
| Allows the creation of new pop-up windows from Silverlight. |
| Upgrades the Silverlight plug-in if a newer version is required. |
| The background color of the rectangle the plug-in appears in. |
| Enables zoom controlled by the host (browser's zoom). |
| Creates a colored overlay to check what parts are GPU (Graphics Processing Unit, the processor on the graphics board) accelerated. This is for development purposes only and should never be used in production environments. |
| Enables GPU acceleration on client. |
| Enables access to the HTML page's content. |
| Enables the user to navigate to other URLs using hyperlinks. |
| Static parameters sent to the Silverlight application on load. |
| Maximum frame rate for media. |
| Minimum runtime version required to run the application. |
| Name of a JavaScript method invoked when the browser changes to full-screen mode. |
| Name of a JavaScript method invoked when browser loads the page's DOM. |
| Name of a JavaScript method invoked when the browser is being resized. |
| Name of a JavaScript method invoked when the browser finishes downloading the sources. |
| Name of a JavaScript method invoked when the browser has downloaded another chunk of source data. It's used to create a progress bar. Huge downloads invoke this event a few thousand times. |
| Name of a JavaScript method invoked when the browser changes the zoom level. |
| Name and path of the XAP file. |
| Path to a splash screen displayed while the plug-in loads additional assemblies or resources. |
| Makes the plug-in rectangle windowless. |
The table shows all the parameters the <object> tag accepts. There are several more you can use through JavaScript. If you plan to create Silverlight applications professionally, you should learn more about these details using the official reference at MSDN.
Tip
To learn more, we recommend Pro Silverlight 3 in C#, by Matthew MacDonald (Apress, 2009).
To get an idea of what's possible with the built-in Web Part, you can examine the definition of the SilverlightWebPart class. Listing 13-7 shows the public methods and properties.
Example 13.7. Public Methods and Properties of the Silverlight Web Part
public sealed class SilverlightWebPart : ClientApplicationWebPartBase
{
    public SilverlightWebPart();

    [WebBrowsable(true)]
    [Personalizable(PersonalizationScope.Shared)]
     public string CustomInitParameters { get; set; }
[WebBrowsable(false)]
[Personalizable(PersonalizationScope.Shared)]
public string CustomProperties { get; set; }
public override Unit Height { get; set; }
[Personalizable(PersonalizationScope.Shared)]
public string MinRuntimeVersion { get; set; }
[Personalizable(PersonalizationScope.Shared)]
public bool WindowlessMode { get; set; }
}The MinRuntimeVersion property can be set to the lowest Silverlight version your XAP requires. It is a string in the format of 3.0.50106.0 (the public RTM version for Silverlight 4 was 4.0.50401.0). Unlike the .NET Framework, many builds of Silverlight are publicly available. Setting the lowest possible number enables more clients to launch your application without downloading a new runtime. If you deploy a Silverlight application using Silverlight 3, with a minimum requirement of Silverlight 3, and users have Silverlight 4 installed, your application will run well.
The CustomInitParameters property can be set to any string, and the value will become available in the Silverlight application during startup. All other properties are defined in the abstract base class ClientApplicationWebPartBase:
public abstract class ClientApplicationWebPartBase :
                      System.Web.UI.WebControls.WebParts.WebPart,
                      ITrackingPersonalizable
{
   protected ClientApplicationWebPartBase();

   [Personalizable(PersonalizationScope.Shared)]
    public string ApplicationXml { get; set; }
    protected string SourceUrl { get; }
    public bool TracksChanges { get; }
   [Personalizable(PersonalizationScope.Shared)]
   [ManagedLink]
    public string Url { get; set; }

    public void BeginLoad();
    public void BeginSave();
    public void EndLoad();
    public void EndSave();
    protected string GetInitParams();
}
Here the Url property is crucial; it is the address where you have copied the XAP file. That are all parameters you can use additionally to those regular Web Parts provide.
Tip
If you need several Silverlight Web Parts, you can just change the XAP file (Url property) and use the same Web Part again.
Running Silverlight does not automatically imply that you have direct access to SharePoint data. Instead, you must build support in your Silverlight application to use client-based access. That is limited to web services. However, the client object model is available for Silverlight, too. This encapsulates the services and exposes them as an API-like layer. You can find a thorough introduction in Chapter 12.
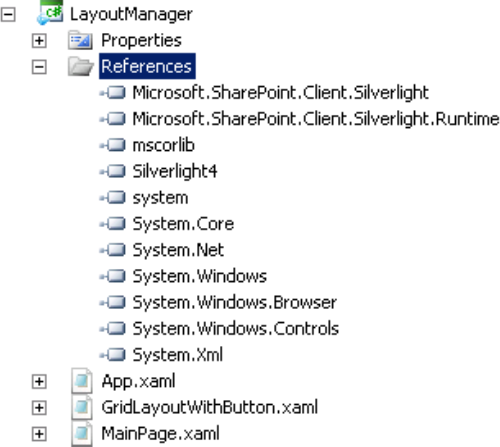
To use the SharePoint client object model, you need to reference two assemblies (see Figure 13-7):
Microsoft.SharePoint.Client.Silverlight.dllMicrosoft.SharePoint.Client.Silverlight.Runtime.dll
Both are located in the %SharePointRoot%TEMPLATELAYOUTSClientBin folder, and are available by default. All the following examples assume that you have a Silverlight project with references to these two assemblies. To execute the code, deploy the XAP file the project builds to one of the locations recommended previously. You can use the Silverlight Web Part to take this XAP file and execute your Silverlight application within your site.
Note
Remember that even if you load your Silverlight application within a Web Part, it's still executed on the client computer. You can't use a server-side API to access SharePoint from a remote location like this.
The Silverlight client object model provides both a synchronous ExecuteQuery method and an asynchronous ExecuteQueryAsync method. The first method is intended to be called from threads that do not modify the UI, whereas the second approach is for threads that do. Both methods actually send the query to the server. Nothing is transmitted over the wire before that call. All preparatory steps are cached and held in the objects provided by the client object model.
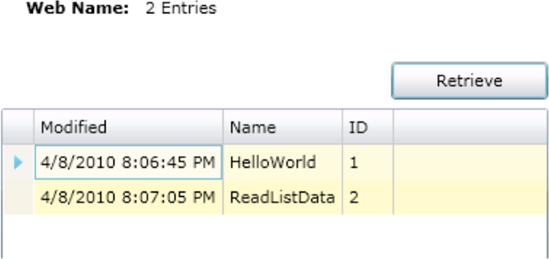
The example in Listing 13-8 shows how to retrieve and change data in a SharePoint list using a Silverlight Grid control.
Example 13.8. The XAML of a Silverlight Application (MainPage.xaml)
<UserControl x:Class="SilverlightClientApp.MainPage"
    xmlns="http://schemas.microsoft.com/winfx/2006/xaml/presentation"
    xmlns:x="http://schemas.microsoft.com/winfx/2006/xaml"
    xmlns:d="http://schemas.microsoft.com/expression/blend/2008"
    xmlns:mc="http://schemas.openxmlformats.org/markup-compatibility/2006"
    mc:Ignorable="d"
    d:DesignHeight="300" d:DesignWidth="400"
      xmlns:data="clr-namespace:System.Windows.Controls;
                  assembly=System.Windows.Controls.Data">

    <Grid x:Name="LayoutRoot" Background="White">
        <TextBlock Height="15" HorizontalAlignment="Left" Margin="29,12,0,0"
                   Name="textBlock1" Text="Web Name:" VerticalAlignment="Top"
                   Width="76" FontWeight="Bold" />
        <TextBlock Height="37" HorizontalAlignment="Left" Margin="111,12,0,0"
                   Name="txtWebName" Text="TextBlock" VerticalAlignment="Top"
                   Width="277" DataContext="{Binding}" TextWrapping="Wrap" />
        <Button Content="Retrieve" Height="26" HorizontalAlignment="Left"
                Margin="280,57,0,0" Name="button1" VerticalAlignment="Top"
                Width="108" Click="button1_Click" />
        <data:DataGrid AutoGenerateColumns="True"
                       HeadersVisibility="All"
                       RowBackground="Cornsilk"
                       AlternatingRowBackground="LemonChiffon"
                       Height="151"
                       HorizontalAlignment="Left" Margin="12,89,0,0"
                       Name="dataGridXAPFiles" VerticalAlignment="Top" Width="376">
        </data:DataGrid>
        <Button Content="Save" Height="23" HorizontalAlignment="Left"
                Margin="281,258,0,0" Name="button2"
VerticalAlignment="Top" Width="107" Click="button2_Click" />
</Grid>
</UserControl>It's not a very impressive application, but it's sufficient to check the complete data round trip. See Figure 13-8 for the result.
You can't do much solely with XAML. Hence, you need a code-behind file, as shown in Listing 13-9. This application needs a reference to System.Windows.Controls.Data.dll to support the Grid control.
Example 13.9. The Code-Behind of the XAML File (MainPage.xaml.cs)
using System;
using System.Collections.Generic;
using System.Linq;
using System.Net;
using System.Windows;
using System.Windows.Controls;
using System.Windows.Documents;
using System.Windows.Input;
using System.Windows.Media;
using System.Windows.Media.Animation;
using System.Windows.Shapes;
using Microsoft.SharePoint.Client;

namespace SilverlightClientApp
{
    public partial class MainPage : UserControl
    {
        public MainPage()
        {
InitializeComponent();
}
Web web;
ListItemCollection allItems;
public class BoundItem
{
public string Modified { get; set; }
public string Name { get; set; }
public int ID { get; set; }
}
private void ClientSuccessWeb(object sender,
ClientRequestSucceededEventArgs e)
{
Dispatcher.BeginInvoke(() => txtWebName.Text = web.Title);
}
private void ClientSuccessFiles(object sender,
ClientRequestSucceededEventArgs e)
{
try
{
List<BoundItem> items = new List<BoundItem>();
foreach (ListItem item in allItems)
{
items.Add(new BoundItem()
{
Modified = item["Modified"].ToString(),
Name = item.DisplayName,
ID = item.Id
});
}
Dispatcher.BeginInvoke(() => txtWebName.Text =
String.Format("{0} Entries", items.Count()));
Dispatcher.BeginInvoke(() => dataGridXAPFiles.ItemsSource = items);
}
catch (Exception ex)
{
Dispatcher.BeginInvoke(() => txtWebName.Text = ex.Message);
}
}
private void ClientSaveFiles(object sender,
ClientRequestSucceededEventArgs e)
{
Dispatcher.BeginInvoke(() => txtWebName.Text = success);
}
private void ClientFailed(object sender, ClientRequestFailedEventArgs e)
{
Dispatcher.BeginInvoke(() => txtWebName.Text = "Fehler: "+ e.Exception.Message);
}
private void button1_Click(object sender, RoutedEventArgs e)
{
using (ClientContext ctx =
new ClientContext("http://sharepointserve/sites/silverlight/"))
{
try
{
web = ctx.Web;
ctx.Load(web);
ctx.ExecuteQueryAsync(
new ClientRequestSucceededEventHandler(ClientSuccessWeb),
new ClientRequestFailedEventHandler(ClientFailed));
xapList = web.Lists.GetByTitle("XAPFiles");
CamlQuery caml = new CamlQuery();
allItems = xapList.GetItems(caml);
ctx.Load(allItems,
files => files.Include(
     file => file.Id,
     file => file.DisplayName,
file => file["Modified"])
);
ctx.ExecuteQueryAsync(
new ClientRequestSucceededEventHandler(ClientSuccessFiles),
new ClientRequestFailedEventHandler(ClientFailed));
}
catch (Exception ex)
{
txtWebName.Text = "Execution error: " + ex.Message;
}
}
}
List xapList;
string success;
private void button2_Click(object sender, RoutedEventArgs e)
{
// Save
using (ClientContext ctx =
new ClientContext("http://sharepointserve/sites/silverlight/"))
{
try
{
xapList = ctx.Web.Lists.GetByTitle("XAPFiles");
foreach (ListItem item in allItems)
{
int id = item.Id;
ListItem serverItem = xapList.GetItemById(item.Id);
serverItem["Title"] = "Modified at "
+ DateTime.Now.ToLongTimeString();serverItem.Update();
}
xapList.Update();
success = "Saved";
ctx.ExecuteQueryAsync(
new ClientRequestSucceededEventHandler(ClientSaveFiles),
new ClientRequestFailedEventHandler(ClientFailed));
}
catch (Exception ex)
{
MessageBox.Show(ex.Message + ex.StackTrace);
}
}
}
}
}Access to the server is always asynchronous. The application has two buttons: one to load data from the server and the other to write changes back. The button1_Click handler method loads the data by issuing a simple list request to the list XAPFiles: web.Lists.GetByTitle("XAPFiles"). This is the list we defined to store the XAP files. The vital part is the selection and filtering of the files retrieved from server:
files => files.Include(
file => file.Id,
file => file.DisplayName,
file => file["Modified"]This is not a true LINQ statement. Instead, the lambda expressions provide a typed way to define property names. You cannot add any other expression code here. In the example, the properties Id and DisplayName, and the Modified field are retrieved. The ExecuteQueryAsync method then invokes the web service call. The allItems variable is filled with data when the ClientSuccessFiles callback method is executed. The remaining part of this method copies the data into a type that Silverlight can bind.
The save method works similarly. The data is gathered from the grid and written back to the list. Because this is another request, invoked by the button2_Click handler method, you need to create another context object. The code is simple—it reads the entire list and assumes that there are changes in most rows. (It would be more sophisticated to note changes and select only the rows with changes, using an appropriate CAML statement.) After writing all the changes to the list, you call the Update method. This is still a preparation step. The ExecuteQueryAsync method actually calls the web service to send the data to the server.
The ClientSaveFiles method outputs a suitable message to inform the user that the operation was successful. Because you have a worker thread that is not the UI thread, the UI controls must be modified asynchronously, too. This is why writing to the screen involves the Dispatcher object:
Dispatcher.BeginInvoke(() => txtWebName.Text = success)
As you examine this code, you might see where there is room for improvement. (Perhaps not, if you have recently started coding with Silverlight. But if you have years of .NET experience, you'll begin to spot the limitations.)
One very annoying aspect is that data binding does not work with anonymous types. The following code snippet will not work:
var items1 = from item in allItems
             select new BoundItem()
             {
                ID = item.Id,
                Modified = item["Modified"],
                Name = item.DisplayName
             };
This is a valid collection, and ASP.NET and even WPF would bind this properly. Silverlight, however, does not. You have to copy it to a List<T> type first.
Note
If you develop with Silverlight 3 and wonder whether this has been fixed in Silverlight 4, you will be disappointed. However, there is a difference: in Silverlight 3 the code will silently fail, while in Silverlight 4 you'll get a NotSupportedException. (This is not really what one would call progress, is it?)
Various tasks concerning lists are demonstrated in this section:
How to retrieve all the SharePoint lists in a web site
How to retrieve list schema (field) information
How to create a new SharePoint list
How to retrieve an existing SharePoint list using a CAML query
You can retrieve all the lists for a web site using the property Web.Lists. Simply load and query the list collection and iterate through the lists. The code starts immediately after loading the XAP file by calling the GetAllLists method (see Listing 13-10).
Example 13.10. Retrieving All Lists for a Web Site (MainPage.cs)
public partial class MainPage : UserControl
{
    public MainPage()
    {
        InitializeComponent();
        GetAllLists();
    }

    ListCollection listColl;

    private void ClientSuccess(object sender,
ClientRequestSucceededEventArgs e)
{
Dispatcher.BeginInvoke(() =>
{
lbAllLists.DataContext = listColl;
});
}
private void ClientFailed(object sender,
ClientRequestFailedEventArgs e)
{
MessageBox.Show(e.Exception.Message, "Exception", MessageBoxButton.OK);
}
private void GetAllLists()
{
using (ClientContext ctx = new ClientContext("http://sharepointserve/"))
{
try
{
listColl = ctx.Web.Lists;
ctx.Load(listColl);
ctx.ExecuteQueryAsync(
new ClientRequestSucceededEventHandler(ClientSuccess),
new ClientRequestFailedEventHandler(ClientFailed));
}
catch (Exception ex)
{
MessageBox.Show(ex.Message, "Exception", MessageBoxButton.OK);
}
}
}
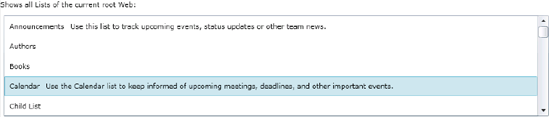
}The corresponding XAML implementation in Listing 13-11 simply uses a ListBox element to expose the collection through data binding. The list displays the title and description. The binding uses the ListCollection class and the List elements it contains to bind the properties Title and Description, respectively.
Example 13.11. Retrieving All the Lists for a Web Site (XAML)
<UserControl x:Class="RetrieveAllLists.MainPage"
    xmlns="http://schemas.microsoft.com/winfx/2006/xaml/presentation"
    xmlns:x="http://schemas.microsoft.com/winfx/2006/xaml"
    xmlns:d="http://schemas.microsoft.com/expression/blend/2008"
    xmlns:mc="http://schemas.openxmlformats.org/markup-compatibility/2006"
    mc:Ignorable="d"
    d:DesignHeight="300" d:DesignWidth="400">

    <Grid x:Name="LayoutRoot" Background="White">
        <TextBlock >Shows all Lists of the current root Web:</TextBlock>
        <ListBox x:Name="lbAllLists" Margin="5,25,5,5" ItemsSource="{Binding}" >
            <ListBox.ItemTemplate>
                <DataTemplate>
<StackPanel Orientation="Horizontal">
<TextBlock Text="{Binding Title}" Margin="5"></TextBlock>
<TextBlock Text="{Binding Description}" Margin="5">
</TextBlock>
</StackPanel>
</DataTemplate>
</ListBox.ItemTemplate>
</ListBox>
</Grid>
</UserControl>The example returns all the lists containing all their properties. To reduce the number of properties, you should explicitly define only those properties you really need. For collections, this can be done using LINQ in combination with the Include expression:
ctx.Load(listColl,
         lists => lists.Include(list => list.Title, list => list.Description));
The result of the example code is shown in Figure 13-9.
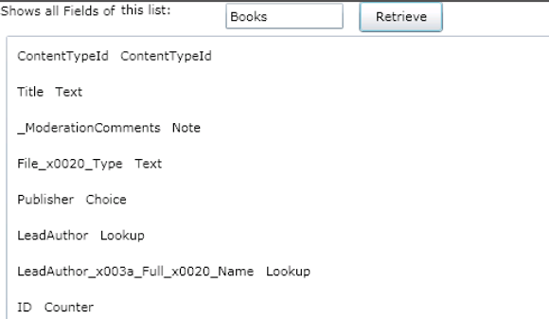
Information about the various fields of a list is obtained via the List.Fields property, as shown in Listing 13-12.
Example 13.12. Retrieving List Schema Information (MainPage.cs)
public partial class MainPage : UserControl
{
    public MainPage()
    {
        InitializeComponent();
    }

    FieldCollection fieldColl;

    private void ClientSuccess(object sender,
                                ClientRequestSucceededEventArgs e)
    {
        Dispatcher.BeginInvoke(() =>
        {
lbAllFields.DataContext = fieldColl;
});
}
private void ClientFailed(object sender,
ClientRequestFailedEventArgs e)
{
MessageBox.Show(e.Exception.Message, "Exception", MessageBoxButton.OK);
}
private void GetAllFields(string list)
{
using (ClientContext ctx = new ClientContext("http://sharepointserve/"))
{
try
{
fieldColl = ctx.Web.Lists.GetByTitle(list).Fields;
ctx.Load(fieldColl);
ctx.ExecuteQueryAsync(
new ClientRequestSucceededEventHandler(ClientSuccess),
new ClientRequestFailedEventHandler(ClientFailed));
}
catch (Exception ex)
{
MessageBox.Show(ex.Message, "Exception", MessageBoxButton.OK);
}
}
}
private void btnRetrieve_Click(object sender, RoutedEventArgs e)
{
string list = txtList.Text;
if (!String.IsNullOrEmpty(list))
{
GetAllFields(list);
}
}
}The XAML defines a TextBox and a Button to invoke the call. This is a very rudimentary solution—if the user types the wrong name, an exception is thrown. The XAML binds the InternalName and FieldTypeKind properties (see Listing 13-13).
Example 13.13. Retrieving List Schema Information (XAML)
<UserControl x:Class="RetrieveFieldInformation.MainPage"
    xmlns="http://schemas.microsoft.com/winfx/2006/xaml/presentation"
    xmlns:x="http://schemas.microsoft.com/winfx/2006/xaml"
    xmlns:d="http://schemas.microsoft.com/expression/blend/2008"
    xmlns:mc="http://schemas.openxmlformats.org/markup-compatibility/2006"
    mc:Ignorable="d"
    d:DesignHeight="300" d:DesignWidth="400">

    <Grid x:Name="LayoutRoot" Background="White">
<TextBlock >Shows all Fields of the this list:</TextBlock>
<ListBox x:Name="lbAllFields" Margin="5,30,5,5" ItemsSource="{Binding}" >
<ListBox.ItemTemplate>
<DataTemplate>
<StackPanel Orientation="Horizontal">
<TextBlock Text="{Binding InternalName}" Margin="5">
</TextBlock>
<TextBlock Text="{Binding FieldTypeKind}" Margin="5">
</TextBlock>
</StackPanel>
</DataTemplate>
</ListBox.ItemTemplate>
</ListBox>
<TextBox Height="23" HorizontalAlignment="Left" Margin="201,1,0,0"
Name="txtList" VerticalAlignment="Top" Width="105" />
<Button x:Name="btnRetrieve" Content="Retrieve" Height="28"
HorizontalAlignment="Left" Margin="320,-1,0,0"
VerticalAlignment="Top" Width="75" Click="btnRetrieve_Click" />
</Grid>
</UserControl>While the binding limits the output, the whole list of properties is obtained from the server. To limit the transferred data to only what is needed, replace the Load method with a filtered version:
ctx.Load(fieldColl, fields => fields.Include(
                    field => field.InternalName, field => field.FieldTypeKind));
The result of this example is shown in Figure 13-10.
Creating a new SharePoint list requires an instance of the ListCreationInformation class. At a minimum, you need to define the Title and the TemplateType properties, and add the list fields. In Listing 13-14, the fields are defined in XML and added to the list using the AddFieldAsXml method.
Example 13.14. Creating a New List (MainPage.xaml.cs)
public partial class MainPage : UserControl
{
    public MainPage()
    {
        InitializeComponent();
    }

    class NewField
    {
        public string Name { get; set; }
        public bool Integer { get; set; }
    }

    List<NewField> newFields;

    private void CreateList()
    {
        using (ClientContext ctx = new ClientContext("http://sharepointserve/"))
        {
            try
            {
Web web = ctx.Web;
ListCreationInformation listCreationInfo =
new ListCreationInformation();
listCreationInfo.Title = txtName.Text;
listCreationInfo.TemplateType = (int)ListTemplateType.GenericList;
List oList = web.Lists.Add(listCreationInfo);
ctx.Load(oList);
foreach (NewField newField in newFields)
{
XElement fld = new XElement("Field",
new XAttribute("Authors", newField.Name),
new XAttribute("Type", newField.Integer ?
"Currency" : "Text"));
oList.Fields.AddFieldAsXml(fld.ToString(), true,
AddFieldOptions.DefaultValue);
}
oList.Update();
ctx.ExecuteQuery();
MessageBox.Show("List successfully created.", "Done",
MessageBoxButton.OK);
}
catch (Exception ex)
{
MessageBox.Show(ex.Message, "Exception", MessageBoxButton.OK);
}
}
}
private void btnCreate_Click(object sender, RoutedEventArgs e)
{
CreateList();
}
private void slider1_ValueChanged(object sender,
RoutedPropertyChangedEventArgs<double> e)
{
int fields = Convert.ToInt32(slider1.Value);
newFields = new List<NewField>(fields);
for (int i = 0; i < fields; i++)
{
newFields.Add(new NewField() { Name = "[Type Name]" });
}
dgFields.DataContext = newFields;
}
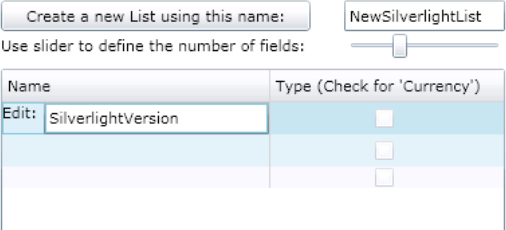
}The XAML (see Listing 13-15) defines a DataGrid in which the user can edit a field's name and change the field's type from String to Currency. The user can enter the name of the list and invoke the list creation by pressing the button. A two-way binding ensures that the business object bound to the grid is filled properly. The number of fields is defined by a Slider control that has a range of zero to ten.
Example 13.15. Creating a New List (XAML)
<UserControl x:Class="CreateList.MainPage"
    xmlns="http://schemas.microsoft.com/winfx/2006/xaml/presentation"
    xmlns:x="http://schemas.microsoft.com/winfx/2006/xaml"
    xmlns:d="http://schemas.microsoft.com/expression/blend/2008"
    xmlns:mc="http://schemas.openxmlformats.org/markup-compatibility/2006"
    mc:Ignorable="d"
    d:DesignHeight="300" d:DesignWidth="400"
    xmlns:data="clr-
    namespace:System.Windows.Controls;assembly=System.Windows.Controls.Data">

    <Grid x:Name="LayoutRoot" Background="White">
        <Button Content="Create a new List using this name:" Height="23"
                HorizontalAlignment="Left" Margin="12,21,0,0" Name="btnCreate"
                VerticalAlignment="Top" Width="231" Click="btnCreate_Click" />
        <TextBox Height="23" HorizontalAlignment="Left" Margin="268,21,0,0"
                 Name="txtName" VerticalAlignment="Top" Width="120" />

        <data:DataGrid ItemsSource="{Binding}" AutoGenerateColumns="False"
                       IsReadOnly="False" Height="200" HorizontalAlignment="Left"
                       Margin="12,72,0,0" Name="dgFields"
                       VerticalAlignment="Top" Width="376">
    <data:DataGrid.Columns>
        <data:DataGridTemplateColumn Header="Name" Width="200">
            <data:DataGridTemplateColumn.CellTemplate>
                <DataTemplate>
                    <TextBlock Text="{Binding Name}"
                                  Foreground="Green"
                                  FontWeight="Bold"
                                  VerticalAlignment="Center"/>
                </DataTemplate>
            </data:DataGridTemplateColumn.CellTemplate>
            <data:DataGridTemplateColumn.CellEditingTemplate>
                <DataTemplate>
                    <Grid>
                        <Grid.ColumnDefinitions>
                            <ColumnDefinition Width="Auto" />
                            <ColumnDefinition Width="*" />
                        </Grid.ColumnDefinitions>
                        <TextBlock Text="Edit: " Grid.Column="0" />
                        <TextBox Text="{Binding Name, Mode=TwoWay}"
                                 Grid.Column="1" />
                    </Grid>
                </DataTemplate>
            </data:DataGridTemplateColumn.CellEditingTemplate>
        </data:DataGridTemplateColumn>
        <data:DataGridCheckBoxColumn Binding="{Binding Mode=TwoWay, Path=Type}"
              IsReadOnly="False" CanUserReorder="True" CanUserResize="True"
              CanUserSort="True" Header="Type (Check for 'Currency')"
              Width="Auto" />
</data:DataGrid.Columns>
</data:DataGrid>
<Slider Height="23" HorizontalAlignment="Left" Margin="268,43,0,0"
Name="slider1" VerticalAlignment="Top" Width="120"
ValueChanged="slider1_ValueChanged" SmallChange="1"
LargeChange="2" />
<TextBlock Height="23" HorizontalAlignment="Left" Margin="12,47,0,0"
Name="textBlock1" Text="Use slider to define the
number of fields:" VerticalAlignment="Top" Width="231" />
</Grid>
</UserControl>This is a simple example that shows how to use several Silverlight controls to manage various administrative options (see Figure 13-11).
Modifying a list follows a similar pattern. You merely call the Update method on the field object. Even deleting is equally simple using the DeleteObject method:
List oBooksList = ctx.Web.Lists.GetByTitle("MyBooks");
oBooksList.DeleteObject();
ctx.ExecuteQuery();Using CAML queries to retrieve list items is the best practice. The filtering of list items is performed on the server, and as a result, only relevant data is transmitted to the client. The following example goes a step further and defines, beyond the CAML query, which properties should be returned. This is accomplished using the Include clause of the LINQ expression within the Load method, as shown in Listing 13-16.
Example 13.16. Retrieving List Items Using CAML (Excerpt from Silverlight Code-Behind)
CamlQuery caml = new CamlQuery();caml.ViewXml = @"<View><Query><Where>
<Eq><FieldRef Name='Publisher'/><Value Type='Text'>APress</Value></Eq></Where></Query></View>";ListItemCollection allBooksFromAPress = booksList.GetItems(caml); ctx.Load(allBooksFromAPress, books => books.Include( book => book.Id, book => book["Title"], book => book["Publisher"] ));
In this example the booksList variable contains the List object you retrieve, as shown in the previous examples. The CAML syntax is the same as you would write for the server-side API.
Working with users, groups, and roles, and dealing with their permissions for SharePoint elements can be quite complex. In former SharePoint versions, the only way to alter the security was to use the provided security web services. With SharePoint 2010, the client object model dramatically simplifies working with security settings. The listings in this section are included in a Silverlight application you can find in the download package associated with this book.
Adding a user to a SharePoint group is a common task, particularly in conjunction with creating a web site. The example in Listing 13-17 shows two ways to add a user to a group. The first approach uses the Group.Users.AddUser method, which expects a User instance of an existing user. The second method adds a new user to a group via the UserCreationInformation class. The new user is identified by its LoginName. If the user already exists in the site collection, the user is added to the group anyway. The example requires that a valid group within the property Web.AssociatedMemberGroup exists; thus, the default group at the time of web site creation has not been removed.
Example 13.17. Adding Users to a SharePoint Group (Excerpt from Silverlight Code-Behind)
ClientContext ctx = new ClientContext("http://sharepointserve");
Group membersGroup =  ctx.Web.AssociatedMemberGroup;

// Add existing user to membersGroup
User currentUser = membersGroup.Users.AddUser(ctx.Web.CurrentUser);

// Add new user to membersGroup
UserCreationInformation userCreationInfo = new UserCreationInformation();
userCreationInfo.Email = "[email protected]";
userCreationInfo.LoginName = @"MAXIMUSjkrause";
userCreationInfo.Title = "Joerg Krause";
User newUser = membersGroup.Users.Add(userCreationInfo);
ctx.Load(currentUser); ctx.Load(newUser); ctx.Load(membersGroup); ctx.ExecuteQuery();
To get a list of all users that are members of a specified group, you can interrogate the Group.Users collection, as shown in Listing 13-18.
Example 13.18. Retrieving Group Members (Excerpt from Silverlight Code-Behind)
ClientContext ctx = new ClientContext("http://sharepointserve");
Group membersGroup = ctx.Web.AssociatedMemberGroup;
UserCollection allUsersOfGroup = membersGroup.Users;
ctx.Load(allUsersOfGroup);
ctx.ExecuteQuery();
Defining your own roles (aka permission levels) is a common task when dealing with complex security requirements (see Figure 13-12). With the client object model you can easily define your own roles and assign them to SharePoint users or groups.
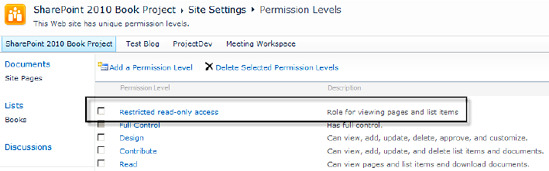
The example in Listing 13-19 reveals how to create a new role.
Example 13.19. Creating a Role (Excerpt from Silverlight Code-Behind)
ClientContext ctx = new ClientContext("http://sharepointserve");
Web oWeb = ctx.Web;

BasePermissions basePerms = new BasePermissions();
basePerms.Set(PermissionKind.ViewListItems);
basePerms.Set(PermissionKind.ViewPages);

RoleDefinitionCreationInformation roleCreationInfo =
            new RoleDefinitionCreationInformation();
roleCreationInfo.BasePermissions = basePerms;
roleCreationInfo.Description = "Role for viewing pages and list items";
roleCreationInfo.Name = "Restricted read-only access";
RoleDefinition roleDef = oWeb.RoleDefinitions.Add(roleCreationInfo);
Ctx.Load(roleDef);
ctx.ExecuteQuery();Assigning SharePoint users or groups to roles is shown in Listing 13-20.
Example 13.20. Adding a User or Group to a Role (Excerpt from Silverlight Code-Behind)
ClientContext ctx = new ClientContext("http://sharepointserve");
Web oWeb = ctx.Web;

Principal oUser = oWeb.CurrentUser;

RoleDefinition oRoleDef =
          oWeb.RoleDefinitions.GetByName("Restricted read-only access");
RoleDefinitionBindingCollection roleDefinitionBindingColl =
        new RoleDefinitionBindingCollection(ctx);
roleDefinitionBindingColl.Add(oRoleDef);

RoleAssignment oRoleAssignment =
        oWeb.RoleAssignments.Add(oUser, roleDefinitionBindingColl);

ctx.Load(oUser, user => user.Title);
ctx.Load(oRoleDef, role => role.Name);

ctx.ExecuteQuery();
As you can see, the RoleAssignments.Add method takes a Principal object as a parameter. The Principal class serves as the base class for both users (User) and groups (Group). Thus, you can assign either a user or a group to a role.
The next example (see Listing 13-21) demonstrates the creation of a new SharePoint group, using the GroupCreationInformation class. The Contributors role is then assigned to this new group.
Example 13.21. Creating a New SharePoint Group and Assigning It to a Role (Excerpt from Silverlight Code-Behind)
ClientContext ctx = new ClientContext("http://sharepointserve");
Web oWeb = ctx.Web;

GroupCreationInformation groupCreationInfo = new GroupCreationInformation();
groupCreationInfo.Title = "My Custom Contributor Group";
groupCreationInfo.Description = "This group has contributor rights.";
Group oGroup = oWeb.SiteGroups.Add(groupCreationInfo);

RoleDefinitionBindingCollection roleDefinitionBindingColl =
        new RoleDefinitionBindingCollection(ctx);
RoleDefinition oRoleDefinition =
        oWeb.RoleDefinitions.GetByType(RoleType.Contributor);

roleDefinitionBindingColl.Add(oRoleDefinition);
oWeb.RoleAssignments.Add(oGroup, roleDefinitionBindingColl);
ctx.Load(oGroup, group => group.Title); ctx.Load(oRoleDefinition, role => role.Name); ctx.ExecuteQuery();
In SharePoint, by default all elements (e.g., Web, List, and ListItem) rely on role inheritance. Consequently, permissions are inherited from top to bottom. For instance, a user has the same permissions on a list item as on a list, because the list item inherits its permissions from the list. There are scenarios, though, in which this default role inheritance is not desirable and has to be broken—for example, if you want a list item to be accessed only by particular users or groups. The example in this section shows how to break the role inheritance of a list item and assign special permissions to it. Figure 13-13 and Figure 13-14 show the list item permissions before and after breaking the role inheritance.
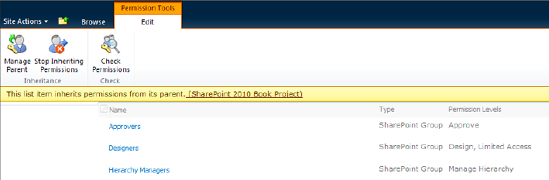
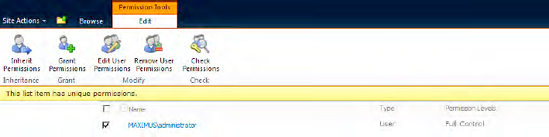
Figure 13.14. List item permissions after breaking the inheritance and adding a user (MAXIMUSadministrator) with full control to the list item
The example in Listing 13-23 obtains a list item with an ID of 1 from the list Books and breaks its role inheritance without copying the inherited permissions and without clearing the child scope.
Example 13.22. Breaking the Role Inheritance (Excerpt from Silverlight Code-Behind)
ClientContext ctx = new ClientContext("http://sharepointserve");
Web oWeb = ctx.Web;

List booksList = oWeb.Lists.GetByTitle("Books");
ListItem bookToSecure = booksList.GetItemById(1);// Break role inheritance for this list item and// don't copy the inherited permissionsbookToSecure.BreakRoleInheritance(false, false);// Assign the current user as AdministratorRoleDefinitionBindingCollection roleDefinitionBindingColl =new RoleDefinitionBindingCollection(ctx);roleDefinitionBindingColl.Add(oWeb.RoleDefinitions.GetByType(RoleType.Administrator));bookToSecure.RoleAssignments.Add(oWeb.CurrentUser, roleDefinitionBindingColl);ctx.ExecuteQuery();
The method BreakRoleInheritance takes two Boolean parameters: copyRoleAssignments and clearSubScopes. The first parameter indicates whether all permissions from the parent object should be copied to the element on which the BreakRoleInheritance method is executed. The second parameter specifies whether unique permissions of the child elements should be cleared.
In this chapter you learned about Silverlight and how to use it to create sophisticated UIs that break the HTML barrier but deploy like any browser-based application. Some basic steps introduced the core features of Silverlight. You examined the security model and saw how to create Silverlight applications using either Web Parts or application pages.
Using the client object model, you can use a SharePoint API style of access from any remote location based on web services. Several examples showed how to create simple XAML-based UIs with code that accesses the SharePoint back end to retrieve and change data from SharePoint lists. Using simple expressions you can limit the amount of data retrieved while obtaining exactly what you want. This improves performance and aids in creating fast UIs.