
Chapter 8: Understanding Data Governance in Amazon EMR
In previous chapters, you learned about EMR cluster security with IAM policies and data encryption and how you can configure security groups to control network traffic from or to your cluster.
As well as EMR cluster-level security, you can also enable data-level security where you can build a centralized data catalog on your datasets and then define fine-grained permissions to control which user can access which database, table, or column of your data catalog. Security of data is as important as maintaining security on your infrastructure. When you put security controls on your data, you also need to think about whether the data available for consumption is available in a useful format with proper data quality checks in place.
That brings us to the focus of this chapter, where we will dive deep into the following topics, which will help you implement data governance and granular permission management on your data catalog:
- Understanding data catalog and access management options
- Understanding Amazon EMR integration with AWS Lake Formation
- Understanding Amazon EMR integration with Apache Ranger
This will help your organization to build a data governance strategy, where they can put controls around the data catalog and security around its access.
Technical requirements
In this chapter, we will dive deep into the EMR cluster's integration with AWS Glue Data Catalog and the AWS Lake Formation service. So, to test the integration, you will need the following resources before you get started:
- An AWS account
- An Identity and Access Management (IAM) user that has permission to create and manage an EMR cluster with related resources, such as Amazon Elastic Compute Cloud (EC2) instances, required IAM roles, and security groups
- IAM access privileges to integrate AWS Glue Data Catalog, AWS Lake Formation, Amazon Simple Storage Service (S3), CloudWatch, and CloudTrail
Now let's understand how you can build a centralized data catalog in EMR and what options you have for this integration.
Understanding data catalog and access management options
When you think of data lake use cases, where the storage layer is a filesystem such as HDFS or an object store such as Amazon S3, by default, the data is not represented as databases or tables. In a data lake, you may receive datasets as structured, semi-structured, or unstructured datasets or files.
If it is unstructured data, such as media files (images, videos), then often machine learning or artificial intelligence tools are integrated to extract data and metadata about the media files and save the output to a data lake for further analytics.
If it is semi-structured, then often it goes through Extract, Transform, and Load (ETL) transformations to flatten it so that it is available to data analysts or data scientists for consumption.
Structured data, which is available as files or objects in a data lake, is not accessible to business users or data analysts in a form that they can query data using standard SQL. To make the data available as databases or tables for business users, you can think of creating a virtual table that imposes the schema while reading the datasets.
In an ideal database world, data that gets written to databases would follow a schema-on-write approach whereas in a data lake it's primarily schema-on-read, which means when you submit a query to read the data, the schema is applied on top of the filesystem to show the output in a tabular format. Whereas for schema-on-write semantics, before the data gets written to the database storage, its schema is validated against the table schema, and upon validation, it gets written to the storage.
When you integrate Amazon EMR for your data analytics use cases, you can store the data in either an EMR cluster's HDFS or Amazon S3 using EMRFS. Amazon S3 is the recommended storage as it provides high availability and scalability. On top of the data store, if you need to create virtual tables, then you have the following options:
- Hive Metastore: You can integrate Apache Hive while creating your EMR cluster, which uses a relational database running on the cluster master node as its metastore, or you can integrate Amazon RDS as its external metastore for better reliability or cross-cluster metadata sharing. Then, you can create databases and virtual tables on top of the cluster HDFS path or Amazon S3 path and run standard SQL queries to fetch data.
- AWS Glue Data Catalog: This is a serverless managed service that is designed to act as the centralized data catalog on top of the S3 data lake as well as other AWS services, such as Amazon Redshift, Amazon DynamoDB, and relational databases connected through JDBC.
If you have configured Amazon S3 as your cluster's persistent data store, then AWS Glue Data Catalog is the recommended option as that provides the opportunity for additional integrations. As an example, you can integrate AWS Glue ETL jobs on top of an S3 data lake using Glue Data Catalog tables, integrate AWS Lake Formation granular permission management, or enable cross-account data sharing for centralized data management.
Now, let's dive deep into AWS Glue Catalog and understand how you can integrate that with your EMR cluster as an external metastore.
Using AWS Glue Data Catalog
AWS Glue Data Catalog is a persistent metastore that allows you to build a centralized data catalog that can be shared across multiple AWS analytics services and can also be shared between multiple AWS accounts. It is integrated with AWS IAM, using which you can control which user is allowed to invoke Glue Data Catalog APIs, such as creating databases or creating tables.
In a data lake use case, AWS Glue crawlers play an important role of crawling subset data from a specified Amazon S3 path to autodetect the schema and create metadata tables in Glue Data Catalog. Glue Data Catalog also has audit and data governance capabilities that keep track of schema changes and create a new version with each update.
The following are the AWS services that are integrated with AWS Glue Data Catalog:
- AWS Glue jobs: AWS Glue ETL jobs read from the catalog for ETL processing and also update the output to Glue Data Catalog.
- Amazon Athena: Glue Data Catalog is one of the primary data sources for Athena, where Glue Data Catalog databases and tables are listed for you to query using standard SQL.
- Amazon Redshift Spectrum: Similar to Amazon Athena, Redshift Spectrum can fetch data from a data lake and other sources by querying through Glue Data Catalog databases and tables.
- Amazon EMR: As described earlier, similar to Hive Metastore, EMR can use Glue Data Catalog as its external metastore.
- AWS Lake Formation: Using AWS Lake Formation, you can define granular permission management on top of your Glue Data Catalog databases, tables, columns, or rows. Once you enable Lake Formation on your AWS account and integrate permission management, other AWS services, such as Athena, Glue jobs, Redshift Spectrum, and EMR, follow the access policies defined in Lake Formation.
After understanding what the role of Glue Data Catalog is, let's learn how you can integrate Glue Data Catalog in Amazon EMR.
Integrating AWS Glue Data Catalog with Amazon EMR
As explained in Chapter 5, Setting Up and Configuring Clusters, when you create your EMR cluster using advanced options, on the Step 1: Software and Steps screen, you have optional AWS Glue Data Catalog settings, which allow you to configure Glue Data Catalog for Hive, Presto, and Spark SQL.
The following screenshot shows the settings in the EMR console:
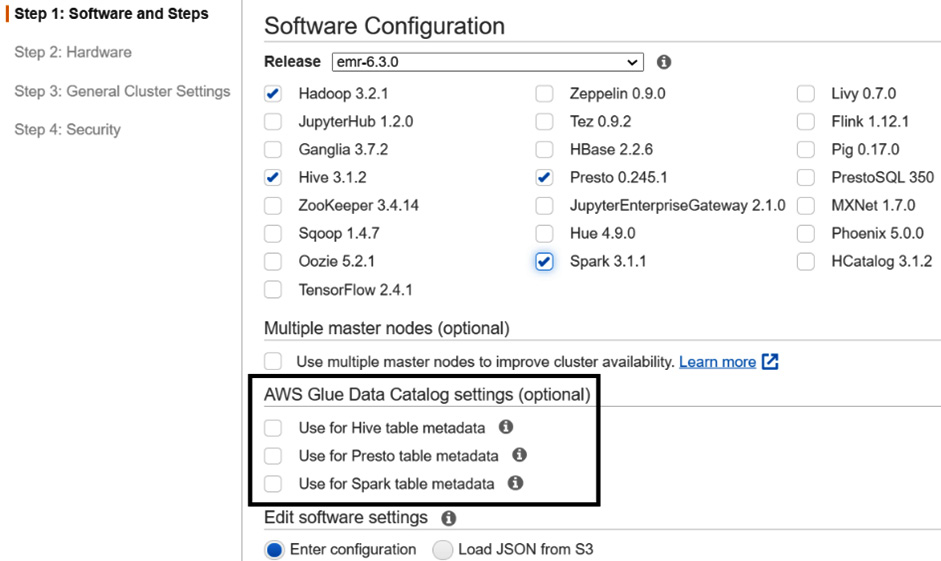
Figure 8.1 – EMR console to configure Glue Data Catalog
You can enable the same settings with the AWS Command Line Interface (CLI) and the following is an example of it:
aws emr create-cluster --name 'EMR with Glue Catalog' --applications Name=Hadoop Name=Hive Name=Presto Name=Spark --release-label emr-6.3.0 --configurations '[{"Classification":"hive-site","Properties":{"hive.Metastore.client.factory.class":"com.amazonaws.glue.catalog.Metastore.AWSGlueDataCatalogHiveClientFactory"}},{"Classification":"presto-connector-hive","Properties":{"hive.Metastore.glue.datacatalog.enabled":"true"}},{"Classification":"spark-hive-site","Properties":{"hive.Metastore.client.factory.class":"com.amazonaws.glue.catalog.Metastore.AWSGlueDataCatalogHiveClientFactory"}}]' --use-default-roles --region us-east-1
As you can see, the --configurations parameter in this command has the configurations that specify Glue Data Catalog for Hive, Spark, and Presto. We have explained the Glue Data Catalog integration with Hive, Presto, and Spark SQL in detail in Chapter 4, Big Data Applications and Notebooks Available in Amazon EMR.
Permission management on top of a data catalog
After customers start using EMR with HDFS or EMRFS with S3 as their distributed storage layer for big data processing, the next thing they look for is data governance and granular permission management on their data lake. This will enable them to provide database-, column-, or row-level permissions on top of Hive Metastore or Glue Catalog.
To implement permission management in EMR, you have the following options:
- AWS Lake Formation
- Apache Ranger
Now, let's dive into each of these options and understand how you can integrate them with EMR.
Understanding Amazon EMR integration with AWS Lake Formation
AWS Lake Formation is a managed service using which you can control which user can access which databases, tables, columns, or rows of your table. Lake Formation also supports integration with Active Directory Federation Services (AD FS) and SAML-based single sign-on (SSO), which allows users to authenticate themselves using their organization's login credentials.
AWS Lake Formation has several features; the following are a few of the popular features:
- Blueprints: Lake Formation blueprints provide you with a few templates using which you can ingest data from relational databases or AWS load balancer logs to an S3 data lake. It invokes AWS Glue workflows and jobs to do the data ingestion.
- Granular permission management: With Lake Formation permissions management, you can define database, table, column, or row-level permissions that validate every user request. You can also define Lake Formation tags and define tag-based permissions, instead of defining access for every database or table.
- Lake Formation governed tables: With Lake Formation governed tables, you can do row-level transaction updates on your Glue Data Catalog tables, which will enable updates or merges on your S3 data lake objects. This is great for GDPR compliance requirements, which require data to be updated or deleted. Lake Formation governed tables also have features such as query acceleration with predicate pushdown, storage optimization with auto compression of small S3 files, and time travel, using which you can access snapshots of your data at a specific time in the past.
Out of all the preceding features, we will primarily focus on Lake Formation fine-grained permission management and understand how you can integrate it with Amazon EMR.
We assume Lake Formation is enabled on your account and you have defined granular permissions on your Glue Data Catalog tables. Now, when you run queries on top of these Glue Data Catalog tables using any of the AWS analytics services, such as Amazon Athena, Amazon Redshift, AWS Glue jobs, Amazon QuickSight, or Amazon EMR, Lake Formation permissions come into play to allow or deny the request.
The following diagram explains how Lake Formation works when a user submits a query using these AWS services:

Figure 8.2 – AWS Lake Formation – user request processing
As you can see in this diagram, the user submits a query to Amazon EMR, Redshift Spectrum, AWS Glue, or Amazon Athena to fetch data from the data lake. AWS Lake Formation validates this request and if allowed, it generates a short-term credential that the AWS analytics service can use to retrieve data from the data lake and return it to the user.
Now let's understand how Lake Formation integration works with Amazon EMR.
Integrating Lake Formation with Amazon EMR
Starting from EMR release 5.31.0, you can launch a cluster with AWS Lake Formation integration, which provides the following two key benefits:
- Granular permission on Glue Data Catalog databases and tables
- SAML-based federated SSO to your EMR notebooks or Apache Zeppelin notebook using your corporate credentials
Now let's understand how you can launch an EMR cluster with Lake Formation.
IAM role needed for Lake Formation setup
The following are the three key IAM roles you need to set up for EMR to work with Lake Formation:
- Custom EC2 instance profile role: To make EMR work with Lake Formation, please make sure you create a custom EC2 instance profile so that you can edit or add policies for Lake Formation integration.
- Additional IAM role for Lake Formation: This IAM role for Lake Formation defines which identity providers (IdPs) can assume this role and what privileges a user will have when they log in through an IdP.
- IAM role for non-Lake Formation AWS services: This role will be used by EMR to interact with AWS services that are not integrated with Lake Formation, such as DynamoDB and Kinesis Data Streams. This role should not include any AWS Glue or Lake Formation API operations, any AWS Security Token Service (STS) AssumeRole operations, or any Amazon S3 bucket or prefix that is controlled by AWS Lake Formation. For S3 paths registered with Lake Formation, EMR will use the IAM role that is integrated with Lake Formation.
We suggest you read through the AWS documentation (link in the Further reading section) to understand the Lake Formation setup steps you will need to configure before you begin integrating Lake Formation as part of your EMR cluster.
Next, let's learn about a few EMR components that help with Lake Formation fine-grained access control.
EMR components that help with Lake Formation integration
Amazon EMR uses the following key components to facilitate integration with Lake Formation:
- Proxy agent: This is an Apache knox-based agent that runs on the EMR master node as the knox system user. This agent helps generate temporary credentials when it receives SAML-authenticated requests from users. While running, it writes logs to the /var/log/knox directory of the master node.
- Secret agent: This agent runs on every node of the cluster and uses Glue APIs to retrieve Glue Data Catalog metadata information and Lake Formation APIs to get temporary credentials to provide access. This agent securely stores secrets such as user temporary credentials or encryption keys of Kerberos tickets and distributes them to other EMR applications for authentication or authorization. This runs as the emrsecretagent user on cluster nodes and writes its logs to the /emr/secretagent/log directory
Please note, this agent process is dependent on a set of iptable rules, so make sure that iptable is not disabled and you have not altered the rules if you customized it.
- Record server: Similar to the secret agent, this process also runs in every node of the cluster and is named as the emr_record_server user. It uses the temporary credentials distributed by the secret agent to authorize requests and then reads data from the S3 data lake as per the row or column-level access defined in Lake Formation. This writes logs to the /var/log/emr-record-server directory of the nodes.
The following is an architecture reference diagram that explains how these three components work to provide SSO capability with SAML authentication and how Lake Formation is integrated to provide fine-grained access control with Amazon S3:

Figure 8.3 – Architecture reference for SAML-based authentication in EMR
From a user standpoint, the SAML-based authentication and Lake Formation based authorization work seamlessly such that users need not provide their credentials and it automatically signs in when they are accessing EMR notebooks or Zeppelin notebooks.
After getting an overview of the Lake Formation way of working with EMR, now let's understand how you can launch an EMR cluster with Lake Formation.
Launching an EMR cluster with Lake Formation
Please make sure you have followed the setup steps and prerequisites specified in the AWS documentation (https://docs.aws.amazon.com/emr/latest/ManagementGuide/emr-lf-prerequisites.html).
Apart from creating a custom EC2 instance profile role, please make sure you have created a security configuration that enables Lake Formation configuration.
The following screenshot shows how you can enable it using the EMR console:

Figure 8.4 – EMR security configurations with Lake Formation
After your security configuration is ready, you can launch an EMR cluster using the following AWS CLI command, which includes a custom EC2 instance profile role, the security configuration name that you created, and the --kerberos-attributes parameter if your cluster has Kerberos configuration enabled.
This cluster enables Zeppelin integration with Lake Formation:
aws emr create-cluster --region us-east-1 --name emr-lakeformation --release-label emr-6.3.0 --use-default-roles --instance-groups InstanceGroupType=MASTER,InstanceCount=1,InstanceType=m4.2xlarge InstanceGroupType=CORE,InstanceCount=1,InstanceType=m4.2xlarge --applications Name=Zeppelin Name=Livy --kerberos-attributes Realm=EC2.INTERNAL,KdcAdminPassword=<MyClusterKDCAdminPassword> --ec2-attributes KeyName=<MyEC2KeyPair>,SubnetId=<subnet-00xxxxxxxxxxxxx11>,InstanceProfile=<MyCustomEC2InstanceProfile> --security-configuration <security-configuration-name>
Please replace the <MyClusterKDCAdminPassword>, <MyEC2KeyPair>, <subnet-00xxxxxxxxxxxxx11>, <MyCustomEC2InstanceProfile>, and <security-configuration-name> variables before executing the command.
If you have configured Active Directory authentication with SSO, then as a next step, you should update the SSO URL for your IdP, as we will see in the following section.
Updating the SSO URL with your IdP
Please refer to the following steps to update the callback or SSO URL so that your users can be redirected to the EMR cluster's master node DNS URL:
If you are using Active Directory Federation Services (AD FS) as your IdP, then do the following:
- From the AD FS management console, navigate to Relying Party Trusts.
- Right-click on the display name of your replying party trust and select Properties.
- From the Properties window, select the Endpoints tab.
- Select Edit for the temporary URL you provided earlier.
- In the Edit endpoint window, replace the trusted URL with your EMR cluster's master node DNS.
- In the Add an endpoint window, enter your EMR cluster's master node public DNS in the Trusted URL field, which might look like https://ec2-11-111-11-111.compute-1.amazonaws.com:8442/gateway/knoxsso/api/v1/websso?pac4jCallback=true&client_name=SAML2Client.
- Then, click OK.
This is just an example for AD FS. For any other IdPs, such as Okta or Azure Active Directory, you can follow the steps given by the respective IdP.
Setting up EMR notebooks to work with Lake Formation
After your cluster is launched with Lake Formation integration, you can use an EMR notebook or Zeppelin for interactive development. Before accessing these notebook interfaces, make sure your cluster's network access control list (NACL) and cluster security group have allowed access to port 8442 from your local system IP.
Important Note
By default, the EMR cluster's proxy agent uses a self-signed TLS certificate, so while accessing the notebook URLs, your browser will have the warning to accept the certificate to continue accessing the URL. But you can apply a custom certificate to your proxy agent.
Now let's understand how you can access both of these notebooks.
Accessing Apache Zeppelin
After your cluster is launched, you can get the cluster's master node public DNS from the EMR console. Then, you can access Zeppelin by using the https://<MasterNodePublicDNS>:8442/gateway/default/zeppelin/ URL.
As described, your browser will prompt you to accept the self-signed certificate. If you have integrated IdP, then after you accept the certificate, it will redirect you to your IdP, where you can authenticate yourself and then get automatically redirected to Zeppelin.
In the Zeppelin interface, you can create a new notebook and then use Spark SQL to access Lake Formation databases or tables.
Accessing EMR notebooks
You can create an EMR notebook using the EMR console and integrate the notebook with an existing EMR cluster that has enabled Lake Formation.
In the EMR console, you can navigate to Notebooks | Create Notebook and then attach the notebook to an EMR cluster. Similar to Zeppelin, after accepting the self-signed certificate, you will be redirected to your IdP. Once authenticated, it will automatically redirect to your EMR notebook.
This concludes the Lake Formation integration with Amazon EMR. Next, we can see how Apache Ranger is integrated with EMR to provide fine-grained access control.
Understanding Amazon EMR integration with Apache Ranger
Apache Ranger is an open source framework that provides comprehensive security across the Hadoop ecosystem, using which you can define and manage security policies to control access on Hadoop components.
Starting from the EMR 5.32.0 release, your EMR cluster has default native integration with Apache Ranger. That means EMR installs and manages the Ranger plugin on your behalf.
Similar to AWS Lake Formation, Apache Ranger also provides fine-grained access control on top of Hive Metastore or Amazon S3 prefixes. Using Ranger, you can define access permissions on top of Hive databases, tables, or columns while using Hive queries or Spark jobs. Data masking and row-level filtering are only supported with Hive.
Ranger has the following two primary components:
- Apache Ranger policy admin server: With this server, you can define authorization policies for Hive Metastore, Apache Spark, and EMRFS with S3. To integrate with EMR, you can use your existing Ranger policy admin server or set up a new one.
- Apache Ranger plugin: This component helps in validating user access against the policies defined in the Ranger policy admin server.
The following diagram explains the Apache Ranger architecture diagram in EMR:

Figure 8.5 – Architecture reference diagram for EMR with Apache Ranger
As you can see in this architecture diagram, EMR uses the following two components to work with Apache Ranger:
- EMR secret agent: As explained when discussing AWS Lake Formation integration with EMR, this agent stores and distributes secrets, including user credentials, Kerberos tickets, or encryption keys. The secret agent validates user requests and generates temporary credentials for access.
- EMR record server: As explained in the Integrating Lake Formation with Amazon EMR section, this runs in every node of the cluster and uses the temporary credentials to authorize the request, and then retrieves authorized data from S3.
By default, Amazon EMR supports Ranger integration with Spark, Hive, and EMRFS + S3. Starting from the EMR 5.32.0 release, you can enable Ranger for other EMR components, such as Apache Hadoop, Apache Livy, Apache Zeppelin, Apache Hue, Tez, Ganglia, ZooKeeper, MXNet, Mahout, HCatalog, and TensorFlow with additional configuration.
Now let's learn how you can set up Ranger in an EMR cluster.
Setting up Apache Ranger in EMR
To set up Apache Ranger in EMR, the following are some of the steps you should consider.
Setting up the Ranger admin server
The Apache Ranger plugin in EMR uses SSL/TLS to interact with the admin server. To enable SSL/TLS, you need to configure the following attribute in the ranger-admin-site.xml file on the admin server:
<property>
<name>ranger.service.https.attrib.ssl.enabled</name>
<value>true</value>
</property>
Apart from the preceding SSL configuration, you also need to configure the following additional configurations:
<property>
<name>ranger.https.attrib.keystore.file</name>
<value>_<PATH_TO_KEYSTORE>_</value>
</property>
<property>
<name>ranger.service.https.attrib.keystore.file</name>
<value>_<PATH_TO_KEYSTORE>_</value>
</property>
<property>
<name>ranger.service.https.attrib.keystore.pass</name>
<value>_<KEYSTORE_PASSWORD>_</value>
</property>
<property>
<name>ranger.service.https.attrib.keystore.keyalias</name>
<value><PRIVATE_CERTIFICATE_KEY_ALIAS></value>
</property>
<property>
<name>ranger.service.https.attrib.clientAuth</name>
<value>want</value>
</property>
<property>
<name>ranger.service.https.port</name>
<value>6182</value>
</property>
With these configuration parameters, you can provide details about your certificate, including the certificate alias, path, password, and ranger service port.
IAM roles for native integration to set up the Ranger admin server
Before launching your cluster, you need to create the following roles that Apache Ranger uses:
- Custom EC2 instance profile role: Instead of using the default EMR_EC2_DefaultRole role that we explained in Chapter 5, Setting Up and Configuring Clusters, and Chapter 7, Understanding Security in Amazon EMR, you need to create a custom role that should have permission to tag sessions and access TLS certificates available in AWS Secrets Manager.
- IAM role for Apache Ranger: This role provides temporary credentials using which the EMR record server and Hive can access S3 data. Please make sure to include access to Key Management Service (KMS) keys, if you have enabled encryption on your S3 bucket using S3-SSE. In addition, you also need to create a trust policy between the EC2 instance profile and this role so that your instance can assume this role. You can refer to the AWS IAM documentation to learn how you can configure the trust policy.
- IAM role for other services: If needed, this role is used to interact with other AWS services. Similar to the IAM role for Apache Ranger, please add a trust policy between this role and the EC2 instance profile so that the EC2 instance can assume this role to interact with other AWS services, such as Amazon Kinesis Data Streams and Amazon DynamoDB.
For a complete list of IAM policies that will be embedded into any of the preceding roles, please refer to the AWS documentation.
Storing TLS certificates in AWS Secrets Manager
As explained in the previous section, the Ranger admin server communicates with EMR over TLS to make sure the communication is secure and cannot be intercepted if read by unauthorized processes. It is mandatory that Ranger plugins for Hive, Spark, or S3 authenticate to EMR using two-way TLS authentication, which requires two public and two private certificates. You must use AWS Secrets Manager to configure these TLS certificates and then integrate them into EMR security configurations.
Important Note
It is recommended that you generate a separate set of TLS certificates for each Ranger plugin so that if one of the plugin keys is compromised, you are not risking all plugins.
Also, you should rotate your certificates before expiry to continue having access.
EMR security configurations for Apache Ranger
After you have created the required roles and trust policies, you can create EMR security configurations that enable Apache Ranger fine-grained access control.
The following screenshot shows how you can enable it using the EMR console:
Figure 8.6 – EMR security configurations to enable Apache Ranger
After you have created the security configuration, you can attach it to your EMR cluster while launching it using the EMR console or AWS CLI.
Understanding Apache Ranger plugins
Starting from the EMR 5.32 release, EMR includes the following Ranger plugins, which integrate with Ranger 2.0 to provide fine-grained access control and audit capabilities. These plugins validate access against the policies defined in the Ranger policy admin server.
Now, let's get an overview of each of these plugins.
Ranger plugin for Hive
In EMR, the Ranger plugin for Hive supports all the functionality available in the open source version, which includes database-, table-, column-, and row-level permissions with the data masking feature.
The Hive plugin is, by default, compatible and integrated with the existing Hive service definition. In the Ranger console, if you do not find an instance of the Hive service under Hadoop SQL, then please click the + icon next to it and add the service name as amazonemrhive. You will need this service name while creating the EMR security configurations.
Additionally, you need to configure connection properties for the Ranger admin server to connect with HiveServer2, and the properties include Username, Password, jdbc.driverClassName, jdbc.url, and Common Name for Certificate.
The following is a screenshot of the Ranger Service Manager console that shows the amazonemrhive configuration under HADOOP SQL:

Figure 8.7 – Ranger console that shows amazonemrhive under Hadoop SQL
In this section, you have learned about the Ranger plugin for Hive and how you configure it. Next, you will learn how you can configure the Ranger plugin for the Spark engine.
Ranger plugin for Spark
In EMR, the Ranger plugin for Spark supports fine-grained access control on Spark SQL queries that query data from Hive Metastore. You can define access control on databases, tables, or the column level.
When a Spark executor runs a SparkSQL query, it goes through the record server to validate access defined in the Ranger policy admin server. In your Ranger policies, you can include grant or deny policies for users or groups and also log audit events to Amazon CloudWatch.
Please refer to the AWS documentation for the complete setup steps.
Ranger plugin for EMRFS S3
EMR uses EMRFS to interact with Amazon S3. When you try to access data from S3, it goes through the following steps:
- EMRFS sends a request to the secret agent to get temporary credentials.
- This request gets authorized against the Ranger plugin.
- If the request is authorized, then the secret agent assumes the IAM role for Ranger that has restricted access to generate temporary credentials. These credentials will have access only to the resources defined in the Ranger policy for which the access was authorized.
- Finally, these credentials are passed back to EMRFS to access data from S3.
You can create policies that allow or deny access to specific users or groups and the policy can point to a specific S3 bucket or prefix.
For complete setup steps, refer to the AWS documentation.
This section provided an overview of Apache Ranger integration with EMR that included setting it up in EMR and understanding the Ranger plugin.
Summary
Over the course of this chapter, you got an overview of integrating a centralized data catalog on top of your distributed persistent storage layer using AWS Glue Data Catalog or Hive Metastore.
Then, you learned about how you can integrate fine-grained access control using AWS Lake Formation and Apache Ranger. This chapter provided an overview of the integration, its different components, and what some of the steps you should be taking to configure it are. The links provided in the Further reading section will guide you through the detailed configuration steps.
That concludes this chapter! Hopefully, this gives you a good starting point to integrate a centralized data catalog and data governance on top of your distributed data lake. In the next chapter, we will explain how you can implement a batch ETL use case using EMR.
Test your knowledge
Before moving on to the next chapter, test your knowledge with the following questions:
- Assume you have multiple batch and streaming ETL workloads that use different transient EMR clusters for distributed processing. Your organization is looking for a persistent centralized data catalog that can help the data governance team get a unified view. Between AWS Glue Data Catalog and Hive Metastore, which one is better suited?
- Assume you have an on-premises Hadoop cluster that uses Apache Ranger for fine-grained access control. You are planning to migrate your on-premises Hadoop cluster to Amazon EMR in AWS to take benefit of cloud security, reliability, and scaling capabilities. For your Ranger server, you have configured custom TLS certificates that you plan to integrate into EMR. How should you integrate the TLS certificates into EMR?
- Assume you are part of a bigger enterprise that has multiple departments and each department has its own AWS account that owns its data. Your organization is looking for options using which they can build a centralized data catalog and permission management system that will be controlled by the data governance team. The central data governance team should be able to define permissions on all the data available in various AWS accounts and also be able to share catalog tables between accounts. Which architecture should you follow for centralized permission management and cross-account data sharing?
Further reading
The following are a few resources you can refer to for further reading:
- Considerations and limitations for AWS Glue Data Catalog with Amazon EMR: https://docs.aws.amazon.com/emr/latest/ReleaseGuide/emr-hive-Metastore-glue.html
- Setting up AWS Lake Formation: https://docs.aws.amazon.com/lake-formation/latest/dg/getting-started-setup.html
- Detailed steps for Lake Formation integration with Amazon EMR: https://docs.aws.amazon.com/emr/latest/ManagementGuide/emr-lake-formation.html
- Detail steps to configure Apache Ranger in EMR: https://docs.aws.amazon.com/emr/latest/ManagementGuide/emr-ranger.html