
Chapter 2: Exploring the Architecture and Deployment Options
This chapter will dive deep into the Elastic MapReduce (EMR) architecture. We will also look at the different deployment options it provides, such as Amazon EMR on Amazon Elastic Compute Cloud (EC2), Amazon EMR on Amazon Elastic Kubernetes Service (EKS), and Amazon EMR on AWS Outposts. It will also explain details around different EMR cluster node types, its life cycle, and ways to submit work to the cluster.
Toward the end of the chapter, you will learn how EMR pricing works with different deployment options and how you can use AWS Budgets and Cost Explorer for cost-related monitoring.
As we proceed to further chapters of this book, where we will cover different use cases and implementation patterns around EMR, an understanding of the architecture and deployment options will be a prerequisite.
The following topics will be covered in this chapter:
- EMR architecture deep dive
- Understanding clusters and nodes
- Using S3 versus HDFS for cluster storage
- Understanding the cluster life cycle
- Building Hadoop jobs with dependencies in a specific EMR release version
- EMR deployment options
Important Note
It is assumed that you are familiar with the Hadoop ecosystem architecture and this chapter will primarily focus on architecture changes with Amazon EMR.
EMR architecture deep dive
The following is a high-level architecture of Amazon EMR, which includes various components, such as the distributed storage layer, cluster resource management with Yet Another Resource Negotiator (YARN), batch or stream processing frameworks, and different Hadoop applications.
Apart from these major components, the following architecture also represents monitoring with Ganglia, the Hue user interface, Zeppelin notebook, Livy server, and connectors that enable integration with other AWS services:
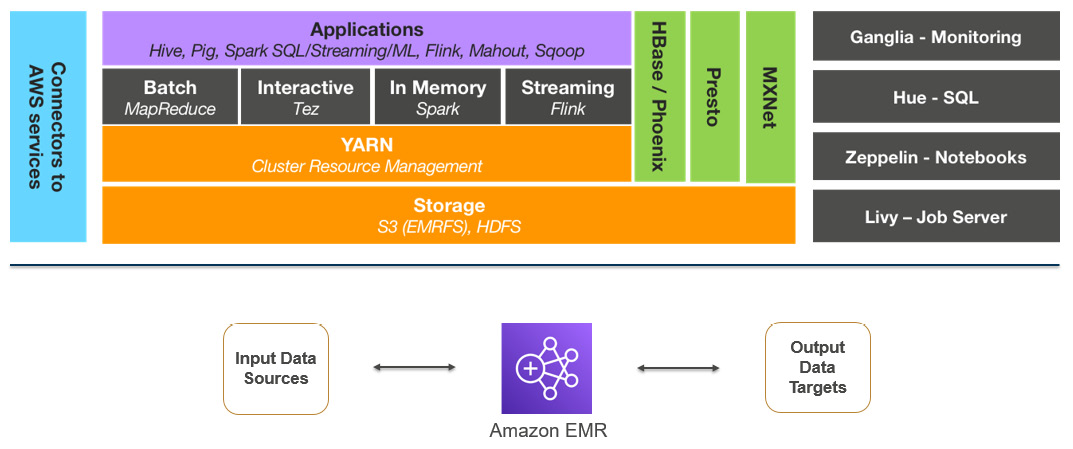
Figure 2.1 – EMR high-level architecture representing core components and applications
Now let's discuss each of these components in detail.
Distributed storage layer
In a typical on-premises Hadoop cluster or Hadoop on EC2 architectures, you will notice the Hadoop cluster node's disk space contributes to Hadoop Distributed File System (HDFS) storage space, and the storage and compute are tightly coupled.
But EMR also provides the option to decouple your compute from storage. Now, let's look at each storage option and understand which use cases they can be a fit for.
HDFS as cluster storage
HDFS is a distributed filesystem of Hadoop with horizontal scaling capabilities, which means as you add more nodes to the cluster you get additional compute and storage capacity.
HDFS distributes the data across cluster nodes as blocks, which are on average between 64 MB and 128 MB in size, and also enables you to have multiple copies of data that are fault-tolerant. The default configuration is to maintain three copies of data distributed into different nodes, but you can increase or decrease it based on your use case.
HDFS is great as persistent storage when you have higher random read writes or you have defined Service-Level Agreements (SLAs) around accessing the data. As the data is stored local to the instance, you get better performance while accessing it.
S3 with EMR File System (EMRFS) as cluster storage
EMR File System (EMRFS) is an extended filesystem of Hadoop created by Amazon to integrate Amazon Simple Storage Service (S3) as the permanent storage for EMR. This integration is seamless as you just need to use EMRFS with the s3a:// or s3n:// or s3:// S3 prefix in the cluster and all your cluster jobs will start pointing to S3.
When you use S3 with EMRFS, HDFS is still being used as intermediate storage during job execution and the final output is being written to EMRFS.
A node's local filesystem
When you use Amazon EC2 instances, it comes with a preattached disk that is called an instance store, and then you can attach additional ephemeral disk volume, which is called Elastic Block Store (EBS). When you talk about HDFS as file storage, it generally refers to the EBS volumes attached to instances.
But you can also refer to the instance store volume for your HDFS, but that is generally not recommended as the data in it is retained only during the life cycle of the instance. As soon as you terminate or restart the instance, you lose the data in it.
YARN – cluster resource manager
In Hadoop clusters, YARN is one of the major components as it helps to manage the cluster resources and also coordinates job execution across multiple nodes.
YARN became very popular because of its multi-tenancy feature, which allows execution of batch, streaming, and graph processing jobs, its optimized resource management, and its scaling capability.
Some of the major components of YARN are an ApplicationMaster, a NodeManager, a ResourceManager, and containers. These containers include disk, memory, and CPU resources of a node and the ResourceManager is used to coordinate all the resources required for different job execution. The ApplicationMaster works with the NodeManager for job execution, its monitoring and completion, and it gets required resources from the ResourceManager.
In Amazon EMR, by default, most of the Hadoop applications or frameworks use YARN, but there are a few others that don't use YARN to handle their resources. On each node, EMR runs an agent that manages YARN components and communicates with Amazon EMR.
If you recollect, we explained in the previous chapter how you can use EC2 spot instances for EMR task nodes to save more costs and make it more scalable. But with spot instances, the chances of task failure are high as they get terminated because of resource unavailability. Now, to make the jobs fault-tolerant, EMR allows running the ApplicationMaster in core nodes only, so that spot node termination will not terminate the ApplicationMaster and it can trigger the failed job in another node.
With the 5.19.0 release, EMR introduced a built-in YARN node label feature using which it labels core nodes with the CORE label and configures yarn-site, and capacity-schedulers to make use of these labels and make sure the ApplicationMaster runs only these nodes.
Important Note
Manually overriding or modifying the yarn-site or capacity-scheduler configuration files of the cluster that have CORE node labels integrated into it might break the feature, which allows running the ApplicationMaster only in core nodes.
Distributed processing frameworks
While designing big data analytics applications, depending on the use case, you might look for different batch and real-time streaming frameworks, and EMR provides a few options around it. A few of the frameworks use YARN and a few others use their own ResourceManager. Depending on the framework you integrate for your data processing, you will have programming language options as not all frameworks support all languages.
Out of the different frameworks, MapReduce and Spark are very common and these days, Spark is widely used for most batch and real-time streaming use cases.
MapReduce
Hadoop MapReduce is one of the popular open source frameworks that has map and reduce as two primary steps. In the map step, it reads input data as per the block size defined in the Hadoop configuration files and output key values pairs. The reduce step takes the map step output as input, does the defined aggregations, and then writes the output as part files to HDFS or S3. The number of reducers defines the number of output files you will have and with configuration parameters, you can control how many reducers you need for your job.
Hadoop applications such as Hive and Pig use the MapReduce framework as their processing engine to do transformations.
Spark
Similar to the Hadoop MapReduce framework, Spark is also another open source framework that is widely used for big data processing. Spark became more popular compared to MapReduce because of its directed acyclic graph execution, faster in-memory processing, support for different programming languages, such as Java, Scala, Python, and R, and multiple APIs to support batch and real-time streaming and graph processing kinds of use cases.
When you use Spark in EMR, you have native integration with EMRFS to read from and write data to S3.
Hadoop applications
Amazon EMR supports many Hadoop ecosystem applications to serve data collection, processing, analysis, or consumption needs. Each of these applications has its own API interface and programming language support.
A few of the popular applications are MapReduce, Tez, and Spark, which are used for big data processing. Sqoop is used for pulling data from relational databases, TensorFlow and MXNet are used for machine learning, Spark Streaming and Flink are used for real-time streaming, Hive and Presto are used as query engines, and HBase is used as a NoSQL database on HDFS or S3.
We will dive deep into a few of these applications in the upcoming chapters.
With this, you should have a good understanding of EMR's overall architecture and an understanding of each of its components. To understand more about the EMR cluster, next we will dive deep into its cluster node types and how they are structured.
Understanding clusters and nodes
The primary construct or component of Amazon EMR is the cluster, and the cluster is a collection of Amazon EC2 instances, which are called nodes. Each node within the cluster has a type, depending on the role it plays or the job it does in the cluster. Based on the node type, respective Hadoop libraries are installed and configured on that instance.
The following are the node types available in EMR:
- Master node: Master nodes are responsible for managing cluster instances, monitoring health, coordinating job execution, tracking the status of tasks, and so on. This is a must-have node type when you create a cluster and you can have a single node cluster with just a master node in it.
- Core node: This node type is responsible for storing data in the HDFS on your cluster and runs Hadoop application services such as Hive, Pig, HBase, and Hue. If you have a multi-node cluster, then you should have at least one core node.
- Task node: This node type is responsible for executing tasks with the amount of CPU or memory it has. Task nodes are optional and are useful when you plan to increase your cluster capacity for a specific job and scale down after its completion. These node types do not have HDFS storage.
The following diagram represents the master node, core node, and task node of a cluster with both HDFS and S3 as the storage layer options:

Figure 2.2 – EMR architecture representing cluster nodes
While creating an EMR cluster, you have two configuration options that you can apply to each of the cluster node types (master/core/task). Either you can select a uniform type of instance, which is called an instance group, or you can select a mix of different instance types, which is called an instance fleet. The configuration you select will be applied for the duration of the cluster and an instance fleet and instance group cannot coexist in your cluster.
Uniform instance groups
When creating an EMR cluster, you have the flexibility to group different instance types and assign core or task node roles to them. This way, you are not restricted to selecting one instance type for your whole cluster.
In general practice, you can select different EC2 instance types for the master node, core nodes, and task nodes. This also helps when you plan to integrate autoscaling into your cluster and you can scale your task nodes, which will be using instances that have higher compute and memory capacity and less disk capacity as they won't have HDFS. The following diagram shows EMR cluster nodes with instance groups:
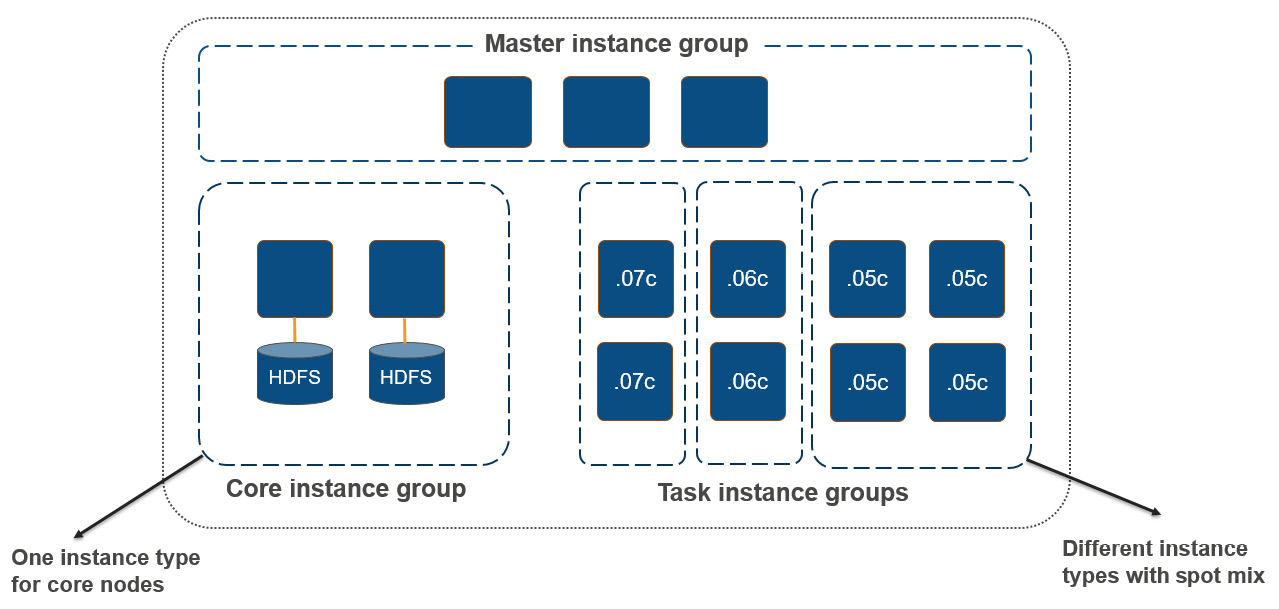
Figure 2.3 – EMR cluster nodes with instance groups
As you can see in the diagram, each node type is grouped as an instance group, and a task instance group has multiple instance types combined to form subgroups. Core instance groups have both compute and HDFS storage, whereas task instance groups have only compute capacity with the option to choose spot instances.
Instance fleet
With instance fleet configuration, you can combine up to five instance types in a single fleet and assign to them a node type. Using a task instance fleet is optional but it provides flexibility to create a mix with spot instance types too. Each instance can have a different EBS volume configuration.
You can define the target capacity for on-demand and spot instances in terms of vCPU cores, and EMR will select any combination of specified instance types to meet the target capacity. For master nodes, specify a single instance type so that it is consistent, and it would be better if you go for the on-demand instance type only.
In this section, we have learned about the EMR cluster's node types and how they are configured using instance groups or instance fleets. Next, we will get an overview of cluster storage, where you can use HDFS cluster storage or Amazon S3.
Using S3 versus HDFS for cluster storage
As you may have understood by now, EMR has the flexibility to choose HDFS or EMRFS + S3 as the cluster's persistent storage. As explained previously, EMR has different types of nodes: the master node, core nodes, and task nodes.
Now, let's understand how both of these storage layers are different and which problem statements they solve.
HDFS as cluster-persistent storage
As you can see from the following diagram, there are multiple core nodes pointing to the master node, and each core node has its own CPU, memory, and HDFS storage:
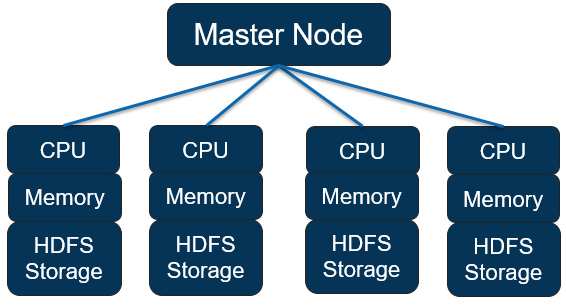
Figure 2.4 – EMR node structure with HDFS as persistent storage
These are some properties to be aware of when your cluster uses HDFS as persistent storage:
- You need to maintain by default three copies of data across the core nodes to be fault-tolerant.
- An EMR cluster is deployed in a single Availability Zone (AZ) of a Region, so a complete AZ failure might cause data loss.
- As HDFS is formed with the core nodes' EBS volumes, your storage cost will depend on the EBS volumes.
- Data is stored locally, which means the cluster needs to be available 24x7 even if no jobs are running, utilizing the cluster capacity.
Now, let's look at Amazon S3 as a storage layer.
Amazon S3 as a persistent data store
The following architecture diagram represents the integration of Amazon S3 as the persistent data store instead of HDFS, where all core nodes or task nodes will interact with the S3 prefix to read or write data:

Figure 2.5 – EMR node structure with Amazon S3 as persistent storage
The following are a few of the benefits you get when you use Amazon S3 as the persistent storage layer:
- With S3 being a persistent store, you get more reliability because of S3 multi-AZ replication.
- Your cluster is protected against data loss from node failure, cluster failure, or AZ failure.
- Compared to EBS-based HDFS, S3 is much cheaper, which brings your total costs down.
- As compute and storage are decoupled, you can terminate clusters when idle or multiple clusters can point to the same dataset in S3.
In this section, we have explained what cluster storage options you have and what benefits or tradeoffs they have while integrating it. In the next section, we will dive deep into the EMR cluster's life cycle and how you can submit jobs to the cluster as steps.
Important Note
Amazon S3 has a limit around the maximum number of write or read requests you can get per second. It is 3,500 for PUT/COPY/POST/DELETE and 5,500 for GET/HEAD requests per second per prefix in a bucket. To avoid hitting the maximum limit, you can think of adding more S3 prefixes while writing output, you can think of reducing the number of write or read requests per second, or you can also think of increasing the EMRFS retry limit.
Understanding the cluster life cycle
When you launch an EMR cluster through the AWS SDK, command-line interface (CLI), or console, it follows a series of steps to launch required infrastructure resources, configure them with required libraries, and then execute any bootstrap actions defined.
The following is the sequence of steps the cluster follows to complete the setup successfully:
- Provision the EC2 instances for the cluster to represent master, core, and task nodes using the default AMI or the custom API you have specified. At this phase, the cluster shows the status as STARTING.
- Run the bootstrap actions that you have specified to install custom third-party libraries or do additional configurations on instances, or start any specific services. At this phase, the cluster shows the status as BOOTSTRAPPING.
- Install libraries related to the Hadoop services (Hive, Pig, Hue, Spark, HBase, Tez, and so on) you have selected during the cluster launch. After completion of this step, the cluster state is WAITING if no jobs are submitted for execution.
After the cluster is ready and in the WAITING state, you can submit jobs to the cluster through the AWS CLI, SDK, or console, and each job is treated as a step. It can be a Hive, Pig, or Spark step that reads from HDFS or S3, does the Extract, Transform, and Load (ETL) operation, and writes the data back to the storage layer. Following the completion of the step, again the cluster goes back to the WAITING state.
While creating the cluster, you can set it to auto-terminate once the last step is performed, which is better suited for transient job-based cluster use cases. When the cluster gets a termination request, its state goes to TERMINATING, and then after successful termination, it goes to TERMINATED.
During the launch, if the cluster creation fails because of any error, then Amazon EMR terminates the cluster, and the state of the cluster is set to TERMINATED_WITH_ERRORS. Please note, you do have the option to enable Termination Protection, which means in case of failures, the cluster will not get terminated, and in such scenarios, you can manually disable termination protection on the cluster, then trigger the termination action.
The following diagram represents the life cycle of a cluster, which means the sequence of steps EMR takes to set up the cluster, configure it, and execute jobs, and what the cluster state is during each stage:

Figure 2.6 – Represents EMR cluster life cycle
Now, as we understand the cluster life cycle and the sequence of steps it takes for setup, next we will learn how you can submit jobs to the cluster and what the steps a job execution goes through are.
Options to submit work to the cluster
You have several options to submit work to the EMR cluster. A few of them are listed here:
- When you have a persistent EMR cluster, you can submit jobs through the AWS console or AWS CLI commands, or submit dynamically from applications using EMR APIs.
- In the case of a persistent cluster, you can also SSH to the master node or the respective Hadoop application's core node and use the CLI of the Hadoop application to submit queries or jobs.
- If you have a transient EMR cluster, then you can include the job triggering steps as part of the cluster creation script or command, which will create the cluster, submit the job as a step, then, post-completion, terminate the cluster.
- You can also invoke cluster creation or job submission actions from workflow orchestration tools such as AWS Step Functions and self-managed or AWS-managed Apache Airflow clusters. For persistent clusters, orchestration tools trigger job submission commands, and for transient cluster use cases, you can trigger cluster creation, followed by job submission, and then termination.
Next, let's understand the steps of job execution.
Submitting jobs to the cluster as EMR steps
When you design an ETL pipeline with multiple transformation jobs, you can submit each job as a step to the cluster and each job can invoke different Hadoop services.
For example, you can have the following two steps in your cluster, which flattens a nested JSON file to derive some insights:
- A PySpark job that reads nested JSON from S3 and flattens it out as a fixed schema file, then writes the output back to S3
- A Hive job that defines an external table on top of the step-1 output S3 path and does SQL-based aggregations to create summarized output and, finally, writes the output back to S3
Ideally, before triggering the EMR steps, you will upload the nested JSON file to the input S3 bucket, which the PySpark jobs will read, and also create the intermediate and final output S3 buckets or paths that the Spark and Hive step will use.
This way, we are decoupling the compute and storage by using S3 as the permanent storage layer.
The following is the sequence EMR takes to run a step:
- Request submitted to start the processing steps.
- The state of both the PySpark and Hive steps is set to PENDING.
- When the first PySpark step goes into execution, its state gets changed to RUNNING.
- After the PySpark state completes, its state changes to COMPLETED, and the Hive step's state changes to RUNNING as that's defined as the next step.
- When the Hive job execution completes, its state changes to COMPLETED too.
- This pattern gets repeated for every step until they are all marked as COMPLETED, and finally, the cluster gets terminated if auto-terminate is set to TRUE.
The following diagram represents the sequence of states each step goes through when it is getting processed:

Figure 2.7 – Sequence diagram for Amazon EMR showing the different cluster step states
As you can see from the preceding diagram, Step 1 starts processing and then moves to the COMPLETED state. That triggers the execution of Step 2, which is in the RUNNING state, and the rest of the states are in the PENDING state, waiting for Step 2 to complete. In ETL pipelines, failures are pretty common and can be because of resource unavailability, data corruption, or schema mismatch issues. You do have the option to specify what will happen if a particular step fails, which will be marked as the FAILED status. You can either choose to ignore the failure and proceed with the next steps or mark the rest of the remaining steps as CANCELLED and proceed with cluster termination. In the case of failures, the default behavior is to mark the remaining steps as CANCELLED.
The following diagram represents the step sequence when a particular step fails processing:

Figure 2.8 – Sequence diagram for Amazon EMR showing failed step
As you can see in this diagram, Step 2 is marked as FAILED and after that, all other steps are CANCELLED and that marks the end of the processing.
This section described the EMR cluster life cycle flow and how job submission works with the status of each job or step. Next, you will learn how you should include job-dependent libraries while building Hadoop jobs in specific EMR releases.
Building Hadoop jobs with dependencies in a specific EMR release version
When you build different Hadoop, Hive, or Spark jobs and execute them on a specific version of the EMR cluster, you might often face version conflict issues between your application code and its dependencies because the specific versions of libraries your code expects might not be available in the cluster. So, it's necessary that you build your application code against the libraries available in the cluster.
Starting with the Amazon EMR 5.18.0 release, you can integrate the Amazon EMR artifact repository, using which you can build your application to avoid version conflicts or runtime classpath errors when you execute them in the EMR cluster.
You can add the artifact repository to your Maven project or with pom.xml, which has the following syntax:
https://<s3-endpoint>/<region-ID-emr-artifacts>/<emr-release-label>/repos/maven/
Now, let's understand each parameter of the preceding https URL, which will help you form your repository URL:
- s3-endpoint is the Amazon S3 endpoint that follows its Region-specific URL format, for example, s3.us-east-1.amazonaws.com for us-east-1 Regions. Because there are no differences in artifacts between Regions, you can choose the one that best suits your environment.
- Emr-release-label is the Amazon EMR cluster's release label and, as highlighted in the previous chapter, release labels follow a format of emr-x.x.x, for example, emr-6.3.0. A specific EMR release series may include multiple release versions, but you can use the first release version within that series. For example, use emr-5.30.0 for the EMR cluster EMR5.30.1 version.
As an example, if you are using the EMR release version 5.30.1 in the us-east-1 Region, then your URL will be as follows:
https://s3.us-east-1.amazonaws.com/us-east-1-emr-artifacts/emr-5.30.0/repos/maven/
Next, we can look at the different deployment options EMR provides and how their pricing is calculated.
EMR deployment options
As Amazon EMR is built on top of the open source Hadoop ecosystem, it tries to stay up to date with the open source stable releases, which includes new features and bug fixes.
Amazon EMR on Amazon EC2
Amazon EMR on Amazon EC2 is the first deployment option EMR offered and is very popular across different use cases. With EC2, you get the broadest range of instance types, which you can select depending on your workload and use case to get the best performance and cost benefits.
The following is a sample AWS CLI command that creates an Amazon EMR cluster with the emr-6.3.0 release label, five m5.xlarge instances, and a Spark application:
$ aws emr create-cluster
--name "First EMR on EC2 Cluster"
--release-label emr-6.3.0
--applications Name=Spark
--ec2-attributes KeyName=<myKeyPairName>
--instance-type m5.xlarge
--instance-count 5
--use-default-roles
Before executing the preceding command, please replace the <myKeyPairName> variable with your EC2 key pair name.
We will go deeper into the EMR on EC2 deployment option and its configuration later in the book.
EC2 instance types to support different workloads
EMR provides flexibility to select a variety of EC2 instance families for different workloads. A few are listed here:
- General-purpose: For typical batch ETL pipelines, you can select from the M4 and M5 EC2 instance families, which are geared toward general batch processing.
- Compute-intensive: For compute-intensive workloads, for example, machine learning jobs, you can use the C4 or C5 instance types.
- Memory-intensive: For high memory usage applications, such as Spark-based heavy ETL workloads or interactive low-latency query requirements, you can use the R4 or X1 instance families.
- Dense disk storage needs: For workloads that need higher storage capacity for HDFS, you can select from the D2 or I3 instance families, which come with higher EBS storage.
Important Note
The EC2 instance families listed here are based on the availability while writing this book and they are subject to change as EMR starts supporting new instance types.
Now let's look at another deployment option.
Amazon EMR on Amazon EKS
EMR on EKS provides great value. It helps if you already have an Amazon EKS cluster that is running different workloads on other applications and you would like to use the same cluster for Spark workloads. With EMR on EKS, you can automate the provisioning of Spark workloads and also use the Amazon EMR optimized runtime for Apache Spark to accelerate your workloads by up to three times.
With EMR on EKS, you can achieve multiple other benefits:
- You can save time from managing open source Spark on EKS, and can on developing an application with Spark.
- You can choose any specific EMR + Spark version with EKS, which gives you an EMR Spark runtime that is three times faster than open source Spark.
- You can use the same EKS cluster with isolation for different Spark workloads and can have control over granular access permissions.
Let's now look at the architecture in this case.
The architecture of an EMR on EKS cluster
The following is a high-level diagram that explains how you can submit different data engineering jobs to the EMR virtual cluster backed by EKS. The EKS cluster can be configured to run with EC2 instances or AWS Fargate and you can choose different Spark versions for different applications:
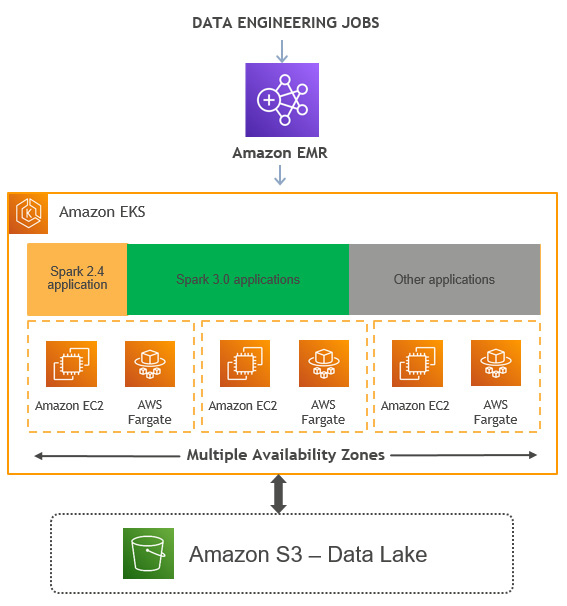
Figure 2.9 – High-level architecture diagram representing the EMR on EKS deployment option
The following are the high-level components of an EMR on EKS cluster:
- Kubernetes namespace: Amazon EKS uses Kubernetes namespaces to create isolation between applications or users within the cluster. While deploying an Amazon EKS cluster, you have the option to select Amazon EC2 or AWS Fargate as its backend compute layer, which you can specify as a Kubernetes namespace.
- Virtual cluster: The EMR on EKS cluster you create is called a virtual cluster as it does not create any resources and uses a Kubernetes namespace with which it is registered. You can have multiple virtual clusters created pointing to the same EKS cluster with their own namespace.
- Job run: This represents submitting a job to the EMR virtual cluster, which submits it to the backend EKS cluster. This job can be a Spark job. At the time of writing this book, EMR on EKS supports Spark only and we can only hope for additional Hadoop application support in the future.
- Managed endpoints: For interactive analytics, you can use a managed endpoint that integrates with EMR Studio and submits the job execution to the underlying EKS cluster.
Next, let's look at an example.
Example AWS CLI commands to manage the cluster and jobs
Assuming you already have an EMR on EKS cluster, you should use the following AWS CLI commands to interact with the EMR virtual cluster.
The following are three sample AWS CLI commands to create an EMR on EKS cluster, submit a job, and then terminate the cluster, to represent a transient EMR cluster use case:
- Create a virtual cluster with the EKS namespace:
$ aws emr-containers create-virtual-cluster
--name <virtual_cluster_name>
--container-provider '{
"id": "<eks_cluster_name>",
"type": "EKS",
"info": {
"eksInfo": {
"namespace": "<namespace_name>"
}
}
}'
- Trigger a PySpark job:
$ aws emr-containers start-job-run
--name <job_name>
--virtual-cluster-id <cluster_id>
--execution-role-arn <IAM_role_arn>
--release-label <emr_release_label>
--job-driver '{
"sparkSubmitJobDriver": {
"entryPoint": <entry_point_location>,
"entryPointArguments": ["<arguments_list>"],
"sparkSubmitParameters": <spark_parameters>
}
}'
--configuration-overrides '{
"monitoringConfiguration": {
"cloudWatchMonitoringConfiguration": {
"logGroupName": "<log_group_name>",
"logStreamNamePrefix": "<log_stream_prefix>"
}
}
}'
- Delete the EMR virtual cluster:
aws emr-containers delete-virtual-cluster —id <cluster_id>
After every job run, you can delete the EMR virtual cluster, but it's recommended to create the cluster once and keep it active for multiple job runs. As the EMR virtual cluster consumes no resources and does not add to the cost, keeping it active will reduce the overhead of creating and deleting it multiple times.
There are a few additional commands you can use to list, monitor, or cancel your job:
- List job run: You can run the following command, which uses the list-job-run option to list the jobs with their state information:
aws emr-containers list-job-runs --virtual-cluster-id <cluster-id>
- Describe a job run: You can run the following command, which uses the describe-job-run option to learn more about the job, which includes the job state, state details, and job name:
aws emr-containers describe-job-run --virtual-cluster-id <cluster_id> --id <job-run-id>
- Cancel a job run: You can run the following command, which uses the cancel-job-run option to cancel the running jobs:
aws emr-containers cancel-job-run –virtual-cluster-id <cluster_id> --id <job-run-id>
Now, let's take a look at the next deployment option.
Amazon EMR on AWS Outposts
AWS Outposts is a fully managed service that gives you access to the same AWS services, infrastructure, APIs, and operational models as virtually any data center or on-premises facility. AWS Outposts is great for workloads that require low-latency access by keeping infrastructure near to the data center.
AWS services related to compute, storage, or databases run locally on Outposts and you can access these services available in your AWS Region to build and scale your on-premises applications using the same AWS tools and services.
There is a range of AWS services, including AWS compute, storage, and databases, that run locally on AWS Outposts. Amazon EMR is also available in AWS Outposts, which allows you to deploy, manage, and scale Hadoop and Spark workloads in your on-premises environments similar to as you would do in the cloud.
Using the same AWS console, SDK, or CLI commands as EMR, you can easily create a managed EMR cluster in your on-premises environment, and these clusters running in AWS Outposts will be available in the AWS console the same as other clusters.
There are a few prerequisites that you need to follow to use Amazon EMR on AWS Outposts:
- You need to have an AWS account.
- You must have installed and configured AWS Outposts in your on-premises infrastructure or data center.
- You will need a stable network connectivity between your Outposts environment and your selected AWS Region.
- You need to have enough capacity of EMR-supported instance types in your Outposts.
For connectivity, you can extend your AWS account's VPC to span its AZs to associated Outposts locations. While creating an EMR cluster, you should configure your Outposts to be associated with a subnet that extends your regional VPC environment to your on-premises deployment.
The following is an example AWS CLI command to create an EMR cluster in Outposts and it's pretty much the same as creating a cluster in the AWS cloud with EC2:
aws emr create-cluster
--name "Outpost cluster"
--release-label emr-<label>
--applications Name=<app-names>
--ec2-attributes KeyName=<key-name> SubnetId=subnet-<id>
--instance-type <type> --instance-count <count> --use-default-roles
Please replace the <label>, <app-names>, <key-name>, subnet <id>, instance <type>, and instance <count> variables with the relevant values before executing it.
With Amazon EMR in AWS Outposts, you will get all the benefits of Amazon EMR with the following additional benefits:
- Easier integration with on-premises deployments: Workloads running on Amazon EMR on AWS Outposts can read from and write data to your existing on-premises Hadoop cluster's HDFS storage. This gives you the flexibility to implement your data processing needs using Amazon EMR without migrating any data.
- Accelerate the data and job migration: If you are in the process of planning to migrate your on-premises Hadoop cluster data and workloads to Amazon EMR in the cloud, then as an interim step, you can start using EMR through AWS Outposts. This will allow integration with your on-premises Hadoop deployment, and then you can plan to gradually move your cluster data to S3 followed by jobs to be executed in the cloud. This way, you can get all the benefits of decoupling compute with storage.
Please check the AWS documentation to look for limitations and current support around different instance types you can select while creating your cluster. At the time of writing this book, EC2 spot instances are not available when you deploy EMR on Outposts.
EMR pricing for different deployment options
Similar to other AWS services, Amazon EMR's pricing also follows a pay-as-you-go model. You can easily estimate your costs based on the deployment option, the Region, the instance types you are selecting, and how long you plan to keep the cluster running. The pricing is calculated per-second with a 1-minute minimum billing period.
A cluster with 20 nodes running for 10 hours will cost the same as a 100-node cluster running for 2 hours. Now, you might consider always running a higher-number node cluster to finish the job in 1 minute, but that's not the ideal way of execution as Hadoop/Spark workloads give maximum performance at a certain number of nodes and don't perform better beyond that point with any additional nodes.
As explained earlier, EMR provides three deployment options: EMR on Amazon EC2, EMR on Amazon EKS backed by EC2 or AWS Fargate, and EMR on AWS Outposts. Now, let's look at a few pricing examples for each deployment option, which can help you estimate the cost of your Hadoop/Spark workloads in EMR.
Important Note
The costs in USD represented in the examples are based on the pricing we had while writing this book and they are subject to change.
Amazon EMR on Amazon EC2 pricing
The Amazon EMR on Amazon EC2 pricing is very simple and takes pretty much the same calculation approach as Amazon EC2 instance pricing, where the pricing varies by the type of EC2 instance you have selected, the number of instances, and the size of the EBS volume attached to them.
The same as EC2 pricing, apart from On-Demand instance types, you can choose to go for Reserved Instances or Savings Plans or choose to use Spot Instances for your task nodes to get higher savings.
Please refer to the AWS documentation to see the instance types supported by EMR, as they might change from time to time.
Pricing example for EMR on EC2
To keep the calculation simple, let's take the following assumptions:
- You will be deploying the cluster in us-east-1.
- You will have one master node of C4.2xlarge, two core nodes of m5.2xlarge, and five task nodes of m5.4xlarge, and all the instances are on-demand instances.
- The cluster is up and running for 2 hours for a Spark job or step.
The following explains the cost breakdown and the total cost you will have:
- Formula to calculate each node type's cost: (number of instances) x (selected instance type's hourly cost) x (number of hours)
- EMR master node cost: 1 instance x $0.105 per hour x 2 hours = $0.21
- EMR core node cost: 2 instances x $0.096 per hour x 2 hours = $0.384
- EMR task node cost: 5 instances x $0.192 per hour x 2 hours = $1.92
- Total cost = $0.21 (master node cost) + $0.384 (core node cost) + $1.92 (task node cost) = $2.514
Let's now understand the pricing of another deployment option.
Amazon EMR on Amazon EKS pricing
When you are considering deploying an Amazon EMR cluster on Amazon EKS, you have the option to select Amazon EKS backed by Amazon EC2 or AWS Fargate. When the Amazon EKS cluster is built on top of EC2 instances, the pricing calculation is the same as EMR on EC2 as the cost will be dependent on the type of instance, the number of instances, and the EBS volumes attached to them.
When you choose to go with EKS on AWS Fargate, pricing is calculated based on the vCPUs and the amount of memory used from the time you start downloading the container image until the EKS Pod terminates, and the time is rounded up to the nearest second as the pricing is per-second billing. With AWS Fargate, pricing is based on the amount of vCPU cores and memory used by the Pod.
You can check the EMR pricing page to find out how much is charged per vCPU core and memory per GB.
Estimating costs for EMR on EKS with AWS Fargate
This is a simple formula you can use to calculate the cost of your workload:
- Total cost for vCPU usage = (number of vCPUs) * (per vCPU-hours rate) * (job runtime in hours)
- Total cost for memory usage = (amount of memory used) * (per GB-hours rate) * (job runtime in hours)
- Total cost = total cost for vCPU usage + total cost for memory usage
Please note, apart from the vCPU core and memory usage cost, you pay an additional $0.10 per hour for each Amazon EKS cluster you have launched. You can use the same EKS cluster for multiple workloads, where you create separation between workloads through Kubernetes namespaces and AWS IAM security policies.
The per-vCPU core hourly rate and per-GB memory rate used in the following example is taken from the EMR on EKS pricing page. You can select the AWS Region you plan to deploy and get the defined cost at the time of implementation.
Important Note
The pricing calculation formula and the cost specified here are subject to change and are based on prices at the time of writing this book. Please refer to the AWS documentation for the latest pricing information.
Pricing example for EMR on EKS with AWS Fargate
Let's assume that the EKS cluster is deployed in the N. Virginia (us-east-1) Region and you have used the r5.xlarge EC2 instance type, which has 4 vCPU cores and 32 GB memory.
If we create the EKS cluster with 100 nodes or instances, then we have a total of 400 vCPU cores and 3,200 GB memory capacity.
Now, let's assume we have a Spark application running in the cluster and that takes 100 vCPU cores and 500 GB memory and the job executed for 1 hour; then, you can apply the formula we specified previously to arrive at the cost:
- Total cost for vCPU usage = 100 * $0.01012 * 1 = $1.012
- Total cost for memory usage = 500 * $0.00111125 * 1 = $0.5556
- Total cost = $1.012 (total cost for vCPU usage) + $0.5556 (total cost for memory usage) + $0.10 (EKS per hour cost) = $1.667
Let's understand the pricing for another deployment option.
Amazon EMR on AWS Outposts pricing
Before getting into the pricing for AWS Outposts, let's see what AWS Outposts offers.
AWS Outposts helps you deploy an Amazon EMR cluster near to your on-premises environment, making it a part of your existing environment but the features, its usage, and the AWS APIs are all the same as the AWS cloud. Amazon EMR on AWS Outposts provides a cost-efficient option with the same benefits of automating different administration tasks of provisioning infrastructure resources, setting up the cluster, and configuring Hadoop libraries or tuning.
Coming back to the pricing of Amazon EMR on AWS Outposts, it's the same as in the cloud. Please refer to the AWS Outposts pricing page of the AWS documentation for more details.
Monitoring and controlling your costs with AWS Budgets and Cost Explorer
Apart from the pricing considerations, you can also take advantage of AWS Budgets and Cost Explorer to monitor your cluster costs and also set some alarms to send notifications to your finance team. Following are a few examples on how to use these applications to your advantage:
- Use AWS Budgets to configure custom budgets that will help track your cost and usage.
- When real or anticipated costs and usage exceed your budget level, and actual Reserved Instances and Savings Plans utilization or coverage falls below the desired thresholds, you can choose to be notified through email or SNS.
- Use AWS Cost Explorer to view and analyze your cost and usage drivers.
- AWS Budgets integrates with AWS Service Catalog, which enables you to track costs on AWS services that are approved by your organization.
With this, you have a good overview of the different EMR deployment options and how the pricing is calculated for each one of them. Please refer to the Further reading section for additional learning materials related to pricing.
Summary
Over the course of this chapter, we have dived deep into the Amazon EMR architecture, each of its components, and Hadoop applications. After covering those topics, we then discussed cluster nodes of EMR with its life cycle and ways to submit jobs.
Finally, we covered what the different EMR deployment options are, what benefits they have, and what the pricing for each of them is.
That concludes this chapter! Hopefully, you have got a good overview of the Amazon EMR architecture with its three deployment options and are ready to learn different use case architecture patterns in the next chapter.
Test your knowledge
Before moving on to the next chapter, test your knowledge with the following questions:
- You receive a daily incremental file from your source system at midnight and you are expected to process it and make it available for consumption. After that, during the day, at 3 P.M., you need to execute a machine learning job that will read this processed output. Will you use a persistent cluster or transient and how will you configure it?
- While creating an EMR cluster, you have a requirement to select multiple instance types for your node types and would like to take advantage of spot instances too. How would you configure your cluster?
- You have a manufacturing unit that expects all the Hadoop/Spark processing to happen near its on-premises site, but has plans to slowly migrate to the cloud. Which Amazon EMR deployment option is best suited?
Further reading
The following are a few resources you can refer to for further reading:
- Setting of an Amazon EMR on EKS cluster: https://docs.aws.amazon.com/emr/latest/EMR-on-EKS-DevelopmentGuide/setting-up.html
- Amazon EMR on AWS Outposts limitations: https://docs.aws.amazon.com/emr/latest/ManagementGuide/emr-plan-outposts.html
- Amazon EMR pricing: https://aws.amazon.com/emr/pricing/