
″Nothing ever happens.
Nothing happens at all.
The needle returns to the start of the song,
and we all sing along like before.″
— ″NOTHING EVER HAPPENS,″ DEL AMITRI, WAKING HOURS (A&M RECORDS, 1989)
The delay line is the single most important signal processor used for manipulating the time axis of an audio signal. In concept, it could not be simpler: delay all signals fed to the device. Audio goes in. It waits the designated amount of time. Audio comes out. Simple on the surface, this process becomes the building block for a vast range of effects, and is a required processor in all recording studio environments.
This chapter begins with some theory, summarizing delay technologies frequently used in recording studios and describing the basic signal flow through a delay processor. This is followed by a detailed look at the many creative applications of delay common in professional music production.
The delay in time may be generated in a number of ways — in software or hardware, analog or digital. The digital delay is perhaps the most intuitive source of delay. Once audio is made digital, it is a string of numbers as willing to be stored in random access memory as any word-processing document or web page. All that is needed is a bit of memory management and a user interface. Any computer should be able to do this. Not surprisingly, digital audio workstations are very good at this. Dedicated digital devices — stand-alone units that offer digital delay outside of the computer — are also available.
Purely analog delay lines also exist, though they become increasingly rare as digital audio becomes ever more available, affordable, and capable. Inductors and capacitors are the basic analog circuit components used to introduce some time delay to an analog signal.

An analog tape machine — perhaps sitting underutilized somewhere in your studio — is also a clever source of delay (see Figure 9.1) and is the basis for a whole class of delay effects, discussed in more detail below.
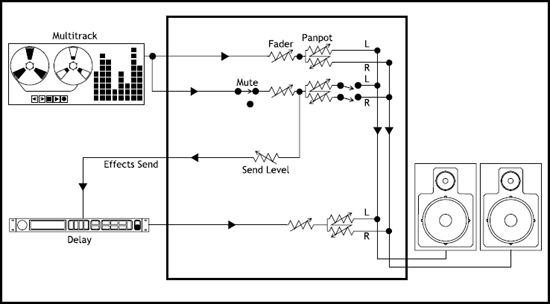
Figure 9.2 demonstrates a good starting point for routing audio signals through the console in order to create many of the delay effects discussed in this chapter (see also ″Outboard Signal Flow″ Chapter 2).
Set up a postfader aux send from the source track to the delay. Return the output of the delay to a separate fader. This sends the desired signal, with all of its carefully thought-out effects like compression (see Chapter 6) and equalization (see Chapter 5), to the delay processor. The delay output is patched into its own mixer input so that the engineer has full control of the return from the delay on its own fader.
Hooking it up as shown in Figure 9.2 and setting the delay time to 200 milliseconds (ms) would add an echo to the source track for the duration of the performance.

![]() Figure 9.2 Signal flow at the mixing console.
Figure 9.2 Signal flow at the mixing console.
![]() Figure 9.3 The ″automated″ effects send.
Figure 9.3 The ″automated″ effects send.
To introduce delay at discrete moments rather than for the entire song, patch up an ″automated send,″ shown in Figure 9.3. Here the engineer has a fader and cut button dedicated to the control of the send into the delay, not just the return. This echo send might remain cut most of the time. Unmute the send only when the effect is desired.
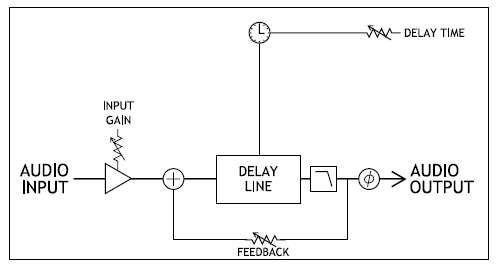
![]() Figure 9.4 Typical signal flow within the delay unit.
Figure 9.4 Typical signal flow within the delay unit.
What is going on at the delay processor itself? Most delay devices available have the controls shown in Figure 9.4: input and/or output level, delay time, and regeneration control. Input/output levels are self-explanatory. Levels are typically set so that there is unity gain through the unit. Watch the input level to make sure the device is not driven into distortion (unless, of course, distortion is part of the intended effect; see Chapter 4).
The regeneration control, sometimes called the feedback control, sends some of the output of the delay back to the input of the delay. In this way, a delayed signal can be further delayed by running it back through the delay again. This is how an echo is made to repeat more than once.
The simple controls of Figure 9.4 empower the delay to become a fantastically diverse signal processor.
The effect becomes more interesting still when the delay time is allowed to change. Many types of signal-processing effects are built on varying delays. Figure 9.5 adds a modulation section to the standard controls on a digital delay device. These controls are an elegant addition to the signal-processing capability of a delay.
Figure 9.6(a) describes a fixed delay time of 100 ms. This creates a slap echo as discussed in detail below. The delay unit takes whatever signal it is sent, holds it for the delay time specified (100 ms), and then releases it. That′s it. Throughout the song, all session long, the delay time remains exactly 100 ms; all signals sent to it — guitar, vocal, or didgeridoo — experience the exact same amount of delay. That is a delay without modulation.
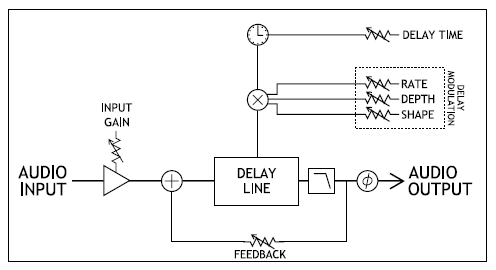
![]() Figure 9.5 Signal flow for a modulated delay.
Figure 9.5 Signal flow for a modulated delay.
The graphs of Figure 9.6 may seem peculiar at first, plotting time on the vertical axis versus time on the horizontal axis. Seemingly similar, the two time axes are wholly independent variables. The vertical axis represents the delay time parameter within the delay unit. The horizontal axis represents the typical human experience of time, flying by, if we are having fun. Figure 9.6 (a–d), therefore, plots the delay time parameter as time goes by.
Some beautiful and powerful effects require the use of a changing delay, using the modulation controls: rate, depth, and shape.
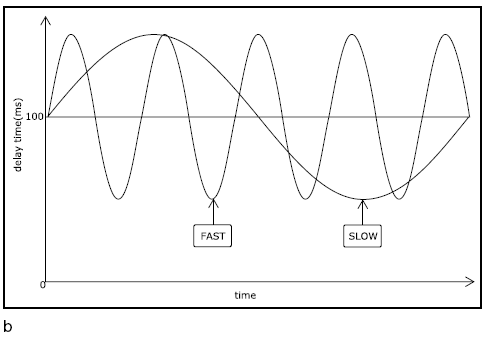
Rate controls how quickly the delay time parameter with the effects device is changed. Figure 9.6(b) gives a graphic representation of what happens when this control is changed. Engineers find cases when they want to sweep the delay time imperceptibly slowly, and other times where they need a fast, very audible rate.
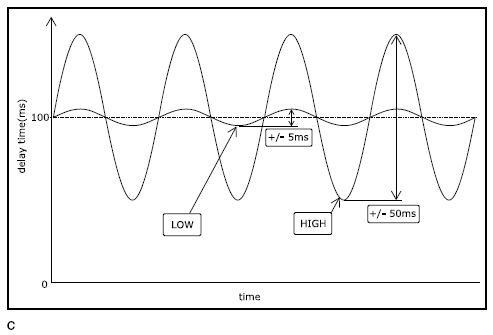
Depth controls how much the delay is modulated. It bounds the delay time at the extreme, defining the shortest and the longest delay times allowed. Figure 9.6(c) graphically contrasts two different settings. The original, fixed delay time might be increased and decreased by 5 ms, 50 ms, or more.
Shape describes the path taken by the device as it changes the delay time within the bounds set by the depth control, at the speed determined by the rate control. As Figure 9.6(d) shows, it can sweep in a perfect, sinusoidal shape back and forth between the upper limit and the lower limit specified (those upper and lower delay limits were set with the depth control described above). Alternatively, there may be a need for a square wave trajectory between delay times, in which the delay time snaps instead of sweeps, from one delay value to the other. Figure 9.6(d) highlights an additional common feature of the shape control: It lets the engineer use a shape that is some mixture of the two — part sinusoid, part square.
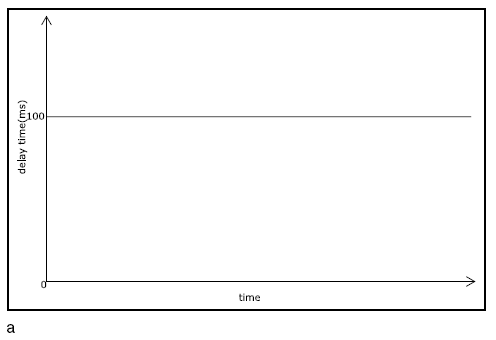

![]() Figure 9.6 (a) Fixed delay; (b) changing delay: rate; (c) changing delay: depth; and (d) changing delay: shape.
Figure 9.6 (a) Fixed delay; (b) changing delay: rate; (c) changing delay: depth; and (d) changing delay: shape.
Beyond these sine and square wave modulation shapes, the delay may have a random setting in which the delay time moves less orderly between the two delay extremes.
Finally, some delay units let you use a combination of all of the above; for example, varying the delay time in a slightly random, mostly sinusoidal general pattern. The shape control may make it possible to mix these shape options and set a unique contour for the delay′s motion between its highest and lowest settings.
These three modulation parameters give the recording engineer much-needed control over the delay, enabling them to play it like a musical instrument. They set how fast the delay moves (rate). They set the limits on the range of delay times allowed (depth), and they determine how the delay moves from its shortest to its longest time (shape).
Readers familiar with using a low frequency oscillator (LFO) to modulate signals in some synthesizers, for example, will recognize that the modulation section of a delay unit relies on a simple LFO. Rate is the frequency of the LFO. Depth is the amplitude of the LFO. Shape, of course, is the type of LFO signal. Instead of modulating the amplitude of a signal, as might be done in an A.M. (amplitude modulation) synthesizer, this LFO modulates the delay time parameter within the signal processor.
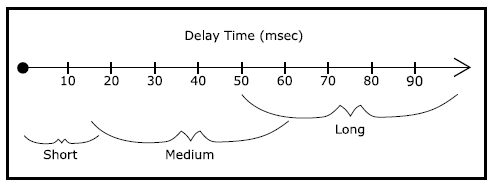
Not all delays are created equal. In order to understand the creative sonic possibilities for a delay effect, it helps first to separate them into different categories based on the length of the delay (Figure 9.7). Delays are classified into three broad categories, cleverly called long (greater than about 50 ms), medium (between about 20–50 ms), and short (less than about 20 ms).
Consider the long delay. A delay is classified ″long″ when the delay time is no less than about 50 ms and as long as … well, as long as you are willing to wait around for the music.
![]() Figure 9.7 Delay effects divide into three classes based on the delay time.
Figure 9.7 Delay effects divide into three classes based on the delay time.
Music (available in the mind′s ear, or in the studio) will illustrate the musical potential of the long delay quite nicely. Hum or sing along with Pink Floyd′s tune ″Comfortably Numb″ from The Wall. There is that all-important first line: ″Hello … hello … hello. Is there anybody in there?″ That repeating of ″hello″ is a classic use of a long delay. The dreamy, disturbed, out-of-mind state of our walled-in friend and hero, Pink, is enhanced by (the entire, brilliant rock-and-roll arrangement, including) this repeating, gently fading echo.
How is it done? Perhaps the simplest way is to use a postfader aux send from the vocal to the delay, which is returned on a separate fader (as shown in Figure 9.2). The voice is sent to the delay processor, which when set to a long delay, creates the echo.
But there is a headache here. Hooking it up as shown in Figure 9.2 adds an echo to the entire vocal performance, not just the word, ″hello.″ Each and every word repeats. This leads to a tiresome, distinctly nonmusical bit of vocal chaos. It is hard to find the melody. The lyrics are difficult to understand, obscured by the relentless output from the delay as each and every word happens two, three, or more times. Echo applied to the entire vocal track in this way is rarely useful.
The solution is the automated send shown in Figure 9.3. Now the engineer has a fader and cut button dedicated to the control of the send into the delay, not just the return. The echo send remains cut most of the song. Open it up briefly for the single word, ″hello,″ and, presto, that single word starts to repeat and fade. The rest of the vocal line, not sent to the delay, fits nicely around this discrete, one-word echo. No distraction. No trouble understanding the words. The melody is easy to follow and the rest of the musical arrangement is easy to hear.
It may take some practice getting the feed into the delay unit just right. The engineer must unmute the effects send just before the word ″hello″ and mute it again just after. You may find it helpful to imagine yourself singing the line. With a musician′s ear for every nuance of a performance, learn the exact phrasing of this track. Know when the singer breathes, learn how long the singer sustains each vowel, and master the exact rhythm of each syllable.
Getting into the musical performance in this way, the engineer finds the brief spaces between words open up and become easier to find. With practice, this becomes an easy, intuitive bit of hand/ear coordination. Store this unmute/mute gesture into the mixer automation system, and a perfectly tailored delay effect occurs each and every time this part of the tune is played.
Approximately 99.9% of the time echoes like these should be set to a time that makes musical sense. The engineer does not simply pick a random delay time. A musical delay time is carefully dialed in. Should it repeat with a quarter-note rhythm, an eighth note, a triplet?
Tuning by Ear
One proven way to find the right length of delay relies on the engineer′s sense of rhythm. Try using the snare to ″tune″ a delay — to set a delay time that makes musical sense. Even if the plan is to add delay to the vocal, piano, or guitar, it is usually easiest to use the snare for setting the delay time both because it is a rhythm instrument, and also because it hits so often. So much of pop music has a back beat — the snare falling regularly on beat two and beat four. Send the snare to the delay and listen to the echo. Starting with a long delay time of about 500 ms, adjust the delay time until it falls onto a musically-relevant beat. This can be extremely confusing at first. It may help initially to pan the snare track off to one side, and the delay return to the other. It is pretty jarring to hear a delay fall at a nonmusical time interval. But when it is adjusted into the time of the music, everyone listening will instantly feel it. It is perhaps easiest to find a quarter-note delay, but with practice and concentration, finding triplet and dotted rhythms becomes perfectly intuitive.
After the delay time value appropriate to the tempo of the song is found by ear, pull the snare out of the effects send, and send the vocal (or whichever track is to be treated with echo) to the delay device instead.
Tuning Through Math
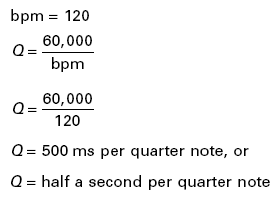
Sometimes studio personnel in search of a specific musical time value calculate a delay time instead. How is this calculated? It is time for a useful bit of algebra. If the tempo of the song is known in beats per minute (bpm) and the length of a quarter-note delay in milliseconds (Q) is desired, perform the following straightforward calculation:
- First convert beats per minute into minutes per beat by taking the reciprocal: bpm beats per minute becomes 1/bpm minutes per beat.
- Then convert from minutes to milliseconds: 1/bpm minutes per beat × 60 seconds per minute × 1,000 milliseconds per second.
- Putting it all together, the length of time of a quarter note in milliseconds per beat is:
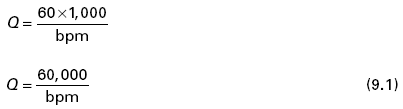
For example, a song with a tempo of sixty beats per minute ticks like a watch, with a quarter note occurring exactly once per second. Try using Equation 9.1:

Double the tempo to 120 bpm:
Milliseconds are used here for two reasons. First, the millisecond is the magnitude most delay units expect. Second, it typically leads to comfortable numbers in musical applications. For the frequencies we can hear, and for the effects we are likely to use, units in milliseconds generate numbers of manageable size — not too many decimal places, not too many digits. Using seconds, minutes, years, or fortnights would still work, theoretically. These are all units of time. But the millisecond is the more convenient order of magnitude.
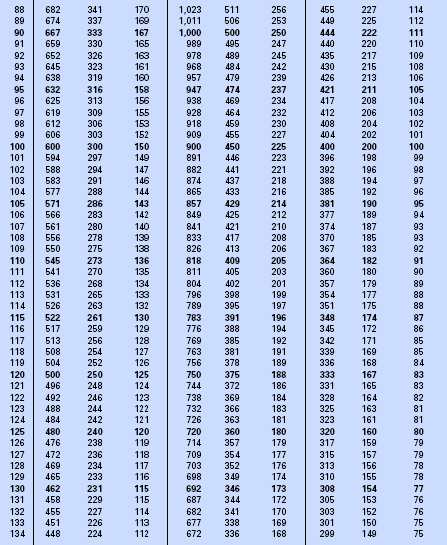
Calculating first the quarter-note delay makes it easy to then determine the time value of an eighth note, a sixteenth note, dotted or triplet values, etc. Table 9.1 can be a useful tool. Use the snare drum approach or the bpm conversion to find the time equivalent of a quarter note. Then use this table and some musical judgment to dial in the right type of echo-based effect.
In Pink Floyd′s ″Comfortably Numb″ example, a dotted eighth-note delay is cleverly used. This is a deliberate production decision, not a happy accident. It is worth transcribing it for some production insight.
The tune is dreamy and lazy in tempo, moving at about 64 bpm. The two syllables of ″hello″ are sung as sixteenth notes. To count quarter notes, just count, ″one, two, three, …″ To count eighth notes, insert the syllable ″and″ in between the beats: ″one and two and three and….″ To count the more complicated sixteenth-note rhythm, stick in two additional syllables to identify all parts of the sixteenth note pattern, ″e,″ which rhymes with ″free,″ and ″a,″ like the a in ″vocal.″ Sixteenth-note time becomes, ″one e and a two e and a three e and a….″
To appreciate the perfection in Pink Floyd′s dotted eighth-note delay time, consider two other, perhaps more obvious, choices: a quarter-note delay or an eighth-note delay (see Table 9.2).
In Table 9.2, the quarter-note delay strongly emphasizes the time of the song; it is orderly and persistent:
Hello x x hello x x hello …
Each repeat of the word falls squarely on the beat. This would make it seem like Pink is being nagged or pushed around, and the very orderliness of the quarter-note repetition takes away from the soporific state intended by this composition.
An eighth-note delay, on the other hand, forces the words to fall immediately and persistently one after the other, with no rest in between:
Hello hello hello hello hello.
This is simply annoying, and stressful, which is not the desired musical effect.


The delay time chosen in the released recording has the effect of inserting a sixteenth-note rest in between each repeat of the word. ″Hello″ is sung on the downbeat. The echo never again occurs on a down beat. First it anticipates beat two by a sixteenth note, then it falls on the middle of beat two (called the ″and″ of two, because of the way eighth notes are counted). It next lands a sixteenth after beat three. Finally, it disappears as the next line is sung.
This timing scheme determines that ″hello″ will not fall squarely on a beat again until beat four, by which time the next line has begun and ″hello″ is no longer audibly repeating. It is really a pattern of three in a song built on four. This guarantees it a dreamy, disorienting feeling. It remains true to the overall ″numb″ feeling for the song′s atmosphere, giving an uncertain, disconnected feeling. The result is a premeditated creation of the desired emotional effect. And it is a catchy hook — a real Pink Floyd signature.
It is a funny idea to add an echo to a singer, or a piano, or a guitar that does not seem to have any motivation based on reality. The only way to hear an echo on the vocal of a song without the help of studio signal processing is to go to a terrible sounding venue (like an ice hockey rink or the Grand Canyon) and listen to music. The sound of an echo across the entire mix that occurs in these places — places not designed for music listening — is quite an unpleasant experience. It is almost always sonically messy and distinctly nonmusical. The echoes found in pop music tend to be used with more restraint. In some cases, the echo is added to a single track, not the whole mix. To keep things from becoming too confusing, the output of the delay is often mixed in at low level, so as to be almost inaudible. As Pink Floyd so ably demonstrates, another valid approach is to apply echo only to key words, phrases, or licks.
If a constant echo is to be added to an entire track, the echo needs to be mixed in almost subliminally, nearly hidden by the other sounds in the mix. A soft echo underneath the lead vocal can give it added richness and support. This approach can strengthen the sound of the singer, especially when the melody heads into falsetto territory. Pulsing, subliminal echoes feeding a long reverb can create a soft and delicate sonic foundation under the vocal of a ballad (see Chapter 11).
Then there is the vulnerable rock-and-roll singer in front of his mate′s Marshall stack. After the last chorus, the singer naturally wishes to scream ″Yeaaaaaaaaah!″ and hold it for a couple of bars. It is not easy to over-come the guitarist′s wall of sound. Help the singer out by pumping some in-tempo delays into the scream.
The best ″Yeaaaaaaaaah!″ ever recorded in the history of rock and roll (according to your author, based on no data whatsoever) is Roger Daltrey′s in ″Won′t Get Fooled Again″ by The Who. The scream occurs right after the reintroduction, when those cool keyboards come back in, and right before the line, ″Meet the new boss, the same as the old boss.″ This scream is a real rock-and-roll icon.
Listen carefully (especially at the end of the scream) and you will hear a set of delayed screams underneath. It is Roger Daltrey, only more so. It is half a dozen Roger Daltreys. It makes quite a statement. Anyone can do this. All they need is a long delay with some regeneration, and young Roger.
A staple of 1950s rock is sometimes part of a contemporary mix: slapback echo. Music fans pretty much never heard Elvis without it. Solo work by John Lennon, therefore, often had it. Guitarists playing the blues tend to like it. Add a single audible echo somewhere between about 80 ms and as much as 200 ms, and each and every note shimmers and pulses a bit, courtesy of the single, quick echo. On a vocal, slap echo adds a distinct, retro feeling to the sound. Elvis and his contemporaries reached for this effect so often that it has become a cliché evocative of the period. Pop-music listeners today have learned to associate this effect with those happy days of the 1950s.
On guitar, slap echo makes a performance sound more live, putting the listener in the smoky bar with the band. Most music fans have experienced the music club, with that short echo of sound bouncing of the back wall of the venue. Slap echo can conjure up that specific experience for many listeners.
Before the days of digital audio, a common approach to creating this sort of effect was to use a spare analog tape machine as a generator of delay. During mixdown, the machine is constantly rolling, in record. The signal is sent from the console to the input of the tape machine in exactly the same way one would send a signal to any other effects unit — using an echo send or spare track bus. That signal is recorded at the tape machine and milliseconds later it is played back. That is, though the tape machine is recording, it remains in repro mode so that the output of the tape machine is what it sees at the playback head. As Figure 9.1 shows, the signal goes in, gets printed onto tape, the tape makes it′s way from the record head to the playback head (taking time to do so), and finally the signal is played back off tape and returned to the console. The result is a tape delay.
The signal is delayed by the amount of time it takes the tape to travel from the record head to the repro head. The actual delay time then is a function of the speed of the tape and the particular model of tape machine in use (which determines the physical distance between the two heads).
Want to lengthen the delay time? Slow the tape machine down. There might be two, maybe three, choices of tape speed: 7½, 15, or 30 inches per second.
None of these delay times seem exactly right? Maybe the tape machine has vari-speed, which lets the engineer achieve tape speeds slightly faster or slower than the standard speeds listed above.
Having trouble making these delay times fit into the rhythm of the song? Now the recording engineer is faced with the rather expensive desire to acquire another analog two-track machine, one with a different head arrangement so that the delay time will be different.
A single tape machine, which might cost several thousand dollars, is capable of just a few different delay settings. A three-speed tape machine used this way is like a really rather expensive effects device capable of only three delay time settings. Tape delay was originally used because it was one of the only choices at the time.
To help out, manufacturers made tape delays. These were tape machines with a loop of tape inside. The spacing between the record and playback heads was adjustable to give the engineer more flexibility in timing the delay. Now, in the twenty-first century, studios have more options. Life is good. Today, engineers can buy a digital delay that is easily adjustable, wonderfully flexible, cheaper than a tape machine, and it either fits in one or two rack spaces or exists conveniently in a pulldown menu on our digital audio workstation.
But those who have a spare open reel tape machine that has perhaps been sitting unused ever since they made the investment in a CD burner have the opportunity to create tape slap. It can even be a cassette deck if it has a tape/monitor switch to allow monitoring of the playback head while recording.
Why bother? Tape delay is more trouble and more expensive than many digital delays. But there is no denying it: Some great old recordings made effective use of it. That is reason enough for some engineers. Retro for retro′s sake.
Engineers go to the trouble to use a tape delay when they want that ″sound.″ An analog tape machine introduces it′s own, subtle color to the sound. Mainly, it tends to add a low-frequency hump to the frequency content of the signal. The exact frequency and gain of this low-frequency emphasis depends on the tape machine, the tape speed, the tape gauge, and how the machine is calibrated. If one pushes the level to the tape delay into the red, that signature analog tape compression is introduced. At hotter levels still, analog tape saturation distortion results (see Chapter 4).
Tape delay becomes a more complex, very rich effect now. It is not just a delay. It is a delay plus equalizer plus compressor plus distortion device. It can be darn difficult to simulate digitally. It is sometimes the perfect bit of nuance to make a track special within the mix.
Adding a long delay to a key word, as in the Pink Floyd example, is a way to emphasize a particular word. It can be obvious, like the ″hello″ that begins the song. Simulating a call-and-response type of lyric, the delay is often a musical hook. The echo invites others to sing along. Alternatively, it can be more subtle. A set of emphasizing delays hits key words throughout ″Synchronicity II″ on The Police′s final album, Synchronicity. The first line of every chorus ends with the word ″away,″ which gets a little delay-based boost. Listen also to key end words in the verses: ″face,″ ″race,″ and, um, ″crotch.″ These are a quick dose of several echoes, courtesy of the regeneration control. The Wallflowers′ ″One Headlight″ on Bringing Down the Horse offers a great example of really hiding the delays. Listen carefully to the third verse. The words ″turn″ and ″burn″ each get a single, subliminal dotted quarter-note delay. The rest of the vocal track receives no such effect throughout the rest of the tune.
Similar, sparing use of echo occurs on the phrases of slide guitar lines in the middle solo section of ″One Headlight". The guitar is panned left. The first echo falls dead center, and the second echo is panned to the right. It is a nice detail in a seemingly straightforward arrangement.
It is not unusual to apply a low-pass filter to these sorts of delays. Attenuating some of the high-frequency content from each repeat of the sound makes it sink deeper into the mix. When sound travels some distance in a room, the high-frequency portion of the signal is attenuated more quickly than the low-frequency part. High-frequency attenuation due to air absorption is an inevitable part of sound propagating through the air. As a result, a well-placed low-pass filter can be used to make any element of the multitrack project seem more distant. The brain seems to infer the air absorption and perceptually pushes the sound away from the listener.
Good delay units provide engineers with this filter as an option (as shown in Figures 9.4 and 9.5). Moreover, there is often the ability to double the delay time on outboard digital delays by pressing a button labeled ″X2,″ meaning ″times two.″ This cuts the sampling rate in half. With half as many samples to keep track of, the amount of time stored in a fixed amount of memory effectively doubles, hence the ″times two″ label. Halving the sample rate also lowers the upper frequency capability of the digital device. Engineers today know this from their pursuit of higher sampling rates in their productions: 44.1 kHz, 48 kHz, 88.2 kHz, 96 kHz, 176.4 kHz, 192 kHz, and beyond. A key benefit of an increased sampling rate is improved high-frequency response. Even as sampling rates creep up on many studio tools (especially DAWs and multitrack recorders), an engineer may purposefully lower the sampling rate on an outboard digital delay device. Doing so lengthens the delay time of the device, and it low-pass filters the signal — an often desirable mix move.
Well-timed delays are an excellent way to fill in part of the rhythm track of a song. Reggae is famous for its cliché echo. Drum programmers have been known to put in an eighth- or quarter-note delay across the entire groove. Guitarists use delay too. U2′s the Edge has made delay a permanent part of his guitar rig. A classic example is apparent from the introduction of U2′s ″Bad″ on The Unforgettable Fire. The quarter-note triplet delay is not just an effect, it′s part of the riff. The Edge has composed the delay element into the song. Used in this way, echo becomes part of the groove, a driving musical force for the tune.
Delays times can be so short that they are not perceived as echoes. The delayed sound happens too quickly for the brain to notice it as an event separate from the original sound. When delays are short enough, they are perceptually fused with the undelayed sound. The mix of signal plus delayed signal becomes a single entity, with a different sound quality.
So as the delay time falls below about 50 ms, the sound of the delay is no longer an echo. It becomes, well, something else. It is not that the delay is impossible to hear, just that it has a different perceptual impact when the delay time is short. In fact, very short delays have an important spectral effect on the sound.
9.4.1 CONSTRUCTIVE AND DESTRUCTIVE INTERFERENCE
Sine waves — with their familiar, faithfully repeating wave shape — are helpful in illustrating the frequency-dependent implications of the short delay. Mixing together — at the same volume and pan position — the original signal with a delayed version of itself might have results like the two special cases shown in Figure 9.8.
If the delay time happens to be exactly the same as the period of the sine wave, constructive interference like that shown with the solid line in Figure 9.8 results. That is, if the delay time of the processor is equal to the time it takes the sinusoid to complete exactly one cycle, then the two signals will combine cooperatively. The combined result is a signal of the same frequency, but with twice the amplitude.
The situation shown by the dashed line in Figure 9.8 represents another special case. If the delay time is set to equal exactly half of a period (half the time it takes the sine wave to complete exactly one cycle), then the original sound and the delayed sound move in opposition to each other when combined. For a sound wave in the air, pressure increases meet pressure decreases for a net result of no pressure change. For a voltage signal on a wire, positive voltages meet equal magnitude but negative voltages and sum to zero volts. In a digital audio workstation, positive numbers are cancelled out by negative numbers. The combination results in zero amplitude — silence.
![]() Figure 9.8 Constructive/destructive interference.
Figure 9.8 Constructive/destructive interference.
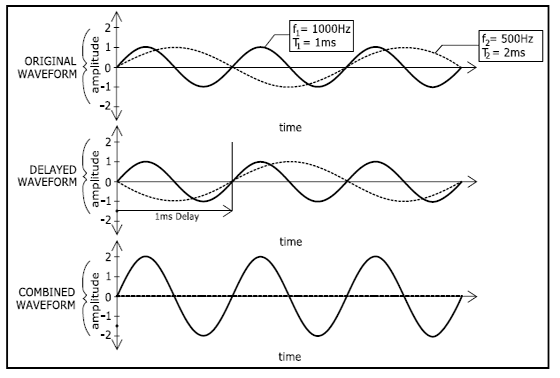
Any audio engineer with access to a sine wave oscillator (either as test equipment or within a synthesizer), can give it a try. 500 Hz is a good starting point. This frequency is not quite as piercing as the standard test tone of 1,000 Hz, yet the math remains easy. The time it takes a pure 500-Hz tone to complete one cycle is 2 ms:

Mixing together equal amounts of the original 500-Hz sine wave and a 2-ms delayed version will create perfectly constructive interference very much like the solid line in Figure 9.8. Lower the delay time to 1 ms — creating the dashed-line situation of Figure 9.8 — and the 500-Hz sine wave is essentially cancelled.
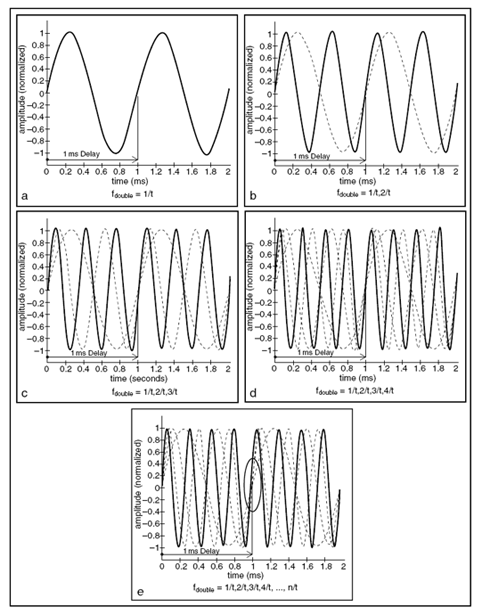
As the bold waveforms on Figures 9.9 and 9.10 show, these doublings and cancellations happen at certain other higher frequencies as well. For any given delay time, certain frequencies line up just right for perfect constructive or destructive interference.
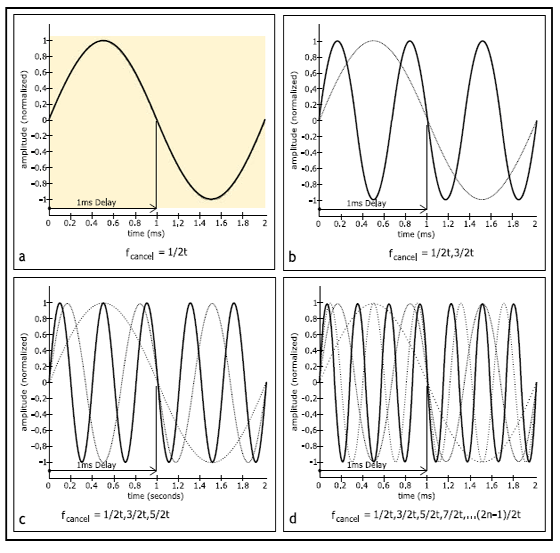
The math works out as follows: For a given delay time (t expressed in seconds, not milliseconds), the frequencies that double are described by an infinite series: 1/t, 2/t, 3/t, etc. These frequencies all possess the feature that, when the delay time t is reached, they are all back exactly where they started, in this case beginning another repetition of their cycle. The frequencies that double in amplitude have cycled exactly once, twice, or some other integer multiple at the instant time t occurs (Figure 9.9).
The frequencies that cancel are 1/2t, 3/2t, 5/2t, etc. These are the frequencies that are one-half cycle shifted when the delay time is reached. They have cycled 1½ times, 2½ times, or any integer-and-a-half times (Figure 9.10).
Using these equations, one can confirm that a signal combined with an equal amplitude 1-ms delay (t = 0.001 seconds) of the same signal has spectral peaks at 1,000 Hz, 2,000 Hz, 3,000 Hz, etc. with nulls exactly in between at 500 Hz, 1,500 Hz, 2,500 Hz, etc. This is consistent with the earlier observation in Figure 9.8 that combining a signal and its 1-ms delay can cancel a 500-Hz sine wave. A 2-ms delay has amplitude peaks at 500 Hz, 1,000 Hz, 1,500 Hz, etc. and nulls at 250 Hz, 750 Hz, 1,250 Hz, etc. The math reveals that the peaks and dips happen at several frequencies, not just one. While this pattern theoretically occurs for all frequencies without limit, audio engineers focus on those peaks and valleys that fall within the audible spectrum from about 20–20,000 Hz.
Another way to explore this further would be to set up the mixer so that it combines a sine wave with a delayed version of itself, set to the same amplitude. Sweep the sine wave frequency higher and lower, watch the meters, and listen carefully. With the delay fixed to 1 ms, for example, sweep the frequency of the sine wave up slowly beginning with about 250 Hz. One should hear the mixed combination of the delayed and undelayed waves disappear into silence at 500 Hz, reach a volume peak at 1,000 Hz, fall silent again at 1,500 Hz, reach a louder peak again at 2,000 Hz, and so on. A delay, not an equalizer, changes the amplitude of the signal as a function of frequency. A delay, not a fader or a compressor, changes the loudness of the mix. The connection between time- and frequency-dependent amplitude is an audio surprise to be savored.
![]() Figure 9.9 Amplitude doubling: 1 ms delay.
Figure 9.9 Amplitude doubling: 1 ms delay.
![]() Figure 9.10 Amplitude canceling: 1 ms delay.
Figure 9.10 Amplitude canceling: 1 ms delay.
The constructive and destructive interference associated with short delays clearly leads to a radical change in the amplitude of an audio signal. Is this a silly parlor trick, or valuable music production tool?
To answer this question, one has to get rid of the pure tone (which pretty much never happens in pop music) and hook up an electric guitar (which pretty much always happens in pop music). Run a guitar signal — live from a sampler, or off the multitrack — through the same setup above. With the delayed and undelayed signals set to the same amplitude, listen to what happens.
Is it possible to find a delay time setting that will enable the complete cancellation of the guitar sound? Nope. The guitar sound is not a pure tone. It is a complex signal, rich with sound energy at a range of frequencies. No single delay time can cancel out all the frequencies at once. But mixing together the undelayed guitar track with a 1-ms delayed version of the same guitar track definitely has an audible affect on the sound quality.
It was already observed that a 1-ms delay can cancel entirely a 500-Hz sine wave. In fact, it will do the same thing with guitar (or piano, or didgeridoo). Musical instruments containing a 500-Hz component within their overall sound will be affected by the short, 1-ms delay: The 500-Hz portion of their sound can in fact be cancelled. What remains is the tone of the instrument without any sound at 500 Hz.
But wait. There′s more. It was also shown in Figures 9.8 and 9.9 that 1 kHz would double in amplitude when this 1-ms delay was combined with the signal. So for the guitar, the 1,000-Hz portion of the spectrally complex signal gets louder.
Taking a complex sound like guitar, which has sound energy at a range of different frequencies, and mixing in a delayed version of itself at the same amplitude, will cut certain frequencies and boost others. This is called comb filtering (Figure 9.11) because the alteration in the frequency content of the signal looks like teeth on a comb.
Combining a musical waveform with a delayed version of itself radically modifies the frequency content of the signal. Some frequencies are cancelled, and others are doubled. The intermediate frequencies experience something in between outright cancellation and full-on doubling. The changes in frequency content associated with combining a signal with a short delay of itself suggest that short delays are less like echoes and more like equalizers (see Chapter 5).
Short delays are too short to be perceived as echoes. In fact they are so short that they start to interact with discrete components of the overall sound, adding some degree of constructive (additive) or destructive (subtractive) interference to different frequencies within the overall sound. Figure 9.8 demonstrates this for a sine wave. Figure 9.11 summarizes what happens in the case of a complex wave — a more typical audio track like guitar, piano, saxophone, or vocal.
Equalization (EQ) is not too far off the mark as a way to think about comb filtering, but it would be nearly impossible to actually do the same with a practical equalization device: a boost here, a cut there, another boost here, another cut there, and so on. In theory one could simulate comb filtering with an equalizer, carefully dialing in the appropriate boosts and cuts. That is the theory. In fact, such an EQ move is unlikely. To fully imitate the comb filter effect that a 1-ms delay creates, the studio would need an equalizer with about 40 bands of parametric EQ (20 cuts and 20 boosts within the audible spectrum), each with its own, unique setting of Q. Such an equalizer would be prohibitively expensive to build, would likely have other side effects (e.g., noise and phase distortion) in terms of quality, and would take a long time to set up. In fact, part of the point of using short delays in this way in music production is to create sounds that can′t easily be achieved with an equalizer. A single short delay creates an unbelievably complex EQ-like frequency contour.

![]() Figure 9.11 Comb filtering: short delay.
Figure 9.11 Comb filtering: short delay.
Short delays offer a very interesting extra detail: They create mathematical — not necessarily musical — changes to the sound. Study Figure 9.11, comparing the upper curve to the lower curve. Both plots show the same information. But the lower graph presents the information with a logarithmic frequency axis. This is the typical way of viewing music (see ″The Decibel,″ Chapter 1). The keyboard of a piano and the fingerboard of most stringed instruments lay things out logarithmically, not linearly and equally spaced. If one looks at comb filtering with a linear (and nonmusical) frequency axis, as in the upper part of Figure 9.11, one finds that the peaks and dips in the filter are spaced perfectly evenly. In fact, it is only by looking at the spectral result in the linear domain that the name, comb filter, becomes clear. The logarithmic plot on the lower portion of Figure 9.11 would not make for a very useful comb, but it′s the more musically and perceptually informative visual representation.
Pure tones, cycling with infinite reliability, would experience the comb filtering effect at any delay time, not just short ones. A delay time of 1 ms has been shown to cause constructive and destructive interference at a precise set of frequencies. The logic still holds when the delay time is 1,000 ms or more. In music production, however, where the target of our signal processing is complex music signals, not pure tone test signals, the effect is practically limited to very short delays.
Two related phenomena are at work. First, as discussed in the section on ″Long Delay″ above, delays greater than about 50 ms become perceptually separate events. Our hearing system identifies the undelayed and the long delayed signals as two separate events, each with their own properties. Comb filtering relies on the fusing together of the undelayed and the delayed signals into a single perceived event.
Second, music signals do not repeat with the rigid regularity over time that sine waves do. Musical signals change constantly. The singer moves on to the next syllable, the next word, the next line. The guitarist moves on to the next note, the next chord. Long delayed signals appear too late to interact directly with the undelayed signal. Unlike a sine wave, the musical signal has progressed to other things.
Even if the musical signal is relatively unchanging — the whole note of a bass guitar, or the double whole note of a sustained piano chord — it still falls well short of sine wave stability. A bass note held over time still wobbles a bit in pitch. This might be a means of expression, as the performer gently raises and lowers the pitch for musical effect. It might also be a practical inevitability; new strings on a stable instrument hold a pitch more steadily than old strings on a weak instrument. If the pitch has changed, the undelayed and long delayed signals are too different from each other for the mathematically predicted comb filtering to occur. In music productions, the distinct spectral signature of comb filtering is limited only to very short delays of 20 ms or less.
Recording engineers patch up the short delay, creating a comb filter, when they have a special, radical, spectral effect in mind. If a more organic, natural tailoring of sound is desired, reach instead for an equalizer, with its logarithmic, more musical controls.
It is still fair to ask: Why all this talk about short delays and their effect on a signal? After all, how often do recordists use delays in this way? It is essential to understand the sonic implications of these short delays because, all too often, they simply cannot be avoided. Consider an electric guitar recording session. With the guitar amplifier in the middle of the recording space, on a beautiful wooden floor, the engineer places the chosen microphone a few feet away and tries to capture the natural sound of the amp in the room. This is a good approach, shown in Figure 9.12. The problem is that the sound reflected off the floor and into the microphone will arrive a split second later than the sound that went straight from the amplifier to the microphone. The path is longer via the reflected path, introducing some delay. The result is some amount of comb filtering. Recording a sound and a single reflection of that sound is a lot like mixing a track or sample with a delayed version of itself, as in the discussions above. With any loud reflection representing a delayed copy of a sound, it rapidly becomes apparent that comb filtering is an everyday part of recording.
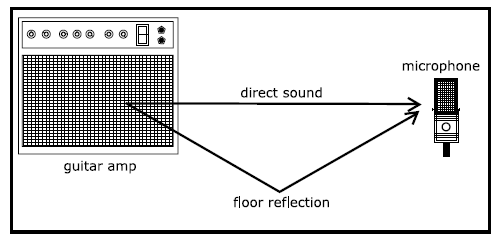
![]() Figure 9.12 Delay from room reflected.
Figure 9.12 Delay from room reflected.
Fortunately the sound reflected off the floor will also be a little quieter, reducing the comb filter effect: less-pronounced peaks and shallower notches. If the floor is carpeted, the comb filtering is a little less pronounced at high frequencies. Place a thicker pad of sound-absorbing material at the point of the reflection, and the comb filtering is likely to be even less audible. An important part of the recording craft is learning to minimize the audible magnitude of these reflections by taking advantage of room acoustics when placing musical instruments in the studio and strategically placing sound-absorptive materials around the musical source. This is one approach to capturing a nice sound at the microphone.
Better yet, learn to use these reflections and the comb filtering they introduce on purpose. For example, raising the microphone will make the difference in distance between the reflected path and the direct path even longer. Raising the microphone, therefore, lengthens the acoustic delay time difference between the direct sound and the reflected sound, thereby changing the spectral locations of the peaks and valleys of the comb filter effect.
Of course, other factors are in play. Raising the microphone also pushes the microphone further off-axis of the amp, changing the captured timbre of the electric guitar tone as viewed by the microphone. Another strategy is to raise the amp up off the floor, perhaps setting it on a piano bench or at the edge of a strong table. It is also common to tilt the amp back so that it faces up toward the raised microphone and away from the sound-reflective floor. This is an exercise in acoustically adjusting the amplitude of a short delayed signal. Then again, one can flop the amp on its belly, facing straight down into the floor if that sounds good. Rock-and-roll guitar knows no rules. Delay-induced comb filtering is only part of the equation.
A common approach to recording a guitar amp — and many other instruments, for that matter — is to use a combination of two or more microphones to create the sound, even as it is recorded onto a single track. Consider the session shown in Figure 9.13: two microphones, one track. Here, a close microphone (probably a dynamic) grabs the in-your-face gritty tone of the amp and a distant microphone captures some of the liveness and ambience of the room. An engineer might label the channel fader controlling the close microphone something like ″close,″ and the channel fader governing the more distant microphone ″room.″ The engineer adjusts the two faders to get an attractive mix of close and room sounds and prints that to a single track of the multitrack.
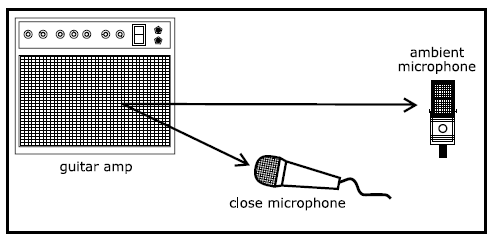
![]() Figure 9.13 Delay from multiple microphones.
Figure 9.13 Delay from multiple microphones.
That is only half the story. As one adjusts the faders controlling these two microphones, not only is the close/ambient mix changed, but also the amount of comb filtering introduced into the guitar tone is affected. These two microphones pick up very similar signals, but at different times. Mixed together, they act very much like the signal-plus-delay scenario just discussed. Moving the distant microphone to a slightly different location is just like changing the time setting on the delay unit. It effectively selects different key frequencies for cutting and boosting using the exact same principles explored in Figures 9.8, 9.9, 9.10, and 9.11. Sound travels a little farther than one foot per millisecond. To lengthen the delay time difference by about a millisecond, move the distant microphone back about a foot. To get a 10-ms delay increase, move the distant microphone back about 10 feet. It is that simple.
Naturally, there is too much to keep track of. Each of these microphones receives reflected sounds from the floor and the ceiling and all the other room boundaries, all in addition to the obvious direct sound from the amp. The engineer tries to orchestrate the complex interaction of the many components of guitar sound radiating out of the amp. The direct sounds into multiple microphones arrive at different times, leading to some amount of comb filtering. The reflections from the various room boundaries into each microphone arrive at a later time than the direct sound, adding additional comb filtering, with peaks and dips falling at different spectral locations. There are an infinite number of variables in recording. Understanding comb filtering is part of how audio engineers master the vast recording process. Recordists rarely do the math; it is enough to know to listen for the comb filter effect.
Perhaps the recording engineer wants a tough, heavy, larger-than-large guitar tone. Maybe a comb filter–derived hump at 80-Hz is the ticket. Or should it be 60 Hz? That is a creative production decision. Explore this issue by moving the microphones around. Place two microphones on the amp as shown in Figure 9.13. Keep the close microphone fixed and move the distant one slowly. The goal is to introduce a frequency peak at some powerful low frequency that suits the tone of the guitar/amp combination currently performing. It is a great luxury, on sessions like these, to have an assistant engineer. The assistant slowly moves the microphone out in the live room while the first engineer listens to the combined close/distant microphone mix in the comfort and monitoring accuracy of the control room. When one lacks an assistant, record a take onto multitrack while slowly moving the microphone, as quietly as possible. When those comb filter peaks and notches fall into frequency ranges that complement the tone screaming out of the guitar amp, that elusive bit of audio nirvana, the sweet spot, has been found.
Finding the microphone placement that captures the tone that pleases the guitarist simply requires a bit of patience, and an understanding of the spectral implications of short delays.
The art of microphone placement requires mastery of room acoustics, musical acoustics, and psychoacoustics. To predictably achieve good sounding results engineers need recording experience, an understanding of microphone technologies, knowledge of microphone sound qualities, and exposure to the various stereo microphone techniques, among many other topics. Note, though, that an essential tool in microphone placement is the deliberate use of comb filtering to modify the sound being recorded.
Electric guitar responds well to comb filtering. With energy across a range of frequencies, the peaks and dips of comb filtering offer a distinct, audible sound property to be manipulated. Other instruments reward this kind of experimenting. Try placing a second (or third or fourth) microphone on an acoustic guitar, piano, or anything. Experiment with the comb filter–derived signal processing to get a sound that is natural, or one that is unnaturally beautiful.
All engineers one day find themselves in a predicament: The guitar amp sounds rich and full out in the live room, but thin in the control room. Perhaps the problem is that, courtesy of the short delay between two microphones, they have a big dip in frequency right at a key low-frequency region. Undo the problem by changing the spectral location of the frequency notch: move a microphone, which changes the delay, which changes the frequencies being cancelled.
Every time more than one microphone is placed on an instrument, make it routine to listen for symptoms of wanted or unwanted comb filtering. Check out each microphone alone. Then combine them, listening for critical changes in the timbre. What frequency ranges are attenuated? What frequency ranges get louder? The hope is to find a way to get rid of unwanted or less interesting parts of the tone while emphasizing the more unique and more appealing components of the timbre. Good engineers make short delays part of their mixing repertoire. For subtle tone shaping or a radical special effect, the short delay is a powerful signal processor. It takes some trial and error, some experience, but it will lead directly to better sounding recordings.
Dialing in a very short delay time and modulating it via the three delay modulation controls leads to an effect known as flanging. The only rule is that the delay time needs to be in that range short enough to lead to audible comb filtering. That suggests a starting delay setting less than about 10 ms, though the effect may be more obvious at delay times closer to 5 ms. This ensures audible comb filtering will occur. Set the delay modulation controls to taste.
That ringing, whooshing, ear tickling sound that is created by a flanger comes from the simple comb filter effect enhanced by these modulation controls. Consider two different short delay settings. One delay time causes the peaks and valleys in the frequency content of the combined signal to occur at one set of frequencies. A different delay setting results in a different set of peaks and valleys (Figure 9.14). This suggests that when a continuously modulated delay value sweeps from one delay time to another, the comb filter bumps and notches sweep also. Figure 9.14 shows the result: flanging.
Sometimes there is no holding back — the entire mix gets flanged. ″Life in the Fast Lane,″ on Hotel California by the Eagles presents a classic example at the breakdown near the end of the tune.
In other applications, the effect is applied to a single instrument — just the drum kit or just the rhythm guitar. The audio engineer might flange just a single track. Or they might limit the effect to just one section of that track (e.g., only on the bridge). Audio experience gives the engineer the maturity and judgment needed to know when, how, and how much of effects such as this to use. It becomes a matter of personal opinion and musical taste.

![]() Figure 9.14 Swept comb filter.
Figure 9.14 Swept comb filter.
Pop music is full of examples of flanging. ″Then She Appeared″ from XTC′s last effort as a band on the album Nonesuch offers a good case study of a gently sweeping flange. Notable from the first time the words ″then she appeared″ occur, a bit of your traditional flange begins, courtesy of a set of short vocal delays being slowly modulated. In this example the flange comes and goes throughout the song, offering us a good chance to hear the vocals with and without the delay treatment. A more subtle approach occurs on Michael Penn′s ″Cover Up″ from the album Resigned. A bit of flanging appears on the vocal for the single word ″guests″ near the end of the second verse. That is it. No more flanging on the vocal for the rest of the tune. It is just a pop-mix detail to make the arrangement that much more interesting. The flange effect actually softens the rather hard sounding, sibilant, and difficult to sing ″sts″ at the end of the word ″guests.″
The simple effect that comes from mixing in a short, modulated delay offers a broad range of audio effects. Flanging invites your creative exploration.
In the above discussion on long delays (those greater than about 50 ms), we saw how they are used for a broad range of echo-based effects. Short delays of about 20 ms or less create the radical comb-filtered effect that, especially when modulated, we call flanging. What goes on in between 20 and 50 ms?
This middle range of delay times does not cause echoing or flanging. The delay is too short to be perceived as an echo. It happens too fast. But the delay is too long to lead to audible comb filtering for most musical signals.
Try a 30-ms delay on a vocal track for a good clue about what is going on. A medium delay sounds a little bit like a double track — like two tracks of the same singer singing the same part.
It is a common multitrack production technique to have the singer double a track. The engineer, producer, and musician work hard to capture that elusive ″perfect″ take. It can require several tries. It might even require several hours. It can get a little grim, but it might even take several different sessions over several weeks or months before everyone is happy with the vocal performance. Once this is finally accomplished, have the singer record the part again, on a separate track. She sings a new track while listening to the just recorded ″perfect″ track of herself. The resulting sound is stronger and richer. It even shimmers a little.
If you are unfamiliar with the sound of doubled vocal tracks, a clean example can be found at the beginning of ″You Never Give Me Your Money″ on the Beatles′ Abbey Road. Verse one begins with solo vocal. On the words ″funny paper,″ the doubling begins. The vocal remains doubled for the next line and then the harmonies commence. Naturally, each harmony part is doubled, tripled, or more.
Roy Thomas Baker is famous for, among other things, pushing doubling to the hilt. Check out the harmonies, doubled and tripled (and beyond), throughout The Cars′ first album, The Cars. For example, listen to the first harmonies on the first song, ″Good Times Roll,″ when they sing the hook, ″good times roll.″ It sounds deep and immense; the vocals take on a slick, hyped sound.
The deep layering of multiple vocal tracks by the same vocalist goes back to 1951 when Les Paul and Mary Ford covered ″How High the Moon.″ Mary Ford sings lead vocal. Mary Ford sings multipart harmonies. And most ear-tingling of all, Mary Ford doubles and triples any and all parts. Pop music has always found occasion to be more than a little over the top.
This layering of tracks borrows from the tradition of forming instrumental sections in orchestras and choirs. Consider the sound of 1 violin. Then imagine the exact same piece of music with 12 violins playing the same line, in perfect unison.
The value of having multiple instruments play the same musical part is almost indescribable. Adding more players does not just create more volume. The combined sound is rich and ethereal. It transports the listener.
A crystal clear application of doubling can be found on Macy Gray′s ″I Try″ from the album On How Life Is. Typically, double tracks support the vocal, adding their inexplicable extra bit of polish. They are generally mixed in a little lower in level than the lead vocal, reinforcing the principle track from the center or panned off to each side. The Macy Gray tune turns this on its head. At the chorus, where pop production tradition calls for a good strong vocal, the vocal track panned dead center does something quite brave: It all but disappears.
The chorus is sung by double tracks panned hard left and right. It is brilliantly done. Rather than support the vocal, they become the vocal. The chorus does not lose strength. The tune does not sag or lose energy at all. The doubled tracks — panned hard but mixed aggressively forward — offer a contagious hook that invites the listeners to sing along, to fill in the middle.
While pop vocals, especially background vocals, are often doubled, any other instrument is fair game. A common track to double is rhythm electric guitar. The same part is recorded on two different tracks. On mixdown, they might appear panned to opposite sides of the stereo field.
The two parts are nearly identical. Change just one variable in the recording setup: switch to a different guitar, a different amp, or a different microphone, or slightly change the tone of the doubling track in some other way. Maybe the only difference between the tracks is the performance. As no two performances are ever identical, the resulting pair of guitar tracks will vary slightly in timing. The ″chugga chugga″ of the left guitar track is slightly early in one bar and slightly late in the next. The result is that, through the interaction of the two guitar tracks, the ears seem to pick up on and savor these subtle delay changes. At times, the two tracks are so similar they fuse into one meta instrument. Then one track pulls ahead and gets noticed on its own. Then the other track pulls ahead in time and temporarily draws the listener′s attention. Then, for a brief instant, they lock in together again. And so it goes. Doubled guitars are part audio illusion and part audio roller coaster; they are an audio treat.
Layering and doubling tracks can be simulated through the use of a medium delay. If it is not convenient, affordable, or physically possible to have the singer or guitarist double the track, engineers reach for a medium delay. Some amount of delay modulation is introduced so that the doubled track moves in time a little relative to the source track. This helps it sound more organic, not like a cloned copy of the original track. The addition of a bit of regeneration creates a few additional doubling layers of the track underneath the primary one.
Some delay units have the ability to simultaneously offer several delay times at once (called multitap delays), each modulated at it′s own rate. Use several slightly different delay times in the 20- to 50-ms area and synthesize the richness of many layered vocals. Using pan pots, spread the various medium delay elements out left to right and front to back (in surround applications) for a wide wall of vocal sound. As with all studio effects, make sure the sonic result is appropriate to the song. The solo folk singer doesn′t usually benefit from this treatment. Neither does the jazz trumpet solo. But many pop tunes welcome this as a special effect on lead vocals, backing vocals, keys, strings, pads, and so on.
An alternative name for this use of modulated medium delays is chorus. The idea is that, through the use of several different delays in the 20 to 50 ms range, one could upgrade a single vocal track into a simulation of the sound of an entire choir. Thus the term, chorus.
Naturally, stacking up 39 medium delays with a single vocalist will not convincingly sound like a choir of 40 different people. Think of it instead as a special electronic effect, not an acoustic simulation. And it is not just for vocals. John Scofield′s trademark tone includes a strong dose of chorus (and distortion, a sweet guitar, and brilliant playing among other things). It is not uncommon to add a bit of chorus to the electric bass. This medium-delay concoction is a powerful tool in the creation of musical textures.
To see how ″out there″ the effect can be made, reach for the album Throwing Copper by Live and listen to the beginning of the tune ″Lightning Crashes.″ It′s difficult to impossible to know exactly what kind of signal-processing craziness is going on just by listening. The guitar sound includes short and medium delays, among the panning, distortion, and phase shifting effects going on. A fair summary is that the delay is being modulated between a short, flanging sort of sound (around 10 ms) and up to a longer, chorus sort of delay time (around maybe 40 ms). Note especially the sound of the guitar in the second verse, when the effect and the relatively clean sound of the guitar are mixed together at similar volumes. This presents a good taste of chorus. Such amazing projects are a great inspiration to the rest of us to do more with the effect.
With all this discussion of delays, it is essential to hear it for yourself.
Patch up a sampler loaded with a variety of sounds or find a multitrack tape with a good variety of tracks. On your mixer, set up a delay fed by an aux send that returns to your monitor mix at about the same volume as the synth or original tracks. Pan both the source audio and the return from the delay dead center. Your assignment is to carefully listen as you mix each source sound with the output of the delay.
Start with a bass line. Check out the combination of the bass with a long delay, maybe 500 ms. Yuk. It is a blurry, chaotic mess. Now start shortening the delay: 200 ms, 100 ms, 80 ms, 60 ms, 20 ms, 10 ms, 5 ms, down to 3 ms and below. As you do this, occasionally mute the delay return so you can remind yourself of the sound of the unprocessed audio signal.
What the heck is going on? The long delay is just an echo, and it probably does not help the music much. The very short delays (15 ms and lower) sound strange, sometimes hollow and sometimes boomy. At one short delay setting you may find extra low end, then at a slightly different delay time, a lack of low end.
This mix of a bass sound with a very short delay sounds like it is been equalized. Gradually lengthen the delay time and listen for the point at which it starts to sound like a distinct echo again. Depending on the bass sound and type of performance, you may hear the delay separate from the bass into an echo somewhere between about 60 and 80 ms. Staccato performances reveal an echo at a lower delay time — closer to about 60 ms #x2014; than long, sustained, double whole-note performances that may not have an audible echo until 80 ms or more. In between the very long and the very short delay times, well, it is hard to describe. More on the middle zone later.
Okay. Next try a snare sound. Again start with a long delay and gradually pull it down to a short delay. Again you should hear a distinct echo at long settings. The delay introduces a strange timbral change at short delays and something tough to describe as it transitions between the two. While we are here, do the same experiment with an acoustic or electric guitar track, or a string patch on the sampler.
Welcome to the real world of delays. They are not just for echoes anymore. When delays become shorter than about 50 or 60 ms (depending on the type of sound you are listening to, as demonstrated above), they are no longer repeats or echoes of the sound. The same device that delays a signal starts to change the color, texture, and spectral content of the signal.
Ride the faders in the following experiment. On your mixer, patch things up so that one fader has a sine wave at 500 Hz, panned to center. The same sine wave should also be sent to a delay unit, set to a delay time of 1 ms. Another fader controls the return from this delay, also panned to center. Start with both faders down. Raise the fader of the source signal to a reasonable level. Now raise the second fader. As you increase the level of the delayed signal, your mix of the two waves gets quieter. As you add more of the delayed sine wave, you get more attenuation of the original sine wave. This is the phenomenon shown by the dashed line in Figure 9.8. The mix reaches its minimum amplitude when the two signals are at equal amplitude.
A simple delay unit offers a broad range of audio opportunity, representing a nearly infinite number of sound qualities. Short delays create that family of effects called flanging. Medium delays lead to doubling and chorusing. Finally, when the delay is long enough, it separates from the original signal and becomes its own perceptible event: an echo.
Take a quick tour of all of the above with a single album: Kick by INXS. To hear a terrific use of flange, listen to ″Mediate.″ This is a textbook bit of flanging. For a true doubling, listen to ″Sweat″ and those hard-panned questions: ″How do you feel? What do you think? Whatcha gonna do?″ Finally, the same album demonstrates a classic application of chorus to an electric guitar. Check out the rhythm guitar in ″New Sensation″ and the steely cool tone the chorusing adds.
Flange, chorus, and echo are three very different kinds of effects that come from a single kind of effects device: the delay.
Artist: The Beatles
Song: ″You Never Give Me Your Money″
Album: Abbey Road
Label: Parlophone/EMI
Year: 1969
Notes: From single-track vocals to double- and triple-tracked vocals and harmonies. A good case study. The layering begins after the words, ″funny paper.″
Artist: The Cars
Song: ″Good Times Roll″
Album: The Cars
Label: Elektra Records
Year: 1978
Notes: This is double tracking taken as far as it can reasonably go. Listen to the vocals when they sing the title ″Good Times Roll.″ One imagines they filled every available track on the multitrack at this point.
Artist: The Eagles
Song: ″Life in the Fast Lane″
Album: Hotel California
Label: Asylum Records
Year: 1976
Notes: Over-the-top flanging of the entire stereo mix in the chorus repeats into the coda at 3:38.
Artist: Les Paul and Mary Ford
Song: ″How High the Moon″
Label: Capitol Records
Year: 1951
Notes: Sets the pace for doubling and tripling multitrack performances.
Artist: Michael Penn
Song: ″Cover Up″
Album: Resigned
Label: Epic Records
Year: 1997
Notes: One word, and one word only, gets flanged: ″guests″ at the end of the second verse.
Artist: The Police
Song: ″Synchronicity II″
Album: Synchronicity
Label: A&M Records
Year: 1983
Notes: Ghost of an echo on most of the lead vocal.
Artist: U2
Song: ″Bad″
Album: The Unforgettable Fire
Label: Island Records
Year: 1984
Notes: Not the only example, by far. The Edge uses delay as part of the guitar riff.
Artist: The Wallflowers
Song: ″One Headlight″
Album: Bringing Down the Horse
Label: Interscope Records
Year: 1996
Notes: The lead vocal is wholly without delay, for the entire song, until the third verse. The words ″turn″ and, to a lesser extent ″burn,″ get an almost subliminal dotted quarter-note echo. The slide guitar solo gets a thoughtful quarter note delay treatment that comes and goes, mid-solo. Solo is panned left, first echo is panned dead center, and the second repetition is panned hard right.
Song: ″Won′t Get Fooled Again″
Album: Who′s Next
Label: Polydor
Year: 1971
Notes: It′s not just the, ″Yeaaaahhhhh!″ It′s the layers of echoes underneath.
Artist: XTC
Song: ″Then She Appeared″
Album: Nonsuch
Label: Caroline Records
Year: 1992
Notes: A modern update of a psychedelic 1960′s flanger effect. The title is the hook, and gets the effect.