
Recording a Voice Narration
A voice narration is useful for many reasons. You can record your own voice-over to accompany
A Web-based presentation.
An on-demand presentation that people can listen to at any time.
An automated presentation, such as one you run continuously at a tradeshow booth.
A presentation delivered by a speaker that includes special recorded commentary by a particular individual. An example of this would be a human resources representative delivering an employee orientation that includes voice narration from the CEO.
Before recording your narration, you should create a script and rehearse it several times until it flows smoothly and matches your presentation.
Caution
You need to have a microphone and a sound card to record a narration. And remember—the better quality equipment you use, the more professional your narration will sound.
Can't hear your other sound files after recording a voice narration? See the “Troubleshooting” section near the end of this chapter.
To record a voice narration, follow these steps:
Choose Slide Show, Record Narration to open the Record Narration dialog box, shown in Figure 9.5.
Figure 9.5. Add voice narrations to your slideshows.

Before you record your narration, you can verify that your microphone is set up properly. To do this, click the Set Microphone Level button. The Microphone Check dialog box appears (see Figure 9.6).
Figure 9.6. Set your microphone level to record properly.
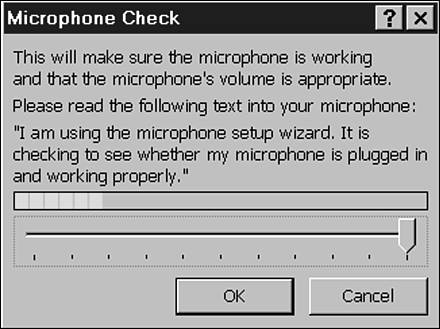
Read the sentence that appears into the microphone, and the Microphone Wizard automatically adjusts your microphone level. Click OK to return to the main dialog box.
To store the narration as a separate file, click the Link Narrations In check box. Your narration will be stored in a separate .WAV file in the same folder as your presentation. To store your narration in another folder, click the Browse button and choose the appropriate folder in the dialog box that appears. If you want to embed the narration in the presentation, be sure the Link Narrations In check box is cleared.
If you want to embed the narration in the presentation, be sure the Link Narrations In check box is cleared.
Tip from
Linking a narration is a good idea if you want to easily transport your presentation without the accompanying narration, such as on a disk or via e-mail. Otherwise, it's easier to just embed the narration in the presentation without creating a separate .WAV file.
Click OK to start recording. PowerPoint displays your presentation in Slide Show view.
Continue narrating as the slide show is displayed.
When you reach the end of the presentation, a message box prompts if you want to save the timings with each slide. If you do, click Yes.
The presentation is displayed in Slide Sorter view with the slide timings appearing below each slide if you chose to save them with the presentation.
Tip from
To delete the narration from a slide while in Normal view or Slide view, select the sound icon that displays in the lower-right corner and press the Delete key. You need to repeat this for each slide that has a corresponding narration.