
5
Building APIs with Spring
In the previous chapter, you learned about the concepts and advantages of PostgreSQL and set it up on your local machine using the installer or the Docker container. You know how to configure Spring Data Java Persistence API (Spring Data JPA) on our project and use its provided repositories to perform Create, Read, Update, and Delete (CRUD) operations on our database with less boilerplate code. Lastly, you have also learned to connect your application with PostgreSQL using the Java Database Connectivity (JDBC) driver and Spring Data JPA.
This chapter will create your Spring Boot application programming interface (API) project; we will focus on coding, making our models, and adding controllers and services to develop our endpoints. We will also add Remote Dictionary Server (Redis) for caching to help improve our application performance.
In this chapter, we will cover the following topics:
- Starting the server
- Adding models
- Writing services
- Adding controllers
- Adding Redis for caching
Technical requirements
There are no technical requirements for this chapter.
The link to the finished version of this chapter can be found here:
https://github.com/PacktPublishing/Spring-Boot-and-Angular/tree/main/Chapter-05/superheroes
Starting the server
In this section, we will now attempt to run our Spring Boot application on our server but first, let’s have a recap of the previous chapter: we learned how to configure Spring Data JPA and connect our application to our PostgreSQL database, and—most importantly—we have installed all of the needed dependencies in our application. These are all prerequisites before running the Spring Boot application.
In the following examples, we will be using an application named spring-boot-superheroes. We will generate a new Spring Boot application using Spring Initializr with the same dependencies. Throughout developing our application, we will also show you several ways to write the different parts of your API, such as how to write models, services, and controllers. These are the most common ways used now in the industry. Still, first things first: let’s proceed with running our Spring Boot application.
We assume that you have already generated your Spring Boot application with the needed dependencies. However, if you have missed this part or are unsure whether all dependencies are included on your generated project, let’s list again all the dependencies we installed in the previous chapter, as follows:
- Spring Data JPA: Dependency for adding Spring Data JPA used for built-in data store-related implementation.
- PostgreSQL Driver: A JDBC and Reactive Relational Database Connectivity (R2DBC) driver that will allow the connection of Java applications to the PostgreSQL database.
- H2 Database: An in-memory database that supports JDBC API and R2DBC access; this is commonly used for unit testing.
If you have successfully initialized your application with the listed dependencies, open your project in your preferred integrated development environment (IDE); we will be using IntelliJ for Spring Boot in the following examples. Then, proceed as follows:
- Expand the project folder; we will see several folders inside, as indicated in the following screenshot:

Figure 5.1 – Project structure of the Spring Boot application
We can see the files and folders in our Spring Boot application in the preceding screenshot. We can find our main class, named SuperHeroesApplication, under src/main/java. This main class will be used in running our application on the server.
application.properties is also an important file that we need to configure, as this is where all the properties are placed that are necessary for connecting to our database.
- Open the application.properties file, and we should set the following configuration:
spring.main.allow-bean-definition-overriding=true
spring.datasource.url=jdbc:postgresql://localhost:5432/{{databasename}}spring.datasource.username=postgres
spring.datasource.password=pass
spring.jpa.hibernate.ddl-auto=update
spring.jpa.show-sql=true
spring.jpa.properties.hibernate.dialect=org.hibernate.dialect.PostgreSQLDialect
spring.jpa.properties.hibernate.format_sql=true
This configuration will allow us to connect to our PostgreSQL database on our local machine. Remember that the database should exist on our PostgreSQL servers; otherwise, our application will not run successfully. If you haven’t created your database, open pgAdmin and enter your master password; on the left panel, expand the Servers section.
- You will see the PostgreSQL instance on your local machine. Right-click on the instance, select Connect Server, and enter the password for the postgres user. This will now access the databases on our server, as illustrated in the following screenshot:
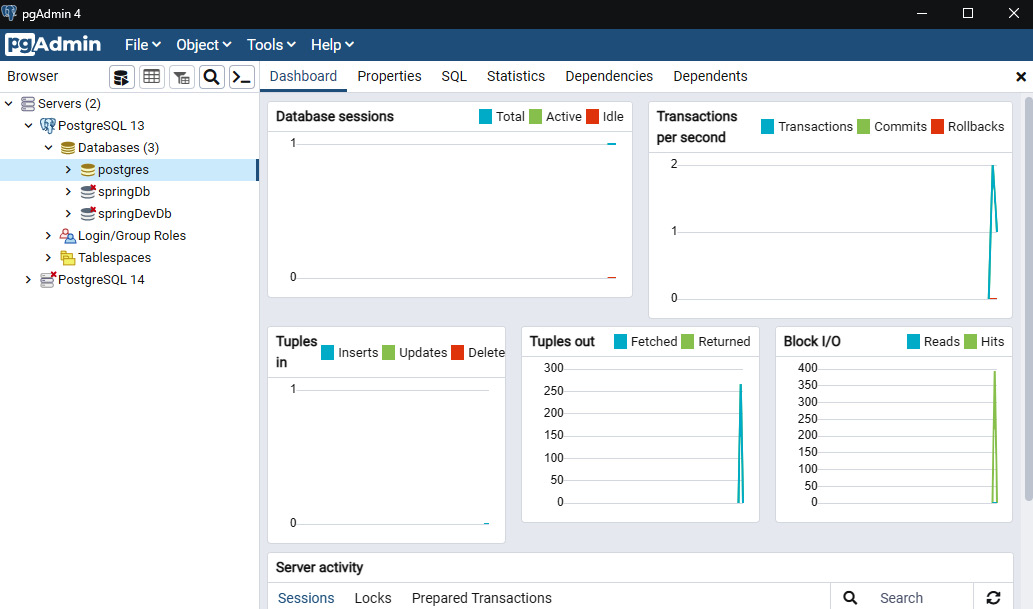
Figure 5.2 – Accessing PostgreSQL server using pgAdmin
- After successfully accessing the server, right-click on Database, select Create, and click on Database; this will open the following modal:
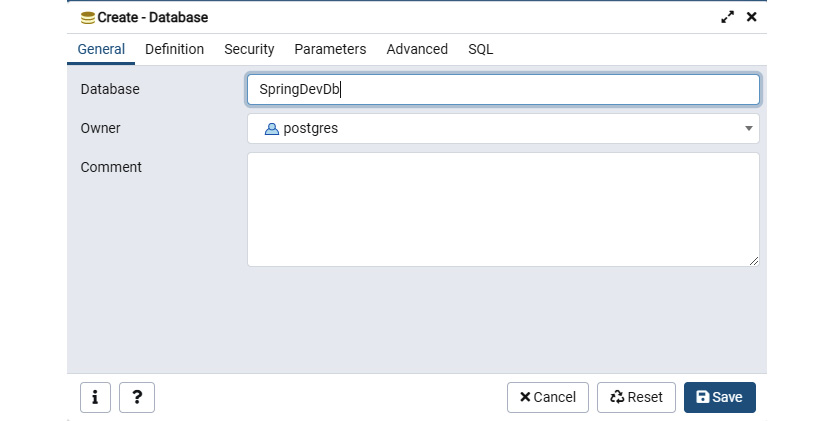
Figure 5.3 – Creating a database
In the preceding screenshot, we named our database SpringDevDB and set the postgres user value in the Owner field. Click Save, and our database is all set in our server.
- Our Spring Boot application is now ready to run on our server; in your IntelliJ IDE, click on Add Configuration, found on the upper-right side of the panel. This will open the modal where we will configure our entry point to run our application, as illustrated in the following screenshot:
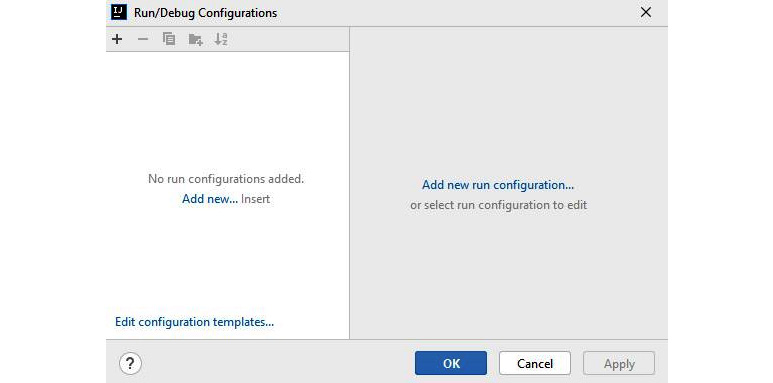
Figure 5.4 – Adding configuration for Spring Boot
- Click on Add new run configuration… shown in the preceding screenshot and select Application. Under the Main class field, type the main class, which is SuperheroesApplication, and this will automatically fill the program arguments with the correct fully qualified name of the class, as illustrated in the following screenshot:
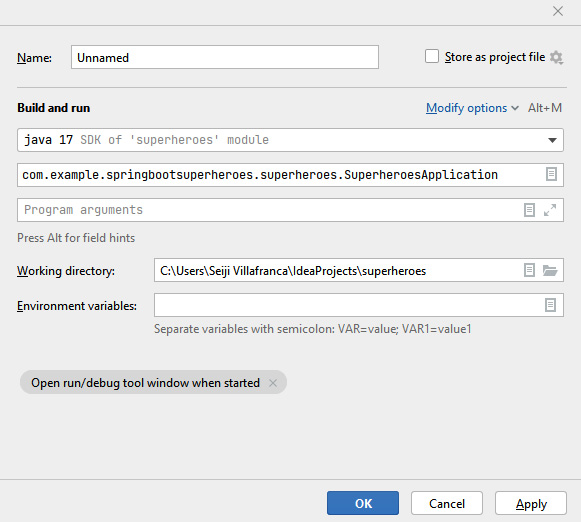
Figure 5.5 – Configuration for application
Click on Apply and then click OK to save the configuration changes.
- In the upper-right panel of the IDE, select the created configuration and run the project by clicking on the green play icon. The application will run on the installed Tomcat server on the default port 8080; we can also use the terminal to check whether the Spring Boot project has successfully started on the server. You can see the process running in the following screenshot:
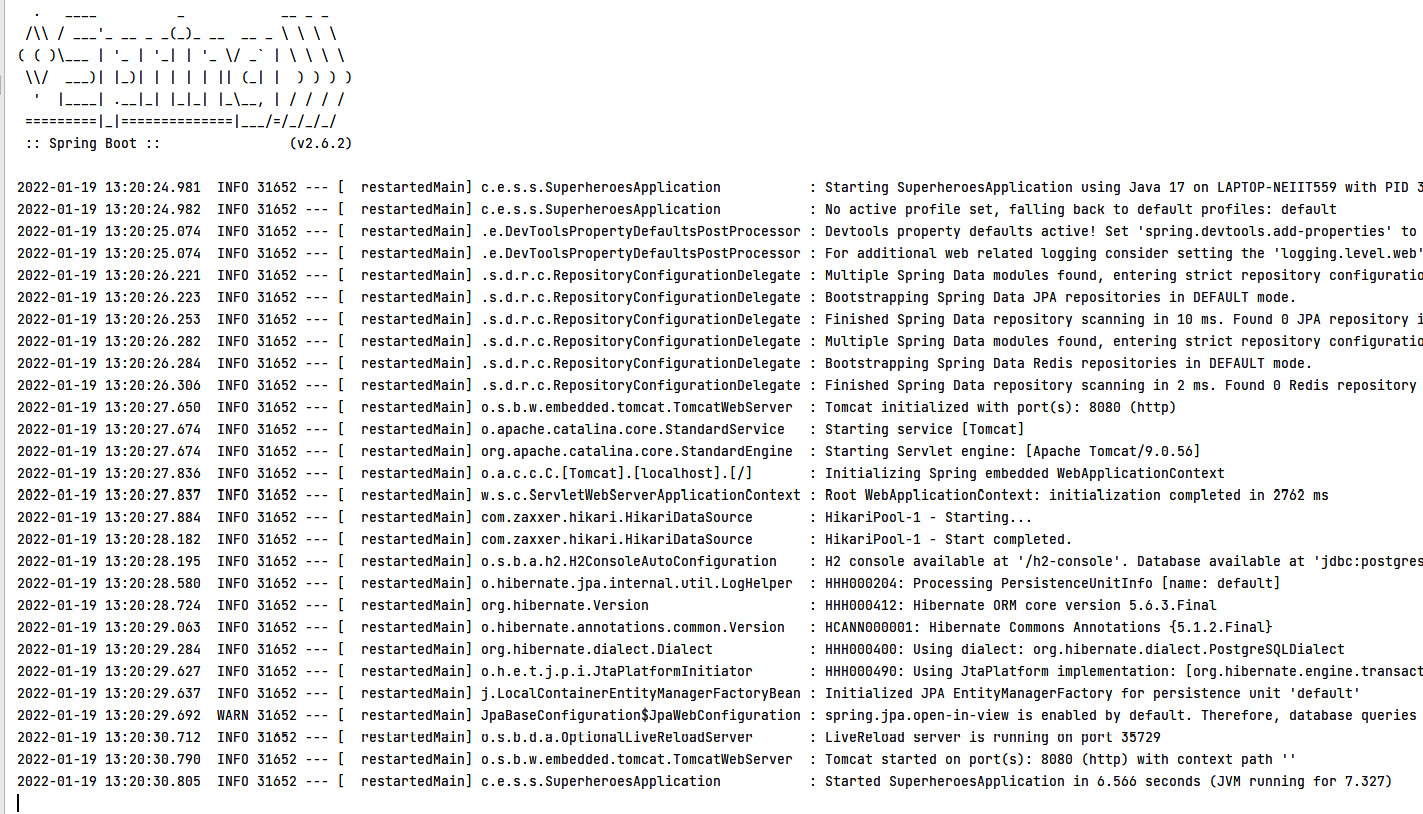
Figure 5.6 – Spring Boot logs
In the preceding screenshot, we can see that our application has started successfully; we are also connected to our PostgreSQL database, and we can now start writing our code.
We will now try to create our application models in the next section.
Adding models
In this section, we will now write code for our application, and the first thing we will create is models. In simple terms, models are the object of our application; the models will serve as our entities and will define our tables in the database.
Once we create models and run the application, this will also generate tables in our database automatically with the help of annotations, which will also be discussed throughout this example.
Creating models with DTOs and Lombok
We will first show you how to write models using Lombok and data transfer objects (DTOs). First, we will discuss DTOs.
DTOs
DTOs are responsible for carrying data between processes to reduce the number of method calls. DTOs are plain old Java objects (POJOs) that commonly consist of data accessors.
DTOs are very useful for creating representations of our entities to have views for clients without affecting the pattern and design. Let’s have an example use case for DTOs. You can see this here:
public class Blog {
private String id;
private String title;
private String description;
private String author;
public Blog(String title, String description,
            String author) {
   this.name = title;
   this.description = description
   this.author = author
}
In the preceding code, we have created an example domain model that will represent entities in our database. There are instances where we would not want to include some information on sending data to the client, which is where DTOs would enter the scene. We will create two DTOs for the blog model used for getting and creating data, as follows:
Public class BlogDTO {
     private String title;
     private String description;
}
In the preceding example DTO, we have created a BlogDTO class that will be used for retrieving data; our objective is to hide the author’s name, thus not including it as a field in the DTO. The code is illustrated in the following snippet:
Public class BlogCreationDTO {
     private String title;
     private String description;
     private String author;
}
The next DTO we have created is BlogCreationDTO, which will create a new blog. We can see that all fields necessary to create a new blog are included.
The created DTOs will be used for our controllers in the following sections.
Lombok
Lombok is a third-party library used to reduce boilerplate code using annotations. Lombok allows us to avoid repetitive code, especially in creating models such as getter and setter methods.
Let’s have a comparison between a model without Lombok and a model using Lombok, as follows:
public class Blog {
     private String title;
     private String description;
     private String author;
     public Blog() {}
     public Blog(String title, String description,
                 String author) {
     super()
       this.name = title;
       this.description = description
       this.author = author
}
     public String getAuthor() {return author;}
     public void setAuthor(String author) {
     this.author = author; }
     public String getTitle() {return title;}
     public void setTitle(String title) {
     this.title = title; }
     public String getDescription() {return description;}
     public void setDescription(String description) {
     this.description = description; }
    @Override public String toString()
    {return "Blog ["
            + "author=" + author + ", title=" + title
            + ", " + " description =" + description + "]";
    }
}
In the preceding code example, we have created a blog model without using Lombok; we can see that we have created a getter and setter method for each field, and we have also created constructors with and without arguments. The code in this example is still manageable.
Still, if our model is required to contain more fields, we need to create setters and getters for the new fields, creating more boilerplate code inside our model and sacrificing the maintainability of our code.
The class and annotations should be as shown in the following code block:
@Data
@AllArgsConstructor
@NoArgsConstructor
public class Blog {
     private String title;
     private String description;
     private String author;
}
In the preceding screenshot, we have used Lombok to create our blog model, and we can see that a considerable amount of code has been omitted from the model. The @Data annotation generates setter and getter methods, a toString() method, and a constructor with required arguments.
@AllArgsConstructor and @NoArgsConstructor are accountable for the constructor with all and no arguments.
The advantage of using Lombok is evident in the previous examples; it makes code easier to read and less error-prone, promotes easy cleanup and maintainability, and gives effortless logging and debugging.
Model application
Now that we have learned about the importance of DTO and Lombok, let’s go back to our Spring Boot application. Under the java folder, right-click on the package and select Package. This will display a small window that will allow you to enter a new package.
In this example, we will create a new package named antiHero. After completing the new package, we will create two new packages under antiHero, calling them dto and entity. You can see the packages in the following screenshot:
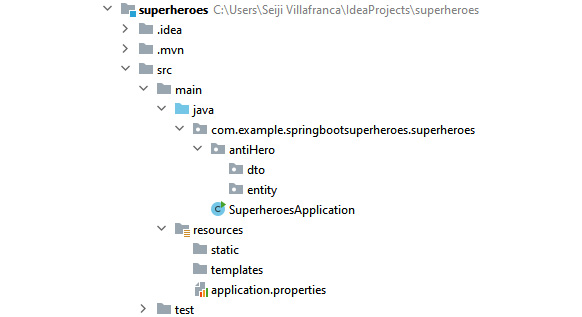
Figure 5.7 – Project structure after the creation of packages
Our project structure should now look just as it is presented in the preceding screenshot. Let’s first create our entity; right-click on the entity package we have created, and then click on New | JPA | Entity. This will open a model for creating a new entity. We will name our entity AntiHeroEntity and click on the OK button. The process is illustrated in the following screenshot:

Figure 5.8 – Creating an entity
We will see a newly generated class under the entity package, and it will have the following code:
package com.example.springbootsuperheroes.superheroes.antiHero.entity;
import javax. persistence.Entity;
import javax.persistence.Table;
@Entity
@Table(name = "anti_hero_entity")
public class AntiHeroEntity {
}
An entity was automatically generated with the @Entity and @Table annotations that will be used to identify this model as an object in the database. The current code will have some issues, stating that the entity does not have a primary key (PK); in this case, we will add the following to our model:
- @Data: Lombok annotations that will set the getter and setter methods, the toString() method, and @RequiredArgsConstructor.
- @AllArgsConstructor: Lombok annotations for generating a constructor for the model with all fields as arguments.
- @NoArgsConstructor: Lombok annotations for generating a constructor for the model with no arguments.
- @Id: Found under javax.persistence.*, this will determine the model’s PK.
- @GeneratedValue: Used on the PK to determine which generation type will be used.
- @NotNull: Found under javax.validation.constraints and validates that a specific field cannot be null.
The dependency should be installed by adding the following code to pom.xml:
<dependency>
   <groupId>org.springframework.boot</groupId>
   <artifactId>spring-boot-starter-validation</artifactId>
</dependency>
After adding the dependency to pom.xml, right-click on your project and select Maven | Reload project to install the new dependency.
After successfully adding the Lombok annotations, PK, validations, and fields to our model, we will have the following code:
package com.example.springbootsuperheroes
.superheroes.antiHero.entity;
…
import java.text.SimpleDateFormat;
import java.util.Date;
import java.util.UUID;
import javax.persistence.*;
import javax.validation.constraints.NotNull;
import lombok.AllArgsConstructor;
import lombok.Data;
import lombok.NoArgsConstructor;
…
After adding all the preceding packages, we can now start writing our class and the annotations, like so:
@Data
@Entity
@Table
@AllArgsConstructor
@NoArgsConstructor
public class AntiHeroEntity {
    @Id
    @GeneratedValue(strategy = GenerationType.AUTO,
                    generator = "UUID")
    @Column(nullable = false, updatable = false)
    private UUID id;
    @NotNull(message = "First Name is required")
    private String firstName;
    private String lastName;
    private String house;
    private String knownAs;
    private String createdAt =
      new SimpleDateFormat("dd-MM-yyyy HH:mm:ss z")
            .format(new Date());
}
In the preceding code block, we can see that we have added a PK of the UUID type; this will be automatically generated once we insert new anti-hero data into our database. The type is defined using the @GeneratedValue annotation, where we have also indicated that the strategy will be using an auto generator. We have also added several fields that will be used to store the anti-hero information.
We have successfully created our entity; now, we will create a DTO for the anti-hero entity. Right-click on the dto package, select New | Java class, and we will name the new class AntiHeroDto. After successfully creating the DTO, we will place the following code into it:
package com.example.superheroes.antiHero.dto;
import java.util.UUID;
import javax.validation.constraints.NotNull;
import lombok.Getter;
import lombok.Setter;
@Getter
@Setter
public class AntiHeroDto {
  private UUID id;
  @NotNull(message = "First Name is required")
  private String firstName;
  private String lastName;
  private String house;
  private String knownAs;
}
In the preceding code example, we have added fields that we only want to display as we send the anti-hero data to the client; in this case, we have removed the createdAt field in our DTO. We have also added @Getter and @Setter annotations to generate getter and setter methods for our DTO, and lastly, we have also added @NotNull validation to match our constraint with the entity.
We have successfully created our DTO and models with Lombok in our application. In the next section, we will make our services responsible for the CRUD functionalities of our Spring Boot application.
Writing services
In this section, we will now write the services for our application, but first, let’s discuss the primary purpose of services in Spring Boot. Services are classes where we place all of our business logic; this is where we will write our CRUD functionalities with the help of JPA repositories. In this case, we will not only make our service class but will also create our JPA repository.
JPA repository
As discussed in Chapter 4, Setting Up the Database and Spring Data JPA, the JPA repository is a widely used specification for managing relational data in Java applications. It helps develop Spring by reducing boilerplate code by not implementing read and write operations.
It is simple to create a JPA repository in Spring Boot; having said that, the JPA library provides classes such as CrudRepository that we can use to extend our classes. Let’s make one in our Spring Boot application example. Proceed as follows:
- Right-click on our antiHero package, select New, and click on the Package option.
- Create a new package named repository.
- After creating the new package, right-click on the repository package, select New, and click on the Class option.
- As the small modal pops up, switch to the Interface option and name the interface AntiHeroRepository. The following code will be generated:
package com.example.springbootsuperheroes.superheroes.antiHero.repository;
import com.example.springbootsuperheroes.superheroes.antiHero.entity.AntiHeroEntity;
import org.springframework.data.repository.CrudRepository;
import java.util.UUID;
public interface AntiHeroRepository {}
We have created our interface, but this is just a simple interface. We will extend our interface with the CrudRepository class to convert it to a JPA repository, as follows:
public interface AntiHeroRepository extends CrudRepository<AntiHeroEntity, UUID> {
}AntiHeroRepository, as we have already extended it with CrudRepository<Type, ID>, will have methods that have the following functionalities:
- Persisting, updating, and deleting one of the blog entities
- Finding one or multiple blogs by their PKs
- Counting all blogs
- Validating whether a single blog exists
We have successfully created our JPA repository; our next step is to do our service. Our goal is to create a service that will have the capability to get an entire list, get a single database in a PK, insert new data, update selected data, and delete data. We can achieve this through the following methods provided by the JPA repository:
- findAll(): Gets all the existing data in a specific entity
- findById(Id): Finds a particular database by PK
- save(): Inserts new data in the table
- save(data): Updates existing data in the table
- deleteById(id): Deletes specific data in the table by PK
Now that we have successfully identified the methods we need for our service, let’s next create our service. Right-click on the antiHero package and create a new package named service; after creating the new package, create a new class under the service package called AntiHeroService, and we will place the following methods inside the service:
public class AntiHeroService {
    private final AntiHeroRepository repo;
    public Iterable<AntiHeroEntity> findAllAntiHeroes() {
        return repo.findAll();
    }
    public AntiHeroEntity findAntiHeroById(UUID id) {
        return findById(id);
    }
    public void removeAntiHeroById(UUID id) {
        repo.deleteById(id);
    }
    public AntiHeroEntity addAntiHero(
      AntiHeroEntity antiHero) {
        return repo.save(antiHero);
    }
    public void updateAntiHero(UUID id,
      AntiHeroEntity antiHero) {
        repo.save(antiHero);
    }
}
Let’s discuss the preceding code; we have added several methods to our service, and these are explained in more detail here:
- Iterable<AntiHeroEntity> findAllAntiHeroes(): This method calls findAll() from AntiHeroRepository, which returns an Iterable instance of AntiHeroEntity.
- AntiHeroEntity findAntiHeroById(UUID id): This method calls findById(id) from AntiHeroRepository, which returns a single AntiHeroEntity instance based on the Id value.
- removeAntiHeroById(UUID id): This method calls deleteById(id) from AntiHeroRepository, which deletes a single AntiHeroEntity instance based on the Id value.
- void AntiHeroEntity addAntiHero(AntiHeroEntity antiHero): This method calls save() from AntiHeroRepository and inserts a new AntiHeroEntity instance in the database.
- void updateAntiHero(UUID id, AntiHeroEntity antiHero): This method calls save(antiHero) from AntiHeroRepository, which updates a specific AntiHeroEntity instance in the database.
After successfully adding the method for our service, we will add @AllArgsConstructor and @Service annotations to AntiHeroService. @AllArgsConstructor is an annotation from Lombok that will generate a constructor that requires one argument of each field; in our example, this will produce the following code:
public AntiHeroService(AntiHeroRepository repo) {
  this.repo = repo;
}
This will now allow the wiring of our AntiHeroRepository dependency on our service.
The @Service annotation, on the other hand, is functional when we want Spring Context to autodetect classes based on their classification.
We have now successfully created our service with CRUD methods, but what if something went wrong as we call our service? For example, the identifier (ID) of the anti-hero we have passed may not exist. We would want to catch the error and return an understandable message to the user. Now, we will create runtime exception handling for our service.
Runtime exceptions
Runtime exceptions are also known as unchecked exceptions. These are programming errors and will happen upon the current execution of our application. This should be prevented directly by the developers.
Some known runtime exceptions are listed here:
- IndexOutOfBoundsException: This exception occurs when we access an index of an array string or an iterable that is out of range, as illustrated in the following code snippet:
String[] array = new String[100];
String name = array[200]; // throws index out of bounds as array variable only has a length of 100
- IllegalArgumentException: This exception occurs when a method has been passed by an illegal argument, as illustrated in the following code snippet:
public class Hero {int number;
public void givePositiveNumber(int number) {if(number < 0) throw new
IllegalArgumentException(
Integer.toString(number));
else { m = number; }}
public static void main(String[] args) {Hero h = new Hero();
// throws illegal argument exception as -1 is a
// negative number
h.givePositiveNumber(-1);
}
}
- NullPointerException: This exception occurs when a variable is accessed that does not point to any object or is simply null, as illustrated in the following code snippet:
public void doAction(ExampleObject obj) { obj.doActionOnMethod();}
// call doAction()
// throws null pointer exception as we are accessing a
// method on a null object
doAction(null)
These are just common runtime exceptions that we use in our application; we can also create runtime exceptions using the RunTimeException class. In this example, let’s create a NotFoundException runtime exception that we will use to get a non-existent ID. Proceed as follows:
- Under the main package, create a new package named exception; after successfully creating the package, create a class named NotFoundException. We will extend our created class with the RunTimeException class and will add the following code:
public class NotFoundException extends RuntimeException {public NotFoundException(String message) {super(message);
}
public NotFoundException(String message,
Throwable cause) {super(message, cause);
}
public NotFoundException(Throwable cause) {super(cause);
}
}
In the preceding code snippet, we have declared several methods with NotFoundException with different arguments; having successfully created our custom exception, we can now use it on our service.
- Go back to AntiHeroService, and we will add the following method:
private AntiHeroEntity findOrThrow(final UUID id) {return repo
.findById(id)
.orElseThrow(
() -> new NotFoundException("Anti-heroby id " + id + " was not found")
);
}
In the preceding code example, we have created a new method named findOrThrow(); this is also calling the findById() method. The only difference is that it checks whether the given ID exists on the database; otherwise, it will throw something based on our code. In this case, we would want to throw a NotFoundException runtime exception.
- After this, we can use it now on findAntiHeroById() by replacing findById() with the findOrThrow() method and also add it to the updateAntiHero() and deleteAntiHero() methods to check whether the data exists before updating or deleting it. The code to accomplish this is illustrated here:
public AntiHeroEntity findAntiHeroById(UUID id) {return findOrThrow(id);
}
public void updateAntiHero(UUID id,
AntiHeroEntity antiHero) {findOrThrow(id);
repo.save(antiHero);
}
We have now successfully created our service for our application. The next section will discuss how to make controllers and define endpoints in our code.
Adding controllers
This section will now discuss the use of controllers and how to create them in our application. Controllers are responsible for intercepting incoming requests and converting the payload of the request for the internal structure of the data; this is also where we will define our endpoint paths that will be available for access for our frontend applications.
In creating controllers, we will use several annotations, as described here:
- @RestController: This is a specialized form of the @Controller annotation; compared to using the @Controller annotation, it already includes both the @Controller and @ResponseBody annotation, not needing to specify the @ResponseBody annotation on each method.
- @RequestMapping: This is an annotation used to map HyperText Transfer Protocol (HTTP) requests to the methods of REpresentational State Transfer (REST) controllers. It is also where we define a base path for the controller.
- @GetMapping: This maps HTTP GET requests on a method; the annotation is a shortcut for @RequestMapping(method = RequestMethod.GET).
- @PutMapping: This maps HTTP PUT requests on a method; the annotation is a shortcut for @RequestMapping(method = RequestMethod.PUT).
- @PostMapping: This maps HTTP POST requests on a method; the annotation is a shortcut for @RequestMapping(method = RequestMethod.POST).
- @DeleteMapping: This maps HTTP DELETE requests on a method; the annotation is a shortcut for @RequestMapping(method = RequestMethod.DELETE).
- @PathVariable: This annotation is used to get the value of endpoint parameters.
- @Valid: This annotation is used to check the validity of an object; it is commonly used on the request body to check whether a passed request is a valid object.
We have successfully identified the annotations we will use for our controller. We can now create our controller. Under the antiHero package, create a new package named controller, and after completing the controller package, create a new class called AntiHeroController.
In the AntiHeroController class, we will use the @AllArgsConstructor, @RestController, and @RequestMapping annotations, as follows:
@AllArgsConstructor
@RestController
@RequestMapping("api/v1/anti-heroes")
public class AntiHeroController {
}
Our controller is now configured; the next step is to place our dependencies inside our controller. We have used the @AllArgsContructor annotation. We don’t need to create a constructor method with the parameters; we only need to define dependencies.
First, we will determine the AntiHeroService class where all our CRUD logic is baked. The next one is ModelMapper; this is important, seeing as we need to convert our entity into a DTO when we use it as a response, and vice versa if we want to read an object from a request body. ModelMapper will easily map the values of an entity to a DTO object with the same property.
To install the dependency, we just need to add the following code to our pom.xml file:
<!--Dto mapper-->
<dependency>
   <groupId>org.modelmapper</groupId>
   <artifactId>modelmapper</artifactId>
   <version>2.3.9</version>
</dependency>
After successfully adding the ModelMapper dependency, we need to define our ModelMapper dependency as a Bean in our configuration to use it on our application. To achieve this, we will create a new package named config under the main package, and we will create a new class called ModelMapperConfig. After creating a new class, we will add a new method annotated with @Bean and return a new instance of ModelMapper. The code is illustrated in the following snippet:
@Configuration
public class ModelMapperConfig {
  @Bean
  public ModelMapper modelMapper() {
    return new ModelMapper();
  }
}
Our configuration is all done, and now, we can add AntiHeroService and ModelMapper to our controller, as follows:
@AllArgsConstructor
@RestController
@RequestMapping("api/v1/anti-heroes")
public class AntiHeroController {
    private final AntiHeroService service;
     private final ModelMapper mapper;
}
We now have our controllers with the needed dependencies. Now, let’s create two functions that will convert our entity into a DTO, or vice versa. As mentioned a while ago, we will be using the ModelMapper dependency to make these methods, and in this case, we will add the following code:
private AntiHeroDto convertToDto(AntiHeroEntity entity) {
  return mapper.map(entity, AntiHeroDto.class);
}
private AntiHeroEntity convertToEntity(AntiHeroDto dto) {
  return mapper.map(dto, AntiHeroEntity.class);
}
We have created two functions in the preceding code example. First, we created the convertToDto() method, which will convert the given AntiHeroEntity instance into an AntiHeroDto instance, for which we have used the map() method from ModelMapper to map the entity’s values. The second function is the convertToEntity() method, which converts the DTO into an entity.
Now, we can create mappings for our CRUD methods. Let’s first start a method that will return a specific entity base on the id value; we will use the @GetMapping annotation to identify that this will use a GET request, and we will add /{id} as a parameter to indicate that we can pass the entity ID as a dynamic parameter in the endpoint.
In creating the method, we will use the @PathVariable annotation to get the value of /{id} in the endpoint and define it as a UUID type. Lastly, we will call the service.findAntiHeroById() function under AntiHeroService and pass the retrieved ID to get the entity in the database, and we will use the convertToDto() function to convert it to a DTO. The code is illustrated in the following snippet:
@GetMapping("/{id}")
public AntiHeroDto getAntiHeroById(@PathVariable("id") UUID id) {
  return convertToDto(service.findAntiHeroById(id));
}
Now, to create the create mapping, we will use the @PostMapping annotation to identify that this will use a POST request, we will use the @RequestBody annotation to get the object on the request body, and we can also use the @Valid annotation to check whether the object is a valid entity.
In creating the function, we will call the convertToEntity() method to convert the object into an entity, and we will call the service.addAntiHero() method to insert the converted entity into the database. The code is illustrated in the following snippet:
@PostMapping
public AntiHeroDto postAntiHero(@Valid @RequestBody AntiHeroDto antiHeroDto) {
  var entity = convertToEntity(antiHeroDto);
  var antiHero = service.addAntiHero(entity);
  return convertToDto(antiHero);
}
The next thing we need to create is the PUT mapping. We will use the @PutMapping annotation to identify that this will use a PUT request, the same as how we created the GET mapping. We will add /{id} as a parameter, and we will also use the @RequestBody annotation to get the object on the request body and the @PathVariable annotation to get the value of id in the parameter.
In implementing the function, we will also call the convertToEntity() method and call the service.updateAntiHero(id, entity) method to update the specific entity with the DTO values. The code is illustrated in the following snippet:
@PutMapping("/{id}")
public void putAntiHero(
  @PathVariable("id") UUID id,
  @Valid @RequestBody AntiHeroDto antiHeroDto
) {
  if (!id.equals(antiHeroDto.getId())) throw new
    ResponseStatusException(
    HttpStatus.BAD_REQUEST,
    "id does not match."
  );
  var antiHeroEntity = convertToEntity(antiHeroDto);
  service.updateAntiHero(id, antiHeroEntity);
}
Next, we’ll create DELETE mapping. We will use the @DeleteMapping annotation to identify that this will use a DELETE request. We will also add /{id} as a parameter to receive the ID of the entity we need to delete, and we will add the @PathVariable annotation to get the value of id.
To implement the method, we simply call the service.removeAntiHeroById() method to delete the specific entity in the database, as follows:
@DeleteMapping("/{id}")
public void deleteAntiHeroById(@PathVariable("id") UUID id) {
  service.removeAntiHeroById(id);
}
And lastly, we need to create a method that will return all the entities in the database. One way we can implement this is using StreamSupport to convert our retrieved list into a stream and convert each object into a DTO, but first, we will create a method that returns a type of List<AntiHeroDto> with the @GetMapping annotation. After completing the method, we will now call the service.findAllAntiHeroes() method to get the entities in the database. Since this returns to an Iterable instance, we will convert it into a stream and transform it into a list using Collectors.toList(). The code is illustrated in the following snippet:
  var antiHeroList = StreamSupport
    .stream(service.findAllAntiHeroes().spliterator(),
            false)
    .collect(Collectors.toList());
After successfully retrieving and converting the data into a list, we want each object converted into a DTO. We can achieve this by converting the list into a stream. Call the convertToDto() method and convert it to a list again, as follows:
  antiHeroList
    .stream()
    .map(this::convertToDto)
    .collect(Collectors.toList());
We will return the converted list in response, and our method will now look like this:
@GetMapping
public List<AntiHeroDto> getAntiHeroes() {
  var antiHeroList = StreamSupport
    .stream(service.findAllAntiHeroes().spliterator(),
            false)
    .collect(Collectors.toList());
  return antiHeroList
    .stream()
    .map(this::convertToDto)
    .collect(Collectors.toList());
}
We have successfully created mappings on our controller, and our code should look like this:
@AllArgsConstructor
@RestController
@RequestMapping("api/v1/anti-heroes")
public class AntiHeroController {
    private final AntiHeroService service;
    private final ModelMapper mapper;
…
    public AntiHeroDto getAntiHeroById(
      @PathVariable("id") UUID id) {
        return convertToDto(service.findAntiHeroById(id));
    }
    @DeleteMapping("/{id}")
    public void deleteAntiHeroById(
      @PathVariable("id") UUID id) {
        service.removeAntiHeroById(id);
    }
    @PostMapping
    public AntiHeroDto postAntiHero(
       @Valid @RequestBody AntiHeroDto antiHeroDto) {
        var entity = convertToEntity(antiHeroDto);
        var antiHero = service.addAntiHero(entity);
…
        return mapper.map(dto, AntiHeroEntity.class);
    }
}
We have completed our Spring Boot application, we have created our models and DTO that defines the structure of our object, we have built services that are responsible for the business logic, and we have created controllers that map the HTTP requests in our applications, so our endpoint will work as expected.
Still, we can improve our backend in terms of performance, and we can do this with caching mechanisms. In the next section, we will discuss the concepts and application of Redis.
Adding Redis for caching
In this section, we will now discuss Redis, which can improve the performance of our REST applications. Redis is an open source, in-memory, key-value data store that allows data to reside in memory to enable low latency and faster data access. Compared to traditional databases, Redis doesn’t require disk access, having all data cached in the memory, which gives a quicker response.
It is now widely used, especially for large applications that receive millions of requests. It is compatible with different data structures such as strings, lists, sets, hashes, bitmaps, and geospatial and is compatible with Publish/Subscribe (Pub/Sub), used for real-time chat applications.
Installing the Redis server
Before using Redis on our Spring Boot application, we will need to install the Redis server in our terminal. Let’s discuss how to install Redis on different operating systems.
macOS
Redis is simple to install in a macOS system; we can use Homebrew to install Redis and execute the following command:
brew install redis
After successful installation, we can set the Redis server to start automatically with the following command:
brew services start redis
And we have successfully installed and run our Redis server on macOS.
Ubuntu Linux
For installing Redis on Ubuntu OS, we will execute the following command:
sudo apt-get install redis-server
This will automatically install and start the Redis server on port 6739, and we have successfully installed and run our Redis server on Linux.
Windows
For installing Redis on Windows, we can install the different versions from the following link: https://github.com/microsoftarchive/redis/releases, download the .zip or .msi file, and extract to your chosen directory. Run the Redis-server.exe file to start the Redis server on port 6739.
Thus, we have successfully installed and run our Redis server on Windows. We can now use Redis on our Spring Boot application.
Configuring Redis on Spring Boot
We have successfully configured and started the Redis server on our local machine; our next step is to use Redis in our developed Spring Boot project. We’ll now follow these steps:
- The first thing we need to do is include the Redis dependency; to achieve this, we need to add the following code to our pom.xml file:
<!-- Redis -->
<dependency>
<groupId>org.springframework.data</groupId>
<artifactId>spring-data-redis</artifactId>
<version>2.4.5</version>
</dependency>
<dependency>
<groupId>redis.clients</groupId>
<artifactId>jedis</artifactId>
<version>3.5.1</version>
<type>jar</type>
</dependency>
After successfully adding the Redis dependency, we will add our Redis configuration that will define the connection properties for the Redis server, under the config package.
- Create a class named RedisConfig. We will use the @Configuration annotation to identify whether this class has Bean definition methods that will be bootstrapped on the execution of the application. We will also add the following method to our class:
@Bean
JedisConnectionFactory jedisConnectionFactory() {RedisStandaloneConfiguration
redisStandaloneConfiguration =
new RedisStandaloneConfiguration();
return new JedisConnectionFactory(
redisStandaloneConfiguration);
}
jedisConnectionFactory() is the method used to identify the connection properties for our Redis server; this uses default values since we have not specified connection properties.
Still, if our Redis server is hosted on a different server, hosted on a different port, or has a username and password, we can use the following methods:
- redisStandaloneConfiguration.setHostName("host"): This sets the host Uniform Resource Locator (URL) where the Redis server is running.
- redisStandaloneConfiguration.setPort("port"): This sets the port where the application will connect.
- redisStandaloneConfiguration.setUsername("username"): This sets the username for the Redis server.
- redisStandaloneConfiguration.setPassword("password"): This sets the password for the Redis server.
The next step is to use the connection factory to create a Redis template; this is used for Redis data interactions. It allows the automatic serialization and deserialization between objects and binary data stored in the Redis server.
- We will create a method that will also use the @Bean annotation; we will create a new Redis template and set the connection factory with the following code:
RedisTemplate<UUID, Object> template = new RedisTemplate<>();
template.setConnectionFactory(jedisConnectionFactory());
After successfully creating the template instance with the connection factory, we can also define serializers depending on the data structures. If we want to use the default serializer, which is JdkSerializationRedisSerializer, we will just return a template instance.
- In the following code snippet, we have used different serializers for different data structures:
@Bean
public RedisTemplate<UUID, Object> redisTemplate() {RedisTemplate<UUID, Object> template =
new RedisTemplate<>();
template.setConnectionFactory(
jedisConnectionFactory());
template.setKeySerializer(
new StringRedisSerializer());
template.setHashKeySerializer(
new StringRedisSerializer());
template.setHashKeySerializer(
new JdkSerializationRedisSerializer());
template.setValueSerializer(
new JdkSerializationRedisSerializer());
template.setEnableTransactionSupport(true);
template.afterPropertiesSet();
return template;
}
}
- The last thing we need to do is add the @RedishHash annotation to our entity. This serves as a mark for objects as an aggregate root to be stored on the Redis hash; in our example, we will use it on AntiHeroEntity, as follows:
@RedishHash("AntiHero")public class AntiHeroEntity {…
}
And this will successfully use the Redis server to cache data on our Spring Boot application as operations are executed.
Summary
With this, we have reached the end of this chapter. Let’s have a recap of the valuable things you have learned. You have learned how to start the Spring Boot application on a Tomcat server using IntelliJ. You have also known how to create a complete Spring Boot application step by step by creating entities, using Lombok and DTOs, writing services with CRUD logic with the help of JPA repositories, and creating controllers using HTTP annotations and ModelMapper for converting entities to DTO, and vice versa.
Lastly, you have also learned how to configure a Redis server and use it on a Spring Boot application.
The skills you have learned here will make your code readable and concise because of the Lombok and JPA repositories.
In the next chapter, we will be learning how to create documentation for our APIs using springdoc-openapi and Swagger UI.