
15
Writing Tests in Angular
In the previous chapter, we learned how to secure an Angular application by adding user authentication, retrieving user information, and protecting routes.
What if I told you that writing tests in the frontend could be fun and exciting? This chapter will show you how good the developer experience of Cypress E2E, short for end-to-end testing, is. Why do frontend developers love the Cypress framework?
This chapter will teach you how to write basic Cypress tests and mock HTTP requests for testing.
In this chapter, we will cover the following topics:
- Getting started with Cypress
- Writing a simple Cypress test
- Mocking HTTP responses and intercepting HTTP requests
Technical requirements
The following link will take you to the finished version of this chapter: https://github.com/PacktPublishing/Spring-Boot-and-Angular/tree/main/Chapter-15/superheroes.
Getting started with Cypress
In this section, you will learn what Cypress is and how to get started with it.
Cypress is an end-to-end agnostic framework for testing web applications. You can write test IDs in HTML tags and assert whether the HTML tags are rendered in the way you would expect them to be.
Let’s define what end-to-end means. End-to-end means how a user will use your application after they land on your web application and finish tasks such as logging in, signing up, checking out, viewing a profile, logging out, filling out a form, and so on.
For instance, you can test or check the UI of your web application in different example cases or scenarios:
- The sentence of the landing page’s value proposition contains the word sale
- The widget count of a section of your website is what you expected
- The items in the basket on the checkout page are cleared out after hitting the Clear button
- A login form is present when the web application’s URL is domain.com/login
These scenarios are examples of what to test for in a web application. Cypress is a test framework where you can write and run tests that don’t take much time to set up and configure.
Now, let’s see how Cypress can be installed.
Installation
To start using Cypress, we must install it from the npm repository by running the following command:
npm i-D cypress @testing-library/cypress
The preceding npm command will install Cypress and the cypress testing library in the dev dependency packages. @testing-library is a group of common testing utilities in web development that makes the life of a developer easier
In the next section, we will learn what we must add to the npm script of our package.json file so that we can run the test later in this chapter.
npm script
To make it easier for us to run the Cypress test later, it’s a good idea to add a new npm script to our package.json file to help us easily run a command. Insert the following key/value pair inside the scripts block of the package.json file:
"test": "npx cypress open"
The preceding key/value pair helps you run the test by running the npm run test command in your Terminal. Run the full stack application as well as the npm run test command in your Terminal to start Cypress.
An interactive browser app will open where you can run your test. Figure 15.1 shows the Cypress dashboard with a welcome message after running the npm run test command. Here, we are going to use E2E Testing, so click that box to continue:
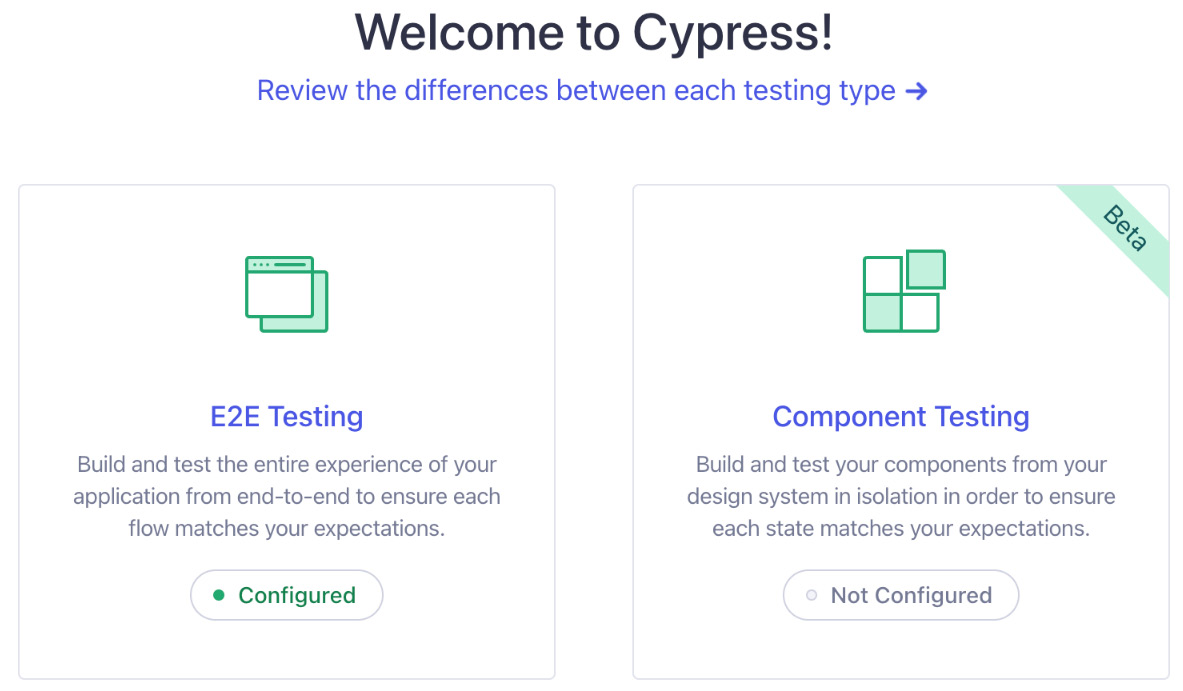
Figure 15.1 – The Cypress dashboard
Figure 15.2 shows the folders and files that will be automatically added to your Angular application directory. These are required for any web application that uses Cypress. We will add more to this because we are using TypeScript, but we will do that later. For now, just hit the Continue button; you will be taken to the following screen:

Figure 15.2 – Configuration Files
Figure 15.3 shows that you can choose different browsers to run your E2E tests. You can choose from Chrome, Microsoft Edge, and Firefox. We will stop here because we haven’t written any tests yet, and we still need to help Cypress learn TypeScript. Stop Cypress from running by pressing Ctrl + C in your Terminal:
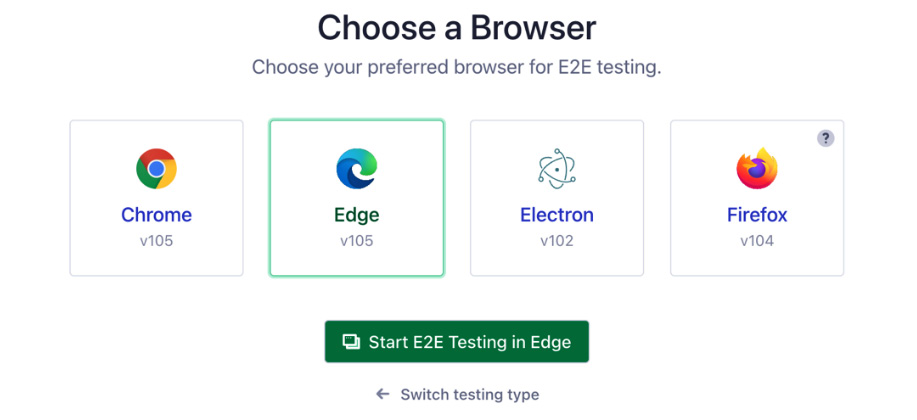
Figure 15.3 – Choose a Browser
Figure 15.4 shows the generated cypress folders, which contain additional folders inside them, and the cypress.config.ts file for editing some of Cypress’s default behaviors. We will discuss the cypress.config.ts file later:
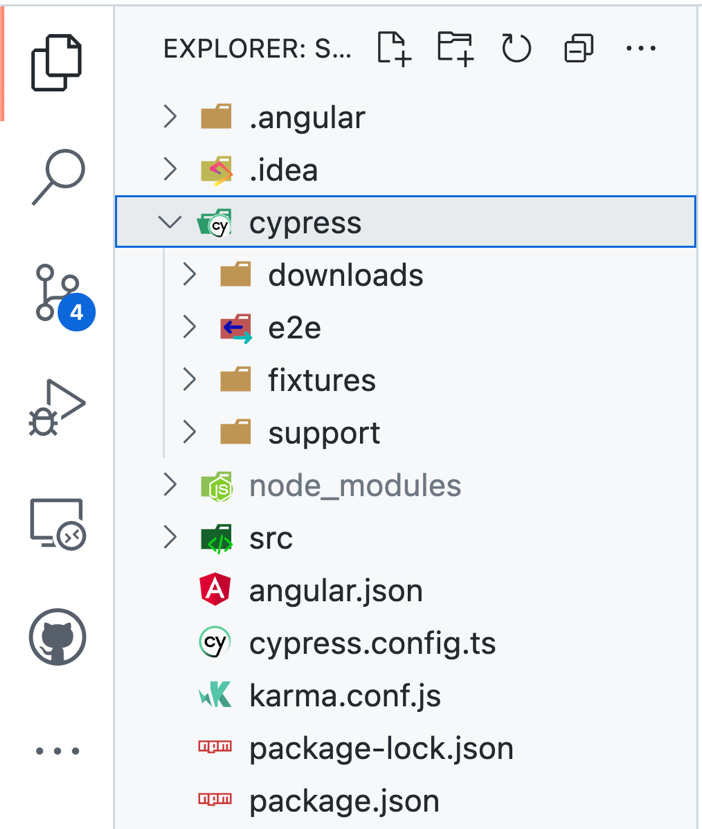
Figure 15.4 – Cypress folders and files
TypeScript for Cypress
To help Cypress understand TypeScript, we must add the tsconfig.json file to the root directory of the cypress folder. Create a new file and name it tsconfig.json; then, write the following configuration:
{
    "extends": "../tsconfig.json",
    "compilerOptions": {
        "types":["cypress", "@testing-library/cypress"],
        "isolatedModules": false,
        "allowJs": true,
        "experimentalDecorators": true,
        "skipLibCheck": true
    },
    "include": [
        "./**/*.ts",
    ],
    "exclude": []
}
The preceding code inherits the tsconfig.json file at the root of our Angular application. Then, we added cypress and @testing-library/cypress to the tsconfig.json file, which will help Cypress understand any TypeScript files in the Cypress directory. The array shows that we are including these TypeScript files in any level of the directory.
Now that we have set up Cypress for TypeScript, let’s update the cypress.config.ts file in our Angular application.
Updating the Cypress config file
What is a Cypress config file? The cypress.config.ts file is used to store any configurations for things such as environments, timeouts, folders/files, screenshots, videos, downloads, browsers, viewports, and more that are specific to Cypress.
You are modifying the default behavior of Cypress by supplying any optional configurations you want to add. So, update the cypress.config.ts file with the following code:
import { defineConfig } from "cypress";
export default defineConfig({
  e2e: {
    setupNodeEvents(on, config) {
      // implement node event listeners here
    },
    baseUrl: "http://localhost:4200",
    video: false,
  },
});
The preceding code configures the base URL for Cypress where Angular runs. There is also a configuration for the video that disables the end-to-end testing recording. We are only using baseUrl and the video properties of the Cypress configuration.
In the next section, we will start writing some simple Cypress tests to help you gain confidence in writing tests and see how easy it is to write tests in Cypress.
Writing Cypress tests
In this section, we will start writing simple Cypress tests to see how fun and easy it is to write tests using Cypress. We will start the tests by adding a test attribute in an HTML tag in the authentication form. We are going to edit the auth-form.component.html file to write the test-id attribute. Here is what was changed in the auth-form.component.html line:
<mat-card-title data-cy="auth-title">{{title}}</mat-card-title>You can see the attribute we added in the preceding code. data-cy is an attribute for the test ID that Cypress will use to target the HTML element we want to test.
Now that we’ve added our first test ID, let’s go to the e2e folder inside the cypress directory and create a new file. The filename needs to contain .cy. Name the new file anti-heroes.cy.ts and then add the following code:
/// <reference types="cypress"/>
describe("Anti Heroes Page", () => {
  // basic test
  it("should display login page", () => {
    cy.visit("/");
    cy.url().should("include", "/login");
    cy.get("[data-cy=auth-title]").should("contain",
                                          "Login");
  });
});
The preceding code provides the first description of our test. First, we are adding a reference to the Cypress types to get extra tooling using TypeScript.
Then, we have the describe function, which is used for group tests. The describe function has two arguments. The first argument is a string, and it passes the name that the describe function will use. The second argument is a callback function that will contain all tests under the describe function.
The it function also accepts a string for the name of the test and a callback function for the details of the tests. The first it function tests whether an authenticated user can see the login page if the user visits the root domain of the Angular app’s URL.
cy is an object where you can chain different types of commands. We are using the visit command, which allows us to write the URL we will use to navigate to localhost:4200 once we run the test. cy.url asserts that the URL can be found on the login subpage. We are also testing mat-card-title through the data-cy= "auth-title" attribute, which has the word Login in this test.
As you can see, the first test is easy to write. The setup for writing the test is also easy. But before we run our first test, let’s create a user for our test:
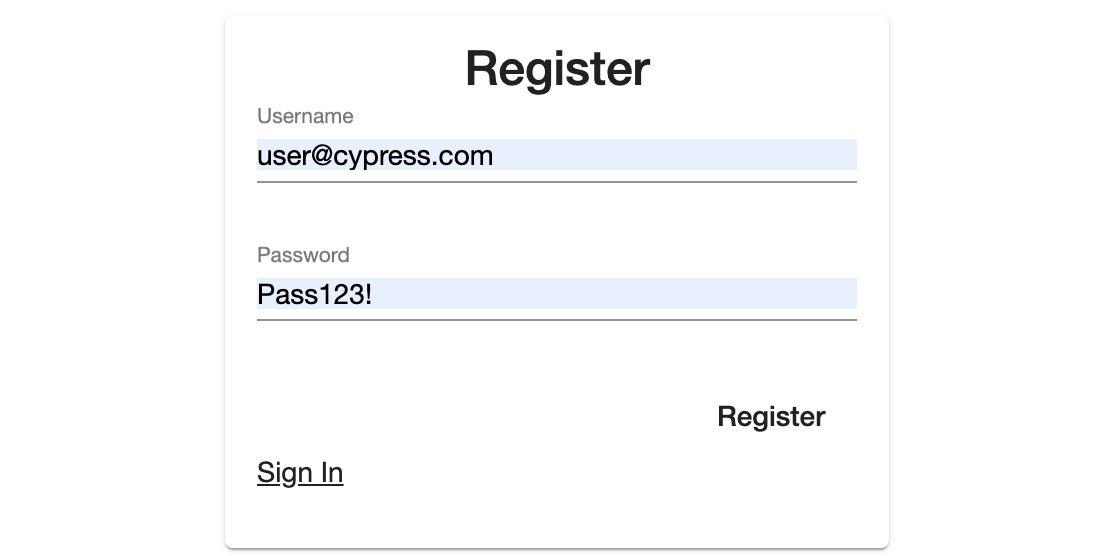
Figure 15.5 – A user for E2E testing (Angular app login page)
In Figure 15.5, we are creating a user for our E2E testing. The [email protected] username is just a made-up email address you are not required to use. You can use whatever email address you want. We will use the [email protected] user to log into our app and use the web app like a real user would use our application.
Now, go to your Terminal and run the npm run test command to run Angular’s E2E tests. Go to the Specs section of the Cypress dashboard to find the list of E2E specs:
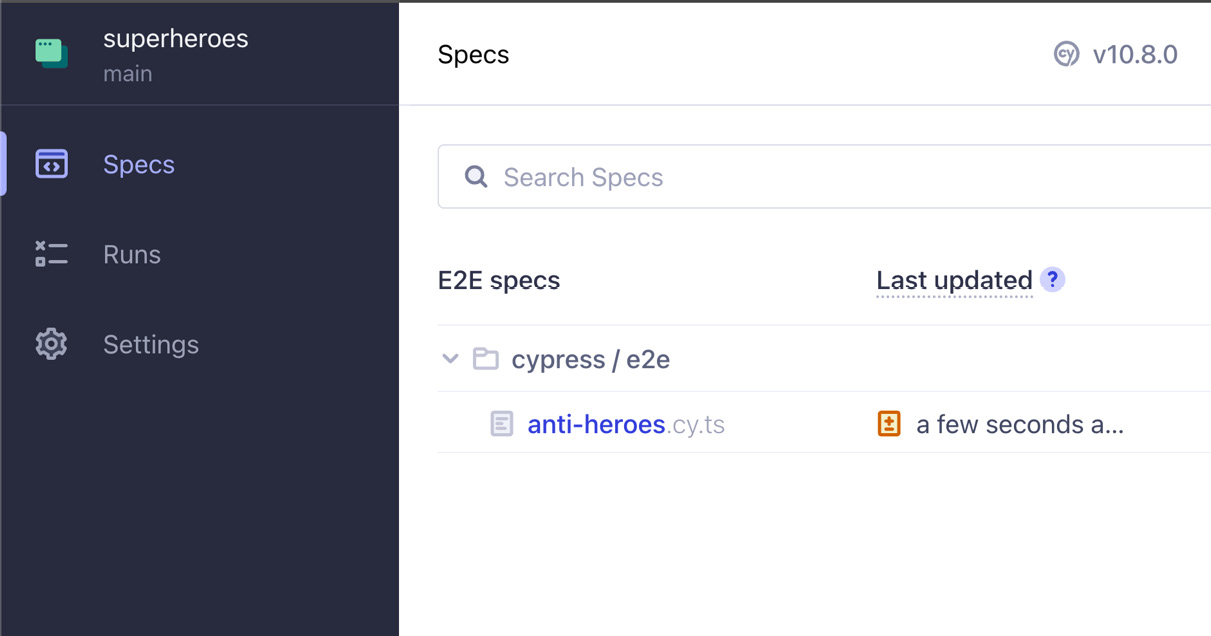
Figure 15.6 – E2E specs
Figure 15.6 shows the list of E2E specs files for testing. Here, there is a single spec file; this is the one we created earlier.
Click on the anti-heroes spec to run the test we created and see whether it is passing or failing:

Figure 15.7 – Passing test
Figure 15.7 shows that the two asserts we wrote in our test are passing. This means that the login subpage is where the unauthenticated user was directed after landing on the root domain page. The passing test also tells us that the title of the form the user saw was Login and not Register.
If you change should("contain", "Login"); to should("contain", "Register");, the test will fail, which is an indicator that the test is accurate and that it is not just passing anything we write in the test.
With that, we have finished writing a simple E2E test using Cypress and saw that our tests are passing. In the next section, we will mock HTTP responses and intercept HTTP requests that our Angular application sends so that we no longer need the backend application to run these tests.
Mocking HTTP responses and intercepting HTTP requests
Mocking tests can help us isolate and focus on tests and not on the state of external dependencies or behavior. In this section, we will mock the HTTP responses of our server and intercept the HTTP requests of our Angular application for testing. We are going to intercept the HTTP requests so that we can send fake responses to Angular and not pollute our dev database.
We will start by adding a new file to the root of the cypress directory. Name the file global.d.ts. The global.d.ts file, also known as global libraries, provides a way to make interfaces and types globally available in our TypeScript code.
After creating the global.d.ts file, write the following code inside it:
/// <reference types="cypress"/>
declare namespace Cypress {
    interface Chainable {
        getCommand(url: string, responseBody: Array<any>):
          Chainable<any>;
        deleteCommand(url: string): Chainable<any>;
        postCommand(url: string, requestBody: any):
          Chainable<any>;
    }
}
The preceding code allows us to use custom chainable commands, which will give us IntelliSense whenever we hit the dot after writing cy.
Now that we’ve added global.d.ts, let’s install a library that can generate a unique universal ID, also known as a UUID, and use it as a temporary ID for a fake object we will create to respond to Angular’s HTTP request.
The following npm command will install an npm library called uuid to help us generate the UUID we need:
npm i uuid
We also need the types for the uuid library we installed:
npm i -D @types/uuid
The preceding npm command will install the uuid TypeScript types.
Now, we need a file for the fixtures in our Cypress test. A fixture is the fixed state of an object or array that’s used as a baseline for running tests:
- Go to the fixtures folder inside the cypress directory in your application. Create two JSON files and name them anti-heroes.json and user.json.
- Copy the content of the file from https://github.com/PacktPublishing/Spring-Boot-and-Angular/blob/main/Chapter-15/superheroes/cypress/fixtures/anti-heroes.json and paste it into the anti-heroes.json file.
- Next, copy the content of the file from https://github.com/PacktPublishing/Spring-Boot-and-Angular/blob/main/Chapter-15/superheroes/cypress/fixtures/user.json and paste it into the user.json file.
The preceding JSON objects are objects that we are going to use in our fixtures. We will use these as response bodies to send mock responses.
- Now, let’s update the commands.ts file in the support folder inside the cypress directory. Use the following code:
// @ts-check
///<reference path="../global.d.ts" />
/// <reference types="cypress"/>
import { v4 as uuidv4 } from "uuid";Cypress.Commands.add("getCommand", (url: string, responseBody: Array<any>) => {cy.intercept("GET", url, {statusCode: 200,
body: responseBody,
});
});
Cypress.Commands.add("deleteCommand", (url: string) => {cy.intercept("DELETE", url, {statusCode: 200,
});
});
Cypress.Commands.add("postCommand", (url: string, requestBody: any) => {requestBody.id = uuidv4();
cy.intercept("POST", url, {statusCode: 201,
body: requestBody,
});
});
The preceding code implements the custom chainable commands we wrote inside the global.d.ts file. getCommand, deleteCommand, and postCommand require URLs as strings to intercept any HTTP requests. The custom chainable commands require a state, which will be a fixture.
- Now, let’s write more tests in anti-heroes.cy.ts. But first, we must add more test IDs for the tests we write.
Go to auth-form.component.html and update the code with the following code:
<mat-card>
    <mat-card-title
      data-cy="auth-title">{{title}}</mat-card-title>
    <mat-card-content>
        <form [formGroup]="form"
          (ngSubmit)="submit()">
        <p *ngIf="error" class="error">
            {{ error }}
        </p>
        <p>
            <mat-form-field>
            <input type="text"
              matInput placeholder="Username"
              formControlName="email"
              data-cy="email">
            </mat-form-field>
        </p>
        <p>
            <mat-form-field>
            <input type="password"
              matInput placeholder="Password"
              formControlName="password"
              data-cy="password">
            </mat-form-field>
        </p>
        <div class="button">
            <button type="submit"
              mat-button data-cy="submit-login">
              {{title}}</button>
        </div>
        <p *ngIf="title == 'Login'" class="link"
          [routerLink]="['register']"
          routerLinkActive="router-link-active">
          Create account</p>
        <p *ngIf="title == 'Register'"
          class="link" [routerLink]="['']"
          routerLinkActive="router-link-active">
          Sign In</p>
        </form>
    </mat-card-content>
</mat-card>
The preceding code contains four data-cy attributes that will be used as targeted selectors. You can find the data-cy selectors in the mat-card-title, inputs, and button elements.
- The next file to update will be navbar.component.html. Use the following code to update the file:
<p>
<mat-toolbar color="primary">
<span data-cy="logo">Angular CRUD</span>
</mat-toolbar>
</p>
The preceding code contains one data-cy attribute, which you can find in the span element.
- Next, we need to update the anti-hero-list-component.html file:
<table mat-table [dataSource]="antiHeroes" class="mat-elevation-z8">
<!-- Data for columns -->
<ng-container *ngFor="let item of headers"
[matColumnDef]="item.fieldName">
<th mat-header-cell *matHeaderCellDef>
{{item.headerName}} </th><td mat-cell *matCellDef="let element"
data-cy="row"> {{element[item.fieldName]}}</td>
</ng-container>
<!-- Actions for specific item -->
<ng-container matColumnDef="actions">
<th mat-header-cell *matHeaderCellDef>
Actions </th>
<td mat-cell *matCellDef="let element">
<button (click)="selectAntiHero(element,
0)" mat-raised-button color="primary"
data-cy="view">
<mat-icon>pageview</mat-icon> View
</button>
<button (click)="selectAntiHero(element,
1)" mat-raised-button color="warn"
data-cy="delete">
<mat-icon>delete</mat-icon> Delete
</button>
</td>
</ng-container>
<tr mat-header-row
*matHeaderRowDef="headerFields"></tr>
<tr mat-row *matRowDef="let row;
columns: headerFields"></tr>
</table>
The preceding code contains three data-cy attributes, which you can find in the td element, and two button elements.
- Next, we must edit the anti-hero-command-bar.component.html file using the following code:
<p>
<mat-toolbar>
<button mat-raised-button color="primary"
(click)="emitAction(0)"data-cy="create">
<mat-icon>fiber_new</mat-icon> Create
</button>
<button mat-raised-button color="warn"
(click)="emitAction(1)"data-cy="delete-all">
<mat-icon>delete</mat-icon> Delete All
</button>
<button mat-button color="danger"
(click)="logOut()" data-cy="logout">
<mat-icon>logout</mat-icon> logout
</button>
</mat-toolbar>
</p>
The preceding code contains three selectors, which you can find in the button elements.
- The last file to update is anti-hero-form.component.html:
<mat-card class="form-card">
<h2>{{ selectedAntiHero ? "Update/View Hero" :"Create Hero" }}</h2>
<form class="anti-hero-form" [formGroup]="form">
<mat-form-field class="example-full-width"
appearance="fill"><mat-label>
First Name</mat-label>
<input matInput formControlName="firstName"
placeholder="Ex. Tony" data-cy="firstName"/>
</mat-form-field><mat-form-field
class="example-full-width" appearance="fill">
<mat-label>Last Name</mat-label>
<input matInput formControlName="lastName"
placeholder="Ex. Stark" data-cy="lastName"/>
</mat-form-field>
<mat-form-field class="example-full-width"
appearance="fill"><mat-label>House</mat-label>
<input matInput formControlName="house"
placeholder="Ex. California" data-cy="house"/>
</mat-form-field><mat-form-field
class="example-full-width" appearance="fill">
<mat-label>Known As</mat-label>
<input matInput formControlName="knownAs"
placeholder="Ex. Iron Man" data-cy="knownAs"
/></mat-form-field><div class="button-group">
<button mat-raised-button color="primary"
(click)="emitAction()" data-cy="action"
>{{ actionButtonLabel }}</button>
<button mat-raised-button color="warn"
(click)="clear()">Clear</button>
</div>
</form>
</mat-card>
The preceding code contains five inputs, which you can find in the input elements and the button element.
With that, we have added the necessary test ID attributes to the HTML elements we are going to test later. We will need the mentioned data-cy test IDs when we start writing tests in the anti-heroes.cy.ts file.
- Now, let’s start writing tests in anti-heroes.cy.ts. Here is the new code:
/// <reference types="cypress"/>
describe("Login Page", () => {beforeEach(() => {cy.fixture("anti-heroes").then(function (data) {/* register custom commands. */
cy.getCommand("/api/v1/anti-heroes", data);cy.deleteCommand("/api/v1/anti-heroes/*");});
cy.visit("/");cy.fixture("user").then((data: { email: string;password: string }) => {cy.get("[data-cy=email]").type(data.email);cy.get("[data-cy=password]").type(data.password);
cy.get("[data-cy=submit-login]").click();});
});
afterEach(() => {cy.get("[data-cy=logout]").click();});
it.skip("should display login page", () => {cy.visit("/");cy.url().should("include", "/login");cy.get("[data-cy=auth-title]").should("contain","Login");
});
});
The preceding code shows a describe function that has two other functions inside it.
The first function inside the describe function is called beforeEach, which runs each time a test starts running. The beforeEach function keeps its state and uses it in the test. This function fits scenarios where the test has to do precisely the same thing that other tests will also have to do – for instance, going to a particular URL, logging in, and intercepting HTTP calls using custom chainable commands such as getCommand and deleteCommand.
The second function inside the describe function is called afterEach. The afterEach function runs every time a test ends. This function is suitable for cleaning up or logging out the user in the test. The beforeEach and afterEach functions save us a lot of repeatable code.
- Now, let’s add some tests to the anti-heroes.cy.ts file. Copy the following code and put it under the first test we wrote:
it("should display logo", () => { cy.get("[data-cy=logo]").should("contain", "Angular CRUD");});
it("should render anti-heroes", () => {cy.fixture("anti-heroes").then(function (data) {cy.get("[data-cy=row]").should("have.length", 24);});
});
it("should remove a card after clicking a delete button", () => { const index = 1;cy.get("[data-cy=delete]").eq(index).click();cy.get("[data-cy=row]").should("have.length", 20);});
it("should add a new hero", () => { const firstName = "Bucky";const lastName = "Barnes";
const house = "Marvel";
const knownAs = "The Winter Soldier";
cy.get("[data-cy=create]").click();cy.get("[data-cy=firstName]").type(firstName);cy.get("[data-cy=lastName]").type(lastName);cy.get("[data-cy=house]").type(house);cy.get("[data-cy=knownAs]").type(knownAs);cy.postCommand("/api/v1/anti-heroes", {firstName,lastName,house,knownAs,});
cy.get("[data-cy=action]").click();cy.fixture("anti-heroes").then(function (data) {cy.get("[data-cy=row]").should("have.length", 24);});
The preceding code shows the tests we are going to use for Cypress. You can see that fixture needs a string, which is the name of the JSON file. The data from fixture is the parameter of the anonymous function.
We are asserting 24 because there are four elements for every object we use in data-cy=" row", which is how we built the HTML elements on the user interface. There are also six objects inside the array of the anti-heroes.json file.
The newly added tests show how we can pick a particular object from a list or array of rendered UIs using the eq keyword and an index number.
The newly added tests also show how to write text into an input field by calling the click and type functions. Then, you can use the postCommand custom chainable command to intercept HTTP POST requests.
- Lastly, before running the test, make Cypress skip the simple test we wrote earlier by calling skip, like so:
it.skip("should display login page", () => {
The preceding code changed the simple test from run to don’t run.
The entire code for the anti-heroes.cy.ts spec file can be found at https://github.com/PacktPublishing/Spring-Boot-and-Angular/blob/main/Chapter-15/superheroes/cypress/e2e/anti-heroes.cy.ts.
Now, we can run the anti-heroes.cs.ts spec file to see whether everything will pass, as shown in the following figure:

Figure 15.8 – Passing tests
Figure 15.8 shows that the should display login page test was skipped, while the rest of the tests passed.
You can see what is happening inside the beforeEach function, like so:

Figure 15.9 – BEFORE EACH DOM snapshot
Figure 15.9 shows the steps that were taken by the beforeEach function. The steps are DOM snapshots of the web application.
Let’s also check the test body of the anti-heroes.cy.ts spec file. You should see the following information:
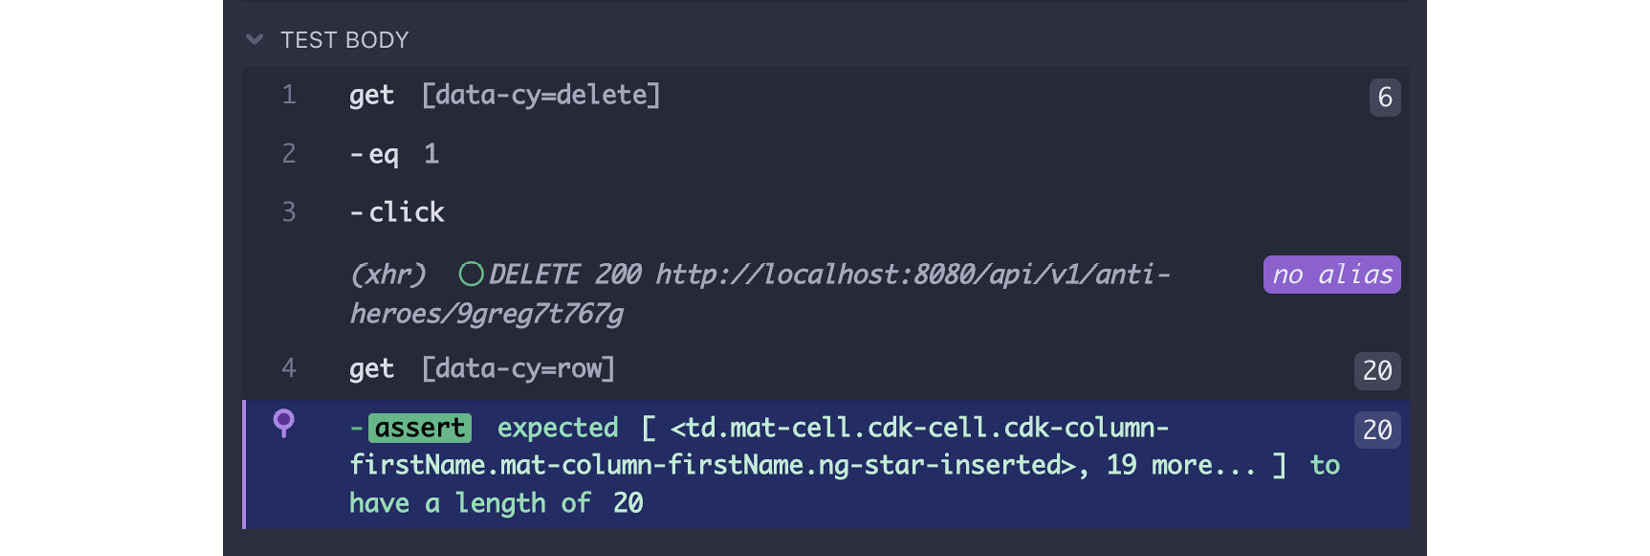
Figure 15.10 – TEST BODY DOM snapshot
Figure 15.10 shows the steps that were taken in the test body. These are the actions that you wrote in the anti-heroes.cy.ts file.
We can also see what happened inside the afterEach function. You should be able to see the following output:

Figure 15.11 – AFTER EACH DOM snapshot
Figure 15.11 shows the steps inside the afterEach function. Here, you can see that the afterEach function logged out and redirected the user to the application’s login page.
And that’s how you write Cypress tests. Now, let’s summarize what was covered in this chapter.
Summary
With this, you have arrived at the end of this chapter. First, you learned what Cypress is and how easy it is to set up and write an end-to-end test. You also learned how to intercept HTTP requests and mock HTTP responses.
In the next chapter, you will learn how to package both frontend and backend applications into a single executable JAR file.