unit
3
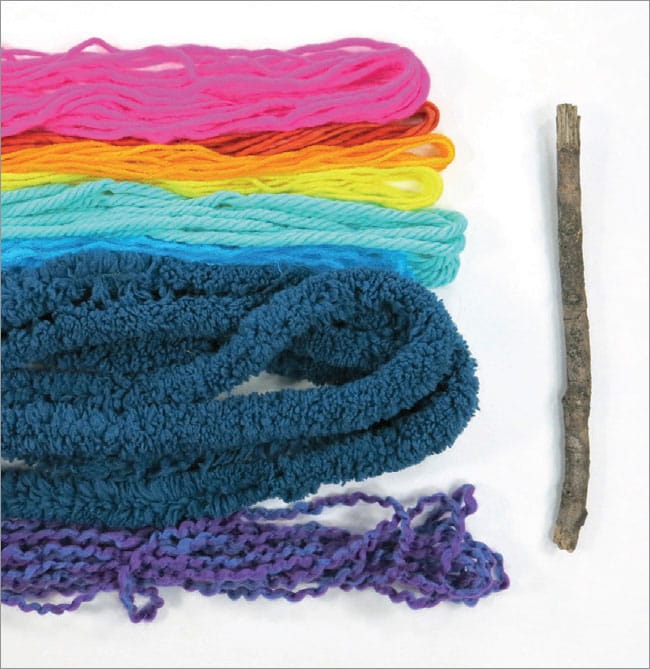
fiber arts
Fiber arts is just that…art created with fibers of all kinds! There are no limitations here as we explore fibers such as yarn, wool roving (or sheep’s hair) and fabric in new and unusual ways which leads us to new and unusual ideas! Can a bundle of yarn be transformed into a pompom or a tassel? Can a toilet paper tube be used to create a knitting spool? Can a plain piece of fabric become a colorful work of art? With fiber arts, the answer is yes. Explore these labs with an open mind and see what amazing fiber arts masterpieces you can create!
These labs use basic sewing skills, refer to Stitching Basics: Know Before You Sew, starting shown here, for how to thread a needle, tie a knot, form a running stitch, whipstitch, and blanket stitch, how to end a row of stitching with a knot, and how to sew on a button.

LAB |
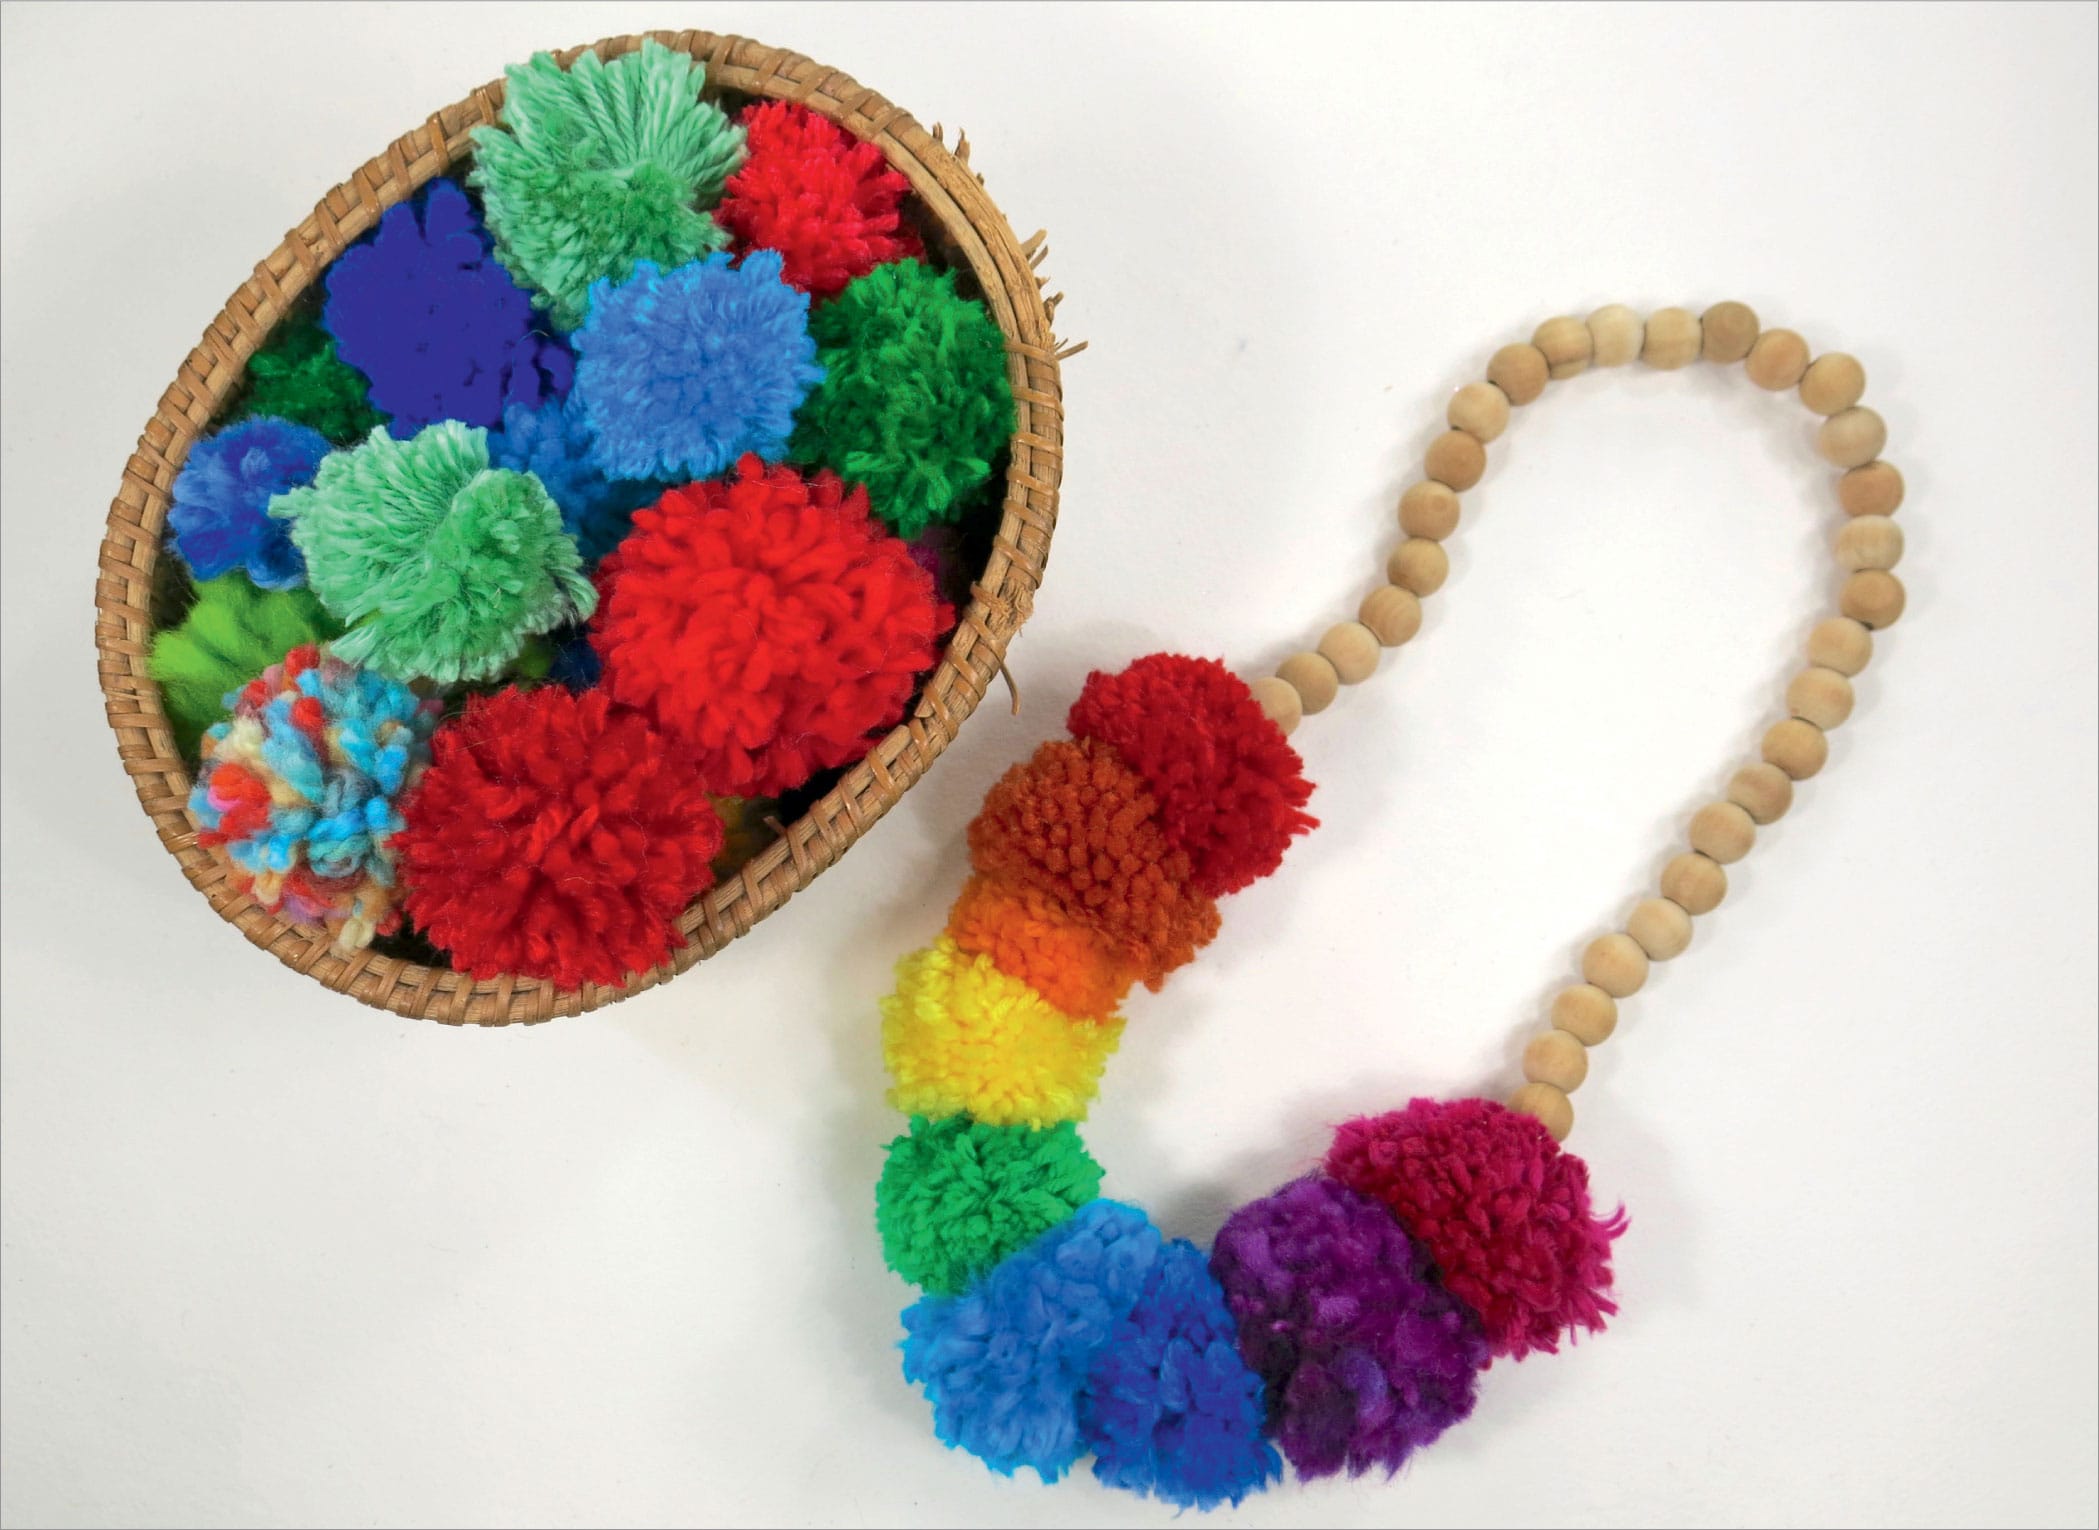
pom poms |
Pom poms are fun and easy to make. Just grab some yarn, scissors, and a small piece of cardboard to get started. Create a collection of pom poms to make necklaces, add to fiber projects, or just to throw around like glitter!

making a pom pom
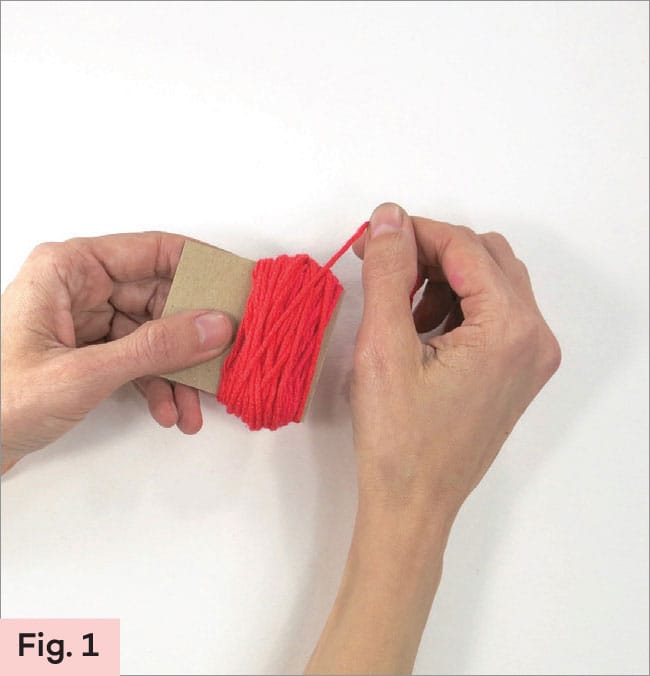
1. For a bigger pom pom, wrap the yarn around the long end of the cardboard. For a smaller pom pom, wrap the yarn around the shorter side of the cardboard. To start, hold the end of the yarn in place with your thumb. (Fig. 1)
2. Wrap the yarn around and around the cardboard. Be sure to overlap the yarn. The more yarn you wrap, the fluffier the pom pom.
3. When you have wrapped enough yarn, cut the end of the yarn.
4. Gently slide the yarn off the cardboard. It should look like a large letter O. If the yarn unravels, just start over again. (Fig. 2)

5. Cut a piece of yarn about 6" (15.2 cm) long. Place the length of yarn around the center of the wrapped yarn. (Fig. 3)

6. Tie a knot, pulling as tight as possible. Then tie a second knot for added security. (Fig. 4)

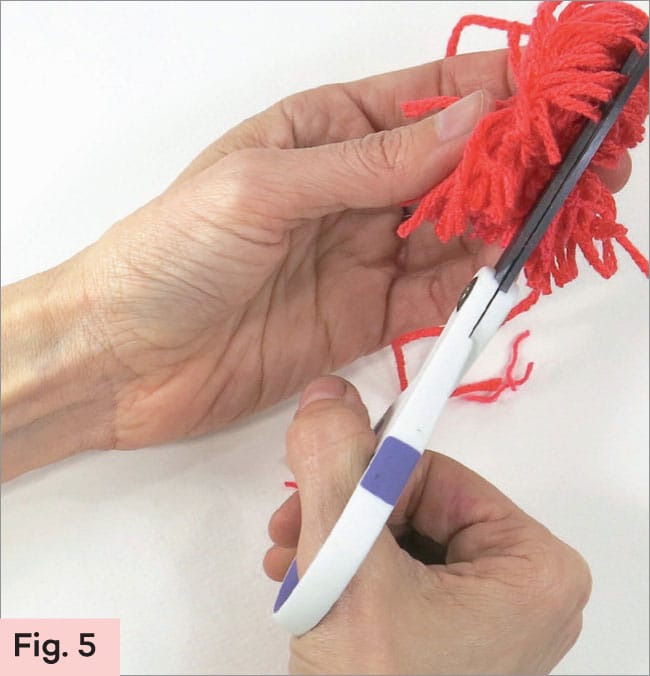
7. Slide the scissors under the loops on both sides of the center. Cut both the top and the bottom loops, as shown. (Fig. 5)
8. Now give the pom pom a haircut to make it fluffier and fuller looking. (Fig. 6)

LAB |
rainbow pom pom necklace |
With a collection of colorful pom poms, why not create a necklace? Pom pom necklaces can be made with a variety of colorful pom poms or created in rainbow order, like this one!
making a pom pom necklace
1. Cut a piece of elastic string that is your favorite necklace length. For this necklace, the string is 24" (61 cm) long. Layout your pom poms in the rainbow or desired color order.
2. Thread a sharp tapestry needle with the elastic string. Find the middle of the pom pom and slide your needle through. (Fig. 1)

3. Continue to slide the pom poms down the needle onto the elastic string in the order of the rainbow. (Fig. 2)

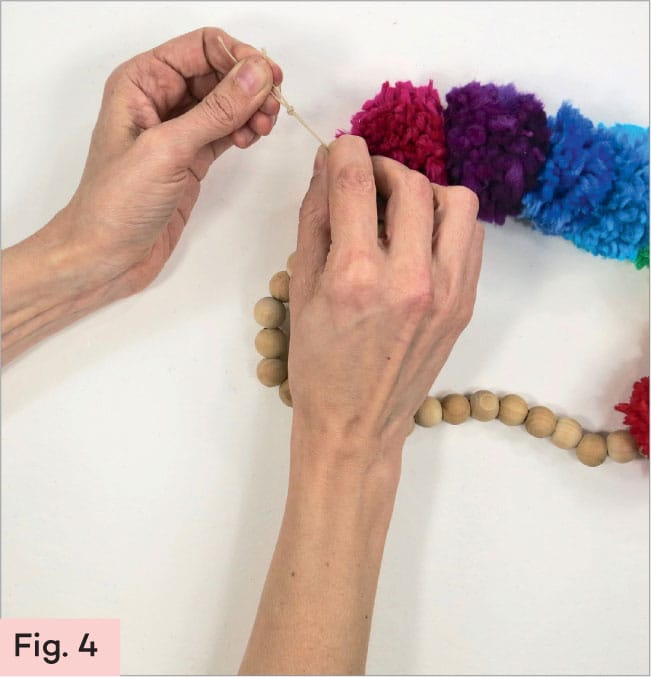
4. Slide the pompoms to the middle of the elastic. On both sides of the pom poms, slide beads onto the string until the string is full. (Fig. 3)

5. Tie the ends of the elastic string together with an overhand knot. (Fig. 4)
LAB |
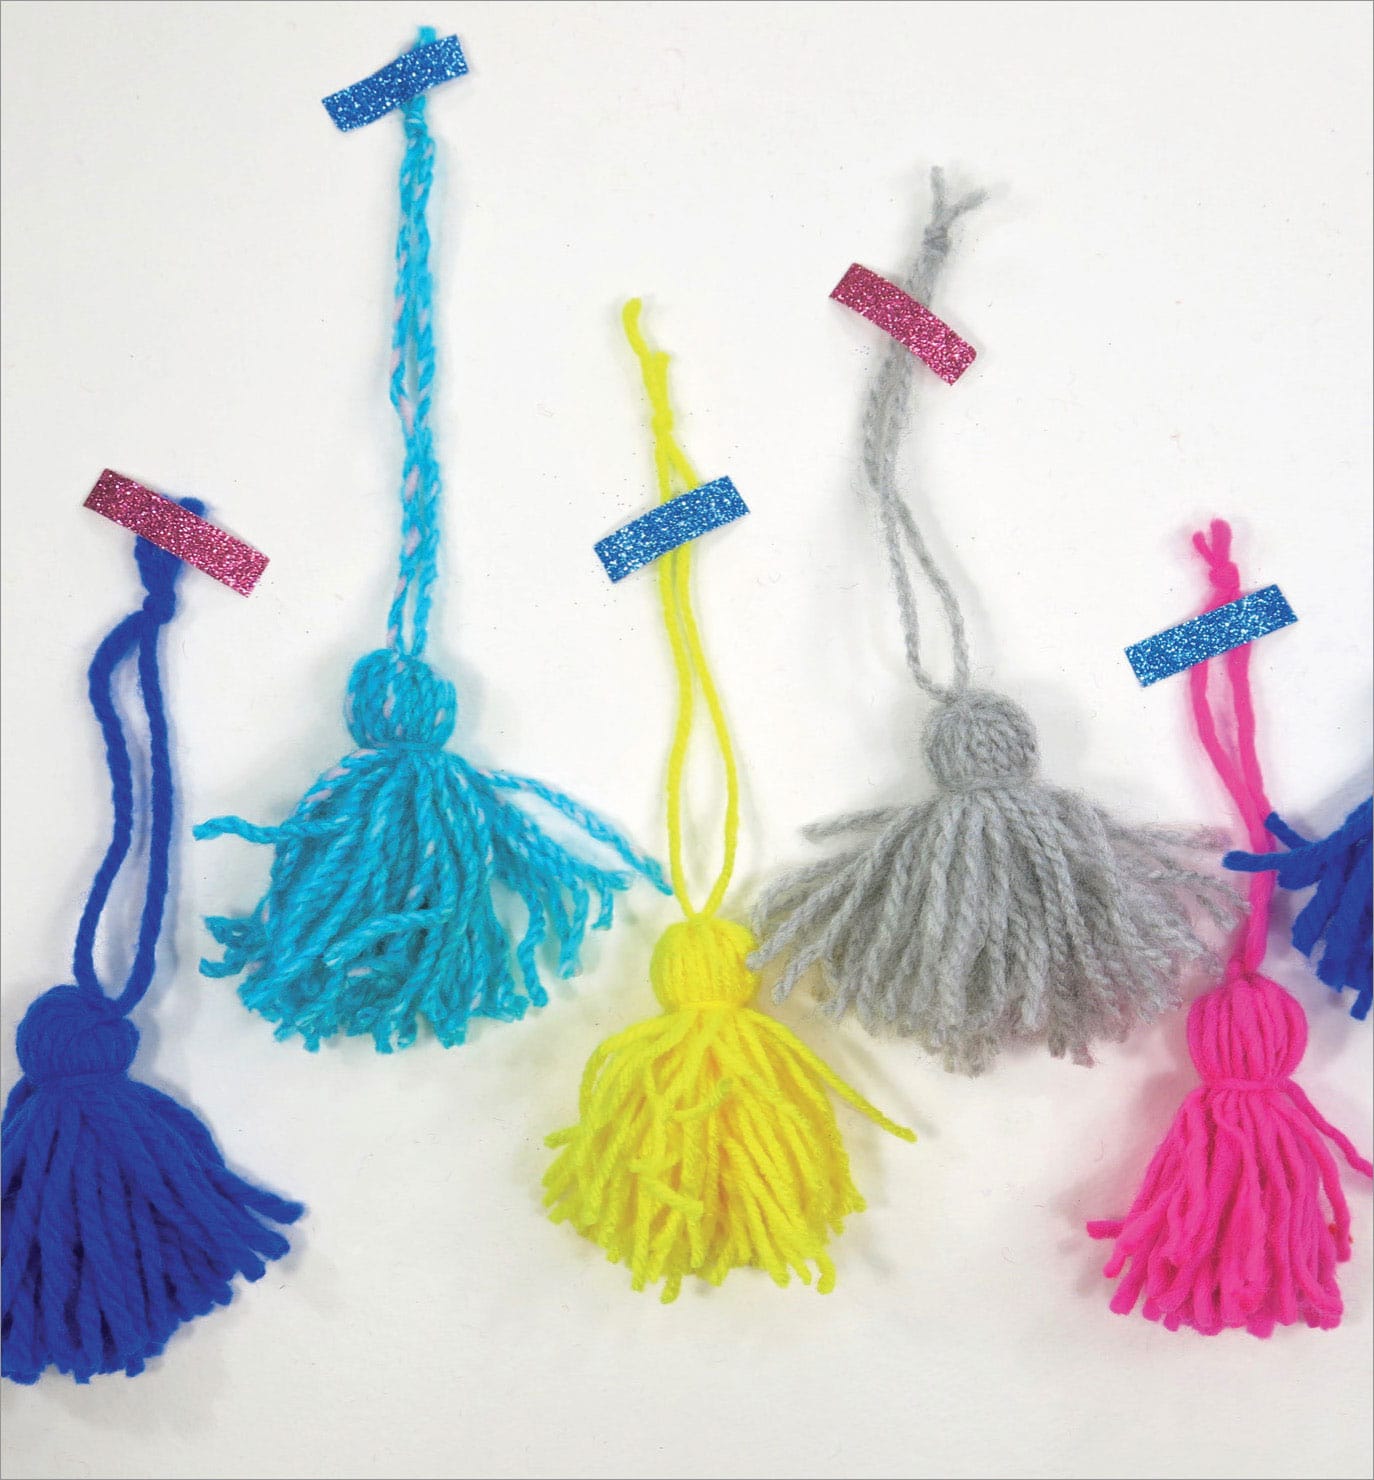
yarn tassels |
Like pom poms, tassels are simple to make and they are often used to decorate stitched projects (like Lab 12). Try making some with embroidery floss for smaller tassels that can be used to make necklaces, like Lab 22!
making a yarn tassel
1. Hold the end of yarn in place along the long edge of the cardboard. Bring the yarn to the top of the cardboard and around. (Fig. 1)

2. Wrap the yarn around the cardboard about fifteen to twenty times. The more it is wrapped, the fuller the tassel will be. Cut the yarn. (Fig. 2)

3. Carefully slide the yarn off the cardboard. Gently open the yarn to see the large O-shaped opening. If the yarn unravels, just start again. At the top of the O, slide a 10" (25.4 cm) strand of yarn inside the opening. Tie the ends together with a double knot to make a hanger for the tassel. (Fig. 3)

4. Wrap the remaining 10" (25.4 cm) length of yarn around the O-shaped yarn about 1" (2.5 cm) from the top. Pull the 10" (25.4 cm) length of yarn tight and tie a double knot. Trim the ends of the tied yarn. (Fig. 4)

5. Cut through the loops at the bottom of the O to create the tassel. (Fig. 5)

LAB |
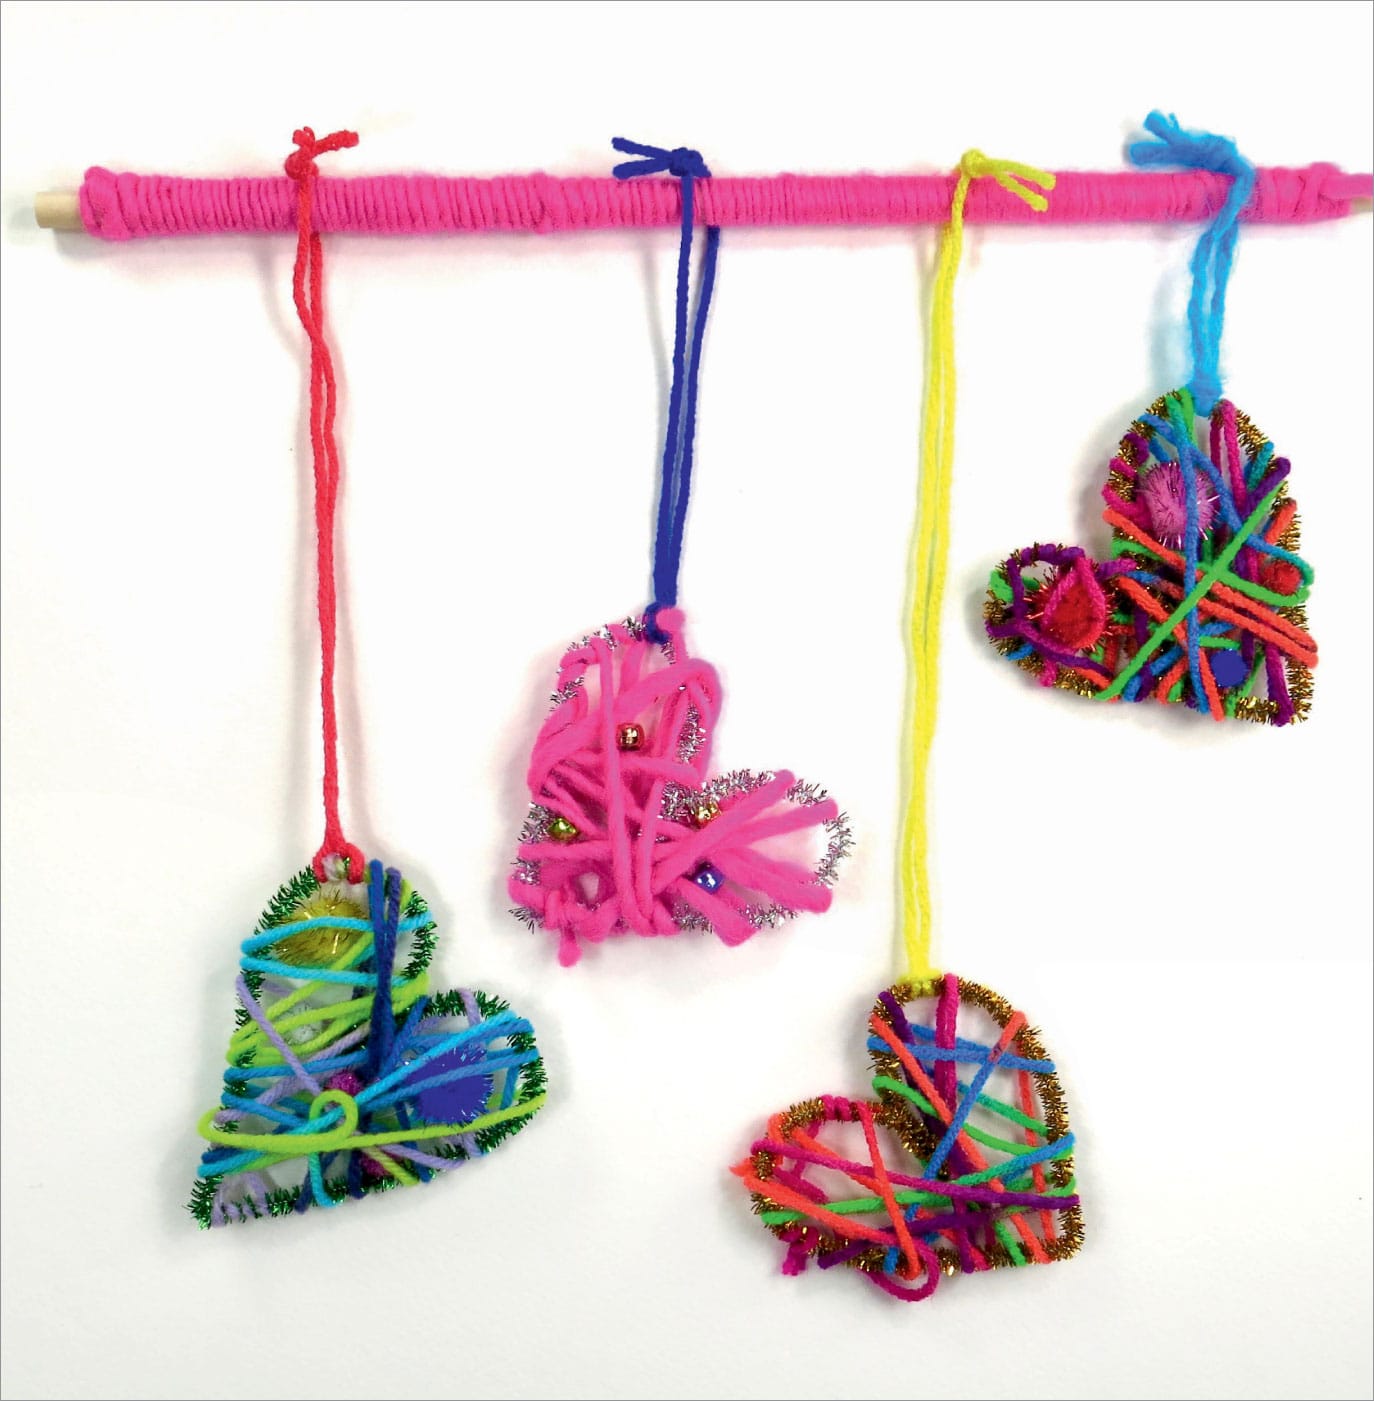
yarn bombed heart wall hanging |
Why not create an object to be yarn bombed? In addition to wrapping something found around the house, let’s create a fun shape to wrap yarn and beads around. In this lab, let’s learn to create heart shapes from chenille sticks to wrap in yarn. Once that has been mastered, explore other shapes to yarn bomb like stars, a crescent moon, even letters of the alphabet!
making a yarn bombed heart wall hanging
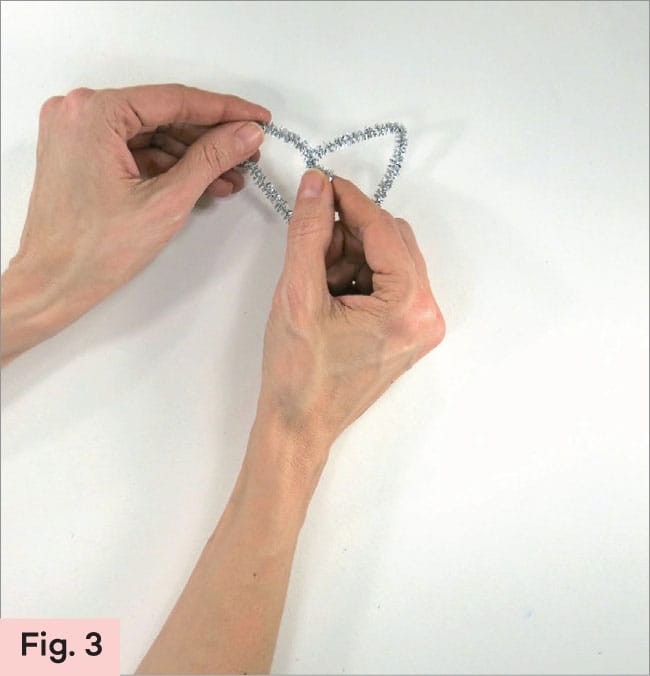
1. Bend a chenille stick in half. (Fig. 1) Bring the ends of the chenille stick toward the middle to create a heart shape. (Fig. 2) Overlap the ends of the stick and twist them together to form a heart. (Fig. 3)


2. To yarn bomb the heart, wrap the end of yarn around the chenille stick a couple of times. No need to tie a knot, the stick will hold the yarn in place. (Fig. 4)

3. Continue to wrap the yarn around the heart a couple of times to decorate the chenille stick. Be sure to maintain the heart shape. Add beads, if you want to, by sliding them onto the yarn; they add sparkle! (Fig. 5)
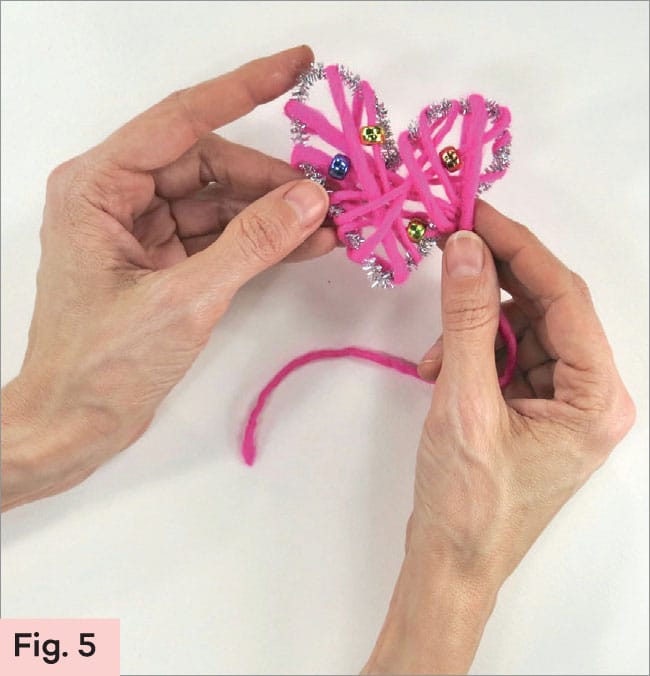
4. You can also slide some small pom poms into the heart and wrap the yarn around them to hold them in place. (Fig. 6)

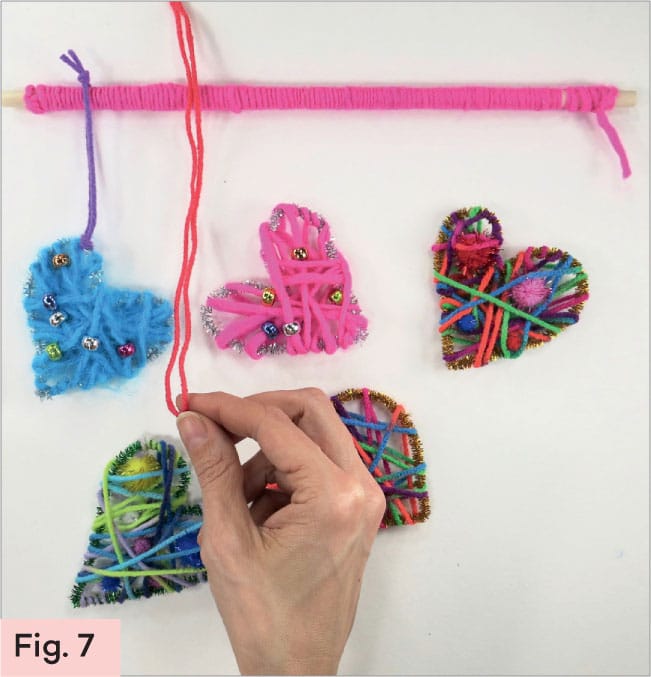
5. To create a wall hanging, wrap a stick or a dowel rod with yarn. Glue the ends of the yarn in place. Then, use different length strands of yarn to tie the hearts to the stick. Add a length of yarn at the top to hang your heart art. (Fig. 7)
LAB |
yarn wrapped worry doll |
Worry dolls are traditionally small, hand-made dolls from Guatemala. They are created from wire, wool, and fabric scraps. Worry dolls are usually shared with children who tell the doll their fears or worries. The doll is then placed under the child’s pillow and slept on. It’s believed that by morning, the doll will have taken away the worries. In this lab, worry dolls are created in a nontraditional way with clothespins and yarn.
making a yarn wrapped worry doll
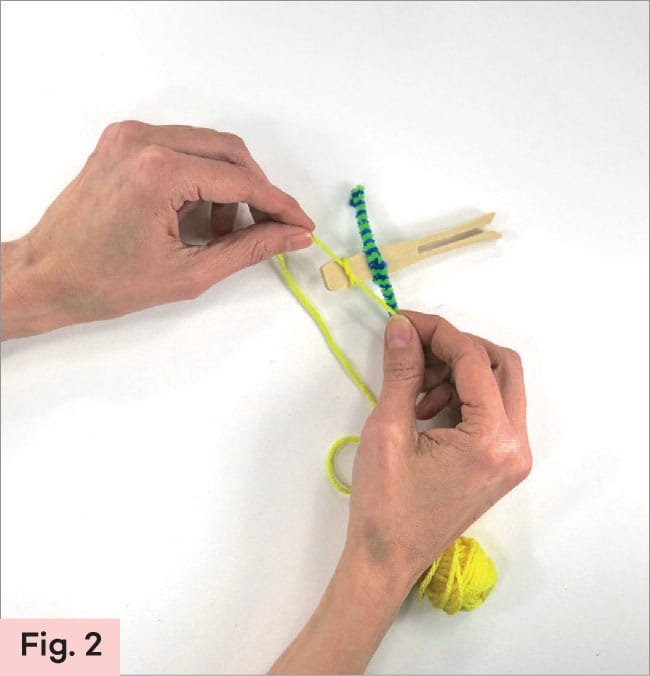
1. Cut a chenille stick in half for the arms. Hold the middle of the chenille stick to the middle of the clothespin. Bring the stick around the front of the clothespin and twist into place. (Fig. 1)

2. The top of the clothespin is the head of the worry doll. Double knot the yarn you plan to use for the doll’s torso underneath the head of the worry doll. (Fig. 2)
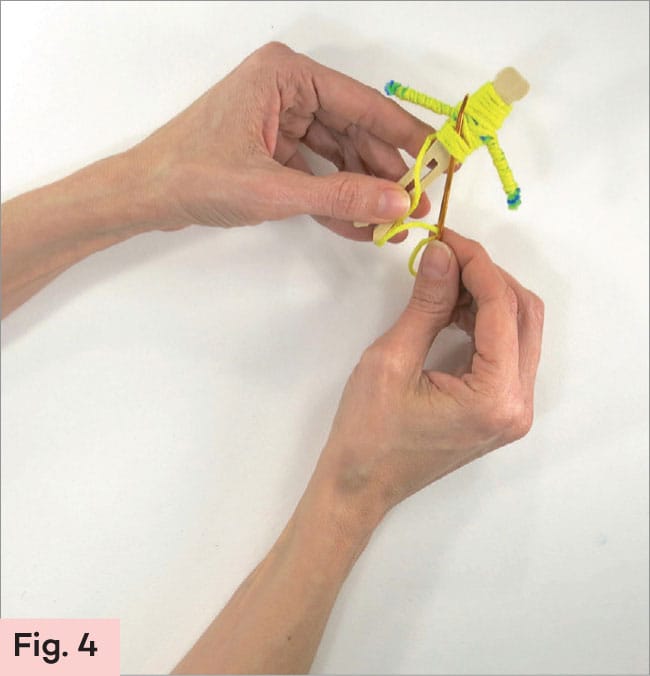
3. Wrap the yarn around the clothespin down to the chenille stick. Then make an X with the yarn, looping the yarn around the stick. Wrap the yarn all the way down one “arm” of the chenille stick to the end and back. Repeat to wrap the other “arm.” Continue wrapping until the yarn reaches the waist of the worry doll. (Fig. 3)

4. Cut the yarn. Place a drop of tacky glue at the end of the yarn and hold it in place for thirty seconds. Or thread the yarn through a tapestry needle and slide the needle under some of the wrapped yarn to secure it. (Fig. 4)
5. To make pants for the worry doll, double knot a new color of yarn to the waist of the doll. Wrap yarn down one leg. Cut the yarn and glue the end or use a needle to secure the yarn end under the wrapped yarns. Repeat for the other pant leg. (Fig. 5)

6. To create the hair, apply glue to the top of the clothespin. Cut strands of yarn and position them on the top. Hold the yarn in place for thirty seconds. Add a face with fine tipped permanent markers, scraps of yarn for a scarf, or small pom poms for buttons. (Fig. 6)

LAB |
worry doll skirts |
Let’s use some fabric scrap to make a worry doll skirt.
making a fabric skirt for your worry doll
1. To make a fabric skirt for your worry doll, cut a strip of scrap fabric 8" × 2" (20.3 × 5 cm). Follow the baste stitch instructions, steps 1-3 in Lab 9. (Fig. 1)

2. Place the little skirt around the middle of the clothespin and pull the baste stitches tight and double knot them to hold the top of the skirt to the worry doll. Whipstitch the narrow edges of the skirt together from the top of the skirt to the bottom. Knot the knot the thread to hold the skirt in place. (Fig. 2)

3. Follow steps 1-4 from Lab 25 to add chenille stick arms to the clothespin and wrap yarn around the body and arms. (Fig. 3)

4. Glue on yarn for hair, pom poms for hats and buttons, and use markers to add shoes and face! (Fig. 4)

LAB |
touchy-feely tapestry |
A tapestry is a work of art created from fiber that is displayed on the wall. During medieval times, tapestries were woven pictures of scenes from everyday life or illustrations of fables. In this lab, the tapestry is one of yarn and color. Try adding pom poms created in Lab 21 for extra texture and fun.

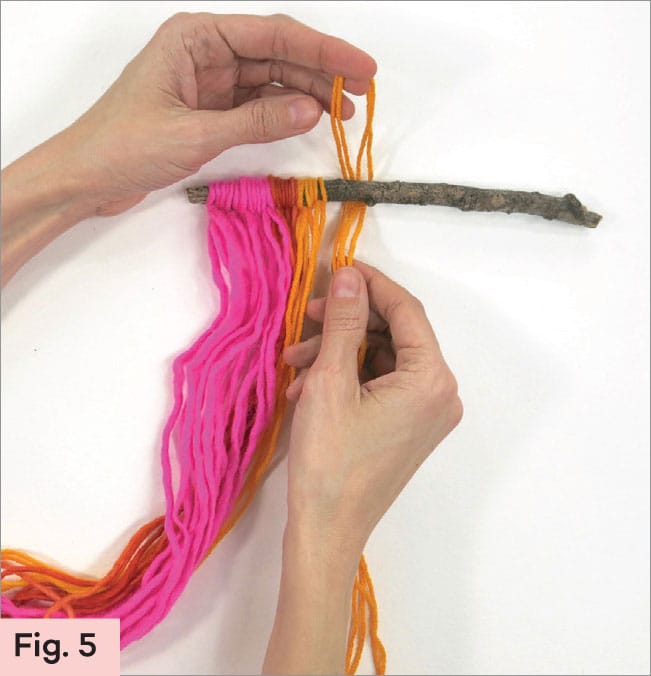
making a yarn tapestry
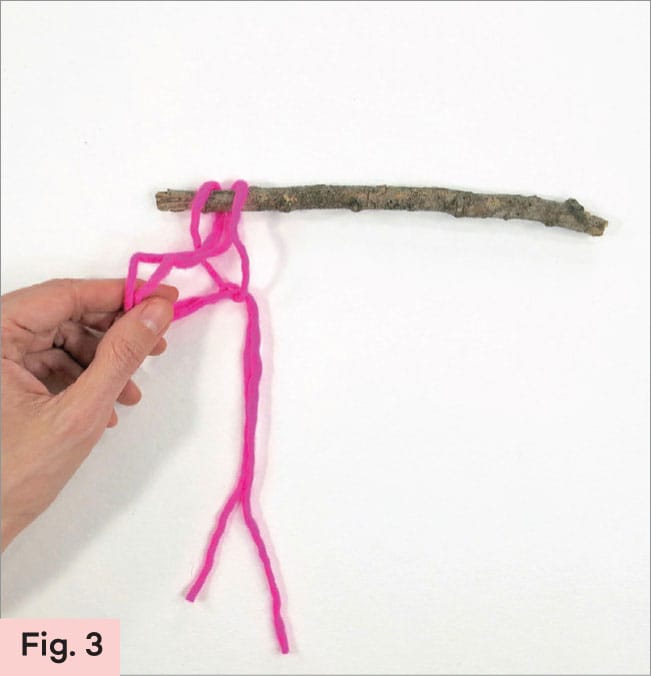
1. Find a sturdy stick. If it is very rough, sand it gently. Gather yarn in a variety of pleasing colors. Cut them into 20" (50.8 cm) strips.
2. Fold one length of yarn in half. Place the loop of yarn under the stick. (Fig. 1)

3. Bring the loop down over the two strands of yarn. (Fig. 2)

4. Pull the two strands of yarn through the loop. (Fig. 3)
5. Pull the ends of the yarn tightly. (Fig. 4)

6. Continue this process across the length of the stick. (Fig. 5)
7. To trim the yarn and make it even, place a piece of tape across the yarn. Trim the ends of the yarn even with the tape. (Fig. 6)

8. To shape the ends of the yarn, cut the desired shape from paper and tape it over the yarn. Then cut along the edge of the paper. (Fig. 7)

9. Remove the tape. Add a hanger by tying a length of yarn on each side of the stick and tying it in a double knot. (Fig. 8)

or try this
Add pom poms to one side or both sides of the stick for added decoration. Use yarn to tie them to the stick.
LAB |
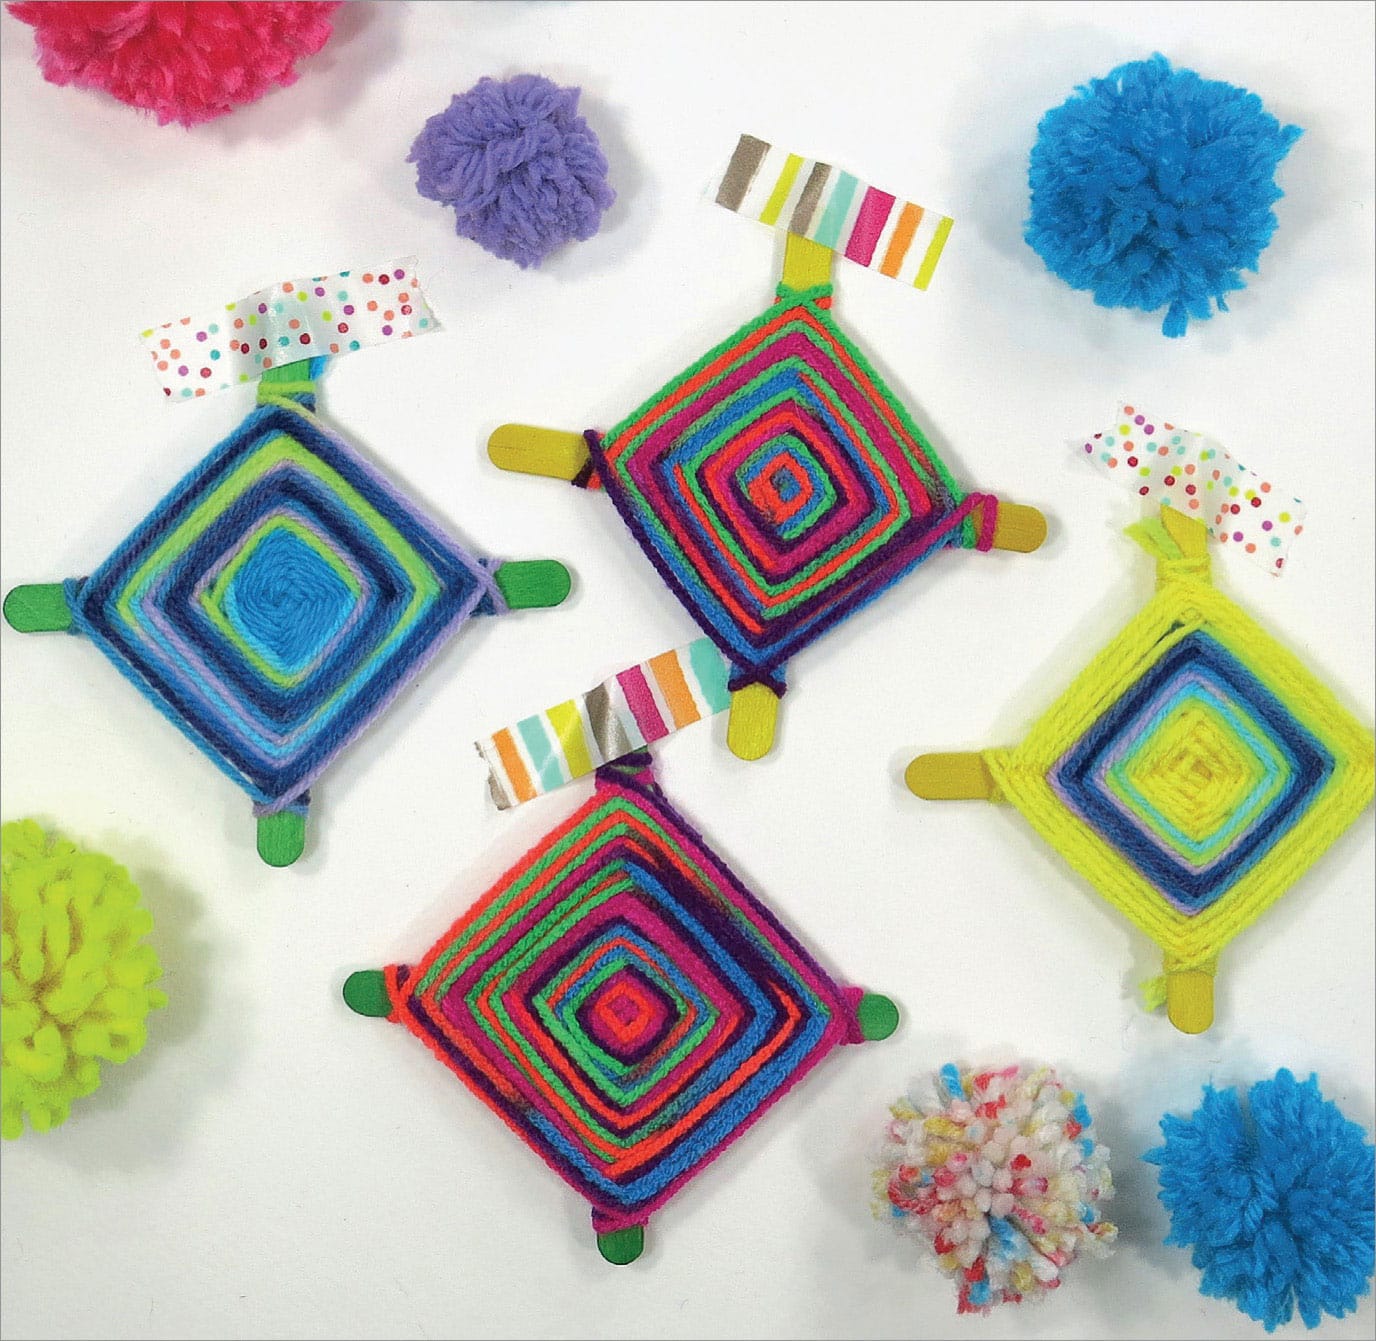
ojos de dios (god’s eye) |
Ojos de Dios is Spanish for “Eye of God.” God’s eyes were first created by the Huicol people, who are indigenous people of Mexico. The Huicol Indians created the ojos de dios to watch over those who prayed. The woven pieces are made from a cross of sticks with the four ends of the sticks representing earth, water, wind, and fire. Creating your own ojos de dios can be a lot of fun. Once you master creating them with craft sticks, try creating them from sticks found outside.
making an ojos de dios
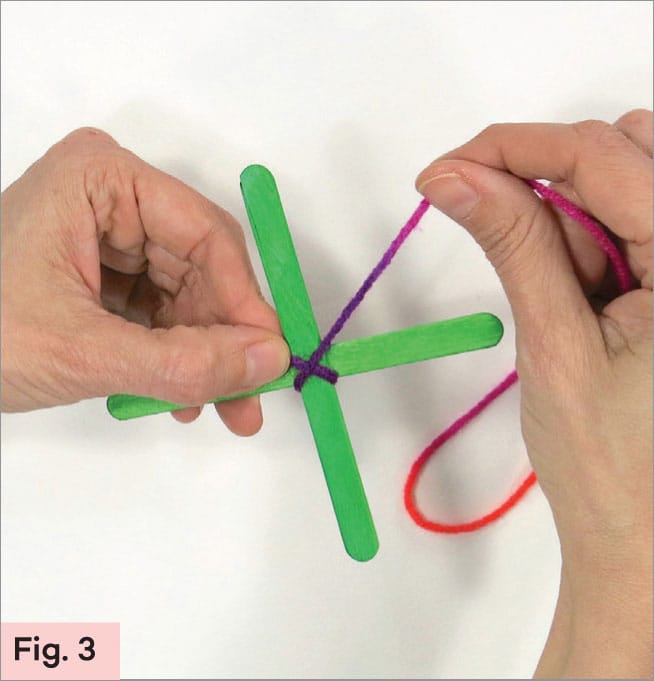
1. Place a drop of glue in the middle of a craft stick. Center another stick over the glue dot to making a lower case ‘T.’ Allow the glue to dry. (Fig. 1) Hold the connected sticks like an X. Wrap yarn over the intersection of the X. Leave a 1" (2.5 cm) tail of yarn. Hold the yarn in place with your thumb. (Fig. 2)


3. Wrap the long end of the yarn directly across the X. Bring the yarn around from the back and go from the top to the bottom of the X. Repeat one more time. (Fig. 3)
4. Now it is time to weave the God’s eye. To do this, wrap the yarn around the sticks in this pattern: behind a stick and around. Rotate the X. Behind the next stick and around. (Fig. 4 and Fig. 5)


5. To complete the God’s eye, cut the yarn so there is a 4" (10.2 cm) tail. Wrap the yarn loosely around the last stick. Slide the end of the yarn into the loop of yarn created and pull tight. Add a dot of white glue to hold yarn end in place. (Fig. 6)

variation idea: woven shell turtles
Use the same skills to make some woven turtles, but instead of craft sticks, use chenille sticks! Bend all the ends of the chenille sticks around to create the feet, head, and tail. Bend the weaving up in the middle to create the curve of the shell. Add googly eyes to finish it off!

LAB |
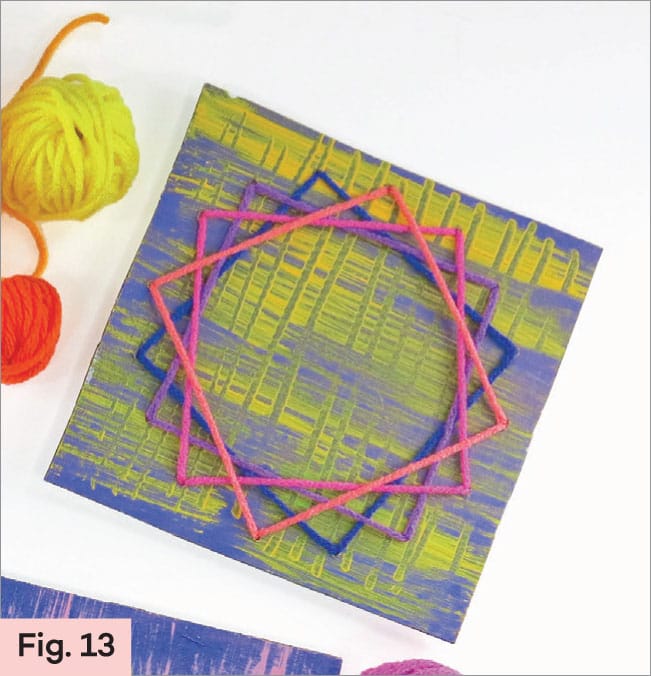
string art |
String art is sometimes called nail and thread art because it is traditionally created with pins in a wooden board and thread wrapped around the nails to create an image. For this lab, cardboard replaces the wood and a needle and thread is used to create a geometric design.

preparing for string art
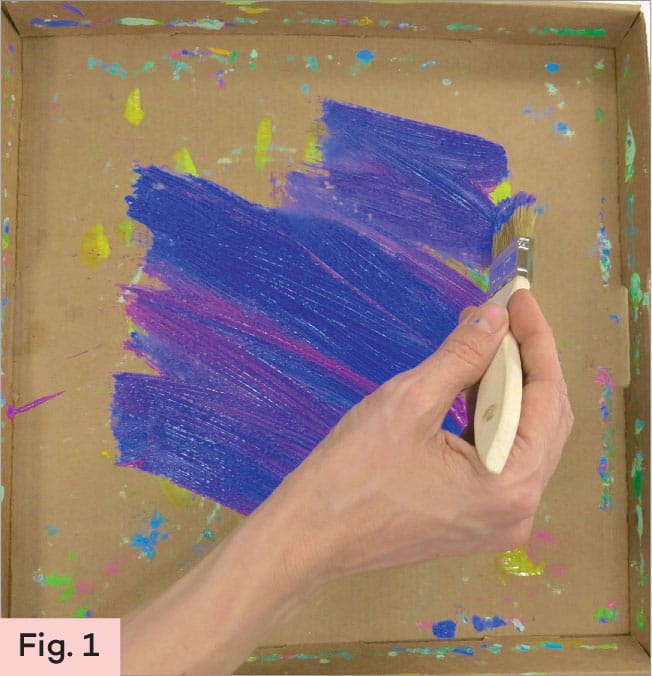
1. Begin by recycling a cardboard box. Try painting the box to add color to the background of the string art design. Once dry, cut the cardboard to a square shape. In this lab, the square is 8" (20.3 cm). (Fig. 1)
2. On the reverse side of the cardboard square, trace a round plate or lid. The larger the circle, the bigger the ultimate design. The design here shows a 6" (15.2 cm) diameter circle on a 8" (20.3 cm) square. Draw four lines extending from the circle, representing the north, south, east and west directions. Between each of those lines, draw four more. (Fig. 2)

3. Between each of those lines, draw eight more for a total of sixteen evenly spaced lines extending from the circle. (Fig. 3)
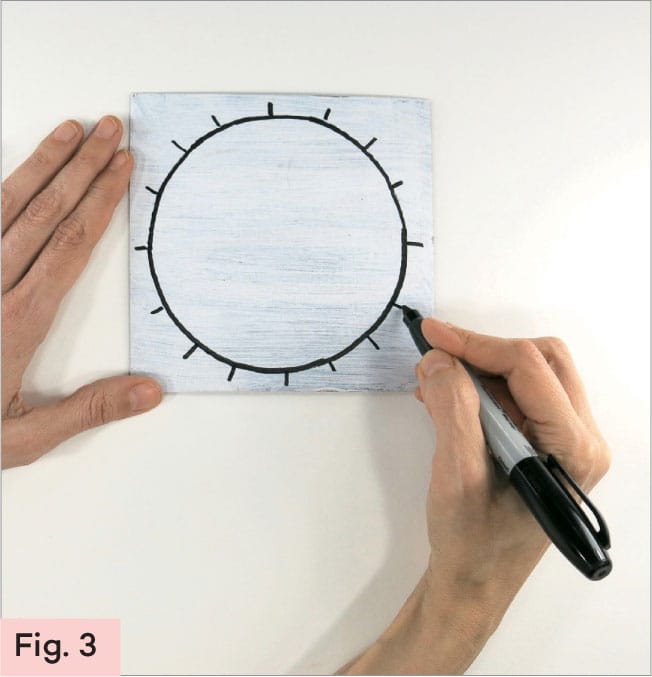
4. At the point where each line meets the circle, use a pushpin, thumbtack, or sewing pin to make a small hole. Then push the tapestry needle through each of the small holes to enlarge them slightly.
making radiating lines string art
1. Thread the needle with yarn but do not tie a knot. Begin on the back of the cardboard where the circle is drawn. Starting at any hole, push the needle through to the front until a small yarn tail is on the back. Secure the tail with tape. (Fig. 4)

2. The hole where the yarn is taped is now the spot where all the yarns will radiate or come from. Pull the needle and thread through the hole until the taped back stops the thread. Insert the needle into the hole just to the right of the one where the needle came out. On the back of the cardboard, bring the needle back up through the first hole and then down again into the second hole from the radiating hole. Continue bringing the needle up through the first hole and diving down the next. (Fig. 5)

3. When the yarn runs out, tape the end to the back of the cardboard. Rethread the needle with new yarn, start in the back and tape the new tail of yarn. (Fig. 6)

4. Finish stitching from the original hole to all the other holes. (Fig. 7)

5. To create the illusion of a stitched sphere, pick a hole directly across from where all the first yarn lines radiated from and repeat the stitching process with a different color yarn. (Fig. 8)

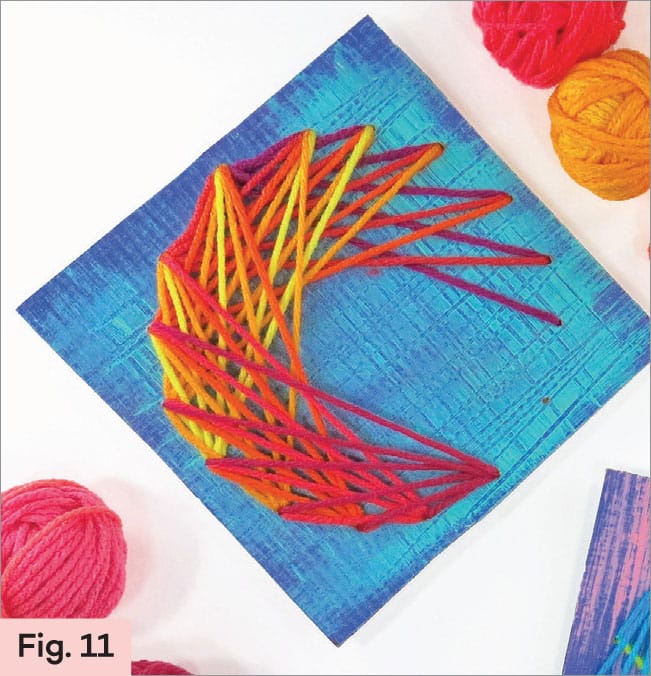
making spectrum string art
1. To create a spectrum design, follow some of the same steps as for the radiating lines design. Start on the back, tape the yarn in place. Stitch lines that radiate from the chosen hole, however instead of stitching all the way around, only stitch six times. (Fig. 9)
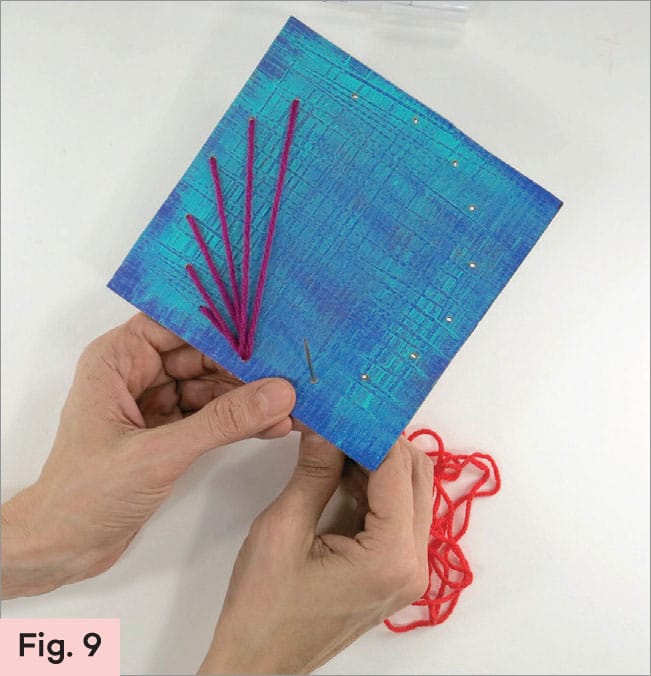
2. After six stitches, cut the yarn and tape the tail of yarn on the back. Rethread the needle with new yarn. Now, move over just one hole to the right of the first hole. This is the new spot for the yarn to radiate from. Stitch six times. (Fig. 10)
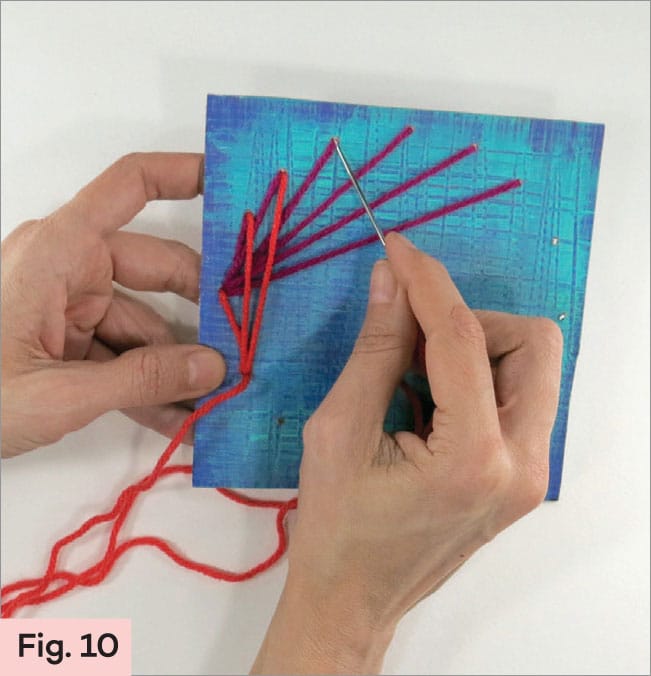
3. Continue moving over a hole and stitching six times until the design is complete. (Fig. 11)
making tumbling square string art
1. For a tumbling square design, begin on the back and tape the tail of yarn in place. Pull the needle up through the first hole until the tape stops it. Count four holes. Have the needle dive down the fourth hole. This stitch marks the top of the square. (Fig. 12)

2. Count four holes, have the needle come up from the back of the fourth hole and backstitch to the end of the last line of the square. The two stitches should create an angle. Stitching the square requires a lot of yarn. If the yarn is getting short, tape the end on the back. Rethread the needle to continue.
3. Starting on the back again, bring the yarn up from the back. Begin at the end of the lines of the square. Count four holes and bring the needle down through the fourth hole. As in step 2, count four holes and have the needle come up from the back of the fourth hole and back stitch. Now a square is created.
4. To create the tumbling block effect, stitch another square, following the same steps. This time the square begins one hole to the right or left of the last one. Four different tumbling squares fit in this design. (Fig. 13)
LAB |
spool knitting |
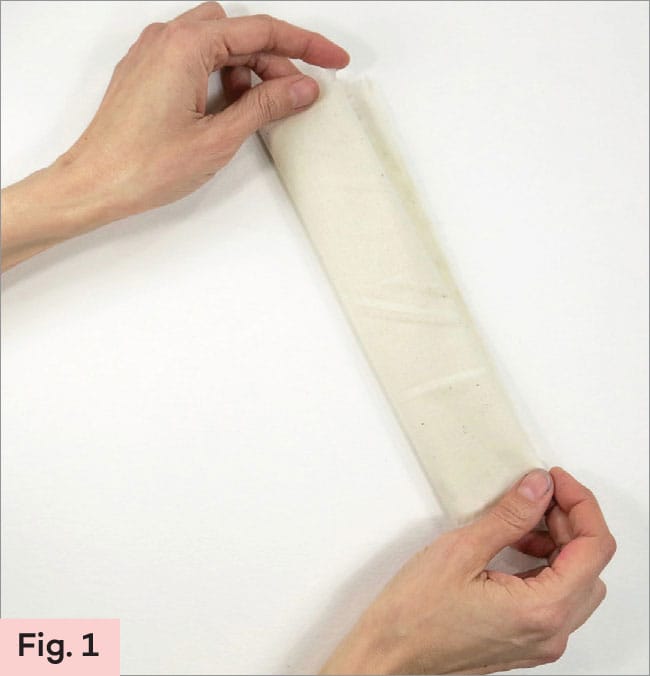
Knitting is way of looping yarn into a textile or fabric and is usually done with two knitting needles. Spool knitting is an easy and fun way to learn how to knit. In this lab, you build a simple contraption, a knitting tube for spool knitting, from craft sticks and a cardboard tube.

making a spool knitting tube
1. Tape a craft stick to the cardboard tube so that it extends about an inch above the top of the tube. (Fig. 1)
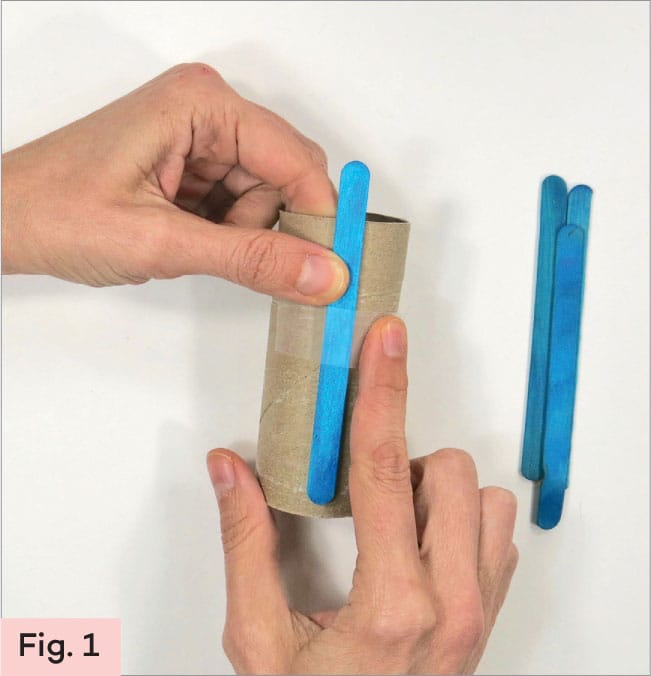
2. Tape another craft stick opposite the first one, in the same way. Tape the last two sticks between the first two on either side. (Fig. 2)
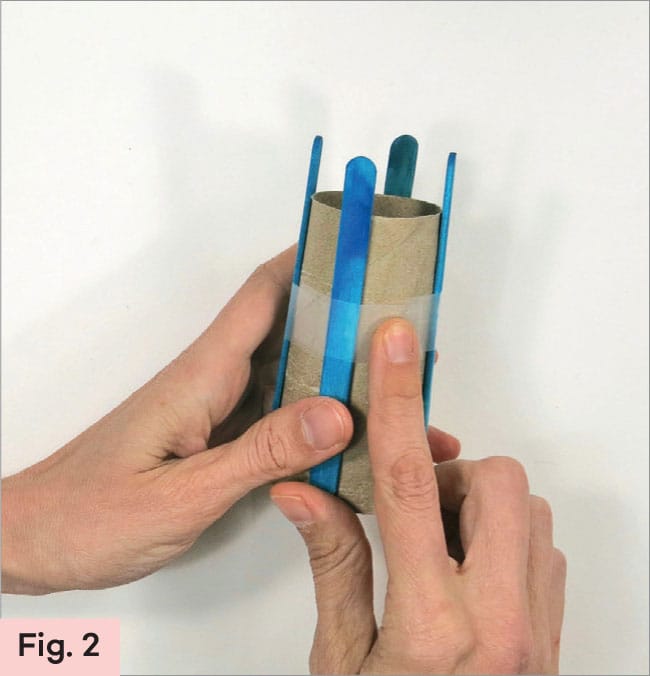
tip
If clear tape doesn’t hold, try using a stronger tape or glue.
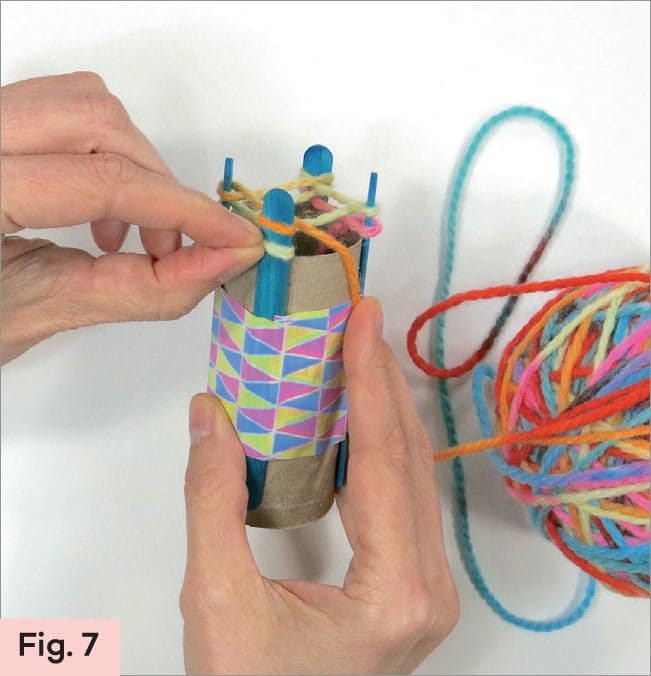
knitting with a spool knitting tube
1. Lower the end of the yarn into the tube until it touches the bottom. (Fig. 3)
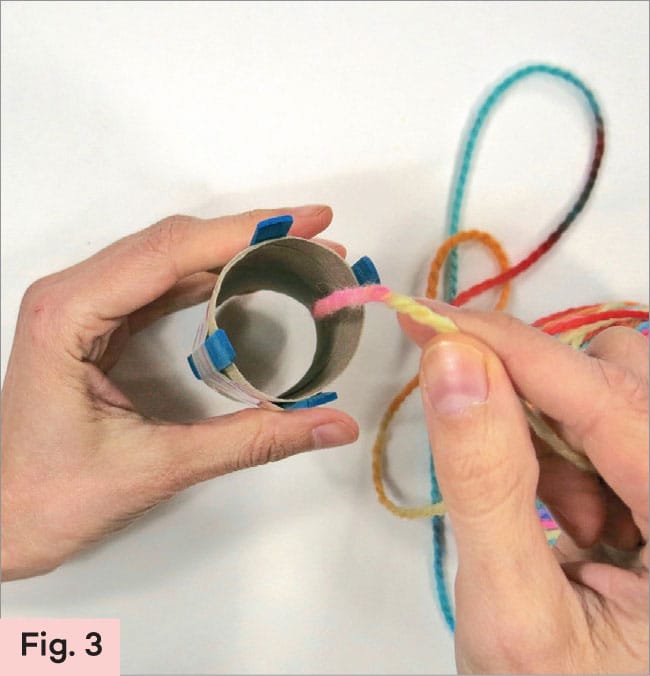
2. With one hand, pinch the yarn end in place inside the tube with your thumb and wrap your fingers around the outside of the tube. With your other hand, wrap the long end of the yarn around one stick. (Fig. 4)

3. Move the yarn toward the stick to the left of the wrapped stick. Wrap the yarn around the stick and move the yarn toward the next stick on the left. (Fig. 5)

4. Go around the next stick. Continue until all four sticks have been wrapped. (Fig. 6)

5. It’s time to start knitting! To do that, tilt the tube. There should be two loops around one stick. Pinch the bottom loop. (Fig. 7)
6. Pull the loop up and over the entire stick and then let it drop inside the tube. This is knitting. (Fig. 8)

7. Continue this pattern of wrapping the yarn around the next stick, pinching the bottom loop, pulling it off the stick, and letting it drop inside the tube. After about five minutes, your knitted yarn should start to come out the bottom of the tube. (Fig. 9)
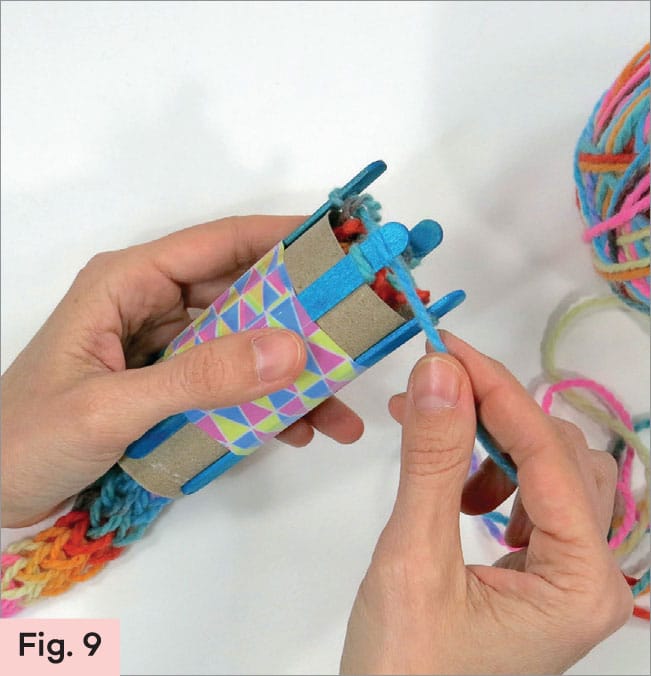
8. Once your knitted yarn is long enough to make into a belt or a headband, it is time to take it off the tube. To do this, cut the yarn at the top of the tube so it is about 6" (15.2 cm) long. Pluck all four of the loops off the end of the tube. Feed the end of the yarn through all four of the loops and pull and then knot the yarn end. (Fig. 10)

tip
The knitting tube can be used again and again to create more scarves or belts. Try using a variegated yarn for more color.
LAB |
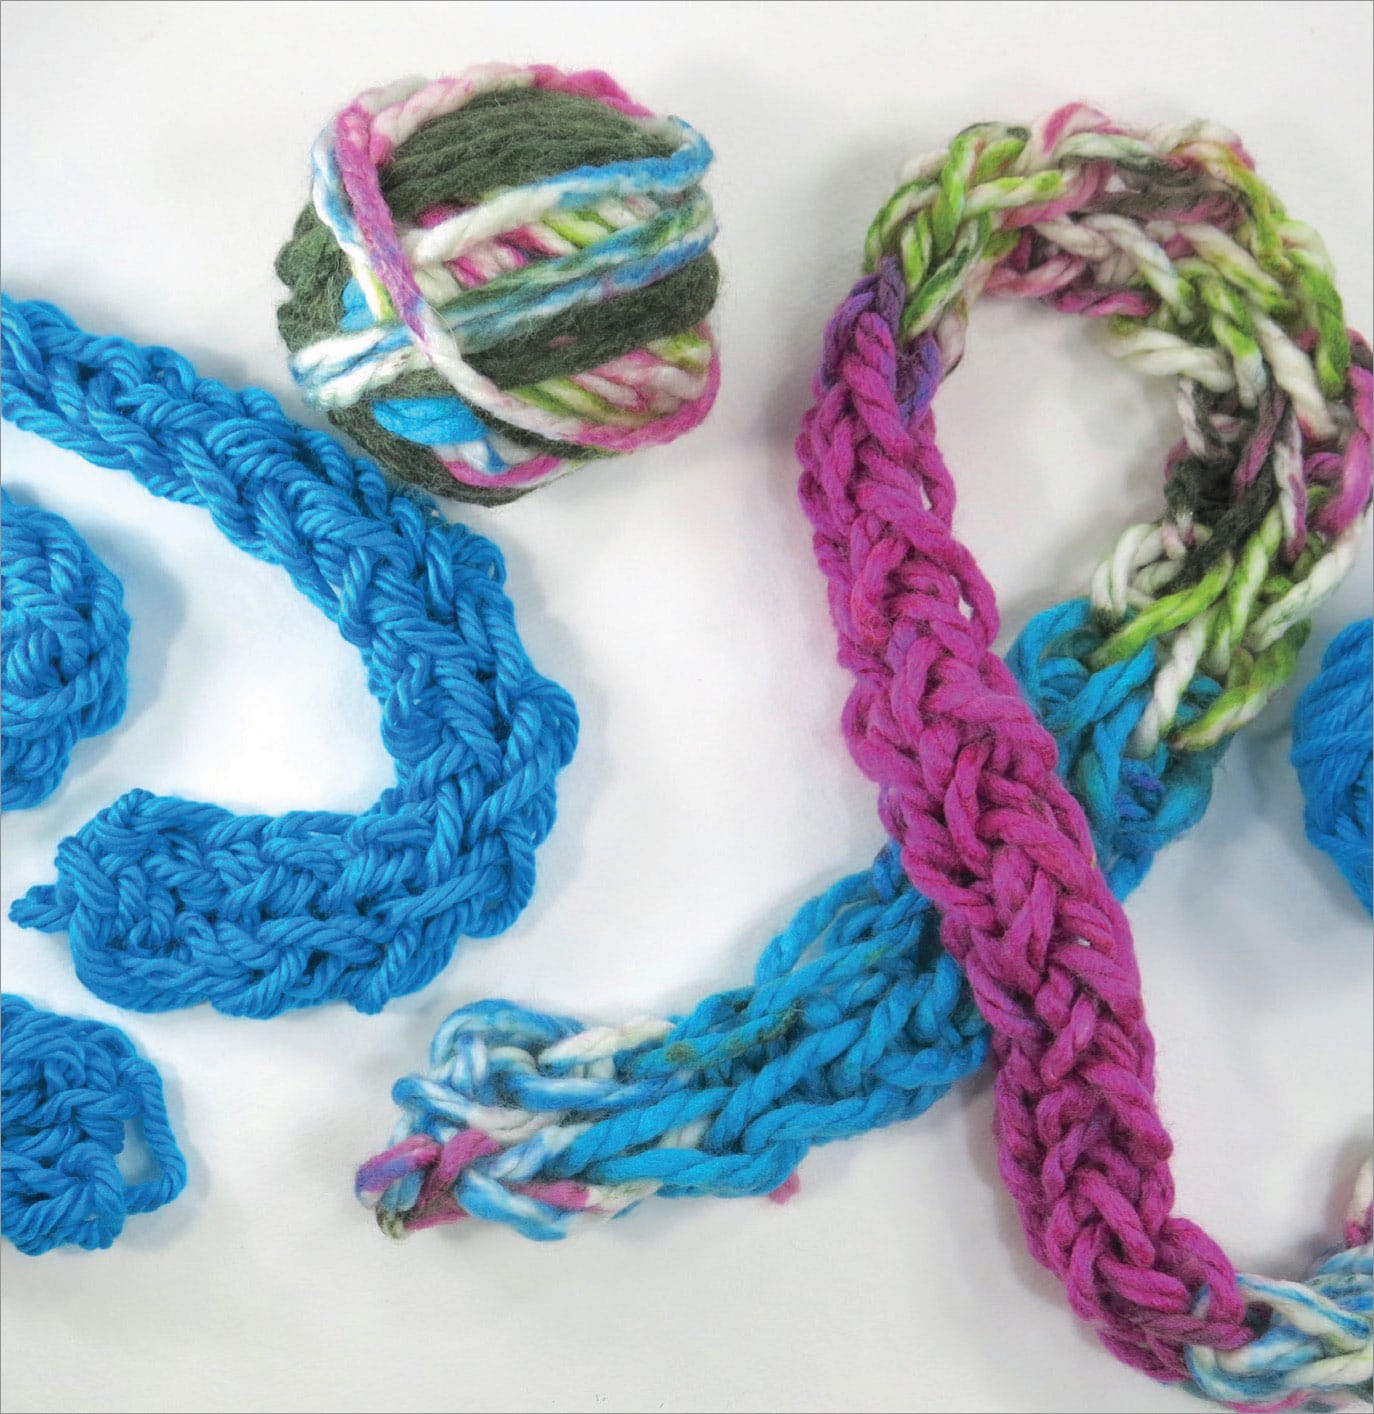
finger knitting |
Now that you’ve learned the basics of spool knitting, let’s try your hand, literally, at finger knitting! In this lab, the only necessary supplies are your fingers and yarn. This is a fun craft to try with extra yarn.
learning to knit with your fingers
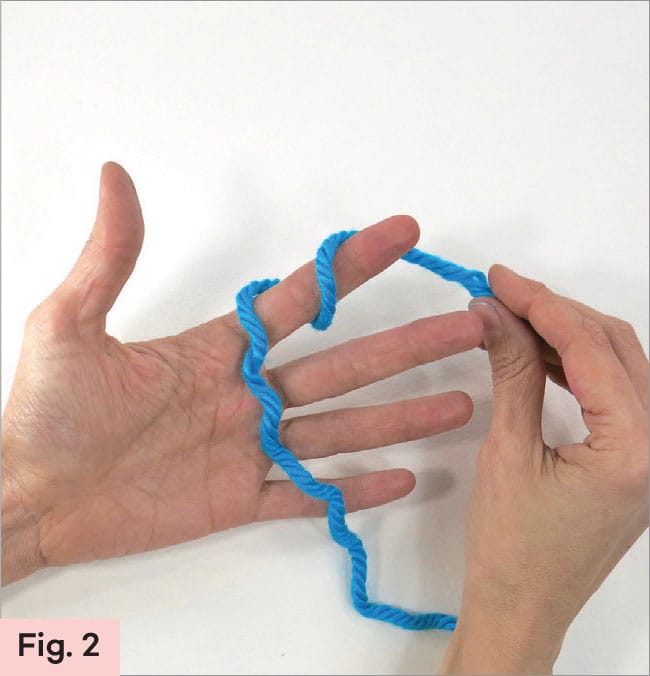
1. Drape an uncut strand of yarn over your open, non-dominant hand. Leave 6" (15.2 cm) long tail of the yarn around your index finger and draped behind your hand. (Fig. 1)

2. Tie a slipknot to anchor the yarn and begin knitting. To make a slipknot, wrap the short end of the yarn loosely around your index finger twice and let if fall behind your index finger. (Fig. 2)
• Bring the bottom strand over the upper strand. (Fig. 3)
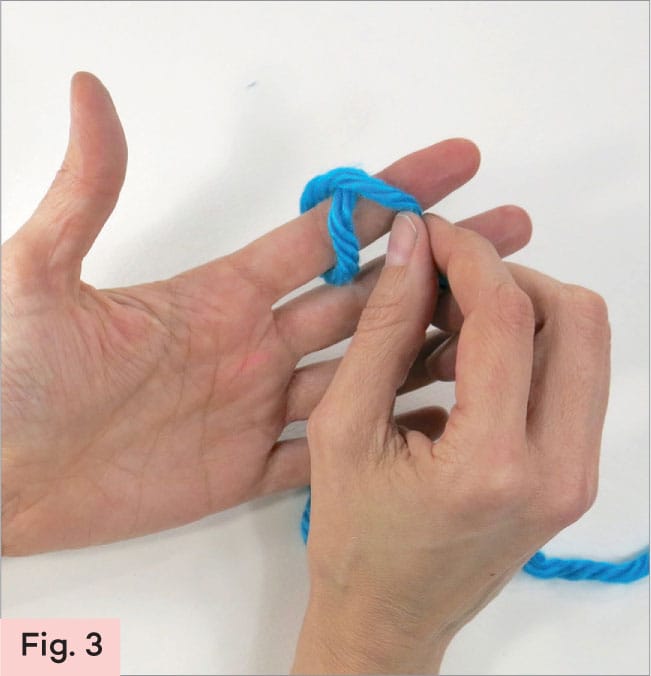
• Then bring the bottom strand over the strand above it to create an opening. Slide your index finger into the opening between the two strands of yarn, so the yarn is anchored to your index finger with a slipknot. (Fig. 4)

3. With the long strand of yarn, begin loosely wrapping the yarn under and around the middle, ring, and pinkie fingers. (Fig. 5)

4. Bring the yarn back to the index finger by wrapping it under and over the ring, middle, and index fingers. There should be two “rings” of yarn around all your fingers except the pinkie. (Fig. 6)

5. Starting at your index finger, bend your finger down and pull the bottom ring of yarn to create an opening of yarn. (Fig. 7)
6. Pull the yarn upwards and slide your index finger into the opening. (Fig. 8)
7. Repeat with your middle and ring fingers. Because the pinkie finger only has one ring of yarn around it, skip this finger.
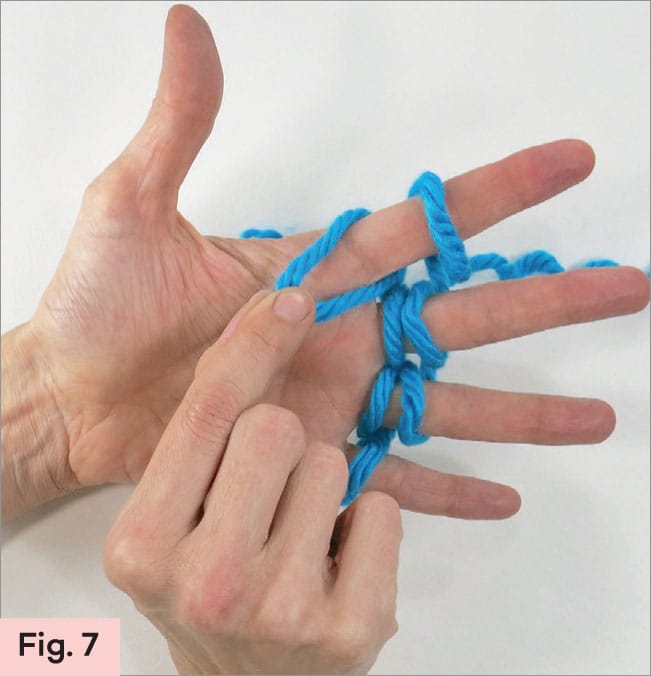
8. Now each finger only has one ring of yarn. Time to add a second ring of yarn and repeat the process! The length of yarn should be behind the index finger. Bring it under and over middle, ring, and pinkie finger. This time, the index finger will only have one ring of yarn.
9. Repeat the process of bending your finger with two rings of yarn, sliding your finger into opening, and rewrapping the remaining fingers. The knitting will begin to appear behind your fingers.
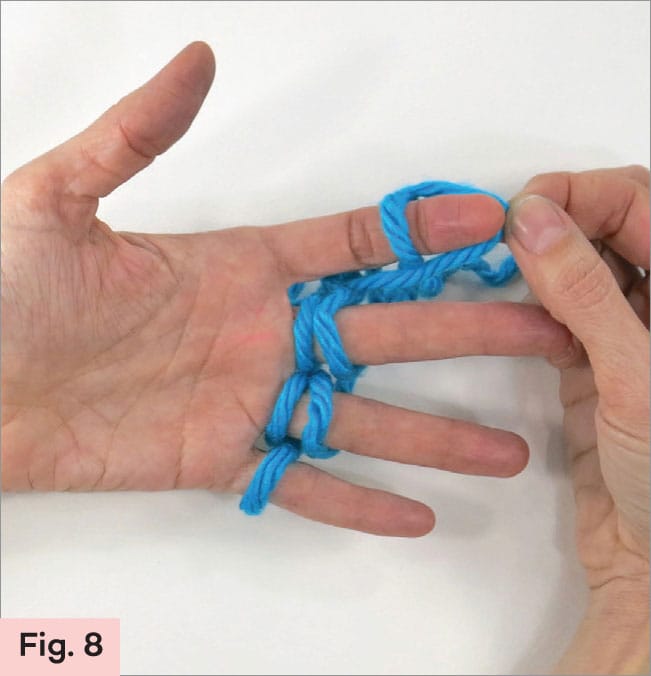
10. When the knit tube is long enough, remove it by cutting the yarn, leaving a 6" (15.2 cm) long tail. (Fig. 9)

11. Slide the cut end of yarn into the rings of yarn on your fingers. Slide the rings of yarn off your fingers. (Fig. 10)

12. Slide the cut end of the yarn through all four rings once more. To tie a knot, bring the yarn into the last loop created.
LAB |
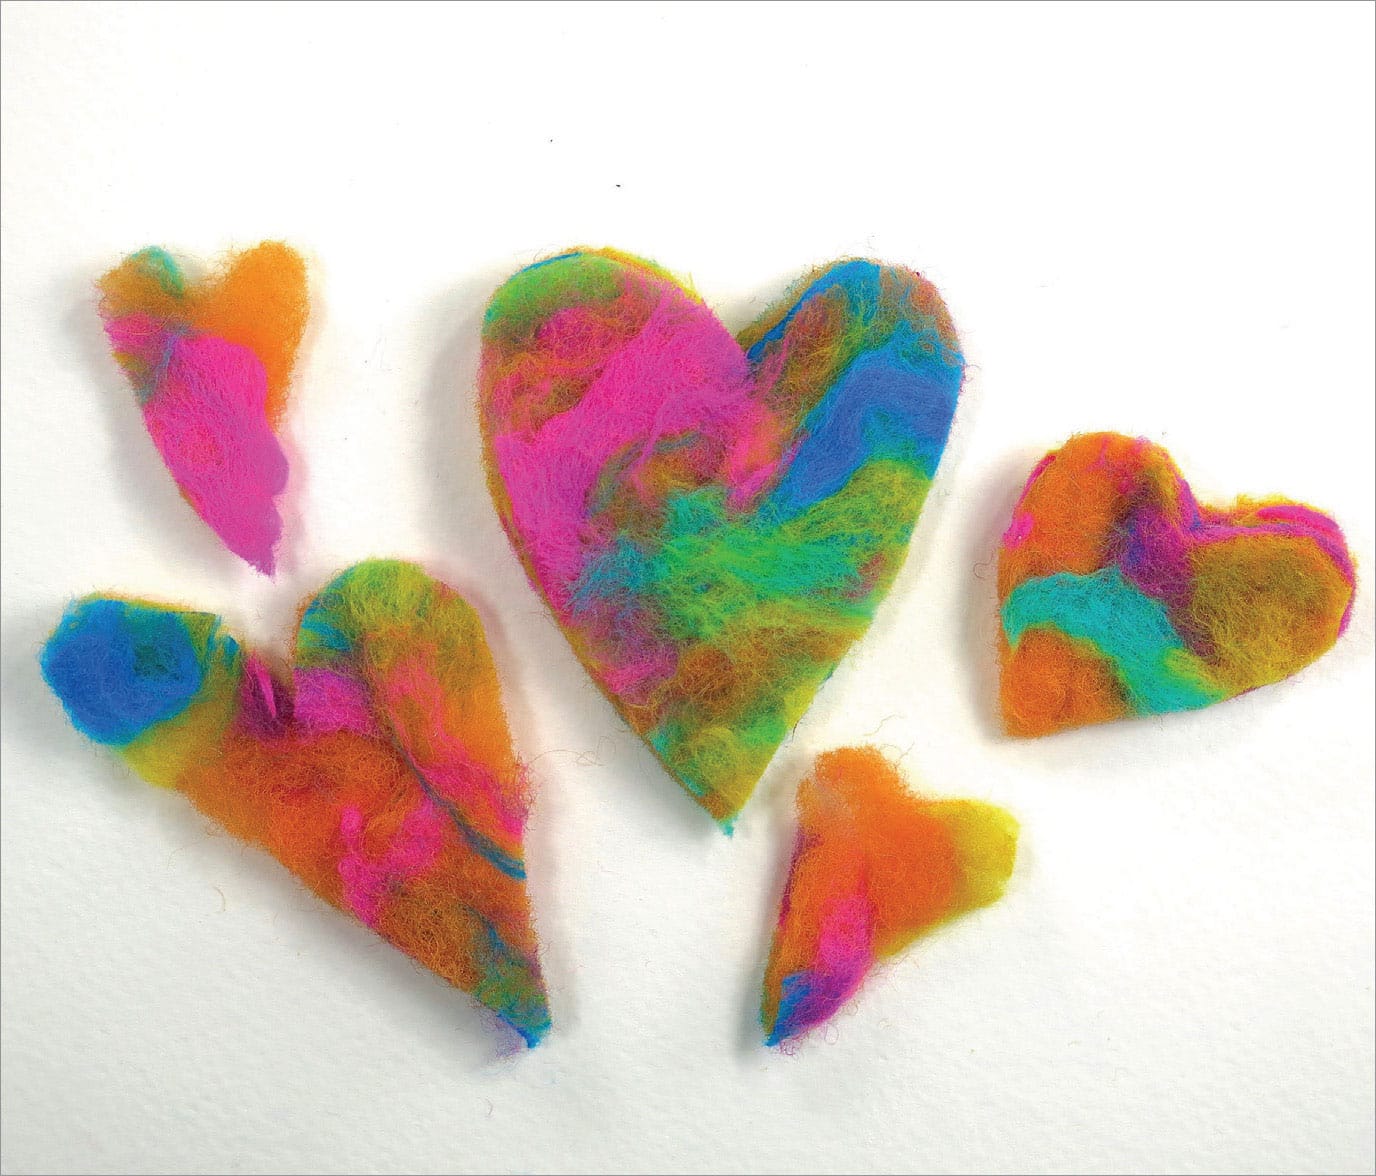
wet felted fiber |
Felted fiber is created with wool roving, water, and agitation. Look at the wool roving, it is made up of small strands of wool fiber. Under a microscope, these individual fibers have little barbs sticking off them. When these barbs get wet and are rubbed together, they begin to shrink and lock together. This creates a piece of felt. Felt can then be cut into different shapes without unraveling. Try making your own felted fiber to be cut out and added to gift cards or to hang as an ornament!
working with wool roving
1. Open a zipper sealed bag. Pour three tablespoons of water into the bag. Add three pumps of foam soap. Close the bag and rub the bag with your fingertips to mix the water and soap.
2. Pull tufts of roving from a bundle, the same way you pull off bites of cotton candy. Never cut roving with scissors, always pull it. (Fig. 1)

3. Open the bag and put the tufts of roving into one corner of the bag. Close the bag. (Fig. 2)
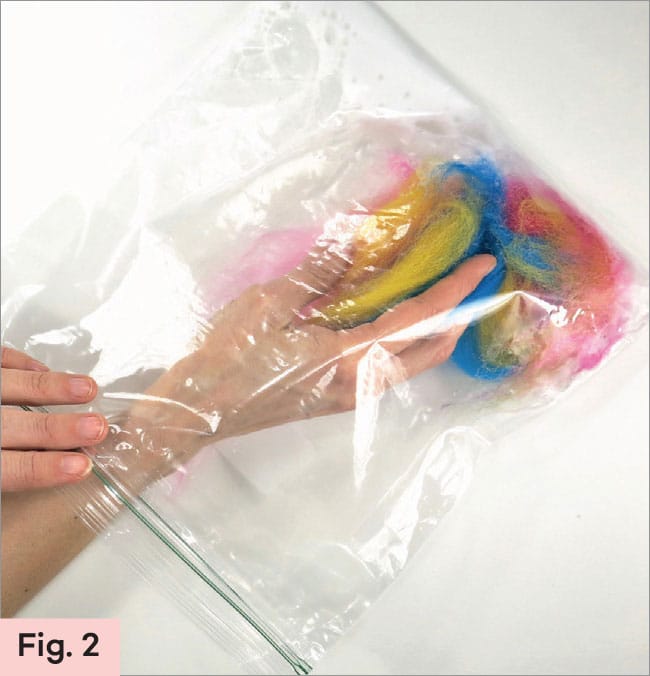
4. Rub the outside of the bag with your fingertips. The soap should help the bag move easily over the roving. If the roving sticks to the bag, open it and add a small amount more of soap and water. Continue rubbing the bag for five minutes on both sides of the bag. (Fig. 3)
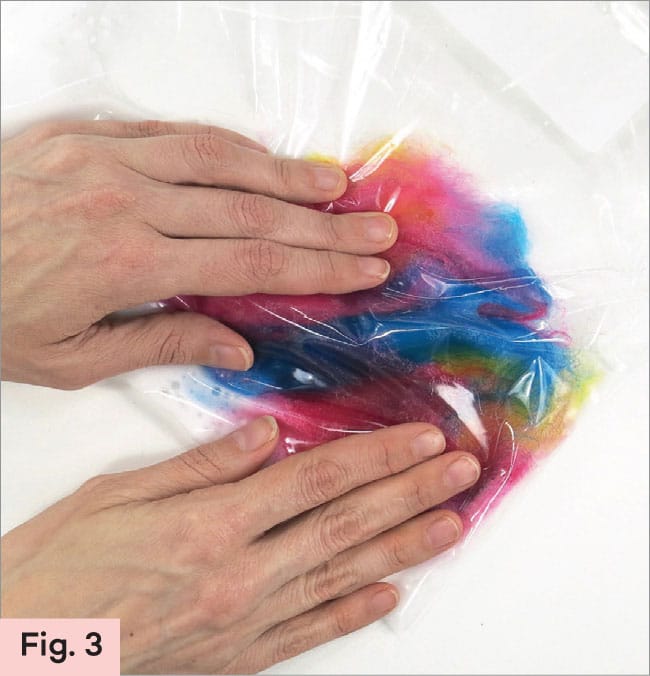
5. Open the bag and squeeze all the water out of the roving. Lay it flat on the outside of the bag and allow it to dry overnight. (Fig. 4)

6. Once the newly felted piece has dried, use scissors to cut it into different shapes. Use a thread and needle to slide a string through the felt to hang the cut shape or glue it to a card and give it to a friend. (Fig. 5)

LAB |
needle felted glitter tree |
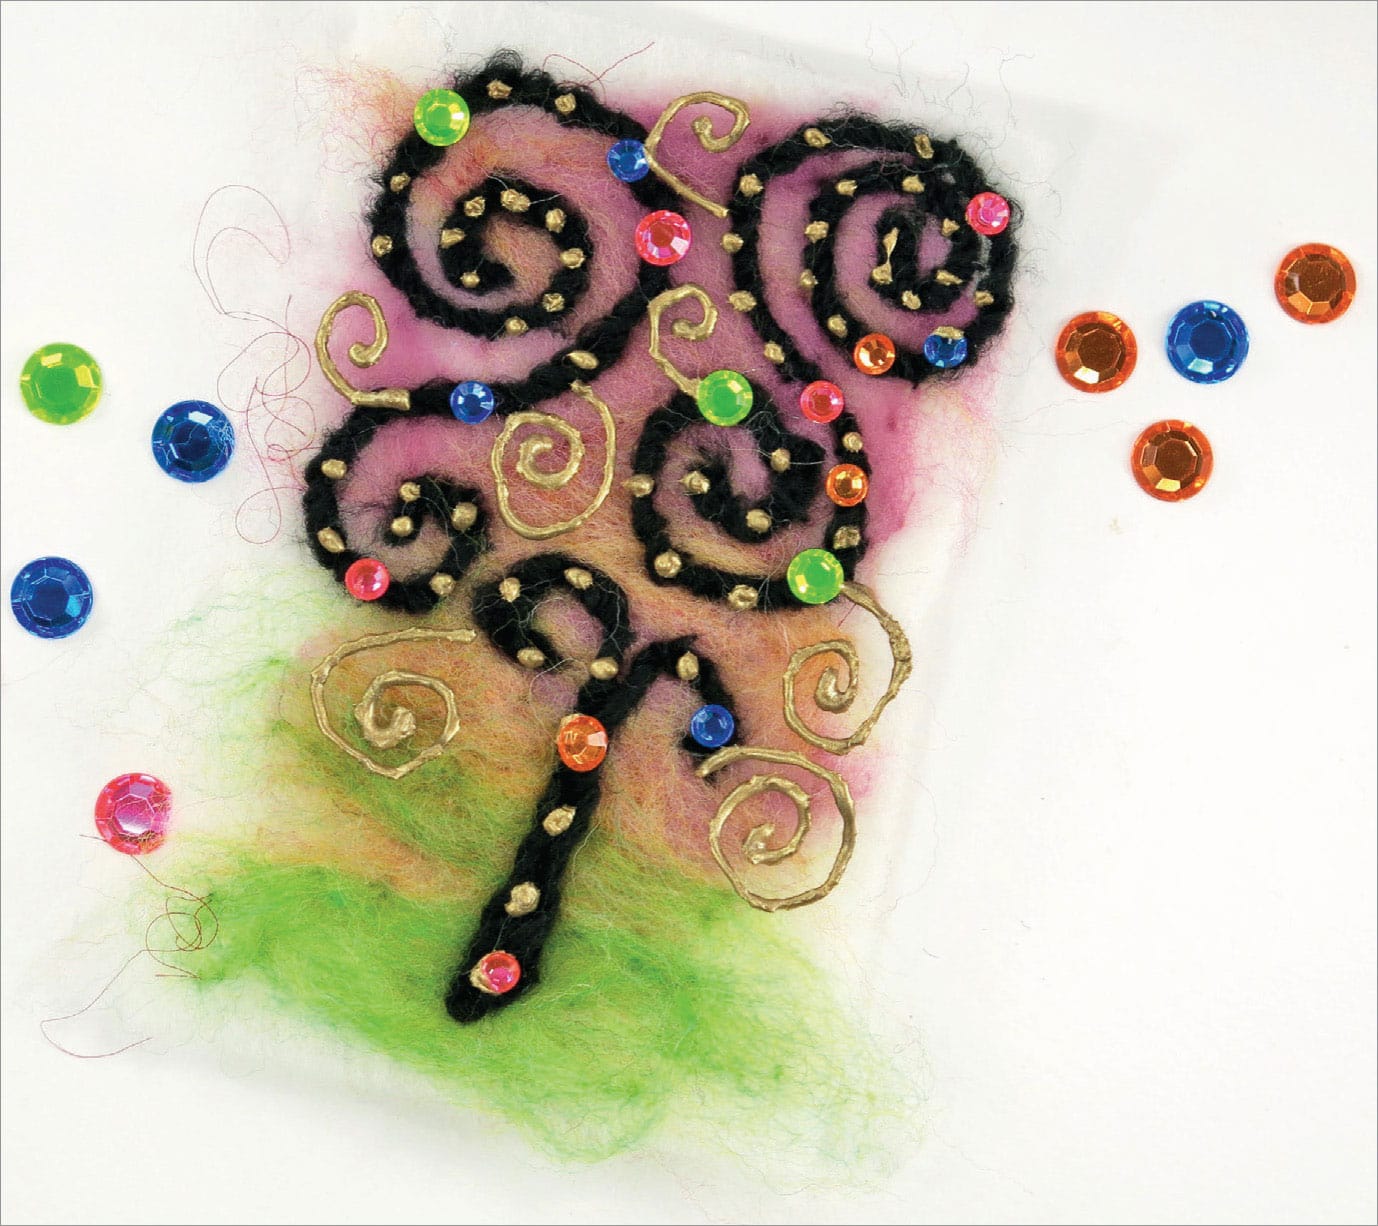
Needle felting is different than wet felting. In needle felting, there is no water. Instead, the fibers in the wool roving are locked together with a special needle felting tool. This tool is not only very sharp but also barbed. Be very careful with this tool and keep your fingers away from the needle felting cushion. In this lab, inspiration is drawn from the artist Gustauv Klimt and his painting, Tree of Life.
making a felted glitter tree
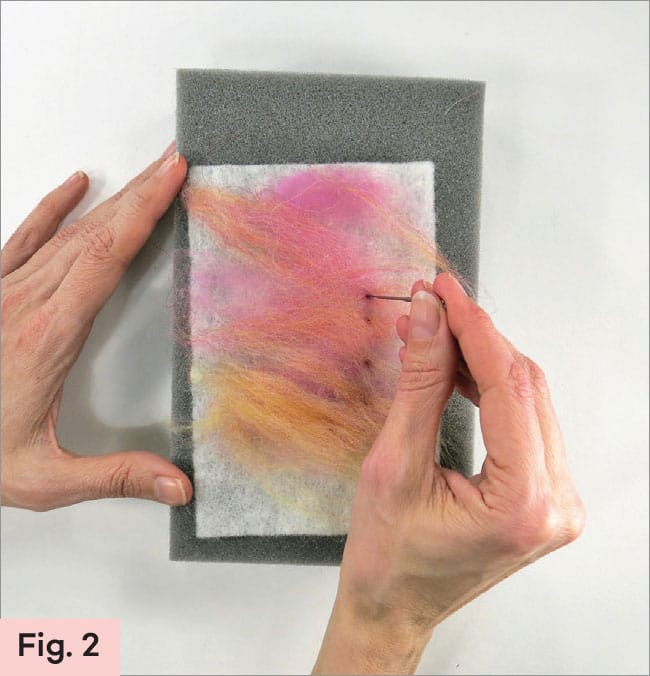
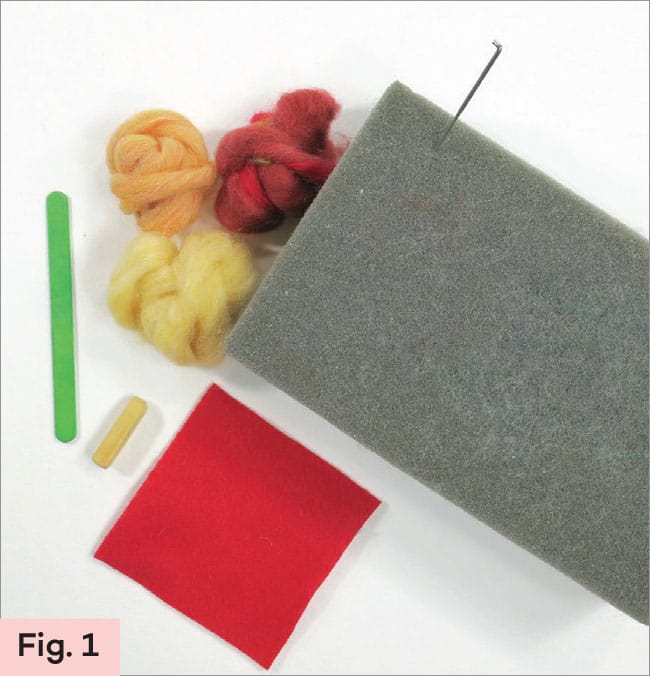
1. Place a piece of felt onto the needle felting cushion. Gently pull small tufts of roving as if pulling cotton candy. Place the roving on the felt. (Fig. 1)

2. Begin to needle felt by holding the needle felting needle vertically. Use an up and down motion to poke or stab the roving. Keep your fingers out of the way! (Fig. 2)
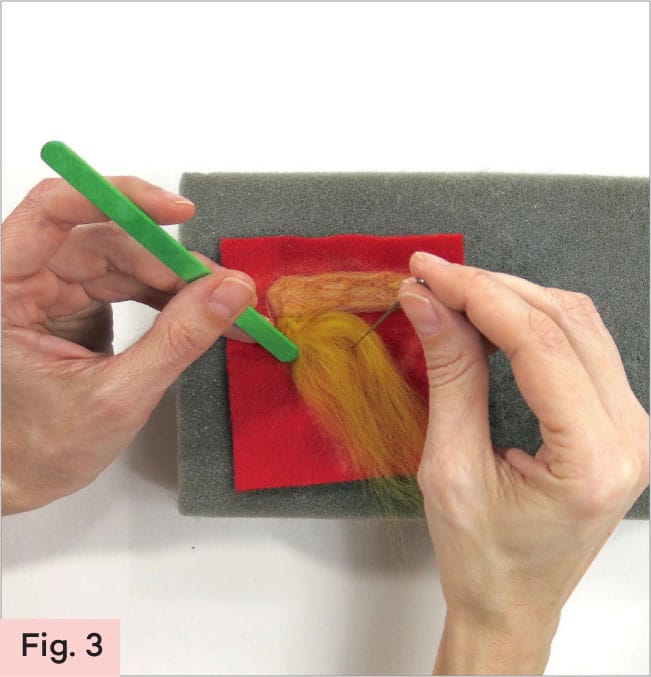
3. Once a colorful background of needle felted roving is complete, place yarn over the roving, on the felt. Curve the yarn into a spiral. (Fig. 3)

4. Use the wooden skewer to hold the yarn in place. Gently stab the yarn through the felt fabric. This will tack it down and keep it in place. If you aren’t happy with the design, gently pull the yarn out and try again. (Fig. 4)

5. Use gold puffy paint to add dots along the trunk and branches of the tree. (Fig. 5)
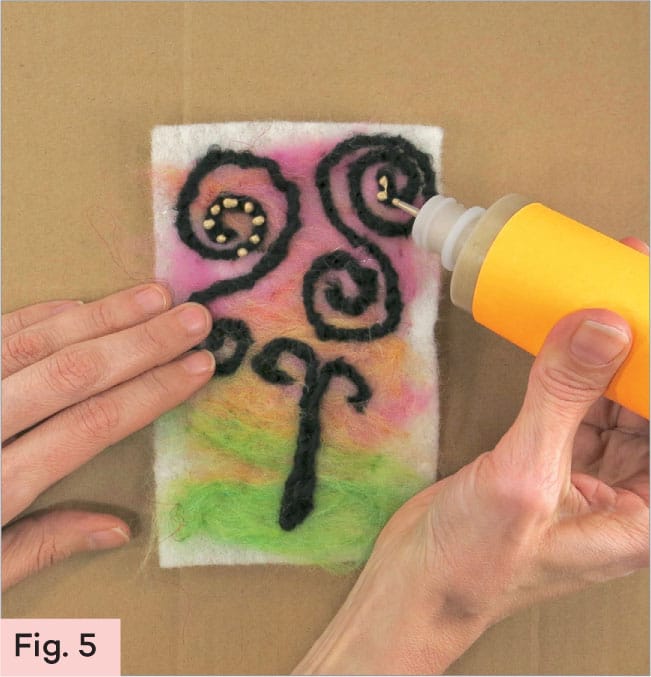
6. For added sparkle, place flat-sided gemstones onto the puffy paint while it is wet. Draw more spirals on to the design. Allow the paint to dry overnight. (Fig. 6)

LAB |
needle felted patches |
Needle felting can be done on nearly every fiber surface. This means you can needle felt designs on sweaters and jackets. In this lab, patches are designed and then stitched to a jacket. Whatever is needle felted on, must be hand washed gently otherwise the wool fibers will wet felt and shrink!

making a pizza- shaped needle felted patch
1. Draw a simple design on a piece of craft store felt. Drawing with chalk makes it easy to brush or wipe away mistakes. (Fig. 1)
2. Gently pull a piece of roving, as if it were a bite of cotton candy. Never cut wool roving. (Fig. 2)

3. Place the felt (with the chalk design) on the foam cushion. Arrange the roving on the design. Using a cushion prevents the needle from breaking during felting. Use the skewer to hold the roving in place. (Fig. 3)
4. To secure the roving permanently, use the needle to poke the roving down through the felt piece. This is called needle felting. Be sure to keep the needle vertical and puncture the roving and the felt fabric to lock the roving in place. If the needle bends, it will break. (Fig. 4)
5. Never place your fingers on the cushion while you are felting. This could cause an injury. Use the skewer to hold the roving in place. (Fig. 5)

6. Yarn can also be needle felted. Do not cut the yarn before felting, but do trim it after the design is complete and then felt the ends of the yarn in place. (Fig. 6)

7. To add small designs like dots, roll a small piece of roving between your fingers to create a small ball. Place it on the design, hold in place with a skewer, and needle felt it in place. (Fig. 7)

making a rainbow needle felted patch
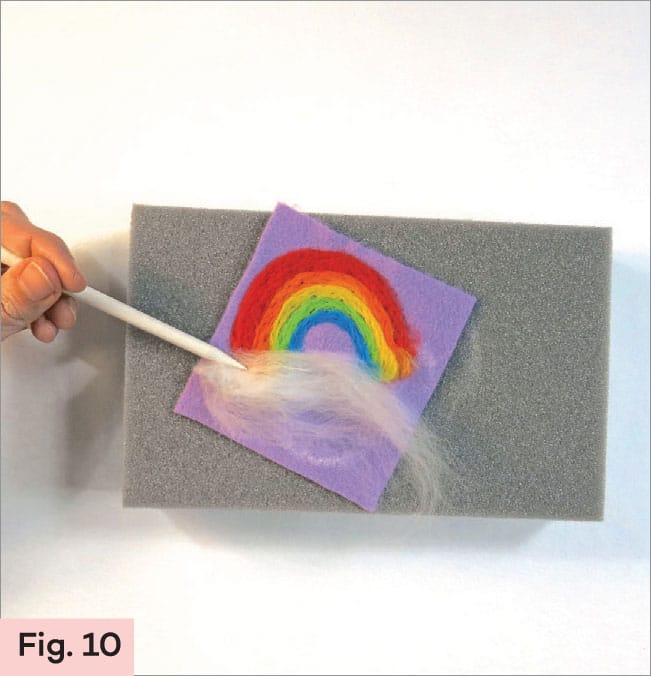
1. For a rainbow, roll a tuft of roving in between your hands to create a snake. (Fig. 8)

2. Needle felt the roving into place. (Fig. 9)

3. Continue with the other colors. Add a tuft of white roving at the bottom for a cloud and needle felt it in place. (Fig. 10)
preparing and attaching the patches
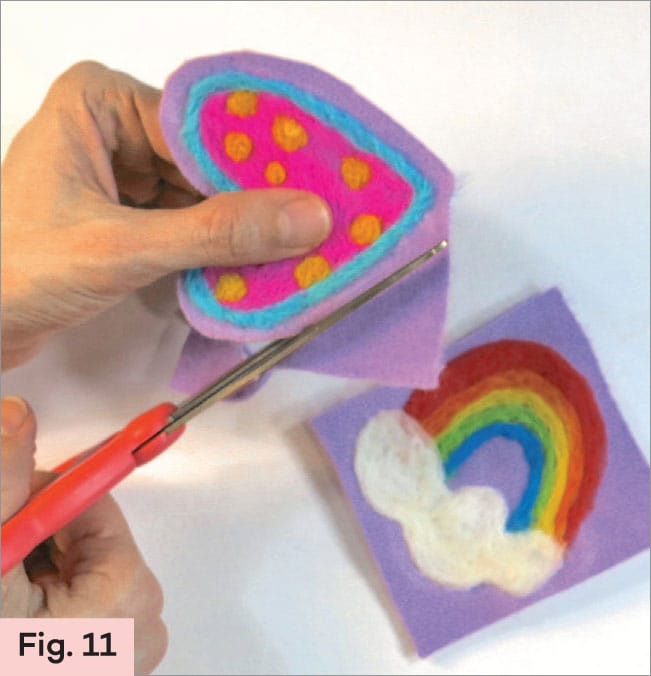
1. Once the patches are complete, cut them out, leaving a 1/4" (6.4 mm) edge around the felting. This will be where the patch is stitched to the jacket. (Fig. 11)
2. Thread a sharp needle, tie a knot at the end the thread, and whipstitch the patch to the jacket. (Fig. 12)
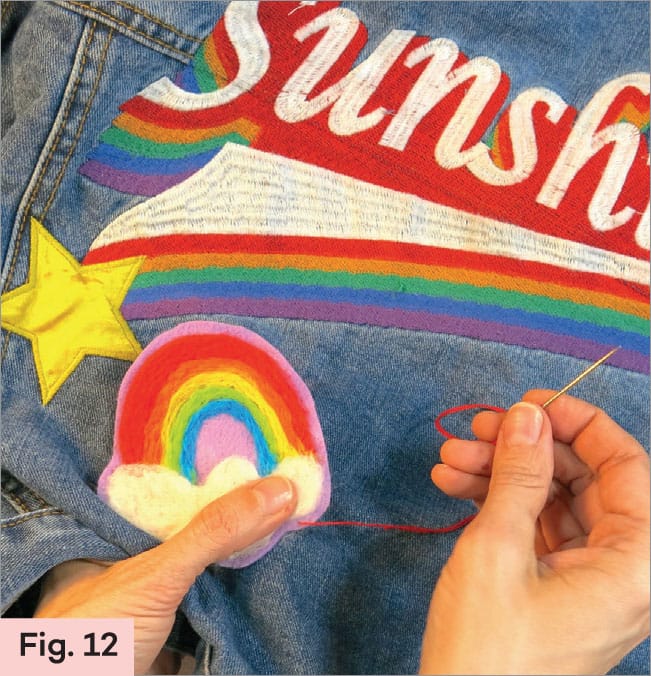
3. Whipstitch around the entire patch. Bring the thread to the wrong side and knot the thread securely. (Fig. 13 and Fig. 14)


LAB |
colorful shibori |
Shibori dyeing is way of folding, binding, and dying fabric traditionally in indigo, or dark blue, dye. This method comes from Japan. There are many ways to fold and bind the fabric and the fun is really in exploring different techniques. In this lab, we don’t use indigo ink, instead we use permanent markers and alcohol to change the color of muslin fabric.

shibori dying with colorful markers
1. Fold the fabric in half lengthwise and then in half again. (Fig. 1)
2. Make a triangle fold at the top, as shown. Continue to fold triangles, forward and then backward, the length of the fabric. (Fig. 2)
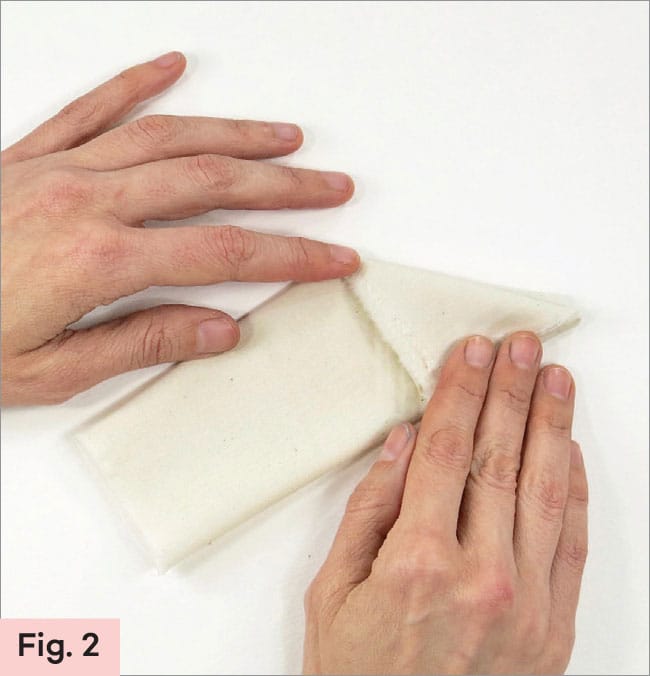
3. Hold the folded fabric together with a clothespin. (Fig. 3)
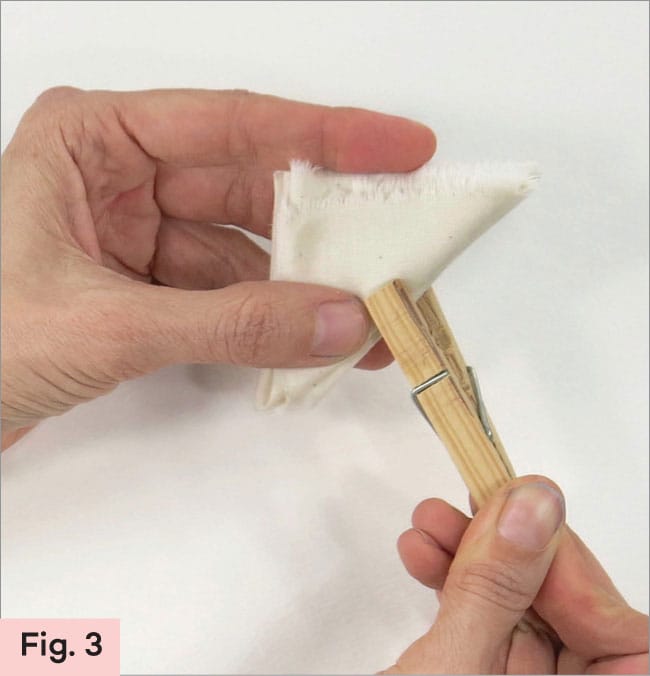
4. Use permanent makers to color the edges of the fabric. The more color you add, the better the fabric will dye. Try letting the marker rest on the fabric and allow the ink to flow from the marker to the fabric. (Fig. 4)

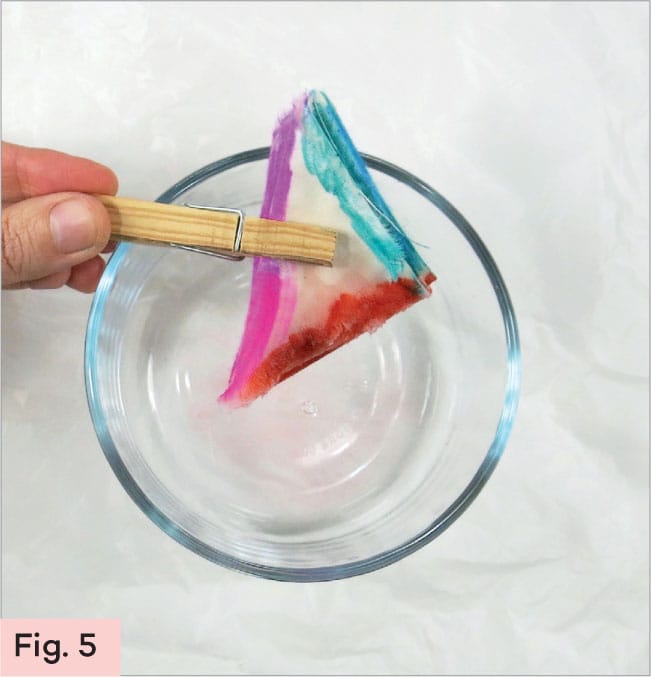
5. Pour rubbing alcohol in a shallow dish. Hold the fabric by the clothespin and dip it into the alcohol. Repeat for each edge of the fabric until the fabric is completely wet. (Fig. 5)
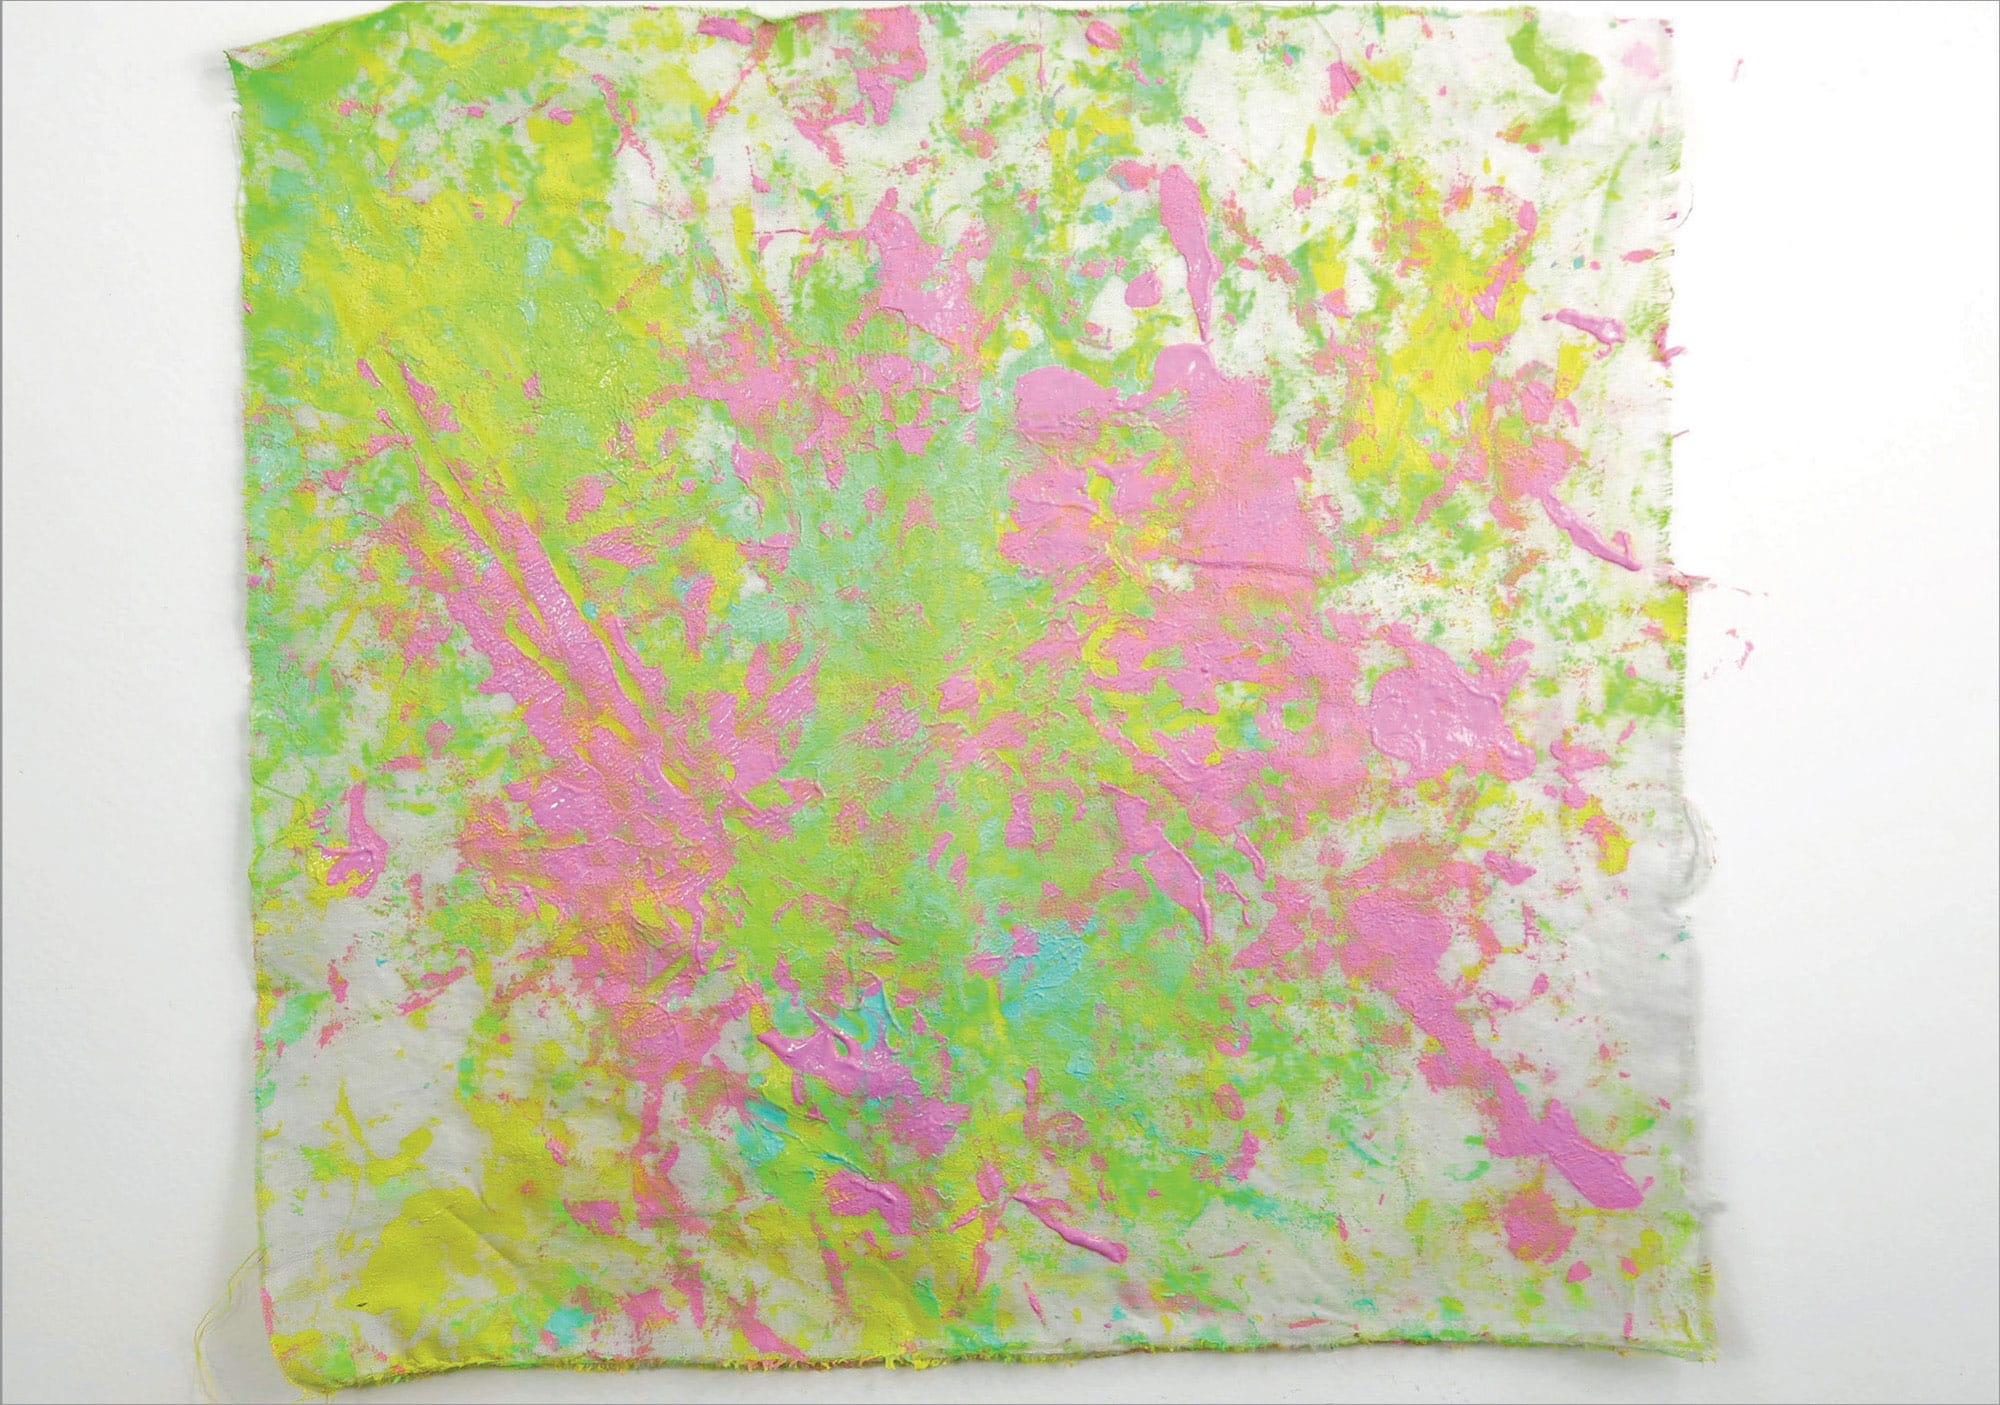
6. Let the fabric dry overnight on a plastic bag. Once it is completely dry, unclip, and unfold. (Fig. 6)

or try this
Experiment with different types of fabric folds. Think of folding the fabric like origami and adding a variety of colors for different effects. It is always a surprise to unfold shibori dyed fabric!
LAB |
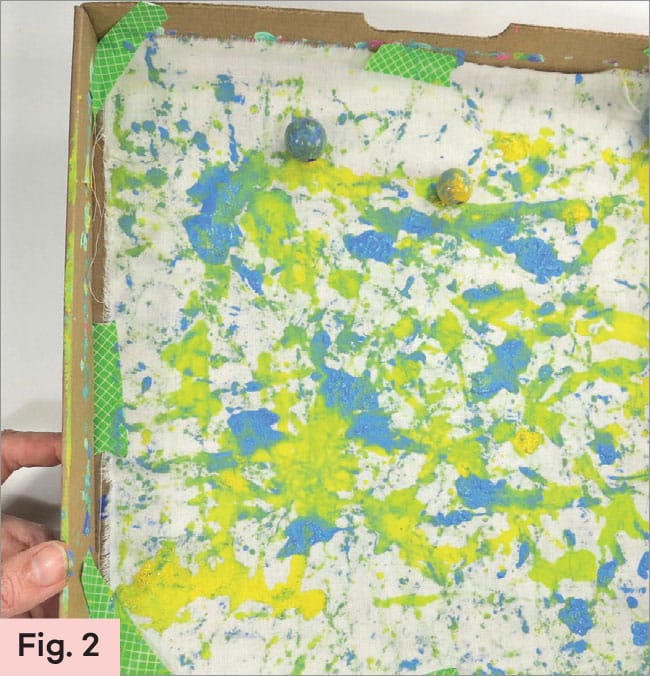
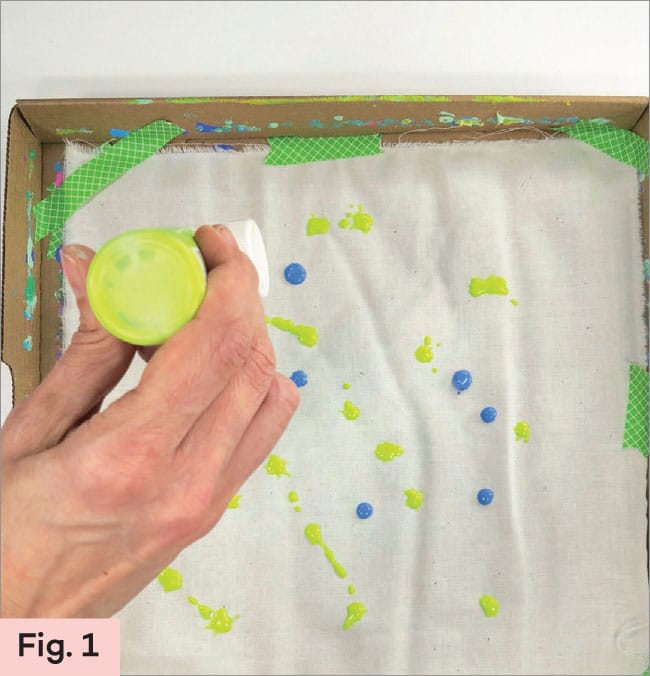
marble rolled fabric |
Shopping for fabric with a print is a lot of fun…but sometimes creating an original fabric design, that no one else has, is even better. In this lab, we create a fabric that can be used for many of the sewing labs including Lab 11.
creating marble rolled fabric
1. Cut the fabric to fit inside a box. Tape the corners and edges of the fabric to hold it smooth inside the box. Clean pizza boxes work well.
2. Dilute or water down the paint a bit. If the paint is applied too thickly to the fabric, it makes the fabric difficult to sew through.
3. Lightly spray the fabric with water. Add drops of paint randomly over the fabric. (Fig. 1)
4. Drop a few marbles or wooden beads into the box. Tilt the box so the marbles roll through the paint and around the fabric.
5. Stop rolling the marbles when you are happy with the way the fabric looks. Remove the marbles and let the fabric dry. Take the fabric from the box so you can use to for all sorts of sewing projects. (Fig. 2)