
E-mail. It's our connection to the world, our way of being part of a larger society. It occupies huge chunks of our days and, even more than phone calls, may be the primary way people touch base with and update each other. Ask most people what they'll be using their new iPad for, and a good number of them will instantly reply "e-mail." Being able to step away from your desk and still be able to keep in touch while on the go is a hugely valuable component of iPad use.
The iPad uses the Mail app to compose, send, and receive electronic communications. It provides a handy way to drop a note, share a file, and view material that others have shared with you. Many iPad apps also use Mail as a conduit for sharing documents or files with others, so Mail is a good app to know.
In this chapter, you'll learn how to set up e-mail accounts on your iPad, discover what's involved in composing and organizing mail, and see how Mail works with other iPad apps to help you share information with others.
The iPad Mail app is instantly recognizable with its white paper envelope floating upon a blue-sky background. By default, Mail's icon is placed in the Dock at the bottom of the iPad screen. The Dock ensures that Mail is easily accessible from any one of the panes of the Home screen. At times you'll see a red bubble with a number appear on top of this envelope/sky icon. That bubble lets you know how many new messages have arrived, and are waiting for you to read them.
Chapter 10 discussed how you could synchronize your calendar, contacts, and notes between your iPad and computer. The iPad and iTunes make it just as easy to transfer accounts to your computer. If you already have multiple e-mail accounts set up on your Mac or Windows computer, there's no reason to reenter all of the information to set them up on your iPad. You can use the same process used in Chapter 10 to sync Mail accounts to your iPad for a quick method of setting up Mail, or you can set up the accounts on the iPad—it's your choice. The next two sections show you how to do both.
Synchronizing mail accounts using the Info tab in iTunes provides the fastest way to set up all of your e-mail accounts on your iPad with your Mac or Windows computer. Connect your iPad to your Windows computer or Mac using the Dock Connector to USB Cable, and then, if it's not already open, launch iTunes on your computer. In iTunes, locate your device in the source list, the blue column at the left side of the screen. Click the icon designating your iPad and then open the Info tab at the top of the screen. The Info tab provides a simple way to synchronize information from your computer to your device, including mail accounts, address book contacts, and calendars. Scroll down until you see the words Sync Mail Accounts (see Figure 11-1).
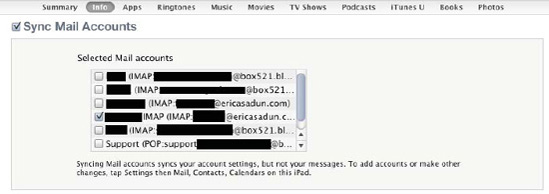
Figure 11.1. Already have multiple e-mail accounts set up on your Mac or Windows computer? iTunes offers a simple-to-use interface for synchronizing those mail accounts to your iPad for fast and reliable setup.
A check box appears to the left of each account name. To enable mail account syncing between your computer and iPad, select the Sync Mail Accounts check box (see Figure 11-1, at the top left of the screen capture), check the box for each mail account that you want to set up on your iPad, and then click the Sync or Apply button at the bottom-right corner of the iTunes window.
One important thing to remember about syncing Mail accounts is that this process synchronizes only your account settings, not the messages that may be stored on the mail server for your account. This is important because the way your iPad retrieves mail varies by the protocol it is set up to use.
Post Office Protocol 3 (POP3, often just called POP) mail accounts are typically configured to download e-mail to your computer or device and remove it from the mail server. This download-then-delete process means that when you receive POP-based e-mail on your iPad, you'll never see it on your computer.
In contrast, when your mail account isn't set up to remove the message from your mail server (as with most default IMAP or Exchange account setups), you'll retain a copy on both the iPad and the computer, and removing it from one machine won't remove it from the other. You can read the message on one device or on the other, and the only thing that changes is the message status, from unread to read.
Apple's MobileMe mail, like other Internet Message Access Protocol (IMAP) mail systems, retains messages until you delete them. That means, with MobileMe, you will see the message on multiple devices, and they'll all have the same status. Unopened messages will be that way on all devices, and read messages show up as read on all devices.
Microsoft's Exchange Server is widely used in business, so it's important to know that Mail provides excellent support for this e-mail standard. Exchange provides push mail capabilities (discussed later in this chapter) for almost instantaneous receipt of incoming mail. iPad fully supports both Exchange Server 2003 and Exchange 2007 synchronization and will support Exchange 2010 as well.
Although setting up Exchange accounts on the iPad is no more difficult than configuring other types of e-mail, it's comforting to know that most organizations that use Exchange can also provide technical support to iPad-toting clients if you run into problems.
If you're interested in using Exchange for your iPad e-mail hosting but don't have the technical expertise available to configure and maintain Exchange Server, there are many Exchange hosting services available worldwide. An Internet search of Exchange Server displays many companies that host Exchange for you.
When you have only one or two e-mail accounts to establish and you either cannot (for example, when you're away from your office) or don't want to synchronize account information between your iPad and your computer, you can set up mail accounts directly on the iPad. This isn't as easily accomplished as simply synchronizing accounts over from your computer, but it's not so hard that you cannot set up an account on the go when you need to.
Before you begin setting up your accounts, make sure that you have the following information on hand. This information is often found on your Internet service provider's support pages under a section about configuring your e-mail.
Name of your e-mail service provider: Common providers include Apple's own MobileMe service, Google's Gmail, Yahoo! Mail, AOL, or Internet service providers such as Comcast and Time Warner.
Your e-mail address: All e-mail addresses are set up in the common [email protected] format, where
mynameis a name or pseudonym for an individual or company,domainis the domain name being used by an organization, andtldis the "top-level domain" for the domain (.com,.gov,.edu, and so on).Your e-mail password: This is the most critical piece of information for setting up an e-mail account, but surprisingly few people remember what their password is! That's because many IT departments create particularly difficult passwords that include numbers and symbols, in order to increase overall security. The end result is, of course, that many people write down that difficult password on a sticky note and attach it to their monitor, defeating the entire purpose of the "difficult password" exercise.
You may want to either contact your Internet service provider or IT department to retrieve your password if you don't remember it or have the password reset to something more memorable. Once set on your iPad, you will not need to reenter it. It is stored securely in your system's "key chain," a private way that your iPad remembers important information.
Server information: Some accounts will be set up automatically by Mail. In other words, it will know whether your server is an Exchange server, POP server, or IMAP server, and it will adjust settings accordingly. However, it's a very good idea to get this information before you start and keep it for your records.
The information to gather includes server addresses (your e-mail provider may refer to this as a server URL) for both your incoming e-mail server (usually prefaced with POP or IMAP) and your outgoing (usually SMTP) server. The e-mail provider may also require that your mail be channeled through specific Internet Protocol ports for security reasons, so requesting port information prior to setup can save headaches later.
Although port 587 is a standard for secure SMTP connections, some connections use ports 25 (SMTP), 110 (POP3), 143 (IMAP), 993 (SSL-encrypted IMAP), 995 (SSL-encrypted POP), and 465 (SSL-encrypted SMTP), among others. Exchange setup also requires a domain name, which can be as simple as a word—
HOST—or as complicated ashost.admin.mycompany.com.
The following steps demonstrate how to set up a Gmail account, one of the most common types of e-mail accounts available. Although each brand of e-mail account may vary in the amount of information required for setup, the setup procedure for all brands is basically the same on the iPad, so you should be able to follow these steps to set up an account other than Gmail:
Always make sure that your iPad is connected to the Internet through a Wi-Fi or 3G connection before attempting to set up or otherwise interact with mail.
In Settings

Choose the proper account type from the list that appears (see Figure 11-2). This example uses Gmail. If you don't see your e-mail service provider listed here, tap Other. Using a predefined account style simplifies setup, because you generally do not need to add extra information like server addresses. Yahoo, Gmail, MobileMe, and AOL server information is provided automatically for you.
After selecting a preset service, enter your information into the setup window (see Figure 11-3). Specify the name that you would like recipients to see. For example, if your name is John Appleseed, you can enter that, John, Mr. Appleseed, or the Apple Tree Guy, and recipients will see your choice as the "real name" of the person who sent them e-mail.
Enter the e-mail address. For this e-mail account, the address is [email protected].
Now type in the e-mail account password. As with all password fields on the iPad, the password is hidden by a series of dots almost as quickly as you type it in.
Enter a description of the account. This example uses "Gmail for Book" to describe the purpose and use of that e-mail address. Always add a meaningful description for each e-mail account, especially when you use many accounts on the same device. These short, descriptive names show up in the list of accounts in Mail on your iPad and allow you to distinguish which mail corresponds to which account. A description like "Gmail" alone is not useful when you use five or six separate Gmail accounts.
Tap the Save button. At this point, your iPad enters a validation process to make sure that there is an account with that e-mail address, that the password is correct, and that the settings have been properly made for that account. A progress wheel will let you know that the process is ongoing. If your iPad cannot establish the account, you'll know within a few minutes, but you do need to be patient during this step.
If everything checks out properly, you'll be presented with a list of account services (see Figure 11-4). These services vary by provider, and allow you to choose which services you wish to be able to sync over the air. Select your services and click Save at the top right of the services pop-up. Once you have selected your services and returned to the list of e-mail accounts in Settings, the new account appears, added at the bottom of the list.
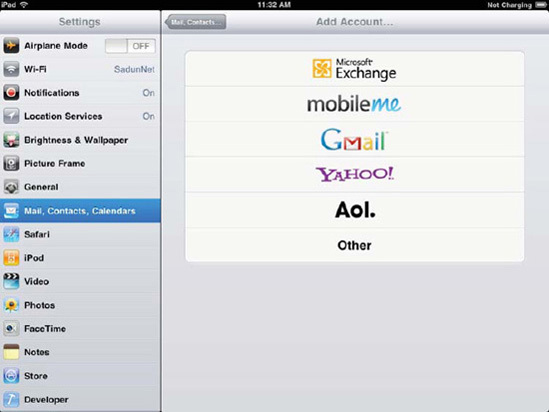
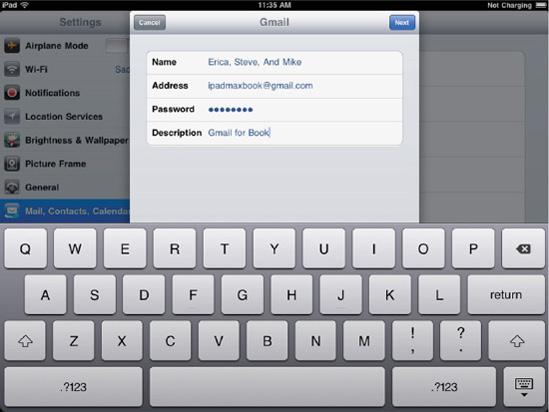

Figure 11.4. Account services vary by provider. Gmail allows you to activate Mail, Calendar, and Note services with your account.
In case of a setup discrepancy, your iPad notifies you of the error. In most cases, the e-mail address or the password was mistyped or, if setting up an account manually using the Other option, a server address was incorrectly entered. Mail does an excellent job of making e-mail setup easy to do on the iPad, so in most situations you'll be done with setup in a few minutes. After setup is complete, most people never need to update their account any further. But what if you need to change settings at a later date?
You'll find a button for each e-mail account listed under Settings
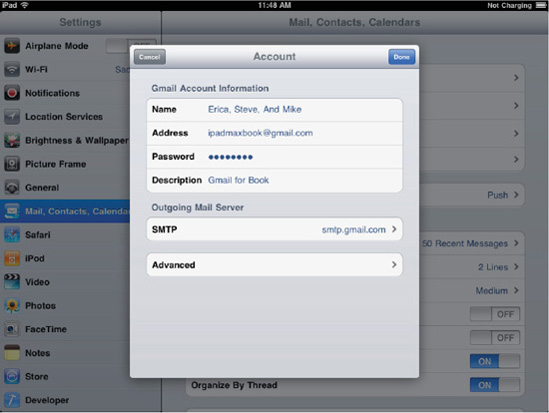
Figure 11.5. Account information, including the name that is displayed to recipients, the name of the account in Mail, and the full e-mail address, is listed for each account in the account information screen. Tap SMTP or Advanced to adjust your account setting details.
When you're in a low-bandwidth situation and wish to turn off services, whether e-mail accounts, calendar, notes, or other over-the-air services, open the settings for each account by tapping the account name in the Mail, Contacts, Calendar screen. An account detail screen appears. Slide the service button, Mail for example, from ON to OFF. After doing so, Mail no longer checks the e-mail server for that account, and the account shows up as Inactive. (The status appears under the name of each account in the Accounts list.) To reverse the process, just slide the Mail button to ON.
Occasionally you may be asked by your Internet service provider or IT department to change some settings for the e-mail servers, or you may run into issues sending, receiving, or configuring Mail. We recommend using Apple's handy cheat sheet, available from http://support.apple.com/kb/HT1277, to help you solicit the proper e-mail account settings from your e-mail providers and to document them in a way that offers an easy-to-use, well-organized reference.
Under Outgoing Mail Server for a specific e-mail account, it's possible to edit the settings. The SMTP option indicates the Simple Mail Transport Protocol server used as the primary server for outgoing e-mail. Tapping that option and then tapping the primary server name displays the settings for the server (see Figure 11-6). When the settings are grayed out like in Figure 11-6, then they are preset, correct, and cannot be edited. When editable, you can use your cheat sheet to change the settings to their proper values.
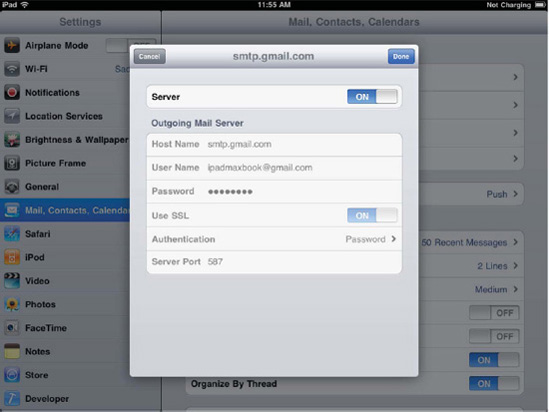
Figure 11.6. When the Outgoing Mail Server settings are grayed out as they are in this figure, then your settings are correct for the server presets and should not be changed.
For security reasons, most mail servers now use authentication and specific server ports. Standard ports include 110 for POP3 servers and 995 for POP3 over TLS/SSL, 143 for IMAP and 993 for POP3 over TLS/SSL, 587 for submission of password information, and 25 for SMTP (outgoing) mail.
Authentication means that Mail must submit a username (usually your e-mail address) and a password to the mail server before being allowed to download mail to your iPad. There are four common types of authentication: MD5 Challenge Response, NTLM, HTTP MD5 Digest, and Password. As always, check with your mail provider for this information if your password is not accepted properly.
You will find many more settings (see Figure 11-7) in Settings

Figure 11.7. Mail settings can be changed to make reading and sending e-mail more enjoyable and productive.
The Fetch New Data button appears just below the last e-mail account listed (Figure 11-7 shows the right pane scrolled down past the Accounts list). Some e-mail accounts, like MobileMe's IMAP service, allow you to set up what is called push service. When push is enabled, new e-mails immediately transfer to your device when the e-mail server receives them. Although this is a great way to get mail as quickly as possible, it also requires more communications between the iPad and the e-mail server. That can reduce battery life, but even more importantly, it increases the amount of bandwidth used by your device.
Although this isn't an issue if you're on a Wi-Fi network, 3G network data plans are costly, particularly if you are using a metered account, which is the standard offered by most iPad carriers. With a metered account, you are granted a certain bandwidth allotment, such as 250MB per month. Exceed that bandwidth and you may be cut off, charged again for another allotment, or possibly charged at an exorbitant out-of-plan rate; details vary by the plan you have selected and the carrier you have signed up with.
The alternative to push, and the method that is used most often for e-mail accounts, is fetch, otherwise known as pull. With this method, your iPad checks for new mail on the server only when you tell it to or at preset intervals. You can set the schedule to have e-mail accounts check for mail every 15 minutes, 30 minutes, 60 minutes, or manually. Manually means that the account doesn't check for mail until you open the inbox in the Mail app or tap the Refresh button that is found at the bottom of most mailboxes. This is a great way to save bandwidth (especially when traveling out of country), but you may miss important messages that arrive between checks.
For most purposes, we recommend leaving push notification turned on for MobileMe accounts and any other e-mail accounts, such as Exchange, that can provide push notification. For other accounts, it's your choice depending on whether you want to have new mail waiting for you when you open your inbox or want the iPad to fetch it at the time you actually open the inbox.
The Settings
Be aware that you cannot individualize polling times; the polling time you select in the Fetch New Data screen applies to all fetched accounts. For example, if you select 15 minutes, all polled accounts will be checked four times an hour.
The next section of the settings page is more about the look and feel of the Mail application. The first button, Show, provides a choice of how many recent messages you'll see in your inbox at any time. The default value is 50 messages, but you can also select 25, 75, 100, or 200 messages.
If you don't receive a lot of e-mail, setting the value to 25 messages is fine. When you receive a ton of e-mail or don't check your inbox for a while, you can always pull more messages down from the server by tapping the Load More Messages link at the bottom of your inbox. Some people prefer a cleaner look and are willing to load more messages when needed. Selecting a bigger number of messages means your mailbox will always be more cluttered but avoids the wait involved when fetching additional mail batches.
Each message in a Mail inbox can include a short preview of the contents so that you can see not only the sender and subject, but also a small preview of the content. The Preview button allows you to set the length of the preview from none (no preview) to five lines.
Mail's message display updates to reflect the preview size you set here. As the preview gets larger, you can see fewer items onscreen at once. As it gets smaller, you see more. With the iPad's generous screen size, this choice affects you less than it would if you were managing mail on a smaller device like the iPhone or iPod touch, where this setting becomes more critical in use. The iPad's default setting includes two lines of the message, which is usually sufficient to see whether the message is important.
If you wear bifocals or otherwise have issues with reading small text, you're going to love the next setting. Minimum Font Size lets you change the size of text in Mail from Small to Giant, with three other sizes in between. Unlike the iPhone or iPod touch, increasing the font size on the iPad, with its large screen, doesn't affect usability, so don't be afraid.. Being able to put your iPad down on a table and refer to it while standing is a wonderful thing, even if your eyes are otherwise quite strong.
When the Show To/Cc Label button is enabled (set to ON), a small label appears next to every message in an inbox indicating whether the message was sent directly to you or you were cc'd (carbon copied) on an e-mail sent to another person. If you leave this option disabled, you can still access the feature while composing your mail—it just takes an extra tap or two. This option simply sets the default, how your mail will start out when you're starting to compose it.
On occasion, you may accidentally delete an e-mail. Enabling Ask Before Deleting forces you to validate that you do indeed want a mail message to be deleted. iPad owners who frequently have to perform mass deletions of e-mails should probably disable this setting to avoid getting bogged down in validations. If the consequences of losing an e-mail may be more serious for you, then enable this option.
When you're on a slow Internet connection, receiving e-mails with lots of images can be a recipe for frustration because it takes a while for those images to load. When you're in a location with a weak 3G signal, the radio in the Wi-Fi + 3G iPad reverts to much slower cellular networks like EDGE or GPRS. Even a Wi-Fi network can be connected to a slow Internet connection. As an example, many cruise ships provide Wi-Fi networks onboard yet are reliant on one very slow satellite connection over which all shipboard Internet traffic must pass.
Images also eat up bandwidth, which is an issue if you're trying to manage your cellular data usage. Because of this, you may want to skip image loading while on-the-go and only view those items when you're back at your desk, away from the metered Internet.
Load Remote Images enables and disables the capability of Mail to autoload images. Instead of loading them right away, they are replaced with an image stand-in. You can still view each image by manually downloading it with a tap. That way you can skip all the snapshots from your company picnic while still enjoying the pictures of your sister's baby.
Do you want a copy of every e-mail you send to be sent to yourself as well? Setting Always Bcc Myself to ON automatically sends a blind carbon copy (bcc) to your inbox. This setting is particularly handy for anyone who wants to keep a record of outgoing e-mail and whose account does not automatically do that for them. Although many modern e-mail services offer a "sent mail" archive, there are still providers who do not offer this option.
What does blind carbon copy mean? It just means that the recipients of the e-mail don't know that you're also getting a copy of it. When you want to send copies of e-mails to co-workers but don't want the original recipient to know that you're sending those copies, bcc is very useful.
Have you gotten e-mail from someone with an iPad, iPhone, or other iOS device? You'll usually know it right away due to the "Sent from my iPad" signature that appears at the end of each message. On your iPad, you can easily tailor that default message for your outgoing mail, changing it to whatever text you like.
Many people like to add a quick note to their signature that explains the brevity of their messages ("so please excuse the terseness of my reply"), and possibly excuse any typographic mistakes (our technical editor Dave Caolo signs his messages, "Please excuse typos. I have big fingers. Not comically large, mind you, just average for a 6' guy").
Some iPad users who use POP e-mail and forwarding accounts have their signature reflect that situation as well ("Sent from my iPad's e-mail forwarding account. Please do not respond to this address. Use my normal work e-mail instead, thanks!"). Still others use their signature for general contact information, to allow lawyers to earn their pay ("This e-mail, including attachments, is intended for the person(s) or company named and may contain confidential and/or legally privileged information"), or to simply gloat about their iPad ("Sent from my iPad. I have the best toys. I win!").
To customize your e-mail signature, tap the Signature button. Unlike most Mac or Windows e-mail programs, Mail on iPad doesn't offer a separate signature for each mail account. Instead, you create a generic signature that is used by every account. Edit the default "Sent from my iPad" text as desired. You can change it to add your name, website address, or anything else you want. Keep in mind that if you include a name in your signature, it appears across all accounts. That's not a problem when all accounts belong to the same user. When both Jon and Suzie share the same iPad, a signature saying "Best, Jonny" will appear at the bottom of Suzie's e-mails as well. For that reason, you may want to avoid names in shared signatures.
The Default Account setting allows you to pick the account you want to send outgoing messages from. When you compose messages using other applications on your iPad, they'll always be sent from the default account. Tap the Default Account button to view a list of the accounts on your iPad, and then select the account you wish to use.
After you set up Mail on your iPad, you'll start to receive e-mail messages automatically, assuming you haven't set everything to "manual." Your first indicator of a new e-mail message is the New Mail sound. Although it's nice to have an audible indication that you're getting mail, it can get a little obnoxious if you receive a lot of mail every day or if you're in a meeting and receive a message. To switch off the New Mail sound, visit Settings
Your iPad also provides a slick little indicator to notify you that you have unread e-mail messages in your inbox or inboxes. The Mail app icon displays a small red oval containing the number of unread items in your inboxes (see Figure 11-8). This number encompasses all inboxes, so if you have 10 messages waiting in one account and 5 in another, the red oval shows that you have 15 unread messages.
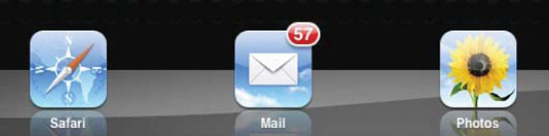
Figure 11.8. You've got mail! It looks like it is time to tap that Mail icon and take a look at those 57 unread messages in your various mailboxes.
You launch the Mail application by tapping its icon. Once launched, what you see depends on whether you've launched the device in portrait orientation or landscape orientation. That's because Mail uses an iPad feature called split views. If you hold your iPad with the wider dimension from side to side (landscape mode), there's enough room onscreen to see both a list of mailboxes and accounts on the left and messages on the right.
Flip the iPad to its side, with the long side going up and down (portrait mode), and that list of mailboxes and accounts pops into an Inbox button. You can only view that list by tapping the Inbox button at the top left of your screen. The small window that opens is called a "pop-over" screen element, in that it pops over the window from the button that you tap.
Figure 11-9 shows the iPad screen in both orientations. As a rule, Mail is much easier to use when you hold the iPad in landscape mode. You don't have to keep opening the pop-over list from the top-left button. Instead, you see everything onscreen at once.
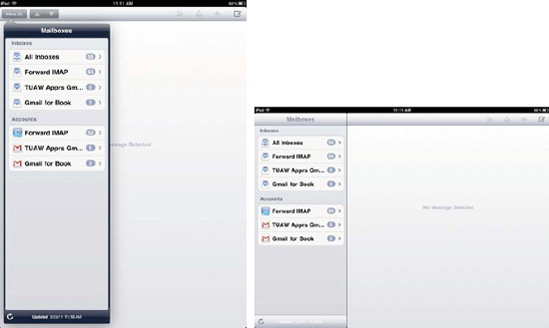
Figure 11.9. The Mailboxes list contains all the e-mail inboxes and accounts currently set up on your iPad, as well as the number of unread e-mails for each. When you hold your iPad in portrait orientation (left), you can only view that list by tapping the Inbox button at the top left of the screen. In landscape mode (right), that list is integrated into the screen, displayed to the left of any selected content.
To view the messages in any one of the inboxes or accounts, tap the item in the Mailboxes list. If you have set that particular e-mail account for manual fetching of messages, the iPad will check the server for new messages at this point. There's also a small refresh icon in the bottom-left corner of the list of mailboxes and accounts. Tapping this icon forces Mail to check the server immediately and retrieve any new messages that have arrived. This allows you to bypass any normal fetch intervals and check for mail whenever you desire.
Warning
With IMAP accounts, sent mail can be saved on the server. With POP3 accounts, however, this may not be the case. If you find that sent messages are not being saved and you want to keep an archive of outgoing mail, use the blind carbon copy feature to send yourself a copy.
Notice the All Inboxes item that appears at the top of your Inboxes list. All Inboxes joins together all items from all accounts, allowing you to read new messages in a single location. It's new to iOS and is one of the many great improvements recently added to Mail.
The Inboxes list is different from the Accounts list in that the former contains only the inbox for each account—that is, the folder of messages that your account has received. Most mail accounts allow you to create other folders, for filing and organizing your messages, allowing you to declutter your inbox without deleting archival mail. Each entry in the Accounts list takes you not just to the account's inbox, but to a complete set of folders for that account, which usually consists of other items, as shown in Figure 11-10. These might include a Trash folder for deleted items, a Sent Mail folder for outgoing mail, a To-do folder for action items, and so forth. Default folders for a Gmail account include Personal, Receipts, Travel, and Work.
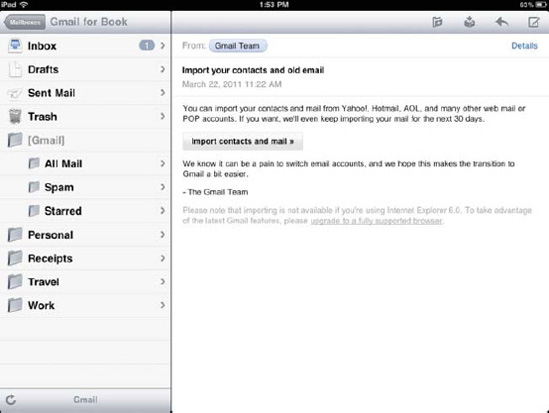
Figure 11.10. The inbox for this example Gmail account contains an unread message, with the remaining e-mail being selected and viewed.
Although the Inboxes screen provides quick and ready access to all new messages, using the Account presentation is particularly handy when you need to organize your mail by moving messages to other folders. It allows you to view all your folders in one place, which simplifies the selection of a destination folder for a message. You'll read more about editing mailboxes later in this chapter.
You can quickly determine which mail you have already viewed and which items remain unread by looking to the left of each listing in any mailbox. A blue dot appears next to each message that you haven't viewed, as shown in Figure 11-11, in which two of the three messages have not been read. The top of the inbox shows the number of unread messages in parentheses.
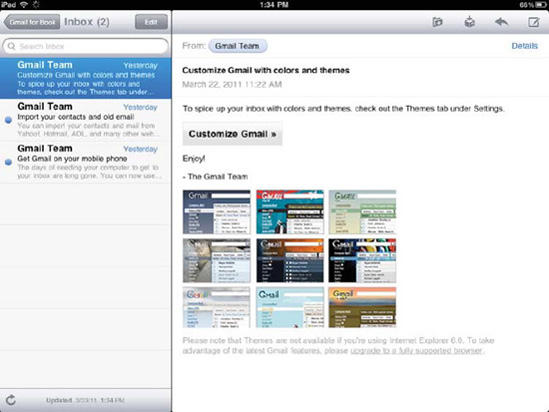
Figure 11.11. The inbox for this example Gmail account contains two unread messages, with the remaining e-mail being selected and viewed.
To read a message, you tap the message item in the mailbox and then view it either on the right side of the screen (in landscape mode) or full screen (in portrait mode). You can navigate through the message by scrolling up and down.
The Details option at the top right of your message allows you to expand the header to see more information about whom the mail was sent to. When expanded, you can then tap Hide to return to the original presentation.
Most people use e-mail to send documents or other files between computers. Let's say that somebody wants to send you a PDF file for you to view, or a Microsoft Word .doc file so that you can make changes to it on your iPad. You'll need to know how to receive that attachment, view that attachment, and possibly then open it in the appropriate app to make your changes.
When the e-mail arrives with the attachment, it appears in the inbox with a tiny paper clip icon denoting an attached file. In the e-mail itself, attachments are represented as small icons and are not downloaded to your iPad until you tap them. This reduces the amount of data automatically transferred to your iPad. You will see the name of the file, its size, and an icon, as shown in Figure 11-12.
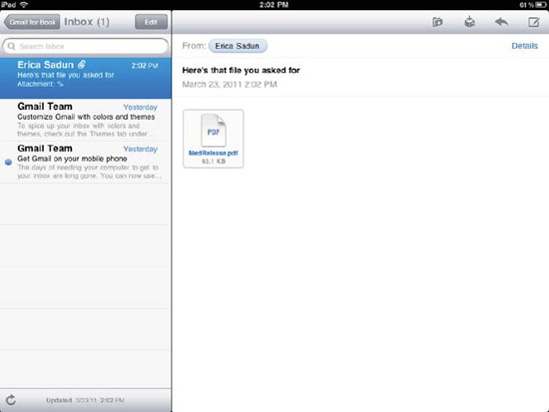
Figure 11.12. A small paper clip icon indicates the message has an associated attachment, a file that has been sent in addition to the core e-mail. Attachments appear in your message with their name, size, and icon. Tap the icon to try to download and view the attached file, or tap and hold the icon for a pop-up menu of other options.
Depending on file type (not all attachments can be viewed), tapping the icon typically allows you to open the file in an in-Mail viewer (called the Quick Look viewer), as shown in Figure 11-13. The viewer allows you to scroll through documents, play back media, and otherwise get a quick overview of the material that has been sent to you, but the viewer does not allow you to make changes to a file. For many attachments, you won't need to do anything further with the file, in which case you can tap the Done button to return to your inbox. Otherwise, you can open the file in another application (to edit a Word document, for example), which you can do from the Open In menu. You can access this menu in either of two ways.

Figure 11.13. Mail's Quick Look attachment viewer allows you to view many types of files sent as mail attachments. When you are done viewing, you can tap Done to leave the viewer or use the action menu at the top right to open the item in another application or perform other system functions. Here, Mail will allow you to print the PDF form to any supported AirPrint printer.
iPad Mail offers two ways to redirect an e-mailed item to another application. As Figure 11-13 shows, you can tap the Action menu button at the top right of the Quick Look viewer screen. This presents a pop-over menu that includes one or more options (such as Form Tools in Figure 11-13) for opening the attachment in a specific application, an Open In option, which you can tap to see a list of possible applications to open it with, and a Print option.
Alternatively, you can just tap and hold the file attachment icon in the e-mail itself. A similar Open In pop-up appears over the attachment, offering the same choices (plus a possible Quick Look option, if the file is viewable). The names on the buttons vary depending on the file type of the attachment and by the applications you have installed on your iPad. Tapping Quick Look, if available, gives you the same quick look at the document in a viewer that you can get if you tap the icon directly (see Figure 11-13). You can't make changes to the document or do anything else; you can just view it.
If you ever have problems getting Mail to open the attachment in the correct app, try opening the document in Quick Look and then tapping the Open In button in the upper-right corner of the Quick Look window. It lists all apps currently installed on your iPad that are capable of opening and editing files of that particular type.
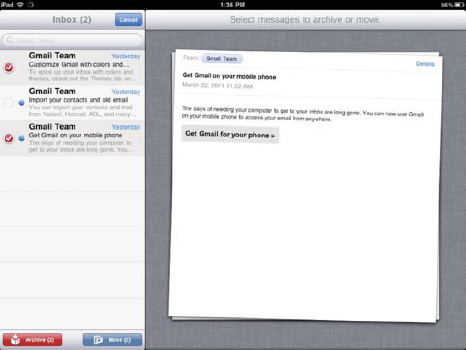
The Edit button at the top right of the mailbox listing provides a way for you to apply batch deletions or moves of the e-mail that populates your mailbox. Consider Figure 11-14, which shows the mailbox after tapping Edit. Next to each message, you'll find either an empty circle or a red-filled, checked circle. Initially, these circles are empty. Tapping a message either adds that item to the collection (filling the circle with a white check mark over a red background) or removes it from the collection (returning the circle to empty).
In batch mode, you always start by choosing which items you want to work with. As you do so, a "stack" of messages appears to the right, as shown in Figure 11-14, giving you a simple visual overview of the most recently selected item and a rough indication of how many items you've chosen.
To delete all of the selected messages, tap the red Delete button at the bottom of the window. If you are using Gmail, the Delete button is replaced by the Archive button (as shown in Figure 11-14), because Gmail has its own "never delete data" policy that the iPad supports. Regardless of whether you are using a Gmail account or not, deleted items are removed from your mailbox. They are automatically moved to the account trash can, moved to an archival folder (as with Gmail), or possibly removed and disposed of completely. It all depends on how your mail account is set up and how your mail provider handles deletion.
To remove individual messages in any mailbox outside of edit mode, swipe your finger left or right over the message. A red Delete button appears, which you tap to send the message to the trash. You will not receive a delete confirmation alert unless you choose that option in Settings, as discussed earlier in this chapter.
Did you accidentally delete messages? Your ability to retrieve those deleted items depends on your mail provider. In some situations, you don't need to worry, since you may be able to retrieve them from another mailbox such as the Trash mailbox, which is used by many IMAP mail accounts. In other cases, you may need to hunt around the mailbox a bit to find out where deleted items went, such as into an archival folder. In still others, your mail will actually be gone permanently. So, always check with your account provider to see how deleted messages are handled for your e-mail account.
If your account uses the Trash mailbox, you can open the mailbox from the list of mailboxes for the account (as shown earlier in Figure 11-10) and use the same management tools described in the last section. Tap the Edit button, mark the messages that you want to recover by tapping the empty circles next to them, and then tap the Move button at the bottom of the window. That displays the list of mailboxes so you can move the selected mail items back to a destination mailbox that you select, such as the account's inbox. Alternatively, tap Cancel instead of tapping a mailbox to leave the messages in the Trash mailbox.
You'll find several buttons at the top of every Mail window that are important to know about. In portrait orientation, up and down arrows on the top left side of the window let you navigate to the previous or next message. On the top right side of the window are buttons for moving the message to another mailbox, deleting the message, replying or forwarding the message, or creating a new message.
The Move button looks like a folder with a downward-pointing arrow. To its right you'll find either a standard Delete button (trash can icon) or, in Gmail, an Archive button (an arrow pointing into a box).
Tapping the Move button displays the list of mailboxes; navigate to a mailbox and then tap it to move the message from its original location into the selected mailbox. Tapping the Delete/Archive button provides a simple way to remove the current message. If supported, the message will move to the account's Trash/Archive mailbox, where either it will be deleted eventually or you will retrieve it if you've deleted it in error. With certain POP accounts, the message will be deleted immediately.
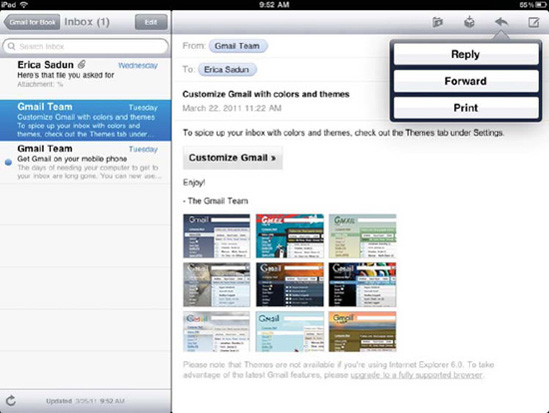
The Reply/Forward button looks like a curved, left-pointing arrow and appears to the right of the Move and Delete/Archive buttons. When you tap the arrow, a small pop-up menu appears with Reply, Forward, and Print options (see Figure 11-15). Each option allows you to choose an action associated with the currently displayed e-mail.
Tapping Reply opens a new message addressed to the original sender, containing the content of the original message, and allowing you to write your reply at the top of the original message. The message subject is also repeated, with the word Re: listed at the beginning to let the original sender know you're sending a reply.
If a message was addressed to you and several other people, another button appears—Reply All. Tapping this button sends the reply to the original sender and all of the other recipients of the e-mail as well.
The Forward button forwards the message to third parties, not limited to the parties included in the original message. Forwarding allows you to pass messages along to anyone who might be interested in their contents. For example, you might forward some family pictures to friends, or send along an amusing joke to your colleagues. When you tap Forward, the message appears in a new window with an empty address list. The subject is repeated with the word Fwd: to indicate to the recipient that you're forwarding someone else's e-mail to them, and then there's a place for you to write a short note to the new recipient of the message.
The Print option allows you to wirelessly print from your iPad to a supported AirPrint printer. In addition, a number of third-party solutions like Printopia for OS X and AirPrint Activator for Windows let you print to most network-connected printers, even if they're not officially AirPrint capable.
The rightmost button at the top of the mail window looks like a pencil poised over a piece of paper. This Compose Message button allows you to compose new e-mail messages. Tapping the button opens a blank message with an empty address list in the To line, an empty Subject line, and a content area showing only your signature (see Figure 11-16).
To address an e-mail to someone, simply start typing the name in the To field. As you type, a pop-up appears with a list of all names from your contacts list or received e-mails that contain the letters you've typed. The letters may match the real-world name or the e-mail address. In the example in Figure 11-17, note that a list of people appears after typing in only the letters jo.
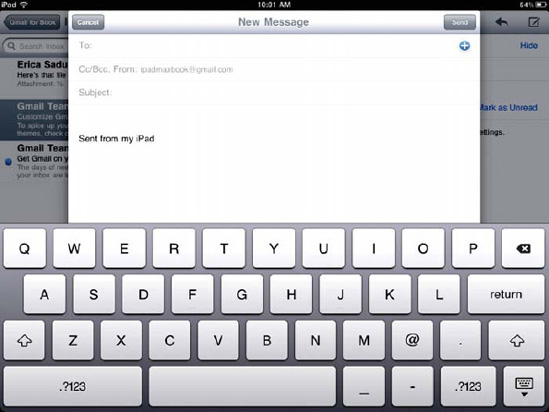
Figure 11.16. Composing a new message in Mail. Your default signature and e-mail address are entered by Mail.
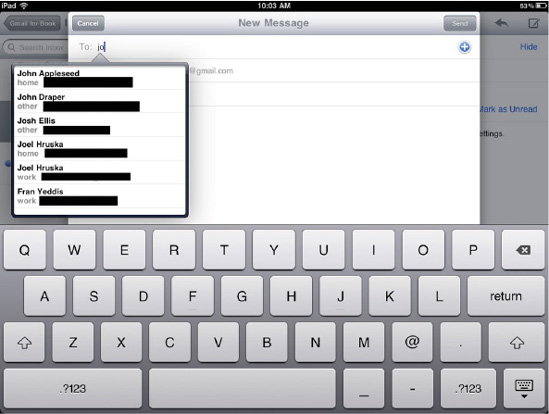
Figure 11.17. As you type a name for the recipient of a mail message, a list of possible names and associated e-mail addresses appears.
If you're addressing the e-mail to one person and they appear on the pop-up list, tap their name to add it to the To line of the e-mail. What if you want to send the e-mail to more than one person or to a group? Tap the circle containing a plus sign (+) at the right end of the To line. That displays your contacts (see Figure 11-18), and you can search for individuals by typing their names in the search box or by scrolling the list with a flick of your finger. To jump to a certain letter in the alphabet (for example, all people with last names beginning with S), tap the letter from the list on the right side of the pop-up.
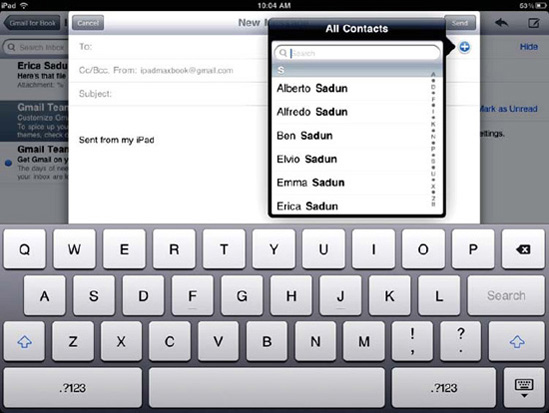
Figure 11.18. You can add as many contacts to your To list as you want by tapping the plus sign and then adding one name at a time. If you have a group you want to send an e-mail to, tap Groups and select the group name.
As with the names that appeared in the search list, just tap a name to add it to the To list. To add a carbon copy or blind carbon copy recipient to your message, tap the Cc/Bcc, From line, and the line expands into three lines—Cc, Bcc, and From. Why does Apple hide these items? Because most e-mails are sent from one person to another, with no need for carbon copy or blind carbon copy. If you need to send a cc or bcc, the recipient lines are easily accessible.
Your default e-mail address is listed in the From line, but if you want to have the e-mail sent from another e-mail account, just tap the From line, and a list of all of your e-mail accounts appears. Tap one of the accounts to select it for this e-mail message.
Next, you need to enter something into the Subject line. This is usually what your recipient sees first, so make it descriptive of the content of your e-mail. "Here's that article for you" or "Friday Lunch" is a little more helpful than "Hi" or "From me."
Finally, type your message into the body of the message. When you're ready to send the message, tap the Send button in the upper-right corner of the message. If you're currently connected to the Internet over a Wi-Fi or 3G connection, the message immediately attempts to move to the server. If you do not have an Internet connection, have quit Mail, or have shut off your iPad, the message is placed in an Outbox mailbox. The next time the iPad connects to the Internet, Mail will attempt to send any messages waiting in Outbox mailboxes.
You can send e-mail from many of the other apps, both Apple apps and third-party apps, on your iPad. Generally, the app displays either an envelope icon or a Share icon, the latter appearing like a piece of paper with an arrow coming out of it. This section discusses some of the common Apple apps and how they integrate with Mail to let you share information with others.
You can share address cards in Contacts through Mail. A Share Contact button appears at the bottom of each address card. Instead of sending someone a laboriously typed list or copy/pasted version of a person's contact information, it's much easier to tap the Share Contact button and send them a vCard. Each vCard contains every bit of contact information that you've captured for that person, including telephone numbers, addresses, e-mail addresses, URLs, and even a photo if one has been added to the contact.
Tapping Share opens a new, unaddressed message that contains the .vcf file for the person whose information is being shared. Address the message to someone, type in a subject line ("Steve's address information," for instance), and then send the message.
Anyone receiving this e-mail on an iPad can tap the .vcf icon that signifies the file is attached to the message, and a small pop-up appears (see Figure 11-19) showing the information contained in the file as well as an option to either create a new contact or to add that information to an existing contact (handy for when people get new cell phone numbers or e-mail addresses).
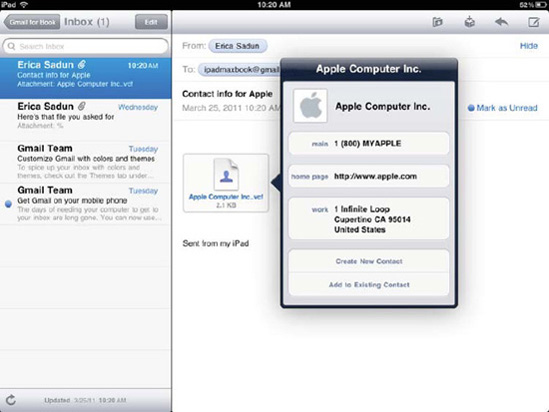
Figure 11.19. If you receive a vCard from someone, tap and hold the icon to view the information it contains. You also have a choice of creating a new contact or adding this information to an existing contact.
Likewise, the .vcf file, when clicked in an e-mail message on a Mac or Windows computer, will launch the appropriate application on the computer and ask the recipient whether they want to add the card to their address book.
To share contact information with others quickly and easily, send vCards through Mail.
As mentioned in the "Notes" section of Chapter 10, it's easy to send a copy of one of your iPad notes to yourself or others from this app.
Tap the envelope icon at the bottom of a page, and a new Mail message appears. The Subject line is filled in with the name of the note, the note is copied as text into the body of the message, and all you need to do is address the message and send it.
There's nothing like finding a funny or thought-provoking video on YouTube and then sharing that clip with friends.
When you find a video in the iPad's YouTube app using the search function, a Share button appears just above the video sample on the page. Tap the Share button, and a new message appears with the name of the video as the subject and a link to the video in the body of the message. Type in an address, and tap Send to let your friends share in the fun.
iTunes includes a quick link for telling friends about movies, music, TV shows, podcasts, or other items that you've found in the store. Tap the Tell a Friend link found in the upper-right corner of each listing in the iTunes Store to create a nicely formatted e-mail complete with any images that accompany the store item, a button that links the recipient to the item in the store, ratings, and more.
If the recipient doesn't have iTunes, they can use the automatically included link to download and install the program on their computer.
Once you own an iPad, it's tempting to let the world know about all the wonderful apps available for the device. Apple makes it easy to spread the word about fun or useful apps by including the same Tell a Friend link on every app description in the App Store. Like iTunes, the e-mail generated by the Tell a Friend link includes a picture of the app icon, the app rating, a button that links the recipient to the app in the App Store, and a link for downloading iTunes.
If the other two stores on the iPad—iTunes and the App Store—include Tell a Friend links, then you might imagine that the iBookstore also provides a similar link. You're correct—for every book listing in the iBookstore, the Tell a Friend link appears in the same location (upper-right corner of the listing) that it occupies in iTunes and the App Store.
All three of the iWork for iPad apps—Keynote, Pages, and Numbers—include a Share button on the main page. The main page displays all the presentations, documents, or worksheets that you've created in one of the apps.
To share a file with a friend or co-worker, drag it to the center of the page, and then tap the Share button below the image of the document. A pop-up appears, with Send via Mail as the first of three actions you can choose.
Tap the Send via Mail button, and a dialog box appears asking which file format you want to convert the file to before sending. For Keynote, the choices are Keynote or PDF. For Numbers, you can select either Numbers or PDF. There are three file format choices for Pages—Pages, PDF, or Microsoft Word .doc format.
Once you've selected the file type, the document is formatted and then attached to a new e-mail message with the document name as the Subject line. Enter an address or two in the To line, tap the Send button, and your work moves on to another person.
There's nothing more fun than sharing photos with friends and family, and the Photos app on your iPad makes it simple to send one or more pictures to anyone with an e-mail address.
When viewing photos in any photo collection, album, or event, our familiar friend the Share button lurks in the upper-right corner of the window. Tapping the button adds Email, Copy, and Delete buttons to the upper-left corner of the window. To add up to five photos as attachments to an e-mail message, tap the photos you want to send, and a check mark appears on them. When you've selected the photos, tap the Send button to embed them in an e-mail.
Like many actions you can perform on an iPad, there's more than one way to send a photo in Mail. While you're browsing your photos, you may see an image that you want to share. Tap and hold the image until a Copy pop-up appears. When it does, tap the pop-up to copy the image. Paste that image into a Mail message, address it, and mail it to share the picture.
Why can you send only five photos? It's all about the size of the images. Depending on the image resolution of the camera that takes the photos, it's not uncommon for photos to be many megabytes (MB) in size. Photos transferred to your iPad are downsampled to the maximum resolution of your iPad's display, which is 1024×768 pixels. That creates a file size of about 900KB. It doesn't sound like much, but five photos embedded in an e-mail message increases the file size to approximately 5MB.
To facilitate the sending of pictures from the iPad, Apple set a limit on the number of pictures. Just about any e-mail system will accept an incoming message with a 5MB file; double or triple that size, and many e-mail servers reject the message as being too large.
What if you have a lot of smaller images to mail to someone? Use the copy and paste method we described earlier to add as many photos as you want, but be cognizant of the fact that the recipient's mail system may reject your message if it is too large.
What happens to photos sent to your iPad in e-mail messages? When the messages appear in your inbox, you may see the photo or an icon that designates that the photo still needs to be downloaded to your iPad from the e-mail server.
Any photo sent to you can be either saved to Photos or copied for pasting into another app. To save or copy the photo, tap and hold it, and a pop-up appears with two buttons—Save Image and Copy. To save the image to Photos, tap Save Image. The iPad copies the image to your Camera Roll in the Photos application. If you're going to paste the image directly into another document, tap Copy, which moves the image to the clipboard for pasting.
Tip
Have you ever wondered how we got the wonderful screen shots for this book? To take a screen shot of whatever is on your iPad display, just press and hold the Home button and then push the On/Off Sleep/Wake button. Your screen "flashes," and a shutter sound tells you that the screen shot has been captured to your photo library.
As the primary conduit for electronic mail on your iPad, the Mail app is arguably one of the most important pieces of software on the device. Setting up Mail is easy, with the app handling much of the configuration work behind the scenes with a minimum of assistance required from the iPad owner.
This chapter showed you how to set up the app and then use it to send or receive e-mail. We discussed how Mail works with many other applications on the iPad to provide a way to share information with others. These are important points to take away from this chapter:
To use Mail, accounts must first be configured in the app. An easy way to move account information to the iPad from another computer is to sync Mail settings from iTunes on the computer.
When you're setting up Mail accounts on the iPad, it's helpful to use Apple's Mail "cheat sheet" to capture all the settings necessary to successfully configure the accounts.
Upon receiving an e-mail with attachments, tap and hold the attachment icon in the message to view or open the file on the iPad.
Send vCard files from the Contacts app to quickly share contact information with others. vCard is a nearly universal file format that works well for Windows, Mac, and Linux users.
All of the electronic storefronts on your iPad—the iTunes Store, iBookstore, and the App Store—include Tell a Friend links for sending friends detailed information about items in the store that you think deserve their attention.
Only five photos at a time can be sent from the Photos application to avoid conflicts with message size limits on mail servers, but it's possible to work around this limit by copying and pasting photos into Mail.