
Now that you've purchased your iPad and have had a chance to sync it with iTunes, it's time to get a bit more familiar with the actual hardware. In this chapter, we'll talk about the various hardware controls on your iPad and how to use them. We'll discuss the care and maintenance requirements of your new device, and we'll explore the details of some of the more widely used Apple accessories for iPad. Grab that iPad, any Apple accessories you may have purchased, and perhaps a refreshing beverage, and let's take a quick tour of the hardware.
In Chapter 1, you were briefly introduced to the names and locations of some of the switches and ports that decorate the outside of your iPad. In this chapter, we explain how those switches and ports are used.
On the top-right corner of the iPad is one of the more important buttons on this little slab of glass and aluminum: the On/Off Sleep/Wake button (see Figure 3-1). That's kind of an odd name for a button, but it describes the function quite clearly.
When your iPad has been totally powered down, you'll need to press and hold this button for two or three seconds to turn it back on. A white Apple logo will appear, followed shortly by either the Home screen of your iPad or the Passcode Lock screen.
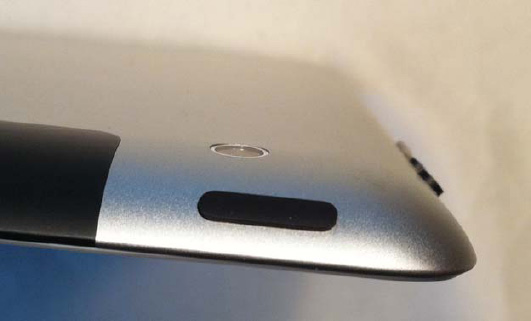
Figure 3.1. The Sleep/Wake button is used for powering the iPad on or off and for putting it to sleep when it's not being used.
If you don't plan on using your iPad for a few hours, you have your choice of either waiting for it to automatically lock and go to sleep (if that option has been turned on in Settings) or manually putting it to sleep. To do the latter, give the button a quick, firm press, and the screen goes dark. When the sound on your iPad is turned up, you'll even hear a click as an audible verification that the device has been put to sleep.
You can wake up the iPad either by giving the On/Off Sleep/Wake button another quick press or by pressing the Home button. Once again, if you have enabled a passcode lock, you need to enter that passcode correctly before you can use the iPad.
Occasionally, you may want to shut off your iPad completely. This means, of course, that it won't be magically picking up e-mail, waking to display alarms, or doing anything else. It will be totally shut down. This is handy when you're not going to be using the iPad for a long time (for example, you leave it home while on a trip) and don't want the battery to drain.
To shut off the iPad, simply hold down the On/Off Sleep/Wake button for about five seconds. The iPad will display a black screen with a Cancel button at the bottom in case you really don't want to shut it off and a red button near the top labeled "Slide to power off." Sliding your button to the right with your finger shuts off power to the device.
This trick can be useful on those rare occasions where an iPad app simply won't respond to your touch and the entire device is locked up. To turn it back on, press the On/Off Sleep/Wake button one more time.
With an iPad 2 adorned with a Smart Cover, there's another way to sleep and wake the iPad: just open the Smart Cover to wake the iPad, or close it to put it back to sleep.
Moving to the right side of the iPad (as oriented with the Home button and Dock Connector port at the bottom and the screen facing you), the next switch is the mute/screen rotation lock (see Figure 3-2). The name of this switch describes the two functions it performs; by default, it is used to mute the iPad, turning the sound on the device completely off. But the mute/screen rotation lock switch can also be used to keep your iPad's screen from changing orientation.

Figure 3.2. The mute/screen rotation lock (the small switch) and the volume toggle (the larger button)
When the button is used to mute your iPad, moving the switch from the top position to the bottom turns off the sound on the device and briefly displays a mute icon (see Figure 3-3) on the iPad screen to signify that the sound has been turned off. Muting your iPad can be very useful if you're trying to play Angry Birds while attending an important meeting.

Figure 3.3. When you flip the mute/screen orientation switch to the down position, this mute icon displays.
New iPad users can sometimes get frustrated when they're reading or playing a game, tilt the iPad a little too far in one direction or another, and have the screen change its orientation from portrait to landscape, or vice versa.
That's where the screen rotation lock comes in handy. It's the second use of the switch on the side of your iPad. To allow the switch to lock the rotation of your iPad screen, go to Settings

Figure 3.4. No matter how your iPad is oriented, the display will remain in the same orientation if the screen rotation lock is enabled.
For example, if you're reading a book in iBooks and find that you prefer the book-like feel of reading in portrait mode, you might want to lock the screen orientation in portrait mode. To lock the screen in portrait mode, orient the display by tilting the bottom of the iPad down. When the display is in the proper orientation, slide the screen rotation lock button down.
To turn the screen rotation lock off, just slide the mute/screen orientation switch upward toward the top of the screen. The lock in the center of the icon disappears, showing that the screen rotation is now unlocked.
Continuing our tour around the perimeter of the iPad, the next button encountered is the volume toggle. As the name implies, it is used to turn the volume up or down or to shut off sound completely. You can see where the volume toggle is located in Figure 3-2.
Increasing the volume of the speaker in the iPad (or any headphones attached through the headphone jack) just requires a push on the top part of the toggle. One push brings the volume up a notch; holding down on the toggle quickly takes the iPad to top volume.
Bringing the volume down requires pushing on the other end of the volume toggle. If you push and hold the volume toggle on its lower end, your iPad's sound is shut off. That's handy for those situations where you need to quickly turn off the volume on Pandora when the phone rings.
Whenever you touch the volume toggle, a visual indication of volume appears in the center of the iPad display (see Figure 3-5). If you have a set of Apple headphones with a volume switch on the cord plugged into your iPad, you can use that switch in a similar manner to adjust volume without touching the iPad.

Speaking of sound volume, the next item on the iPad tour is the speaker. It's hidden on the bottom of the iPad (see Figure 3-6) and blasts out various system beeps, music, and movie soundtracks through a grid of tiny holes in the curved aluminum bottom of the iPad 2. On the original iPad, it's a set of three tiny oblong openings behind mesh grills.
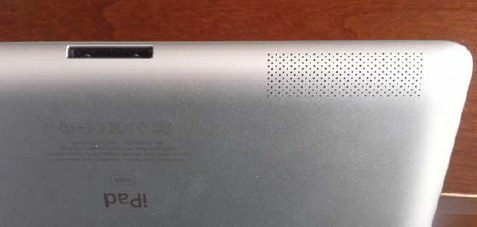
There's not much to say about the speaker, other than if you're purchasing or making a case for your iPad, be sure that it has an opening in the proper location so that the sound isn't muffled. One more hint: be sure to keep liquids away from the speaker and the Dock Connector port (see the following section), as even a slight splash may void your iPad warranty.
The Dock Connector port is the iPad's high-speed connection to the world. Through the port, your iPad can connect to your Mac or Windows machine for syncing, can capture photos through the Camera Connection Kit, and can use a variety of docks or cables for charging the battery.
We'll be talking about many of those accessories later in this chapter, but for now, we're going to just talk about using the Dock Connector port with the included Dock Connector to USB cable.
You can find instructions on how to plug the cable into the Dock Connector port in Chapter 1. When plugging the cable into your iPad, be sure to have the side with the small gray icon (it's a rectangle with a line in it) facing up, and also make sure that you push the cable in squarely. In other words, don't have the cable connector angled up, down, or sideways, because that can cause undue wear on the Dock Connector port.
To quote Dorothy from The Wizard of Oz, "There's no place like home." The Home button (see Figure 3-7) is undoubtedly the most heavily used physical button on the iPad.

It is used for a number of actions, including the following:
Quitting an application that is in use and returning to the Home screen.
Waking a sleeping iPad.
Displaying all of the apps that are currently running on your iPad. This feature, which was added with iOS 4 (the fourth iteration of Apple's mobile device operating system), is enabled by double-clicking the Home button. The iPad's display becomes transparent, and the active apps are displayed in the row of icons at the bottom of the screen.
One fascinating thing about the iPad is that, depending on how you're holding it, the Home button can be on the top, bottom, left, or right side of the display. In most situations, however, it is in the standard bottom side of the screen.
On top of the iPad on the left side is the headphone jack (see Figure 3-8).
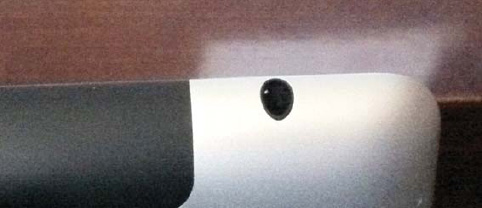
The headphone jack accommodates any standard 3.5mm stereo headphone connector, so you have thousands of choices for headphones to enhance your listening pleasure. Apple sells two headphones: the Apple Earphones with Remote and Mic and the Apple In-Ear Headphones with Remote and Mic. Both of these headphones provide a way for you to control music volume as well as play, pause, rewind, advance, or skip through music or video.
Remember earlier in this chapter, when you were warned about getting water into the speaker or Dock Connector? That warning goes for the headphone jack as well. In that jack is a small liquid sensor. If you ever get your iPad wet, the liquid sensor changes color. This indicates to any Apple technician who is disassembling your iPad that the iPad was wet at one point or another, and it voids your warranty. Unfortunately, some people have found that the liquid sensor may show "water damage" even if the iPad has just been exposed to extremely humid conditions.
If this happens to you, it's within your rights as a consumer to insist on having the technician open the iPad, because there is a second internal sensor that is less susceptible to humidity.
The iPad's microphone is probably the most invisible piece of equipment on the device. On the first-generation iPad, it's a tiny hole located right next to the headphone jack. The second-generation iPad moved the microphone to the front of the iPad, where it is a miniscule circular array of microscopic dots arranged above the front-facing camera.
If you're using an iPad application to record a lecture or conversation, you can enhance the sound recording slightly by orienting the mic directly toward the person(s) speaking. When you're recording your own voice, either of the Apple headphones with microphones discussed in the previous section provides clear reproduction of your speech without picking up a lot of background noise. Also available from many sources professional-quality mics such as the $60 iRig Mic from IK Multimedia (ikmultimedia.com/irigmic/) that plug into the headphone jack.
USB headsets also work well for listening to and recording on the iPad when connected through the USB adapter that is part of the iPad Camera Connection Kit. We'll discuss the Camera Connection Kit later in this chapter.
There's one more port on the Wi-Fi + 3G iPad that doesn't exist on the Wi-Fi model: the micro-SIM port (see Figure 3-9).
Every device that is connected to a GSM-based mobile phone system anywhere in the world uses a small card called a subscriber identity module (SIM) card. Your 3G iPad cannot access the Internet through a 3G network without an SIM card, so each 3G iPad comes with one pre-installed. Apple uses a smaller SIM card form factor in the iPad called micro-SIM.
On occasion, SIM cards may be defective and require replacement. For that purpose, there is a tiny door on the left side of the 3G iPad. On the original iPad, it's located on the lower part of the left side, while it's near the top of the second-generation iPad. That door has a miniscule hole in it, which you can think of as the lock for the door (see Figure 3-9).
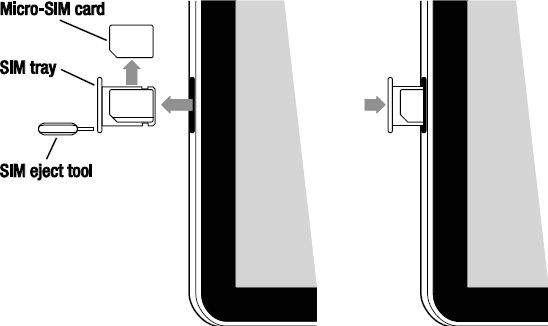
Figure 3.9. The micro-SIM card, the SIM tray, and the SIM eject tool are found only on the Wi-Fi + 3G iPad. On the second-generation iPad, the port is located near the top of the left side of the device.
The 3G-enabled iPad also comes with a SIM eject tool, which is a small oblong aluminum piece with a small protrusion on one end. To open the SIM door, take the SIM eject tool and put the protruding piece into the hole in the door. Apply pressure to the tool, and the door will pop up from the surface. It is quite easy to lose the SIM eject tool, so in a pinch you can use a small paper clip bent to resemble the tool.
Grasping the top of the door with your fingers, pull the micro-SIM out of the iPad. It rests in a small tray, and it can be popped out and replaced with a new micro-SIM. To put the new SIM into the iPad, simply push the tray back into the iPad until the door is flush with the side of your device.
Although an iPad isn't as expensive as MacBook Pro, you'll still want to keep it around as long as possible. With a little loving care, your iPad can serve you for many years to come. In this section of Chapter 3, we'll tell you how to maintain your iPad for long life and years of loyal service.
As with the iPhone before it, the iPad is creating its own economy with a plethora of accessories being produced for it. Some of the hottest products for iPad are cases that protect the device from scratches, water, dirt, and accidental drops. Although we're not going to list every possible case in this section, we'll talk about the different types of cases and who they're for.
An iPad sleeve (see Figure 3-10) is usually made of a soft material with a nonscratch lining. The iPad is placed into the sleeve, and then it's commonly put into another carrying case—a backpack, a purse, a briefcase, or a laptop bag.

Figure 3.10. The Targus Hughes Leather Portfolio Slipcase iPad sleeve by Targus. Image courtesy of Targus.
More than anything, sleeves are designed to protect the iPad from scratches when it is placed into another bag. They can be made of a variety of materials (there are sleeves made of leather, fleece, cork, neoprene, nylon, and hemp, for example), and prices are also all over the map.
Examples of sleeves are products from Targus (www.targus.com) and Booq (booqbags.com).
Bags for the iPad (see Figure 3-11) are meant not only to protect the iPad, but to be the primary form of transportation for it as well. As such, they're usually equipped with a handle or strap of some sort for easy carrying. Price-wise, bags are usually more expensive than sleeves, but they also provide more protection. Often there's some sort of padding provided, as well as a stiff insert to protect the screen.
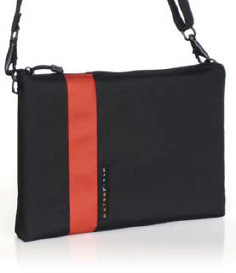
Figure 3.11. The attractive and functional iPad Travel Express bag from WaterField Designs. Image courtesy of WaterField Designs.
Several stylish bags are made by WaterField Designs (sfbags.com) and Tom Bihn (www.tombihn.com).
If you want to protect the surfaces of your iPad without a lot of extra weight, consider a skin. These are usually made of a thin material that might not protect your iPad against a drop but will keep scratches away. Zagg's Invisible Shield for iPad (www.zagg.com) and Fusion of Ideas' Stealth Armor (www.fusionofideas.com/sa-ipad/index.html) are two perfect examples of skins that provide scratch protection with little or no bulk.
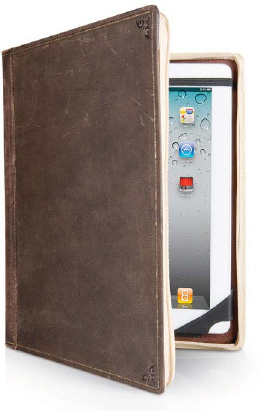
The iPad is an excellent electronic book reader, so why not make it look like a book? The first case of this type was developed by San Francisco-based DODOcase (dodocase.com), a company that fused high-tech and old bookbinding skills and came up with a good-looking and protective iPad case. Other companies have followed suit, with the Twelve South BookBook for iPad (twelvesouth.com/products/bookbook_ipad/) being a clever and beautiful example of this genre of iPad case (see Figure 3-12).
One great thing about the iPad is the battery life. It's not uncommon to go for days without charging the battery, and the thought of being far from a power outlet will no longer cause you to panic. A good rule of thumb is that, for normal usage, the battery level drops about 10 percent for each hour of use. If you're playing games with some heavy graphic and sound demands, your battery may not last as long on a charge. On the other hand, if you're reading an e-book, the iPad battery may last longer.
However, your iPad battery won't last forever without a charge, so you'll want to charge it on a regular basis. You do this by connecting the iPad to a power outlet using the Dock Connector to USB cable and the 10W USB power adapter or by connecting the cable to a high-power USB 2.0 port.
What do we mean by high-power USB? Generally, that means plugging either directly into a port on your computer or into a powered USB hub. Plugging your iPad into a port on a USB keyboard or into an unpowered USB hub won't charge it. Instead, you'll see the message "Not Charging" in the status bar next to the battery icon. We recommend plugging the iPad into the power adapter every night to receive a full charge.
If your iPad is very low on power, you may see one of the images in Figure 3-13 on the screen. These mean that the device needs to be charged for at least ten minutes before you can use it. If the battery is extremely low or completely drained, you may not see these images for up to two minutes after plugging the iPad into a power source.
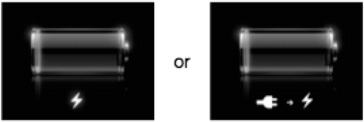
Figure 3.13. If you see either of these symbols on your iPad screen, stop using it, and plug it into a power source as soon as possible.
With constant usage, your iPad battery may eventually get to the point where its capacity to hold a charge has depleted 50 percent or more from the original specification. You'll be able to tell this is the case if your iPad is constantly running out of power or if it never shows that it is completely recharged after being plugged in for a long time. In this case, you may need to have your battery replaced by an Apple-authorized service provider. If you purchased an AppleCare Protection Plan for your iPad and you've owned it for less than two years, you may be able to have Apple replace the battery at no cost.
There are some simple steps you can take to stretch your battery life that can be useful in situations (international flights, for example) where you cannot readily recharge your battery:
Turn off push notifications: Some apps use Apple Push Notifications to provide alerts. These tend to decrease battery life when frequently used, so you can disable push notifications by going to Settings

Turn off Wi-Fi: When you're not using Wi-Fi, turn it off to save power. Go to Settings
Have a Wi-Fi + 3G iPad? Using 3G networks tends to drain battery power faster than connecting via Wi-Fi. If you're in a zone with low or no 3G coverage, turn off 3G to improve your battery life. There are two ways to do this. First, choose Settings
Minimize use of location services: iPads can determine where they are by two methods: by Wi-Fi location through Skyhook Wireless's database of Wi-Fi hotspot locations or by Assisted GPS (A-GPS) on Wi-Fi + 3G iPads. Both of these methods can reduce battery life. If you don't need to know where you are or where you're going, disable location services. Go to Settings
Adjust the brightness of your screen: The iPad normally has Auto-Brightness turned on, which means that it will brighten the screen in bright ambient light conditions and darken it in darker rooms. You may want to adjust brightness yourself by going to Settings
Know your downloaded applications: Some apps that you run on your iPad may be eating your battery life. Games that prevent the screen from dimming automatically are a common culprit, as are apps that need to run continuously for location updates. Geotracking apps that poll the GPS position of a Wi-Fi + 3G iPad are known to pull the battery life down quickly.
Keep your iPad out of temperature extremes: Apple recommends keeping your iPad out of direct sun and hot cars. Extreme heat can cause decreased battery life and may also result in other issues we'll discuss shortly. Apple's recommended temperature ranges for the iPad are 32° to 95° F (0° to 35° C) in operation and −4° to 113° F (−20° to 45° C) when it is turned off.
Set your iPad to turn off after a short amount of inactivity. The AutoLock feature, which can be set by going to Settings
Unlike the easily scratched displays on early mobile devices like the Apple Newton MessagePad or Palm Pilot, the iPad's screen is made of a very durable and extremely hard glass. Although it will resist most scratches, eventually something may scratch the screen. Except in extreme situations, this should not harm the screen, and you should still be able to use your iPad with no difficulties.
Probably the biggest issue you'll have with an iPad display is that it tends to pick up fingerprints. The iPad screen has an oleophobic (oil-repelling) coating on it, but it still picks up smears and fingerprints quite easily.
Cleaning fingerprints and smears off of your iPad screen can get to be a bit of an obsession. Fortunately, about the only time that they're readily visible is when the iPad is turned off, so you shouldn't need to get obsessive about fingerprints. On those occasions where the smearing is really interfering with your iPad use, Apple recommends turning off the iPad completely, unplugging all cables, and then using a soft, slightly damp, lint-free cloth. We recommend using a RadTech ScreenSavrz cleaning cloth (www.radtech.us), dampening the cloth slightly with water, and then squeezing it until almost all the water is gone.
Some iPad users claim that baby wipes work well to clean the iPad screen. They're inexpensive, convenient, and easy to use. After cleaning the screen, just wipe any remaining dust or liquid residue with a soft cloth.
Next, use the cloth to wipe the screen. Make sure that you avoid any openings on the iPad, such as the headphone jack, Dock Connector port, and speaker.
Never use window cleaners, liquid eyeglass cleaners, household cleaning sprays, alcohol, ammonia, or any abrasives to clean the iPad, because they may damage the screen.
In the previous section about battery life, we mentioned Apple's recommendation that you keep the iPad out of hot conditions in order to optimize battery life. There's another good reason to make sure that you keep your iPad cool—it may shut off if it gets too hot.
Apple designed the iPad without a built-in cooling fan, so that you wouldn't be bothered by the noise and power consumption of a fan. Unfortunately, that means that the only way your iPad can keep itself cool is by transferring heat to the surroundings through conduction.
Some iPad users reported that when their device experienced conditions with a high ambient temperature, a warning appeared on the screen and the iPad shut down. To bring your iPad "back to life," it's necessary to bring it into a cool place out of direct sun until it can cool down. This seems to be a more common occurrence during summer and when the iPad is being used in direct sunlight.
When this book was being written shortly after the release of the iPad, there were already thousands of third-party accessories available. For many iPad buyers who will be making their purchase from a nearby Apple Store or through the Apple Online Store, Apple accessories may be their first choice.
In this section, we'll describe the iPad accessories made by Apple and how they can be used to enhance your user experience. You've already been introduced to these accessories in Chapter 1; here, we provide more details about how each of these items can be used with your iPad.
We mentioned the Apple Smart Cover for iPad 2 earlier in this chapter as a way to protect the screen of your device from scratches. The Smart Cover is useful in many other ways as well.
The Smart Cover is made of either leather ($69.00) or polyurethane ($39.00), which means that when your iPad is wearing the Smart Cover it is easier to grip. We find the "naked" iPad to be somewhat slippery, so having the Smart Cover has probably kept us from dropping the iPad at least once.
The Smart Cover is attached to the iPad 2 with very strong and strategically placed magnets. There's only one right way to attach the cover, and when you get the cover into the proper orientation, it actually installs itself.
The Smart Cover has one magnet that works with a small microswitch inside the iPad 2 to wake the device when the cover is lifted or put it to sleep when the cover is closed. That feature makes it unnecessary to press the On/Off Sleep/Wake button to bring the iPad to life.
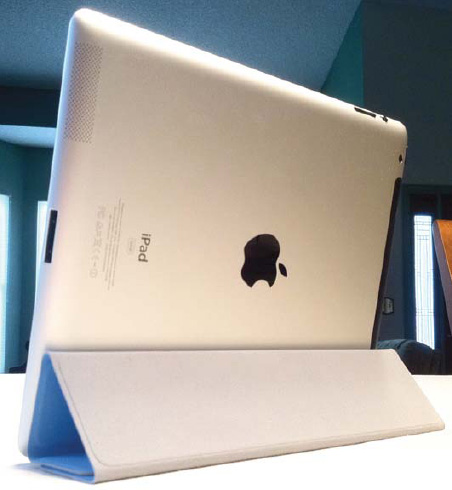
Our favorite feature of the iPad Smart Cover is that it folds origami-like into a handy stand, as shown in Figure 3-14. There's a steel plate inside one of the folds in the Smart Cover that is attracted to an array of magnets. When folded into a triangular tube shape, the Smart Cover acts either as a prop for easier typing on the iPad, or to hold it into a vertical position for convenient viewing of movies.
The Apple iPad 2 Dock ($29.00) provides a docking base for charging and syncing your iPad 2 (see Figure 3-15).
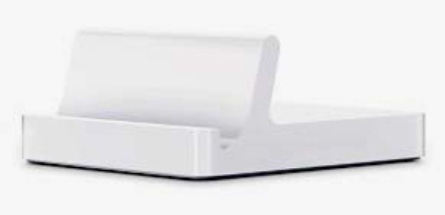
There's a similar dock available for the original iPad, and many other vendors have created docks that are equally functional and less expensive. The iPad 2 Dock provides access to a Dock Connector port and an audio line-out port. It holds your iPad at one fixed angle, and there's no way to adjust the angle. For those who wish to use a Bluetooth keyboard with the iPad, the iPad 2 Dock is a perfect way to hold the iPad in a useful configuration for typing.
For photographers, a very useful accessory from Apple is the iPad Camera Connection Kit (see Figure 3-16). The kit consists of two separate connectors that plug into the iPad's Dock Connector port. The first has a slot for a Secure Digital (SD) memory card like those used in many digital cameras and camcorders. When you want to move photos or movies from your camera to your iPad for sharing or touch-up, you simply plug in the Camera Connection Kit's SD adapter, remove the SD card from your camera, and insert it into the SD slot on the Camera Connection Kit.
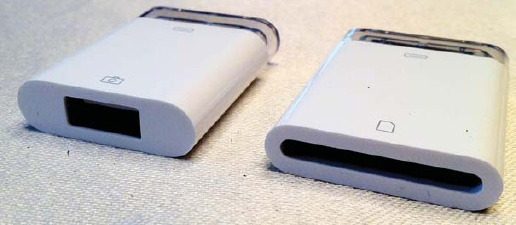
Figure 3.16. The iPad Camera Connection Kit consists of a USB adapter (left) and an SD memory card reader (right).
Even more useful is the second connector, which provides the iPad with a USB port. What can you connect to the USB port? A digital camera or camcorder, of course, but you can also attach most USB keyboards, USB headsets, and even an iPhone or iPod touch. If you're using your iPhone or iPod touch as a camera and wish to move your photos or video to the iPad for editing, the Camera Connection Kit USB adapter and the regular iPhone sync cable make beautiful music together.
The ability to add a USB headset to an iPad makes it a great portable workstation for Skype voice chats, and if you have a favorite USB keyboard that you just can't part with, you'll now be able to use it with your iPad.
The iPad comes with a 10W USB power adapter for charging, but you may want a second adapter for travel or so you can charge up both at home and at work. The iPad 10W USB Power Adapter has one additional piece that's not included with the standard adapter that you get with your iPad—it's a 6-foot-long power cord, so you don't need to be right next to the power outlet to get a charge.
When Steve Jobs announced on the iPad on January 27, 2010, he also announced the availability of iWork for iPad. iWork consists of three powerful apps: Pages, Keynote, and Numbers.
Apple's Keynote is presentation software, so for those of us who give presentations as part of our work life, this was exciting news. What we needed, however, was some way to get the image from the iPad to a standard PC projector or large monitor.
Minutes later, Jobs announced the Apple VGA Adapter (see Figure 3-17), which provides exactly that capability. For the original iPad, the VGA Adapter only works with certain apps that have been written to include a set of special drivers. On the iPad 2, the VGA Adapter provides true mirroring of everything on the screen to an attached display or projector.

Figure 3.17. The iPad Dock Connector to VGA Adapter is useful for displaying Keynote presentations on an external monitor or PC projector.
This adapter is a godsend for presenters who don't want to lug a laptop around. With Keynote for iPad, the adapter, your iPad, and a PC projector, you're ready to wow the crowd with your presentation.
With the introduction of the second-generation iPad, Apple introduced a new cable: the Digital AV Adapter. The purpose of this cable is to let your iPad connect to the many high-definition displays and TVs that use the HDMI connector standard.
This adapter features a dock connector on one end to plug into the iPad, and an HDMI cable port on the other end. The HDMI side also has another dock connector in case you wish to power your iPad while using it to pump video to your HDTV. The Digital AV Adapter mirrors content on your iPad 2 screen to an HD display, but only works with apps that specifically support video out on the original iPad.
Not every PC projector or TV uses the VGA standard for input of video signals, so Apple made sure that the Apple Component and Composite AV cables worked with the iPad. Unlike the VGA and adapter, which will work in video mirroring mode on an iPad 2, these cable works only with applications that have been written to take advantage of the video-out capabilities of the iPad. We hope more iPad programmers will support video-out in their applications in the future.
The Apple Wireless Keyboard is another Apple product that can be used with the iPad. This diminutive keyboard is comfortable and has good tactile feedback for touch-typing.
The keyboard uses Bluetooth wireless connectivity to converse with the iPad and has two AA batteries that provide power to it. If you have an existing Apple Wireless Keyboard and want to use it with your iPad, you will need to pair the keyboard with the iPad only—you cannot use it for both your Mac and your iPad unless you go through the pairing process each time you want to use it.
The best thing about the keyboard is that it is not attached to anything, so you can use it in front of your iPad, in your lap, or up to 30 feet away from the iPad.
As we mentioned earlier, just about any third-party Bluetooth keyboard will work with the iPad. There are a number of vendors who are producing iPad cases that incorporate a Bluetooth keyboard, such as the ZaggMate (zagg.com/accessories/zaggmate-ipad-case) and the Kensington KeyFolio case (kensington.com)
Although the iPad essentially uses the same operating system software as an iPhone, it's not designed to make or receive phone calls. Even the iPad Wi-Fi + 3G can't make voice calls except by using FaceTime or Voice over IP (VoIP) software like Skype (http://skype.com) or Line2 (www.line2.com).
Even though you can't make phone calls with your iPad like you can on any iPhone, you'll still want to listen to music, watch movies, or even take part in the occasional FaceTime chat. For that reason, you may want a good set of headphones. The Apple Earphones with Remote and Mic have a small switch on one of the earphone cables that acts as a remote control for iTunes. If you need to fast-forward to the next song, pause, turn the volume up or down, or rewind, you can do it with the remote.
The remote switch also includes one important component—a small directional microphone for picking up your voice. Since these are the same headphones that are included with each iPhone, you can use them with your iPad by simply plugging them into the headphone jack.
The last Apple accessory for the iPad that we'll discuss is another headphone. The Apple In-Ear Headphones with Remote and Mic are virtually identical to the previous entry, but with one important difference. These headphones actually fit inside your ear canal so that you get better sound quality and isolation from outside noises.
This chapter introduced you to the user-controllable hardware of your iPad by taking you on a tour of the various switches, buttons and ports you'll use on a daily basis. You also became familiar with the care and maintenance of your iPad and found out more about the iPad accessories that you can purchase from Apple.
Here are some key points from this chapter:
For ease of use, the iPad has very few physical switches and toggles. Most interaction with an iPad is done through the touch screen. The true buttons and switches consist of the On/Off Sleep/Wake button, the Home button, the volume toggle, and the mute/screen rotation switch.
There are many ways to extend the battery life of your iPad for those rare occasions where you'll be away from a power outlet for a long time. On those long international flights, consider dimming the screen, lowering the volume, and turning off all wireless services (Wi-Fi, 3G, and Bluetooth).
Extreme temperatures are the enemy of your iPad. Chances are, if you're feeling uncomfortable, your iPad is too! Keep it at a temperature you'd feel comfortable at, and you shouldn't run into any problems.
Never get liquids into any of the ports on your iPad, especially the headphone jack. Exposure to liquids can void the iPad warranty.
If you plan on using any of the Apple cables or adapters to connect your iPad to a projector, TV, or home theater system, understand that not all apps may support those cables.