
With the iPad's Photos application (launched from its icon, shown in Figure 13-1), you can free your photos from your home computer and pass them around the room like you used to do with photos of old. Hand your iPad to your friends, and they can swipe through your photos in their hands without the need to huddle around a desktop computer. In this chapter, you'll discover how to navigate your photo collections, share them with friends and family, and use the iPad as a digital picture frame.
Before you can view your photos on the iPad, you first need to put them on it. There are five ways you can do this: syncing photos from your computer, importing photos from a digital camera directly into the iPad, saving photos from e-mailed messages, saving images found on web pages, and taking photos with the iPad's built-in camera. We talk about the various ways you can capture photo's with the iPad's camera in Chapter 15.
We discussed syncing photos to your iPad in Chapter 2, but let's touch upon it briefly again. iTunes can synchronize your iPad with pictures stored on your computer. This allows you to bring your photo collection with you and share it using the iPad's unique touch-based interface. Who needs to carry around thick and heavy physical photo albums when you have an iPad with its thin body and vibrant display?
To get started, connect your iPad to your computer, and launch iTunes. Select your iPad from the source list (the blue column on the left side of the iTunes window), and open the Photos tab. Select the "Sync photos" box, and then choose the location of the photos you want to sync. Your choices depend on your operating system.
On the computer, your options will be Adobe Photoshop Elements 3.0 or newer or any folder on your computer, such as My Pictures. On the Mac, your options will be iPhoto 4.0.3 or newer, Aperture 3.0.2 or newer, or any folder on your computer.
After you choose where to sync your photos from, select whether to sync your entire photo collection (a good choice for relatively small libraries) or individual albums (better for large libraries that might not fit on the iPad's limited storage space). In the latter case, pick only those albums you want to copy to your iPad.
If you are using a Mac and iPhoto or Aperture, you'll have the option to sync faces (iPhoto '09 or newer), events (iPhoto '08 or newer), and albums (see Figure 2-38). Faces are smart photo albums that contain all the photos that have a selected individual's face in them. It does this by using iPhoto's built-in facial recognition software. Events are another type of smart album that group photos together that were taken on the same day. This helps eliminate clutter and keeps your photo library organized.
To finish, click Apply to save your changes, and then sync.
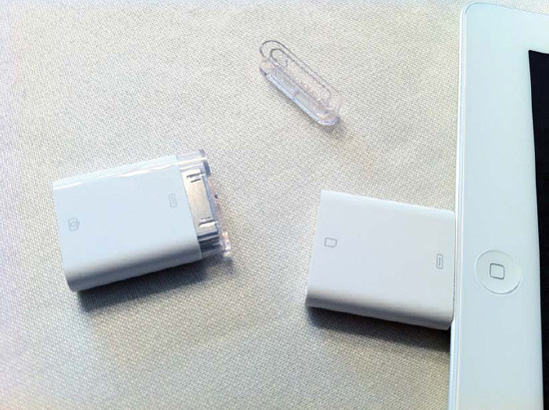
You can also import photos to your iPad directly from any camera that can connect via USB or that uses a SD card. To do this, you will need to purchase the iPad Camera Connection Kit ($29 at the Apple Store). The kit includes two adapters—one for connecting a camera through a USB 2.0 cable, the other for reading SD memory cards (see Figure 13-2).
The iPad supports standard photo formats, including JPEG, GIF, TIFF, PNG, and RAW. You can connect most cameras to your iPad through the USB adapter in the iPad Camera Connection Kit, including an iPhone so that you can do direct iPhone to iPad photo transfers. You can even connect the popular line of Flip cameras to the iPad, but because of USB power issues, you will need to connect the Flip camera to an external power source before you connect it via USB to your iPad.
You can also import video clips taken by your camera through the iPad Camera Connection Kit if those video clips are in one of the video formats the iPad supports. Supported iPad video formats are M4V, MP4, MOV, MPEG-4, and H.264. The iPad does not support many popular video formats such as AVI and WMV, but there are countless applications that let you convert AVI and WMV files to iPad-compatible formats. Google WMV to iPad or AVI to iPad to see all the software that offers conversion capabilities.
To import photos, plug either the USB adapter or the SD card adapter into the iPad. When using the USB adapter, connect your digital camera to it using the USB cable the camera came with, and switch the camera into transfer mode (see your camera's manual for details). To import photos from your iPhone's camera, plug the iPhone into the USB adapter using the iPhone's Dock Connector to USB Cable. Make sure the iPhone is turned on. When importing using the SD card adapter, plug the adapter into the iPad, and insert the SD card into it.
Once your camera or SD card is attached, unlock your iPad by sliding the unlock bar on the bottom of the lock screen. The Photos application automatically appears, displaying the photos available for importing. You now have two options: import all the photos by tapping the Import All button (see Figure 13-3) or import only a selection of photos.
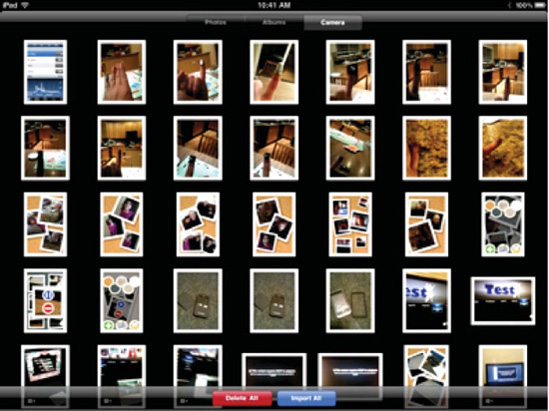
Figure 13.3. Import all your photographs by tapping the Import All button at the bottom of the screen.
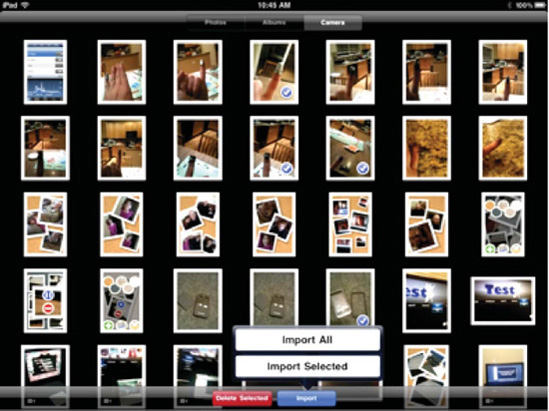
To import selected photos, tap each photo you wish to include. A check mark appears on it (see Figure 13-4). When you are done selecting photos, tap Import and select Import Selected.
After a successful import, the iPad prompts you to decide whether to keep or delete the photos you imported from the device you imported them from (see Figure 13-5).

Newly imported photos appear in an album called Last Import (see Figure 13-6) and in a new event, which contains the last imported photos. After you have imported photos more than one time, you'll also see an album called All Imported.
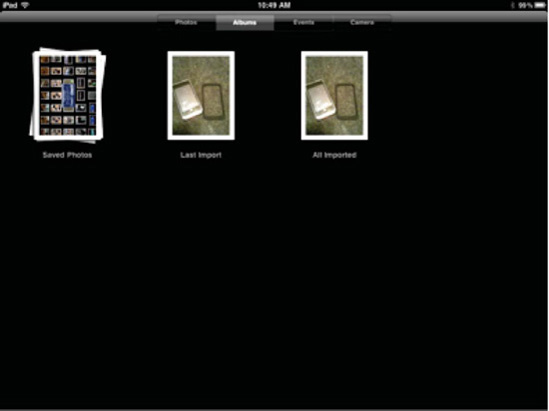
Figure 13.6. Photos imported directly to the iPad from a digital camera or SD card will show up in the Last Import album.
Once you have transferred your photos, you can disconnect the camera connection adapter from the iPad.
To export transferred photos from the iPad back to your computer, connect your iPad and open a photo application such as iPhoto or Image Capture on a Mac or Adobe Elements on a Windows computer.
You may find yourself in a situation where you quickly want to add some photos from your computer to the iPad. You want to avoid an entire synchronization procedure. Wouldn't it be great if you could quickly import images to the iPad using a USB thumb drive?
Good news! You can unofficially use the iPad Camera Connection Kit to attach some types of USB thumb drives for quick and easy transfer of photos from your computer to the iPad. To do this, you have to trick your iPad into thinking your thumb drive is a camera.
DCIM (Digital Camera Images) is a universal standard used by camera manufacturers to organize photos on your camera by a defined file system and structure including the file naming specification, file formats, and metadata information. Before the iPad connects to your camera or SD card, it looks for a DCIM folder on the device. The presence of this folder from the folder.
A camera's SD card automatically creates a folder labeled DCIM when you take the first picture. Since there's not much difference between an SD card and a USB thumb drive (both are just forms of solid-state storage), you can simply create a DCIM folder on the thumb drive to trick your iPad into thinking it's a camera.
The easiest way to do this is to create a new folder on your desktop and name it "DCIM." Drag that folder to the USB thumb drive. Once the folder is on the thumb drive, find and drag whatever photos you want from your computer into the DCIM folder on your thumb drive. After the photos are copied, plug the thumb drive into the USB adapter in the iPad Camera Connection Kit, and the iPad will see the photos in the DCIM folder and think it's talking to a camera, thus allowing you to import those pictures from the thumb drive into the iPad Photos app.
You can also store photos on your iPad without importing them from your computer or camera. If someone e-mails a photo to you, in the iPad's Mail app you'll see the photos appear in the body of the e-mail message. Tap and hold your finger on any photo, and you'll see a pop-up appear that allows you to save that one photo or all the photos contained in the e-mail (see Figure 13-7). The photo or photos you've selected to save will appear in an album labeled Saved Photos in the iPad's Photos app.
Similarly, in the iPad's Safari web browser, you can tap and hold your finger on any photo in a web page and select the Save Image button from the pop-up that appears (see Figure 13-7). That photo will be saved to a Saved Photos album in the iPad's Photos app.

Note
Many third-party apps (such as web browsers and magazines) also allow you to save images to your iPad. Some apps may have their own, unique way of saving images, but most should be fairly similar to the way you save images in Mail or Safari.
This is where the fun begins. When you touch your digital photos for the first time, you feel like you've finally stepped into the 21st century—that promised utopian future where technology merges with our fondest memories and we can go back and relive and explore them like never before. When you start pinching, dragging, and expanding your photos and albums, you'll feel like a child who has just spread his first bag of marbles on the ground and now is staring wide-eyed at the array of colors, shapes and sizes that he can control before him.
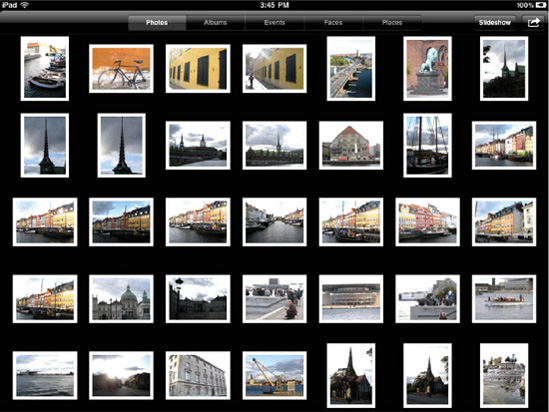
To launch the Photos app, tap its icon on the Home screen. Once launched, the Photos app displays thumbnails of the beginning of your photos in your Photos library, as shown in Figure 13-8.
Running along the top of the app, right above the thumbnail photos, you'll see the menu bar (see Figure 13-9). This bar displays tabs that allow you to switch between the different ways your photos are organized. To select a view, tap its tab in the menu bar. Note that you may not see all the tabs, depending on how you've synced your photos. For instance, those who sync only a single album won't see Events. Similarly, those whose photos lack geotag data won't see Places.
Photos: This is the first view you see when you launch the Photos app for the first time. Subsequent launches will display what was active the last time the app was run (the Places tab, for example). On the Photos tab (see Figure 13-8), your pictures aren't grouped into any kind of albums at all. They are displayed in a sequential order by date taken. If you have lots of photos synced on your iPad, scrolling through this list can take quite a while.
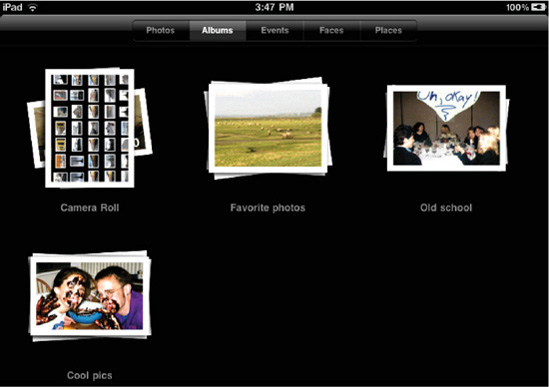
Albums: This view displays your photos in their albums as you've arranged them on your computer (see Figure 13-10). You will also see a Saved Photos album if you've saved images from the Web or that you've received in an e-mail on your iPad. Also, as mentioned earlier, if you've imported photos directly to the iPad from a digital camera, you will see them in a Last Import album.
Note
Did you know you can take screen shots of your iPad? A screen shot, or a screen capture, is an image taken of whatever appears on the iPad's screen at the moment you are taking it. To take a screen shot, press and hold the power button on the iPad, and then press and release the Home button while still holding the power button. The iPad's screen will flash white, and you'll hear a shutter-click sound effect. Once you hear the sound, you can let go of the power button. The captured screen shot will appear in the Saved Photos album. You can use screen shots to save images of entire web pages or show off that high score in a video game. Most of the images in this book were taken using the iPad's screen capture function.
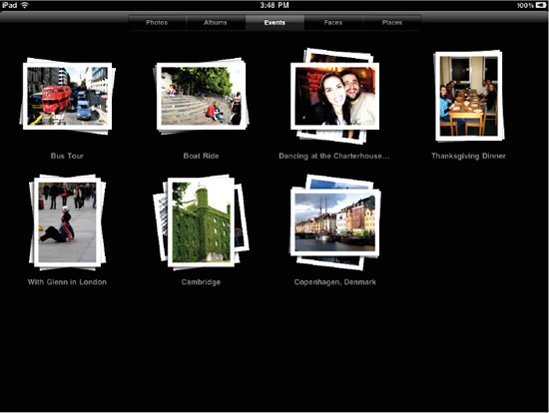
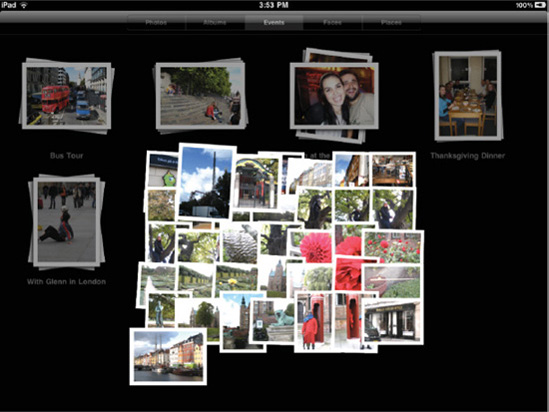
Events: This view displays your photos in events (see Figure 13-11). Events are used in Aperture 2 and iPhoto '08 and newer as a way to automatically arrange your photos according to the date they were taken. This helps people automatically keep large photo libraries in easy-to-navigate shape. The Events tab is a Mac-only feature. You will not see this tab if you are using a Windows computer to sync your iPad.
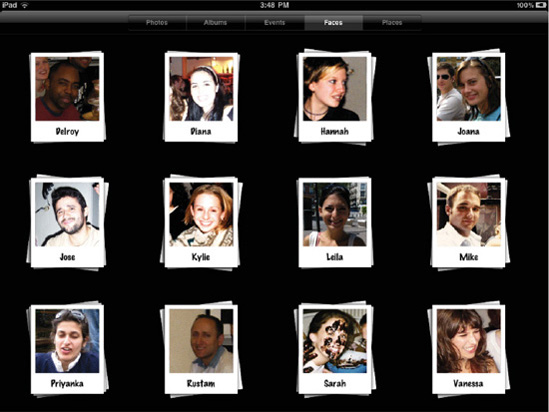
Faces: This view displays your photos grouped into an individual's "face" album (see Figure 13-12). If you are using iPhoto '09 or Aperture 3 on a Mac, the programs have facial recognition software built in. The Mac software automatically creates albums of individuals and groups all the photos they appear in. It's an amazingly fun way to see all the photos a certain friend or family member is in. Faces also works to some extent on cats and dogs. You will not see this tab if you are using a Windows computer to sync your iPad with; Faces is a Mac-only feature.
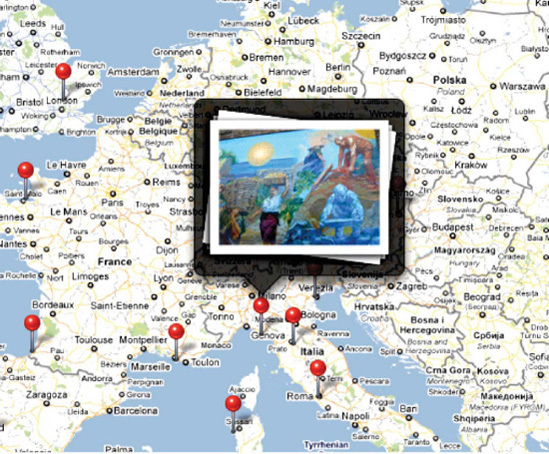
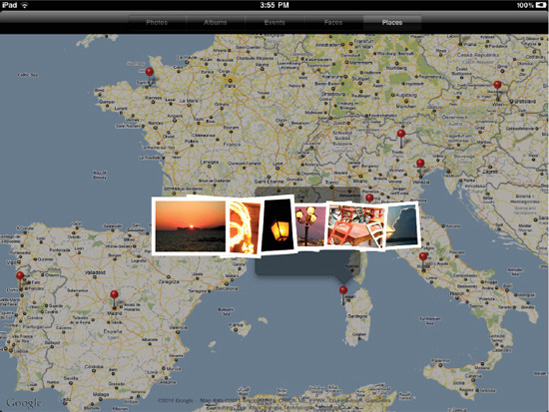
Places: Many cameras today feature geotagging, which codes the photo with the location coordinates where it was taken. What the Places tab does is take your photo's coordinates and display them on a Google map (see Figure 13-13). This is arguably the coolest feature of Photos on iPad because it lets you navigate your photos on a map that you can view from a global level to a street level. It's an especially cool feature for travelers: you can see at a glance where you have been and just how much of the world is left to explore.

Red pins appear on the map that signify the geographic location of your photos. You can pinch and zoom on the map to get closer. As you do, you may see more pins appear on the map (see Figure 13-14).

Figure 13.14. Note that more pins appear as you zoom in to an area of the map signifying greater accuracy of the photo's coordinates.
Tap a pin to see an album pop-up appear (see Figure 13-15). You can then explore all the photos that were taken in that location. Places requires an Internet connection to display the Google map.
As you can now see, the iPad's Photos app organizes your photos into five views for easy navigation. It is important to note that you may not see all the views on your iPad. The view categories you see depend on whether you are using a Mac or Windows computer, whether you have chosen to sync albums from each category view, and whether your photos are tagged with geocoordinates.
As long as you have one photo on your iPad, you'll always see the Photos tab. Most likely you will see the Albums tab too, especially if you've imported photos from a digital camera onto the iPad (a Last Import album is automatically created) or if you've saved an image you received in an e-mail or saw on the Web (a Saved Photos album is automatically created). To see other albums, events, or faces, you'll need to sync them from your computer. You don't need to do anything to sync Places; its tab will appear automatically if you have any photos tagged with geocoordinates.
Now that you know how to navigate your photo collections, you'll learn how to touch and view them. Remember all the gestures covered in Chapter 4? When viewing a collection of albums or a single image full-screen, the iPad allows you to interact with that album or photo using a number of these gestures.
For this section, an album will refer to a regular album, an event, or a faces album, since interacting with these are all the same. As you can see in Figure 13-11, there are a series of event albums. An album appears as a pile of some of the photos that are contained in the album. To open the album, you have two options to expand, or open, the photo album:
Tap the album once to cause the photos in it to spread out and expand.
Starting with two fingers together on an album, slowly spread them apart in a reverse-pinch motion, and you'll see the album's photos start to spread out (see Figure 13-16). Remove your fingers to expand the album fully.
You'll notice the menu bar at the top of the screen has changed once you are in an album (see Figure 13-17). It now displays the name of the album, a back button on the left that takes you to the category view you were previously in, a Slideshow button, and a Share button, which allows you to present your photos and share them with others (we'll talk about the Slideshow and Share buttons a little later).
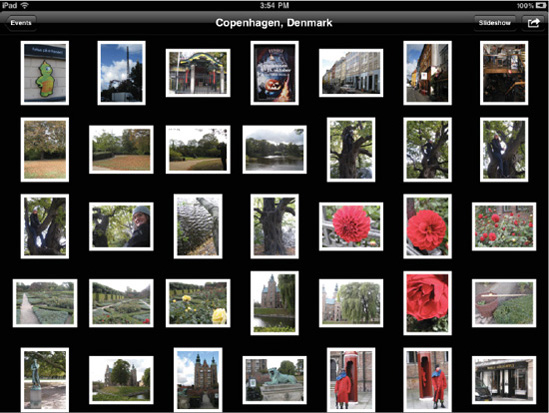
To exit the album, tap the back button (which will be named after the category the album is in; in Figure 13-17, the album Copenhagen, Denmark is contained in the Events category, so Events is the name of the back button in this example) or pinch the photos of the album together. They will collapse on each other, and you'll find yourself back on the album screen.
While on the Places tab, the red pins on the map act as albums containing all the photos taken there. Tap the pin to be presented with an album thumbnail (see Figure 13-15); then tap the thumbnail, or reverse-pinch it, to expand the photos of that location onto the screen (see Figure 13-18).
When in an album, you will see thumbnails of the photos it contains (see Figure 13-17). To view a photo full-screen, you have two options to expand, or open, the photo:
Tap the photo once to cause the photo to fill the screen.
Starting with two fingers together on a photo, slowly spread them apart in a reverse-pinch motion, and you'll see the photo start to grow. Remove your fingers to expand the photo fully to fill the screen.
Once you display a photo full-screen, you have several ways to interact with it:
Pinch to zoom into and out of the photo.
Double-tap to zoom into the photo. Double-tap again to zoom out.
When your image is displayed at the normal zoomed-out size, swipe to the left or right to move to the previous or next image in the album. When zoomed into an image, dragging the photo pans across it.
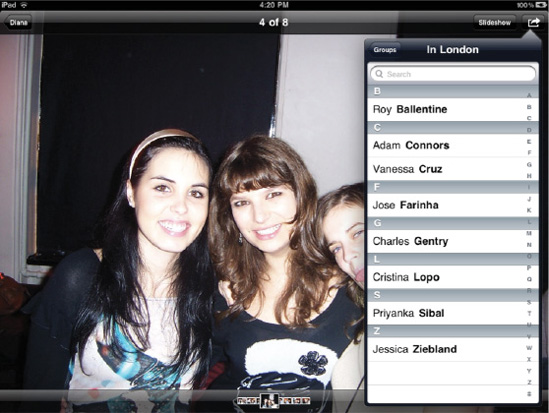
Tap any image once to open the image overlay, as shown in Figure 13-19. The image overlay features a menu bar at the top of the screen and a scrubber bar at the bottom.
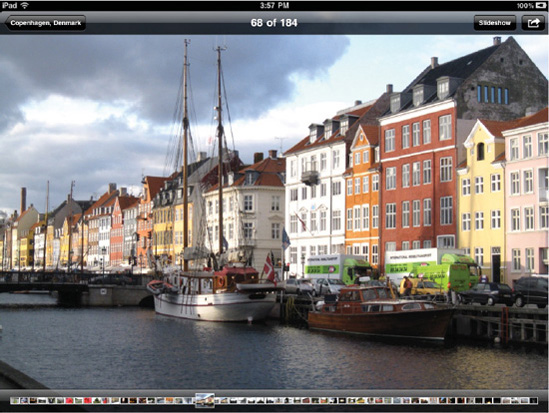
The image overlay menu bar at the top of the screen shows you the number of the selected image out of the total number of images in the album, the back button to return to the album, a Slideshow button, and a Share button. If you're in range of a Wi-FI network that also has an Apple TV, and you're running iOS 4.3 or later on your iPad, you'll see the AirPlay button here as well (discussed in the next section). Slide your finger across the photo thumbnails in the scrubber bar at the bottom of the screen to quickly scan through your images (see Figure 13-20).
While viewing a photo in the Saved Photos album, you'll notice a garbage pail icon next to the Share button. This garbage pail icon shows up only in the menu bar of images in the Saved Photos album. Tapping this button will delete the selected photo. We talk more about deleting photos later in this chapter.
While viewing individual photos, flip your iPad onto its side to have your photo reorient itself. If the photo was shot using landscape orientation, it fits itself to the wider view.
You can tap a full-screen image once with two fingers to return to album view.
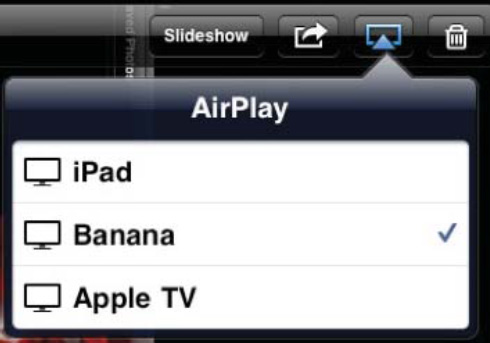
New to iOS 4.3 and later, AirPlay support allows you to send music, photos, and videos wirelessly to Apple-supported devices. In the case of images, that is limited to Apple's newly updated Apple TV media presentation device and to some custom third-party applications like Erica Sadun's Banana TV for Mac OS X.
The AirPlay icon, which you can see toward the right in Figure 13-21, looks like an outline of a rectangle with an upward-pointing triangle within it. When tapped, it presents a list of available receivers. The TV icon to the left of each name indicates that the receiver can receive photos and videos. When you tap any item other than the first, which corresponds to your iPad, the photo will wirelessly echo out to the selected device and display there, as will any photos that you slide to as you navigate through your album.
To disable AirPlay echoing, select the first iPad option. Once checked, AirPlay transmission ceases.
When viewing the contents of any album or a single image in any album, you'll see the Slideshow and Share buttons in the upper-right corner of the screen (see Figure 13-22). As the name suggests, the Slideshow button displays the contents of a photo album, one image after another. We'll discuss the Share button after the Slideshow button.
Figure 13.22. The Slideshow and Share buttons display in the right of the menu bar when viewing a single photo or the contents of any album.
Slideshows are an awesome way to share your photos with your friends and family. Remember, however, that our images are associated with our personal memories, so they are always going to be more pleasant for us to watch than for others. All you have to do is remember a time you were stuck looking at someone else's photos and the seconds ticked by as if they were hours. To keep slideshows exciting for your viewers, keep a few things in mind:
Shorter is better: The average shot (a clip of video displayed between cutting away to another shot) in a movie or TV show is less than two seconds nowadays. Back in the 1950s, the average shot was 30 seconds long. Watch an episode of Friends and then an episode of I Love Lucy, and you'll see exactly what we mean. Lucy seems to trudge along so slowly by today's standards. As the world—and media—got faster, our attention spans shrunk. This applies to viewing still images too. People can take in a lot from an image in just two or three seconds. If they are forced to look at an image any longer, they start to get bored. Keep the time a single image is displayed short. Also, keep the entire length of the slideshow short. When you watch a movie trailer in the cinema, its time is exactly 2 minutes and 20 seconds, which is considered a perfect length to whet the appetite, show people the best shots, and leave them feeling fulfilled but not exhausted.
Music always helps: Playing the appropriate kind of song in the background of a slideshow really adds a lot of ambience and power to a slideshow. Music is a powerful tool for conveying the emotion and sense of place and situation. In film school, one of the authors had an editing class where we watched clips from the now classic horror film Halloween. We watched a clip, as it was shown in theaters—with the soundtrack score, dialogue, and sound effects—that showed Michael Myers chasing his victim with a big butcher's knife. Pretty scary stuff. Then we watched the same clip with the dialogue and sound effects only—the soundtrack's score was removed. The clip went from being scary to being almost comical. Music adds more to your images than you realize.
Transitions help too: A transition is the effect that occurs when moving from one image to the next. It adds some visual flair to the change of images. Photos' slideshows allow you to choose between five transitions. Use them as eye candy to keep your audience entertained.
Use your TV: If you are having a party, a great way to show off your photos without wrangling up all your guests and forcing them to sit and watch is to project your slideshow on a TV and set it to repeat. That way, your slideshow is constantly playing in the background, and your guests can continue to catch glimpses of it as they mingle. Images on slideshows playing in the background are great conversation starters and allow you to play much longer slideshows and display individual images for longer, since you don't have to worry about a captive audience. If you are going to play your slideshows in the background, you can choose to show several thousand images for as long as five or ten seconds each; that way, the entire show could run for hours, and it won't get boring or tedious.
To begin a slideshow, tap the Slideshow button. A drop-down menu appears that presents several slideshow options (see Figure 13-23). At the top, you'll find the same AirPlay receiver list you saw in Figure 13-21. Starting with iOS 4.3, the iPad allows you to play slideshows wirelessly to Apple TV and other AirPlay receivers. This AirPlay option is in addition to your ability display slideshows onscreen, or to use a connected cable via the HDMI, VGA, or other video adapters to mirror the iPad to a TV screen. These branded adapters are available from the Apple store, starting at $29.

Below the AirPlay receiver list are the following options:
Transitions: Transitions provide a visual effect when moving between images. Available transitions depend on the capabilities of the selected output device. The onboard transitions include wipes, ripples, and dissolve among other options. Apple TV adds a number of slick extras including Ken Burns, Sliding Panels, Origami, Reflections, and more.
Play Music: When switched to ON, this option will play music in the background while the slideshow runs.
Music: Tap this button to navigate through all the songs in your iPad's music library. Once you find the song you want, tap it to select it.
Start Slideshow: Tap this button to start the slideshow. The image overlays disappear, and the slideshow plays, whether directly onscreen for local slideshows or on a remote device with AirPlay. With AirPlay, your screen turns black, and a message appears telling you that "This slideshow is now playing" via AirPlay. To stop the slideshow at any time, touch the screen. This stops the slideshow and places you in the full-screen photo display. To start the slideshow again, tap the Slideshow button and tap Start Slideshow.
Slideshows display each slide for a set period of time, which you can set. As mentioned, you can export your slideshow to a TV screen by purchasing a special cable from Apple that connects your iPad to your TV. Apple offers a number of different cables, which are discussed in Chapter 7.
To customize how your iPad displays its slideshows, go to your Home screen, and navigate to Settings
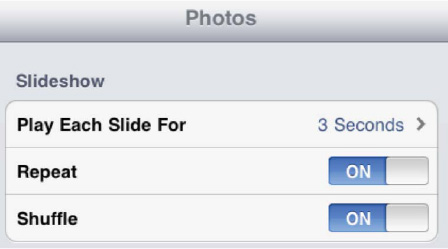
Play Each Slide For: Here, you can set the slide duration. Your choices are 2 seconds, 3 seconds (the default, which works really well for most people), 5 seconds, 10 seconds (which starts to get boring fast), and 20 seconds (which is probably recognized officially by Amnesty International as torture for most humans; seriously, don't do this to your friends and family).
Repeat: Set this to ON to make your slideshow loop.
Shuffle: Show your pictures in a random order by switching Shuffle from OFF to ON. When Shuffle is disabled, your pictures display in album order.
You have a number of ways to share photos you have on your iPad. To access all the ways you can share your photos, bring up a photo full-screen and tap the Share button, which looks like an arrow breaking free from a small box. You'll be presented with a drop-down menu of sharing options (see Figure 13-25):

Email Photo: Tap this to see an e-mail compose window appear on the screen. You'll notice the photo has been copied into the body of the e-mail already (see Figure 13-26). Enter the recipient's e-mail address, a subject, and body text; then tap Send, and your photo is on its way!
Alternatively, you can e-mail up to five photos at a time from within the Photos app. While in an album, tap the Share button, and you'll see the album menu renamed to Select Photos. Tap up to five photos that you want to send, and then tap the Email button in the upper-left corner (see Figure 13-27). An e-mail compose window will appear on the screen with the photos in the body of the message. Note that although you are limited to e-mailing five photos at a time from the Photos app, you can actually copy as many as you want and then open the Mail app, compose a new message, and paste them all in the body of the e-mail.
Send to MobileMe: MobileMe is Apple's e-mail service that also allows you to publish and share your photos online. The Send to MobileMe option lets you upload your photos to your MobileMe gallery online right from your iPad. Tap Send to MobileMe. A window will appear asking you to name the photo and write a description if you want (see Figure 13-28). Select the MobileMe Gallery album you want to publish the photo to; then tap Publish.
A pop-up will appear when the photo has finished uploading, and you'll be able to tap View on MobileMe, which takes you to your MobileMe web gallery in Safari, or Tell a Friend, which opens the Mail app and composes an e-mail with the link to the photo in the body of the message.
To use these MobileMe features, you must have a MobileMe account. See
www.me.comfor details.Assign to Contact: This option allows you to assign a photo to an address book contact. Tap Assign to Contact, and then select the contact's address book entry from the drop-down menu (see Figure 13-29).
Move and scale the thumbnail of the photo that appears between the opaque bars on top and bottom to zoom in onto the contact's face; then tap the Use button (see Figure 13-30).
The next time you view the contact in the iPad's Contacts app, the image you selected for them will appear next to their name. This image will sync with their contact information in Address Book and Entourage on a Mac and Outlook on a Windows computer.
Use as Wallpaper: Tap this button to use the selected image as wallpaper on your iPad. From the menu bar (see Figure 13-31), you'll be able to select whether you want to use the image for the iPad's lock screen, the Home screen, or both. This isn't the only way to set your iPad's wallpaper options. We'll talk about the other way in a bit.
Print: This allows you to print your photo to an AirPrint-compatible printer. Tap Print and then select the printer you want to print to and the number of copies you want to print. We talk about AirPrint and printing from your iPad in Chapter 3.
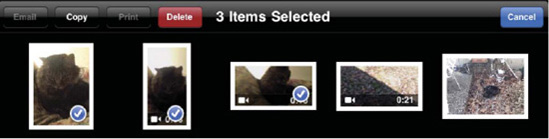
You can also print multiple photos at a time. When viewing an album, tap the Share button. You'll see the album menu renamed as Select Photos. Tap as many photos as you want to print. A check mark will appear on each selected photo (see Figure 13-27). After you have selected all your photos, tap the Print button in the upper-left corner and then select the printer you want to print to and the number of copies of each photo you want to print.
Copy Photo: Tap Copy Photo to copy the image. This saves the image to your clipboard for use in pasting into other things (such as an e-mail or document) later.
You can also copy multiple photos at a time. When viewing an album, tap the Share button. You'll see the album menu renamed as Select Photos. Tap as many photos as you want to copy. A check mark will appear on each selected photo (see Figure 13-27). After you have selected all your photos, tap the Copy button in the upper-left corner. These photos can then be batch copied into an e-mail or other applications.


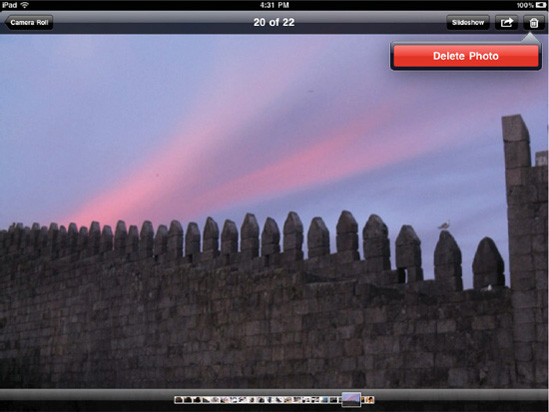
Apple made it so you can only delete photos on your iPad that are part of the Camera Roll album. This album contains any photos you have saved from the Web or an e-mail on the iPad plus photos and videos taken with the iPad 2's camera. Apple disabled deletion of photos from your other albums synced to your iPad because it didn't want users accidentally deleting photos they had stored on their computer.
To delete the photos, navigate to your Camera Roll album and tap the Share button. Tap the photos you want to delete, and a check mark will appear on them; then tap the red Delete button (see Figure 13-32). Alternatively, while displaying a photo full-screen in your Saved Photos album, you'll notice a trash can icon next to the Share button (see Figure 13-33). Tapping this button will cause a Delete Photo confirmation pop-up to appear. Tap Delete Photo to delete the selected photo from your iPad.
To delete other photos on your iPad, you must delete them on your computer first and then resync the iPad.
On the iPad's lock screen (the screen that appears when you turn on your iPad or wake it from sleep), to the right of the Slide to Unlock bar, you'll notice there is a small icon of a flower inside a box (see Figure 13-34). This is the Picture Frame button. Tap this to turn your iPad into an awesome digital picture frame. The picture frame turns your iPad into an interactive piece of furniture in your office or living room and is a great way to still "use" the iPad while you're doing other things. You can buy one of the many stands that supports the iPad to make best use of the Picture Frame feature.
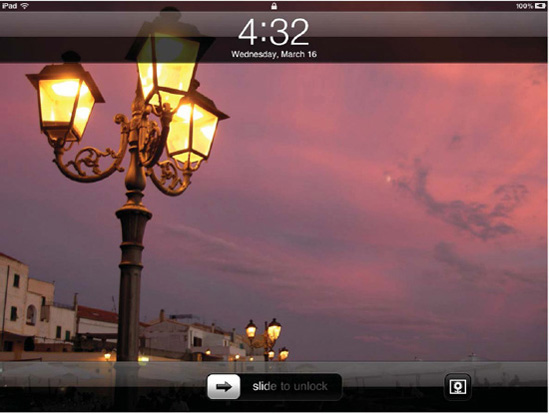
To start the picture frame, lock the iPad by briefly pressing the power button. Press the power button or Home button on the iPad again to be taken to the lock screen. Tap the Picture Frame button to enter picture frame mode. The icon will change to a blue color, and the screen will fill with a photo, displaying one after the next. To pause the slideshow, tap the screen. The current image will pause in the background as the lock screen fades into view. To disable the picture frame, tap the blue picture frame icon, and you will return to the lock screen with its selected wallpaper displayed.
You have several options for the Picture Frame feature, described next, which can be configured from within the iPad's Settings app. Navigate to your iPad Home screen, and tap the Settings icon. Select Picture Frame (see Figure 13-35).
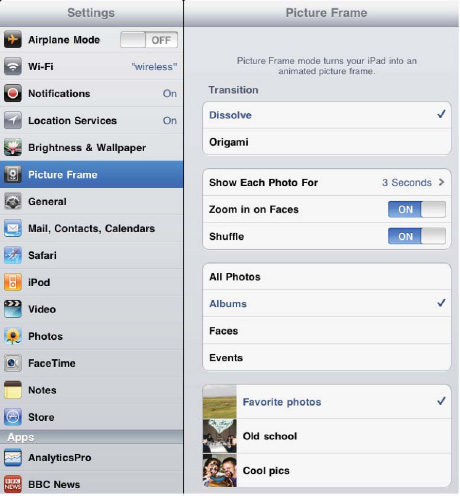
Transition: Choose between Dissolve and Origami to flow from one photo to the next.
Show Each Slide For: Choose from 2, 3, 5, 10, or 20 seconds.
Zoom in on Faces: When this is set to ON, photos that display in the picture frame will focus on faces in the picture. It knows which faces you like because of the Faces feature built into the Photos app. If more than one face is in a picture, it will choose one at random to focus on. Face zooming is only an option when transitions are set to dissolve.
Shuffle: When set to ON, your photos will show in a random order.
The Picture Frame feature will display all the photos from your Photos app by default. You can select to show only photos from certain albums, faces, or events by selecting their category and then selecting the one you want to show.
We showed you how to set your wallpaper from a photo in the Photos app, but you can also set it from within the iPad's Settings app. To do this, navigate to your iPad Home screen, and tap the Settings icon. Select Brightness & Wallpaper. You'll see two images, one representing your iPad's lock screen and the other its Home screen (see Figure 13-36). The pictures you see on each image show you the wallpaper you have selected for each one currently.

Tap the images to be taken to the wallpaper selection screen (see Figure 13-37). Here you'll see a list of every album in your Photos app and also a new album labeled Wallpaper.
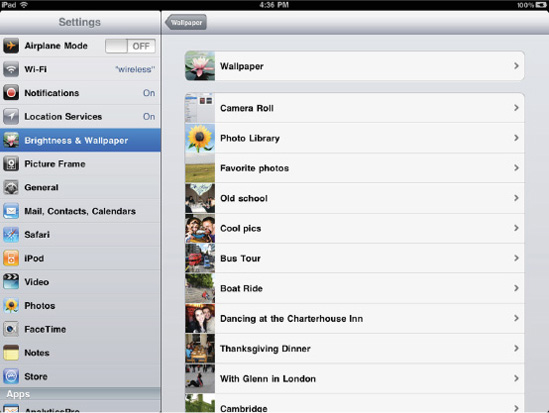
Figure 13.37. You can select from Apple's included wallpapers or use any photo you have on your iPad as wallpaper.
Wallpaper includes images Apple included on the iPad to be used as wallpaper. Select an image from any album, and you'll get a full-screen preview of it. Then tap Set Lock Screen, Set Home Screen, or Set Both to use the image for the background of the lock screen, Home screen, or both the lock screen and Home screen (see Figure 13-31). If you choose to use the image just for, say, the lock screen, you can go back and select another image for the Home screen.
With the iPad 2, Apple added front and rear cameras that, among other things, allow you to record video (see Chapter 15 for all the things you can do with the iPad 2's cameras). You can also import recorded video from a digital still camera using the iPad Camera Connection Kit (see earlier in the chapter). All recorded or imported video is stored in the Camera Roll album. To view any video you have recorded or imported onto the iPad, simply tap its thumbnail in the Camera Roll. The video will appear with a big play button in the center. Tap any area of the screen once to bring up the onscreen video controls (see Figure 13-38).
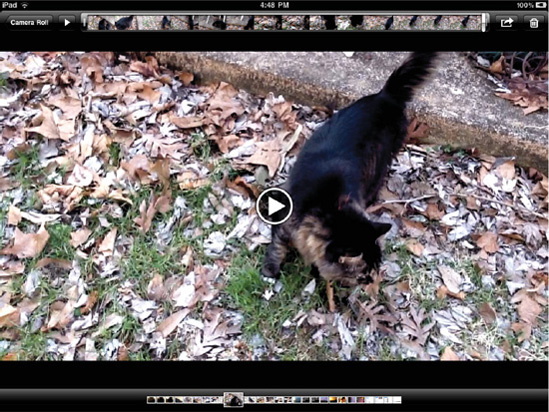
Once you display a video full-screen, you have several ways to interact with it:
Tap the video once to play it. Tap the play/pause button in the upper-left corner to pause it.
Scrub through the video by tapping and holding the silver drag bar in the scrubber bar. The scrubber bar shows you segments of the video represented by thumbnails for those segments.
Hold your finger on the scrubber bar for a few seconds, and you'll see the scrubber bar stretch out. This gives you finer control over finding a specific spot in the video.
The video overlay menu bar at the top of the screen shows you the back button, labeled Camera Roll, to return to the main Camera Roll. You can tap the Done button to exit the Camera Roll and return to the Camera app. You'll also see the Share button and the trash can icon, which will bring up a deletion confirmation menu. Tap the red Delete Video button to delete the selected video.
Apple has included limited video-editing functionality in the Camera app. Video editing isn't exactly the right word, though. Trimming is more accurate because you can shorten, or trim, the video at the front and end of the clip.
To trim a video, bring up the video menu overlays (see Figure 13-38). Next, grab the beginning of the scrubber bar, and pull it to the right. This activates trim mode (see Figure 13-39).
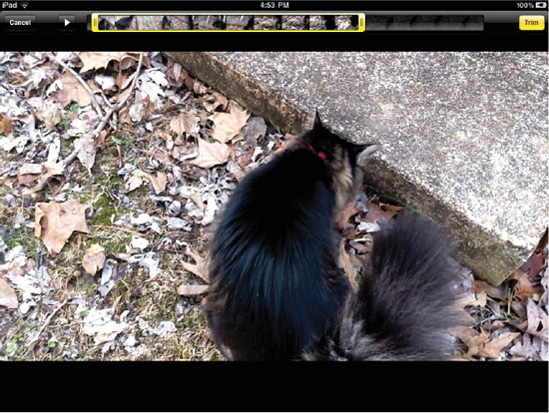
In trim mode, you can drag the ends of the scrubber bar, now outlined in yellow, toward the center. Dragging the ends shortens the clip at the beginning and the end.
Trimming is a great feature that allows you to highlight just the really good portions of your video clips. When you've adjusted your trim commands, tap the yellow Trim button to bring up a Trim pop-up (see Figure 13-40).
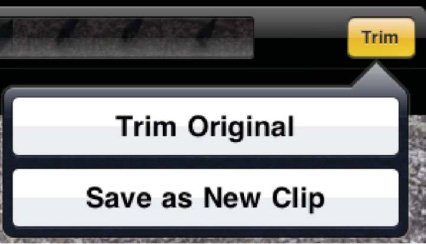
The Trim pop-up gives you two options:
Trim Original: This actually changes the original video recording. It will permanently delete the sections of video you have trimmed out.
Save as New Clip: This leaves your original video intact and creates a completely new video file of just the trim you specified.
To cancel a trim, simply tap anywhere outside of the Trim pop-up. Remember that if you choose to keep the original clip, storage space on your iPod can quickly fill up. A one-minute clip took up a whopping 120MB of space on our iPad.
While viewing any single video clip, you have several sharing options. To bring up the sharing menu, tap the Share button, which looks like an arrow breaking free from a small box. You'll be presented with a pop-up of sharing options (see Figure 13-41):
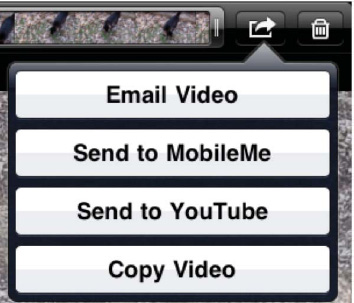
Email Video: Selecting this option will compress the video clip as a QuickTime movie file. A new message window will appear with the movie clip attached to the body of the message.
Depending on the length of your video clip, you may get an error message that says "Video is Too Long." If you see this, your iPad will ask you whether you want to select a smaller clip from the video to e-mail. Tap OK, and you'll enter trim mode, which will allow you to cut down the length of the clip.
What's interesting about trim mode is that the yellow trim selection bar is fixed to 54 seconds. You can shorten it or drag the 54-second trim selection bar around, but you can't increase the trim to longer than 54 seconds. So, as of now, 54 seconds seems to be the longest a clip can be that you can e-mail. Apple can always change this with a software update in the future, however.
Once you have trimmed your video, tap the yellow Email button above the scrubber bar. A blank e-mail with the video in the body of the message should appear.
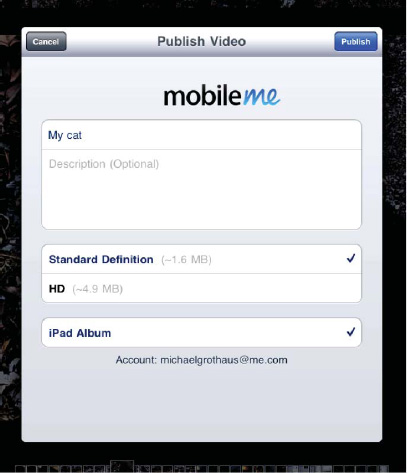
Send to MobileMe: MobileMe is Apple's e-mail service that also allows you to publish and share your photos and videos online. The Send to MobileMe option lets you upload your videos to your MobileMe gallery online right from your iPad. Tap Send to MobileMe. A window will appear asking you to name the video and write a description if you want (see Figure 13-42). You can also choose whether to upload a standard-definition video or the original high-definition version of it. Finally, select the MobileMe Gallery album you want to publish the video to, and then tap Publish. Note that you can't create a new gallery this way. You must add your video to an existing gallery.
A progress bar signifying the upload will appear over the video. When the video has finished uploading, you'll be able to tap View on MobileMe, which takes you to your MobileMe web gallery in Safari, or Tell a Friend, which opens the Mail app and composes an e-mail with the link to the video in the body of the message.
To use these MobileMe features, you must have a MobileMe account. See
www.me.comfor details.Send to YouTube: Selecting this option will allow you to upload your video to YouTube right from your iPad. On the screen that appears (see Figure 13-43), enter a name and description for your video, select to upload it in standard or high definition, add tags, select a YouTube category, and then tap Publish. You must have a YouTube account to upload videos to YouTube.
Copy Video: Tap Copy Video to copy the video. This saves the video to your clipboard for use in pasting into other things (such as an e-mail or document) later.
You can also copy multiple videos at one time. When viewing an album, tap the Share button. You'll see the album menu renamed as Select Photos. Tap as many video (and/or photos) as you want to copy. A check mark will appear on each selected item. After you have selected all your videos and/or photos, tap the Copy button in the upper-left corner. These videos and photos can then be batch copied into an e-mail or other applications.

This chapter introduced you to the iPad's Photos app and showed you how to navigate your photo collections, share them with friends and family, change the iPad's wallpaper, and even use your iPad as a digital picture frame. Once you view your digital photos on the iPad, you might find that you'll never want to navigate and view them on a computer monitor or laptop screen again.
Here are some final thoughts for this chapter:
The iPad's Photos application offers some of the most instantly appealing ways to show off the power of your iPad. You can scroll through your albums, zoom in and out with a pinch or double-tap, and flip the unit on its side. These features all deliver the iPad "wow" factor.
You can import photos directly from a camera onto the iPad. This is a huge help for professional photographers who might be out in the field shooting. They can load their images on the iPad and instantly see what they look like on a bigger screen. They can even zoom in to see more detail.
Consider investing in an inexpensive business card holder and a cheap speaker. They make watching slideshows on your iPad a lot easier, especially for more than one person at a time. A video-out cable from Apple increases the fun by sending the slideshows to a TV screen.
The Photos app also allows you to view recorded or imported video. You can even trim your video clips and easily send those clips to YouTube or e-mail them to your friends.