
The iPad offers new ways to interact with your media. The iPad provides a magnificent dedicated music player, and with just a few touches, you can access that same audio from a wide variety of other applications, allowing you to enjoy your tunes as you play and work. When you watch a TV show, a movie, or a quick video on your iPad, its widescreen video playback capabilities and superb television integration provide beautiful, clear images, larger than ever before. What's more, the iPad's wireless Internet capabilities allow you to access a huge range of content—from YouTube to embedded video on the Internet to your own personal computer—and to share the content already on your device out to external players. This chapter introduces the primary applications that let you enjoy music and video on your iPad: Videos, YouTube, Safari, and iPod.
Video forms such a basic component of your iPad that you shouldn't think about it as just a single application. Apple provides the base technology used by several built-in apps that support video playback of third-party media. The following list provides a quick overview of those Apple-supplied apps (see Figure 7-1).
Note
Chapter 15 discusses how you can record and play your own homebrew video using the iPad's new built-in camera system.

Videos: The Videos application appears on the Home screen of your iPad. The icon looks like a traditional clapperboard, with a black-and-white striped top over a blue base. This application plays back the TV shows, movies, podcasts, iTunes U lessons, and music videos you've synchronized from your home iTunes library.
YouTube: You'll find the YouTube app icon next to the Videos app icon in Figure 7-1. The icon looks like an old-fashioned TV, complete with a greenish screen and brown dials. YouTube connects to the Internet and allows you to view videos from
YouTube.com. You can navigate towww.youtube.comin Safari on the iPad and browse YouTube videos that way, but the iPad's YouTube app wrapswww.youtube.comin such a nice and easy-to-navigate package that you'll find it's leaps and bounds better than using YouTube in a web browser.Safari: Safari, which you read about in depth in Chapter 6, offers a third way to view videos. Like its computer-based equivalents, the Safari app allows you to watch embedded movie files. Safari's icon looks like a light blue compass with a needle pointing to the northeast.
In addition to the three apps that play video that ship with the iPad, there are thousands of other apps that play video. You can discover all these apps in the iTunes Store. Some of our favorites are the BBC News app to view news footage and The Weather Channel app to view weather-related news stories and Doppler video.
For all that the iPad brings to video, it has limits. Your iPad's built-in applications play H.264 MPEG-4 video, and that's pretty much it. As the previous chapter mentions, you cannot use your iPad's standard apps to view Flash/Shockwave videos or animation. You cannot play AVI videos. You cannot play DivX, Xvid, or any of the other dozens of popular formats. If your video isn't in H.264 MPEG-4 format, your iPad won't understand it without help.
Fortunately, the App Store helps you to work around this limitation. Some third-party apps enable you to watch videos using formats that the iPad does not officially support. Video-playing applications include such titles as CineXPlayer, yxplayer, and Azul Media Player. These viewers work with a wide variety of content including WMV, AVI, DivX, and Flash FLV formats, among others. Because these applications work outside of Apple's built-in media support, you will generally have to preload your content to each app. Use iTunes' Apps tab, in the File Sharing section, to add and remove video files.
Some applications also let you access media directly from web URLs, even allowing you to play Flash video (FLV) embedded in web pages (rather than URLs that link directly to FLV assets). Custom web browser Skyfire offers Flash video playback support by using edge cases. It isn't always successful, because some monetized sites like Hulu currently disable iPad video access through any solution outside their own custom player (the Hulu Plus player in Hulu's case). Even if Flash-on-iPad limitations were removed, Hulu's own restrictions mean that it will not freely distribute video to mobile browsers.
The general consensus on the matter is that although Adobe has had Flash technology ready to roll out for iPad and iOS in general for some time, relations between Adobe and Apple, not to mention outspoken opinions by Apple's Steve Jobs, have kept that technology off the platform.
Note
Apple's iPad officially supports H.264 video, up to 1.5Mbps, 1024 by 768 pixels, 30 frames per second, and 720p in M4V, MP4, and MOV file formats.
The iPad is an orientation-agnostic device: you can interact with it in portrait or landscape mode. That's no different for playing video. When you watch a video on the iPad, you can watch it holding the iPad in portrait mode or in landscape mode. Depending on the app you are watching it in, you may see more options for the video being played or indeed for the app itself.
However, most apps display the video interface with all the same elements, meaning once you know how to control video playback in one app, you know how to do it in the rest of them. Here is a quick overview of those controls, which are shown in Figure 7-2.
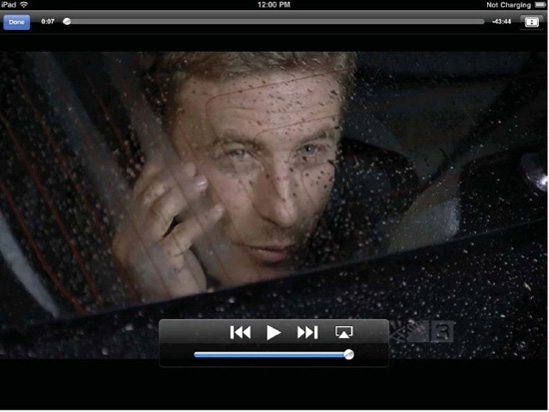
Play/Pause: Play/Pause appears as either a right-pointing triangle (Play) or a pair of vertical lines (Pause). Tap this button to pause or resume video playback.
Rewind: The Rewind button appears as two triangles pointing left to a line. Tap it to return to the start of the video, or press and hold the button to scan backward.
Fast-Forward: The reverse of Rewind, the Fast-Forward button's triangles point to the right instead of the left. Press and hold this button to scan forward. Tap it to skip to the next video track.
AirPlay: A rectangle with an embedded upward-pointing triangle, AirPlay allows you to redirect over-the-air playback to other devices. At the time this book was being written, AirPlay receivers were limited to second-generation or later Apple TV units and third-party applications like Banana TV (
http://bananatv.net).Volume: The volume control is the large line below the Play/Pause button. Drag the volume control knob to adjust playback volume. Of course, you can always use the dedicated physical volume button on the side of the iPad as well.
Scrubber bar: The scrubber bar appears at the top of your screen. It is a long line with a small knob that you can drag. (The volume control is the thicker bar at the bottom.) Drag the playhead along the scrubber bar to set the current playback time.
Zoom: The Zoom button looks like two arrows in a white box pointing away from each other, at the top right of your screen. Either double-tap the screen or tap the Zoom button to switch between full-screen mode and the original aspect ratio. To get back into the original aspect ratio's view, double-tap the screen again, or tap the Zoom button again. You'll note that the Zoom button changes slightly when viewing a video full-screen: the arrows turn into a letterbox icon. When viewing in full-screen mode, you use the entire iPad screen, but some video may be clipped from the top or sides of the video. In the original aspect ratio, you may see either letterboxing (black bars above and below) or pillarboxing (black bars to either side), which results from preserving the video's original aspect ratio.
Audio tracks and Subtitles: If alternate audio tracks or subtitles are available in the video you are watching, you'll see an icon that looks like a speech bubble appear in the controls. Tap this icon to select from a pop-up list of audio tracks and subtitles.
Done: The Done button appears on all video application screens. Tap Done to exit video playback. Press the physical Home button on the iPad's bezel to quit the app and return to your Home screen.
While you're playing a video, the iPad automatically hides your video controls after a second or two. This allows you to watch your video without the distraction of onscreen buttons. Tap the screen to bring back the controls. Tap the screen again to hide them; or leave them untouched for a few seconds, and they once again fade away.
To launch the Videos app, tap its blue clapperboard icon. When the app opens, you'll be presented with a list of media items synchronized to your iPad. These items are organized into categories by tabs, including items such as movies, TV shows, podcasts, and so forth (see Figure 7-3). As long as you've already synced videos from your iTunes library (see Chapter 2), you'll see them appear here. Tap through each tab to find a complete selection of synchronized media.
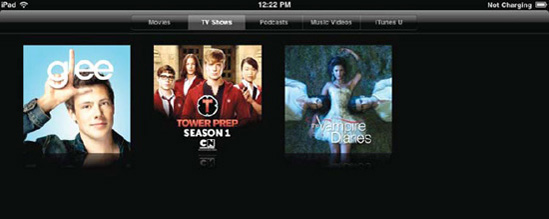
Figure 7.3. The Videos app offers separate tabs of movies, TV shows, podcasts, music videos, and iTunes U lessons you've synchronized to your iPad.
As you can see, the Videos interface shown in Figure 7-3 couldn't be simpler. Its thumbnail images represent the items you've copied to your iPad. (Synchronizing these items is discussed in Chapter 2.) Navigate between your various video media categories by tapping the category tabs that run along the top of the screen (see Figure 7-4). If you have a lot of videos in a specific category, you can flick your finger to quickly scroll through the list.
Figure 7.4. Navigate your video categories by tapping the appropriate category tab at the top of the screen.
Tap any video thumbnail to open it. The item's icon flies forward as gray panels unfold from behind it like origami. You'll be presented with the information page that displays the name of the video and the year it was made, along with other information that could include the length, dimensions, file size, codecs, and copyright notice, but generally simply includes an extended episode or movie description (see Figure 7-5). Tap "more" to see the entire write-up.
If you are viewing a video with chapters, such as a TV show (each episode in a season is considered a chapter), podcast, or movie, you'll see a list of chapters. If it's a podcast or TV show, you'll be presented with the episodes you have on your iPad, including the name, a summary, ratings, and the length of each episode.

To begin video playback, tap the circular Play button in the top right of the screen, or if your video has a list of chapters, tap a chapter from the list. Your screen clears, and the video loads and automatically begins playing. Tap Done to return to the information page.
If you want to delete a video from your iPad, touch and hold the video thumbnail until a circle with a white × appears in the corner of the video's icon (see Figure 7-6). Tap the × to delete the video. With the exception of videos rented from the iTunes Store, deleting a video from the iPad will not delete it from your computer. You'll be able to sync it again from your iTunes library should you choose to do so.

You can adjust several settings that affect your video playback. These settings are accessed through the iPad's Settings application (see Figure 7-7).
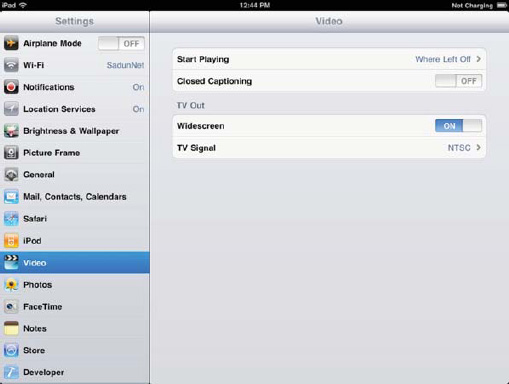
Start Playing: This setting allows you to choose whether to start playing videos from the beginning or from where you left off. Being able to start from where you left off is terrific when you're trying to work through a movie or TV episode in short snippets. You might prefer to always start product demonstration videos at the beginning, however.
Closed Captioning: If your video contains embedded closed captions, you can view them by switching this option from OFF to ON. Closed captions are not just helpful for the hard-of-hearing. They provide an excellent way to augment your video-watching experience in noisy conditions when on the subway or at a busy cafeteria.
The iPad's Video app also lets you play content from it through your home television. You'll need to buy some extra cables for this, which you can read about later in the "Video Accessories" section of this chapter, but the Video settings is where you can choose the following options:
Widescreen: Turn this on to force widescreen videos to be played in widescreen on your TV. This preserves their original aspect ratio.
TV Signal: Choose either NTSC or PAL. If you are in North America or Japan, you'll most likely have an NTSC TV. In Europe, Australia, and New Zealand, it's PAL.
Discovering, navigating, and watching YouTube videos on the iPad is an experience that's light years beyond watching them on your computer while sitting at your desk. The iPad turns watching YouTube videos into a fantastic leisure experience that you can enjoy from the comfort of your couch.
Unlike the Videos app, the YouTube app requires an Internet connection. As long as you have at least a Wi-Fi connection, you're all set. At the time this book was being written, YouTube allows you to watch videos using 3G connections as well; the application automatically downgrades video quality to put less strain on your bandwidth allocation. The lower-quality videos won't look quite as good as they will over a Wi-Fi connection, but they won't deplete your account quite as fast.
To take full advantage of the YouTube app, you'll want to have a YouTube account. You don't need one to use the app, but having one makes the app that much more powerful. With a YouTube account, you can view and bookmark your favorite videos; subscribe to YouTube users' videos; see with a tap of a button all the videos you've uploaded to YouTube; and share, rate, and flag videos—all from within the YouTube app. Creating a YouTube account takes only a few minutes and can be done at www.youtube.com/create_account.
To launch the YouTube app, tap the YouTube icon; it looks like a retro-styled TV set (shown earlier in Figure 7-1). When launched for the first time, the application displays the Featured screen, as shown in Figure 7-8. This screen showcases videos chosen by YouTube's staff.

Key elements of the YouTube app include a search field in the upper-right corner of the app and a row of seven buttons at the bottom of the screen. Each button (see Figure 7-9) offers a different way to discover and enjoy YouTube videos.
Featured: This screen displays videos reviewed and recommended by YouTube staff. You'll often find some worthwhile viewing here that you might otherwise miss.
Top Rated: This screen displays videos that have the highest ratings on YouTube. You can choose to show the highest-rated videos for the day, the week, or all-time. Viewers assign ratings, and the videos with the highest votes are collected here.
Most Viewed: This screen displays videos that have the most views on YouTube. You can choose to show the most-viewed videos for the day, the week, or all-time. Here's where you'll discover videos that have gone viral, passed from viewer to viewer by e-mail, Twitter, and Facebook recommendations.
Favorites: This screen displays all the videos you've added to your Favorites list on YouTube. This screen will also show you a list of any playlists and their videos when you tap the Playlists tab at the top of the screen. This is one of the features of the YouTube app that requires you to have a YouTube account. To sign into your account, tap the Sign In button in the top-left corner (see Figure 7-10). You'll be prompted to enter your username and password. Once you do this, any videos you've favorited will be displayed.

Figure 7.10. The Sign In/Sign Out button is located in the top-left corner of the Favorites, Subscriptions, and My Videos pages. Tap it to log into your YouTube account.
To remove a bookmarked video, tap the Edit button in the top gray bar. All your bookmarked videos will display a circled × in their top-left corner. Tap the × to remove the video from your favorites. When you are finished deleting favorites, tap the blue Done button. (When you delete your last favorite, and there are no favorites left, the iPad automatically returns you to the Favorites screen without having to tap Done.)
Note
Removing a video from your YouTube favorites on the iPad also removes it from your YouTube account, meaning it will no longer be displayed in your favorites, no matter what device you log into YouTube from. You cannot undo removing favorites.
Subscriptions: YouTube allows you to subscribe to another YouTube user's videos so you can keep up-to-date with the latest videos they've posted. Any subscriptions you have will show up on this screen. Tap the name of the user to see all their videos displayed to the left of the list. This feature requires you to be logged into your YouTube account.
My Videos: This screen displays all the videos you've uploaded to YouTube. This feature requires you to be logged into your YouTube account.
History: This screen displays the videos you have viewed on your iPad. The history does not reflect the videos you've viewed on your computer while logged into your YouTube account. To clear your history, tap the Clear button in the top-left corner.
You can also use the search field, found in the upper-right corner of any of these screens, to search YouTube's library of videos.
After finding a video you want to watch, what do you do next? This is one of the situations where the next step depends on whether you're holding the iPad in landscape or portrait mode. If you tap the video thumbnail in portrait mode, the video's information screen will appear, and the video will automatically begin playing in the information screen. If you tap the video thumbnail in landscape mode, the video will begin playing full-screen, and you'll need to tap the Done button to view the video's information screen.
Video information screens provide detailed information for each video. Depending on which orientation you are holding your iPad in—landscape or portrait—you'll see that information laid out slightly differently, but either orientation gives you the same information. Figure 7-11 shows the same info screen in both landscape and portrait modes.
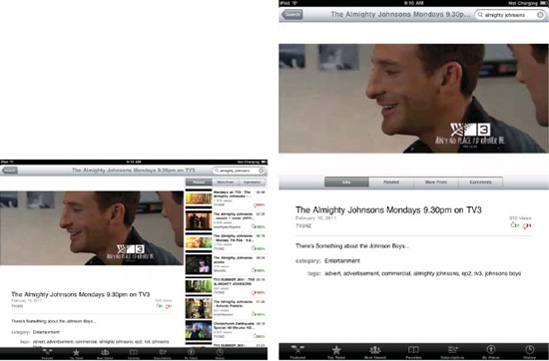
Figure 7.11. A YouTube video's information screen offers information about the video in both landscape and portrait modes. The landscape layout offers a list of related videos, the portrait layout shows you a fuller video write-up.
On the video information screen you'll find the name of the video, its rating (in stars, from zero to five, when applicable), the number of times the video has been viewed, its run time, and more. You'll also see tabs labeled Related, More From, and Comments.
Related: Shown by default, this tab lists videos related to the one you're watching. YouTube uses some clever tricks to match names, themes, and uploaders, among other aspects, to provide a list of videos that are most related to the one that you're currently watching.
More From: Tap this tab to see more videos from the YouTube user who uploaded the video you are currently watching. From this tab you can also tap a Subscribe button to subscribe to the user's video feed. The user's YouTube name and videos will show up on the Subscriptions page.
Comments: Tap this tab to read comments left by other YouTube users about the video you are watching. You can also tap the "Add a comment" field to write your own comment. You must be logged into your YouTube account to write a comment.
You can do more with videos in the YouTube app than just sort and view them. While in a video's information screen, you can bookmark, share, rate, and flag the video, as well as move from embedded to full-screen playback. Simply tap the video to bring up its YouTube control overlay, shown in Figure 7-12.
As you see in Figure 7-12, the overlay consists of opaque bars at the top and bottom of the video. The bar at the bottom allows you to play/pause the video, scrub backward or forward with the slider, and switch to full-screen mode by tapping the double-arrow expand button. These are all standard controls and operate exactly as you'd expect them to, matching the video interface used in other applications. The double-arrow also appears in full-screen mode, allowing you to return from full-screen to embedded playback.
The bar at the top allows you to select several options for managing the video. From here, you can add the video to your favorites, share it with others, vote on the video (like or dislike), or flag the video as inappropriate. All the top-bar options require a YouTube account to apply them. Here's a quick overview of what the options are and how they work.

Figure 7.12. Tap a video in the video information screen to overlay it with a number of management options.
Note
You must be viewing the video in its information screen (i.e., embedded mode) to rate the video, share it with others, and so forth. The managing video toolbar does not show up when you are playing a video in full-screen mode. The only exception is bookmarking. In full-screen mode, a bookmark icon appears next to the volume slider at the bottom of the screen. Tap it to add the video to your favorites.
Add: Tap this to bookmark the video to your favorites. If you have more than one Favorites list, you'll be able to select the list you'd like to add the video to. The video will immediately appear under the Favorites button in the YouTube app.
Share: Tap this to send a link to the video in an e-mail message. Without taking you out of the YouTube app, an e-mail compose window will pop up with the name of the video in the Subject field and a link to it in the body of the message. Just enter the e-mail address of the person you want to send it to, and you're done! You can also add your own text to the body of the e-mail like any other e-mail.
Like/Dislike: Tapping either button flags the video as one you like (thumbs up) or dislike (thumbs down).
Flag: Tapping this button will display a red Flag as Inappropriate button. Tap that to send a notification to YouTube. They will review the video and pull it from the site, if they deem it necessary. Be warned: don't flag videos just because you don't like the content. Flagging is meant only for objectionable content. If you falsely flag too many videos, you could have your YouTube account suspended.
Here are some tips for using the YouTube application:
Use the Clear button at the top-right corner of the History screen to erase your YouTube viewing history. People don't have to know you've been watching that skateboarding dog.
Don't overlook the Related Videos list. Scroll down on the video information screen to find related videos that you may want to view. YouTube is pretty clever about adding listings that you may actually want to see.
While navigating videos on the Featured, Top Rated, and Most Viewed pages, scroll all the way down, and you'll see a gray video icon with the words "Load More..." on it. Tap this to load more videos on the selected page.
You can play your YouTube videos out to TV either by connecting your iPad through a supported video cable (composite, component, VGA, and HDMI cables are all available through the Apple Store) or by selecting an AirPlay destination such as an Apple TV or a third-party player like Banana TV.
Video on the iPad isn't limited to special-purpose applications. You can also watch MPEG-4 movie files with the iPad's Safari application. Chapter 6 introduced Safari. Here you'll see how you can connect to video on the World Wide Web and watch it in your Safari browser.
Many websites besides YouTube feature embedded video. For example, go to virtually any news site, and you're sure to find embedded video. As we mentioned in Chapter 6 and earlier in this chapter, the iPad, and thus Safari, does not normally support Flash playback, which limits the iPad's ability to display every single web video (see Figure 6-20 to see what happens when a Flash video is displayed on a website in iPad's Safari). However, many websites serve HTML-5 and MPEG-4 videos, and these are fully iPad-compliant. You can also use a third party application like the Skyfire Mobile Browser to view Flash video on the web.
For example, the website TED (www.ted.com), where you can watch videos of some of today's greatest minds talk about science, education, technology, and art, is fully iPad-compatible. Figure 7-13 shows playing back in the iPad's Safari web browser this site's video of author Elizabeth Gilbert talking about creativity.
You simply tap an embedded video to begin playback. Depending on the speed of your Internet connection, it may take a few seconds before the video begins playing. You can watch the video in-page or full-screen. To navigate between the two views, tap the video, and a navigation bar appears along the bottom of it. It displays the Play/Pause button, the navigation scrubber, and the familiar full-screen double-arrow button at the very right. Tap the double arrows to enter full-screen view. To exit full-screen view and return to the web page, tap the Done button on the video playback screen.

If you are going to be watching a lot of videos, there are several iPad accessories you should consider purchasing:
Stands: Several companies make them, and they range in price from $5 to $100. Whatever stand you choose, make sure it holds the iPad in landscape mode, because that gives you maximum screen real estate to watch your videos. Some cases also double as an iPad stand. Apple's iPad 2 Smart Cover ($39) folds into a stand.
Apple Digital AV Adapter ($39): Use this adapter (see Figure 7-14) to connect your iPad to any television using an HDMI connection. The dual-port design allows you to charge your iPad through the second port at the same time as you display video. The iPad 2 offers screen mirroring, but the adapter can be used with older iPads for applications that support video-out, including Videos, Photos, and YouTube.
iPad Dock Connector to VGA Adapter ($29): The VGA end of the adapter can be connected to external monitors, some TVs, and PC projectors. You'll need this, or the cables listed next, to connect your iPad to your home television. Like the Digital AV Adapter, this connector works with older iPads as well as newer ones. Screen mirroring is only available, however, on the iPad 2 and later.
Apple Component AV Cable ($49) and Composite AV Cable ($49): These also work with the iPad, providing two more methods of linking external monitors and projectors to the device. You cannot perform screen mirroring on any iPad with these cables.
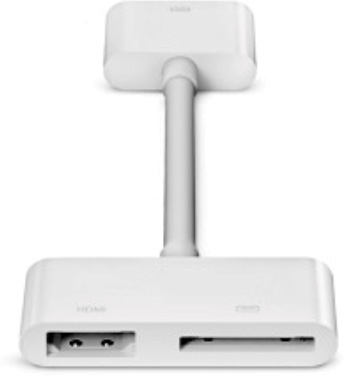
Figure 7.14. Apple's new Digital AV Adapter provides HDMI connectivity from your iPad. The second connector outlet allows you to charge your iPad at the same time as you display video.
Don't worry if you don't know the difference between VGA, HDMI, Composite, and Component. All three are types of physical video connectors that link devices to TVs.
VGA is a 15-pin connector that you can still find on the back of many PCs. It supports resolutions up to 2048×1536.
HDMI, also known as the High Definition Multimedia Interface, is a digital audio/video connector (it carries both signals at once) that provides high-definition signal support up to 2560×1600 across a single digital link.
Composite is a video connector that channels three video source signals through a single connection. It's the oldest of the four technologies, but it still supports a resolution of up to 720×576i.
Component is a video connector that takes three video source signals (red, green, and blue) and outputs them through three different connections. It's basically an RCA cable with three heads like the composite cable, but Component offers a much better resolution, up to 1920×1080p (otherwise known as full HD).
Many modern TVs support all these connections. Check your TV's manual to see which yours supports.
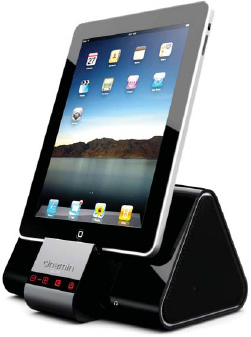
Although Apple's connector cables allow you to direct your iPad video to televisions, a number of innovative third parties provide video solutions as well. Take the $430 Cinemin Slice (www.wowwee.com) from WowWee for example. It's a video system that allows you to dock your iPad (see Figure 7-15) and project video to any screen or wall. With it, you can avoid a lot of awkward cabling when making presentations on-the-go, plus you don't have to arrange in advance for an HDTV. Instead, you can carry this relatively small unit along with you and display to any large flat surface, including the ceiling, if needed—the projector head is on a hinge that can rotate forward and upward.
The Slice works with iPad 2's screen mirroring. If you need to project in landscape mode rather than portrait, which most business folk probably prefer, you can purchase a $40 connectivity pack to use with your Apple-branded VGA video cable.
When Apple introduced the iPad, many people started complaining on the Internet that it was nothing more than a big iPod touch, even though most of them hadn't yet tried the iPad. There's even a popular parody video that shows joggers carrying an iPad instead of an iPod on their morning run. By now you've discovered that the iPad is much more than just a big iPod touch, but it also does play music like an iPod (just don't go jogging with it; or, if you do, get a Bluetooth headset and throw the iPad in a backpack, so you don't look silly running with something the size of a laptop screen in your hands, or worse yet, attached to your arm).
When it comes to the iPad, iPod is not a device—it's an application, the one that allows you to browse your audio libraries and select items to play. Once you get past the slightly confusing name switch, you'll discover that the iPad's iPod app brings all the functionality and ease of use you expect from an iPod, but it delivers that functionality in a distinctive iPad package.
If you are used to listening to music on an iPod, iPod touch, or iPhone, you may expect the iPad to have the same kind of interface for its music player. In actuality, the iPad's music player interface shares a closer resemblance to iTunes on your computer than to any previous iPod interface. This is great news, because if you are used to using iTunes on a Mac or a Windows computer, you'll be instantly familiar with the basic layout of the iPad's music player app.
Note
Do not confuse the iPod and iTunes applications on your iPad. iPod is used to play back your music tracks. iTunes connects you to the mobile iTunes Wi-Fi Music Store and is not a general music player.
Tap the iPod icon (see Figure 7-16) on your iPad's Home screen to launch the app. The iPod icon is bright orange and has a picture of a classic-looking iPod, complete with outdated click wheel. It's a homage to the past, and should be instantly recognizable to anyone who enjoyed music on an iPod in the early 2000s, even if my younger children have never used, understood, or will likely encounter a click wheel.

The first thing that you'll notice about the iPod app (see Figure 7-17) is that its layout, as mentioned earlier, is similar to that of iTunes. Not only can you listen to music in the app, you can also easily create and edit playlists like you would on your desktop. If you've played music on an iPhone or iPod touch, you'll be struck by how much more open the layout of the iPad's iPod app feels. There's so much more space on the iPad that you can see more music at once. Instead of popping up and down long sequences of menu screens, the iPad presents more options and more music in one place, making it much easier to find and enjoy your tunes.

The iPod window is composed of five key elements:
The play bar: This runs along the top of the app and contains the volume slider; the Play/Pause, Forward, and Rewind buttons; and the search field.
The Library source list: In the left column you'll see your music separated into different categories, depending on the items you have synced to your iPad (see Figure 7-17). Tap any category to see its contents.
Music: Contains all the music on your iPad
Audiobooks: Contains your audiobooks
iTunes U: Contains your iTunes U lectures and classes
Genius Mixes: Contains any genius mixes you've chosen to sync from iTunes
Purchased: Contains all the music and music videos you've bought through the iTunes Store
Below these five categories you may see a number of different playlists. Playlists come in three types (see Figure 7-18):
Regular playlist: An icon with four lines and a music note symbolizes this kind of playlist. A regular playlist contains any music you've manually added to the list. It does not update itself, and changes only when you add or remove a song.
Smart playlist: A cogwheel preceding the name symbolizes this kind of playlist. A smart playlist is one in which you set a specific set of rules that songs must match. Any songs that match the rules will show in the playlist.
Genius playlist: An icon that looks like an atom surrounded by electrons symbolizes this kind of playlist. A Genius playlist is a playlist that iTunes or the iPod app automatically generates based on a single song in your library. The playlist will be populated with songs that go great with the song you've selected to originate the playlist from.
Note
See the "Creating Playlists" section later in this chapter to find out how to create playlists on the iPad.

The songs list: This is the main body of the iPod app. It shows all the songs in any selected category or playlist. Navigate the list by scrolling up or down with your finger. If your list is long, you'll see an alphabet control on the right side of the screen, as shown in Figure 7-17. Tap a letter, or slide your finger down the alphabet to move to the section you want to view.
The create and sort bar: This is the bar that runs along the bottom of the app (see Figure 7-19). From this bar you'll be able to create new playlists and Genius playlists, as well as sort music from the songs list by song, artist, album, genre, or composer.
Cover art: A song's cover art (the cover of the album the song is from) is displayed in the lower-left corner of the iPod app's screen, right below the Library source list. Tap the cover to enter the Now Playing window (shown in Figure 7-20 a bit later in the chapter).
Note
Only playlists and the Music and Purchased categories in the Library source list can be sorted by song, artist, album, genre, or composer. Podcasts, audiobooks, iTunes U, and Genius mixes do not feature sorting options.
When viewing music in your library, you can take advantage of several buttons that allow you to choose how to view your tracks. Use these buttons to help locate items you're looking for. Located at the bottom center of Figure 7-17, your choices include:
Songs: Displays all the songs in your iPad music library in an alphabetical list.
Artists: Displays an alphabetical listing of all the artists in your library. Tap an artist to see all their albums and the songs under each album. Tap any song to play it.
Albums: Displays an alphabetical thumbnail list of all the albums in your library. Tap an album cover, and it springs forward and flips around to reveal a miniaturized Album view. Tap a song to begin playing it.
Genres: Displays an alphabetical thumbnail list of all the genres of songs in your library. Tap a genre cover, and it springs forward and flips around to reveal a miniaturized Album view. The songs displayed can be from many different artists. Tap a song to begin playing.
Composer: Displays an alphabetical listing of all the composers in your library. Tap a composer's name to see all their albums and the songs under each album. Tap any song to play it.
Whether you are in your main music library or a standard, smart, or Genius playlist, to start playing a song, simply tap it. Figure 7-20 shows the iPod app's Now Playing screen. You arrive at this screen whenever you start playing a song.

Figure 7.20. The iPod app's Now Playing screen provides an interactive screen that controls playback for the currently playing item. From this screen, you can adjust the volume, pause and resume playback, and loop the current track. If you have added lyrics in iTunes, you'll find them displayed here as well.
You'll also notice that a Play indicator has appeared in the iPad's status bar (see Figure 7-21). The right-pointing Play indicator at the top-right of the screen (just left of the battery status) appears universally when you're playing back music. This tells you at a glance that music is playing. You'll find this especially helpful when you've removed your earbuds and placed the iPad on a table. It alerts you that your battery is gleefully emptying itself as your iPad plays music that no one is hearing.
The Now Playing screen (see Figure 7-20) is divided into three sections. Here's a run-down of each of those sections and what kinds of information and controls you'll find there.
The title bar (see Figure 7-22) is the black bar at the top of the Now Playing screen and contains the following items:

Volume slider: Drag along the slider to adjust the volume. You can also use the iPad's physical volume button to adjust the volume. If you've attached an external speaker or remote control, you can use its switches to control the playback volume as well.
AirPlay button: When music-capable AirPlay receivers are available on your home network, an AirPlay button appears just to the right of the volume slider. Tap on the button and select a receiver to redirect your music to. Because of Apple's highly encrypted AirTunes protocol, AirPlay for music and audio was limited to Apple-branded receiver equipment until Spring 2011, when it was finally reverse engineered to allow access by third-party applications.
Artist, song, and album: These items appear at the top middle of the screen and are for information only. Tapping them does nothing.
Rewind: The Rewind button looks like a line followed by two left-pointing triangles.
Tap to move back to the beginning of the currently playing song.
Double-tap to move to the previous song in the album or playlist. If you are already at the start of the song, a single tap moves you back; if you're already at the first song, this works as if you had pressed the Back button—you return to the most recent album or playlist screen.
Touch and hold to rewind through the current song. You'll hear very short snippets as you move backward through the song. This feature proves especially handy while listening to audiobooks.
Play/Pause: Play looks like a right-pointing triangle. Pause looks like a pair of upright lines. Tap this button to toggle between playback and pause modes.
Forward: The Forward button looks like the Rewind button in a mirror. The line is to the right, and both triangles point right instead of left.
Tap once to move to the next song in the album or playlist. If you're at the last song, tapping Forward moves you back to the album or playlist.
Touch and hold to fast-forward through your song.
Below the title bar, you'll find a thin bar that contains the loop button, the scrubber bar, and the shuffle button (see Figure 7-22).
Loop control: This control, which looks like a pair of arrows pointing to each other in a circle, appears when you tap album art.
Tap once to loop the currently playing album or playlist. After the last song plays, the first song starts again.
Tap a second time to loop just the current song. The number 1 appears on the loop, telling you that the loop applies to just this song.
Tap once more to disable looping.
A blue loop (both the regular loop and the loop with the number 1) indicates that looping is enabled. A white loop means looping is switched off.
Scrubber bar: The scrubber bar appears to the right of the loop control. Tap the album cover to make this control appear; tap again to hide it.
The number at the left of the bar shows the elapsed playback time. The number at the right shows the remaining playback time.
Drag the playhead to set the point at which your song plays back. You can do so while the song is playing, so you can hear which point you've reached.
Shuffle: The shuffle control looks like two arrows making a wavy X. It appears to the right of the scrubber bar and, like the loop and scrubber controls, appears only after you tap the album cover.
Note
If you are using Apple's iPhone earphones with a remote and mic to listen to music on your iPad, all the buttons and click features of the iPhone's earbuds work just fine (despite Apple not listing the earbuds as an official iPad accessory). Click to play/pause a song. Double-click to skip to the next song. Triple-click to return to the previous song. Tap the + or − button on the earphone control to increase or decrease the volume. The microphone on the iPhone earbuds also works fine with the iPad. The Apple Earphones with Remote and Mic cost $29 at the Apple Store.
Below the scrubber bar, you'll notice the song's album art taking up a majority of the display (see Figure 7-20).
Album art: When you've downloaded album art, the cover image appears just below the top bar and occupies most of your screen. (When the iPad cannot find album art, it instead displays the same light gray music note on a white background).
Song count: This is a little pill-shaped button that shows you the number of the song in the playlist and how many songs are in it in total.
Lyrics: If the song has lyrics embedded in the music file, the lyrics will be displayed over the album art. You can make the lyrics and the rest of the control interface go away by tapping them once. Tap the album art again to bring them back.
At the bottom of the Now Playing screen you'll see a thick black bar (see Figure 7-23) containing the following:
Back button: Tap the Back button (the arrow pointing left) at the left end of the bar to return to the most recent album or playlist screen. Tapping the Back button does not stop playback. Your song continues to play as you browse through your categories or tap the Home button to do other things on your iPad.
Genius button: This center button looks like an atom with electrons swirling around it. Tapping this will create a Genius playlist based on the song that is currently playing. When you navigate back to the music library, you'll see a playlist labeled "Genius" along with several other options. We'll discuss those options in just a bit.
Album View button: This button looks like a three-item bulleted list and appears at the right of the bar. Tap this to switch between your Now Playing screen and its Album view.

Album view is a powerful and fun way to navigate your music. You can access Album view in two ways, both from the Now Playing window. As a matter of fact, Album view is part of the Now Playing window. When you access it, you'll see that the bars at the top and bottom of the Now Playing window stay the same (see Figure 7-24).
Double-tap the album art area to reveal Album view. The cover art will flip around, and you'll be presented with the full list of songs from that album.
Tap the Album View button in the thick bottom bar of the Now Playing window. The cover art of the current song will flip around, and you'll be presented with the full list of songs from that album.
To leave Album view, tap the small thumbnail of the album art in the bottom-right corner of the screen (where the Album View button used to be). The list of the albums songs will flip back around and display the cover art again. Alternatively, tap the Back button at the bottom left of the screen, and you'll be taken back to the main iPod app screen. Your music will keep playing.
Why use Album view? Pretend you are listening to a playlist and a song comes on you haven't heard in a while. It's a great song, and you want to check out what other songs are on the album. Album view lets you do this without leaving the playlist. Simply access it by using either of the methods mentioned earlier, and you'll be presented with a screen that shows a track list of all the songs from that album along with their names and durations. Scroll up and down the track list to see all the items on the current playlist or album. Tap any item to start playback.
Album view also allows you to rate your songs. Use the star control that appears below the scrubber bar to rate the current song, from zero to five stars. Drag your finger along the stars to set your rating. These ratings sync back to your computer. Rating your music is a good thing to do because it lets you keep track of songs you really like. You can create smart playlists to contain all of your five-star songs, enabling you to access them all in one place instantly.
Also, if you use the iTunes DJ feature in the desktop version of iTunes, higher-rated songs will be played more often. iTunes DJ is an iTunes feature that picks songs from your library and creates an endless playback of music. It's great when you are having a party. iTunes DJ is not a feature of the iPod app on the iPad.
Tip
When there's empty space on the track list in Album view—for example, when you have only one or two tracks—double-tap the empty areas to return to the Now Playing screen. Alternatively, double-tap either side of the rating stars display.
The different kinds of playlists were introduced earlier in this chapter. Playlists you've chosen to sync from iTunes will automatically appear in your iPod app. But you aren't limited to creating playlists on your computer. You can create playlists and Genius playlists right from your iPad, allowing you to build audio-listening experiences on-the-go.
To create a standard playlist, tap the + button at the lower-left of the iPod app screen (see Figure 7-17). A pop-up appears, asking you to name the playlist. Enter a name, and tap Save. Immediately after, a list of all the songs on your iPad slides up the screen. Select the songs you want to include in your playlist by tapping the blue + button next to each track. When you select a song, it will appear grayed out. You'll also find an Add All Songs option at the top of your list of songs. Adding all the songs in your library defeats the purpose of a playlist, however.
If you select a song by accident, you cannot unselect it at this point, but you can easily remove it later. You may add a song more than once to your playlist. You can delete those copies after you're done by editing the playlist (as discussed in the next section).
While adding songs to a playlist, you have several options to navigate your library to find the songs you want. At the bottom of the Add to Playlist screen, you'll see the five category views of the iPod app: Songs, Artists, Albums, Genres, and Composers. Select any of these to sort through your song library, and then click the appropriate song to add it to the playlist.
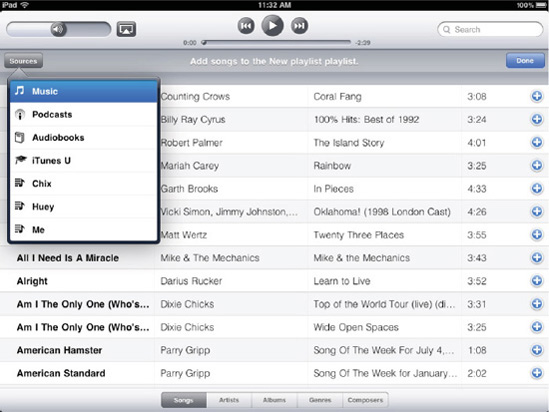
You also can navigate through your iPod app's Library source list to find items to add to your playlist. To do this, tap the Sources button in the upper-left corner of the screen, and you'll be presented with a drop-down list of the sources and existing playlists in your library (see Figure 7-25). You can combine audiobooks, songs, and podcasts in the same playlist. Tap the blue Done button when you are finished adding songs.
When you are finished adding songs to your new playlist and tap the blue Done button in the upper-right corner, you are taken to the playlist edit screen (see Figure 7-26). This screen allows you to add, delete, rearrange, and shuffle songs as well as to delete the playlist entirely.
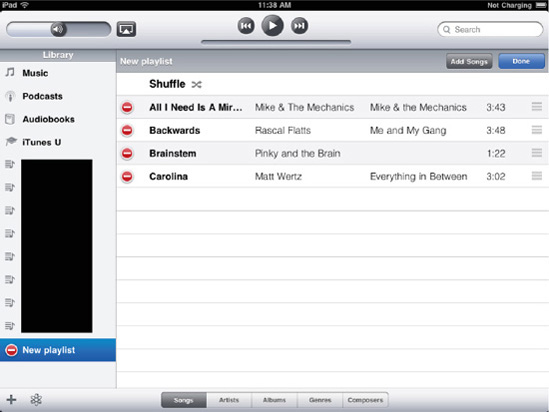
Figure 7.26. The playlist edit screen allows you to further customize your playlists after their creation.
You can access the playlist edit screen from any existing playlist by tapping the gray Edit button at its top-right corner. This playlist edit screen allows you to do the following:
Add songs: Tap the Add Songs button to be presented with the Add to Playlist screen again, and follow the previous steps until you've added the items you want; then tap the blue Done button again.
Delete songs: Tap the white and red minus (−) button to remove a selected song. Tap the red Delete button that appears to the right of the song to confirm deletion. Removing a song from a playlist will not delete it from your music library on your iPad or on your computer.
Rearrange songs: Tap and hold the grip bars to the right of a song, and drag to rearrange it in the playlist.
Delete playlist: If you decide you no longer want the playlist, tap the white and red minus (−) button next to the name of the playlist in the source list to delete the playlist. Tap the red Delete button that appears to the right of the playlist's name to confirm deletion. Deleting a playlist will not delete the songs it contains from your music library on your iPad or on your computer. The iPod app will prompt you to confirm your deletion.
Note
You can edit only standard playlists. If you have synced a smart playlist (the kind with the icon of a machine's cogwheel next to it) from iTunes on your computer, you won't be able to edit it.
Genius is a feature in iTunes that finds songs in your music library that go together. It does this by matching rhythm, beat, artists, genres, and Internet data. A Genius playlist is a list of songs that results when you choose to run the Genius feature on a song you are listening to.
You can create Genius playlists in iTunes on your computer or on the iPad. However, to enable the Genius feature, you need to turn it on through iTunes on your computer first. To do this, launch iTunes on your computer, go to the Store menu, and select Turn on Genius. You'll need to log in with an iTunes Store account (see Chapter 8 for creating an iTunes account) to access the Genius features. Enter your username and password, agree to the terms and conditions, and sit back as Apple analyzes your music library.
You can create Genius playlists in two ways:
Tap the Genius icon at the bottom of the main iPod app screen (see Figure 7-17). The icon looks like an atom surrounded by electrons. If no song is playing, you'll be presented with a list of songs like you were when you created a playlist. Tap a song to base the Genius playlist on.
From the Now Playing window, tap the Genius icon in the center of the bottom bar (see Figure 7-20).
A new playlist named Genius appears in your music library's source list. In its list of songs, you can scroll through to see what Genius has picked out. The playlist offers three options via three buttons at the top of the song list:
New: Tap New to start a new, fresh Genius list. The iPod app presents you with a list of your songs to choose a new song from. Select the song you want to base your playlist around, and let the built-in Genius feature do its work.
Refresh: Tap Refresh to rebuild the Genius playlist around your original song. This allows you to retain the same playlist styling with an updated selection of tracks matching that theme. This is a great feature if you're exercising and finish the playlist but want to keep going with the same kind of songs you just listened to.
Save: Did Genius generate an absolutely awesome collection of songs that you want to keep around to play over and over again? Tap Save to keep your Genius playlist for later. After tapping Save, the name of the playlist changes from Genius to the name of the song you chose to create the playlist.
Genius playlists offer the following two management options. Both appear as buttons above the song list when the Genius playlist is selected.
Refresh: Tapping Refresh populates the Genius playlist with all new songs seeded by your original selection. Keep your theme while switching up the music with this option. All songs previously on the playlist are removed but remain in your music library.
Delete: Tapping Delete prompts the white and red minus (−) button to appear next to the name of the Genius playlist in the source list. Tap the minus button to remove the playlist from your iPad, and then tap the red Delete button that appears to the right of the Genius playlist's name to confirm deletion. A pop-up will appear warning you that deleting the Genius playlist will delete it from your computer's iTunes library the next time you sync. Tap Delete to delete.
Note
Once a Genius playlist is synced back to iTunes on your computer, you will not be able to delete it on your iPad. Your only option will be Refresh. If you want to delete the Genius playlist, you must do so through iTunes on your computer.
Another way to explore the music on your iPad is by playing a Genius mix. A Genius mix is similar to a Genius playlist, but you have no control over what songs appear on it, and the songs change each time you play it.
On your computer, iTunes automatically creates Genius mixes when you enable the Genius feature. A Genius mix is based on genre and format, not on an individual song like a Genius playlist is. You can have any number of different mixes—it all depends on the types of songs you have in your iTunes library. Examples of Genius Mixes are Punk Mix, Pop Mix, Classical Crossover Mix, Folk Mix...the list goes on and on.
To play a Genius mix, tap Genius Mix in the source list. The iPad presents a series of Genius mixes represented by squares formed of four album covers (see Figure 7-27). These represent a sample of songs contained in the mix. To begin playing a mix, tap it. The mix's four-covers icon will transform into the album cover of the currently playing song in the mix.
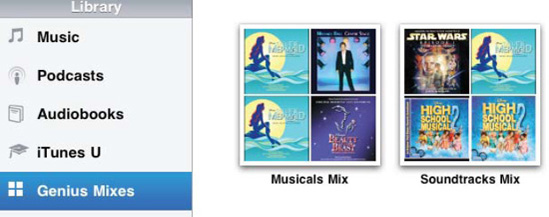
Figure 7.27. Genius mixes on the iPad allow you to listen to automatically generated collections of genre-based music.
Your navigation options are limited while in a mix. You won't see a list of the songs in the mix and can only move through the songs by using the Forward and Back buttons. The currently playing album still appears in the now-playing screen.
If you've synced podcasts, audiobooks, and iTunes U lessons to your iPad, their categories will show up in the iPod app Library source list, along with other playlists. To view the items available in each category, simply tap the category name. Unlike with music, there is no way to sort podcasts, audiobooks, and iTunes U lessons in the items list.
For podcasts and iTunes U lessons, tap the series or class, and then select the episode or lesson to begin playing back that item. To play an audiobook, tap your chosen audiobook in the list.
When you select a podcast, audiobook, or iTunes U lesson, the Now Playing screen appears. While this screen is similar to the Now Playing screen for music, it has some subtle differences (see Figure 7-28).
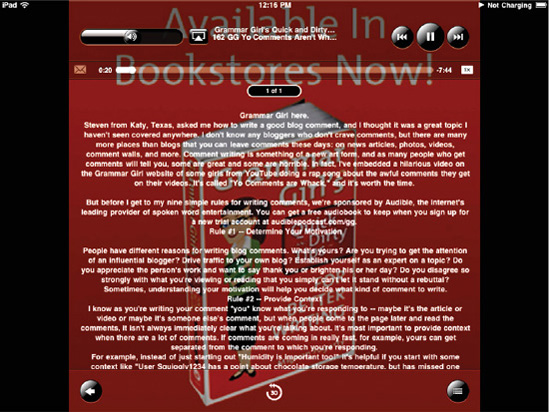
Figure 7.28. The Now Playing screens for podcasts, audiobooks, and iTunes U lessons offer several extra features that do not appear on the Now Playing screen for music.
As you can see, the Now Playing screen is laid out in the same way that it is for music playback (see Figure 7-28). There are some new features, however:
E-mail: Tap the envelope icon to the left of the scrubber bar to share via e-mail a link to the currently playing podcast.
Audio speed button: Tap the 1X icon once, and it becomes a 2X icon. This doubles the speed of the audio playback. Tap the 2X icon, and it becomes a 1/2X icon. This plays the audio back at half the normal speed, which is helpful if the dialogue is being spoken too fast for you to follow. Tap the 1/2X icon, and it turns into a 1X icon, returning the rate of audio playback to normal speed.
30 seconds button: This button appears in the bottom center of the screen. The number 30 with a double-headed arrow wrapped around it counterclockwise denotes it. Tap this button to jump back 30 seconds in the podcast or audiobook. This feature enables you to avoid rewinding with the scrubber bar, which can quickly take you back much farther than you intended to go. If you got distracted and missed what was just said, a quick tap of the 30-second rewind button will quickly get you caught up.
Album View button: This button, which looks like a three-item bulleted list, also appears in the Now Playing screen for music, but the view itself differs. Album view in a podcast, audiobook, or iTunes U class shows you a list of all the episodes, chapters, or lessons in each one, respectively.
The iPod app offers an easy-to-use search feature that lets you find a song quickly. That's super-helpful when you have a large media library and don't want to spend the time flicking through long lists of titles. Tap the search field in the top-right corner of the iPod app screen. A keyboard appears. As you type in your search keyword, a list of results automatically begins to populate the main portion of your screen (see Figure 7-29).

You can navigate through the search results by song, artist, album, composer, podcast, or audiobook by tapping the respective buttons above the keyboard. As you can see in Figure 7-29, which buttons are active depends on which media you've loaded into your iPad's library
You can also scroll through the results with your finger. Doing so hides the keyboard so you can see a longer list of results. To get the keyboard back, tap the search field again. Tap any song to play it. Your search results list remains until you navigate to a category or playlist in the source list or tap the × button in the search field.
We've already mentioned how your music, podcasts, and audiobooks will keep playing even when you leave the iPod app. The good news is that you don't need to go back into the iPod app to change tracks. Simply double-tap the iPad's physical Home button in quick succession to reveal the recent apps list, and then swipe to the right to find your iPad playback controls (see Figure 7-30). From this small pop-up, you'll be able to navigate through songs, adjust the volume, or select an AirPlay destination. To close this panel, tap anywhere on the main screen. Tap the iPod icon at the right to move immediately into the iPod application.

Figure 7.30. These iPad controls appear to the left of your recently used applications. Swipe to the right to uncover this little gem.
You can also access these controls when your iPad is locked. Simply double-tap the iPad's Home button, and the iPod navigation bar appears at the top of the display (see Figure 7-31).

Surprisingly, for a feature-rich application like iPod, the iPad provides just a few settings for its music player. You'll find these in Settings
Sound Check: Say you're listening to a song that was recorded way too low. So, you crank up the volume during playback. Then when the next song starts playing back, boom!—there go your eardrums. Sound Check prevents this problem. When you enable Sound Check, all your songs play back at approximately the same sound level.
Tip
You can also use Sound Check in iTunes. Choose Edit

EQ: The iPad offers a number of equalizer settings that help emphasize the way different kinds of music play back. Choose from Acoustic, Dance, Spoken Word, and many other presets. To disable the equalizer, choose Off.
Volume Limit: Face it, personal music players bring your audio up close and very personal—so up close, in fact, that your hearing may be in peril. Though not a dedicated music player, the iPad is no different. We strongly recommend you take advantage of the iPad's built-in volume limit to protect your ears. Tap Volume Limit, and adjust the maximum volume using the slider. All the way to the left is mute—sure, you'll protect your ears, but you won't be able to hear anything. All the way to the right is the normal, unlimited maximum volume. If you're super paranoid or, more usually, if children have access to your iPad, tap Lock Volume Limit to open a screen that allows you to set a volume limit passcode. No one may override your volume settings without the correct passcode.
Lyrics & Podcast Info: This setting allows you to display or hide lyrics and podcast information on currently playing audio. You will see this information when viewing a song or podcast in the Now Playing window.
Tip
If your songs don't have lyrics embedded in them, you can add them yourself. In iTunes, select a song, and then press Cmd+I (Mac) or Ctrl+I (Windows). On the song's Get Info screen, navigate to the Lyrics tab. You can paste in the lyrics field any lyrics you have for the song. There are also a number of apps that search your iTunes songs and automatically add lyric information. Try Get Lyrical (www.shullian.com) on the Mac and SoundCrank (www.soundcrank.com) on the Windows computer.

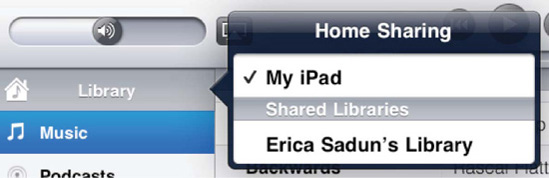
Home Sharing allows you to play music on your iPad that is stored on your home computer. It's pretty much the opposite of AirPlay, where you send music and videos from your iPad out to other devices for playback. For Home Sharing to work, your computer and your iPad must be sharing the same Wi-Fi network, and iTunes has to be running on your computer. Home Sharing is a feature of the iTunes application itself, and it has to be able to serve that data out to the network and from there to your iPad.
Enable Home Sharing by entering your Apple ID and password in settings (see Figure 7-32). You must use the same Apple ID and password that your home computer is signed into. If you fail to do so, you won't be able to access your music.
On your home computer, launch iTunes, and select Advanced
From the iPad side of things, you can access Home Sharing media by tapping the Library item at the top of the iPod app's sources list (see Figure 7-33). Select the shared library you wish to browse from the pop-up. Once selected, it may take a minute or two for the library contents to load (there is eventually a progress wheel that fills to let you know how long it will take). Once loaded, the Home Shared library replaces the current library and the check mark in the Home Sharing pop-up switches to the library in use. You can return to your onboard library at any time by selecting your iPad from the Home Sharing pop-up.
In this chapter, you learned how to watch videos through the YouTube and Videos apps, as well as in the Safari web browser. You also learned how to browse and play back your music and podcasts using the iPod application and Home Sharing.
Here are a few points you should take away and consider:
Video playback is consistent across applications. If you can handle video in YouTube, you'll know how to use it in Safari. The changes between the screens are minor and easy to follow.
Set up a free YouTube account to enjoy the YouTube app even more. You'll be able to bookmark your favorite videos, subscribe to video feeds, and rate and share your favorite clips.
The iPod app has three types of playlists: standard, smart, and Genius. The iPod app lets you create and edit two of those kinds: standard, which lets you manually add songs to it, and Genius, which automatically generates a list of songs based on a single song you choose in your music library.
Save your ears. Adjust your playback volume using the built-in volume controls and limiters. You can find out more about the increasing occurrence of noise-induced hearing loss at
www.cdhh.org/resources.php.Don't forget about double-tapping the Home button to pull up music controls, regardless of your current application.
Home Sharing currently can be used only when your iPad and computer share the same Wi-Fi network. Hopefully, Apple will extend this to remote access in future updates. Forcing you to authenticate with your Apple credentials suggests that that feature remains just around the corner.