
When Apple introduced the iPhone in 2007, Steve Jobs said it was like having the Web in your pocket. The Safari web browser on the iPhone was revolutionary. It allowed you to literally touch the Web like never before. Take the iPhone Safari experience, magnify it by ten, and you'll have some idea of what browsing the Web is like on the iPad. Web pages on the iPad's screen are large and show you more than ever before with a clarity you've never imagined. It's like the iPad turns the Web into an interactive magazine in the palm of your hands.
In this chapter, you'll discover how to get the most from Safari and all its awesome powers. You'll learn how to navigate web pages, manage bookmarks, and use both Portrait and Landscape orientations. You'll also discover some great finger-tap shortcuts, bookmarking skills, and the handy Web Clip feature. Read on to learn about all this and more.
Tap the Safari application icon to launch the program. By default, Apple places it in the bottom left of the Dock. It's marked with a white compass on a blue background (see Figure 6-1). Once tapped, the Safari application opens a new window.

Many elements on the Safari window may look familiar, especially to anyone experienced in using web browsers or Safari on the iPhone or iPod touch. Familiar elements include the Address bar, the Reload button, and the History navigation arrows. Figure 6-2 shows a typical Safari browser window.

Figure 6.2. The Safari window displays many familiar features, including the Address bar and the Back, Forward, and Bookmarks buttons.
Let's look more closely at the top of a Safari page. Atop every Safari window, you'll see the Navigation bar (see Figure 6-3). The Navigation bar contains common buttons and tools found on any modern web browser. From left to right, they are as follows:
Note
When the back and forward buttons are grayed out, you haven't yet created a history. The arrows turn from light gray to dark gray once you start browsing, and you can move back and forth through your history to the previous and next pages. Each page maintains its own history. You can't use these buttons to go back to a page you were viewing in another window (see the Pages button discussion next).
The Pages button: This button looks like two squares superimposed on one another. It allows you to open the page selection browser and select one of your currently open Safari windows. You can open up to nine browser windows at a time. We'll talk more about this button later in the chapter.
The Bookmarks button: Tap the book-shaped icon to open your Bookmarks screen. The Bookmarks screen also contains your complete browsing history for Safari.
The Share button: This button looks like an arrow breaking out of a box. Tapping it displays a menu that allows you to add a bookmark of the current page, add a shortcut to the page on your Home screen, mail a link to the page, and print the web page displayed. We'll talk more about this button later in this chapter.
The Address bar: Use the Address bar at the top center of the Safari window to enter a new web address (web addresses are uniform resource locators, also known as a URLs).
The Reload button: The arrow bent in a semicircle in the Address bar is the Reload button. Tap it to refresh the current screen.
The Stop button: As a page loads, Safari replaces the Reload button with a small X. If you change your mind after navigating to a page, tap this. It stops the current page from loading any further.
The Search bar: Tapping this gives you quick access to Google search.
iPad's Safari lets you do all the normal things you expect to do in a browser. You can tap links and buttons. You can enter text into forms and so forth. In addition, Safari offers iPad-specific features you won't find on your home computer: tilting the iPad on its side moves it from Landscape to Portrait view and back. The following sections guide you through Safari's basic features.
Tap the Address bar to open the URL-entry window (see Figure 6-3). The Navigation section appears at the top of your screen, and a keyboard opens from below. Between these, the screen dims, and you can still see part of the page you were on (see Figure 6-4).

Note
If you decide you want to remain on the page you are on, simply tap the dimmed area between the Navigation bar and keyboard, and you'll be taken back to the page. Alternatively, you can tap the Hide Keyboard button in the lower-right corner of the keyboard.
You'll also see a Bookmarks bar appear below the URL field (see Figure 6-5). These aren't all of your bookmarks, but a select few you've decided to add to the Bookmarks Bar folder that's located in your collection of bookmarks. Bookmarks are generally used for quick access to your most frequently visited web sites. To activate a bookmark in the Bookmarks bar, simply tap it and you'll be taken to its web page.

If the current URL field is empty, simply tap it and begin typing. You'll briefly see a contextual menu saying Paste, but don't worry about that. Just start typing and the contextual menu will disappear (or hit the Paste button if you want to paste a URL that you've copied previously).
If the current URL field is populated (e.g., if you are already on a site and not a blank page), simply tap it. You'll see a small gray X appear where the Refresh button normally appears (see Figure 6-5). Tapping this X will clear the contents of the URL field. Additionally, if you'd like to copy the current URL, tap anywhere in the URL field, and you'll get a pop-up menu that says Select, Select All, and Paste. Tap Select All, and then tap Copy in the pop-up field that appears.
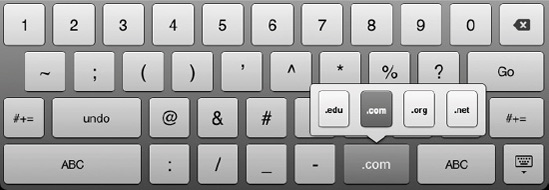
Don't worry about typing http:// or even www; Safari is smart enough to know that those are required and will add them automatically. A handy feature on the iPad's keyboard in Safari is the dedicated .com button (see Figure 6-6). This single button makes your fingers perform four keystrokes less work. What's even cooler is that, when you press and hold the .com button, you'll be presented with a pop-up field allowing you to select .edu, .org, .us, and .net.
As you type, Safari matches your keystrokes to its existing collection of bookmarks. A pop-up field will appear and display a list of possible matches from both your bookmarks and your history (see Figure 6-7). To select one, just tap it. Safari automatically navigates to the selected URL.
When you are done typing in a URL, tap Go and Safari will navigate to the address you've entered. To return to the browser screen without entering a new URL, tap anywhere between the keyboard and the Navigation bar.
Tip
When you see a white X in a gray circle in a text-entry field, you can tap it to clear the field.

Many times you'll have to fill in user names or passwords on a web page to log in, or you may be on a page that asks you to fill in other forms. To edit the contents of any text-entry field, simply tap it and Safari will open a new text-entry keyboard.
Although this keyboard is superficially similar to the one shown in Figure 6-5, it presents a few differences. These differences include the Previous and Next buttons atop the keyboard that search for other text fields on your web page (see Figure 6-8). These buttons let you fill out forms without having to go through tedious tap/edit/done cycles. Simply enter text, tap Next, enter more text, and so forth.

Figure 6.8. The text-entry keyboard for web page forms. Notice the Previous, Next, and AutoFill buttons at the top.
Another difference from the text-entry features in Safari is the AutoFill button. Tapping the AutoFill button will automatically populate the text fields with information from your personal contact card in your address book. It will also enter stored user names and passwords. We'll talk about setting up AutoFill features later in this chapter.
To submit a form after you've entered all the text, tap Go or Search. This is like pressing the Enter or Return key on a regular computer.
From any Safari window, you'll just be a tap away from a web search. As shown in Figure 6-5, a Google search field lies just to the right of the URL field. It initially appears light gray, marked with a Spyglass icon. Tap this search field to bring up the keyboard and enter a term you want to search for in Google.
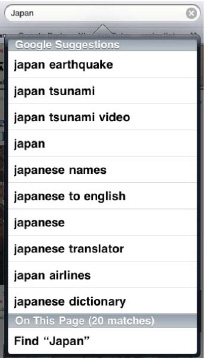
The search field elongates while the URL field shortens, and the Go button on the keyboard switches to a Search button. Type a word or two, and you'll see a pop-up box appear with Google-suggested search terms based on what you've typed (see Figure 6-9). To select one of the Google-suggested terms, you can simply tap it in the list or just finish typing what you are looking for and tap Search on the keyboard. Safari will navigate to www.google.com (no matter what page is currently displayed) and search for your queried term.

If you'd rather use Bing or Yahoo! search than Google search, you can navigate to Settings
Safari also allows you to search for specific text on a web page. To search for text, tap inside the Google search field and enter the word or words on the web page that you are looking for. Tap where it says "Find"; next, tap the text you entered in the bottom of the search suggestion pop-up field (see Figure 6-10).
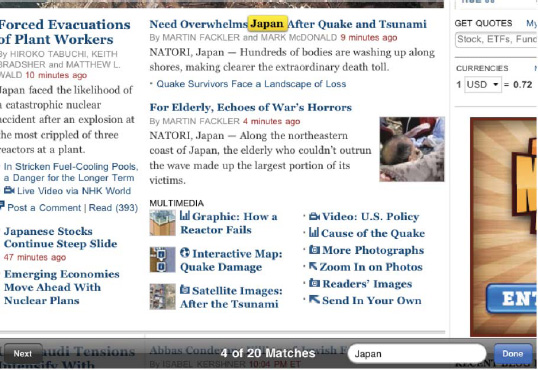
After you tap the Find command, Safari will zoom into the section of the web page with the first occurrence of the text you are looking for and highlight it in yellow (see Figure 6-11). Then, using the Search text bar at the bottom of the page, you can tap the Next button to find the next instance of the text on the web page. You can also refine your keyword search using the search field in the Search text bar at the bottom of the page.
Hypertext links are used throughout the World Wide Web. Text links are marked with underlines and usually involve a color change from the main text. Image links are subtler, but they can also move you to a new location.
Tap these links to navigate to new web pages or, for certain special links, to open a new e-mail or view a map. When a link leads to an audio or video file that the iPad understands, it will play back that file. Special links include mailto:(to create Mail messages), tel:(for phone calls, if you have Skype installed on your iPad), and automatic recognition of Google Maps URLs (which will take you to the iPad's Maps app).
Note
Supported audio formats include AAC, M4A, M4B, M4P, MP3, WAV, and AIFF. Video formats include h.264 and MPEG-4.
You have other options than simply tapping a link to get to a new page. To preview a link's address, touch and hold the link for a second or two. An address pop-up field will appear next to the link (see Figure 6-12). Below the link's full address, you'll see three buttons, which behave as follows:
To cancel any of these options and stay on your current page, simply tap your finger anywhere on the screen.

Tip
To detect image links on the screen, tap and hold an image. If it turns gray, it's a link. If it remains at the same brightness, it's just a plain image. When you tap and hold a linked picture, you'll have the same options as you do with a text link. You'll also have one additional option: Save Image. This will save the image to your Photos app on the iPad.
One of the iPad's standout features is its flexible orientation support. When you turn your unit on its side, the iPad flips its display to match, as you can see in Figure 6-11. A built-in sensor detects the iPad's tilt and adjusts the display to Landscape orientation. Tilt back to vertical, and the iPad returns to Portrait orientation. It takes just a second for the iPad to detect the orientation change and to update the display. Don't forget you can always lock your screen's orientation by sliding the screen Orientation Lock button on the side of the iPad; however, you should sure you've got the button set to lock the orientation and not to mute the iPad. To do this, go to Settings
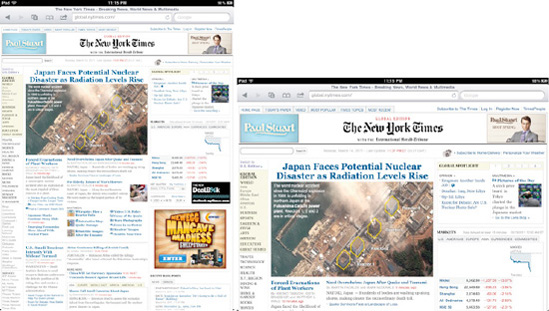
The iPad's Landscape view offers a significantly wider display. This is particularly good for side-to-side tasks such as reading book-width text. The wider screen allows you to use bigger fonts and view wider columns without scrolling sideways. The Portrait view provides a longer presentation. This is great for reading web content with more narrow columns, like news feeds. You don't have to scroll quite as much in Portrait view as you do in Landscape view.
Whether in Landscape or Portrait view, Safari features work the same, including the same buttons in the same positions. In Landscape view, you enter text using a wider, sideways keyboard.
Safari responds to the complete vocabulary of taps, flicks, and drags discussed in Chapter 2. You can zoom in on pictures, squeeze on columns, and more. Here's a quick review of the essential ways to interact with your screen:
Drag: Touch the screen and drag your finger to reposition web pages. If you think of your iPad as a window onto a web page, dragging allows you to move the window around the web page.
Flick: When dealing with long pages, you can flick the display up and down to scroll rapidly. This is especially helpful when navigating through search engine results and news sites.
Double-tap: Double-tap any column or image to zoom in, auto-sizing it to the width of your display. Double-tap again to zoom back out. Use this option to instantly zoom into a web page's text. The iPad recognizes how wide the text is and perfectly matches that width.
Pinch: Use pinching to manually zoom in or out. This allows you to make fine zoom adjustments as needed.
Tap: Tap buttons and links to select them. Tapping allows you to move from site to site and to submit forms.
Page down: When zoomed in onto a column, double-tap toward the bottom of the screen while staying within the column. The page re-centers around your tap. Make sure not to tap a link!
Jump to the top: Double-tap the very top of the screen (just below the time display) to pop instantly back to the top of the page.
Stop a scroll: After flicking a page to get it to scroll, you can tap the page at any time to stop that movement. Don't forget that you can also manually drag the screen display to reset the part you're viewing.
Tip
Some web pages have text boxes in them, which have their own scrollbars, separate from the scrollbars of the web page. If you come across a web page with a text box while using Safari on the iPad, you can scroll through the text box on the page without scrolling through the entire page. To do this, swipe up or down with two fingers inside the text box. Only the contents of the text box will scroll, and the main page will stay in place.
Safari allows you to open up to nine concurrent browser windows at once. To review your open windows, tap the Pages button (it's the one that looks like two boxes stacked on top of each other) in the Navigation bar. Safari's Page viewer opens, as shown in Figure 6-14. You may see a number inside the boxes. This number signifies the number of open pages you have in Safari at the moment.
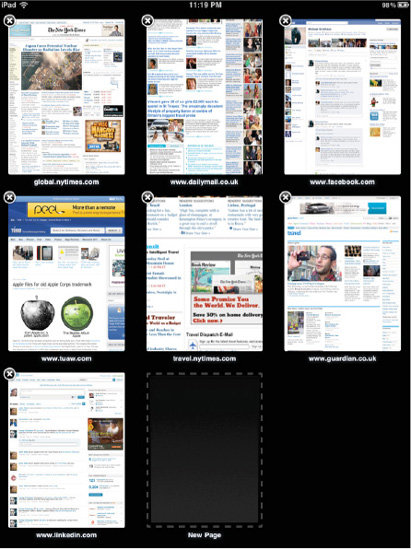
This viewer allows you to interactively select a browser window. From there, you can do the following:
To select a window, simply tap it. The Safari window springs forward and automatically reloads so it has the most current content on the page.
To close a window, tap the Close button—the black circle with an X in it at the top left of each page. The Page viewer slides the remaining pages into the gap left by the closed window.
To add a new page, tap the dotted, blank New Page button; Safari will create a new window and open the new, blank page for you to work with. You will not see a New Page window if you have nine currently opened pages.
The page-management tool lets you quickly navigate back and forth between several open Safari windows. If you want, think of this tool as a replacement for tabs that your desktop browser offers.
One of the great features of the iPad is that it lets you take your world with you: contacts, calendars, e-mail accounts, and bookmarks. You don't have to reenter URLs for all your favorite pages on the iPad. It loads these bookmarks whenever it syncs, provided you have enabled this feature in the iTunes iPad Preferences window (see Chapter 2).
A bookmarks collection can contain hundreds of individual URLs, which is why people really appreciate the iPad's simple bookmarks browser (see Figure 6-15). When you tap the Bookmarks button in the Navigation bar, a simple Bookmarks pop-up window appears. It uses the same folder structure that you've set up on your personal computer. You can tap folders to open them and tap the Back button (top-left corner) to return to the parent folder.
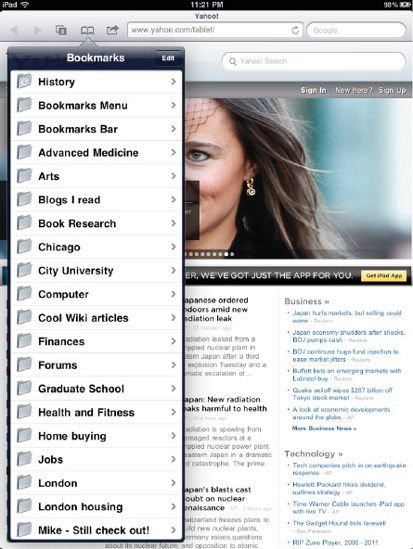
Figure 6.15. Use iPhone Safari's interactive Bookmarks navigation menu to locate and open your favorite bookmarks.
Identifying bookmarks is easy. Folders look like folders, and each bookmark is marked with a small open book symbol. Tap one of these, and Safari will take you directly to the page in question. If your list of bookmarks is long, simply flick or scroll through the list.
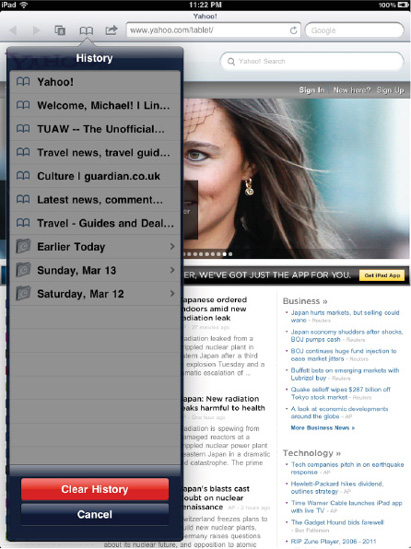
When you are on the first level of your bookmarks, you'll notice a History folder at the top. Tap it and you'll be taken to all the pages you've visited in Safari since you last cleared the history. To clear the history, tap the Clear History button, and you'll be asked to confirm. Tap the red Clear History button to confirm (Figure 6-16).
You'll also see a folder labeled Bookmarks Bar. Any bookmarks placed in this folder will appear in the Bookmarks bar that shows below the bottom of Safari's Navigation bar when you are entering a URL (shown earlier in Figure 6-5).
Note
The history of your desktop browser and iPad's Safari browsers do not sync. Any pages you navigate to on your iPad will not show up on your desktop's browsing history, and vice versa.
As Figure 6-15 shows, an Edit button appears at the top-right of the bookmark's pop-up field. Tap this to enter Edit mode (see Figure 6-17).

Figure 6.17. Safari contains a built-in bookmark-management system that allows you to edit and reorder your bookmarks.
Edit mode allows you to manage your bookmarks on your iPad just as you would on your personal computer:
Delete bookmarks: Tap the red Delete circle icon to the left of a bookmark to delete it. Tap Delete to confirm or tap elsewhere on the screen to cancel.
Reorder bookmarks: Use the gray grab handles (the three lines on the far right) to move folders and bookmarks into new positions. Grab, drag, and then release.
Edit names: Tap the gray Reveal arrow (the sideways V symbol to the right of each name) to open the Edit Bookmark or Edit Folder screen. Use the keyboard to make your changes and tap the Back button to return to the Bookmarks editor.
Re-parent items: You can move items from one folder to another by tapping the parent folder field below the Name edit field. Select a folder, and then tap the Back button to return to the Bookmarks editor. Unfortunately, you don't get the same wild animation that you do in Mail when you send an item to a new folder, but at least it works reliably.
Add folders: Tap New Folder to create a folder in the currently displayed bookmarks. The iPad automatically opens the Edit Folder screen. Here, you can edit the name and, if needed, re-parent your new folder. Tap Back to return to the editor.
Finish: Return to the top-level Bookmarks list (tap the Back button until you reach it), and then tap Done. This closes the editor and returns to your bookmarks list.
To save a new bookmark, tap the Share button in the Navigation bar of any Safari web page. It's just to the left of the Address field. A sharing pop-up menu appears, giving you four choices (see Figure 6-18):

Add Bookmark: Tapping this lets you enter a title for the bookmark and then optionally select a folder to save it to (see Figure 6-19). Tap the currently displayed folder to view a list of all available folders. The root of the bookmark tree is called Bookmarks. After making your selection, tap Save. Safari adds the new bookmark to your collection. If you want to return to Safari without saving, tap Cancel.

Add to Home Screen: This is a cool feature. Tapping this adds an icon of the web page to your iPad Home screen. Apple calls these web page icons Web Clips. Before you save a Web Clip, you have the option of renaming it. Keep the names short, so you can see the entire name under the Web Clip icon on the Home screen.
Note
Some web sites will have an iPad-optimized site icon when you add a Web Clip to your Home screen. Others will just show you a thumbnail of the page in the shape of an iPad icon.
Web Clips look just like app icons and allow you to simply tap to open Safari and automatically be taken to the web page. We keep a Home screen on the iPad full of our favorite Web Clips, so we can quickly navigate to our most frequently visited sites (see Figure 6-20). We find this much quicker than using the Bookmarks feature in Safari.

Figure 6.20. A series of Web Clips on the iPad Home screen. You can see which sites have dedicated Web Clip icons and which ones make iPad use a thumbnail of the web page.
In iTunes the Web Clips will appear in the virtual iPad screen on the Apps tab (see Chapter 2). Note that you can only rearrange Web Clips within iTunes, not delete them. To delete a Web Clip icon on the iPad, press and hold it until it jiggles, and then tap the X in the upper-left corner.
Mail Link to this Page: Tapping this button opens a new Mail message window in Safari and automatically inserts the link into the body of the message.
Print: Tap this button to bring up the Print menu (Figure 6-21). The Print menu allows you to select which wireless AirPrint printer you want to print to, as well as the number of copies you want to print. After you have made your choices, click the Print button.

Like many apps on the iPad, Safari can be customized to a degree. Customize your Safari settings by navigating to the Settings app on your iPad Home screen and tapping Safari. This screen, shown in Figure 6-22, allows you to control a number of features, mostly security related. Here's a quick rundown of those features and what they mean:

Search Engine: This setting determines which search engine is used for the search field you saw in Figure 6-3. Choose from Google, Bing, or Yahoo!
AutoFill: This allows you to turn on AutoFill for use in filling out forms on web pages. In the My Info box, select your address book card to take the AutoFill information from. Here you can also choose to turn on Names & Passwords. With this feature on, Safari will remember login names and passwords to web sites you visit. Tap Clear All to wipe all saved names and passwords from your iPad.
Always Show Bookmarks Bar: Turn this on, and you'll always see the Bookmarks bar below Safari's Navigation bar; otherwise, this bar appears only when you select the URL field (see Figure 6-5).
Fraud Warning: Turn this preference on, and you'll be presented with a warning before navigating to a potentially fraudulent web sites. Unfortunately, fraudulent sites are rampant on the Internet (like bogus PayPal sites). This feature helps you recognize and avoid those sites.
JavaScript: JavaScript allows web pages to run programs when you visit them. Disabling JavaScript means you increase overall surfing safety, but you also lose many cool and worthy web features. Most pages are safe to visit, but some, sadly, are not. To disable JavaScript, switch this from ON to OFF.
Block Pop-ups: Many web sites use pop-up windows for advertising. It's an annoying reality of surfing the Web. By default, Safari pop-up blocking is ON. Switch this setting to OFF to allow pop-up window creation.
Accept Cookies: Cookies refer to data stored on your iPad by the web sites you visit. Cookies allow web sites to remember you and to store information about your visit. You can choose to always accept cookies, never accept cookies, or accept cookies only "From visited" web sites.
Databases: You'll see this option only if you've visited a web site that uses database features such as those found in some Google sites, like Gmail. These databases store local information on your iPad for offline browsing.
Clear History: Tap and confirm to empty your page Navigation history from your iPad. This keeps your personal browsing habits private to some extent, although other people can still scan though your bookmarks.
Warning
Clearing your Navigation history does not affect Safari's Page history. You can still tap its Back button and see the sites you've visited.
Clear Cookies: Tap and confirm to clear all existing cookies from your iPad.
Clear Cache: Your iPad's browser cache stores data from many of the web sites you visit. It uses this data to speed up page loading the next time you visit. As with your cookies and history, your cache may reveal personal information that you'd rather not share. Tap Clear Cache and Confirm to clear your cache.
Tip
Clearing your cache may also help correct problem pages that are having trouble loading. By clearing the cache, you remove page items that may be corrupt or only partially downloaded.
Developer: Most people will never have to fuss with this setting. As its title suggests, it's for developers and allows them to turn on a debug console that helps them when optimizing their web sites for the iPad.
If you've ever watched a video on the Web, chances are the video was encoded using Flash. Ever since Apple unveiled the iPhone to the world, there has been growing tension between Apple and Adobe. The reason for this: Apple does not allow Adobe's proprietary Flash plug-in to run on the iPhone—or the more recent iPad.
Flash, in Apple's estimation, is a slow, buggy, and archaic technology. Steve Jobs himself even posted a letter on Apple's web site effectively telling the world the same thing (www.apple.com/hotnews/thoughts-on-flash/). His letter was the last nail in the coffin for anyone hoping to see Flash on the iPad or iPhone.
What many people misunderstand when they hear "no Flash on the iPad" is that they think the iPad can't play web videos. Nothing could be further from the truth. Sure, if a video is encoded in Flash, you can't view it on the iPad. And while most videos on the Web (about 75 percent of them, Steve Jobs says) are encoded in Flash, most are also available in a new, universal web standard called HTML5. HTML5 videos don't require a plug-in to play. HTML5 is also much less power hungry than Flash—an important feature when dealing with mobile devices that consume battery power.
The world is moving to HTML5, and Apple chose to support it—and open standards—instead of Adobe's aging and proprietary Flash. Most of YouTube's videos have already been reencoded to support HTML5, and many other major web sites have chosen to drop Flash in favor of the new HTML5 web standard.
The iPad turns browsing the Internet from something you did at your desk to something you can do in the comfort of your lap in your living room. In a way, browsing the Internet on the iPad gives web pages a tangibility they've never been capable of before—you can just reach out and touch them. It's very likely that, after using Safari on iPad to surf, you'll never want to explore the Web any other way.
Here are a few tips to keep in mind as you move on from this chapter:
iPads work in more ways than the traditional vertical, or Portrait, orientation. Go ahead and flip your iPad on its side to view web pages in Landscape mode. Your Safari pages will adjust.
Nope, there's no Flash support. There never will be. And you don't need it.
Web Clips are a great way to access your favorite web sites right from your iPad's Home screen.
Tap the top of any Safari page (right below the clock in the Status bar) to quickly return to the top of the web page.
Safari's page-management tool lets you navigate back and forth between several Safari windows at once. This functions similar to the way tabs function on desktop browsers.