
Installing GNS3 is only the first step on the road to creating projects; the second step is configuration. Fortunately, GNS3 has never been easier to configure, and you need to perform only a few tasks. In this chapter, I’ll cover the basic GNS3 configuration options you need to get IOS routers up and running using Dynamips.
The virtual Dynamips routers provided by GNS3 are emulated hardware devices. Like a freshly formatted PC hard drive, your virtual routers are patiently waiting for you to install an operating system so they can do something useful. What they need is Cisco IOS!
Before you can boot up a router, you’ll need to install and configure at least one Cisco IOS image file in GNS3, though you’re on your own when it comes to acquiring one. IOS is the intellectual property of Cisco Systems and not ordinarily available to the public. Additionally, because the GNS3 developers have no affiliation with Cisco, they can’t legally supply you with an IOS image either (so please don’t ask).
The simplest way to acquire an IOS image file is to copy an image from a Cisco router that you own. The upside to this approach is that you’re not stealing an image; you already have an IOS image that’s licensed for your router. The downside is that GNS3 supports only a few models out of the hundreds that Cisco manufactures, and your router may not be one of them. (See Appendix B for a complete list of compatible Cisco routers and hardware configurations.)
To copy an IOS image file from a router to a workstation, log on to your router and use the Cisco copy command to copy the image file from your router’s flash memory to an FTP server. If you don’t know the name of your IOS image file, you can use the show flash command on your router. In the following example, the IOS image filename is c7200-ios-version.bin; my FTP server is running on a PC with the IP address 192.168.1.25, and my FTP username and password are jason and mypass, respectively.
# copy flash:c7200-ios-version.bin ftp://jason:[email protected]When the command is executed from the router, the image file will be copied from the router’s flash memory to an FTP server running on 192.168.1.25 using the supplied credentials.
If you want to use TFTP instead, download a free TFTP server from the Jounin website (http://tftpd32.jounin.net/). When the server is installed and running, use the following tftp command to copy the file from your router to your TFTP server:
# copy flash:c7200-ios-version.bin tftp
Address or name of remote host []? 192.168.1.25
Destination filename [c7200-ios-version.bin]? <enter>
Press ENTER after Destination filename [c7200-ios-version.bin] to complete the copy.
If, on the other hand, you don’t own a Cisco router, there are more unsavory ways to find IOS image files, as you’ll surely find with a simple Internet search. While companies like Cisco and Juniper have turned a blind eye to this sort of thing in the past (as long as the software is used only for educational purposes), you may not want to use a bootleg version of Cisco IOS. Such images may work just fine, but there’s always the possibility that they contain malware or have been tampered with in unexpected ways.
Lastly, if you work for a large company that happens to be a Cisco partner, you should be able to log on to the Cisco website using your partner credentials and get any IOS image you desire. Be aware that this sort of activity could be grounds for marching you to the corporate gallows, so get permission before using your company account.
However you obtain an IOS image, you can use only image files that are designed for router models supported by GNS3, and some IOS versions for a given model may work better than others. If you find that a Dynamips router is acting persnickety, try swapping the IOS for a different version because this often corrects the problem.
Choosing the right router and IOS image is critical to creating stable projects. Recommended IOS versions are c36xx, c37xx, and c7200 (but not the c7200p) because these are the most stable versions for Dynamips and GNS3. Consider the IOS version number, as well. While new IOS versions provide the latest bells and whistles, older versions tend to use fewer PC resources, such as processor power and memory. If you’re creating simple projects for CCNA study, you might want to use an older IOS from the 12.2 or 12.3 train to conserve resources, but if you’re studying for your CCIE, you might need to install the newest IOS available.
Once you have an IOS image, you need to do a few things before you can start using your virtual routers. First, verify the path to Dynamips (this is specific to Linux). Next, copy your IOS images to a folder and then add the images to GNS3. Finally, set an Idle-PC value for each IOS image that you’ve added to GNS3. I’ll walk you through these steps now.
On Windows and OS X, the preferences should be set up for you, but on Linux you should verify that the path to the Dynamips application is correct. Go to Edit ▸ Preferences, select Dynamips, and click the General settings tab, as shown in Figure 3-1.
Verify that the Path to Dynamips field points to /usr/local/bin/dynamips. If you’ve installed the Dynamips application in some other directory, set the path to that directory instead.

Next, click the Advanced settings tab to display the settings in Figure 3-2.

The Dynamips Advanced settings options mostly relate to Dynamips stability and memory usage. As a rule you shouldn’t change them, but I’ll discuss the options so you can decide for yourself.
The Memory usage optimisation settings are all about conserving memory in your PC. The less memory Dynamips uses per router, the more routers you can add to your projects. The Enable ghost IOS support option reduces memory consumption in your PC by allocating one shared region of memory that multiple routers can use, as long as they’re running the same IOS image. This is a good reason to use the same router model multiple times in a project; using several different models, with different IOS versions, will eat up more of your PC’s memory. The Enable mmap support option allows the contents of router memory to be written to a file on your hard drive, similar to a cache or swap file. The Enable sparse memory support option reduces the amount of virtual memory used by your routers so you can run more router instances per Dynamips process.
Before you start creating projects using IOS routers, add at least one IOS image to GNS3. To add an IOS image, select Edit ▸ Preferences on Windows and Linux, or select GNS3 ▸ Preferences on OS X. Expand Dynamips from the pane on the left and click IOS routers, as shown in Figure 3-3.

Click New to start the wizard and then click the Browse button to locate your image file. After selecting your image file, you’ll be asked whether you would like to decompress the IOS image, as shown in Figure 3-4.
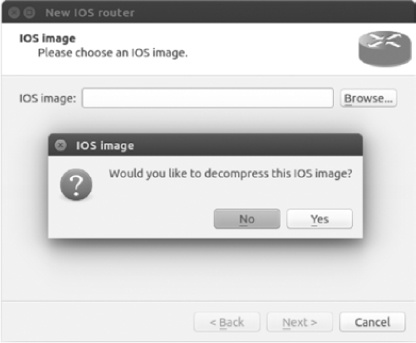
It’s a good idea to let GNS3 decompress your image files; otherwise, your routers will have to decompress the images every time a router loads. Decompressing the images ahead of time will make your routers boot much faster. After decompressing your image, click Next, and GNS3 will attempt to recognize the router platform that your IOS belongs to, as shown in Figure 3-5.

GNS3 has determined that my image file belongs to a c3745 router platform and has automatically named it c3745. If you think this is incorrect, you can use the Platform drop-down menu to choose another platform, but in my experience, GNS3 does a good job of getting this correct. You can change the name of your router to anything you like by entering a name in the Name field.
In general, from here, you can just click through all the configuration settings to configure a basic router model, but the wizard provides opportunities for you to customize router memory and other features during this process. For now, click Next to continue. You should be presented with the Memory screen, shown in Figure 3-6.

Your routers should run fine with the default memory setting. But if you’re unsure, click Check for minimum RAM requirements, and GNS3 will launch a web browser and take you to the Cisco Feature Navigator web page at http://www.cisco.com/. From here, you can search for your IOS image’s specific memory requirements. Enter that value in the Default RAM field. When you’re done, click Next, and you will be presented with the Network adapters screen, as shown in Figure 3-7.

The default setting configures your router with the same standard options that are provided with a real model of the same Cisco router. If you would like to add more interfaces, use the drop-down menu next to the available slots and choose the desired network modules. The slot options will be limited to actual options that are available in the real version of the Cisco router. When you’re done, click Next and choose any WIC modules that you would like to install. Then click Next again to display the Idle-PC screen, shown in Figure 3-8.
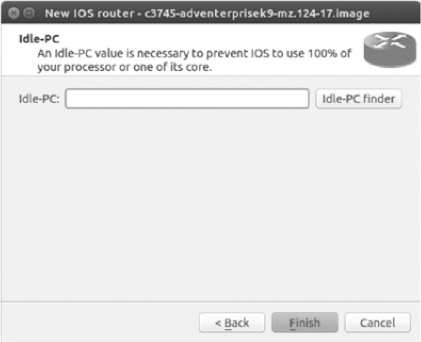
If you start a router in GNS3 without an Idle-PC setting, your computer’s CPU usage will quickly spike to 100 percent and remain there. This happens because Dynamips doesn’t yet know whether your virtual router is doing something that requires system resources, so it overcompensates by giving it all the resources it can. GNS3 will run sluggishly until this is corrected, and if CPU usage is left at 100 percent for a long time, your PC’s processor could overheat.
You can easily fix this by having GNS3 look for places in the IOS program code where an idle loop exists (idle loops cause the CPU to spike); the result of this calculation is called an Idle-PC value. When the proper Idle-PC value is applied, Dynamips should periodically sleep the router when these idle loops are executed, which greatly reduces CPU usage. If you don’t care about all the details, just remember that the Idle-PC value is what keeps Dynamips from eating your processor for lunch.
To have GNS3 automatically find a value, click the Idle-PC finder button, and GNS3 will attempt to search for a value. If GNS3 finds a suitable value, then you’re done; click Finish. If it’s unsuccessful, leave the field blank and click Next to save the router without an Idle-PC configuration.
If GNS3 is unable to find an Idle-PC value automatically, you’ll need to find one manually. You need to calculate an Idle-PC value only once per IOS image. GNS3 applies this setting to all virtual routers using that image file. Close the Preferences window, and drag a router from the Devices toolbar to your GNS3 workspace, as shown in Figure 3-9.

Next, boot the router by right-clicking the router icon and selecting Start; then verify that the IOS loads correctly by immediately right-clicking the router again and selecting Console. A Cisco console window should open and display the router’s boot messages. If the router boots correctly, you’re ready to begin the Idle-PC calculation; if not, make sure that the model and default RAM settings assigned to the router are correct, or try a different IOS image.
If you’re running Linux and a Cisco console does not appear after selecting Console, check your GNS3 Console Settings. Go to Edit ▸ Preferences, click General, and select the Console applications tab, as shown in Figure 3-10.
Using the Preconfigured commands drop-down menu, select your Linux terminal type and then click Set, Apply, and OK.
When the router boots, your computer’s CPU usage will quickly surge to 100 percent. Monitor your CPU usage so that after you’ve set an Idle-PC value, you can verify that your CPU usage has settled down. On Windows, press CTRL-ALT-DEL and click Task Manager to display CPU usage. On OS X, open the Activity Monitor program from the Applications/Utilities folder and click CPU. On Linux systems, use System Monitor or enter top at the terminal.

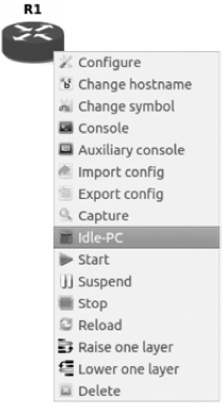
To begin calculating a value, right-click your router and select Idle-PC from the menu, as shown in Figure 3-11.
GNS3 should now calculate Idle-PC values and provide one or more values to choose from. This can take a minute, so give it time to display the results in the Idle-PC values window, shown in Figure 3-12.
If there is an asterisk (*) next to a given value, then GNS3 has determined that value to be the best, and you should choose it. Click Apply to choose the value, and recheck your CPU usage.
Occasionally, GNS3 miscalculates the value, and processor usage remains high. If this happens, try again using a different value from the drop-down menu, and click Apply again to choose the new value. If no asterisk is displayed, you’ll need to find a value that works using a simple trial-and-error method. When you’re done, click OK to save the value.

After a working Idle-PC value has been applied, you’re ready to create some projects!
Now that you’ve assigned one or more IOS image files to your routers and configured basic options in GNS3, you’re ready to begin working with your routers. You can select any virtual router displayed on the Routers Device toolbar. Give it a try. Drag a couple of routers to the workspace, start them up, and enter a few IOS commands.
Just like real Cisco routers, the limitations of your Dynamips virtual routers are determined by the IOS version they’re running. If you find that your router is missing an IOS command or that the syntax for a given command is not what you expected, you may need to try a different IOS version. If you’re studying for the CCNA or CCNP exam, this shouldn’t be an issue because those certifications require a fairly straightforward set of commands and features. If you’re studying for a CCIE or other advanced Cisco certification, you might need the latest IOS that supports a more robust set of features. When in doubt, visit the Cisco website to find out what features and capabilities are supported by a specific router model or IOS. Cisco’s Feature Navigator web page is an awesome tool that allows you to search for IOS information by features, technology, software, image, or product code, and it also allows you to compare software versions.
Now that you’ve assigned an IOS image and configured basic options in GNS3, let’s move on to creating projects!