
iDVD lets you burn movies and photos to DVDs, complete with menus you can fully customize.
Designers and photographers can use iDVD to assemble digital portfolios that they can hand out like brochures. Filmmakers and advertising professionals can distribute rough cuts of movie scenes and commercials to clients and colleagues. Businesspeople can create in-house training discs and video archives of corporate meetings. Videographers can offer DVDs of weddings and other events. And home-movie buffs can preserve and share family videos and photographs.
Creating a DVD involves choosing and customizing a menu design and adding the movies and photos you want to include on the DVD. You can perform these steps in any order and preview your work along the way. When you’ve finished, you can commit the final product to a shiny platter.
Creating a DVD with iDVD involves creating a new project document, choosing and customizing a menu design theme, and adding content. Here’s how to get started.
Choose File > New or click the Create a New Project button.
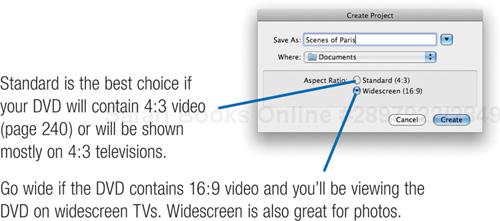
Name your iDVD project, choose an aspect ratio, then click Create.
Now what?
Choose a theme and fine-tune it if you like (pages 292–295). Add movies to your DVD (page 296). Create slide shows containing your photos (pages 298–301). Explore the authoring and menu-customizing features described later in this chapter. Preview your work as you go (page 293), then burn the final product (page 316).

A big part of creating a DVD involves choosing which menu theme you want. iDVD includes menu themes for many types of occasions and subjects: weddings, parties, vacations, kids, and more. Many of these themes have motion menus containing beautiful animations and background music.
In iDVD, all themes are designed for widescreen presentation. Although iDVD can’t yet burn high-definition discs, you can take advantage of the more cinematic 16:9 aspect ratio if you shot widescreen video. You can also create your project in the older 4:3 aspect ratio, if that better suits your movie formats and TV set.
Your design options don’t end once you’ve chosen a theme. Many of iDVD’s themes provide drop zones, special areas of the menu background into which you can drag photos or movies. Drop zones make it easy to customize a theme with your own imagery.
Most drop zones have special effects that iDVD applies to the photos or movies that you add to them. For example, the Reflection White theme puts your imagery in a set of 3D panels that glide like a moving art gallery. The Road Trip theme puts your imagery in a scrapbook—and if you look closely, you’ll see that the pages cast shadows on each other.
Most themes provide “dynamic” drop zones that move around the screen. And as the following pages describe, you have more options for managing the contents of drop zones.


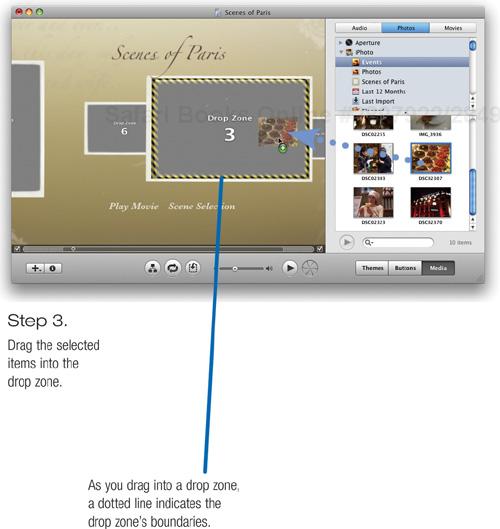
iDVD provides several ways to add items to drop zones. Here’s the technique you’re likely to use most often. For details on more drop zone techniques, see the following pages.
Click the Media button. Then, to access photos in your iPhoto library, click the Photos button. To access movies, click Movies.
In the photo or movie media browser, select the item or items you want to add. You can select multiple photos or an entire album. If you add multiple photos to a drop zone, iDVD displays them successively as the menu is displayed. You can add up to 99 items to a drop zone.

Previewing and Testing Your Work
As you work on a DVD, you’ll be anxious to see how the final product will look. To find out, use iDVD’s preview mode. Click the Preview button, and iDVD turns itself into a DVD player and starts playing your DVD.
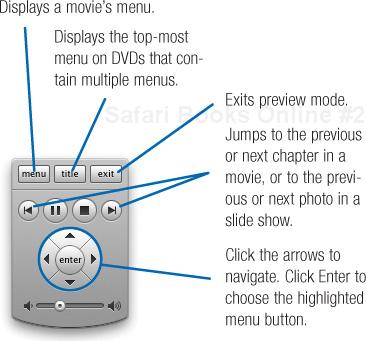
In preview mode, an on-screen remote control lets you navigate—choose menu buttons, jump to chapters, and watch the movies and slide shows you’ve added to your DVD.
Preview mode plays back whatever is displayed in iDVD’s window. If your main menu is visible, that’s what plays back. If you’re working on a slide show, the slide show begins playing.
Using iDVD’s preview mode is a great way to check your work, but you shouldn’t rely on it as your only testing tool. As you near the end of your project, create a disc image and use Mac OS X’s DVD Player program to test it (see page 316). Then burn a disc and test it in your DVD player.
Here are some tips for working with drop zones.
It’s important to understand the difference between drop zones and buttons. A drop zone is merely an area of imagery within a DVD menu—it isn’t a clickable button that your viewers can use to watch your DVD. A drop zone is a piece of eye candy; a button is a navigation control that plays a movie or slide show, or jumps to another menu.
How to tell the difference. As you drag items into the menu area, how can you tell whether you’re dragging into a drop zone or creating a button? Easy: When you’re dragging into a drop zone, a dotted-line pattern appears around the edges of the drop zone, as shown on the previous page.
If you don’t see this pattern, you aren’t in the drop zone, and you’ll end up creating a button or changing your DVD’s background image. If that happens, head for the Edit menu and choose the Undo command.
In most themes, drop zones are dynamic—they move around on the screen or they appear and disappear as a motion menu plays.
How do you add items to a drop zone that’s behind another drop zone or not even visible?

(If you don’t see the motion playhead, choose Show Motion Playhead from the View menu.)

movies to drop zones by dragging them into the editor.
You can also display the drop zone editor by choosing Edit Drop Zones from the Project menu.
Autofill. Want quick results? Let iDVD do the work. Choose Project > Autofill Drop Zones, and iDVD fills all drop zones with images from the media in your DVD. You can fine-tune the results if you like.
Older themes. Both the motion playhead and drop zone editor also work with iDVD’s older themes.
Many iDVD themes provide introductory animations. For example, in the Vintage Vinyl theme, the stack of album sleeves slides into position before the menu buttons become visible.
These animations are cute, but you might not always want to use them. They’re fine on a DVD’s main menu, but on a submenu (such as a scene selection menu for a movie), they slow down your DVD’s users, who must wait for the animation to finish before they can access the menu’s buttons.
Solution: Turn off the introductory animations when you don’t want them. Just click the little check box at the left edge of the motion playhead. Or, display the Menu Info window and uncheck the Intro or Outro boxes.
You can also add items to a drop zone by dragging them from the Finder: simply drag the items’ icons into the drop zone or drop zone editor. And you can drag photos from iPhoto and other programs directly into a drop zone.
Another way to add items is from the shortcut menu: Control-click within a drop zone, and choose the Import command; or, choose Fill with Content to grab media used elsewhere in the project.
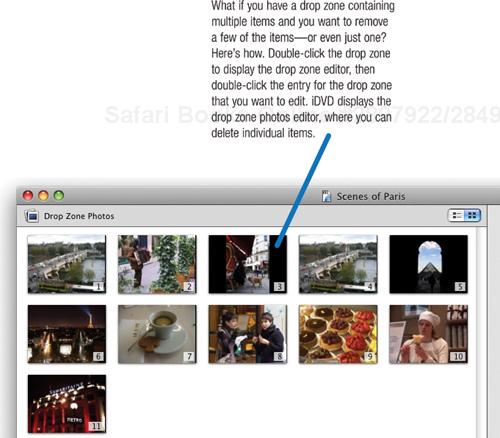
To remove the contents of a drop zone, drag the item out of the drop zone. When you release the mouse button, the item disappears in a puff of smoke. As an alternative to dragging, you can also Control-click within the drop zone and choose Clear Drop Zone Contents from the shortcut menu.
You can also use the drop zone photos editor to rearrange the order in which items in a drop zone are displayed: just drag the items around. And you can add items to a drop zone by dragging them into its editor.
In the Media pane, click the Movies tab and select an iMovie project that’s been shared to the media browser. Drag the shared movie into a drop zone.
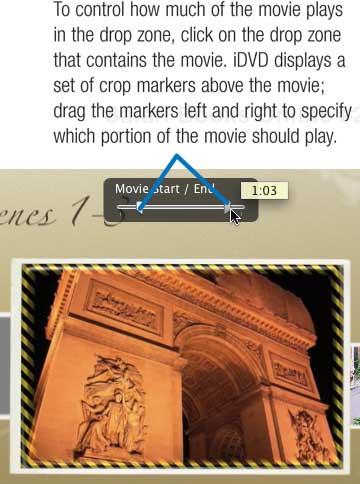
What if you want to use just part of a video clip in a drop zone? You can’t use iMovie’s cropping or trimming features to indicate which portion you want to keep. That’s because these features don’t actually delete any video; they simply tell iMovie which parts you want to use. If you drag a cropped clip into an iDVD drop zone, the entire clip plays in the drop zone.
If you have a drop zone that contains multiple items, you can quickly scan through the drop zone’s contents without having to open up the drop zone editor. Click on a drop zone, and a small slider pops up; to scan through the drop zone’s items, drag the slider back and forth. If, while browsing, you decide to rearrange the drop zone’s contents, click the Edit Order button below the slider.

When you’ve added movies or high-resolution photos to a menu’s drop zones, you may see and hear some problems when you preview the menu: the drop zones’ motion may appear jerky, and the menu’s background audio may break up as it plays.
Not to worry—these problems won’t occur on your final DVD. Indeed, the problems often go away once the menu has had a chance to play through once.
iDVD’s job is to integrate and present assets from other programs. The assets you’re most likely to add to your DVDs are movies you’ve created in iMovie or another video-editing program, such as Apple’s Final Cut Express or Final Cut Pro.
You can add movies to your DVDs using a couple of techniques. iDVD can accept movies in just about any QuickTime-compatible format (for some examples of movies you can’t use, see page 318). You can also use 16:9 movies in either HDV or DV Widescreen format. If you use high-definition movies, however, note that iDVD will convert them to standard-definition for display—not because it wants to, but because it has to. Today, the high-definition DVD landscape is still in flux, with a couple of standards vying for acceptance.
In the meantime, your high-definition movies will still play in all their widescreen glory if you play your DVD on a widescreen TV set. On a conventional TV, they’ll play in letterboxed format.
Video on a DVD is compressed, or encoded, into a format called MPEG-2. As the sidebar on the opposite page describes, iDVD performs this encoding either as you work or after you click the Burn button.


Drag the desired movie into your DVD’s menu area.
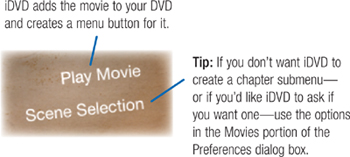
If the movie contains DVD chapter markers, iDVD creates two buttons: one named Play Movie and another named Scene Selection. If the movie lacks DVD chapters, iDVD simply creates one button, giving it the same name as the movie itself. To rename any button, select it and edit the name.
You can also add a movie by dragging its icon from the Finder into the iDVD window, or by choosing File > Import > Video. These techniques are convenient if you store your movies on an external hard drive and you don’t feel like adding the drive to the movie browser using the Preferences command.
You can also use the media browser to add video clips from your iTunes or iPhoto libraries (although you can’t burn your video purchases from the iTunes store). For more details on using digital camera movies in iDVD projects, see page 318.
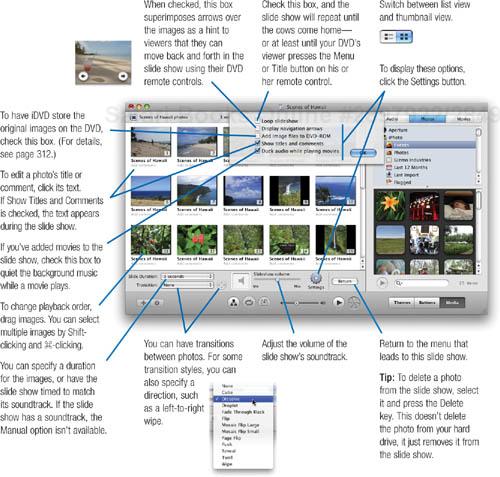
iDVD slide shows are a great way to share photos. Even low-resolution photos look spectacular on a television screen, and they can’t easily be copied and redistributed—a plus for photographers creating portfolio discs. (You can, however, opt to include the originals on the disc, as described in “The DVD-ROM Zone” on page 312.)
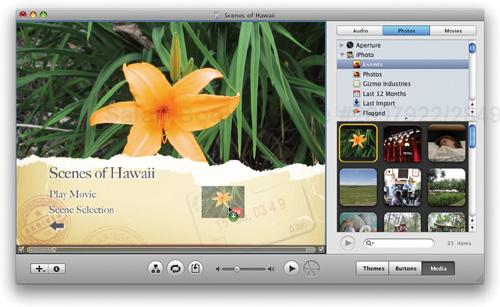
iDVD provides a few ways to create a slide show. You can use iDVD’s photo browser to drag a few photos or an entire album or event into the iDVD window. You can also use the Send to iDVD command in iPhoto to send an album, an event, a selection of photos, or a saved slide show to iDVD. And you can manually drag photos from iPhoto (or anywhere else) into iDVD’s slide show editor.
As the following pages describe, you can give your slide shows background music from your iTunes library and fine-tune other aspects of their appearance. You can also choose to have transitions between images; iDVD gives you twelve transition styles from which to choose (see page 300).
Each image in a slide show can be any size and orientation; however, vertically oriented images will have a black band on their left and right edges.
Slide shows aren’t even limited to still images. Sprinkle movies into them, too. Make a slide show containing just movies if you like. Try that with your slide projector.
In iPhoto, create an album that contains the photos you want in the slide show, sequenced in the order you want them to appear (see page 146). You can also create a slide show from an entire event’s worth of photos.

Locate the desired album or event and drag it into the iDVD menu area.
Tip
Be sure you don’t drag the album or event into a drop zone; see “Working with Drop Zones” on page 294.
iDVD creates the slide show and a menu button for displaying it. iDVD gives the button the same name as the album or event, but you can rename the button to anything you like.
You can send photos to iDVD from within iPhoto, and with a couple of different options.
Saved slide show. If you’ve created a saved (cinematic) slide show, you can add it to iDVD and retain its custom Ken Burns moves and other goodies. In iPhoto, select the saved slide show in your Slideshows list. Then, choose Send to iDVD from the Share menu. iPhoto creates a video version of the slide show and ships it off to iDVD.
If you need to revise the slide show, first delete it from your iDVD project. (Select its button and press Delete.) Then, return to iPhoto, make your changes, and choose Send to iDVD again.
If you create a 16:9 (widescreen) slide show in iPhoto, iDVD displays it in widescreen format.
Basic slide show. Here’s the technique to use if you don’t need Ken Burns moves and you’d prefer the advantages of a DVD slide show (for example, more efficient use of disc space and the ability to easily include original images on your disc). In iPhoto, select an album or a series of photos. Then, choose Send to iDVD from the Share menu.
You can revise this type of slide show directly within iDVD using the techniques on the following pages.
You can also create a blank slide show and then manually add photos to it. You might use this technique to add photos that aren’t stored in your iPhoto library.
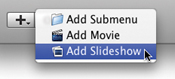
Choose Add Slideshow from the pop-up menu or choose Project > Add Slideshow (![]() -L).
-L).
iDVD adds a button named My Slideshow to the currently displayed menu. Rename this button as desired.
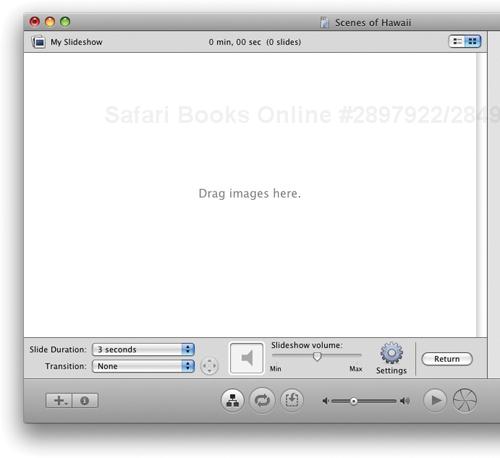
When you create a DVD slide show, you can fine-tune it using the slide show editor. To display the editor, double-click the slide show’s menu button or icon in Map view.
You can add a music track to a slide show. One way to add music is by using the iTunes browser in iDVD. Click the Media button, then click the Audio button. Locate the song you want (use the search box if need be), then drag it to the Audio well. To add an entire playlist, drag it to the Audio well.

You can also drag a song directly from the iTunes window or, for that matter, from any folder on your hard drive. And you don’t even have to drag an audio file: if you drag a QuickTime movie to the Audio well, iDVD will assign its audio to your slide show.
If you create a slide show by dragging an iPhoto album into the iDVD window (or by choosing Send to iDVD while an album is selected in iPhoto), the slide show will retain whatever song was assigned to it in iPhoto. (For details on assigning songs to albums, see page 182.)
Music and timing. How iDVD matches your soundtrack to your slides depends on the option you choose from the Slide Duration pop-up menu. If you choose a specific duration, such as five seconds per slide, iDVD repeats your soundtrack if its duration is shorter than the slide show’s total length. If the soundtrack is longer than the slide show, iDVD simply stops playing the soundtrack after the last slide displays. (To have the music fade at the end of the slideshow, use the Slideshow portion of the Preferences dialog box.) And if you choose the Fit to Audio option, iDVD times the interval between image changes to match the soundtrack’s duration.
To remove a slide show’s background music, drag the icon out of the Audio well. When you release the mouse button, the icon vanishes in a puff of smoke.
When you want to create a DVD in a hurry, use the Magic iDVD feature.
Magic iDVD presents you with a single window containing a list of menu themes, a set of drop boxes for holding movies and photos, and a media browser for accessing your audio, photos, and movies.
Choose a theme, then drag movies into the drop boxes. To create DVD slide shows, drag photos to the drop boxes. Drag an entire event or album from iPhoto or build a slide show one photo at a time by dragging individual photos into the same box. Want a music soundtrack for a slide show? Drag an audio track into the slide show’s drop box.
When you’re done, preview your work by clicking the Preview button and using iDVD’s standard preview features (page 293). Then click the Burn or Create Project buttons, and iDVD builds your project for you, even creating chapter submenus for movies containing DVD chapters (page 297).
Magic iDVD may be all you need for many projects. And if you need to customize or enhance the DVD it creates, you can bring the rest of iDVD’s authoring features to bear. Indeed, Magic iDVD is a great way to rough out a project that you plan to refine later.
Here’s how to make DVD magic.
iDVD provides two ways to go from zero to DVD with very few steps. Which method should you use, and when?
When to go OneStep. Use OneStep DVD when you want to burn just one movie to a DVD and you don’t need navigation menus. When you use OneStep DVD, you don’t have the opportunity to customize menu designs—there aren’t any. As page 305 describes, OneStep DVD creates an autoplay, or kiosk-mode, DVD: the disc begins playback as soon as you insert it into a computer or DVD player.
When to go Magic iDVD. Use Magic iDVD when you want navigation menus and more than one piece of content on your DVD—for example, a couple of movies and some slide shows.
Choose File > Magic iDVD.
Edit the DVD title.
Choose a theme for the DVD by clicking one of the theme thumbnails. (To access additional themes, use the pop-up menu above the row of thumbnails.)
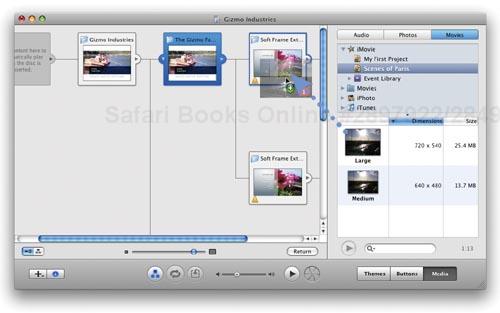
To add video to the DVD, click the Movies button in the Media pane, then drag one or more movies into the drop boxes.

Tips
You can also drag movies directly from folders on your Mac’s hard drive. (To have iDVD list movies from other folders in its media browser, use the Preferences command as described on page 296.)
Need to add multiple movies? Simply Shift-click or
 -click on each one to select the movies, then drag them as a group, as shown on the opposite page. When you release the mouse button, each movie appears in its own drop box.
To add a slide show to the DVD, drag photos into the photos drop boxes. Each box represents a different slide show.
Tips
You can drag albums or events from iPhoto, or folders of photos from your hard drive or a CD. If you like to overwork, you can drag individual photos to a drop box, one at a time. You can also combine approaches. For example, you can drag an entire album or event to create a slide show, then drag individual photos to that slide show’s drop box to add them to the show.
And just as you can add multiple movies at once, you can create multiple slide shows at once. Shift-click or
-click on each event or album in the Photos media browser, then drag the items as a group. Each item becomes its own slide show.To add music to a slide show, drag an audio file from the Audio media browser (or elsewhere on your hard drive) to the slide show.
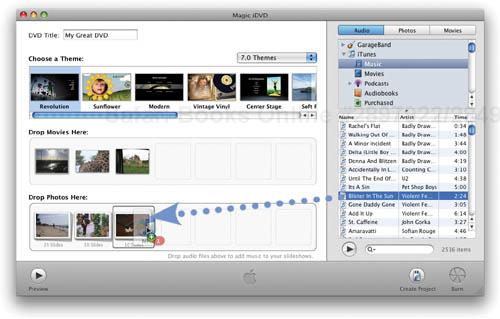
A speaker icon appears on the slide show’s thumbnail to indicate that it has a soundtrack.

Preview or finish up.
Check your work. To preview the DVD, click the Preview button. When you exit preview mode, you return to the Magic iDVD window.
Ready to bake. If you’re happy with the job Magic iDVD has done, click the Burn button. iDVD creates a project containing your content, then immediately switches into burn mode. (For burning details, see pages 314–317.)
Further refinement. If you want to refine the project—for example, to customize some menus or refine your slide shows—click the Create Project button. iDVD creates a project that you can customize using the techniques described throughout this chapter.
When creating a DVD, you’re also designing a user interface. If your DVD contains a couple of movies and a slide show, the interface will be simple: just one menu containing a few buttons.
But if your DVD will contain a dozen movies and another half-dozen slide shows, it will need multiple menus. And that means that you’ll need to think about how to structure a menu scheme that is logical and easy to navigate.
As you plan a complex DVD, consider how many buttons each menu should have. In iDVD, a menu can have up to 12 buttons. That’s a lot—too many choices for a main menu. If you have several movies and slide shows to present, it’s better to create a set of submenus that logically categorize your content.
It’s a balancing act: create too few menus, and you present your viewers with a daunting number of choices. Create too many, and you make them spend time navigating instead of viewing.
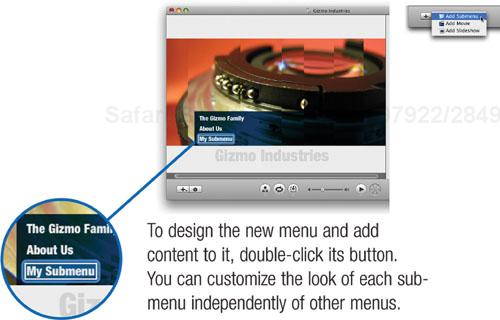
All of the new themes in iDVD ’08 are designed with submenus in mind. You don’t have to use these themes for projects containing submenus, but at least note their underlying philosophy: it’s a good idea for a submenu to share some common design traits with the menus that lead to it.
If your DVD will be presenting a large number of movies or slide shows, you need to plan how you will make that content available to the DVD’s user. How many menus will you need? How will you categorize the content in each menu? This process is often called information design, and it involves mapping out the way you want to categorize and present your content.
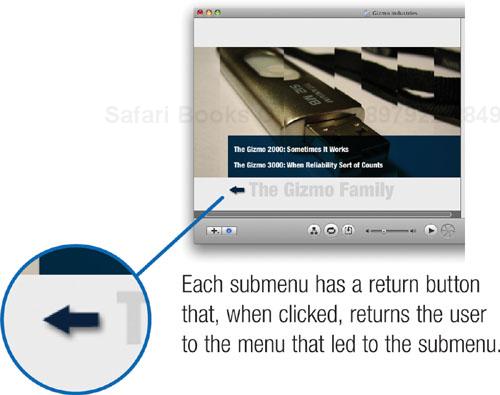
A good way to map out a DVD’s flow is to create a tree diagram depicting the organization of menus—much as a company’s organizational chart depicts the pecking order of its management.
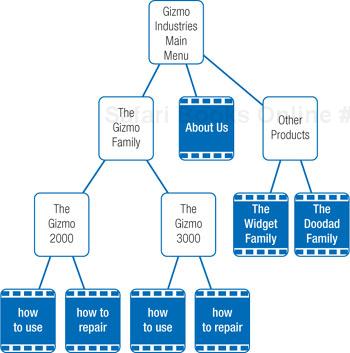
The chart shown here depicts the flow of a DVD a company might create to promote its new Gizmo product line. A main menu contains three buttons: two lead to other submenus, while the third plays a promotional movie about the company.
The submenu “The Gizmo Family” leads to two additional submenus, one for each Gizmo model. The “Other Products” submenu leads to two movies that promote other fine products.
The design themes built into iDVD look great and, in some cases, sound great, too. But you might prefer to not use off-the-rack designs for your DVDs.
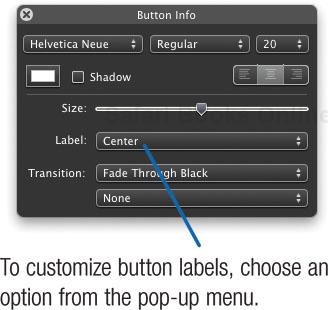
Maybe you’d like to have a custom background screen containing your company logo or a favorite vacation photo. You might like the background image of a particular iDVD theme, but not its music or its buttons’ shape or typeface. Or maybe you’d just like to have the title of the menu at the left of the screen instead of centered.
You can customize nearly every aspect of your DVD’s menus and navigation buttons. With the Buttons pane and the Menu Info window, you can modify buttons, add and remove background audio, change a menu’s background image, and more.
You can also create text labels—for example, some instructions for DVD newbies or a few lines of commentary about the DVD’s subject.
iDVD ’08 provides more menu customizing options than did earlier versions. You can even have a different shape and style for each button on a menu. As with all design tasks, restraint is a virtue. Have fun with your menu designs, but don’t lose sight of the menu’s main purpose: to provide convenient access to your DVD’s contents.
Normally, iDVD positions buttons on a fixed grid. This keeps them lined up nicely, but you can also manually specify a button’s location—perhaps to line it up with a custom background image.
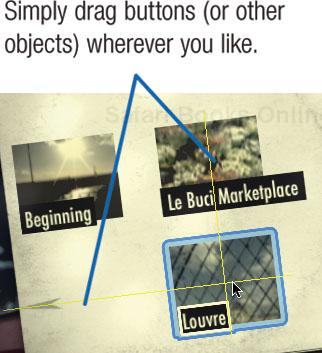
When you drag a button or other object, iDVD displays positioning guides to help you align items. (You’re free to ignore these guides.) If you want to return to the fixed grid, click the Inspector button, then, in the Menu Info window, click the Snap to Grid.
You like a particular motion menu but you don’t want to use all of it. Maybe you don’t need all eight drop zones in the Reflections themes. Just shorten the menu’s duration. Go to the Menu Info window, then drag the Loop Duration slider until the menu is the desired length.
This technique works best with themes that don’t have background music, so either choose a theme that lacks music or delete the music (see page 308).
To add descriptive text, captions, or instructions to a menu, choose Add Text from the Project menu (![]() -K). A text area appears; drag it to the desired location, then click within that text area, and type. To start another line, press Return.
-K). A text area appears; drag it to the desired location, then click within that text area, and type. To start another line, press Return.
To format the text, choose a font and size from the pop-up menus that appear below it, or use the Inspector window; see the opposite page.
iDVD displays the Apple logo watermark on each menu screen. To get rid of it, choose Preferences from the iDVD menu, click the General button, and then uncheck the Show Apple Logo Watermark box.
TV sets omit the outer edges of a video frame—a phenomenon called overscan. To make sure buttons and other menu elements will be visible on TV sets, choose the Show TV Safe Area command in the View menu, and avoid putting buttons or other elements in the shaded area.
Get links to more iDVD menu themes. www.macilife.com/idvd

To change the background image of an iDVD menu, simply drag an image into the menu area. For the best results, be sure to use a photo with proportions that match your project’s aspect ratio: 4:3 for standard television or 16:9 for widescreen or HD television. You can ensure these proportions when cropping in iPhoto: from the Constrain pop-up menu, choose 4 x 3 (DVD) or 16 x 9 (HD).
Tips
Some photos make better backgrounds if you reduce their brightness and contrast so the image doesn’t overwhelm the buttons. In iPhoto, duplicate the image and then adjust the brightness and contrast of the duplicate.
If you replace the background on a theme that has a drop zone, the drop zone remains. To remove drop zones after replacing a background, go to the Menu Info window and uncheck the Show Drop Zones and Related Graphics box.
Want a plain white background? You can download one from www.macilife.com/idvd. You can also make your own patterned or solid-colored backgrounds in a program like Photoshop Elements. Create a graphic with dimensions that are 640 by 480 pixels (854 by 480 pixels for widescreen), save it as a JPEG image, and then drag it into iDVD.
If your project contains several menus, you can apply one menu’s custom design to other menus in the project; see page 309.
And, if you decide you’d rather just have the theme’s original background, simply drag the custom background’s image thumbnail out of the Background well (above the Loop Duration slider) in the Menu Info window.
To change a button’s shape, select it and display the Buttons pane.
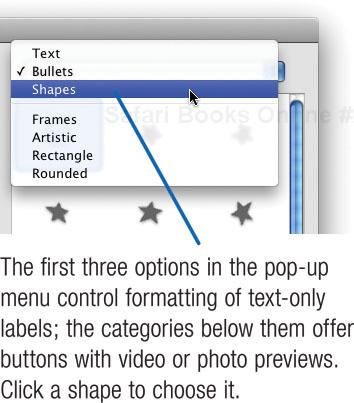
You can also control the size of the buttons by dragging the Size slider.
When you choose a button shape, your buttons consist of text labels and little thumbnail images or movies. In the Button Info window, you can change where a button’s text labels appear in relation to the button’s thumbnail image.
To add a soft shadow to some text, select the button or label and click the Shadow box.
Each button style has its own style of highlight, which appears when a user selects the button. To change the highlight color, click the Highlight Color well.
You can also change the font, font color, and type size for button text and for the menu’s title and any text you’ve added. If you don’t like the results, choose the Undo command as many times as needed to get back to where you started.
Tip
To format all of a menu’s buttons at once, select them all first. Click on one button, then press ![]() -A. Similarly, to select every text item you’ve added, click one item and then press
-A. Similarly, to select every text item you’ve added, click one item and then press ![]() -A.
-A.
To return the buttons to the theme’s style, select them and choose Advanced > Reset Object to Theme Settings.
You can have a transition between menus. For example, when your DVD’s viewers choose a button to go to a movie, you can have the menu appear to peel away to reveal the movie.
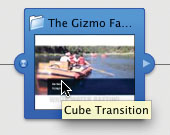
You can choose from a dozen different transition styles. For menu transitions, I’m partial to cube, page flip, or wipe—each conveys the notion of moving from one area to another.
You create menu transitions by assigning them to buttons. You can assign a different transition to every button in a menu, but in the interest of good taste, it’s better to stick with just one or two different transition styles. For example, you might choose the cube transition for buttons that go from one menu to another, and the fade through black transition for buttons that lead directly to movies and slide shows.
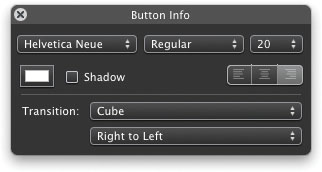
To assign a transition to a button, select the button and then choose the desired transition from the Transition pop-up menu in the Button Info window. Some transitions, such as cube, also allow you to specify a direction—set this by choosing from the second Transition pop-up menu.
Varying the direction of transitions can be a nice way to add variety without resorting to using a lot of different transition styles. For example, when a viewer chooses a button to go to a slide show, you might have a cube that rotates to the left. For a different button that leads to another menu, you might have a cube transition that rotates downward.
Tip
If you’ve mixed and matched transitions and decide you’d prefer to use just one transition style, you don’t have to change the transitions one button at a time. Just use iDVD’s map view to change the transitions in one fell swoop; see page 311.
To move a button from one menu to another, select the button and choose Cut. Next, move to a different menu (use map view to get there in a hurry), then paste.
You can also copy a button instead of pasting it. You might do this to provide access to a piece of content from several different menus.
For example, say you’ve created a series of online help screens in the form of a slide show. To make the online help available from every menu in your DVD, copy its button and then paste it into each menu.
After adding numerous items to a DVD, you realize that a particular menu has too many buttons. The solution: move some of those buttons to a new menu. But don’t wear out your wrists cutting and pasting. Just select the buttons you want to move (Shift-click on them), then sprint up to the Project menu and choose New Menu from Selection. iDVD removes the selected buttons and stashes them in a new menu.
You might like the look of a motion menu, but maybe you don’t want any music or sound effects to play. To silence a motion menu, go to the Menu Info window and drag the Menu Volume slider to its leftmost position. If you change your mind, raise the volume level. To silence the menu for good, drag the icon out of the Audio well, and it disappears in an animated puff of smoke.
Conversely, maybe you would like some background audio to play, but you don’t want motion in your menus. First, choose a theme that lacks motion, or replace an existing motion theme’s background with a static image. Next, drag an audio file, iTunes playlist, or QuickTime movie into the Menu pane’s Audio well. To hear the audio, click the Motion button. A menu can play for up to 15 minutes before it loops.
In many themes and button styles, iDVD also applies motion to your movie buttons: small, thumbnail versions of the movies play back when the menu is displayed.
You can even specify which portion of the movie plays: just drag the slider that appears above the movie or in the Button Info window.

There are times when you might not want a movie’s button to be a thumbnail movie. Maybe the movie thumbnail distracts from the motion menu’s background. In any case, simply enable the Still Image checkbox. Now use the slider to choose a static thumbnail image for the movie.
If you’re using a theme that has text-only buttons, you can add motion or thumbnail buttons by choosing a different button style in the Buttons pane.
Your project contains several menus and you’ve customized one of them. Now you decide you’d like to apply your design to all the menus in your project. Easy: choose Apply Theme to Submenus from the Advanced menu.
Conversely, if you’ve customized a submenu and want to apply that design to the project’s other menus, choose Apply Theme to Project.
You’ve changed a button’s text and color, and would like to apply that formatting to other buttons. Easy: select the formatted button and choose Edit > Copy Style. Then select one or more other buttons and choose Edit > Paste Style.
Happy with the results of a menu-design session? Save your customized theme as a “favorite,” and you can apply it to future projects with one mouse click.
Choose Save Theme as Favorite from the File menu. If you have multiple user accounts on your computer, you can make the custom theme available to all users: check the Shared For All Users box.
The new theme appears in the Themes pane. To see it, choose Favorites or All from the themes pop-up menu. On your hard drive, saved themes are stored in your home directory in the following path: Library > Application Support > iDVD > Favorites. Shared themes are stored in the same path at the root level of the drive.
To have a menu’s audio fade out at the end of the menu loop, enable that feature in the General portion of the Preferences dialog box.
Want to go beyond the themes that are built into iDVD? Try out some of the themes from DVDThemePak (www.DVDthemepak.com). The company offers more than a dozen theme and button collections. They look great and are inexpensive.
iDVD’s map view lets you see the organization of your DVD project using a display that looks a lot like the organizational chart depicted on page 304.
In map view, you can see at a glance how your project is organized. More to the point, you can get around quickly. By double-clicking the icons in map view, you can jump to a specific menu or preview a slide show or movie. Need to drill down into a deeply nested submenu to do some design work? Display the map, then double-click the submenu’s icon.
Map view is about more than just seeing the big picture. You can use it to rearrange submenus, change menu themes, create menu transitions, and add content to your DVD. You can also use map view to loop a slide show or movie so that it plays over and over again. And you can use map view to have a movie or slide show start automatically when your DVD is played.
To switch to map view, click the Map button. To exit map view, click the Map button again, double-click an icon in the map, or click the Return button in the lower-right corner of the map.

When you’re on the road, sometimes you need the big picture and sometimes you need street-by-street details. Map view provides this flexibility, and then some.

To customize a menu in map view, select the menu by clicking it once. To change the menu’s theme, use the Themes panel. To change the menu’s background, audio, drop zones, or text formatting, use the Menu Info window. To change the appearance of all buttons on a menu, use the Buttons pane; to set a transition, use the Button Info window.
Here’s the best part: you can customize multiple menus at once. Just Shift-click on each menu you want to change, and then use the panes to make your changes.
Note
When you use map view to specify a transition for a menu, every button on that menu will use the same transition. If you want a different transition for some of the menu’s buttons, assign a transition to each button individually as described on page 308.
Want to move a slide show or other item to a different menu? Simply drag the item’s icon to another menu.
To see which transitions a menu uses, point to the menu’s icon, and a description of the transition appears.
To add content to an existing menu, drag it from the media browser or the Finder to the menu’s icon.
If you drag a movie or iPhoto album to an existing menu, iDVD creates a button for that item.
You can also change a menu’s background image using the map: just drag a single image to the menu’s icon. (For more details on customizing menu backgrounds, see page 307.)
To have a movie or slide show loop (play over and over), select its icon and choose Loop Slideshow from the Advanced menu.
(When you aren’t in map view, you can specify looping by selecting a movie’s or slide show’s menu button and choosing Loop.)
On many DVDs, a movie appears when the DVD begins playing—an FBI warning, for example, or a movie-studio logo.
You can use map view to add this AutoPlay content to your DVD. Simply drag a movie, a photo, a set of photos, or an entire iPhoto album to the project icon.

If you drag photos to the project icon, you can double-click the project icon to open the slide show editor where you can specify transitions and add background music (page 300).
Don’t want an AutoPlay item after all? Just drag it out of the project icon, and it disappears in a puff of pixel smoke.
One of the reasons why the DVD format is so versatile is that it can accommodate not only video, sound, and pictures, but also any disk files that you may want to distribute.
Here’s the scoop on this aspect of DVD authoring, along with a peek under the hood to see how MPEG-2 compression manages to squeeze up to two hours of video onto a 4.7GB DVD.
A DVD can hold more than video and slide shows; it can also hold “computer files”—Microsoft Word documents, PDF files, JPEG images, and so on. You might take advantage of this to distribute files that are related to your DVD’s content.
If you’ve created an in-house training DVD for new employees, you might want to include a PDF of the employee handbook. If you’ve created a DVD containing a couple of rough edits of a TV commercial, you might also include some PDFs that show the print versions of your ad campaign. If you’ve created a DVD promoting your band, you might include some audio files of your tunes.
When a DVD-Video disc also contains files intended to be used by a computer, it’s said to have a DVD-ROM portion. If users play the DVD in a living-room DVD player, those files are invisible. However, if they use that same DVD with a personal computer, they can access the files.
As described on page 300, when creating DVDs containing slide shows, you can have iDVD copy the original images to the DVD-ROM portion. In the slide show editor, click Settings, then check the box labeled Add Image Files to DVD-ROM.
This option is ideal for photographers who want to distribute high-resolution versions of their images along with slide shows. You might also find it a useful way to back up a set of digital photos. The slide shows serve as a handy way of viewing the images, while the original, high-resolution files are archived in the DVD-ROM portion of the disc.
Note
If your slide show includes raw-format photos from iPhoto, iDVD includes both the raw-format originals and the JPEG stand-ins that iPhoto created. If you’d rather not include the raw originals (or the JPEGs), save your DVD as a disc image and edit the contents of the disc image as described on page 317.
To add other types of files to your DVD, choose Edit DVD-ROM Contents from the Advanced menu. Use the DVD-ROM Contents window to manage and organize the contents of the DVD-ROM folder.

MPEG: Compressing Space and Time
One of the jobs iDVD performs is to compress your movies into MPEG format, the standard method of storing video on DVD-Video discs. Like image and audio compression, MPEG is a lossy format: the final product lacks some of the quality of the original. But as with image and audio compression, the amount of quality loss depends on the degree to which the original material is compressed.
Like JPEG, MPEG performs spatial compression that reduces the storage requirements of individual images. But video adds the dimension of time, and MPEG takes this into account by also performing temporal compression.
The key to temporal compression is to describe only those details that have changed since the previous video frame. In an MPEG video stream, some video frames contain the entire image; these are called I-frames. There are usually two I-frames per second.

An I-frame describes an entire scene: “There’s a basketball on a concrete driveway.”
Sandwiched between those I-frames are much smaller frames that don’t contain the entire image, but rather only those pixels that have changed since the previous frame.

“It’s rolling toward the street.”
To perform temporal compression, the video frame is divided into a grid of blocks, and each square is examined to see if anything has changed. Areas that haven’t changed—such as the stationary background in this example—are simply repeated in the next frame.
This is why video with relatively little motion often tends to look better than video that contains a great deal of motion. When little changes from one frame to the next, the quality of each frame can be higher.

You’ve massaged your media and made your menus. What’s next? Burning the final product onto a blank DVD. Simply click iDVD’s Burn button and insert a blank disc. But before you burn, read the following tips.
Before you insert that pricey blank DVD, preview your work by clicking iDVD’s Preview button. Use the iDVD remote control to step through your menus and spot-check your video, slide shows, and any menu transitions you’ve added. And don’t forget to proofread your menu titles and button text.
Before you burn, consider creating a disc image, a kind of virtual disk that can be extremely useful for testing and burning. You’ll find full details on working with disc images on page 316.
If your DVD has a lot of menus, transitions, and content, consider creating a disc image and using Mac OS X’s DVD Player program to test it. And if you have a slower Mac—or just seem to have trouble burning reliably—creating and burning a disc image can be a great way to increase your success rate.
Note
If you will be burning a dual-layer DVD, do not try to burn it from a disc image. For details, see page 316.
When burning a DVD, avoid running complex programs that put a lot of demands on your system. Recording a track in GarageBand while also burning a DVD is not a good idea, for example. Also, consider turning off file sharing and quitting any disk-intensive programs.
Several types of writable DVD media exist: DVD-R, DVD-RW, DVD+R, and DVD+RW. Previous versions of iDVD could handle the DVD-R format only, but iDVD is now much more versatile. It can burn any of the aforementioned formats, assuming your DVD burner supports them. Most of the SuperDrives in today’s Macs can; older SuperDrives support the DVD-R and DVD-RW formats only.
The differences between the “minus” and “plus” camps are technical ones and don’t have much bearing on your burning endeavors. The more important difference deals with R and RW: an RW disc can be erased and reused roughly 1,000 times. If you insert an RW disc that already contains data, iDVD even offers to erase it for you.
RW discs are great for testing, although as the following page describes, you’re more likely to encounter playback problems on some DVD players. Also, RW discs are more sensitive to damage and aging than write-once discs.
If you’re interested in the technical details between the minus and plus formats, read Jim Taylor’s superb DVD FAQ at www.DVDdemystified.com.
Many of today’s Macs include SuperDrives capable of burning on dual-layer DVD+R media. With a dual-layer drive, you can burn nearly 8GB, or about four hours’ worth of video.
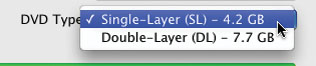
To see if your Mac is capable of dual-layer burning, choose Project > Project Info, and click on the DVD Type pop-up menu. If you have a dual-layer drive, you’ll have the option of specifying dual-layer media.
Incidentally, if you have a single-layer SuperDrive but would like to double your pleasure, you can buy external dual-layer burners that work just fine with iDVD. But note that more is not always better. Dual-layer burned discs often do not play in standalone DVD players, and may lack the longevity of single-layer discs.
You’ve burned a disc and are ready to show it off to your boss. You pop the disc into the conference room DVD player and proudly press the play button—and nothing happens.
Welcome to The Incompatibility Zone. The sad fact is, some DVD players and personal computer DVD drives are unable to read burned DVD media. Generally, older DVD players and drives are most likely to have this problem, but you may encounter it in newer players, too.
Roughly 85 percent of DVD players can read DVD-R and DVD+R discs, and about 80 percent can read DVD-RW and DVD+RW discs. Those are good numbers, although they won’t be of much solace if your player—or your boss’s—is in the minority.
The picture is much more bleak when it comes to dual-layer DVD burning: a large percentage of DVD players have trouble playing dual-layer burned DVDs. If you’re shopping for a new DVD player, be sure to verify compatibility with the type of media you plan to burn. And diplomatically inform your friends, family, and colleagues that if they have problems playing your DVD, the fault probably lies with their players.
You can burn multiple copies of a DVD using iDVD, but you might find the job easier with Roxio’s Toast or Popcorn software, both of which provide copying features. Or, make a disc image and use Mac OS X’s Disk Utility program to burn multiple copies (see page 316).
If you need to have more than a few copies of a disc—for example, 2,000 training DVDs for a large company—you’ll want to work with a replicator. Most replicators will accept a burned DVD as a master.
One excellent source for low-volume replication is CreateSpace (www.createspace.com), which also provides e-commerce and shipping services.
Archiving Projects for Burning Elsewhere
iDVD provides an archiving feature that saves a project and all of its assets in one self-contained file.
Archiving enables you to author on one Mac, then burn on another. Move projects between home, school, or work. Start a project on a cross-country flight, then archive and transfer your project when you land.
To archive a project, choose Archive Project from the File menu.
If you created customized themes for the DVD—or if you want to be certain that your themes will be available in a future version of iDVD—check the Include Themes box. If you’re using standard themes and aren’t obsessed about future compatibility, you can uncheck this box and your archive file will be a bit smaller.
If iDVD has already encoded the DVD’s content, you can include those encoded files in the archive by checking the Include Encoded Files box. Doing so will make your archive file quite a bit larger, however.

After you specify archive settings and click Save, iDVD goes to work, copying everything in your project into a file. You can transfer this file to another Mac using a fast network, a FireWire hard drive, or the Fire Wire disk mode that laptop Macs provide.
For many projects, one click of the Burn button is all it takes to commit your work to plastic. But sometimes it’s better to take the roundabout route: creating a disc image and then using it as the basis for your burns.
If you’ve downloaded software from the Internet, you’re probably already familiar with the concept of disc images. But if you haven’t heard the term before, it can seem confusing.
And for good reason: a disc image isn’t a disc or an image. It’s a file on your hard drive. The bits and bytes in this file are organized in the same way that they would be on a disc. If you double-click a disc image file, the Mac’s Finder reads the disc image and creates an icon on your desktop—as if you’d inserted a disc.
iDVD lets you create a disc image for a DVD project. You can then test your DVD on your Mac, or use other software to burn it.
In a bigger hurry? Save the project as a VIDEO_TS folder. You can test your project by opening this folder with the DVD Player program.
Important
If you plan to burn a dual-layer disc, note that Apple recommends burning the disc directly from iDVD, rather than creating a disc image and then burning from that image. To quote from iDVD’s online help, “double-layer discs burned from a disc image may cause playback issues in some DVD players, such as freezing during playback.”
Give your disc image a name and click Save.
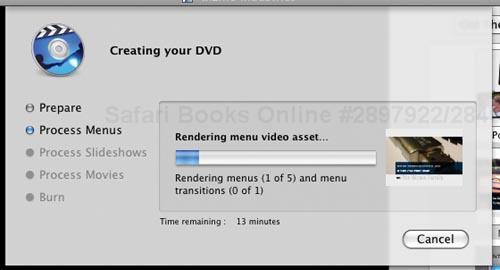
iDVD compresses your video, encodes your menus, and then saves the resulting data in the disc image file. The file’s name ends in .img.
To test your DVD using Mac OS X’s DVD Player program, begin by double-clicking the disc image file to create an icon on your desktop.
If you double-click this icon to examine its contents, you’ll see two folders: AUDIO_TS and VIDEO_TS. (If you added DVD-ROM content to the DVD, you’ll see a third folder.) Those awkward names are required by the DVD standard, as are the even more awkward names of the files inside the VIDEO_TS folder.
(The AUDIO_TS folder will always be empty, but don’t try to create a DVD that lacks one; the DVD may not play in some players. And if it ever comes up in a trivia contest, TS stands for transport stream.)
To test your disc image, start DVD Player and choose File > Open DVD Media. (In pre-Tiger Mac OS X versions, choose File > Open VIDEO_TS Folder.) Navigate to your disc image, select its VIDEO_TS folder, and click Choose or press Return. Now press the spacebar or click DVD Player’s Play button, and your faux DVD will begin playing back.
If you found a problem when testing your disc image—a typo, for example, or a missing piece of content—you haven’t wasted a blank DVD. Simply trash the disc image, make your revisions in iDVD, then create and test another disc image.
And if you’re ready to burn? If you’re burning a single-layer DVD, don’t bother with iDVD’s Burn button—use the disc image instead.
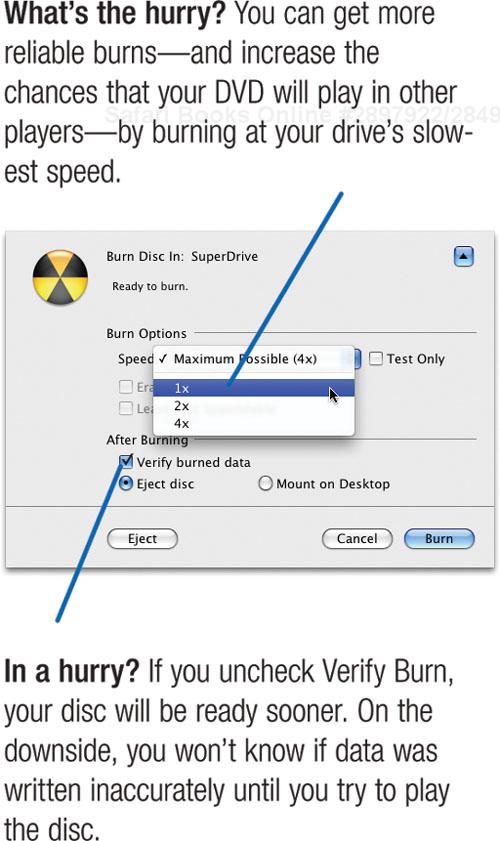
First, start up Mac OS X’s Disk Utility program. (It’s located in the Utilities folder within your Applications folder.) Next, click the Burn button in the upper-left corner of Disk Utility’s window. In the dialog box that appears, locate and double-click the disc image file. Disk Utility displays another dialog box. Before you click its Burn button, click the little down-pointing arrow to expand the dialog box.
If you have Roxio’s Toast Titanium software, you can drag your disc image’s AUDIO_TS and VIDEO_TS folders into Toast and burn your disc there. If you’ve installed Toast’s Toast It shortcut menu, the job is even easier: Control-click on your disc image icon and choose Toast It from the shortcut menu. (Use Toast’s Preferences command to install the Toast It shortcut menu plug-in.)
You can also use Toast to fine-tune any DVD-ROM content you’ve added—for example, removing the raw versions of the photos that you’ve included in a slide show (see page 312).
Toast also gives you a choice of burning speeds. For critical projects where you need the broadest compatibility, burn at 1x speed.
Burned discs don’t last forever. To improve their reliability and longevity, don’t use peel-and-stick labels. If a label isn’t perfectly centered, the DVD will be off-balance when it spins, and that could cause playback problems. If you want to label your DVDs, use an inkjet printer that can print on DVD media.
Label discs with a Sharpie or other permanent marker. Write small and be brief—the solvents in permanent ink can damage a DVD’s substrate over time.
Keep burned DVDs in jewel cases, and store them in a cool, dark place. Be careful to never flex the disc—a DVD is comprised of several different layers, and flexing a disc can cause the layers to separate. To remove a disc from a jewel case, press the center button of the case, then lift the disc out—don’t simply pull the disc by its edges. (This advice applies to all optical media, by the way.)
You can include digital camera movies in an iDVD project—just drag them into the iDVD window. If the movies are in your iPhoto library, you can use iDVD’s photo or movies browsers to access them.
Indeed, you can burn nearly any kind of QuickTime movie onto a DVD, including movies you’ve downloaded from the Web or copied from an old CD-ROM.
If a movie is smaller than the DVD standard of 720 by 480 pixels, iDVD enlarges it to fill the screen. This results in a loss of sharpness, but enlarged movies can still look good when viewed on a TV. It’s better to have shared a blurry movie than never to have shared at all.
You can’t use movies stored in MPEG-1 or MPEG-2 formats. Sony digital cameras use the MPEG format for their movies, and many of the movies that have been posted on file-sharing networks are in MPEG format.
There are free or cheap utilities that enable you to convert MPEG movies into a format that iDVD (and iMovie) can use. I’ve written up instructions on my site; see www.macilife.com/imovie. You can also use Toast Titanium’s Export Video command, as described at right.
Incidentally, this MPEG prohibition does not apply to MPEG-4 movies created by digital cameras or to iMovie projects created in MPEG-4 format. Those movies work just fine in iDVD.
You’ve made some modifications that you don’t like. Many programs, including GarageBand, have a Revert command that lets you get back to the last version you saved. iDVD lacks a Revert command, but you can simulate one: just reopen the project by choosing its name from the Open Recent submenu in the File menu. Click Don’t Save when iDVD asks you if you want to save changes before reopening the project.
You burned some cherished video to a DVD, then lost the original tape—and now you want to edit it in iMovie.
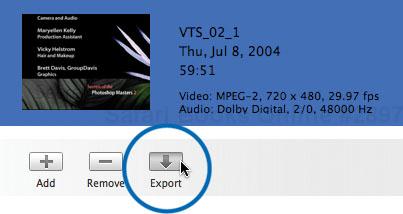
You can extract video from a DVD and convert it into DV format, but you will lose some quality in the process. If you have Toast Titanium, click its Video button and drag your DVD’s VIDEO_TS folder into the Toast window. Locate the clip you want to extract, select it, and click the Export button.
You can also extract video using any of several free or cheap utilities. Video guru Matti Haveri has published a fine tutorial on his Web site; I’ve linked to it at www.macilife.com/iDVD.
Get more iDVD tips. www.macilife.com/idvd
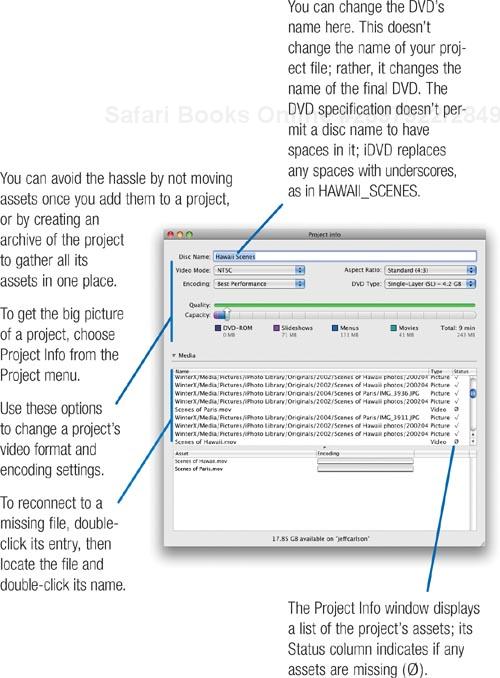
When you add a movie or set of images to iDVD, the program doesn’t actually add those files to your project file. Rather, iDVD simply links to the existing files on your hard drive.
If you need to move a project from one Mac to another, create an archive of the project using the Archive Project command in the File menu. As described on page 315, this command copies all of the project’s assets into one file.

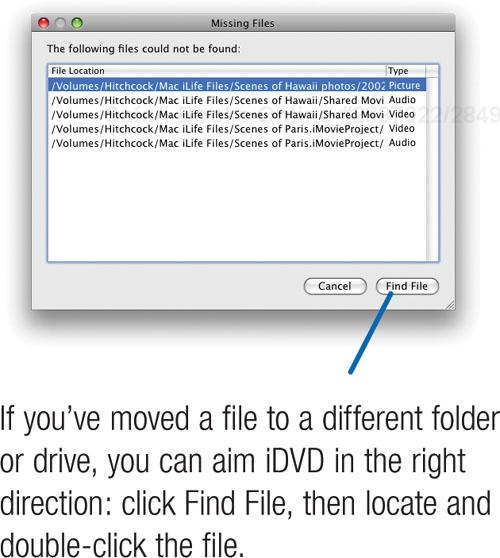
When you open a project containing broken links, iDVD displays an error message.
If you’ve assembled a great set of photos for a drop zone and you’d like to use that same set elsewhere in the project, it’s easy to duplicate it. Control-click the drop zone and choose Copy Drop Zone Contents from the shortcut menu. Then, go to the destination drop zone and choose Paste Drop Zone Contents from the shortcut menu.
You can use the Preferences command to tell iDVD to search other folders and hard drives when displaying its movie browser (page 296). You can expand your browsing options for audio and photos, too. Just drag a folder from the Finder into the appropriate media browser.
This also works for the movie browser—and it’s a handy alternative to the Preferences dialog box.
Previous versions of iDVD stored the themes within the application itself, but starting with iDVD 6, Apple moved them to a more sensible location: Computer > Library > Application Support > iDVD > Themes.
Each theme (which ends with the text .theme) is also a package—to explore it, Control-click on its icon and choose Show Package Contents from the shortcut menu. Double-click the Contents folder and then the Resources folder, and you’ll find background movies and audio loops. To extract an item—for example, to grab the background audio from the Revolution-Main theme—press Option while dragging the item’s icon out to the desktop. This makes a duplicate of the item, leaving the original theme unchanged.
Take care to not throw away or alter any resources whose purpose you don’t understand, lest you have to reinstall the iDVD application.
An iDVD slide show isn’t restricted to the JPEG image format. A slide show can display numerous graphics formats, including PDF.
iDVD’s PDF support means that you can display just about any document in a slide show. Want to put a Microsoft Word document or a Web page in a slide show? Create a PDF version of the document: choose Print from the File menu, then click the Save as PDF button. Drag the PDF into the iDVD slide show editor, and iDVD creates a slide containing the contents of the PDF’s first page. (If you have a multi-page document, save each page as a separate PDF or use the Preview application to extract specific pages, as described in the following tip.)
Before making a PDF of a document, you might want to choose the Page Setup command and click the landscape-orientation button. That way, your PDF will have the same horizontal orientation as a slide. If you make the PDF in portrait orientation, your slide will have black borders on either side of the page.
Think twice about using a PDF that contains lots of text, especially in font sizes below 14 point. Small text looks fuzzy on a TV screen.
On page 213, I discussed a method for saving an iPhoto book as a PDF and then extracting pages for printing. Here’s a variation of that technique that lets you include iPhoto book pages in iDVD slide shows.
After saving your book as a PDF, open the PDF in Mac OS X’s Preview program. Next, open Preview’s sidebar (choose Sidebar from the View menu). In the sidebar, locate the page that you want to turn into a slide. Select the page and choose Copy from the Edit menu.
Next, choose the New from Clipboard command from the File menu. The Preview program creates a new document and pastes the page you copied into it. Save the page as a new PDF file.
Get links to background animations and other iDVD add-ons. www.macilife.com/iDVD

You aren’t limited to the motion menus that accompany iDVD. You can make any QuickTime movie a motion menu background: just drag the movie to the Background well in the Menu pane.
If your motion menu movie is smaller than full-screen, iDVD enlarges it to fit. For the best video quality, use a movie whose dimensions are 640 by 480 pixels or 720 by 480 pixels.
As for what to put in your own custom menu, that’s up to you. If the star of your DVD is an iMovie production, you might use a two- or three-minute excerpt of your movie. Copy and paste a few clips from your movie into a new iMovie project. Then, use iMovie’s Video Adjustments tools to increase the brightness and make the footage appear faint. That way, buttons and text labels will still be easy to read. Share the movie to the Media Browser, return to iDVD, and drag the movie from the Media pane to the Background well in the Menu Info window.
Smooth looping. A motion menu loops until a user chooses a menu option. To avoid a visually jarring loop point, try this: In iMovie, create a still frame of the very first frame of your menu movie. Add this still frame to the very end of the movie, and put a fairly lengthy (say, two-second) dissolve between the end of the movie and the still frame. Finally, trim the clip to make the remainder of the still frame as short as possible. (In the trimmer, drag its right edge to the left until it’s right next to the dissolve in the timeline.) Now, when your movie loops, its last frame will appear to gradually dissolve into its first frame.
If you’re after something more abstract, you can buy royalty-free libraries of animated backgrounds that you can use as motion menus. Two sources are ArtBeats (www.artbeats.com) and Digital Juice (www.digitaljuice.com). If you have Final Cut Pro or Final Cut Express, you can use its LiveType program to create rich animated textures.
A motion menu in iDVD can be up to 15 minutes long. But keep in mind that menu video uses disc space just like any other video clip.
iDVD provides thorough support for AppleScript, the automation technology that’s built into Mac OS X. iDVD’s AppleScript support enables you to create scripts that automate the creation and layout of DVDs.
In Mac OS X 10.5 (Leopard), you can use the Automator program to build workflows that put iDVD on autopilot. For example, you could create a workflow that prompts a user for a movie and some photos, then builds a DVD containing the results.
To learn more about Automator, visit www.automator.us.