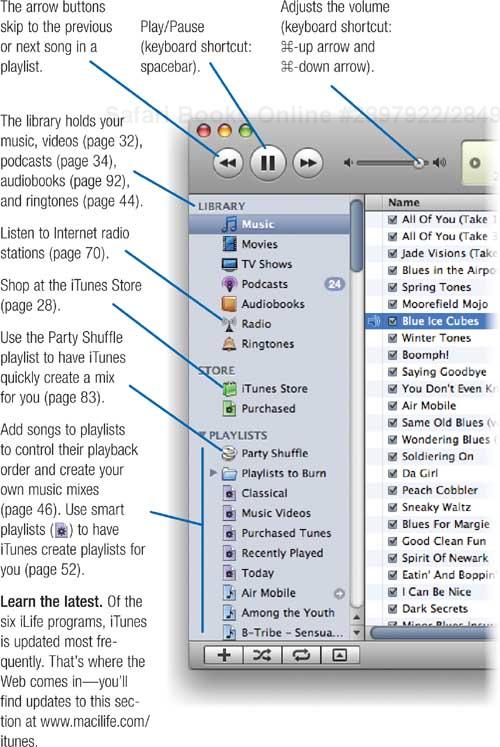
iTunes is your gateway to music, audiobooks, Internet radio programs, TV shows, movies, music videos, and much more.
With iTunes, you can create digital music files from your favorite audio CDs. You can buy and download music, videos, and more from the iTunes Store. You can create your own music mixes by creating playlists. And you can listen to your playlists on your Mac, burn them onto CDs, or transfer them to an iPod portable music player.
When iTunes debuted in 2001, it was a relatively simple digital music jukebox. Since then, iTunes has evolved into the computer industry’s leading gateway to digital media. In 2005, the iTunes Store was the seventh-ranked music retailer in the United States—ahead of giants, such as Tower Records and Sam Goody—and it was the first time an online music service ever appeared among the top ten. By 2007, the iTunes Store had pulled ahead of Amazon and Target to become the third-largest music retailer in the US.
iTunes is also the control center for the Apple iPhone: you use iTunes to activate a new iPhone and to manage the contents of an iPhone. With the runaway success of the iPod family and with Apple continuing to add new forms of media to the iTunes Store, iTunes seems poised to remain the dominant digital jukebox.
Anybody have a quarter?

The first step in stocking your digital jukebox might be a sprint to the iTunes Store to start buying and downloading (page 28). But if you have a library of music CDs, you’ll want to invite them to the party, too.
It’s easy to add CDs to your iTunes library—a process often called ripping. Insert a compact disc into your Mac’s CD drive, and iTunes launches, connects to the Internet, and retrieves the name of the CD and its tracks. Click the Import CD button, and iTunes converts the CD’s contents into digital music files that are stored on your Mac’s hard drive.
That’s the big picture. You can create a vast digital music library with iTunes without having to know any more than that. But iTunes has several features that give you more control over the ripping process. You can, for example, specify that iTunes import only certain songs—no need to waste disk space by storing songs you don’t like.
And as I describe on the following pages, you can choose to store the tracks that you import in a variety of formats, each with its own advantages and drawbacks. But don’t feel obligated to delve into those details if you don’t want to. Feel free to skip on to page 28 after you’ve mastered the ripping three-step: insert, import, eject.
Insert the CD into your Mac’s optical drive. iTunes asks if you’d like to import it. Click Yes or press the Return key.
To import all the tracks on the CD, click Yes or press Return. (To control which tracks iTunes imports, click No, then see the notes below.) As iTunes imports, it displays a status message. To cancel the import, click the X.

When iTunes finishes, it plays a little beep.
Eject the CD: press your keyboard’s Eject key or click the Eject button (
 ) in the corner of the iTunes window or next to the CD’s name.
Being selective. Don’t want to import every track? Uncheck tracks you don’t want. Tip: To uncheck all tracks, press ![]() while clicking any track’s check box.
while clicking any track’s check box.
To import the remaining songs, click the Import CD button.
Dragging tracks. You can also import tracks by dragging them to the Library area in the left side of the iTunes window.
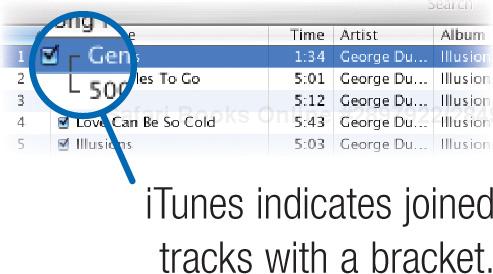
Joining tracks to eliminate gaps. In some cases, you might not want a gap of silence between songs. For example, the songs on a CD might be composed so that one flows seamlessly into the next.
You can prevent gaps between two or more songs by importing the songs as joined tracks. Select the tracks, then choose Join CD Tracks from the Advanced menu. iTunes will import the tracks as one file. If you decide to not join the tracks after all, choose Unjoin CD Tracks from the Advanced menu.
Note that you can’t join tracks that you’ve already imported.
Power ripping. Doing some binge ripping?

Where iTunes Stores Your Tunes
iTunes stores your library in your Music folder. The fastest way to locate the Music folder is to choose Home from the Finder’s Go menu. The Music folder also appears in the sidebar of Finder windows.
You don’t have to venture inside the Music folder—indeed, you should always add and remove songs and other items to and from your library by using iTunes itself, not by dragging files into and out of the Music folder.

If you’re curious, here’s how the Music folder is organized. The Music folder contains another folder named iTunes, and inside this folder is a file named iTunes Library. This file contains a database of all the songs you’ve added to iTunes, as well as all the playlists you’ve created. But it doesn’t contain the song files themselves; those files live in the folder named iTunes Music.
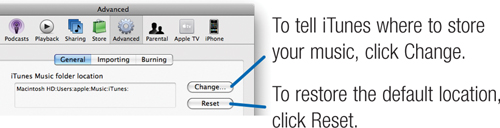
Note that you don’t have to store your music in the Music folder. You might want to store it elsewhere—on a portable hard drive, for example. To specify a different location for your music library, choose Preferences from the iTunes menu, click the Advanced button, and then specify the desired location. (For more iTunes library tips, see page 86.)
The factory settings that iTunes uses for importing music from CDs are perfectly fine for most music lovers and listening scenarios. So if you’d rather explore some of the more musical and less technical aspects of iTunes, feel free to skip to page 28. But if you’re an audiophile or are just curious, read on for a look at how audio compression works—and at how you can adjust the way iTunes applies it.
CD-quality stereo sound requires about 10MB of disk space per minute. By using compression, iTunes can lower audio’s appetite for storage by a factor of 10 or more. Most audio-compression schemes use something called perceptual encoding, which eliminates those portions of an audio signal that our ears don’t hear well anyway. Because some information is lost in the process, this form of compression is called lossy.
iTunes supports two lossy compression schemes: MP3, the format that helped fuel the Internet music revolution; and a newer method called AAC (short for Advanced Audio Coding). Each scheme has advantages and drawbacks.
iTunes also offers a lossless compression scheme called Apple Lossless encoding. It doesn’t provide nearly as much compression as MP3 or AAC—files are only about half the size of the original. But true to its name, Apple Lossless imposes no quality loss. If you’re a golden-eared audiophile with plenty of hard-drive space, you might prefer to rip your CDs using the Apple Lossless encoder.
From the factory, iTunes is set up to encode in AAC format. By adjusting the Importing options in the Preferences dialog box, you can change the encoding settings to arrive at your own ideal balance between sound quality, storage requirements, and listening plans.
Choose Preferences from the iTunes menu.
Click the Advanced button.
In the Advanced preferences area, click the Importing button.
Table . Encoder Options at a Glance
Encoder | Comments |
|---|---|
AAC | Best balance between sound quality and small file size. |
MP3 | Not as efficient as AAC, but broadly compatible with non-Apple portable players and computer systems. |
Apple Lossless | Creates much larger files than the MP3 or AAC encoders, but with no audio quality loss. Files won’t play on iPod shuffle or older iPods. |
WAV and AIFF | Create uncompressed files that use 10MB of disk space per minute. (AIFF, which stands for Audio Interchange File Format, is a standard audio format on the Mac; WAV is its equivalent on Windows. Both formats are broadly supported on Macs and Windows computers.) |

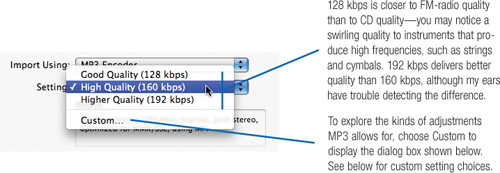
iTunes is set up to encode MP3 at a bit rate of 160 kbps. To change the bit rate and other MP3 settings, choose Custom from the Setting pop-up menu.
Converting from MP3 to AAC and Apple Lossless
iTunes can convert existing MP3s to AAC, but you’ll lose quality in the process. That’s because both AAC and MP3 are lossy formats: each discards audio information in order to save disk space. Thus, when an MP3 file is compressed with AAC, the lossiness is compounded.
Bottom line: to take advantage of AAC’s space savings, re-rip your original CDs instead of recompressing existing MP3s.
This re-ripping requirement also applies if you want to take advantage of the Apple Lossless encoder. You can’t convert an MP3 (or an AAC) file into Apple Lossless and gain the quality benefits of the latter—the sonic damage has already been done.
iTunes has some smarts that make re-ripping less laborious: if you re-rip a CD that iTunes already has in its library, iTunes tells you that the songs have already been imported and asks if you want to import them again. Thus, you’re spared from having to rebuild your playlists, retype any song information, or manually delete your old MP3s.
Note
If you’ve edited a song’s information—changed its name or that of the artist or album as described on page 26—iTunes won’t recognize that you’re importing it again, and you’ll end up with two copies of the same song.
To avoid this, make the same edits before you import the CD, or edit the song information of the existing MP3s to match that of the audio CD. Or just make a mental note to delete the old MP3 files after re-ripping.

A digital music file holds more than just music. It also holds information about the music: the song’s name, the name of the artist who recorded it, the year it was recorded, and more. These tidbits of information are sometimes referred to as tags.
There may be times when you’ll want to edit this information. Maybe the song is from an obscure CD that iTunes can’t identify, and iTunes has given its tracks generic names like Track 5. (This also happens if you rip a CD when not connected to the Internet.)
Or maybe a particular artist is listed in slightly different ways on different CDs—for example Bill Evans and Bill Evans Trio. When you transfer those songs to your iPod, you’ll have two separate listings in the Artist view—even though both listings refer to the same artist.
For situations like these, you can use iTunes’ Get Info command to edit the information of one or more songs. First, select the song whose attributes you want to edit, and then choose Get Info from the File menu, or press ![]() -I.
-I.
You can also edit song information directly within the iTunes window: simply select the song and then click on the item you want to edit.

You’ve ripped a few audio CDs while on a cross-country flight. Since you didn’t have Internet access, iTunes wasn’t able to retrieve album and song information, and now you have songs named Track 01, Track 02, and so on.
Must you venture into the Song Information dialog box to manually enter album, song, and artist information? Of course not. Simply connect to the Internet, select those “anonymous” tracks, and then choose Get CD Track Names from the Advanced menu. iTunes connects to the Internet and retrieves the information you crave.
To edit information for a song, click the Info button in the song information dialog box. While many of the items in the Info area are self-explanatory, some aren’t. Let’s take a look.
As you delve into this dialog box, keep in mind that you don’t have to play by the rules. For example, you can store any piece of text in the Composer field—iTunes won’t complain. Feel free to use the more obscure items in this dialog box to describe and categorize your music library as you see fit. Your efforts will pay off when you start creating smart playlists (described on page 52).

At the iTunes Store, you can search for, browse, audition, and buy music, music videos, TV shows, and more. Wander the store’s virtual aisles or search for specific items. Check out 30-second clips of your finds. Buy entire albums, or just the songs you want. iTunes downloads your purchases into your music library, from which you can add them to playlists, burn them to CDs, and transfer them to an iPod or iPhone.
You can use the store with any kind of Internet connection, but a high-speed connection—for example, a cable modem or DSL line—works best. Music takes a long time to download over a slow modem connection—and videos take forever.
Have an iPhone or iPod touch? Get yourself in range of a Wi-Fi wireless network. With the iTunes Wi-Fi Music Store, you can browse and buy even when you’re away from your Mac. iTunes transfers your purchases to your Mac the next time you connect your iPhone or iPod touch (see page 102).
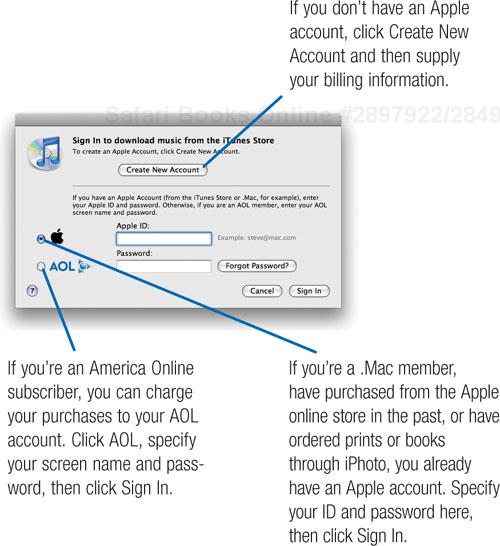
Before you can buy, you must set up an account by providing billing information and creating a password. Once that’s done, you can buy with a couple of mouse clicks.
The music you buy is stored in AAC format and is tied to your account in ways that guard against the piracy that pervades the MP3 scene. And yet you still have plenty of freedom to burn CDs and move your music between computers.
Let’s go shopping.

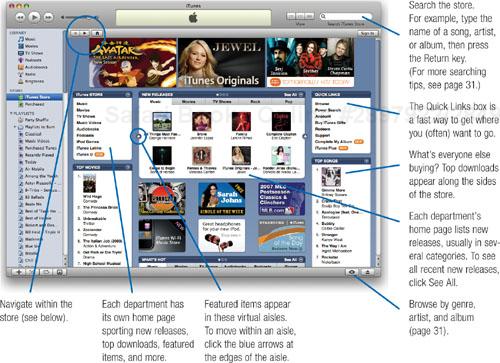
Once you’ve created an account and signed in, you’re ready to shop at the iTunes Store. You might start by browsing the store’s virtual aisles, clicking on the little album thumbnail images or the text links around them. (The links are underlined when you point to them.)
You might jump to a different music genre by clicking its link, or head to a different department to browse TV shows or music videos. You might use the Browse button to quickly see what’s available. Or you might use the Power Search option to home in on exactly what you’re looking for.
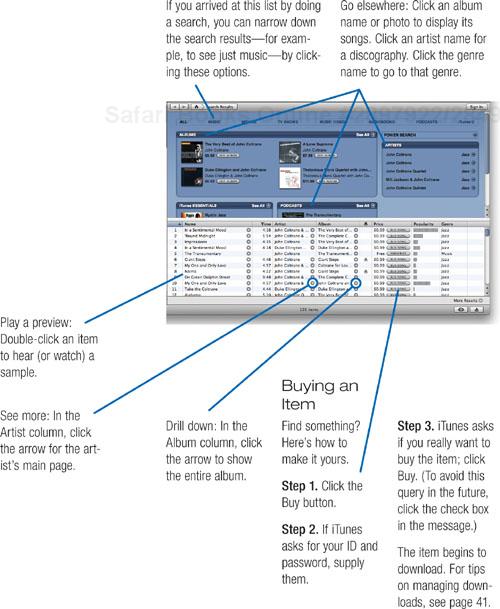
The end result of any searching or browsing session is a list of items—songs, TV show episodes, music videos, and so on. Here’s where you can play previews, locate related items, and most important, buy and download your finds so you can start enjoying them.
You’ve searched or browsed your way to a list of songs, TV shows, or other items. What happens next is up to you.
If you’re the type who heads for a mall directory instead of wandering around, try the store’s browse mode, where you can quickly home in on genres, sub-genres, artists, and albums. Browsing is efficient, and because it discards graphics in favor of all-text displays, it’s fast. Browsing is also the only way to see a complete list of all artists, genres, and so on.
With the store displayed, click the Browse button (
 ).
).Choose a genre, then a sub-genre (if appropriate), then an artist.


The iTunes Store is about more than music. You can also buy video: music videos, TV shows, short films, comedy performances, and more.
Buying videos is a lot like buying music. Browse your way to a video or do a search for a specific video. Watch a preview if you like; it appears right within the iTunes window. Like what you see? Click the Buy button, and iTunes downloads your video and adds it to your library. At this writing, most videos cost $1.99 each. Some TV shows are available on a $9.99 per month subscription basis called a multi-pass.
You can use iTunes to watch your videos at your desk—or at 30,000 feet. You can also copy videos to an iPhone or any iPod with video capabilities. Or add an Apple TV (page 78) and watch them on your TV set.
Let’s go channel surfing.
You can locate videos in a few ways.
Wander. Click the links on the music store’s home screen.
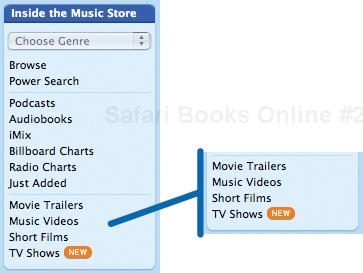
Browse. You can also use the Browse mode described on the previous pages. As with music, browsing is a fast, efficient way to quickly get a glimpse of everything that’s available.

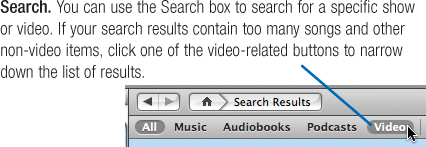
You can also use the Power Search feature to home in on video content. In the Power Search window, click one of the video-related options—for example, Music Videos or TV Shows.
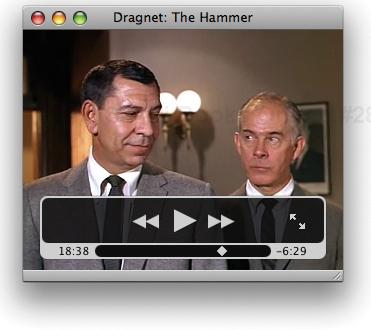
Where to watch. Normally, iTunes plays videos within its window. If you resize the iTunes window by dragging its lower-right corner, the video grows or shrinks accordingly.
To start and stop playback, press the spacebar or click the play/pause button. To skip around in the video, drag the little diamond-shaped playhead marker. To return the iTunes window to its normal display, press the Esc key.
If you move the mouse pointer into the video area during playback, controls appear that let you expand to a full-screen view or cancel playback.

You can customize how iTunes plays video. Choose iTunes > Preferences, then click the Playback button in the Preferences dialog box.
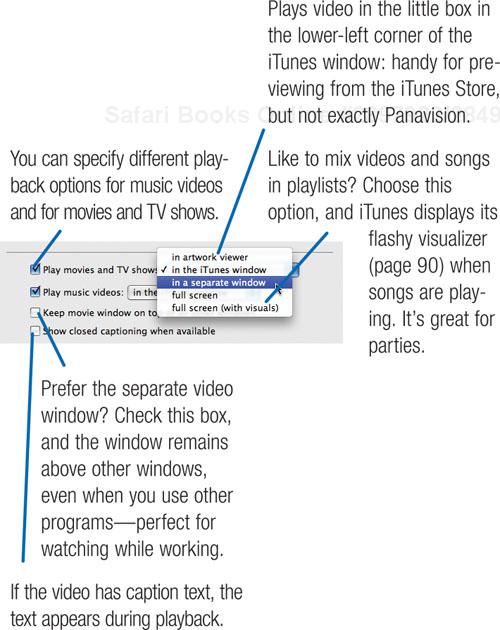
Resizing the video window. To adjust the size of the separate video window, drag its lower-right corner or use the commands in the View menu.
Controlling playback. When viewing video full-screen or in a separate window, you can access playback controls by moving your mouse into the video area. The controls let you play and pause playback, switch between full-screen and small-window modes, and step forward or backward one frame at a time (keyboard shortcut: the left and right arrow keys).
Podcasts bring you radio and more whenever you want it. A podcast is typically an audio recording of a radio program—either an actual radio show that has been archived for Internet distribution, or an Internet-only program. Thousands of free podcasts await your ears, and they range from mainstream programs from the likes of National Public Radio to amateur productions that only a mother’s ears could love.
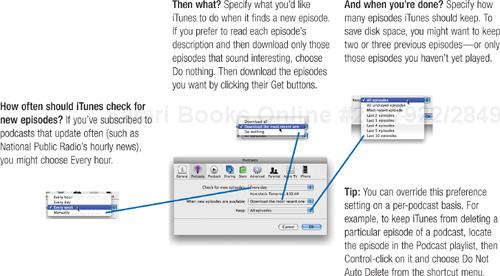
Internet radio isn’t new, but podcasts sweeten the pot with a couple of innovations. Foremost among them is that you don’t have to remember to download podcasts. Instead, you use iTunes to subscribe to your favorite podcasts. When you subscribe to a podcast, iTunes automatically checks for new episodes at regular intervals. If iTunes finds a new episode, it downloads it.
At the iTunes Store, you’ll find thousands of podcasts in over 20 categories, from technology to politics to talk radio and public radio.
Podcasts also come in several flavors. Video podcasts add the dimension of video, while enhanced podcasts provide extra goodies, such as photos, Web links, and chapter markers for convenient navigation (see page 36).
And if you’re curious, the term podcast was coined by former MTV veejay Adam Curry. A major force behind the development and popularization of podcasting, he’s referred to by many in the podcasting community as the “podfather.”
Radio (and more) in every imaginable category, retrieved for you automatically: now that’s an offer you can’t refuse.
As with music and videos, you can find podcasts in a few ways. To wander the podcast aisles of the iTunes Store, click the Podcasts link on the store’s home screen. The podcasts page appears.
To quickly scan what’s available in each podcast category, click Browse.
To search for podcasts, use the Power Search feature (page 31). You can refine your search to specific categories, titles, authors, and languages.
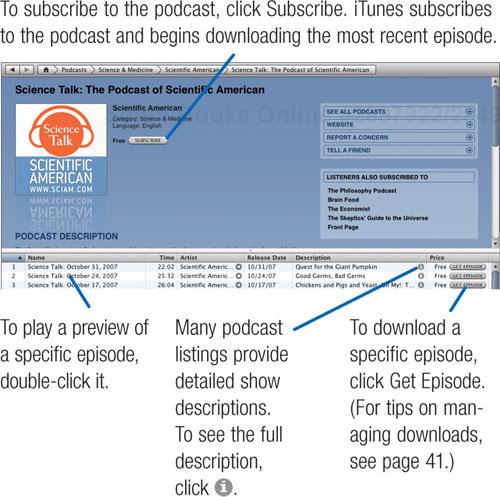
Once you’ve made your way to a specific podcast, you can preview episodes, download them, and subscribe to the podcast.
Tune in to my podcast, “The Digital Hub,” and get links to more podcast tips. www.macilife.com/podcast

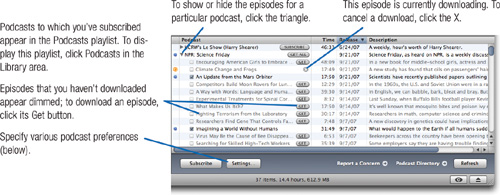
If you decide you no longer want to subscribe to a podcast, you have a couple of options for tuning out. Begin by displaying your podcasts: click the Podcasts list in the Library area.
To unsubscribe to a podcast without deleting episodes you’ve already downloaded, select the podcast and click the Unsubscribe button at the bottom of the iTunes window. iTunes won’t check that podcast for updates any more, but you can still do so manually: select the podcast and click the Refresh button. And you can subscribe again by clicking the Subscribe button next to the podcast’s name.
If you want to unsubscribe and delete all episodes, select the podcast and press the Delete key on your keyboard. iTunes asks if you want to delete the episodes, and then if you want to move their files to the Trash.
The iTunes Store has a vast podcast directory, but you may sometimes encounter a podcast on the Web that isn’t listed in the music store. You can still use iTunes to subscribe to such a podcast.
On the Web site hosting the podcast, locate the link for the podcast’s feed. Then, if you’re using Apple’s Safari browser, simply drag the link into the iTunes window.
If that doesn’t work—or if you’re using a different browser—try this more-laborious method. First, copy the podcast feed’s link to the Clipboard: Control-click on the link and choose Copy Link from the shortcut menu. Next, switch back to iTunes and choose Subscribe to Podcast from the Advanced menu. Paste the link you copied, and click OK or press Return.
If you have podcasts that you’ve already downloaded with a Web browser, you can add them to your iTunes library by simply dragging their icons to the Library area of the iTunes window. Note that such podcasts will not appear in the Podcasts list in the Library area, however. That list shows only podcasts that you’ve subscribed to with iTunes.
You’ve subscribed to a great podcast and want to let a friend know about it. It’s easy. In the Podcasts list, choose the title of the podcast, then drag it to the desktop. iTunes creates an address file with a file extension of .pcast.
You can email this file to your friends, who can drag it into their copies of iTunes to subscribe to the podcast.
Want to share all of your podcast subscriptions? In the Library area, Control-click on the Podcasts list, then choose Export Song List from the shortcut menu. In the Save dialog box that appears, choose OPML from the Format pop-up menu. Type a name for the list, then save it somewhere convenient—on your desktop, for example.
Now email that file to your friends. They can subscribe to those podcasts by dragging the file into the iTunes window.
This is also a handy way of moving a set of podcast subscriptions from one computer to another: export the Podcast list, email the file to yourself, retrieve the email on the other computer, then drag it into that computer’s copy of iTunes.
You’ve probably noticed that podcast subscriptions and individual episodes often have a blue dot (![]() ) next to them. A blue dot next to a podcast episode indicates that you haven’t started listening to that episode. A blue dot next to a podcast subscription indicates that there’s at least one episode of that podcast you haven’t started listening to yet.
) next to them. A blue dot next to a podcast episode indicates that you haven’t started listening to that episode. A blue dot next to a podcast subscription indicates that there’s at least one episode of that podcast you haven’t started listening to yet.
If you listen to even just part of a podcast, the blue dot disappears. More to the point, iTunes figures you’ve listened to the entire podcast. If you have your preferences set up to delete a podcast after you’ve listened to it, you’ll lose the podcast—and the chance to hear the rest of it.
The solution? Tell iTunes to treat a particular podcast as if you had never played it. Control-click on the podcast, and from the shortcut menu, choose Mark as New. iTunes restores the blue dot next to the podcast’s name—as if you’d never played it.
Enhanced podcasts can contain artwork, such as photos, that plays back along with the audio.
Enhanced podcasts can also contain Web links that appear in the iTunes video viewer. You can click on the link to go to a Web site.
And enhanced podcasts can contain chapter markers that make it easy for the listener (or viewer) to jump from one part of the podcast to another. iTunes displays a Chapters menu that lets you jump to specific spots.
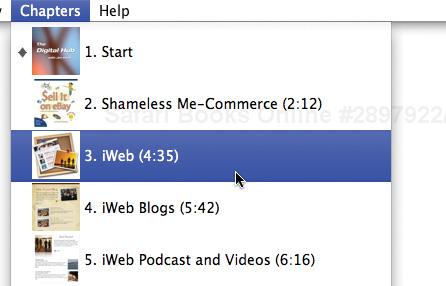
You can also navigate from one chapter to the next by pressing the Next and Previous buttons on an iPod.
Finding enhanced podcasts. So where can you find these podcasts with punch? Alas, the iTunes Store doesn’t devote a category to enhanced podcasts, nor does it provide a way to search specifically for them. Try using the store’s Power Search screen to search for podcasts with the word enhanced in their descriptions.
A Google search for the phrase enhanced podcast will also turn up lots of interesting results.
Managing Downloads from the iTunes Store
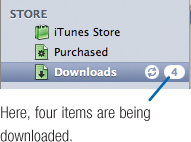
iTunes is able to download three items (podcasts, songs, TV shows, movies, and so on) at a time. If you’re on a shopping spree and you try to download more, iTunes stashes the additional items in its download queue and gets to them as soon as it finishes downloading other items.
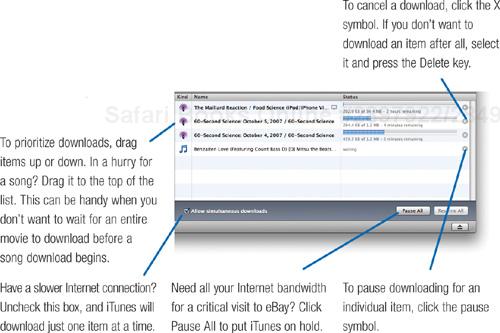
You can control how iTunes downloads items. For example, you can pause a lengthy movie download to free up your Internet connection for some song downloads.
When iTunes is downloading, a Downloads item appears in the Store area.
To manage your downloads, click Downloads.
Looking for more ways to discover new music? Here are a few shopping avenues to explore. To access most of the following options, click the Music link on the store’s home screen.
iTunes Essentials. In the iTunes Essentials area of the store, you’ll find meticulously categorized lists of tunes selected by the staff of the store. Categories run the gamut from “Motorcycle Music” to “Romantic Moods,” and each category is divided into several subcategories that let you drill ever deeper into the groove at hand.
Celebrity Playlists. If you’re interested in what your favorite musicians listen to, check out Celebrity Playlists, where top artists share their favorites.
iMixes. As page 50 describes, you can publish your own playlists for other music store customers to check out and rate. To check out and rate other shoppers’ iMixes, click the iMix link.
iTunes Originals. In the iTunes Originals area of the store, you’ll find exclusive tracks, song compilations, and artist interviews.
Just for You. This area of the store’s home screen lists songs that Apple thinks you’ll like, based on previous purchases you’ve made.
Starbucks Entertainment. In late 2007, Apple and Starbucks joined forces to offer the iTunes Wi-Fi Music Store in Starbucks outlets (see page 102), and to offer Starbucks’ growing music library at the iTunes Store.
The Starbucks Entertainment section of the iTunes Store has a great selection of compilations from Starbucks-owned Hear Music. You’ll also find Artist’s Choice compilations, which are similar to the iTunes Store’s Celebrity Playlists.
Billboard Charts. The Charts category lists the top tunes from Billboard magazine. You can get lists of top tunes going back to the 1940s, as well as current country and R&B favorites.
Click the Browse button at the bottom of the iTunes window, then click the Charts entry. Choose the chart you want to view, then drill down to specific years.
Free Downloads. Look for the Free On iTunes heading on the store’s home screen for links to free songs and videos.
Concerned about your kids buying music and sapping your credit card? Or about them buying music or downloading podcasts that contain explicit content?
By using the Parental option of the Preferences dialog box, you can control what the munchkins can access. Choose Preferences from the iTunes menu, then click the Parental button.
Next, choose the options you want. For example, to prevent access to music store content labeled as explicit, click Restrict Explicit Content. Finally, click the lock icon and enter your password.
To remove restrictions, click the lock icon again, enter your password, and then uncheck options as desired.
Saddled with a slow connection? Improve previewing by tweaking iTunes’ preferences.
Choose Preferences from the iTunes menu, click the Store button, and then check the box labeled Load Complete Preview Before Playing. From now on, iTunes will load the entire preview before playing it. You’ll wait longer for the preview, but at least it won’t be interrupted.
Unlike the music files that iTunes creates when you rip a CD, the music tracks you buy contain some playback and copying restrictions designed to prevent music thieves from sharing the songs through Internet file-swapping services.
When you buy a song, the iTunes Store embeds your Apple ID in the music file that downloads to your hard drive. To play the song, you must authorize your Mac, a one-time process that simply involves typing your Apple ID and password. You can authorize up to five Macs (or Windows PCs) per Apple ID.
If you’ve already authorized five computers to play your purchases and you want to play them on a sixth computer, you’ll have to deauthorize one of the other five. Choose Deauthorize Computer from the Store menu, choose Apple Account in the subsequent dialog box, and then type your Apple ID and password. You must be connected to the Internet to deauthorize a computer.
Parting with your computer? If you’re parting with your Mac for any reason—selling it, giving it away, or even just sending it off for repairs—be sure to deauthorize it first.
Deauthorizing everything. You forgot to deauthorize a computer that you no longer have—and you’ve reached your five-computer limit and thus can’t authorize your newest Mac. What do to? Wipe the slate clean.
You can deauthorize all the computers that are tied to your account. To do so, go to your account information screen by signing into the store and clicking the account button in the upper-right corner. On the Account Information screen, click the Deauthorize All button.
You can burn purchased songs to audio CDs, but iTunes imposes a minor restriction on your burning endeavors. If a playlist contains purchased music, you can burn a maximum of seven CDs containing that playlist.
Chris Breen, editor-in-chief of Playlist magazine, has done some interesting research on how iTunes tracks the number of times you’ve burned a playlist—and on steps you can take to work around the seven-CD limit. I’ve linked to the articles at www.macilife.com/itunes.
And incidentally, you can’t burn DVDs containing videos that you’ve purchased from the iTunes store. You can burn backups of the video files themselves (and you should), but you can’t, for example, use iDVD to create a DVD that contains some episodes of Lost that you’ve bought.
In 2007, Apple and some other online music retailers began selling music that wasn’t shackled by the surveillance bracelet of copy protection. It was a major step for a recording industry terrified of music piracy.
Apple calls its offerings iTunes Plus, and they do indeed have some pluses. An iTunes Plus song has no copy protection, or digital rights management (DRM), attached to it. You can play the song on a computer that hasn’t been authorized for your iTunes account, and you can burn it to a CD as many times as you like. It’s unshackled—just like a music file that you rip from a CD.
Sweeter still, it sounds better than a standard iTunes Store purchase. iTunes Plus songs are encoded at twice the bit rate as DRM-shackled songs you buy: 256 kilobits per second, instead of 128kbps.
In the iTunes Store, an iTunes Plus song is indicated by a plus sign symbol (![]() ). To browse iTunes Plus offerings, click the iTunes Plus link in the Quick Links box that appears on most store pages.
). To browse iTunes Plus offerings, click the iTunes Plus link in the Quick Links box that appears on most store pages.
One more thing: although iTunes Plus songs lack copy protection, they are still “stamped” with your Apple ID: you (and anyone else) can see it in the Get Info dialog box. Keep that in mind should you be tempted to pass along some iTunes Plus purchases to a friend.
Upgrading to Plus. If you’ve purchased songs that are now available in iTunes Plus form, you can upgrade to the higher-quality, DRM-free versions. On the iTunes Plus page of the store, look for the Upgrade My Library box. Click the See Details button to view a list of previous purchases available in Plus form.
A huge number of song compilations are available at the iTunes Store—just a few examples include the iMixes that your fellow music lovers create; the iTunes Essentials mixes that Apple creates; the celebrity playlists that, well, celebrities create; and the iTunes Originals compilations described on page 38.
When you buy a song compilation, you’ll probably want to create a playlist containing its tunes. That way, you’ll be able to easily listen to (and burn) the entire compilation instead of simply having its songs scattered throughout your music library.
iTunes has a feature that automatically creates playlists for you when you buy a compilation. Choose Preferences from the iTunes menu, click the Store button, and verify that the box labeled Automatically Create Playlists When Buying Song Collections is checked.
For details on playlists, see page 46.
If your Internet connection is interrupted during a download, you haven’t lost your money. Simply reconnect and choose Check for Purchases from the Store menu. iTunes will resume any incomplete downloads.
You buy a couple of songs from an album, then, as you grow ever fonder of them, decide to buy the rest of the album. The iTunes Store makes it easy with a feature called Complete My Album.
With Complete My Album, you have 180 days after you buy a track to buy the rest of the album at a discount. (Well, not really a discount: the iTunes Store simply sells you the rest of the songs, omitting the ones you’ve already bought.) The feature is also available for some music videos.
To access Complete My Album, click the Complete My Album link in the Quick Links box that appears on most store pages. A screen appears listing the albums eligible for completion.
Apple has published a list of frequently asked questions about Complete My Album. You’ll find a link to it by going to macilife.com/itunes.
Want to be informed when a favorite artist releases a new album? Click the Alert Me link that appears in the artist’s screen. From there, you can sign up to be notified when that artist—and other artists whose work you’ve purchased—releases something new.
That isn’t the only way to stay informed. If you use iCal (page 118), you can subscribe to daily calendar updates of top songs, albums, and new releases by going to Apple’s iCal site, www.apple.com/ical.
And if you use a newsreader program, such as NetNewsWire or the latest versions of Apple’s Safari Web browser, you can create RSS newsfeeds that contain this information by going to www.apple.com/rss.
One of the drawbacks of the digital music era is that you don’t get a booklet of lyrics and other liner notes with your purchases. That’s slowly changing: Apple now offers liner notes in PDF form for some albums. Many iTunes Originals collections also include PDF booklets.
The PDFs are downloaded automatically with your purchase, and appear in your iTunes library. Double-click the PDF, and your Mac launches Preview (or Adobe Acrobat Reader, if installed) and opens the PDF.
To learn more about working with PDFs in iTunes, see page 84.
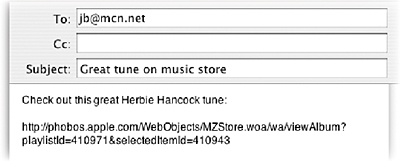
Every item—song, album, video, podcast—in the iTunes Store has its own Internet address. You can copy this address and include it in an email, or link to it from your personal Web site. Using this address is a fun way to let other people know about the stuff you’ve found.
To copy an item’s Web address, point to the item, press the Control key (that’s Control, not ![]() ), and choose Copy iTunes Store URL from the shortcut menu that appears.
), and choose Copy iTunes Store URL from the shortcut menu that appears.
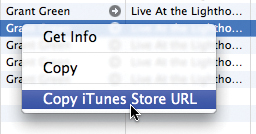
Next, switch to your email program, create a blank email, then paste the address into the body of the email.
You can also drag any item in the iTunes Store to the desktop; this creates an icon that, when double-clicked, takes iTunes to the appropriate item. If you’ve stumbled onto an interesting-sounding album but you want to wait and explore it later, use this technique to put a temporary “bookmark” on your desktop.
In a similar vein, you can also bookmark a favorite artist or genre. Navigate to the artist’s home screen, then drag the artist’s name to the desktop. To bookmark a genre, click the Music link on the store’s home page, then drag the desired genre out onto the desktop. You can also create these “bookmark icons” by dragging the buttons in the store’s navigation bar (shown on page 29).
The music store provides link arrows (![]() ) that let you jump to a page for an artist, album, or song. These buttons also appear when you’re viewing your music library or a playlist. The buttons are Apple’s way of letting you search for (and buy) songs related to ones that you already have.
) that let you jump to a page for an artist, album, or song. These buttons also appear when you’re viewing your music library or a playlist. The buttons are Apple’s way of letting you search for (and buy) songs related to ones that you already have.
If you’d rather not see these buttons—maybe so you don’t accidentally click one and beam yourself into the music store—you can disable them. Choose Preferences, click the General button, then uncheck the box labeled Show Links to the Music Store.
The iTunes Store is addictive enough when you’re sitting at your desk; now it’s possible to carry that addiction with you. If you have an iPhone or iPod touch, you can use its Wi-Fi capabilities to shop at the iTunes Wi-Fi Music Store. Browse for and preview songs, then buy them with a tap. When you sync your Mac and iPhone or iPod touch, iTunes copies your purchases to your iTunes Library. You’ll find details and tips on page 103.
Thinking of buying a music CD for someone? That’s so twentieth century. If the music lovers in your life use iTunes, treat them to some music at the iTunes Store. Or buy them music videos, movies, or TV shows.
The iTunes Store offers a few gift-giving options. If you want to give a specific album, song, or video to someone, you can. Don’t have anything specific in mind? You can also buy prepaid cards and gift certificates that let your lucky recipients pick and choose exactly what they want. You can even set up a monthly allowance that keeps on giving.
To access most of these options, click the Buy iTunes Gifts link located in the Quick Links box that appears on most store pages.
Want to give all year long? Set up an allowance to give a monthly iTunes stipend. You can give as little as $10 per month—about one album’s worth—or as much as, gulp, $200.
You aren’t giving cash, of course, but rather the ability to buy a given amount of music each month. And if your recipient ends up being a bad boy or girl, you can cancel the allowance at any time during the subsequent year. Try that with a music CD.
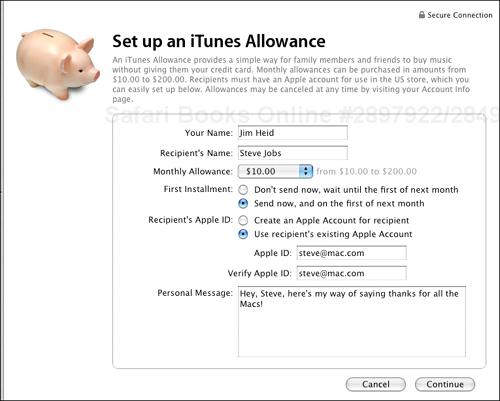
Your recipient must have an Apple account. If he or she doesn’t have one, you can set up an account when creating an allowance.
Note
If you know your recipient has an Apple account but you don’t know what the account name is, don’t set up a separate account for the allowance. That would complicate your recipient’s life, since music store purchases are locked to a specific account. Instead, either find out what the recipient’s Apple account is, or, if you want to maintain the element of surprise, buy a gift certificate or prepaid card instead.
If you don’t know your recipient’s Apple account name—or you aren’t feeling generous enough for a monthly allowance—consider a gift certificate. You can give between $10 and $200. Apple emails the gift certificate to the recipient, who can redeem it by simply clicking a link.

For an analog touch, you can also have the gift certificate printed and mailed to the recipient. Or print it yourself and tuck it into a card.
Prepaid iTunes Gift Cards are available in various denominations from many retail stores as well as the Apple online and retail stores.

To redeem the card, your recipient clicks the Redeem link on the store’s home screen, then types the card’s serial number (it’s printed on the back of the card, beneath a scratch-off coating). After the card is redeemed, the recipient’s copy of iTunes will show that he or she has an additional credit.
You can give any item that’s sold at the iTunes Store. Make your way to the main page for an album or TV series, then click the Gift link. (For albums, the link reads Gift This Album; for shows, it reads Gift This TV Show.)
A new screen appears that enables you to give the entire album (or season, for TV shows) or only certain songs or episodes.
You can also give something that you already have in your music library; see page 50.
Want your iPhone to play a certain tune when a certain someone calls? Create a custom ringtone.
Like any mobile phone, the iPhone lets you store contact information: names, addresses, and phone numbers (see page 116). And like most mobile phones, the iPhone lets you associate specific ringtones with specific people. By adding musical ringtones to your iPhone, you can match the music to the caller.
Ringtones are fun—you can probably imagine many songs that would pair up with the people in your life. But ringtones are practical, too. They let you know who’s calling without your having to extract the phone from your pocket to look at its screen. That makes for safer driving.
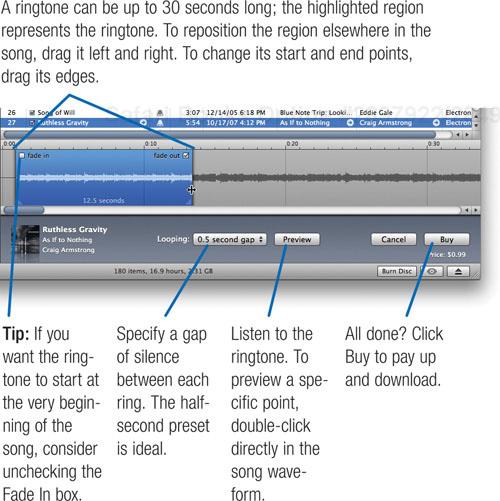
At the iTunes Store, you can buy a ringtone for 99 cents. Use iTunes to choose which portion of a song you want to be the ringtone, then transfer the ringtone to your iPhone.
That’s the Apple Way, and it works just fine, but with limitations. You must buy an entire song for 99 cents before you can turn it into a ringtone—for another 99 cents. And because of the mysteries of record-label licensing, a relatively small selection of the songs on the iTunes Store can be turned into ringtones.
Fortunately, there’s another way: an inexpensive little program that lets you turn any song in your music library—or any sound on your Mac—into a ringtone.
Here’s how to make your iPhone sing when it rings.
Here’s how to create a ringtone from a song you’ve already purchased. Note: Before performing these steps, display the Ringtone column in iTunes: choose View > View Options, then check the Ringtone box.
Click the bell (
 ) next to the song’s name, or select the song and choose Store > Create Ringtone.
(No bell? The song isn’t licensed for ringtone fun. Choose a song that is, or consider Plan B: see the sidebar on the opposite page.)
Use the ringtone editor to create and buy the ringtone.
Sync your iPhone with iTunes (see page 108).
On your iPhone, assign the ringtone to one or more contacts.
Learn more about iPhone ringtones and tools. www.macilife.com/itunes
Your ringtone library. To view ringtones that you’ve created in iTunes, click the Ringtones item in the Library area. (And if you don’t have an iPhone, feel free to remove this item using the General portion of the iTunes preferences dialog box.)
Ringtone candidates at a glance. Want to quickly view a list of your purchases that are licensed for ringtones? Click the Music item in the Library area, then click the bell at the top of the ringtone column; this sorts your library by the ringtone column. To re-sort the library display, click a different column heading, such as Artist.
Just one chance. Once you buy a ringtone, you can’t change it without buying it again, so make that session with the ringtone editor count.
Making Ringtones with iToner
With Ambrosia Software’s $15 iToner, you can copy any AAC-or MP3-format audio file to your iPhone and use it as a ringtone.
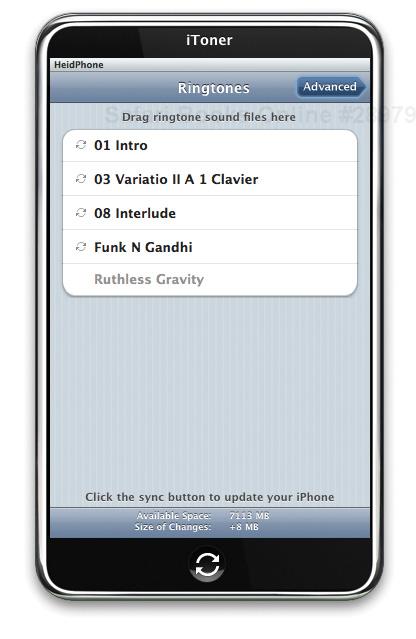
Simply connect your iPhone, then drag AAC or MP3 files into the iToner window. You can drag songs, including ones you’ve purchased, directly from the iTunes window. Then, click iToner’s Sync button to copy the songs to the phone.
<division> <title>Ringtone Tips</title>Editing songs. iToner copies entire songs to your iPhone. If you’d rather save space on the phone—and have ringtones that are a reasonable length—you’ll need to edit AAC or MP3 files before copying them. The best tool for the job is Rogue Amoeba Software’s Fission.
Recording your own. Many Macs contain built-in microphones. If yours does (or if you have a separate mike), you can also use GarageBand to record your own ringtones: record your friend saying, “Hey, it’s me. Answer the phone!”
After recording the audio in GarageBand, use its Export Song to Disk command to create an AAC or MP3 version of the recording (page 357). Then fire up iToner and drag the recording into its window.
More sound sources. Speaking of GarageBand, its sound effects, loops, and podcast jingles are great ringtone fodder. Create a new GarageBand project, add a sound, customize it with effects if you like, then use the Export Song to Disk command to create a version for iToner.
Cat and mouse. New updates to iTunes have been known to cause iToner to stop working. Ambrosia Software says it will keep iToner updated as long as it’s able to, but before downloading iToner, check Ambrosia’s Web site to verify that it’s compatible with the latest version of iTunes.
</division>After you’ve created a digital music library, you’ll want to create playlists: collections of songs sequenced in whatever order you like.
You might create playlists whose songs set a mood: Workout Tunes, Road Trip Songs, Romantic Getaway Music.
You might create playlists that play all your favorite tunes from specific artists: The Best of U2, John Coltrane Favorites, The Artistry of Britney Spears. (That last one is pretty small.)
With playlists, you can mix and match songs in any way you see fit. You can add a song to as many playlists as you like, or even create a playlist that plays one song five times in a row.
Once you’ve created playlists, you can, of course, play them. And you can also transfer them to an iPod, iPhone, or Apple TV (page 108) and burn them to create your own compilation CDs (page 60).
This section describes how to create playlists “by hand.” You can also use the smart playlists feature to have iTunes create playlists for you. For details on smart playlists, see page 52.
After you’ve created some playlists, share them with the rest of us. As page 50 describes, you can publish your playlists on the iTunes Store for everyone to see and rate. And if you’re feeling generous, you can buy the songs in a playlist as a gift for someone.
Hint, hint.
Create a new playlist.

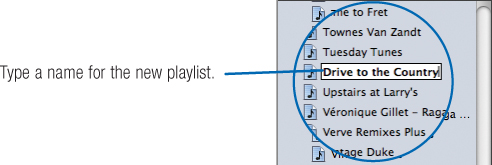
Rename the new playlist.
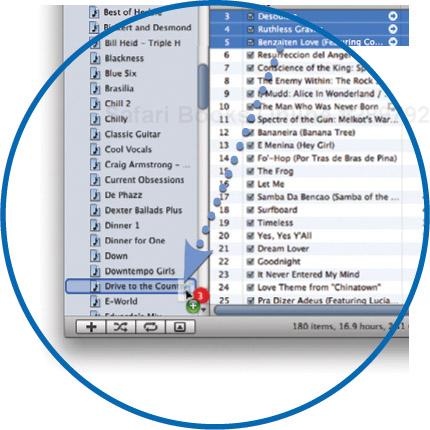
Drag songs to the playlist.
You can drag songs into the playlist one at a time, or select a series of songs and drag them all at once.
Selecting multiple songs. You’ll often want to select multiple songs—to drag them into playlists, copy them to an iPod, and more. To select a range of songs that are adjacent to each other, use the Shift key: click on the first song, then Shift-click on the last one. To select songs that aren’t adjacent to one another, press
 while clicking on each song.
Organizing Playlists with Folders
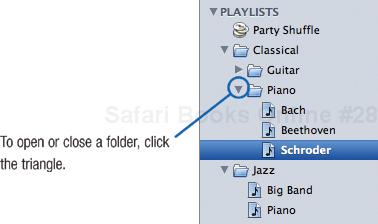
As your collection of playlists grows, consider organizing them by stashing related playlists in folders. To create a new folder, choose File > New Folder. Then, drag playlists into that folder.
How you use folders is up to you. You might create one for all your jazz playlists and another for your classical playlists. If you have a lot of playlists for various artists, consider stashing each artist’s playlists in a folder. If a few members of your household use iTunes, create a folder for each person’s playlists. You get the idea.
Tip
Folders are also a great way to assemble “playlists of playlists.” If you select a folder in your library, iTunes displays (and will play) all the tracks in each of the playlists contained in the folder.
You can also use folders as criteria in smart playlists, described on page 52.
A well-crafted playlist is more than a slew of songs slung into one place.
Consider the setting. A good playlist complements an event. For example, say you’re creating a playlist for a dinner party, and you expect that guests will be mingling for an hour or so before sitting down to dinner. Start your playlist with about 15 minutes of fairly mellow tunes, then build up to some more energetic ones for the next 30 minutes or so. Then start to wind down again, and lead into a solid block of fairly unobtrusive music that won’t overwhelm the dinner conversation.
Similarly, for a workout playlist, you might start and end with slower songs to accommodate warm-up and cool-down times, and put the pulse-pounding tunes in the middle. You get the idea: if your playlist will be accompanying an event, assemble tunes that complement the event’s “story arc.”
Mix artists. To make a playlist that’s more interesting to the ears, mix and match artists.
Consider the transitions. Think about how the songs in your playlist flow from one to the next. You might follow a barn-burner with a slower ballad, for example, or put an instrumental after a vocal. To assess the transitions between songs, start playing one song and then fast-forward by dragging the little playback diamond to near the end of the song (see page 19). Then listen as the songs change. If the transition sounds jarring, consider reorganizing the songs to create a more pleasing segue.
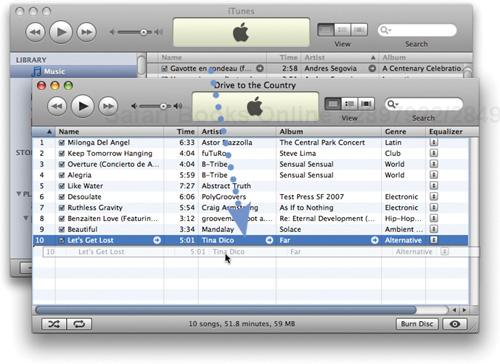
To open a playlist in its own window, double-click the playlist’s name. iTunes opens the playlist in a new window, and switches its main window to the Library view.
You can open as many playlist windows as you like and drag songs between them, as shown here. It’s a handy way to work, since it lets you see the contents of your library and your playlist at the same time.
You can drag a song preview from the music store into a playlist. This can be a handy way to put together a temporary shopping list—drag previews into a playlist, then go back and review them again before deciding what to buy.
You can also publish a wish list of tunes: drag previews into a playlist, then publish the playlist as described on page 50. Who knows? Maybe someone will buy the tunes for you.
To help you tell a preview from a full-length song, iTunes displays a little badge (![]() ) adjacent to a preview song’s name.
) adjacent to a preview song’s name.
Here’s a shortcut for creating a playlist: in the Library view, select the songs you want to include in a playlist, and then choose New Playlist From Selection from the File menu. iTunes adds the songs to a new playlist, which you can then rename.
If you plan to transfer your playlists to an iPod, there’s a trick you can use to ensure that a given playlist will appear at the top of the iPod’s Playlists menu. This cuts down on the time and scrolling required to find a specific playlist.
To have a playlist appear at the top of the iPod’s Playlists menu, precede the playlist’s name with a hyphen (-) character, as in - Mac’s Greatest Hits.
A few other punctuation characters, including period (.), will also send a playlist to the top of the heap.
You can add the entire contents of one playlist to other playlists. Simply drag one playlist to another.
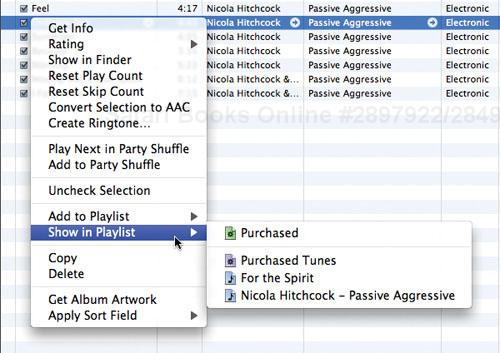
Curious about which playlists contain a particular song? Hold down the Control key, click on the song, and a shortcut menu appears. Open the Show in Playlist submenu to see which playlists contain the song. To jump to a specific playlist, choose its name.
You can also add a song to an existing playlist using this shortcut menu: choose the playlist’s name from the Add to Playlist submenu.
You’re about to rip an audio CD and you’re planning to add some of its tracks to a playlist. Here’s a shortcut: simply drag the tracks from the CD list to the playlist. iTunes will import the tracks and add them to the playlist for you.
You’ve crafted the perfect playlist and now want to move it over to a different Mac, or email it to a friend. Here’s how: select the playlist, then choose Export from the File menu. In the Save dialog box, choose XML from the Format pop-up menu, choose a location for the exported playlist (the desktop is convenient), then click Save.
Next, move the playlist over to a different computer. On that computer, choose Import from the File menu. Locate the playlist and double-click its name. You’re done.
Note that iTunes exports and imports only information about the songs in a playlist—it doesn’t copy the songs’ music files themselves. If any of the songs are missing on the importing computer, iTunes displays a warning and removes those songs from the imported playlist.
To export all of your playlists (an ideal prelude to backing them up), choose Export Library from the File menu.
By choosing the Plain Text format in the Export Playlist dialog box, you can export a playlist in text format—perhaps to bring it into a database manager or spreadsheet program. (Hey, some iTunes users are very obsessive audio librarians.)
When you export a playlist in this way, iTunes creates a text file containing all the information about each song, from its name to its bit rate. You can open this text file using a word processor, or you can import it into a spreadsheet or database program. The items—artist, song name, album name, and so on—in an exported playlist are separated by tab characters. (In geek speak, this command creates a tab-delimited text file.) Most spreadsheet and database programs can read these tabs and use them to put each piece of information in its own spreadsheet cell or database field.
Some programmers have created free AppleScripts that provide more control over playlist exporting. (To learn about expanding iTunes with AppleScript, see page 90.)
Another way to publish a song list is to use the Print command in iTunes. With Mac OS X’s ability to “print” to a PDF file, you can create a PDF listing of songs, then email it or post it on a Web site.
In the Print dialog box, click the Song Listing or Album Listing option, pick a theme, then click Print. Click Save As PDF in the next dialog box, and give the PDF a name. Now share the PDF as you see fit. You can even drag the PDF into the iTunes window and store it as part of your iTunes library. (For more details on working with PDFs in iTunes, see page 86.)
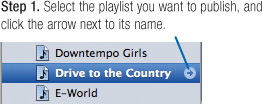
You’ve crafted the perfect playlist? Share it with the rest of us by publishing it at the iTunes Store. (You must have an account at the store or with America Online before you can publish a playlist.)
A published playlist is called an iMix, and it appears in its own screen, much like an artist or album page. Each iMix is available for one year. After you create one, you can tell your friends by sending them e-cards or by publishing your iMix’s address on a Web site. If you have a Web site of your own (including one you’ve created with iWeb), you can also publish snazzy-looking boxes that list the tunes in your iMix and allow visitors to buy them.
Want to buy the songs in a playlist for a friend? In the dialog box that appears after you click the arrow to the right of the playlist’s name, click the Give Playlist button.
iTunes displays a list of the songs that are available in the music store, along with options that let you notify the recipient via email or print a note that you can tuck into a card.
For more music-giving options, see page 42.
iTunes asks if you’d like to give the playlist as a gift or publish it as an iMix. For details on giving the playlist as a gift, see the tip at lower left. Otherwise, click Create iMix.
If iTunes displays its sign-in screen, supply your account name and password.
Describe your iMix.
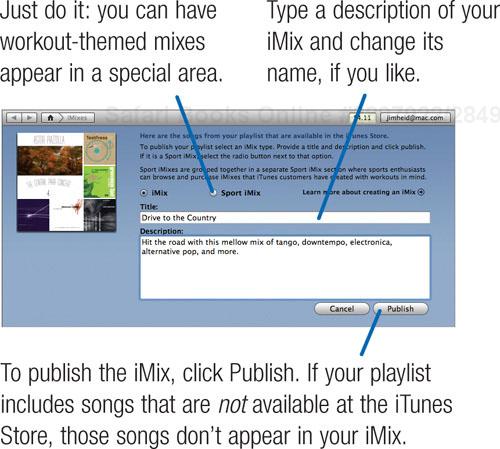
Tell the world, or at least a friend.
After your iMix is published, you’ll receive an email containing a summary of its tunes and a link that you can include in an email or on a Web page.
Exploring iMixes. To explore the iMixes that other people have created, click the Music link on the store’s home screen, then click the iMix link.
You can view mixes chronologically or in order of their rating. On the iMix page, you can also search for songs, artists, and albums that others have included in their iMixes. Highly rated iMixes also appear in relevant artist and album pages.
What else? If you like someone’s iMix, you might want to explore other iMixes that he or she has created. In an iMix window, click the link labeled See all iMixes by this user.
Linking to an iMix. Want to grab the Internet address for an iMix? Control-click on the iMix’s name or artwork, and choose Copy iTunes Store URL from the shortcut menu. Paste the resulting link into an email or the Web tool of your choice.

As with other items in the store, you can also create a desktop icon for an iMix—just drag its title or artwork icon to the desktop.
Publishing an iMix to the Web. Have a Web site? Click the Publish to the Web link, and your browser will display a snippet of code that you can paste into a Web page. The code creates a box listing the tunes, with links to the store. It works nicely with iWeb; see page 404.
Updating an iMix. To make changes to an iMix, edit the original playlist, then publish it again. When you’ve published a playlist, a link arrow appears next to it, even when the playlist isn’t selected.
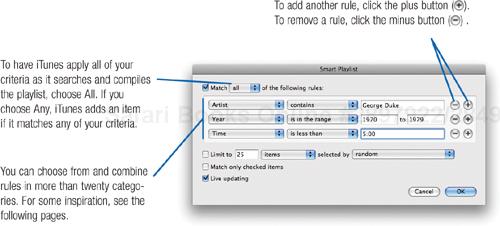
iTunes can create playlists for you based on criteria that you specify. When you’re in a hurry—or if you’re just curious to see what iTunes comes up with—use iTunes’ smart playlists feature to quickly assemble playlists. Smart playlists take advantage of all that information that’s stored along with your music—its genre, artist, year, and more—to enable you to enjoy and present your music library in some fun ways.
Creating a smart playlist involves specifying the criteria for the songs you want included in the playlist—for example, songs whose genre is jazz and whose year is in the range of 1960 to 1969. You can choose to limit the size of the playlist using various criteria, including playing time (don’t create a playlist longer than 74 minutes); disk space (don’t create a playlist larger than 2 GB); number of songs (limit this playlist to 20 songs); and much more. You’ll find some smart playlist ideas on page 54.
You can also use smart playlists to corral videos and podcasts. For example, you might create a smart playlist that collects all unplayed podcasts or all unwatched episodes of a TV show.
The smart playlists feature is really just a sophisticated search command. But remember, a good playlist is more than a series of songs that meet certain rules—it also presents those songs in a musically and emotionally pleasing way. For tips on building good playlists, see page 48.

When you want to be more specific, use more than one rule in your smart playlist. In this example, my smart playlist will contain all George Duke songs from the 1970s that are under five minutes long.
Smart Playlist Tips
To modify a smart playlist’s criteria or update settings, select the smart playlist and choose Edit Smart Playlist from the File menu (or press ![]() -I).
-I).
iTunes lists items you’ve purchased from the iTunes Store in a special playlist named Purchased. However, the Purchased playlist lists only songs you’ve purchased using that particular computer. If you move those purchased songs to a different computer, they won’t show up in its Purchased playlist. And that can complicate backup sessions.
The solution? Create a smart playlist containing only items you’ve purchased. Set up the Smart Playlist window to contain two criteria: Kind contains protected and Kind contains purchased. Then, from the Match pop-up menu, choose Any. These criteria cover protected (that is, DRM-shackled) songs and videos as well as DRM-free iTunes Plus songs. Keep the Live Updating box checked, and you’ll always have a full list of your purchases, no matter which Mac you use to do your buying.
</division>Some smart playlist ideas are obvious: a playlist containing songs from your favorite artist, a playlist of dance tunes, and so on.
But smart playlists aren’t just a quick way to create playlists; they’re also a great way to rediscover your music and explore your library in ways you might not think of otherwise. In short, don’t restrict yourself to the obvious.
As you can see, the Smart Playlist dialog box lets you search on more than 30 criteria. Here are some smart playlist ideas to get your creative juices flowing.
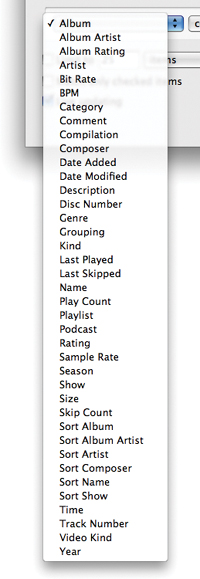
Table . Smart Playlist Suggestions
For a Compilation of | Specify These Criteria |
|---|---|
Short dance tunes | Genre is Dance and Time is less than 5:00 minutes |
The same song performed by various artists | Song Name is equal to name |
Songs added to your library recently | Date Added is in the last 1 week (adjust date value as desired) |
Songs from a particular artist and era | Artist is name and Year is in the range years here |
Songs you haven’t listened to recently | Last Played is not in the last x days (adjust date value as desired) |
Items with missing info—for example, no album name | Album is (leave the third field blank) |
Audio files that are not in MP3 format | Kind is not MPEG audio file |
Songs you’ve added but never listened to | Play Count is 0 (zero) |
Songs you’ve created in GarageBand and exported to iTunes | Kind contains AIFF audio file (assuming that you haven’t compressed them) |
Audiobooks from Audible.com | Kind contains audible |
PDF documents in your music library | Kind contains PDF |
Songs that ask a question | Song Name contains ? |
Songs from your high-school days (assuming that you’ve reached them) | Year is in the range 1975 to 1978 (for example) |
TV shows you’ve purchased | Video Kind is TV Show |
Videos you’ve purchased | Kind contains protected MPEG-4 video |
Podcasts you haven’t listened to | Podcast is true and Play Count is 0 (zero) |
Do you have an iPod with a relatively limited capacity—an iPod shuffle or nano, for example? Instead of letting iTunes decide what to copy to the iPod as described on page 111, you might want to set up a smart playlist that selects only songs you like and omits ones in space-consuming audio formats.
The smart playlist below, based on one originally developed by Playlist magazine’s Chris Breen, does exactly that.

You might want to fine-tune the Limit to value to accommodate your specific iPod. The 3500MB value (roughly 3.5GB) is ideal for a 4GB iPod nano.
After creating this playlist, set up your iPod preferences to update only that playlist (see page 108).
You can have iTunes include or exclude specific playlists when putting together a smart playlist. Choose the Playlist item from the leftmost pop-up menu, choose “is” or “is not” from the middle pop-up menu, then choose a playlist name from the rightmost pop-up menu.
This gives you more control over which songs iTunes selects. For example, to put together a playlist of all the jazz you’ve bought from the iTunes Store, create two criteria: Genre is jazz, and Playlist is Purchased Music.
Or, assemble a playlist of the highest rated songs in a favorite playlist: My Rating is greater than three stars, and Playlist is My Favorites (for example).
You can also use this feature to create more sophisticated search rules. For example, say you want to assemble a smart playlist of your R&B and jazz tunes from the 1960s. First, create a smart playlist that locates all your R&B and jazz. Create two criteria: Genre is R&B and Genre is Jazz, then choose Any from the Match pop-up menu. Name this playlist something like “R&B and Jazz.”
Next, create another smart playlist with the following two criteria: Playlist is R&B and Jazz, and Year is in the range 1960 to 1969.
As described on page 26, you can assign comments and other tidbits of information to your songs. These tidbits pair up beautifully with smart playlists. For example, if you’re a jazz buff, you might use the Comments field to store the sidemen who appear on a given song—Ron Carter on bass, Freddie Hubbard on trumpet. You could then create a smart playlist containing songs in which Freddie Hubbard appears: Comment contains Freddie Hubbard.
Want to explore your music library in a completely different way? Try making a smart playlist built around the Track Number field. For example, to create a smart playlist containing the first song in all of your albums, specify Track Number is 1. If one of your favorite artists always starts his or her albums with a particularly cool track, add the artist’s name: Artist is George Duke and Track Number is 1.
Looking for even more smart playlists? Believe it or not, there’s a Web site devoted to them: www.smartplaylists.com. Check it out for smart playlist ideas and iTunes tips of all kinds.
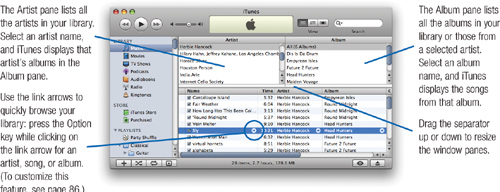
As your iTunes library grows, you’ll want to take advantage of the features iTunes provides for locating songs, artists, videos, podcasts, and albums.
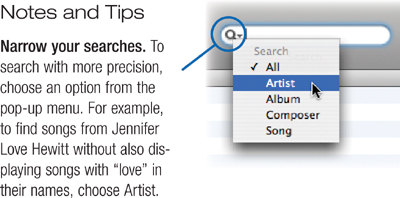
With the Search box, you can quickly narrow down the list of items displayed to only those items that match the criterion you typed.
With the Browse button, you can quickly scan your library by artist, album name, or genre. You can also browse your library of ringtones, podcasts, and audiobooks.
And with the Show in Finder command in the File menu, you can quickly display the actual disk file that corresponds to a given item in your library or in a playlist. That can be handy in a variety of circumstances.
Select the part of your library that you want to search.
For example, to search music, click the Music item in the Library list. To search movies, click Movies. To search a specific playlist, click the playlist’s name.
Click within the Search box and begin typing.
As you type in the Search box, iTunes narrows down the list of items displayed. To see everything in the selected area of your library, select the text in the Search box and press Delete, or simply click the
 in the Search box.
Searching comments, too. When you search for music, iTunes searches the album title, artist, genre, composer, and song title items. If you make use of the Comments field in the Get Info dialog box, you can have iTunes search it, too. Just display the Comments column: choose View > View Options and check the Comments box.
There may be times when you want to locate an item’s disk file on your hard drive—to back it up, for example, to move it to another drive, or to simply determine where it’s stored.
To locate an item’s disk file, select the song and choose Show in Finder from the File menu (or press ![]() ). iTunes switches you to the Finder, opens the folder containing the song, and highlights the song file.
). iTunes switches you to the Finder, opens the folder containing the song, and highlights the song file.

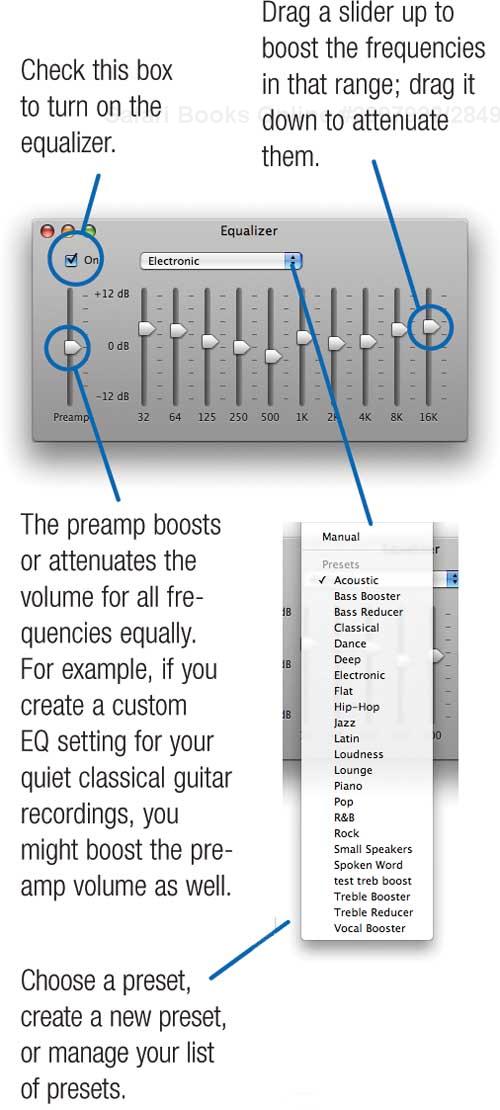
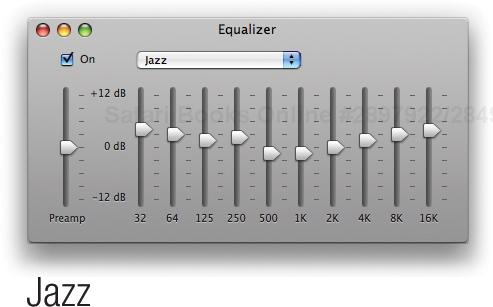
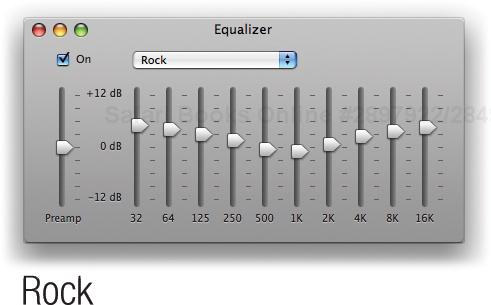
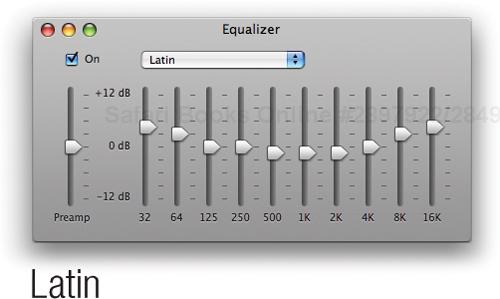
The iTunes equalizer lets you boost and attenuate various frequency ranges; think of it as a very sophisticated set of bass and treble controls. You might pump up the bass to make up for small speakers. You might boost the high frequencies to make up for aging ears. Or you might just prefer a little extra sonic seasoning on your music.
The iTunes equalizer (EQ) divides the audio spectrum into ten bands, and provides a slider that lets you boost or attenuate frequencies in each band. The bands start at 32 hertz (Hz), a deeper bass than most of us can hear, and go all the way up to 16 kilohertz (KHz), which, while short of dog-whistle territory, approaches the upper limits of human hearing. (If you’ve been around for more than several decades or have listened to a lot of loud music, 16 KHz is probably out of your hearing range.)
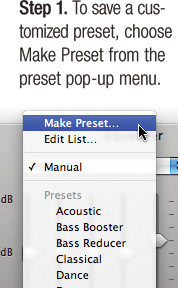
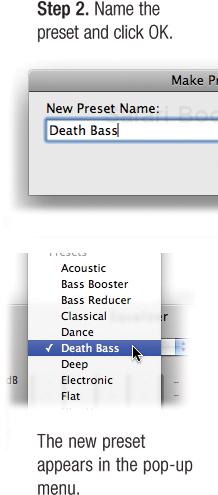
iTunes provides more than 20 equalization presets from which to choose. You can listen to all your music with one setting applied, or you can assign separate settings to individual songs. You can also adjust EQ settings by hand and create your own presets.
Your iPod will also grant your EQ wishes. If you assign an EQ setting to a song and then copy the song to an iPod, the iPod plays the song with that setting.
Note
Although iTunes allows you to assign EQ settings to videos, it ignores them; iTunes applies EQ to music only.
To display the equalizer, click the Equalizer button (![]() ) near the lower-right corner of the iTunes window, or choose Equalizer from the Window menu (
) near the lower-right corner of the iTunes window, or choose Equalizer from the Window menu (![]() ).
).
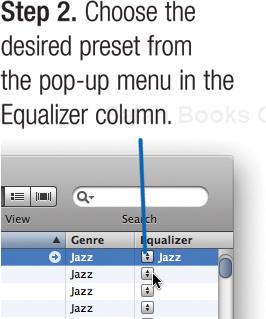
If you’ve turned on the equalizer, iTunes applies the current EQ setting to any song you play back. However, you can also assign EQ settings on a song-by-song basis.

Tip
To change the EQ settings for several songs at once, select the songs and choose Get Info from the File menu. Then choose the desired EQ setting.
You may have noticed that many of iTunes’ presets have a smile-like appearance: the low- and high-frequency ranges are boosted to a greater degree than the mid-range frequencies.

Audio gurus call this shape the Fletcher-Munson curve. It reflects the fact that, at most listening levels, our ears are less sensitive to low and high frequencies than they are to mid-range frequencies.
Chances are your stereo system has a Loudness button. When you turn it on, the stereo applies a similar curve to make the music sound more natural at lower volume levels.
Being able to control the volume of 10 different frequency ranges is great, but how do you know which ranges to adjust? Here’s a guide to how frequency ranges correlate with those of some common musical instruments and the human voice. Note that these ranges don’t take into account harmonics, which are the tonal complexities that help us discern between instruments. Harmonics can easily exceed 20 KHz.

It may be on life support, but the compact disc player isn’t dead yet. Using the CD or DVD burner in your Mac, you can create your own audio CDs—to play in the car, in the living room, on a boombox, or at a friend’s house.
To burn some songs onto a CD, you must first add them to a playlist. Once you’ve done that, burning a CD is a two-click proposition.
iTunes also has some advanced burning features that enable you to burn other types of discs; for details on them and for tips for all your burning endeavors, see page 62.
Chances are you’ll be burning using the CD or DVD burner built into your Mac. But iTunes also works with many external burners sold by La Cie, Formac, EZQuest, and others. These drives typically connect to the Mac’s USB or FireWire connector.

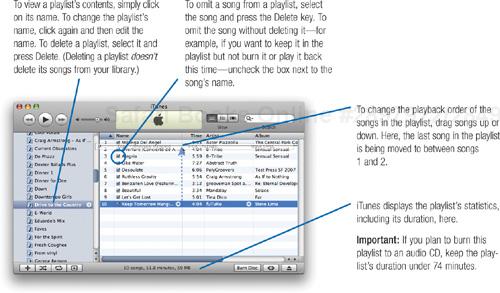
Duration matters. If you’re burning an audio CD, keep the playlist’s duration under 74 minutes. If your entire playlist won’t fit on one audio CD, iTunes will prompt you to burn additional discs.
Your burning desires. By using the Preferences dialog box, you can customize how iTunes burns audio CDs. For example, the Sound Check option ensures that songs on the CD have a consistent volume level, while the audio-gap options let you control how much silence separates each track. For details on these options, see the following pages.


By adjusting burning preferences, you can control the pause between songs, volume levels, and even the format of your final CD. Choose Preferences from the iTunes menu, click the Advanced button, then click Burning.
When iTunes burns an audio CD, it uses a two-second gap to separate songs. Depending on what you’re burning, you may want to omit, or at least change, that gap. On many albums, one song flows seamlessly into the next. When burning these kinds of tracks, close the gap: choose None from the Gap Between Songs pop-up menu.
Unfortunately, because of the nature of audio compression, you may still hear a tiny gap between songs. If you can’t bear even the smallest pause, rip the songs from an audio CD using the Join Tracks option (page 20).
Not all albums are mastered at the same volume level, and if you mix and match tracks from a few CDs, some songs may sound much quieter than others. Don’t reach for the volume knob—click the Sound Check box before burning, and iTunes adjusts each track to make the final CD’s levels consistent.
You can also apply Sound Check when playing music in iTunes; see page 80 for details.
Normally, iTunes burns CDs in standard audio CD format. But you can also burn tracks as MP3 files; this lets you take advantage of MP3’s compression so you can squeeze more music onto a CD—roughly ten times the number of songs that an audio CD will hold.
But there are a couple of catches. Catch Number One: Most audio CD players can’t play MP3-format CDs. If you’re shopping for a CD or DVD player, you may want to look for one that supports MP3 playback.
Catch Number Two: When you burn a playlist in MP3 format, iTunes skips over any songs that are stored in AAC format. If you’ve built a library of purchases from the iTunes Store—or if you use AAC when ripping your audio CDs—MP3 CD format won’t be of much use to you.
To have iTunes burn in MP3 format, click the MP3 CD button in the Burning preferences dialog box.

When ripping CDs that you’ll subsequently be burning in MP3 format, you might find it useful to activate the iTunes track numbering option: in the Preferences dialog box, click Importing and then check the box labeled Create file names with track number.
Track numbering is useful because many players play the songs on MP3 CDs in alphanumeric order—activating track numbering will enable the tracks to play back in the correct order.
Many CD and DVD players are able to display track information—song and artist name, for example—when that information is present on the disc. This capability comes from a part of the audio CD standard called CD Text.
If you have a player that supports CD Text, you can have iTunes record the track information on the CD: just check the Include CD Text box in the Burning portion of the preferences dialog box.
Players that don’t support CD Text simply ignore the information on the disc, so it can’t hurt to choose this option when burning audio CDs.
To learn more about CD Text—and how iTunes retrieves track information from your audio CDs—see macilife.com/itunes.
You’ve bought some music—and then your hard drive dies. The songs and videos you bought are gone, and the only way to download them again is to buy them again. Clearly, backing up is good to do. iTunes can help.
Choose File > Back Up to Disc, and iTunes offers to back up your entire library and all playlists or only iTunes Store purchases.

If you’ve backed up once before, you can also choose to back up only those items that you’ve added since the last backup session.
Which option should you choose? If you have a modest-sized iTunes library—or a generous supply of blank discs—back up everything. Or just back up your purchases. If the worst happens, you’ll have to re-rip your CDs and recreate your playlists—but at least you won’t have to buy your purchases again.
Tip
Most current Macs provide dual-layer SuperDrives. Buy dual-layer DVD blanks, and you can burn 8.5GB on each disc—enabling you to fit even a large iTunes library on a relatively small number of discs.
If the worst does happen and your iTunes library is lost or damaged, start iTunes and insert the first disc in your backup set. iTunes asks if you’d like to restore from the disc.
The built-in backup feature in iTunes works well, but the easiest way to back up a large iTunes library is to drag it to a second hard drive. An external FireWire or USB hard drive is inexpensive and makes great backup media for music and photos alike. Go to your Home directory (choose Home from the Finder’s Go menu), then locate and double-click your Music folder. Locate the folder named iTunes and drag it to the other hard drive. Unlike the burning approach, this technique also backs up all of your playlists.
Tip
If you’ve copied your entire music library to an iPod, you can recover your library from your iPod; see page 110.
Many brands of CD-R media are available, and some people swear by a given brand. Some users even claim that certain colors of CD-R blanks are better than others.
My advice: don’t sweat it—just buy name-brand CD-R blanks. And don’t fret about their colors. Color varies depending on the organic dyes used by the CD-R’s manufacturer, and different manufacturers use different dye formulations. Color isn’t a useful indicator of CD-R quality anyway.
How long will your burned CDs last? Manufacturers toss out figures ranging from 75 to 200 years, but these are only estimates based on accelerated aging tests that attempt to simulate the effects of time.
One thing is certain: a CD-R will last longer when kept away from heat and bright light. Avoid scratching either side of a CD-R—use a felt-tipped pen to label it, and don’t write any more than you need to. (The solvents in the ink can damage the CD over time.)
Also, think twice about applying a peel-and-stick label to the CD. The label’s adhesive can damage the CD over time, and if you don’t center the label perfectly, the CD will be out of balance as it spins, which could cause playback problems.
To learn more about CD-R media, visit the CD-Recordable FAQ at www.cdrfaq.org.
For broadest compatibility with CD players, you’ll want to burn using CD-R blanks, which can’t be erased and reused. But the CD burners in all current Macs can also use RW media—rewritable media, which costs more but can be erased and reused again and again.
A growing number of CD players can play back rewritable media, and if yours is among them, you might consider using rewritable media for some burning jobs—such as burning some podcasts for car listening or to back up your iTunes library.
Note that iTunes can’t erase an CD-RW disc. To do that, use Mac OS X’s Disk Utility program; it’s located in the Utilities folder, inside the Applications folder.
After you’ve burned a CD, you might want to print an insert that you can slide into the disc’s jewel case. With the printing features in iTunes, you can do this and more.
When printing a case insert, you can choose from a variety of insert designs, called themes. Some themes take advantage of the album artwork feature described on the opposite page. If your playlist’s songs have corresponding album art, iTunes uses the art for the front and back of the case insert. With a few mouse clicks, you can even put your own artwork on a jewel case insert.
You can also print several types of song and album lists. They’re a great way to produce a hard-copy reference of your music library and favorite playlists.
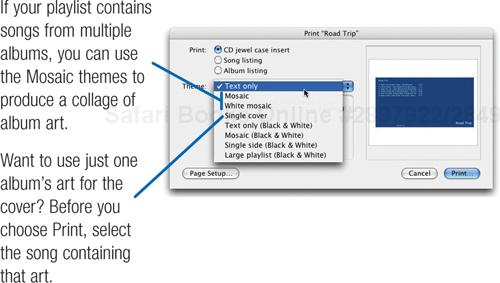
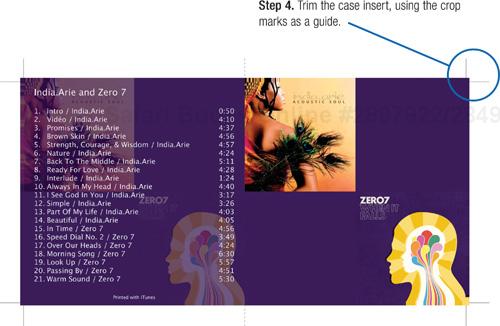
iTunes can store album artwork—for example, an image of a CD cover—along with your music. The artwork also displays elsewhere, as the following pages describe.
Items you buy from the iTunes Store include artwork. To display it, click the Show/Hide Artwork button.
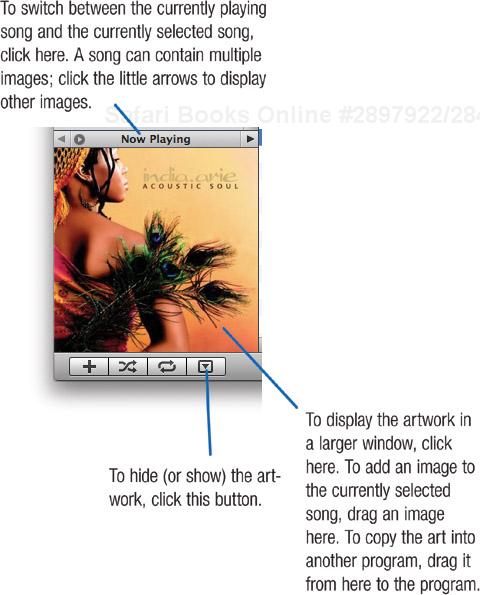
You can also view and modify a song’s artwork by using the Song Information dialog box. Select a song, choose Get Info from File menu, and click the Artwork button. In the example below, the song contains four images. You can store even more, but keep in mind that each image increases the size of your music file, thus leaving less free space on your hard drive and iPod.
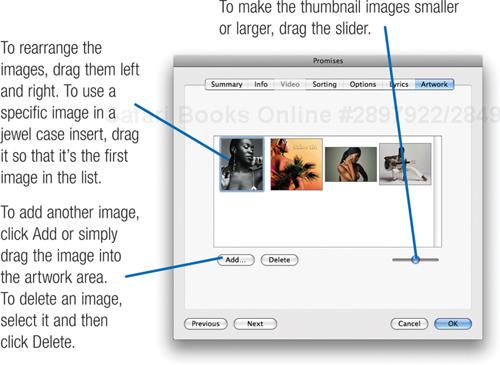
Print your own artwork. You can print your own artwork—including a photo from your iPhoto library—on a jewel case insert. First, add the image to a song. (For a photo, simply drag it from the iPhoto window to the artwork area.) Drag the image so it’s the first image in the list, then print. To reduce the size of the song file, delete the image after printing.
Compact discs, DVDs, and vinyl albums have an advantage that digital files don’t: you can touch them. There’s a tactile pleasure to handling cases and jackets and discs that the digital world doesn’t provide (though fondling an iPod is rather fun in its own way).
Artwork plays a large role in the world of spinning discs. Over time, you associate an album’s cover with the music. Every music lover has experienced it: you see an album cover with your eyes, and hear the songs in your head.
Apple’s Cover Flow feature puts your senses of sight and touch back to work. Found in iTunes, the iPod family, and elsewhere, Cover Flow shows the artwork for your albums in a carousel-like display.
Other items from the iTunes Store, including videos and audiobooks, also include artwork, making Cover Flow a great way to visually explore your library. Click to “paw” through your collection. You can even have the artwork fill your screen while your music plays. That’s bigger than a vinyl album cover.
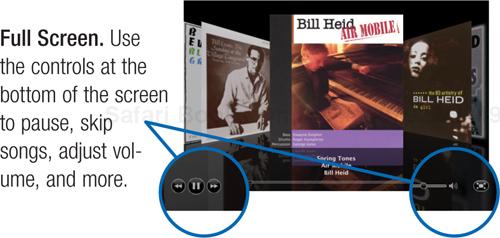
In the Library area of the iTunes window, select the item you want to view in Cover Flow view.
You can view your entire library or a specific item, such as your TV Shows list or a playlist.
Click the Cover Flow button to the left of the Search box (
 ) or choose View > Cover Flow View.
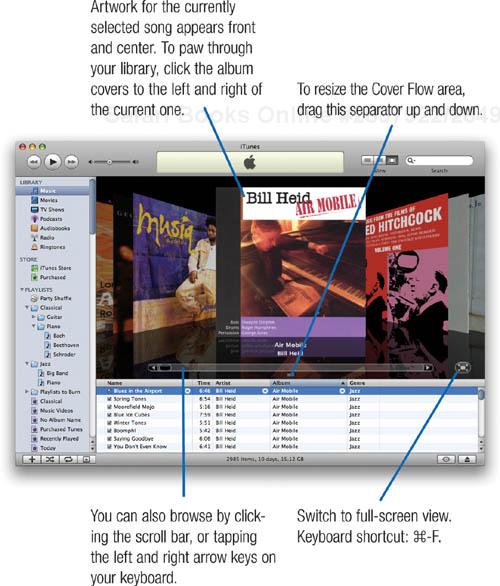
Learn how iTunes works with artwork under the hood. www.macilife.com/itunes
If you’ve ripped songs from obscure CDs or downloaded them from the Internet, there’s a good chance your library contains artless music.
You have several options for completing your art collection.
Use iTunes. Select one or more artless songs, then choose Advanced > Get Album Artwork. iTunes retrieves the artwork—provided the songs are available in the iTunes Store. Start with this option: iTunes retrieves nice, large images that look great.
Use a utility. Artwork utilities, such as Fetch Art by Yoel Inbar, retrieve artwork from other sources, such as Amazon.com. For links to artwork utilities, see macilife.com/itunes.
Do it yourself. By going to Google’s Image Search page (www.google.com/images), you can search for artwork or artist photos. Look for the largest image size available (300 by 300 pixels, which is much smaller than iTunes Store artwork, is often the best you’ll find). When you find one, drag the image from your browser window into the song information window, as described on page 67.
Artwork and Cover Flow figure prominently in Apple’s world. Here are some more places where your art might pop up.
In your hand. The latest iPod models provide a Cover Flow display. Choose Music > Cover Flow, then use the click wheel to flip through your library. To see a list of songs on the album, press the Center button.
Have an iPod touch or iPhone? Navigate to your songs, then turn it sideways to activate Cover Flow view. Sweep your finger through your library. To see the songs on an album, tap the cover.
In the Front Row. Artwork appears when you browse your iTunes library using the Front Row software that is included with many Macs.
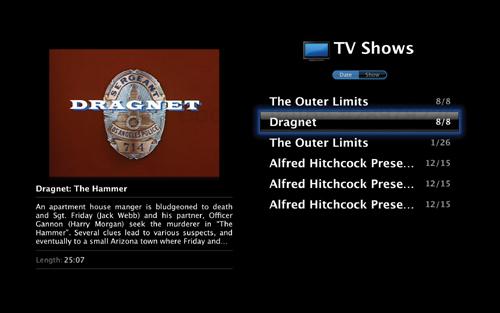
On your TV. If you have an AppleTV (pages 76–79), artwork appears on your TV screen while you browse and listen.
On your newest cat. In Mac OS X 10.5 Leopard, you can use the Desktop & Screen Saver system preference to display an animated artwork screen saver. In the Screen Savers list, choose the iTunes Artwork visualizer.
Tip
For a particularly mesmerizing display, click the Desktop & Screen Saver window’s Options button and increase the number of rows while decreasing the delay.
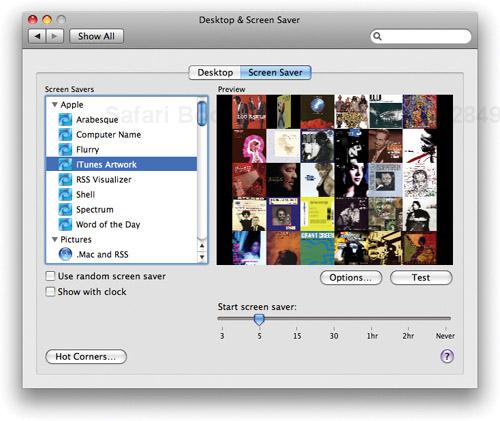
In other utilities. Many iTunes add-ons, such as the magnificent CoverSutra (page 91), make use of album artwork in the course of enhancing iTunes.
If you have multiple Macs or Windows PCs on a network, you can use iTunes’ sharing feature to turn them into media jukeboxes. Share a computer’s iTunes library, and other computers on the network can connect to it and play its music, podcasts, and videos. (You’ll need to install iTunes for Windows on the PCs.)
Sharing enables all manner of media networking options. You might keep all of your music and videos on one Mac—no wasting disk space by storing an iTunes library on each Mac or PC on your network. Conversely, you might prefer to segregate your library—put your kids’ music on their iMac and your music on yours—while still giving each Mac access to every song. You might want to set up a jukebox Mac to dish out tunes to the office. Or use AirPort wireless networking to listen at poolside using your MacBook.
If you use a Mac that supports Apple’s Front Row software, you can also access shared music libraries using Front Row’s Music mode. In Front Row, choose Sources, then select an iTunes library from the list. You can also access shared libraries with an Apple TV (page 78). And if you’re connected to a hotel’s high-speed network, try looking for shared iTunes libraries. You may be surprised by how many you find.
The sharing feature relies on streaming: when you play something from another computer’s library, the files are streamed across your network. The files are never actually copied from one computer to another.
To share your iTunes library with other computers on your network, choose iTunes > Preferences, then click the Sharing button.
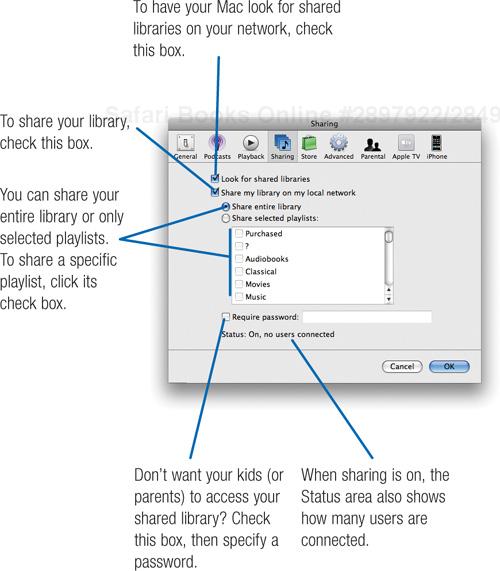
Note
Be sure you’re using the same version of iTunes on each computer on the network. Apple changes the format of the iTunes library now and then, and as a result, different versions of iTunes aren’t always able to share libraries. If a shared library appears grey and an error message appears when you select it, it’s probably because the shared library is coming from an incompatible version of iTunes.
If you’ve checked the Look for Shared Libraries box in the Sharing portion of the Preferences dialog box, iTunes scans your network and lists the shared libraries it finds.
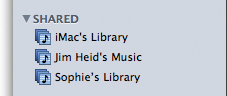
To connect to a shared library, click its name. If the library requires a password, a dialog box appears.
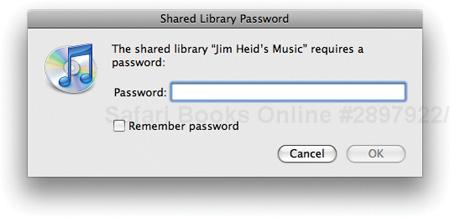

Tips for Sharing
Because shared songs and other items don’t reside on your hard drive, you can’t add them to playlists, delete them, burn them to a CD, or modify their names or other information.
</division><division> <title>Up to Five a Day</title>Up to five computers can connect to a shared library on a given day. If a sixth user tries to connect, he or she sees an error message along these lines: The shared music library “Jim’s Music” accepts only five different users each day. Please try again later.
There is but one solution to this restriction: wait until tomorrow.
</division><division> <title>Disconnecting</title>To disconnect from a shared library, click the Disconnect button (![]() ) in the lower-right corner of the iTunes window, or Control-click on the library’s name and choose Disconnect from the pop-up shortcut menu. Or, click on the eject button that appears next to the library’s name.
) in the lower-right corner of the iTunes window, or Control-click on the library’s name and choose Disconnect from the pop-up shortcut menu. Or, click on the eject button that appears next to the library’s name.
If you want to play a purchased item from a shared library, you’ll have to authorize your Mac by supplying your account name and password. (This doesn’t apply to iTunes Plus purchases.) As noted on page 38, you can authorize up to five computers per account.
</division>The Internet is transforming a lot of things, and broadcasting is one of them. You can tune in to thousands of streaming Internet radio stations using iTunes and other programs.
Many of these stations are commercial or public broadcasters that are also making their audio available on the ’net. But most stations are Internet-only affairs, often set up by music lovers who simply want to share their tastes with the rest of us. You can join them—create your own radio station using a service such as Live365 (www.live365.com) or a streaming server program such as Rogue Amoeba’s NiceCast (www.rogueamoeba.com).
If part of streaming audio’s appeal is its diversity, the other part is its immediacy. Streaming playback begins just a few seconds after you click on a link—there’s no waiting for huge sound files to download before you hear a single note.
Several formats for streaming audio exist, and MP3 is one of them. Using the iTunes Radio tuner, you can listen to Internet radio stations that stream in MP3 format.
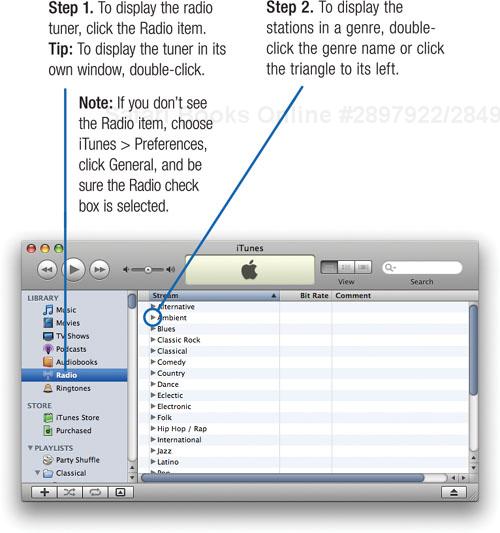
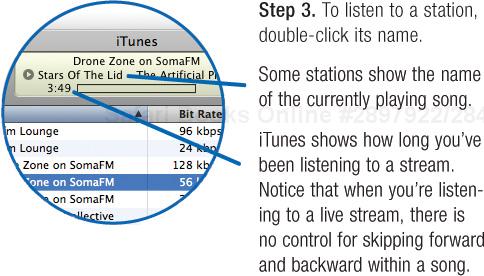

How Streaming Works
When you begin playing back an Internet radio stream, iTunes connects to a streaming server, which downloads several seconds’ worth of audio into an area of memory called a buffer. When the buffer is full, playback begins. The player then continues downloading audio into the buffer while simultaneously playing back the audio that it has already buffered. It’s this just-in-time downloading that gives streaming its near-immediate gratification—most of the time, anyway.
If Internet congestion or connection problems interrupt the incoming stream, the buffer may empty completely, stalling playback while the buffer refills.

Internet radio is a fleeting affair—just as your radio doesn’t store programs, iTunes and other streaming players don’t store Internet audio on your hard drive. That means you can’t add your favorite streaming radio programming to your iTunes library or listen to it on your iPod.
At least not without a little help. Several inexpensive programs can record streaming audio on your hard drive. In fact, they can record any sound your Mac can play. Thus, you can also record audio from DVDs: record some tunes from a favorite concert movie—or some dialog from your favorite Cheech and Chong romp—and burn an audio CD to play in the car.
You can also use one of these programs to record real-time performance effects in GarageBand. You can even record the soundtrack and explosions of a favorite video game, if that’s your idea of easy listening.
Incidentally, if you have favorite AM or FM radio broadcasts that you’d like to record and add to your iTunes library (and iPod), check out Griffin Technology’s RadioShark. It turns your Mac into a TiVo for radio, enabling you to schedule and record radio broadcasts.
The top tool for recording the unrecordable is Rogue Amoeba Software’s Audio Hijack (see opposite page for a look at other tools). Here’s how to use it.
Hijack.
Create a preset for the program with the audio you want to record. If you like, set a timer to start or stop recording at specific times. You can also specify that Audio Hijack run an AppleScript after recording (see page 90 for an introduction to AppleScripts). Audio Hijack includes scripts that use iTunes to encode a recording into AAC or MP3 format.

Click the Record button and start playback.
Click Audio Hijack’s Record button and then begin playing back the audio. Audio Hijack starts recording when playback begins.

Add to iTunes and tweak track info.
Add the recording to iTunes if necessary (if you run either of the encoding scripts after recording, this happens automatically). Then, locate the track in your iTunes library, choose Get Info from the File menu, and edit the song information.
For more information about adding audio files to iTunes “by hand,” see page 86.
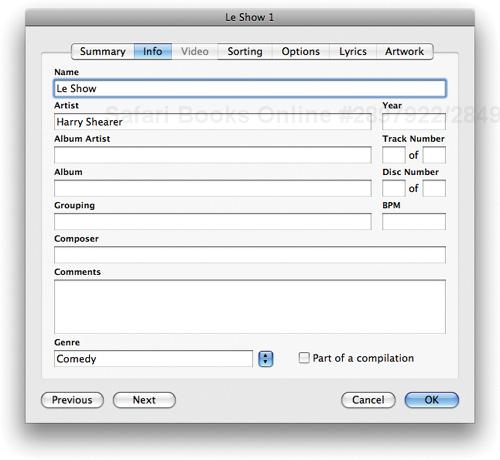
Link to audio-recording programs and more. www.macilife.com/itunes
When recording Internet audio, you’ll often have to make audio-quality decisions.
The right rate. Internet audio is often heavily compressed to allow streaming over slow modem connections. To avoid degrading the sound quality even more, encode at a relatively high bit rate, such as 96 kbps for spoken-word programming, and 128 or 160 kbps for music. If you’re recording talk radio, record in mono rather than stereo.
As for format decisions, as I’ve mentioned elsewhere, AAC provides better sound quality at a given bit rate than does MP3.
Before or after? With some programs, including Audio Hijack Pro, you can choose these settings before you record. With most of the other tools, you must use iTunes to encode after you record.
Being able to encode as you record is a timesaving convenience that uses disk space more efficiently. On the downside, you don’t have the opportunity to experiment with different encoding settings. If you’re recording music and want to get the best sound quality, record in uncompressed AIFF format first, then use iTunes to encode, experimenting with different bit rates and formats until you arrive at the combination that sounds best to your ears.
If you’re like me, you’re desperate to recapture the past: you want to create digital audio files from audio cassettes and vinyl albums.
Bridging the gap between the analog and digital worlds requires some software and hardware. The process involves connecting your Mac to an audio source, such as a cassette deck or stereo system, and then using recording software to save the audio on your hard drive as it plays back. You can encode the resulting files into AAC or MP3 format and add them to your iTunes library.
All current Mac models contain audio-input jacks to that you can connect to a sound source, such as a cassette deck or stereo system. Older Macs need an adapter such as Griffin Technology’s iMic (below), which is inexpensive and includes Final Vinyl, a cutely named recording program. Griffin, M-Audio, and other companies also sell more sophisticated (and better-sounding) audio hardware that you might prefer if you’re an audiophile or you plan to record acoustic instruments using GarageBand.
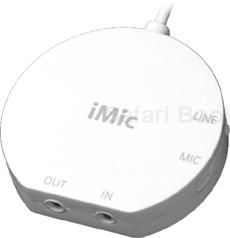
Recording analog sources is easiest when you connect the Mac to the audio output of a stereo system. This will enable you to record anything your stereo can play, from vinyl albums to cassettes to FM radio.
Most stereo receivers have auxiliary output jacks on their back panels. To make the connection, use a cable with two RCA phono plugs on one end and a ⅛-inch stereo miniplug on the other. Connect the phono plugs to the receiver’s output jacks, and the miniplug to the input jack on your Mac or audio adapter.

Before you record, set your audio levels properly: you want the audio signal to be as loud as possible without distorting the sound.
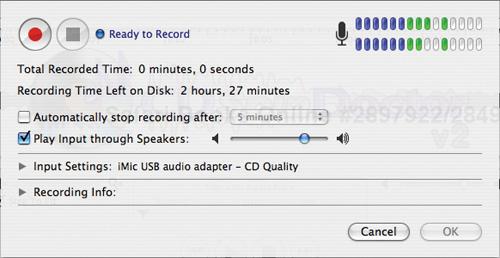
Fire up your audio recording software (Roxio’s CD Spin Doctor is shown here), and adjust its recording levels so that the loudest passages of music fully illuminate the volume meters.
Learn more about recording old tapes and CDs. www.macilife.com/itunes
First, do a test recording. Activate your software’s Record mode and begin playing back the original audio, preferably a loud passage. After a minute or two, stop and play back the recorded audio to verify that the recording levels you set are correct. Listen for distortion in loud passages; if you hear any, decrease the levels slightly.
Once you’ve arrived at the correct setting for recording levels, record the original audio in its entirety.
Your completed recording will almost certainly be stored in uncompressed AIFF format—the format used by Mac recording programs.
To save disk space, you’ll probably want to encode the recording into AAC or MP3 format. Naturally, you can use iTunes to do this.
Before encoding your recordings, use the Preferences command to choose your preferred encoding settings as described on page 22. Next, hold down the Option key and check out the Advanced menu—you’ll see a command that reads Convert to AAC. (If you specified the MP3 encoder in the Preferences dialog box, the command reads Convert to MP3.)
Choose the Convert to AAC (or Convert to MP3) command, and then locate and double-click on the recording you just made. iTunes will encode the track and will store the resulting digital audio file in your iTunes library.
iTunes can also encode multiple recordings in one operation. After choosing Convert to AAC (or Convert to MP3), simply ![]() -click on each file you want to import.
-click on each file you want to import.
After you’ve encoded your recordings, edit their song information to add artist, song, and album names (see page 26). And consider adding artwork so the songs look their best in Cover Flow view (page 66).
Once you’ve assembled a digital music library, you’re going to want to listen to it using your stereo system. One option is, of course, an iPod: copy your music library to one, then connect the iPod to your stereo (or anyone else’s) as shown on page 120.
But you can also connect your Mac to an audio system, and there are some good reasons to do so. You can play music with DJ-like crossfades: one song fades out even as the next song fades in (see page 80). You can play Internet radio—another trick no iPod can perform. You can play audio from other sources, from games to DVDs, and from streaming players to GarageBand. And if your Mac supports Apple’s Front Row software and includes a remote control, you can control your music playback without having to leave your recliner.
The journey from Mac to stereo system has several possible paths; the best one for you depends on the distance between your computer and your audio system, the specific Mac model you have, and your listening goals. Here’s a roadmap of some popular routes. And if you want to also view iTunes videos on your TV, detour to page 78 to learn about AppleTV.


Works with: Any AirPort-equipped Mac.
Best when: Mac and stereo aren’t close enough for convenient cabling.
Downside: Works with iTunes only, unless you use Airfoil software (see page 91).
The audio-output jack on the AirPort Express base station accepts either a ⅛-inch stereo miniplug or an optical digital miniplug (it’s the same type of jack provided by all current Macs).
You can connect any Mac to a stereo system by plugging a cable into the Mac’s headphone jack.
Works with: Any Mac.
Best when: Mac and audio system are relatively close together.
Downside: Audio is less pristine than with digital connections, although most ears will never notice.
All current Macs models have optical digital outputs that use fiber optic cables to provide pristine, hum-free signals, even with cable lengths of over 30 feet. (Add an inexpensive repeater for even longer cable runs.)
Works with: Any Mac with digital audio output.
Best when: You demand top audio quality and have an audio system with optical digital inputs.
Downside: Not an option for if your Mac and stereo lack digital outputs and inputs.
An iPod puts your iTunes library in your pocket. Apple TV puts your iTunes library in your living room.
Apple TV is a bridge between iTunes and your TV set and stereo system. Synchronize part or all of your iTunes library with Apple TV: iTunes copies items to the Apple TV’s hard drive via AirPort wireless networking or an Ethernet cable.
Once that’s done, use the Apple TV’s remote control to navigate your library, watch videos, listen to music and podcasts, and view photos. If you’ve used Apple’s Front Row software on your Mac, you’ll feel right at home: Apple TV’s menus work identically.
Once you marry Apple TV and your iTunes library, the two remain in sync. Buy some tunes or TV shows, and iTunes copies them to your Apple TV. You can also take control yourself and, for example, copy only certain playlists and videos.
It gets better. Apple TV also lets you search for and view videos from YouTube. You can even sign in to YouTube to access your favorites. You can also preview top songs and videos from the iTunes Store. And if you have additional Macs or Windows PCs in your house, they can stream music and videos to the Apple TV—much as you can share iTunes libraries between computers (page 68).
If you use iTunes for music only, consider one of the stereo-connection schemes on the previous pages. But if you’re into iTunes video or you want to view photos or YouTube on your TV, tune in to Apple TV.
Set up.
Connect your Apple TV to your TV and stereo. You have several options, depending on the kind of video- and audio-input jacks your TV and stereo provide. (For some advice, see the following pages.)
You’ll also need to provide a way for your Mac and the Apple TV to communicate. An AirPort wireless network is ideal—no need to string more wires into your TV cabinet. You can also run an Ethernet cable from your Mac to the Apple TV.
Next, configure the Apple TV. This involves connecting to your wireless (or wired) network and specifying some video options. Finally, a five-digit passcode appears on your TV screen.
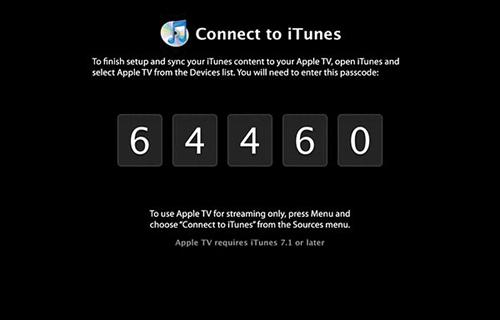
Sit down at your Mac and launch iTunes. Your Apple TV appears in the Devices list. Select it, and then type the passcode that appeared on your TV.
This step pairs your Mac’s copy of iTunes with your Apple TV. iTunes then begins syncing: copying your iTunes library to the Apple TV’s hard drive. A status message appears in iTunes.
If you don’t want to sync everything in your library, take the reins yourself: click the Apple TV item in the Devices list, then use the tabs to specify what you’d like to sync. For details on syncing options, see page 108.
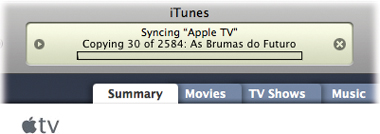
Enjoy and Repeat.
Crack open a Dr. Pepper and start watching or listening. Use the Apple TV’s remote control to navigate and choose options from the menus on your TV. Explore your iTunes library, or detour to YouTube if you’d like.
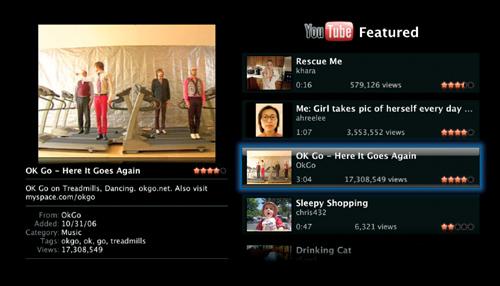
You hear it on the radio all the time: as one song nears its end, it begins to fade as the next song starts to play. You can recreate this effect in iTunes. First, choose Preferences from the iTunes menu, click the Playback button, and then check the Crossfade Playback box.
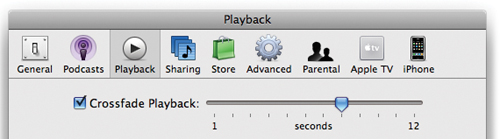
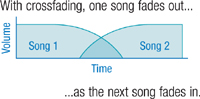
With albums whose songs flow seamlessly into one another, you don’t want crossfading: that would ruin those seamless segues. To prevent iTunes from crossfading a particular song, select it and choose File > Get Info. In the dialog box, click Options, then click the Part of a Gapless Album check box. To set this option for an entire album, select all its tracks (![]() -click on each), then choose File > Get Info.
-click on each), then choose File > Get Info.
When iTunes is running, you can start and stop playback and perform other tasks using the iTunes icon in your dock. Point to the icon and hold down the mouse button (or simply Control-click on the icon), then choose the desired command from the shortcut menu. For even more control over iTunes, check out Synergy and CoverSutra, described on page 90.
To instantly miniaturize the iTunes window, click the green button in its upper-left corner.


Stash this micro-iTunes window in a corner of your screen for convenient access. And if you always want it to be visible, even when you’re working in other programs, choose Preferences from the iTunes menu, click Advanced, click General, and then check the box labeled Keep Mini Player on top of all other windows.
To restore the full iTunes window, click the green button again.
When you create a playlist containing songs from numerous albums, you may notice that some songs are louder than others. To compensate for this, use the Sound Check option, which optimizes playback volumes so that all songs play back with similar volume levels. To turn Sound Check on, choose Preferences from the iTunes menu, click the Playback button, then check the Sound Check box.
You can add aural punch by improving what audio gurus call presence, the perception that the instruments are right in the room with you. To do this, use the Sound Enhancer option in the Playback tab of the Preferences dialog box. Drag the slider toward the High setting, and you may notice brighter-sounding high frequencies and an enhanced sense of stereo separation. Experiment with the setting that sounds best for your ears—and your audio equipment.
As I noted on page 19, you can skip to the next song by clicking ![]() and to the previous song by clicking
and to the previous song by clicking ![]() . To skip to the next or previous album, press the Option key while clicking these buttons.
. To skip to the next or previous album, press the Option key while clicking these buttons.
You can also skip to the next and previous album using the keyboard: press Option along with the right-arrow or left-arrow key.
Apple’s Mighty Mouse and many third-party mice have a scroll wheel. If your rodent is so equipped, you can use the scroll wheel to adjust the volume when iTunes is in its tiny-window mode—just point to the volume slider and roll the wheel.
Here’s a common scenario: As you listen to a tune, you begin browsing your music library or maybe even shopping at the iTunes Store. Then you decide to add the currently playing song to a playlist.
How can you quickly find it? Easy: choose File > Show Current Song (![]() -L), and iTunes displays and highlights the song that’s currently playing.
-L), and iTunes displays and highlights the song that’s currently playing.
You can also click the SnapBack button, which appears near the right-hand side of the iTunes LCD—that wide area at the top of the iTunes window.

Scenario #1: You have an album that was recorded live, and each song starts with a long, rambling introduction by the recording artist. You’d like to cut out that intro and just start with the music.
Scenario #2: There’s a song you really want to like but, two thirds of the way through, it degenerates into an ear-bleeding cacophony of noise.
iTunes has a little-used feature that beautifully addresses both of these scenarios: you can “crop” a song—lop off part of the beginning, part of the end, or both—to hear only the part you want to hear. This cropping is even retained when you transfer the song to an iPod. And best of all, it’s easy.
First, listen to the song you want to crop, and use the iTunes time display to note where the offensive portion ends or begins. Now select the song, choose Get Info from the File menu, and click the Options button.
Next, configure the Start Time and/or Stop Time boxes as needed. In the example below, I’m skipping over the first 34 seconds of the song.

Click OK when you’ve finished, and you’re done.
And if you ever do want to hear that cropped-out portion, you can do so by simply dragging the little playback diamond that appears near the top of the iTunes window. Or, return to the Get Info dialog box and uncheck the Start Time and/or Stop Time boxes.
Note
Your adjustments apply to iTunes and iPod playback only; if you add a “cropped” song to iMovie, for example, you’ll still hear the entire song. But there is a workaround: in iTunes, select the cropped song, then choose Advanced > Convert Selection to AAC (or whatever your preferred import format is). iTunes makes a new file containing just the cropped portion.
iTunes has the ability to remember the point where you stopped listening to or watching an item, and then resume at that point the next time you play it back. Audiobooks and videos work this way automatically, but you can add the “bookmarking” capability to any item. Select the item, choose Get Info from the File menu, click the Options button, then check the Remember Playback Position box.
Bookmarking extends to the iPod, too: when you play an item that you’ve already started, the iPod resumes where you left off.
When long-playing albums appeared in the 1940s, recording artists gained the ability to present more than one song at a time. LPs enabled artists to present songs in a sequence of their choosing. And for the next forty years or so, music lovers would be locked into their choices.
Then compact discs appeared. Unlike phonographs, CD players could instantly access any part of an album. To take advantage of this, player manufacturers added shuffle features: press a button, and the player skipped around within a CD, playing tracks at random. One comedian even worked the concept into his routine: “I ran into a famous musician on the street and I told him, ‘I’m familiar with your latest CD—but not in the order you want me to be.’”
iTunes takes the shuffle concept to the next level. Sure, you can play tracks or albums at random, but with the Party Shuffle playlist, you can combine the serendipity of shuffle mode with the forethought of a well-crafted playlist.
Some music lovers want full control over playback; others love the game of chance that shuffle modes provide. One thing is certain: random-playback features are a great way to rediscover songs you haven’t listened to in a while.
Here’s how turn your music jukebox into a slot machine.
The simplest form of random playback is shuffle mode. To play random songs from your library, select the Library item, then click the shuffle button (![]() ).
).
Shuffling a playlist. To simply hear a playlist in random order, select the playlist, then click the shuffle button. If you’d like to see what kind of random order iTunes comes up with, click the playlist’s leftmost column heading to sort it in numeric order, then click the shuffle button.
Keeping a shuffle. Sometimes a random pick is perfect—just ask any lottery winner. If you like the way iTunes has shuffled a playlist, you can tell iTunes to reorder the songs so that they always play back in that order. Simply Control-click on the playlist’s name and then choose Copy to Play Order from the shortcut menu.
Album and grouping shuffle. Normally, shuffle mode plays back songs in random order. You can, however, also choose to shuffle by album or by grouping. In album-shuffle mode, iTunes plays back an entire album in its original song order, then randomly chooses another album and plays all of it. Grouping is similar, but applies to grouped tracks within an album—for example, the four movements of a symphony.
To use these modes, use the Playback pane of the iTunes Preferences dialog box. While you’re there, you can also drag the Smart Shuffle slider to fine-tune how likely you are to hear multiple songs in a row by the same artist or from the same album.
Tip
To ensure that a particular item—for example, a podcast—never plays in shuffle mode, select that item and choose File > Get Info. Next, click Options and check the Skip When Shuffling box.
Read some articles about the joys of shuffle. www.macilife.com/itunes

Party Shuffle Tips
Customizing the mix. As with other types of playlists, you can change the Party Shuffle playlist on a song-by-song basis: drag songs up or down to change their playback order, delete songs you don’t want to hear, and manually add songs from your iTunes library by dragging them into the playlist.
Adding a song. You can add a song to the Party Shuffle playlist by simply dragging it, but there’s a shortcut. Control-click on a song, then, from the shortcut menu, choose either Play Next in Party Shuffle (to hear the song next) or Add to Party Shuffle (to add the song to the end of the Party Shuffle playlist).
Selecting from multiple playlists. To base a party shuffle mix on more than one playlist, create a smart playlist that selects those playlists (for example, Playlist is My Favorites and Playlist is Jazz Hits), then specify that smart playlist.
Freeze the mix. If you like what Party Shuffle comes up with, you can save the mix as a conventional playlist: choose Select All (![]() -A), then choose New Playlist from Selection (Option-
-A), then choose New Playlist from Selection (Option-![]() -N).
-N).
Adding to a playlist. You can also add the results of a Party Shuffle refresh to an existing playlist: select the songs you want to add, then Control-click on one of them. From the shortcut menu, choose Add to Playlist, then choose the playlist.
iTunes lets you express your inner music critic by assigning a rating of between one and five stars to songs, albums, videos, and other items in your library. You don’t have to assign ratings, but if you do, you can use the Rating and Album Rating categories as criteria when creating smart playlists. You can also have iTunes take ratings into account when compiling Party Shuffle playlists (page 83).
Rating items. The fastest way to rate an item is to Control-click on it and then choose the desired rating from the Rating pop-up menu.
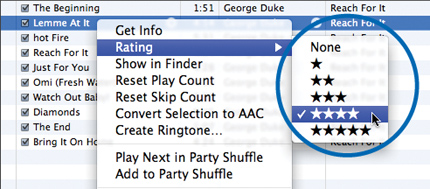
You can also rate items by clicking within the Ratings column in the iTunes window or by opening the Options portion of the Get Info dialog box. And finally, you can rate the item that is currently playing by using the iTunes icon in your dock. Control-click on the iTunes icon, and a pop-up menu appears. Use the Ratings submenu to assign a rating.
You can also assign ratings to multiple items at once: Shift-click or ![]() -click to select them, then use any of the above techniques.
-click to select them, then use any of the above techniques.
Rating albums. You can also rate an entire album; when you do, iTunes gives all its songs the same rating.
To rate an album, begin by displaying the Album Rating column (see the following tip to customize columns). Then, select any song in the album and click its rating stars.
Incidentally, if you rate individual songs in an album but not the entire album, iTunes still gives the album a rating: the average of the songs you rated.
You can specify which columns of information iTunes displays in its windows—to remove columns you never use, or to add ones that iTunes normally doesn’t display.
One way to customize columns is to use the Edit menu’s View Options command. Here’s an easier way: Control-click on any column heading, and uncheck or check columns in the shortcut menu.
You can also use the shortcut menu to automatically resize columns to fit the longest item in each one. And you can change the order of the columns themselves, moving them left and right to suit your tastes. To move a column, click on its heading and then drag left or right.
It’s worth mentioning that you can customize columns on a playlist-by-playlist basis. For example, if you want to see the Composer column when viewing a favorite classical music playlist, click on the playlist’s name in the Playlists list, then display the Composer column using the techniques described here.
I’ve mentioned it elsewhere, but it’s worth repeating: you can customize the Library list by using the Preferences dialog box. Most of your customizing opportunities lurk within the General pane: that’s where you can change the font size iTunes displays; show or hide Party Shuffle and more; and show link arrows.
To control whether the iTunes Store appears, use the Parental portion of the Preferences dialog box.
While you’re listening, iTunes is watching: the program keeps track of how many times you listen to a song and when you last listened to it.
iTunes displays this audio odometer in its Play Count and Last Played columns. This means you can sort your music library or a playlist according to how many times you listened to a song (click the Play Count column heading) or when you last listened to it (click the Last Played column heading). Note that you’ll probably have to scroll the iTunes window to the right to see these columns.
You can also use these data as criteria when creating a smart playlist (see pages 52–55)—have iTunes create a playlist of your favorite songs or of those you haven’t listened to lately.
Get links for even more sources of free music, radio, and video. www.macilife.com/itunes
iTunes uses its play-count records for other tasks. Play count can factor into whether a song is included in the Party Shuffle playlist (page 83). Play count also comes into play if you’ve told iTunes to create an iPod Selection playlist (page 111).
iTunes also keeps track of how many times you skip over a song or other item. If, within about 20 seconds of beginning playback, you click the next track button (![]() ) or choose Next from the iTunes dock shortcut menu, iTunes consider that a skip.
) or choose Next from the iTunes dock shortcut menu, iTunes consider that a skip.
This extends to the iPod, too: jump to the next track within about 20 seconds, and the iPod records a skip that is transferred back to iTunes the next time you sync.
Want to weed out songs you tend to skip over? Create a smart playlist whose criteria include the Skip Count item—for example, Skip Count is greater than 10. You might also use Skip Count when crafting smart playlists that select tunes for a small-capacity iPod, such a shuffle or nano.
On page 39, I mentioned that some songs on the iTunes Store include liner notes in PDF form. You can add your own PDFs to your iTunes library. Scan a CD booklet, and then save it as a PDF. Find an online article about a favorite artist? Save it as a PDF. (Mac OS X makes it easy to create a PDF: just choose a program’s Print command and then use the PDF options in the Print dialog box.) Then, drag the PDF into your iTunes window to add it to your library.
Doug Adams has created an AppleScript that associates a PDF with a specific artist or album. The script is called PDF Adder, and you can get it at Doug’s site (www.dougscripts.com).
When you import music from a CD or buy items from the iTunes Store, iTunes stashes the audio or video files in your iTunes library for you. And as described in the following tip, iTunes is set up to manage the items in your library for you.
But what about items that you get from other sources—for example, audio files downloaded from Web sites or from file-sharing networks, or video files created with a product such as El Gato’s EyeTV? How do you get those items to show up in your iTunes library?
Easy: simply drag their icons into the iTunes window. When you do, iTunes copies the item to your iTunes folder and adds it to your library. To add the item and put it in a specific playlist, simply drag its icon to the playlist in the Playlists list.
As an alternative to dragging icons into the iTunes window, you can also use the Add to Library command in the File menu. Choose the command, then locate and double-click the item you want to add.
iTunes normally stores your music in the Music folder, as described on page 21. If you download an MP3 file from the Internet and drag it into the iTunes window, you’ll actually have two copies of the MP3 file on your hard drive.
If you don’t want iTunes to copy files to the iTunes Music folder—if you’d prefer to have your music files scattered throughout your hard drive—choose Preferences from the iTunes menu, click the Advanced button, and then uncheck the box labeled Copy Files to iTunes Music Folder When Adding to Library. You can also temporarily override the copying feature: press Option while dragging a file into the iTunes window. Note, though, that having music scattered across your hard drive makes backing up your music library much more cumbersome. I don’t recommend it.
Chances are you have some compilation CDs in your music collection: Solid Gold 70s, The Best of Bartok, Tuvanese Throat Singing Mania, and so on. You can have iTunes store the music files for compilations in a separate folder within your iTunes Music folder. This helps reduce folder clutter and makes it easier to locate and manage your music files.
For example, say you have a compilation CD that contains tracks from a dozen different artists. Normally, iTunes would create a separate folder for each artist—even though that folder might contain just one music file. But when those songs are designated as being part of a compilation, iTunes will store all of those tracks together in their own folder.
Compilation albums that you buy from the iTunes Store are all set up this way. And chances are that when you rip a compilation CD, its tracks will be, too. Here’s how to make sure. Select all the tracks on the album, then choose File > Get Info. Then, be sure that Yes is chosen in the Compilation pop-up menu at the lower-left corner of the Get Info dialog box.
iTunes stores compilations within a folder whose name is, you guessed it, Compilations. Within this folder, iTunes creates a separate folder for each compilation you’ve specified.
If you’re like the vast majority of people who use iTunes, one library is quite enough. But one library does not fit all. Some people like to create multiple iTunes libraries, and designate each for certain types of media. For example, maybe you have a MacBook containing your music library, but you don’t want to store gigantic video files on your laptop’s hard drive. Solution: Create a second library on an external hard drive, and store your iTunes Store video purchases there.
To create a new iTunes library, quit iTunes. Then, start iTunes and immediately hold down the Option key on your keyboard. A dialog box appears that lets you choose a library or create a new one.
Get more tips for managing iTunes libraries. www.macilife.com/itunes

Click the Create Library button, then give the new library a name. If you want to store it somewhere other than your Music folder, specify the location. It’s that easy.
Switching from one library to another is a similar process: Quit iTunes, then start it while pressing the Option key. This time, though, click the Choose Library button and aim iTunes at the library you want to use.
You already know that iTunes sorts the contents of its window according to which column heading you’ve selected. And you also know that you can reverse the sorting order (for example, z to a) by clicking a column heading a second time.
But there’s more to sorting.
Album-sorting options. If you click the Album column heading, it changes to read Album by Artist. Click it again, and it changes to Album by Year.
When Album by Artist is active, iTunes sorts the window by album name, then artist name. For example, all albums by Al Green are grouped together, sorted by their album name (I Can’t Stop appears above Still In Love With You).
When Album by Year is active, iTunes sorts the window by album, then year. In this case, Al Green’s 1972 Still In Love With You appears ahead of 2003’s I Can’t Stop.
Both views give you more ways to look at your library. And incidentally, to reverse the sort order of the Album column, click the little triangle in the column heading.
Customizing sorting. You might have some items that don’t sort the way you want them to. For example, maybe you’d like The Beatles to appear in the Ts instead of in the Bs. Or perhaps you want artists to be sorted by last name (Brown, James instead of James Brown). Or maybe you’d like your songs by rapper 50 Cent to appear in the Fs rather than in, well, the fives.
To change how iTunes sorts items, head for the Get Info dialog box. Select an item, such as a song, then choose File > Get Info. Click the Sorting button, and you’ll find half a dozen fields where you can specify how you want iTunes to sort the item.
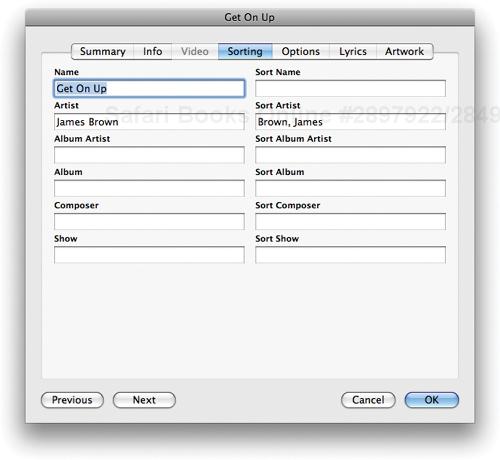
For example, to have a 50 Cent tune sorted in the Fs, type Fifty Cent in the Sort Artist field. Or to have James Brown’s tracks sorted by his last name, type Brown, James in the Sort Artist field.
There’s just one catch: iTunes lets you change sort information for just one track at a time. You’ve changed one James Brown tune—what about the rest?
Easy. (Not obvious, but easy.) Control-click on the one James Brown tune that you customized, then, from the shortcut menu, choose Apply Sort Field > All Matching Fields. A confusingly worded dialog box appears; click Yes.
That may be more than you ever wanted to know about iTunes sorting. But as I’ve said before, some iTunes users are obsessive librarians. And tricks like these become useful when you deal with libraries containing tens of thousands of items.
When you use Mac OS X to set up separate accounts for different people, each person gets his or her own iTunes library. But what if you want to have just one library that can be accessed by everyone who uses your Mac?
It isn’t difficult, and my colleague Chris Breen has explained how to do it. I’ve linked to his able explanation at www.macilife.com/itunes.
I’ve already mentioned the importance of backing up your iTunes playlists and your music (page 62). This message bears repeating. Make a habit of backing up your playlists by using the Export Library command in the File menu, and of backing up your music files by burning them to CDs or DVDs. Or simply drag your entire iTunes folder to an external hard drive every now and then.
As your library grows, you may end up with more than one copy of some songs. This can happen if you frequently buy compilation CDs or iTunes Essentials mixes: you might have John Coltrane’s Giant Steps from the CD of the same name, and the identical recording from the compilation Heavyweight Champion: The Complete Atlantic Recordings. It’s a great tune, but why waste space storing two copies of it?
iTunes can help you find those duplicates. First, tell iTunes what kind of duplicates you want to find: in the Library area, click one of the categories (Music, Movies, TV Shows, and so on).
Next, choose View > Show Duplicates. The iTunes window changes to show just duplicate items. Study those duplicates to verify that they really are duplicates.
iTunes simply matches item names, so it will consider Norah Jones’ Don’t Know Why from her Come Away with Me album to be a duplicate of the same tune from her Live in NYC album. A glance at the Time column is usually all it takes to identify genuine duplicates: their times will be identical or extremely close to it. In the example below, iTunes thinks it has found duplicates, but a look at the Time column (and, in this case, the album name) shows that the songs aren’t duplicates at all.
If you do indeed find a duplicate that you’d like to get rid of, select it and press the Delete key. When iTunes asks if you’d like to move the file to the trash, click Move to Trash.
To restore the iTunes window to its normal view, click the Show All button at the bottom of the window.
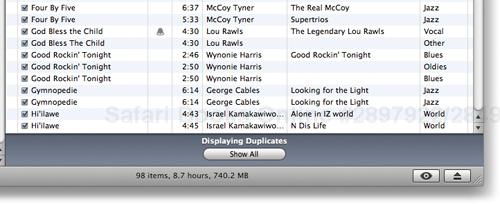
It’s a frequently asked question: how do you merge two iTunes libraries into one? Maybe you’ve been maintaining separate libraries on your MacBook and your iMac, and you’d like to unite them into a single, unified library.
To synchronize two libraries or merge one library’s contents into another, turn to an iTunes library utility. Several are available; SuperSync and TuneRanger are the most capable ones I’ve tested. Both will open two iTunes libraries, compare the two, and the let you know which items are present in one library but not the other. From there, you can have the program synchronize the two libraries (making them identical) or just copy items from one library to another.
Both programs also enable you to access the contents of an iPod and copy items from it into your library. (For more programs that do this, see page 110.)
Using library-synchronization utilities can be tricky. Unless you’re trying to sync up two very large, very different libraries, you might consider synchronizing libraries by hand. Consider simply copying items from one library to another yourself: use Mac OS X’s file-sharing features, copy the items to a USB Flash drive or external hard drive, or burn them on a CD or DVD. It’s a bit more work, but it will give you a chance to examine both libraries and remove unwanted or duplicate items.
I’ve already mentioned that you can enhance the capabilities of iTunes through AppleScripts that automate iTunes in various ways.
You can also enhance the iTunes visualizer—the feature that displays those psychedelic patterns as your music plays back—by adding plug-ins. Visualizer plug-ins may not be as practical as AppleScripts, but on-screen psychedelics can often be more fun than practicalities.
Here’s how to download and install iTunes AppleScripts and visualizer plug-ins, as well as information on some other programs that can round out the audio spoke of your digital hub.
If you’re a fan of the iTunes visualizer, try out some of the free or inexpensive visualizer plug-ins available on the Web. One favorite is Andy O’Meara’s free G-Force, which goes well beyond the built-in iTunes visualizer. For example, you can “play” G-Force—controlling its patterns and colors—by pressing keys on your keyboard as a song plays back.
You can find G-Force and other visualizer plug-ins by going to www.macilife.com/itunes. Or do a Google search for iTunes visualizer.
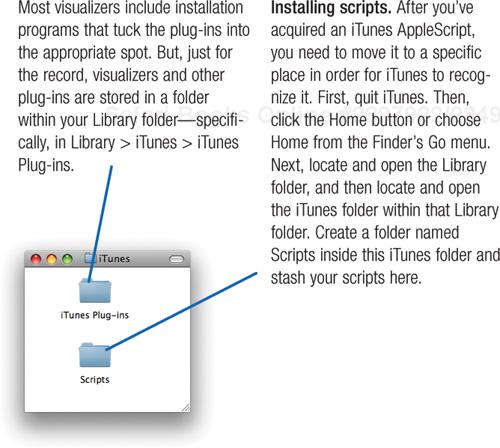
AppleScript is a powerful automation technology that is part of the Mac OS and many Mac programs, including iTunes. AppleScript puts your Mac on autopilot: when you run a script, its commands can control one or more programs and make them perform a series of steps.
Dozens of useful scripts are available for iTunes. The hands-down best source for them is Doug’s AppleScripts for iTunes (www.dougscripts.com). When it comes to automating iTunes, no one has done more than Doug Adams.
Find iTunes add-ons aplenty. www.macilife.com/itunes
Completing Your Audio Arsenal
Dozens of programs are available that enhance or complement iTunes. Here’s a quick look at a few of my favorite audio things. For links to these and many more iTunes companions, see the Web address above.
Synergy. This inexpensive program lets you control iTunes without having to switch into iTunes. Synergy provides keyboard shortcuts that let you play, pause, change volume, and even assign ratings to songs—no matter which program you’re using at the moment. Synergy also adds a menu to your Mac’s menu bar that lets you start and stop playback, skip to a particular playlist, and much more. When a song begins playing, Synergy displays a cool-looking “floater” that lists the song and artist name, album cover art, and other information.
CoverSutra. Cute name, cool program. CoverSutra also enhances iTunes playback with features similar to those of Synergy. But CoverSutra goes further. It supports the Apple Remote Control that is included with many Macs, enabling you to control playback and volume using the remote control but without switching into Apple’s Front Row. CoverSutra can also tap into the last.fm social networking site, sending songs you play to your last.fm profile.
Toast Titanium. Roxio’s Toast Titanium is a burning program for serious CD arsonists. Toast can burn DVDs as well as audio and data CDs, and provides more control over the burning process. Just one example: while iTunes puts the same amount of time between each song on a CD, Toast Titanium lets you specify a different interval for each song. You can also have DJ-like crossfades between the tracks on your CDs. Toast Titanium also includes the CD Spin Doctor audio-recording program discussed on page 74.
iWOW. Strange capitalization, cool program. iWOW, from SRS Labs, installs within iTunes and essentially remasters your music as it’s playing back. iWOW lets you increase the stereo “presence” of a recording as well as add punch to bass and treble. Download a trial version from the company’s Web site and hear for yourself.

Airfoil. On page 76, I lamented that the AirPort Express base station supports wireless streaming from iTunes only. With Rogue Amoeba’s Airfoil, you can work around this limitation. Airfoil hijacks any program’s audio output and routes it through AirPort Express, making it possible to pump RealAudio and Windows Media sound to your AirPort Express.
Salling Clicker. If you have a Bluetooth-equipped Mac and a Bluetooth-equipped phone or other handheld device, you can turn the handheld into a powerful remote control for iTunes (and many other Mac programs, including iPhoto). Combine Salling Clicker with an AirPort Express base station, and you’ve got a wireless audio system with a remote control.
iTunes isn’t just about tunes. You can also use it to listen to recorded audiobooks that you can buy and download from the iTunes Store or from Audible.com (www.audible.com). Listen to a novel on your next flight, burn it to a CD so you can listen to it in the car, or transfer it to your iPod and listen while you jog. You can buy audio versions of novels, magazines, newspapers, comedy shows, and much more. With the latest iPods, you can even speed up or slow down the reading speed (see page 111).
The easiest way to shop for audiobooks is to use the iTunes Store. Simply click the Audiobooks link on the store’s home page.
If you want a much larger selection, shop at Audible.com’s Web site. Buying audiobooks through Audible.com is a bit trickier than buying them through the iTunes Store. You’ll also have to perform an extra couple of steps to add your purchased audiobooks to your iTunes library. These steps are outlined at right.
And to ensure that your Mac handles audiobooks correctly, be that sure iTunes is set up to handle Internet playback. Quit your Web browser and email program, then choose Preferences from the iTunes menu. Click the Advanced button at the top of the Preferences window, then click the General button. Finally, click the Set button that appears next to the label Use iTunes for Internet Music Playback.
Now your Mac is ready to read aloud.
If you already have an Apple account, you’re ready to buy audiobooks from the iTunes Store. If you’re interested in the broader selection available from Audible.com’s site, visit www.audible.com and create an account. Then read on for details on working with Audible.com files.
When buying an audiobook from Audible.com’s Web site, you typically have a choice of formats, which are numbered 1 through 4. The iPod supports formats 2, 3, and 4. Which should you use? If you’re in a hurry or using a modem connection, you might choose format 2—its files are smaller and thus download faster. If you have a fast connection, you might lean toward formats 3 or 4. They sound better, but they’ll take longer to download and use more disk space on your Mac and iPod. (Audiobooks that you buy from the iTunes Store are available in AAC format only.)
When you download an audiobook from Audible.com’s site, the audiobook should be added to your iTunes library automatically. If it if isn’t, you’ll need to do the job yourself. Locate the audiobook on your desktop or Downloads folder (its name ends with the file extension .aa), then drag its icon into the iTunes window.

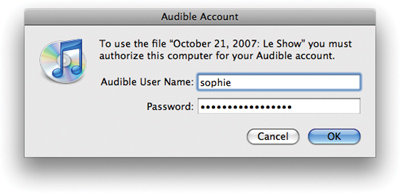
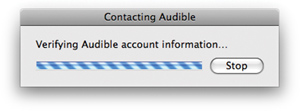
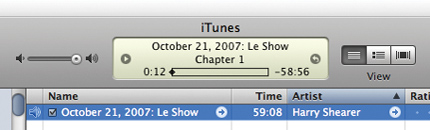
It’s hard to appreciate the significance of the iPod until you load it up with hundreds of songs and begin carrying it around with you.
Then it hits you: all of your favorite songs are right there with you, ready to play—in the car, on a walk, in the living room, on a plane. There’s no finding and fumbling with CDs, and every song is only a couple of button presses away.
Several factors work together to make the iPod the best portable music player, starting with its integration with the iTunes Store: no other portable music player can tap into the store’s vast selection of music, videos, podcasts, and more.
Another factor is the iPod’s integration with iTunes: connect the iPod to your Mac, and iTunes automatically synchronizes your music library and playlists.
And finally, there’s the iPod’s versatility. Its ability to store videos, photos, contact information, your calendar, appointment schedule, and other files make the iPod more than a portable music player.

The iPod is more than a music player—it’s a cultural phenomenon. There’s even a service, podapic.com, that will turn a photo you supply into a mock iPod ad. Here’s Sophie modeling the latest earwear.
Use the techniques described earlier in this section to import songs from audio CDs, buy music and videos from the iTunes Store, subscribe to podcasts, assign equalization settings (optional), edit song information (if necessary), and create playlists.

Connect the iPod to your Mac’s USB port (older iPods connect to the FireWire port instead). You can also buy a dock that makes connecting to the Mac even faster and more convenient (see page 120). Whether you use the dock or just a cable, when you connect the iPod to a Mac, iTunes copies your library and playlists to the iPod.
You can adjust settings for updating the contents of your iPod. For example, you can have iTunes copy only certain playlists, or copy songs but not videos. For details on syncing options, see page 108.
While the iPod is connected, its battery charges. The battery charges to 80 percent of its capacity in an hour or two, and charges fully in about three to four hours.
The iPod’s battery gauge is located in the top right corner of its screen.
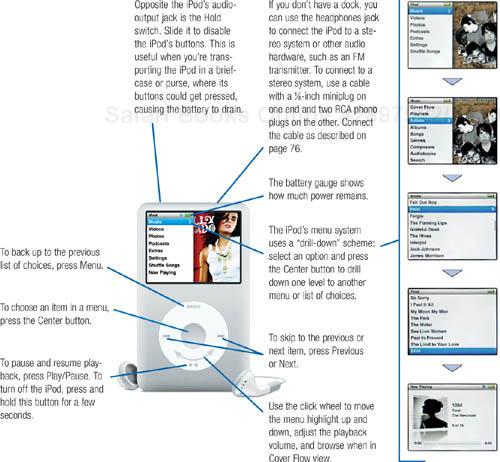
The iPod has changed since its debut in 2001, and it continues to evolve. Sometimes the changes are simple: bigger hard drives to store even more songs. Sometimes the changes bring significant new capabilities, such as the ability to store photographs and play video. And sometimes, the changes are downright revolutionary, such as the touch-screen iPod touch and its telephonic cousin, the iPhone.
Each new generation brings improvements and enhancements to the software inside the iPod. Apple often makes these enhancements available as software updates for older iPods, although the oldest models have been left behind by some upgrades. For example, older iPods (specifically, ones that do not have dock connectors) can’t play back songs compressed using the Apple Lossless encoder, nor do they provide as many menu-customizing options.
The features change, but the iPod’s name remains the same. Because of this, the iPod family is often categorized according to “generations”—at least until 2007, when Apple gave the full-sized iPod its own name: classic. Here’s a look at each generation of full-sized iPod and the features and capabilities that are common across the iPod line. On later pages, we’ll take a closer look at the littlest iPods—the mini, the nano, and the shuffle—as well as at the iPhone and iPod touch.
All current iPods that have display screens (as opposed to the tiny, screenless iPod shuffle) provide a common set of features and capabilities—starting with the obvious ability to play audio files. All iPods support iTunes playlists and provide shuffle modes for random-listening fun. And they all provide sound-enhancing equalizer settings similar to those provided by iTunes itself (page 58).
Beyond these basics, all current iPods also have some non-musical talents, which are covered in the following pages.
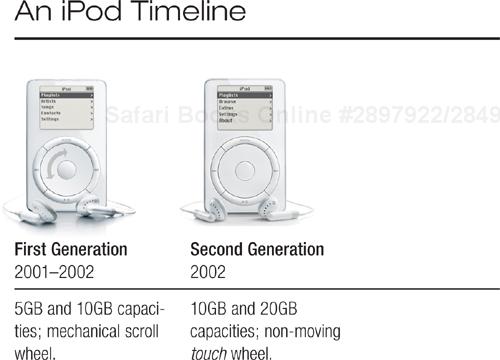
All current full-sized iPods (and the latest iPod nano) can store and play videos that you buy from the iTunes Store (page 32) or convert for iPod playback yourself (page 106). You can watch the videos on the iPod’s screen or connect the iPod to a TV set.
Use iTunes to transfer photos from your iPhoto library, then view them on the iPod’s screen or on a connected TV set (page 104).
If you store addresses in the Mac OS X Address Book, Microsoft’s Entourage, or other programs, you can transfer that information to your iPod and carry your contacts with you (page 116).
The fifth-generation iPod and the iPod classic support optional microphones that let you record voice memos and similar snippets.
All iPods have some built-in games, but the fifth-generation iPod and the iPod classic support sophisticated games that you can buy from the iTunes Store.
Similarly, you can stash calendar events in the Mac OS X iCal software and transfer them to your Mac. You can even have the iPod sound an audible alarm when a calendar event arrives.
All current iPods also provide some fun and practical (and sometimes both) extras: a stopwatch function, an alarm clock mode, and the ability to display text notes copied from your computer.
An iPod’s dock connector is the gateway to a world of accessories and expansion opportunities, from radio receivers to radio transmitters to external speaker systems (page 120).
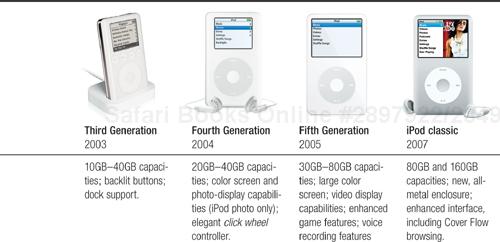
Honey, I shrunk the iPod—that about sums up the iPod mini and iPod nano. Both have most of the talents of their bigger brethren, but are much more compact—or, in the case of the nano, much, much more compact.
The iPod mini was the first of Apple’s petite iPods. It’s no longer made, but if you crave a pink iPod, a visit to eBay will probably turn up plenty. Like full-sized iPods, the mini contained a hard drive. Functionally, its features match those of the 4G iPods. The mini can’t store photos or videos.
As for the iPod nano, it makes the mini look maxi. Its compact size is due in part to its use of flash memory—the same type of memory used by your digital camera—instead of a hard drive. And while the nano may be a fraction of the size and half the weight of the mini, it does more—you can store photos and video on it, and watch them on its screen or on a connected TV set.
All of the general iPod techniques described in this section apply to the mini and the nano. Here’s a look at what’s different about these compact iPods.
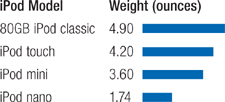
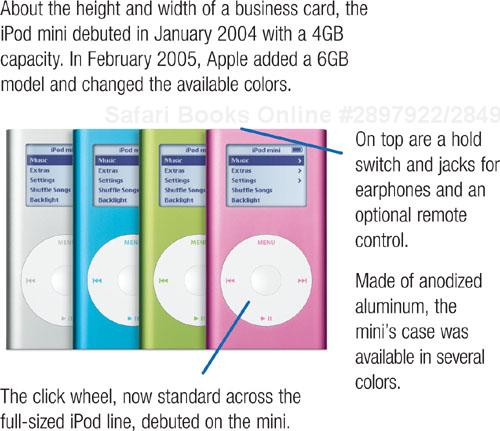
The original iPod nano debuted in September 2005. Available in 1GB, 2GB, and 4GB capacities, it stored photos as well as music, but did not provide video playback or the ability to display photos on a TV set. Its color screen was bright and readable, but at 1.5 inches, it wasn’t the best place to view photos.
In September 2006, Apple introduced a second-generation nano. It was available in several colors and in capacities of 2GB, 4GB, and 8GB.
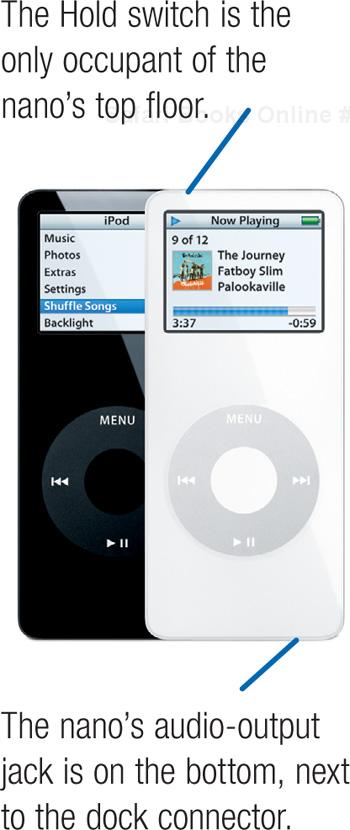
Introduced in September 2007, the latest iPod nano is a bit larger than the original nano, but it does so much more: the nano, like the iPod classic, plays video and connects to a TV set.
Initially available in 4GB and 8GB capacities, the third-generation nano also matches the other enhancements of the iPod classic, including Cover Flow browsing, a search function, and advanced game support. The nano’s energy-efficient flash memory and improved battery provide roughly 24 hours of continuous music playback, and about five hours of video playback. Caffeine not included.
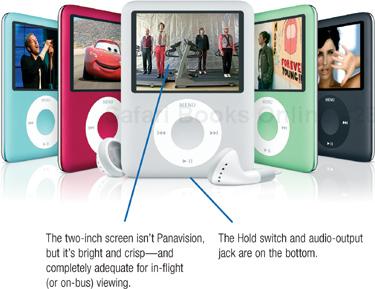
iPod shuffle is something completely different. It lacks a display and click wheel. You can navigate to the next and previous song, but you can’t skip around within songs or jump to a specific song in a playlist or album. And forget about storing photos, contacts, and calendar information.
But where iPod shuffle shines is in your pocket—and pocketbook. This is a truly tiny music player—you’ve carried bigger clothespins. It’s also the least expensive iPod, costing just $79.
And true to its name and marketing campaign, iPod shuffle embraces the random world of shuffle discussed on page 82. iTunes has a special Autofill feature that will pack your iPod shuffle with a random selection of tunes. You can, of course, also take the reins yourself and manually copy specific songs, albums, and playlists.
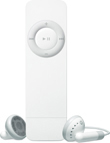
First generation iPod shuffle
iPod shuffle debuted in January 2005 in two capacities: 512MB (about 120 songs) and 1GB (about 240 songs). The original shuffle had a white plastic case (lower left). In September 2006, the second-generation shuffle debuted, sporting an even more compact aluminum case and a 1GB capacity. In September 2007, the third-generation shuffle added new color schemes.
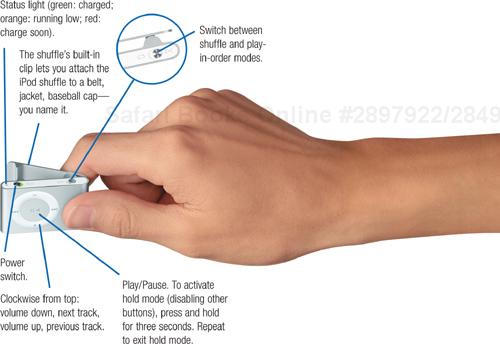
Unless you have a ridiculously small iTunes library, you won’t be able to fit all your music into an iPod shuffle. That’s where the Autofill feature comes in: it lets you easily corral a collection of songs into your shuffle.
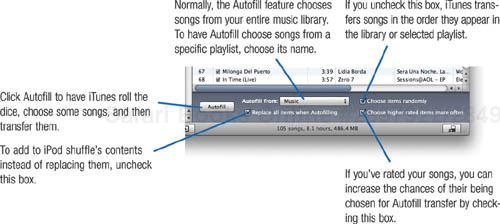
iPod shuffle Tips
Keeping the fill. Like what Autofill has come up with? You can save it as a standard playlist: select any song in the Autofill list, and then choose Select All from the Edit menu (![]() -A). Finally, choose New Playlist from Selection from the File menu.
-A). Finally, choose New Playlist from Selection from the File menu.
Autofill based on playlists. When you simply Autofill your shuffle from your main library, you’re likely to end up with a lot of songs you might not have chosen otherwise. When you want more control over Autofill, choose a specific playlist from the Autofill From pop-up menu. Indeed, you might want to create some smart playlists that allow you to Autofill based on genre—classical, jazz, rock, and so on—or on other key criteria, such as an artist’s or composer’s name. (For details on smart playlists, see pages 52–55.)
Self-serve fill-up. Autofill is an easy way to sling some songs onto a shuffle, but you might prefer more control over what gets copied. No problem—fill your shuffle yourself. You can copy songs directly to the shuffle by simply dragging them from your iTunes library to the iPod shuffle in the Devices list. Drag songs one at a time, or use the selection techniques described on page 46. You can also copy an entire playlist by simply dragging it to the shuffle.
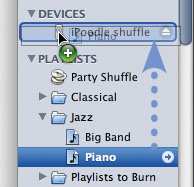
Middle ground. You can combine the convenience of Autofill with the control of manual management. If you like most of what Autofill has come up with, just delete the tunes you don’t want on your shuffle: be sure that your shuffle is selected in the Devices list, then select tunes you don’t want on the shuffle and press the Delete key on your keyboard. Then, add some additional tunes if you like.
Or take the opposite approach: start off by manually adding the songs and playlists that you want, and then click Autofill to finish the job.
Take it from the top. When your iPod shuffle is in play-in-order mode, you can jump to the first song in the shuffle’s playlist by pressing the Play/Pause button three times.
For more iPod shuffle tips, see page 112.
With the iPhone and iPod touch, your iTunes library is at your fingertips. Flick your way through lists of songs and artists. Rotate the screen, then sweep your finger across it to browse in Cover Flow view. Tap album artwork to flip it over and view its tracks. It’s the most tactile way to explore music without becoming a tour-bus groupie.
With only a few exceptions, the iPhone and iPod touch have the same talents as their untouchable cousins: playlists, shuffle modes, equalizer settings, and the ability to browse by song, artist, album, composer, and genre. And like other iPods, they also display photos and videos—and on a screen whose size and vividness no click wheel iPod can match.
But these touchy-feely iPods provide a luxury no other iPod does: the ability to browse and buy songs using the iTunes Wi-Fi Music Store. Wander into Wi-Fi range, and you’ve got a music store in your hand. Search for songs. Listen to previews. Buy and download. When you return to your Mac, sync up to copy your purchases to your iTunes Library.
Throughout this book, I discuss the unique capabilities of the iPhone and iPod touch as they relate to iLife. Here’s an audition of iTunes Wi-Fi Music Store.
The iTunes Wi-Fi Music Store provides a streamlined slice of the full iTunes Store. You can browse new and featured releases and “top ten” lists in all major genres, and you can preview, search for, and buy songs.
To shop the Wi-Fi Store, be sure that Wi-Fi is active on your iPhone or iPod touch, and then tap the iTunes button.

The store’s Featured screen appears.
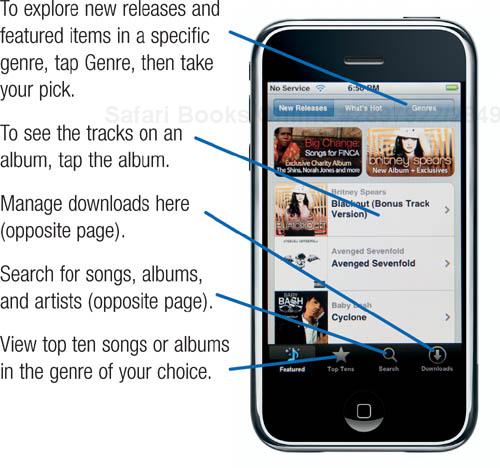
What isn’t on hand. You can’t buy or download videos, audiobooks, or podcasts from the Wi-Fi Store. Also, the Wi-Fi Store doesn’t offer access to Apple’s compilations (for example, iTunes Essentials and celebrity playlists), iMixes, and more-esoteric browsing features, such as Billboard charts. You can’t redeem gift certificates here (though you can use store credits if you’ve already redeemed them on your Mac), nor can you read reviews and artist biographies. But every song and album in the iTunes Store is available, including the higher-quality, DRM-free iTunes Plus offerings (page 39).

Browse. Explore featured and top ten albums and songs in your favorite genres. To view a song’s album, double-tap the song.
Search. Tap Search, then tap the text box near the top of the screen. Type an artist, album, or song name, then tap the blue Search button for a list of matching songs and albums.
Preview
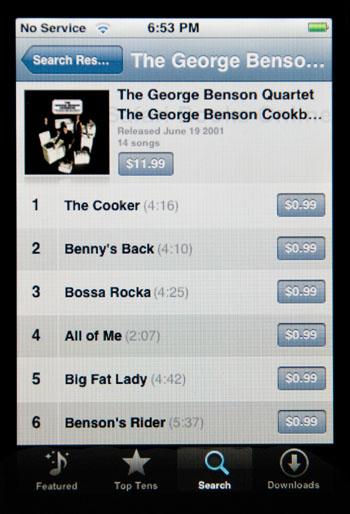
To hear a 30-second preview of a song, tap it. To stop the preview before it finishes playing, tap the song again or tap any other item on the screen.
Buy

To buy a song or an entire album, tap the price, then tap Buy Now. Tap out your password, tap OK, and the download begins. If you wait more than 15 minutes to buy another item, you must enter your password again.
Talented musicians often branch out into other arts after a while. Except for the tiny shuffle, all current iPods can store and display photos. (Some older models can, too.) Stash some favorite shots on your iPod, then show them to friends, family, or the person sitting next to you on the plane. Or connect your iPod to a TV set and view your shots on its screen.
Scroll through photos one at a time at your own pace, or have your iPod display a slide show, complete with music from your iTunes library. You can even play the game of chance and view a slide show in shuffle mode—which photo will appear next?
Just as iTunes is the conduit between your music library and your iPod, it’s also the bridge between your iPhoto library and your iPod. Using iTunes, you can copy all photos and albums, or only the ones you want to carry with you.
Because large photos devour space, iTunes creates a small, iPod-friendly version of each shot before transferring it to the iPod. You can also choose to transfer the full-resolution photos. This can be a handy way to back up photos or take them to a friend’s house for sharing.
Here’s how to turn your iPod into a pocket slide projector. Unless otherwise noted, everything on these pages also applies to the iPhone and iPod touch.
There are several ways to transfer photos to an iPod. For example, you can transfer your entire photo library or just the albums you want to carry along with you.
For the latter approach, use iPhoto to create an album containing the photos you want to show. If you want to create iPod slide shows for several different events—your summer vacation, the Halloween party, your family reunion—create a separate album for each event. (For tips on creating albums, see pages 146–151.)
Don’t forget music. The iPod can play music while displaying a slide show. If you want a particular song or playlist to play during a slide show, assign that song or playlist to the album, as described on page 182.
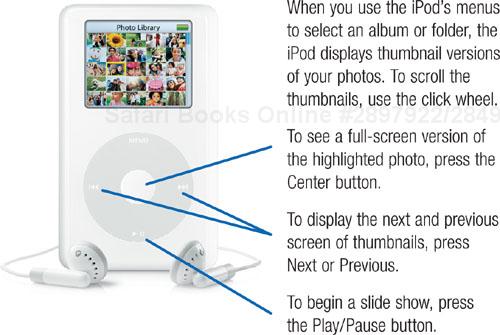
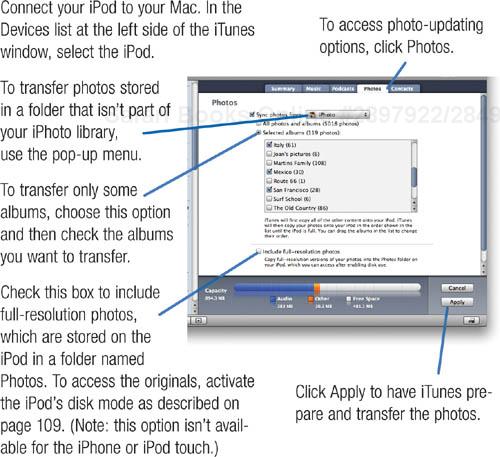
Navigate to the album that holds the photos you want to display, and press (or tap) the Play/Pause button. If your iPod is connected to a TV (see page 120), you have the option of viewing the slide show on the big screen.
To jump to the previous or next photo, during the slide show press the Previous or Next buttons. To pause the slide show, press Play/Pause. To end the show, press Menu (clickwheel iPods) or the Home button (iPhone and iPod touch).

The latest iPods can play videos that you purchase from the iTunes Store (page 32) or that you prepare for the iPod yourself.
Watching video on an iPod isn’t all that different from listening to music. Use the iPod’s menus to locate the video, start playback, and watch, hopefully not while also driving.
Video that you buy from the iTunes Store is in a format that’s ready for iPod playback. But what about movies you find on the Web? Or that friends or family email to you? Or that you create yourself? Although iTunes can store nearly any type of movie, the iPod is a more finicky eater. To play on an iPod, a movie must be compressed in a specific way.
And as with audio compression (page 22), video compression comes in various formats. I delve into this glamorous topic in further detail on page 240 and elsewhere in the iMovie chapter but, for now, the names to drop when you’re talking iPod compression are MPEG-4 and H.264. And the virtue to practice is called patience—compressing video can take a long time.
iTunes can compress video for the iPod, as can other programs, some of which are free. Here’s an overview of the options you have for preparing movies for their small-screen debut, as well as a collection of video-related iPod tips.
The TV connection. All video-capable iPods can connect to TV sets, the vast majority of which provide larger screens than an iPod’s. Better still, a growing number of TVs, including many in hotels, provide front-panel input jacks that allow you to make connections without groping around the back of the cabinet.
To connect your iPod to a TV, use one of the cable accessories described on page 120.
Once you connect the cable, you need to tell your iPod to display video on the TV set. On the iPod, go to Videos > Settings > TV Out, then choose On. (If you’d rather switch this setting each time you play a video, choose Ask. On an iPhone or iPod touch, simply tap Yes in response to the Display on TV? prompt.)
Other video devices. You can also connect the iPod to video-recording devices, such as a VCR, camcorder, or set-top DVD recorder. This lets you record videos you’ve purchased from the iTunes store, not to mention slide shows displayed with the iPod’s photo display features.
Got juice? When playing video, an iPod’s battery charge will drain much more quickly—partly because the hard drive will spin more often, but largely because the screen’s backlight is on the entire time.
Video playlists. You can add videos to playlists and smart playlists. You can even mix and match videos and music in the same playlist. If you frequently buy music videos from the iTunes Store, you may want to listen to their soundtracks along with tunes from your music library.
Bookmarks and chapters. As with audiobooks, videos that you buy from the iTunes Store provide bookmarking: if you stop playback partway through, playback continues at that point when you resume. When watching a movie that provides chapters, you can also skip to the next and previous chapter using the iPod’s Next and Previous buttons.
Get more tips and tools for playing video on your iPod. www.macilife.com/itunes
Converting with iTunes. First, add the movie to your iTunes library (page 86). Then, select the movie in iTunes and choose Convert Selection for iPod from the Advanced menu.
Converting with QuickTime Pro. Apple’s $29 QuickTime Pro adds the ability to export movies using the QuickTime Player that you already have. QuickTime Pro provides a Movie to iPod setting that delivers fine results, albeit with long encoding times. You can also take the reins yourself and specify encoding settings.
Converting with other tools. Splasm Software’s ViddyUp! is an inexpensive conversion program. Techspansion’s iSquint is free, and its inexpensive VisualHub is my favorite—it’s able to convert between just about every major video format. ViddyUp! and VisualHub are also handy for preparing movies for Apple TV playback.
Handbrake and Instant Handbrake. Video on a DVD-Video disc is compressed in MPEG-2 format (page 313). Video on a commercial DVD, such as a Hollywood movie, is also shackled by encryption to thwart copying.
Neither of these issues bothers either of these programs. HandBrake is a power tool that gives you precise control over the conversion process, including the ability to tweak compression settings and even choose which chapters you want to extract.
Table . Video Conversion at a Glance
Source | Best Option(s) |
|---|---|
A DVD | Use Handbrake or Instant Handbrake. |
A QuickTime movie that a friend emailed to you | Use iTunes, QuickTime Pro, ViddyUp!, iSquint, or VisualHub. |
A movie in Windows Media format | Use VisualHub. |
An MPEG-format movie taken by a digital camera or camcorder | Use ViddyUp! or VisualHub, or add the movie to iMovie and then share (page 276). |
A movie you’ve created in iMovie | Use iMovie Share menu (page 276). |
A Final Cut Express or Final Cut Pro project | Choose File > Export > Using QuickTime Conversion, then choose iPod from the Format pop-up menu. |
Instant Handbrake can also suck video from a DVD, but doesn’t let you tweak settings or choose specific chapters.
El Gato’s EyeTV. Got a TiVo’s worth of shows you’d like to pod? Connect El Gato’s EyeTV box to your TiVo, then record the shows on your Mac’s hard drive. Then, use the EyeTV software to export a version encoded for the iPod.
What quality settings? Conversion programs provide several encoding settings that let you balance compression time, image quality, and file size. I recommend sticking with the default settings. iPod video is all about portability, not high-definition quality.
But if you want to sweat the details, here are a few guidelines: the H.264 setting often gives better quality and smaller file sizes, though encoding can take much longer than MPEG-4. For maximum quality, specify two-pass H.264.
If you’ll be connecting your iPod to a TV and viewing on the big screen, consider choosing the 640- by 480-pixel frame size. This larger frame size appears more crisp on a TV than the standard iPod video size of 320 by 240 pixels.
What kind of video? After preparing some video for the iPod and adding it to your iTunes library, consider using the Get Info command to specify a category for the movie. This allows the video to appear in the right category on the iPod’s Videos menu (and on an Apple TV). In iTunes, select the video, choose File > Get Info, click Options, then choose an option from the Video Kind pop-up menu.
Normally, iTunes will synchronize all your playlists and your entire iTunes library, or at least as much of it as will fit on the iPod.
But there may be times when you want to manually control which items iTunes copies to the iPod. Maybe your iTunes library is larger than will fit on the iPod, and you’d like to specify what you want to copy. Or maybe you listen to some podcasts on your Mac but not on your iPod, and you don’t want to waste iPod capacity by copying those podcasts.
Whatever the reason, you can use iTunes to specify syncing options. You can also use iTunes to activate disk mode, in which the iPod appears on your desktop just like a hard drive (which, for a full-sized iPod, it is). In disk mode, you can use the Mac’s Finder to copy files to and from the iPod. This is a handy way to shuttle documents to and from work, to back up your iPhoto library, or to carry backups of important programs or files with you on the road. (Disk mode isn’t available on the iPhone or iPod touch.)
Here’s the lowdown on syncing. Although the focus is on the iPod and iPhone, the basic techniques described here also apply to the Apple TV (page 78).
Whether you’ve connected an iPod, an iPhone, or an Apple TV, the Summary panel provides quick access to key information and basic preferences.

Each tab leads to options specific to certain media. The Music pane appears here, but each pane provides three basic ways to control syncing. (For photo-syncing details, see page 105. For details on syncing contacts and calendar information, see pages 116–119.)
Sync everything. Copy every item (song, TV show, podcast, ringtone, and so on) in that category. This is the preset option.
Sync nothing. Don’t copy anything in that category—for example, you might not want to copy to your iPod movies that you watch only on your Apple TV.
Sync just some things. Use check boxes to specify which items you want to sync. In the Podcasts and TV Shows panes, you have even more control—the ability to specify that only the most recent episodes are copied, for example, or that only unplayed ones are. (This last option pairs up well with the ability to mark items as new or not new, as described on page 36.)
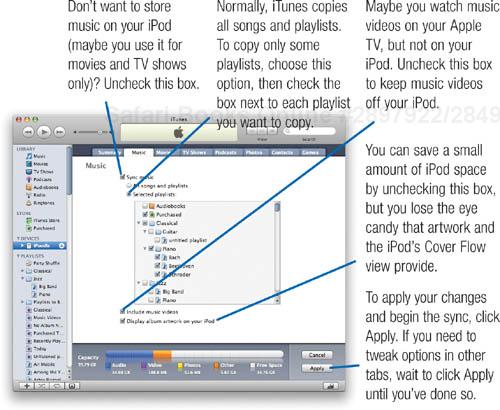
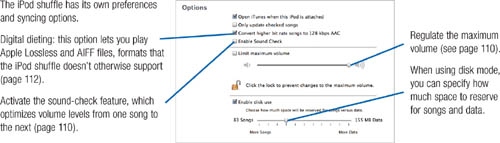
Do you love music? Then turn it down. At the risk of sounding like a nagging parent, I’m telling you that you shouldn’t listen to music at high volume levels, especially when you’re wearing headphones or earbuds. Your brain can acclimate to loud volume levels, but your ears can’t—they’ll be damaged.
When you’re wearing headphones or earbuds, set the iPod’s volume so that it’s just loud enough. When you start playing back a tune, you should be thinking to yourself, “I wish that was a just a little bit louder.”
Pay attention, kids. In a couple of decades, a lot of iPod users are going to be cupping their ears and saying, “Pardon me?” Don’t be one of them. Just remember: your hearing is the only sense you can damage with too much of a good thing.
With the latest iPods (as well as the fifth-generation iPod and the original iPod nano), you can set a maximum volume limit. If you’re a parent concerned about your kids’ hearing, you can dial down the iPod. You can also create a password that prevents anyone from changing the limit you set.
Click wheel iPods. Go to Settings > Volume Limit. Use the click wheel to specify a maximum, then press the Center button. To prevent changes to the setting, choose Set Combination, then dial in a code.
iPhone and iPod touch. Go to Settings > iPod > Volume Limit. Drag the volume control. To lock the setting, tap Lock Volume Limit, then type a code.
iPod shuffle. Use the Summary panel, as shown on page 109.
For details and more background on the importance of safe listening, see www.apple.com/sound.
Speaking of volume control, if you use the Sound Check feature in iTunes (page 80), you might want its volume-adjustment talents to extend to iPod playback, too.
Easy: navigate to your iPod’s Settings menu, then activate Sound Check. With the iPod shuffle, use the Summary pane shown on page 108.
You can quickly move around, or scrub, within an item while it plays. Go back and listen to a favorite song verse again, or skip that movie’s boring love scene and get to the fiery car chase.
Click wheel iPods. Press the Center button, and the elapsed-time gauge on the iPod’s screen is replaced with a little diamond—just like the one iTunes displays during playback. Using the click wheel, move the diamond left and right to scrub within the item.
iPhone and iPod touch. You can move forward or backward by holding your finger on the Next or Previous buttons at the bottom of the screen. For faster navigation, tap the screen to display the playback controls at the top of the screen. Then, drag the playhead left or right. (When viewing video, tap the screen to make these controls appear.)
All iPods. When listening to an enhanced podcast or audiobook, or when viewing a movie containing chapter markers, you can skip between chapters by pressing the Next or Previous buttons.
You love listening to audiobooks, but sometimes you wish the narrator spoke a bit faster or slower. You can get your wish.
Click wheel iPods. Go to Settings > Audiobooks, and then choose Slower or Faster.
The iPod adjusts its playback speed without changing the pitch (a trick it may have learned from GarageBand). To restore the normal playback speed, go to Settings > Audiobooks and choose Normal.
iPhone and iPod touch. To adjust playback speed, go to Settings > iPod > Audiobook Speed. Alas, choosing Faster will not help with long, droning phone calls.
You can use the iPod to assign star ratings (page 86) to an item while it’s playing. When you sync your iPod, iTunes retrieves the rating and assigns it to the item in your library.
Click wheel iPods. Navigate to the Now Playing screen, then press the Center button until the rating screen appears. Use the click wheel to assign a rating.
iPhone and iPod touch. Double-tap the Now Playing screen to display a list of tracks on the album. Tap the dots near the top of the screen to assign stars.
You have a sudden hankering to hear some songs from six different albums, but you’re on the road and thus can’t build a new playlist using iTunes. Solution: the On-The-Go playlist, a special, temporary playlist that lives within the iPod. Create the playlist on the iPod, and it’s copied back to the Mac the next time you sync.
Click wheel iPods. To add a song to the On-The-Go playlist, scroll to the song and then press and hold the Center button until the song flashes a few times. Repeat for the next song.
You can even add entire albums, artists, genres, and playlists to the On-The-Go playlist. Simply scroll to the item you want and hold down the Center button.
To delete a song that you’ve added to the playlist, go to the On-The-Go playlist, highlight the song, and hold down the Center button until the highlight flashes.
To clear the On-The-Go playlist, navigate to it, scroll to the bottom of the song list, and choose Clear Playlist. The playlist is also cleared when you connect the iPod to your Mac, but if you’ve set up iTunes to automatically update the iPod when you connect it, the On-The-Go playlist will be copied to iTunes so you can use it again.
To save the On-The-Go playlist, scroll to the bottom of its song list, then choose Save Playlist. The saved playlist will have the name New Playlist followed by a numeral. When you sync up your iPod, the saved playlist is transferred to iTunes, where you can rename it. Now you can create another On-The-Go playlist, if you like.
iPhone and iPod touch. Go to Playlists > On-The-Go, then tap songs to add them. (You can’t add entire albums or artists in one fell swoop, as on click wheel iPods.) When you’re finished, tap Done.
To edit the On-The-Go playlist, tap its name, then tap Edit. To add more songs, tap the plus sign at the top of the screen. To remove a song, tap the minus sign in front of it. To change song order, drag the horizontal bars to the right of a song’s name. To clear the playlist, tap Clear Playlist.
Chances are the syncing features in iTunes are all you need to manage the contents of your iPod. But when you want to go beyond automatic syncing—or if you need to recover items from your iPod because of a Mac hard-drive crash or other calamity—here are some options.
As pages 108–109 show, the syncing panes in iTunes give you a lot of control over what iTunes copies to the iPod, especially if you use the “sync only checked songs and videos” option. But for real control freaks, there’s another path: manual updating. In this mode, you can manage the iPod’s music and videos by hand using iTunes—copying and deleting individual songs and videos to and from the iPod to control exactly how its storage space is used.
Manual updating is great when you have a huge iTunes library and a lower-capacity iPod, such as the nano. Assemble playlists containing just the songs and videos you want to enjoy on your next workout (or cross-country flight), then sling them into the iPod.
Note that manual updating is available for click wheel iPods only; the iPhone and iPod touch don’t allow it. And the iPod shuffle is always in manual-update mode.
To activate manual updating, connect your iPod and, in the Summary pane, click the Manually Manage Music and Videos box. iTunes asks you to confirm your choice; click OK.
Now a world of opportunities awaits.
Copying items. To copy songs or videos to the iPod, drag them from the iTunes window to the iPod’s name in the Devices list. To copy an entire playlist to the iPod, drag it from the Playlists area to the iPod.
You can even copy an item and add it to an existing playlist on the iPod. Click the triangle next to the iPod’s name in the Devices list, and you see a list of the playlists on the iPod. Now drag items to the existing playlist.
Deleting items. To remove songs or videos from the iPod, click the triangle next to the iPod’s name. Next, select one of the items below the iPod’s name—for example, Music. Now select the doomed items and press the Delete key.
Playing items. You can play items on the iPod without having to copy them to the iTunes library. This is a big deal—it lets you connect your iPod to a friend’s Mac and then play tunes or watch videos that are on the iPod. (Alas, to play a protected item purchased from the iTunes Store, you’ll have to authorize that Mac with your Apple ID and password.)
iPod-only playlists and content. When you have the iPod set up for manual updating, you can use iTunes to create playlists that exist only on the iPod. In the Devices area of the iTunes window, select the iPod and then create the new playlist.
You can also copy audio and video files directly to the iPod without storing them in your iTunes library. Just drag items from the Finder to the iPod in the Devices area.
Notes and Tips. You might find it easier to sling items into your iPod if you open a second window in iTunes. In the Devices list, click the triangle next to the iPod’s name. Now double-click a library category on the iPod—for example, if you’ll be copying music, double-click Music. A second window opens that you can position next to the main iTunes window.
When manual updating is active, you must manually unmount the iPod when you’re done with it. Select the iPod in the Devices list and then click the Eject button next to the iPod’s name or in the lower-right corner of the iTunes window.
If you ever decide to switch back to iTunes’ automatic updating mode, iTunes will replace the iPod’s contents with the current iTunes library and playlists, according to the syncing options you specify (page 108).
When you have more media than you have iPod capacity, manual management is the best solution. But there’s also an automatic alternative. iTunes can create a playlist containing only songs that will fit on your iPod. This playlist is called the iPod Selection playlist, and iTunes will offer to create it for you if it determines that your library won’t fit on your iPod.
The iPod Selection playlist uses a five step process to determine which songs to copy to your iPod.
Get links to essential iPod utilities and more. www.macilife.com/itunes
iTunes groups all tracks into albums.
iTunes calculates an average play count and average rating for each album.
iTunes begins filling the iPod with albums that have non-zero average play counts and non-zero ratings, in descending order. In other words, albums with higher play counts and higher ratings get higher priority.
If Step 3 completes and there’s still some free space, iTunes starts copying albums that were recently played or recently added to your library.
If there’s still some free space after Step 4 completes, iTunes adds random albums until the iPod is filled to the gills and loosening its belt.
If there’s a lesson here, it’s this: rate your music. Ratings clearly play an important role in the iPod Selection playlist, so if you rate your songs, you’ll stand a better chance of shoehorning your favorites into your iPod.
Of course, in the end, there’s no substitute for your own smarts: you can probably do a better job of budgeting iPod capacity by manually managing your iPod’s library.
You have more than one Mac and you want to move items purchased from the iTunes Store from one Mac to another. You could burn data CDs or copy the items over a network, but you can also use your iPod.
Be sure that the purchased items are on your iPod, then connect it to the Mac to which you want to copy the items. If the iPod is set up for automatic updating, iTunes asks if you want to transfer the purchases to the Mac’s iTunes Library. Click Transfer Purchases.
If the iPod is set up for manual updating, you need to start the transfer yourself. In the Devices area of the iTunes window, Control-click on the iPod’s name, then choose Transfer Purchases from the pop-up shortcut menu.
The music and video files on an iPod are stored in invisible folders. Thus, you can’t use the Finder to copy items from the iPod to your hard drive, even if you put the iPod into disk mode. Except for the ability to transfer iTunes Store purchases as noted in the previous tip, transfer is a one-way street: from the Mac to the iPod.
However, several free or inexpensive utilities let you directly access the files on an iPod. This can be a great way to recover your iTunes library should something happen to the copy on your Mac.
I’m fond of Findley Designs’ iPod Access, which lets you access and play items on an iPod as well as copy them to your Mac’s hard drive. iPod Access also works with the iPhone and iPod touch.
You copied some photos to your iPod, but didn’t include the original, high-resolution versions. Now you’re at a friend’s house and she’d like a copy of the photos. You connect your iPod to her Mac, put it in disk mode, and open up the Photos folder. But instead of seeing individual image files, you see only a couple of files with cryptic names, such as F1023_1.ithmb.
When iTunes prepares photos for iPod storage, it stashes them in a format that isn’t readable by imaging programs, such as iPhoto or Photoshop. But that doesn’t mean there isn’t a way to get to those photos.
Click wheel iPods. A free utility, Keith’s iPod Photo Reader, lets you copy some or all of the images. Consider stashing it on your iPod for those times when you want to copy photos. And if you want a more fully featured photo-access program, check out Findley Designs’ inexpensive iPod Access Photo.
iPhone and iPod touch. To access your photos directly, use Ecamm Network’s iPhoneDrive, described on page 112.
iPod acting up? Apple has developed a nicely alliterative troubleshooting plan of attack that it calls “The Five Rs.”
Reset. Reboot the iPod using the key sequences shown in the table at right. This will often clear its head.
Retry. Connect the iPod to a different port on your computer, not on a USB hub. Then try syncing again.
Restart. Reboot your Mac. Open the Software Update system preference and see if you have the latest Mac OS X software updates.
Reinstall. Download and install the latest version of iTunes, then launch it. If iTunes recognizes the iPod, check the Summary pane to see if an update to the iPod software is available (page 108).
Restore. Wipe the iPod clean and restore its factory settings by clicking the Restore button in the Summary pane.
Apple has created a special Web page that walks you through each of the five steps after you specify which iPod model you have. It’s called The Five Rs Assistant, and I’ve linked to it at macilife.com/itunes.
Table . iPod Key Sequences
To Do This | Do This |
|---|---|
Turn off the iPod | Hold down Play/Pause. |
Restart the iPod | 3G and older iPods: Hold down Menu and Play/Pause until the Apple logo appears on the screen (five to 10 seconds). 4G and later: Toggle the Hold switch, then hold down Menu and the Center button until the Apple logo appears (about six seconds). |
Access the iPod’s diagnostic mode | 3G and older iPods: Restart, then immediately hold down Previous, Next, and the Center button. 4G and later: Restart, then immediately hold down Previous and the Center button. |
The iPod’s battery doesn’t last forever. For $59 plus shipping, Apple will replace any iPod whose only problem is a dead battery. For details on the iPod Out-of-Warranty Battery Replacement Program, see the link to Apple’s page on macilife.com/itunes.
Some companies also sell replacement batteries that you can install yourself—if you dare to crack open the iPod’s case and venture inside. One source is www.ipodbattery.com. For details on replacement batteries and information on iPod batteries in general, see www.ipodbatteryfaq.com.
Extending battery life. There are a few things you can do to get more playback time out of each iPod charge. Avoid frequently jumping between songs, especially on hard-drive iPods. Use the Settings menu to turn off the Equalizer. Put the iPod to sleep when you aren’t playing it. Turn off screen backlighting on click wheel iPods (Settings > Backlight Timer > Off). And don’t watch video—the screen backlight is one of the iPod’s biggest power consumers. For more tips, see macilife.com/itunes.
You can add items to, and remove them from, the iPod’s main menu. For example, if you frequently browse your library by artist, add an Artist menu to the main menu.
Click wheel iPods. Choose Settings > Main Menu. Scroll to the desired option (for example, Artist), then press the Center button—the word On appears next to that option to indicate it will be in the menu. You can add as many items to the main menu as you like.
(Note: Menu customizing isn’t available on the now-elderly 1G and 2G iPod models.)
iPhone and iPod touch. Menu customizing is limited: you can replace the four browse buttons at the bottom of the screen with ones you might use more. For example, if you like podcasts but you rarely browse by artist, replace the Artist button with Podcasts.
Tap the More button, then tap the Edit button. Drag one of the buttons (for example, Podcasts) to the bottom of the screen so that it’s over the button you want to replace. (The doomed button glows when you’re at the right spot.)
You can also rearrange the browse buttons: drag them left or right. When you’re finished, tap the Done button.
The iPod shuffle can play all audio formats supported by larger iPods, with two exceptions: Apple Lossless and AIFF. What if you’ve been ripping your CDs in Apple Lossless format and want to play those tunes with your shuffle? Or what if you’ve exported some GarageBand songs and want to shuffle around with your music clipped to your belt?
As page 109 showed, the iPod shuffle has a preference setting that lets you accomplish both tasks: it’s the check box labeled Convert higher bit rate songs to 128 kbps AAC. That’s a mouthful, but it’s a useful option.
When this box is checked, iTunes creates 128 kbps AAC versions of any Apple Lossless or AIFF songs that you try to copy to your iPod shuffle. The song files remain in their original format in your iTunes library; iTunes simply encodes an AAC version on the fly before transferring it to the iPod shuffle.
Starting with the 5G and nano models, the iPod has the ability to display song lyrics. (At this writing, the iPhone and iPod touch can’t display lyrics.)
If you use the Song Info window to add lyrics to a song (page 26), you can display the lyrics on the iPod as the song plays. Navigate to the Now Playing screen if necessary, then press the Center button until the lyrics appear.
To retrieve song lyrics, try Eternal Storm’s GimmeSomeTune, available from download sites. You can also find lyrics on innumerable Web sites; search for song lyrics using your favorite search engine. Once you’ve found lyrics for a tune, copy them, then open the Get Info window for the song and paste them into the Lyrics panel.
The Notes feature, provided by 3G and later click wheel iPods, supports hyperlinks not unlike those on Web sites. A text note can contain a link to another note or even to a song: navigating to the link and then clicking the iPod’s Center button is the equivalent of clicking on a hyperlink.
If you’re interested in learning more about creating hyperlinked text notes, check out the article that my Macworld colleague Chris Breen wrote in the September 2004 issue. The article is called “Hack the iPod’s Notes,” and is online at macworld.com.
Notes are also the key to the iPod’s museum mode, so named because some museums have used it to create interactive tours of their displays. Apple has created some Web pages that discuss how museums can use the iPod—and how some already are. Go to macilife.com/itunes and click the link named “iPod as Tour Guide.”
Numerous programmers have created useful AppleScripts for the iPod that enable you to manage playlists, copy songs, and more. The best source for these scripts is Doug Adams’ excellent Doug’s AppleScripts for iTunes site (www.dougscripts.com).
Your iPod can hold more than just audio-visual treats. It can also store names and addresses and short text notes.
Every Mac includes Address Book, a straightforward but powerful digital Rolodex program. Besides being able to store contact information, Address Book can tap into other Apple programs. When using iPhoto to create a calendar, for example, you can have birthdays from Address Book automatically added to calendar dates. Address Book can also sync your contact information to Apple’s .Mac service. It’s a great way to back up your address book and synchronize it across multiple Macs.
Address Book is also on speaking terms with iTunes: you can use iTunes to sync your collection of contacts to your iPod or iPhone. If you use Address Book to categorize your contacts into groups—friends, business associates, bookies—you can even selectively sync only certain groups.
Once you sync, you can view your contacts on the iPod. With click wheel iPods, choose Extras > Contacts. (And if you do so frequently, add a Contacts item to the main menu; see page 114.)
On the iPhone and iPod touch, you can also edit and delete contacts and create new ones. When you sync, iTunes copies your changes into Address Book.
Click wheel iPods can also store text notes that are accessible through the Notes menu item: simply peck your notes into a text-only file and then copy the file to the iPod’s Notes folder.
Connect your iPod.
In the Devices area of the iTunes window, click your iPod’s name. The Summary panel appears (page 108).
Click the Contacts tab. The Contacts pane appears.
Specify sync options.

Click the Apply button near the lower-right corner of the iTunes window. (Tip: You can tweak settings in other tabs if you like, then click Apply when you’re done.)
Find these and other iPod utilities. www.macilife.com/itunes
Don’t use Address Book? You should try it. Because of its tight integration with Mac OS X, the iPod, and other Apple tools, it’s the best place to stash your friends and colleagues. But if you do store contacts elsewhere, you can still sync them with your iPod. It may not work as smoothly and you may need additional tools, but you can do it.
If you use Microsoft Entourage, you can sync by enabling Sync Services in Entourage’s Preferences dialog box.

For click wheel iPods, you can also copy Entourage contacts by hand. Activate your iPod’s disk mode (see page 108), then drag contacts from Entourage into the iPod’s Contacts folder.
If you’ve used this manual-copying technique, you can remove contacts from the iPod by dragging them from the Contacts folder to the Trash. If you frequently shuttle contacts from Entourage to your iPod, consider Zapptek’s iPDA software, described below.
In general, any contact-management program that supports the industry-standard vCard format can provide contacts to the iPod, although if the program doesn’t support Mac OS X’s Sync Services, you may have to copy them by hand as described at left.
With Apple’s iCal software, you can keep track of appointments, schedules, and events of all kinds. You can create multiple calendars—for example, one for personal events such as birthdays and another for work appointments.
Use iCal to display multiple calendars at once to quickly identify schedule conflicts. You can also share calendars—with friends, coworkers, or complete strangers—by publishing them through your .Mac account.
You can even download and use calendars that other people have created. Hundreds of free calendars are available in categories ranging from TV schedules to holidays to the phases of the moon.
You can also use appointment information from iCal calendars when creating wall calendars in iPhoto. Check a box, and iPhoto adds iCal events to your calendar. For details, see page 216.
What does iCal have to do with the iPod? Simply this: You can copy your calendars to the iPod and view them on the road. On the iPhone and iPod touch, you can create and update calendar events. When you sync, iTunes copies changes back to iCal. You can also set up alarms in iCal and have your iPod notify you of important appointments.
Or TV shows.
To set up iTunes to update your Calendars, connect your iPod to your Mac, then select the iPod in the Device list and click the Contacts tab (for an iPhone or iPod touch, click Info). Calendar-syncing options lurk here.
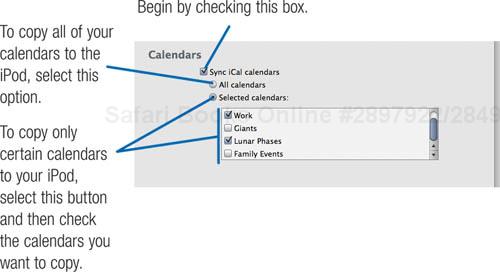
Syncing calendars from elsewhere. You may also have calendar files that originated somewhere other than in your copy of iCal—perhaps you downloaded a calendar from a Web site, or someone emailed it to you as an attachment, or you simply copied it from a different Mac. To add a calendar file to the iPod, activate the iPod’s disk mode (page 108), then drag its icon into the Calendars folder.

The iPod can also store calendars in the industry-standard vCal format. Files in vCal format end with the extension .vcs.
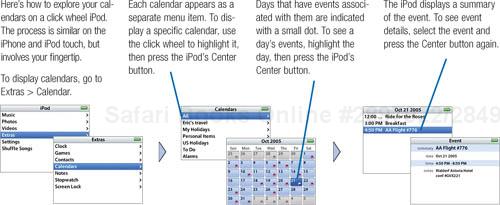
The iPod line has spawned an industry of accessories—speaker systems, cases, docks, TV and car interfaces, and more. Apple calls it the “iPod ecosystem,” and it’s a thriving one. You’ll even find iPod interfaces in toilet paper dispensers and in a $14,000 dining-room table, though you won’t find them in my house.
Here’s a sampling of some accessories. For reviews of iPod add-ons, checkout Playlist magazine (www.playlistmag.com) and iLounge (www.ilounge.com). And because iPod models change now and then, be sure whatever accessory you’re considering is compatible with your specific iPod or iPhone model.
The iPhone and all current iPods, except for the shuffle, can connect to a TV set: view movies and TV shows on the big screen, or display slide shows from photos that you’ve synced (page 104).
Apple sells a couple of cable accessories that let you connect your video-capable iPod to a TV and stereo system.
Apple Composite AV Cable. If you’re going to buy just one cable to connect your iPod to a TV and stereo, make it this one. Compatible with all video-capable iPods as well as the iPhone, it connects to the composite video jack that virtually every TV provides. (Look for a yellow, female RCA jack.)
To use this cable, plug the flat connector into your iPod or iPhone, then connect the yellow plug to the yellow video-input jack of your TV (or VCR or other device). Connect the red and white plugs to the red and white audio-input jacks of your TV or stereo. The red cable is for the right channel, and the white cable is for the left channel. (To remember that, just remember that red and right both start with R. It works for me.)
Apple Component AV Cable. This is a more-specialized beast. Not all TV sets provide component video inputs, though most high-definition sets do. Component video provides a better picture than does composite—the red, green, and blue portions of the video signal travel on their own lines instead of being merged into a composite signal.
If your TV has red, green, and blue video-input jacks, use this cable. Connect each plug to its matching input jack, then connect the audio leads as described above.
Note that the Apple Component AV Cable does not work with the fifth-generation iPod (the original “video iPod”) or the iPod photo.
Incidentally, both cables also include AC power adapters and USB jacks, so you can charge your iPod while you watch.
A dock makes it convenient to update your iPod and charge its battery. Some iPod (and especially iPhone) owners buy multiple docks—one for home, one for the office, for example.
Apple Universal Dock. This dock works with all click wheel iPods as well as the iPhone and iPod touch. It pairs up nicely with the cables described on this page: set the dock next to your TV and connect the flat end of your AV cable to the dock. When you’re ready to view, slide the iPod or iPhone into the dock.

The Apple Universal Dock also includes a remote control, enabling you to start and stop playback and adjust the volume from across the room.
Apple iPod shuffle dock. This diminutive dock is for charging second-generation iPod shuffle models and connecting them to a stereo. It won’t work with the original shuffle—the one shaped like a pack of gum.
Speak up, dock. Several companies, including Apple, sell self-contained amplifier and speaker systems containing iPod docks. Apple’s offering is called iPod Hi-Fi. Similar products are available from Bose, Altec Lansing, Griffin Technology, and JBL, among others.
Get links iPod accessories aplenty. www.macilife.com/itunes
An FM transmitter plugs into the iPod and then transmits its signal so that you can tune it in on a radio. Griffin’s iTrip connects to the top of the iPod, while Sonnet’s highly regarded Podfreq packs an FM transmitter into a rugged carrying case.
I use an FM transmitter from C. Crane (www.ccradio.com). It doesn’t have a fancy dock connector—it simply plugs into the iPod’s headphone jack. But on the plus side, it works with every iPod made. I also plug it into the headphone jack of one of my Macs, enabling me to listen to its audio throughout my house.
Want to receive radio instead of transmit it? Apple’s iPod Radio Remote adds FM radio tuning to the fifth-generation iPod model as well as to first- and second-generation nanos (but not the newest, video-capable nanos). Use the click wheel to tune in stations, viewing a virtual dial on the iPod’s screen.
Recording. Most recent iPods accept microphone attachments that let you record voice memos, lectures, family fights—you name it.
Photo storage. In the field with your iPod and digital camera—and not enough camera memory cards? Many iPod models accept add-ons that let you transfer photos and store them on the iPod. Apple’s iPod Camera Connector is one example; Belkin sells similar models. In general, though, these devices have proven to be less useful for photographers than “digital wallets” from Epson, Archos, and Nikon.