
Video editing is the process of assembling video clips, still images, and audio into a finished package that tells a story, conveys a message, and keeps your audience from falling asleep.
iMovie lets you edit video, but it also lets you manage it. Just as iPhoto helps you store and organize photos, iMovie helps you keep track of the video you shoot.
That’s important, because we’re shooting more video than ever. New, tiny video cameras make it easy to capture memories wherever we go. Many new camcorders don’t even use tape, instead recording movies on built-in hard drives or on memory cards like those used by your digital camera. And speaking of digital cameras, many of them can shoot video clips, too.
iMovie keeps track of your video in a central place called the Event library. You can browse your Event library and relive memories with just a couple of mouse clicks. Don’t have time to edit a finished movie? That’s fine. Just browse your events and watch your life flash before your eyes.
When you want to assemble some clips into a finished project, iMovie is ready—and indeed, it lets you edit video quickly and efficiently. Create as many projects as you like, and switch between them with a click. Add titles and scene transitions, then share your final product on the Web, on a DVD, or on your iPod or iPhone.
Quiet on the set.
iMovie ’08 is dramatically different from its predecessors. Its video-editing tools work differently, and its Event library and video-management tools are completely new. iMovie ’08 is a much better program than earlier iMovie versions.
But the road of change often has bumps. There are things that the older iMovie HD could do that iMovie ’08 can’t. And many people had years of experience with the old version’s way of doing things.
In recognition of both realities, Apple has made iMovie HD available as a free download for iLife ’08 users. To get it, visit www.apple.com/support/imovie and look for the “iMovie HD Support” area of the page.
Best of both worlds. Even if you’ve never used the old iMovie, you still might want to grab the free download. That’s because iMovie HD has some talents that, at this writing, iMovie ’08 lacks. iMovie HD lets you create chapter markers to help DVD viewers navigate your movie. iMovie HD also has a large variety of video effects that iMovie ’08 lacks, including stylish motion-graphics themes, slow-motion effects, and video filters for creating special effects.
Does that mean you have to choose one program over the other? Not at all. As I describe on page 285, you can combine both programs to get the best of both worlds.
Free program, free book chapter. But how do you learn the older version? Easy. Head to my Web site, and you can download the entire iMovie HD chapter from the previous edition of this book—over 60 pages of tutorials and tips in PDF form. You’ll even find some video tutorials there to help you get going.
Download your free iMovie HD chapter. www.macilife.com/imovie

If you have a standard, miniDV camcorder and you’re anxious to start making movies, feel free to skip this little lesson and move on to page 242. But if you want to use video from a different kind of device—or you’re curious about one of iMovie’s most intriguing capabilities—read on.
Just as music and photos can be stored in a variety of digital formats, video also comes in several flavors. And, as with music and photos, each video format takes its own approach to organizing the bits and bytes that make up your media.
In early iMovie versions, projects were based on one video format: DV. You could import other formats into iMovie, but iMovie would convert that footage into DV format. DV was iMovie’s native tongue, and using other formats meant a translation step that took time, used up disk space, and often compromised video quality.
Times change. New types of video devices have appeared, and iMovie has evolved to keep pace: iMovie ’08 provides native support for several video formats. iMovie ’08 is multilingual, and as a result, you have the flexibility to edit video from a wider variety of video devices, ranging from Apple’s iSight (which is built into many Mac models) to many digital camera models to the new breeds of high-definition HDV cameras from companies such as Sony, Canon, and JVC.
iMovie’s basic operation is identical regardless of which video format you use. There are some subtleties to some formats, and I’ll share them as we go. But first, let’s look at the video languages iMovie understands.
Many of the differences among video formats aren’t visible at first glance, but one of the differences definitely is: the aspect ratio of the video frame.
We encountered the concept of aspect ratio when looking at iPhoto cropping techniques (page 155). The phrase simply describes how square or rectangular an image frame is.
Early iMovie versions were limited to one aspect ratio: the standard 4:3 ratio used by most TV sets, DV camcorders, and digital cameras.
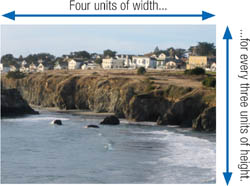
Going wide. iMovie also features the ability to work with and create widescreen video in the 16:9 aspect ratio—the format common in high-definition TV sets.

The widescreen format provides a more cinematic experience.
Pronunciation guide. Making video small talk at the local coffee shop? The expressions 4:3 and 16:9 are usually pronounced “four by three” and “sixteen by nine.” Technically, “four to three” and “sixteen to nine” are more accurate, since these expressions are ratios. After all, when was the last time you heard a bookie describe “2 by 1” odds on a horse?
In this chapter, look for the ![]() for information specific to HDV editing.
for information specific to HDV editing.
One of the quiet, yet revolutionary, features of iMovie ’08 is that it doesn’t care much about which video format you throw at it. You can stick with one format throughout a project, mix formats within the same project, or apply an aspect ratio that’s different from the original footage.
That said, iMovie can’t read everything: uncompressed HD, for example, remains in the realm of professional tools, such as Final Cut Pro. Here’s a look at the formats you can use with iMovie ’08.
DV. By far the most common format used by digital camcorders. Now that the era of high-definition TV is upon us, the DV format is often described as a standard definition format.
DV Widescreen. Most DV camcorders can shoot in widescreen mode, often by simply cropping the top and bottom of the video frame. (To shoot in this mode, use your camcorder’s menus to activate 16:9 mode.) You don’t get the picture quality of high-definition TV, but you do get that cinematically wide image.
HDV 1080i and HDV 720p. High definition (HD, for short) TV is gradually gaining momentum, and the new breed of HDV camcorders is helping. The HDV format brings high-definition videography to advanced amateurs and budget-minded professionals (and, as prices come down, to the rest of us). HDV always uses a 16:9 aspect ratio. The images below illustrate the difference between DV and 1080i resolution.
MPEG-2 and MPEG-4. Many digital cameras shoot their movie clips in these formats, as do a growing number of compact video cameras that connect via USB.
AVCHD. This high-definition video format is based on MPEG-4; it’s used by camcorders that record 1080i footage directly to a built-in hard disk, removable memory cards, or DVDs.
iSight. Apple’s iSight camera is built into some current Mac models and used to be available as a separate camera. (You’ll still find them on eBay.) The iSight is designed for video chatting using iChat, but makes a great low-budget TV camera, too.

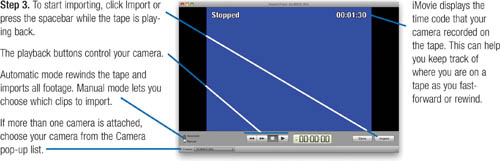
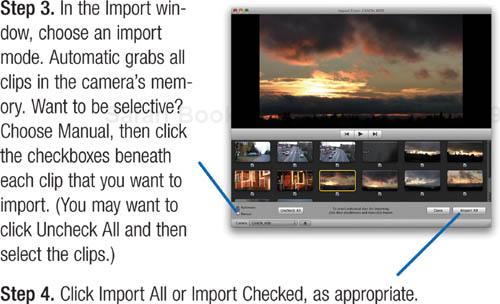
The first step in an iMovie editing project usually involves importing video that you’ve shot. If you’re using a miniDV or HDV camera, you can connect the camera to your Mac’s FireWire jack and use iMovie’s camera mode to bring in your video. (If you’re using a camera that connects using USB, your import procedure will be a bit different; see page 244).
With camera mode, you can control your camera using the transport buttons in iMovie’s Import window. There’s no need to grope for the tiny buttons on your camera when you need to rewind, fast-forward, stop, or play. Click the on-screen transport buttons, and iMovie sends the appropriate signals to your camera through the FireWire cable. Video professionals call this device control.
When you import video, the footage is organized into events—much as iPhoto organizes photos. You can create a new event or have iMovie store footage in an existing event. As in iPhoto, you can browse events by skimming across them, and you can assign keywords to help you locate footage later.
The first step in editing a movie may be importing video, but another step should come first: making sure you have enough free disk space. Digital video eats disk space like I eat Oreos: for miniDV video, you’ll need about 200MB of free space for each minute of video. For HDV video, you’ll need a few times that amount. Bottom line: think about buying an external hard drive and using it for your video endeavors.
Connect your DV or HDV camera to your Mac’s FireWire jack.

Tip
To store imported video on an external hard drive, simply create the video’s event on the external drive. If you’ve already started the project and it’s on your internal drive, quit iMovie and open the Movies folder in your home folder. Next, open the iMovie Events folder, locate the folder for the Event you want to move, and copy that to the iMovie Events folder on the external drive. When you launch iMovie again, it will rebuild the Event’s thumbnails and you’ll be set.

HD Differences
Importing from an HDV camera? Under some circumstances, you may experience an odd delay as the video comes in: the tape may finish playing, but you’ll still see video being displayed in iMovie’s Import window. The video’s motion may also appear jerky.
This occurs because your Mac must transcode (convert) the HD video into a format that allows for fast editing. This process occurs more or less in real time, depending on whether you’re running other programs that may be fighting for their share of processor power.
To minimize the delay, close other applications. And if you’re running Mac OS X 10.5 (Leopard), consider turning off its Time Machine backup feature while importing.
One ramification: it’s a bit harder to tell when to stop importing, since your Mac may be displaying footage that the camera actually played back seconds or minutes earlier.
For more precise control when selectively importing HD footage, view the footage on your camera’s LCD screen during the import, and use your camera’s buttons to stop and start playback.
Camcorders have come a long way in a short time. All camcorders used to capture footage to tape—many sizes and formats of tape, but always to cassettes of magnetic tape.
Thanks to the onward march of technology, tape may soon be the exception rather than the rule. A growing number of cameras record footage directly to DVDs, solid-state memory cards like the ones your digital camera uses, or internal hard disks.
The benefits? No more rewinding or fast-forwarding to find a scene—and no more stacks of tapes sitting on the shelf and waiting to be digitized.
The shift isn’t just a matter of media. The new tapeless formats compress video in various ways to save significant amounts of storage space.
iMovie can import clips from most tapeless cameras. (Apple has published a list on its Web site; I’ve linked to it at www.macilife.com/imovie.) The import process is a bit different—and more convenient—than the steps outlined on the previous pages.
iMovie can also import movies stored in your iPhoto library or elsewhere on your hard disk. And if you’re an iMovie veteran with older iMovie HD projects, iMovie ’08 can import them, too—to a degree.
Note
To import AVCHD footage, you need a Mac with an Intel processor. However, a utility called Voltaic (www.mac1080hd.com) can convert the raw AVCHD video files on PowerPC-based (or Intel-based) Macs. Also, if your camera records AVCHD video to DVDs, you must use iMovie under Mac OS X 10.5 (Leopard).
Connect your camera to the Mac’s USB port. (Even if your camera includes a FireWire port, iMovie recognizes tapeless formats only via USB.)
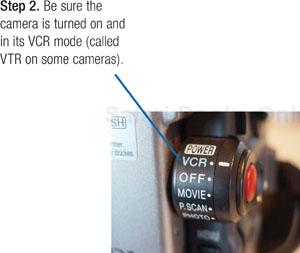
Be sure that the camera is turned on and set to its PC Connect mode.
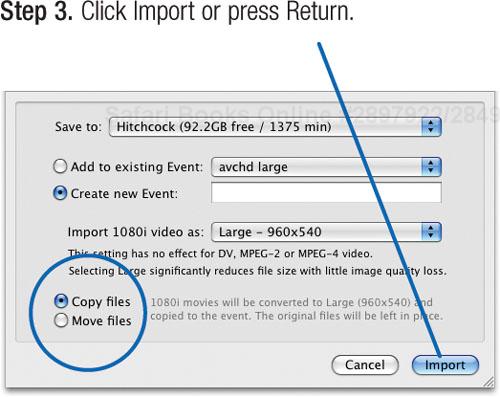
Click OK and take a break while iMovie copies the footage and transcodes it into the editable AIC (Apple Intermediate Codec) format. When it’s finished, click Done.

From an iMovie HD project. iMovie ’08 can import projects created in iMovie HD, but the results aren’t pretty. Effects, titles, and music tracks are discarded, and all transitions are converted to Cross Dissolve transitions. Clips in the Clip viewer are put into a new event, and any clips in the timeline go into a new project. If all those trade-offs sound acceptable, choose File > Import iMovie HD Project, locate the project, and click Import. Otherwise, finish your old projects in iMovie HD and use iMovie ’08 for new movies.

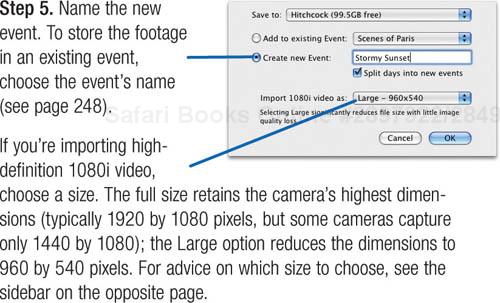
Large versus Full HD
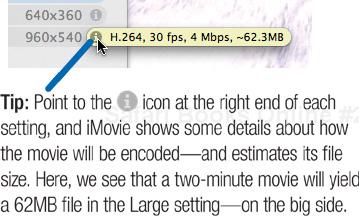
You paid good money for the extra pixels that HD video gives you, so why reduce the size by importing footage at the Large size? The answer depends on what you’re shooting. For most home uses, reducing the size to 960 by 540 won’t produce a noticeable difference in the video quality—but it does ease the processor strain on iMovie when throwing around full-resolution HD video, not to mention reducing the amount of disk space consumed (13 GB for one hour of footage compared to 40 GB for the full quality, according to Apple).
In fact, the term full quality is a bit misleading. To make the footage easier to handle, iMovie tosses out some of the image information (specifically, one field of interlaced video).
If you’re concerned about getting the absolute highest quality possible, a program such as Final Cut Express or Final Cut Pro is a better choice.
You’ve imported some video from your camera and maybe you also imported some movies that were already on your hard drive. Now what?
If you’re the obsessive-organizer type, you might want to start organizing your video—managing events, marking clips as favorites or rejects, and maybe even assigning some keywords to help you file your footage. If this sounds like the most exciting way to begin exploring a personal movie studio, feel free to turn the page and dive in.
But if you’d rather make something out of the video you’ve imported, stay tuned. Here’s a little lesson that introduces the basic techniques and tools for editing in iMovie.
We’re going to make a “video slide show”—a series of video clips, each four-seconds long, accompanied by some background music. In the interest of immediate gratification, I’ll skip over the details and just give you the big picture.
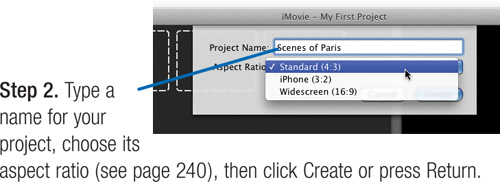
Choose File > New Project, type a name for your project, and choose the aspect ratio that matches that of the video you imported.
In the Event Library, select the event containing your video. The event’s video footage appears in the Event browser.
In the Event browser, skim the mouse pointer over a clip. When you see a scene you’d like to add to the slideshow, click on the clip.

Click the Add Selection to Project button, or simply press the E key, its keyboard shortcut.

iMovie adds the selected four seconds to your project.

Skim over a clip until you see something you like, click the clip, then add the clip to your project.
After clicking a clip, try dragging it from the Event browser to the project—that’s a very common way of working in iMovie.
Tip
Want to see more of each clip in your event? Drag the slider at the lower-right corner of the Event browser.

Add a background music soundtrack.
Display the Music and Sound Effects Browser by clicking its button. Find a tune, then drag it to the background of your project; the entire background turns green.
Play your movie.
Click one of the two play buttons below the Project Library. The button on the left plays the movie full-screen.

Add transitions.
Let’s add a cross-dissolve transition between each clip in your movie. Choose File > Project Properties. Check the box labeled Add Automatically, then click OK. Another message appears; click OK to that one, too.
The Project Properties dialog box controls overall project settings: its aspect ratio, durations of transitions and photos, and more.
Play your movie again.
Each clip now dissolves into the next one. In the Project browser, little transition symbols now appear between each clip.
It’s that easy to assemble a quick movie: Click a clip, add it to the project, and repeat. There’s much, much more you can do, of course, and the rest of this chapter tells all.
Essential Notes and Tips
Never destructive. When you assemble a project in iMovie, you’re never altering your original source video (the footage you imported). This isn’t old Hollywood, where editors cut and spliced film and unwanted footage fell to the floor. iMovie simply keeps track of which parts of each clip you want to use, and in what order. You’re always able to change edits and use footage that you didn’t use the first time around.
At the same time, some housekeeping features let you delete unwanted footage and free up disk space (see page 250).
Full-screen controls. When playing a movie full-screen, try moving the mouse—controls appear that let you jump to a specific spot in the movie.
How many seconds? If you like iMovie’s click-and-add editing technique, you may want to customize how much video iMovie selects when you click a clip. Choose iMovie > Preferences, and drag the slider labeled Clicking in Events Browser Selects. Want to create a fast-paced video? Choose a short duration, such as two seconds. Creating a leisurely montage of scenic shots? Think longer.
Selection tips. Clicking a clip is just one way to select some of its footage. You will also frequently select video by dragging across a clip. This lets you select a specific amount of footage: as you drag, the thumbnail and the Viewer display the frame currently under the playhead. A little time readout also appears next to the clip; it shows how many seconds you’ve selected.
To select an entire clip in the Event browser, press Option while clicking the clip.
To select more than one clip at a time, ![]() -click on each clip, or Shift-click to select a range of clips—standard Mac selection maneuvers.
-click on each clip, or Shift-click to select a range of clips—standard Mac selection maneuvers.
Clip details. As you work, you might want to display information about a clip. Choose View > Playhead Info. A little banner appears above the playhead containing information about the current clip.
Keyboard shortcuts abound. As you get familiar with iMovie, start exploring its keyboard shortcuts—there are lots of them, and they can help you edit efficiently. (For a list, choose Help > Keyboard Shortcuts.)
iMovie isn’t just about editing video; it’s also about managing it. Indeed, one of the great strengths of iMovie ’08 is that it lets you organize and keep track of the video you import. You might say that iPhoto has taught iMovie a thing or two about organization.
And as with a photo library, the more accessible and organized your video library is, the more likely you’ll spend time exploring and enjoying it.
Here’s a look at the basic explorer’s tools iMovie ’08 provides. We’ll explore more video-management tools on the following pages.
iMovie stores video you import as a series of events, which appear in the Event library area. To browse the footage in an event, select the event.
Skimming and playing. It’s easy to browse your iPhoto library: all the photos are there for you to see. Video, however, involves time—what you see at the beginning of a clip is just a hint of what happens later, requiring you to watch the entire thing (or keep it all in your head).
iMovie’s skimming feature lets you conquer time.
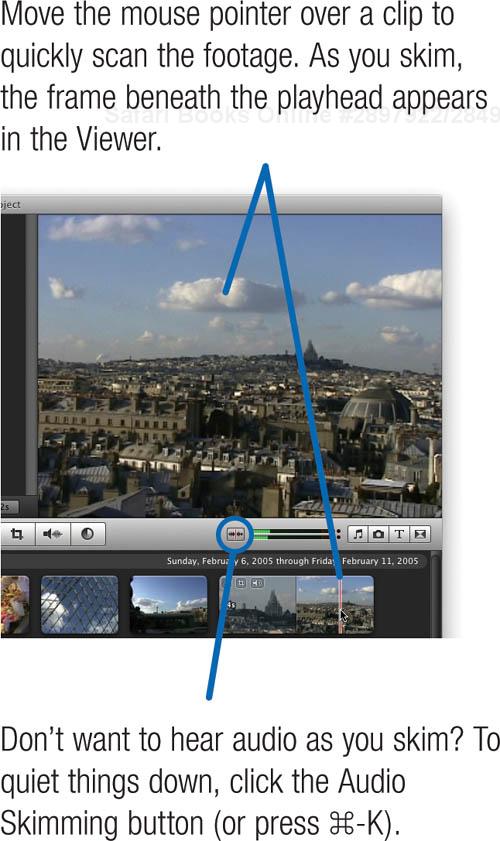
Play time. To play video at actual speed, point to the spot on a clip where you want playback to begin, then press the space bar. You can also double-click a clip.

The Event browser shows the clips in an event. You can customize how those clips appear.
The big picture. When you want to see as many clips as possible in the Event browser, drag the clip size slider all the way to the right, until the word All appears next to it. In this view, you see just one frame per clip. When you’re assessing some newly imported footage or just reliving some memories, this is an efficient way to view clips.
A closer look. When you’re editing, you’ll want to see more of each clip in the Event browser. It’s essential for selecting which portions of clips you want to use in your project.
And seeing more of the clips is easy: just “unroll” your clips into filmstrips by dragging the clip size slider to the left. The further to the left you drag, the more frames you see. At the leftmost setting, iMovie displays a thumbnail for every half-second of video—great for precision work.

Thumbnail sizes. To control the size of the clip thumbnails, drag the thumbnail size slider above the Event library. Want to see as many clips as possible on the screen? Make the thumbnails small. Need to see the differences between similar-looking clips? Make the thumbnails big.
The thumbnail setting applies to clips in both the Event browser and the Project browser.
Renaming an event. To change the name of an event, double-click its name, type a new name, and press Return.

Splitting an event. For organization’s sake, you may sometimes want to split one event into two. Maybe you have an event containing footage from a morning hike with the kids and a nighttime poker game with friends. Those are very different events, and you might like your movie library to reflect that.
To split an event, click the clip that you want to be the first clip of the new event. (In this example, that would be the first poker game clip—the clip where you tuck the ace up your sleeve.) Then, choose File > Split Event Before Selected Clip.
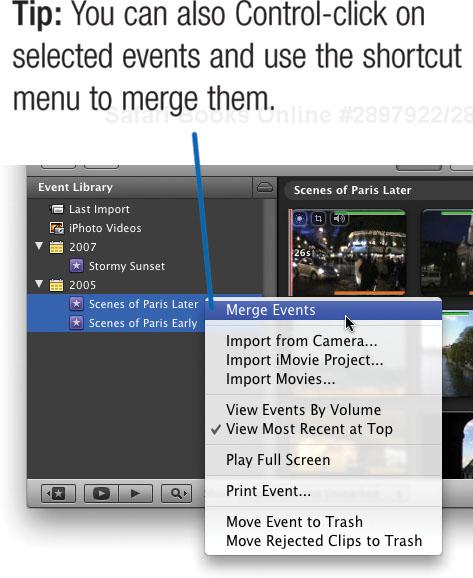
Merging Events. At other times, you might decide that two or more events really constitute just one. Maybe you have several events containing footage from your Paris vacation, and you’d like to see them stored as just one.
Select the events you want to combine, choose File > Merge Events, and give the new event a name.
Moving footage between events. Sometimes, you might want to move a clip from one event to another. Maybe your latest import revealed some new-puppy footage that you forgot was in your camera, and you’d like to move those clips into the New Puppy event that contains the rest.
Begin by selecting the event that contains the clips you want to move. Next, select the clips you want to move (use the Shift-click and ![]() -click maneuvers to select multiple clips). Finally, drag the selected clips to the event where you want them.
-click maneuvers to select multiple clips). Finally, drag the selected clips to the event where you want them.

Just as iPhoto provides features for organizing and keeping track of photos, iMovie provides features for managing the video in your Event library.
And just as with iPhoto, you don’t have to use any of these features. But as your video library grows, you may find that locating specific clips becomes cumbersome. You may also find yourself running low on hard drive space.
iMovie’s video-management tools can help on both counts.
Your first job after importing some video will probably be to sit back and enjoy it—to watch the footage, smile at the good stuff, and cringe at the bad. As you watch, you may get ideas for ways to edit the video into a finished project.
As you audition your footage, you can mark sections of it to reflect your smiles and grimaces. The best stuff? Mark it as a favorite. The stuff your enemies may use against you someday? Mark it for deletion.
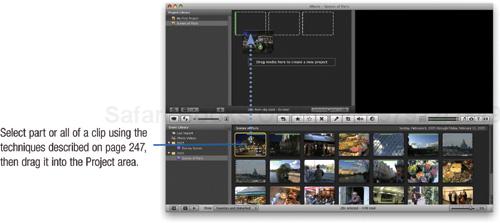
Playing favorites. To mark a clip, start by selecting part or all of the clip. (See page 247 for details on selecting clips.) Then, turn to the toolbar.

By skimming, selecting, and tapping the keyboard shortcuts for each of these buttons, you can very quickly group your footage into these best, worst, and “I’ll decide later” categories.
Controlling what you see. Using the Show pop-up menu below the Event Library, you can control what iMovie displays in the Event browser.

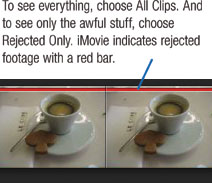
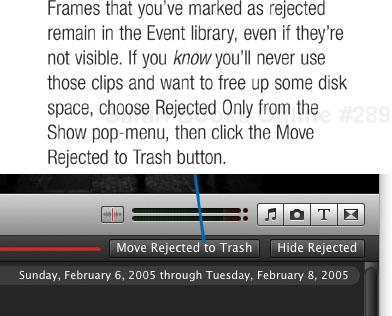
Normally, iMovie shows your favorite footage and anything that you haven’t marked. To see only your favorite footage, choose Favorites Only. iMovie hides unmarked and rejected footage.
As you become accustomed to marking footage, you might want to take advantage of a more powerful marking mode. Choose iMovie > Preferences, and check the Show Advanced Tools box.
The marking tools now work differently. Click the Mark as Favorite button, for example, and then drag across the range of frames to be marked. When you’re done, the tool is still active, so you can drag across another clip and mark it—saving you a couple of clicks.

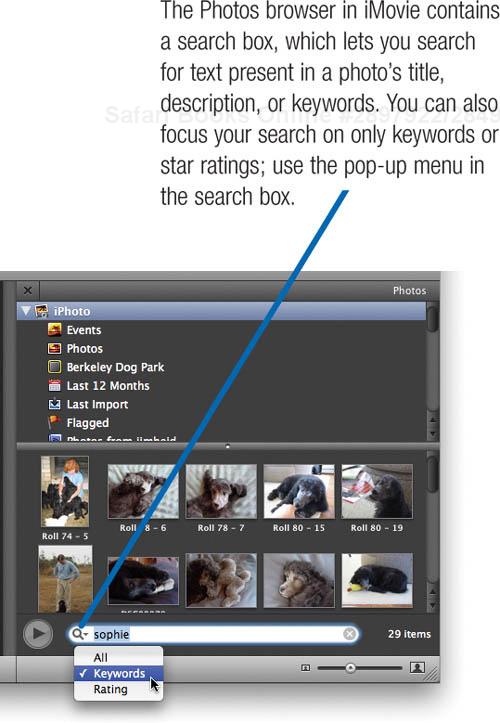
Like iPhoto, iMovie lets you assign descriptive keywords to video: Dog, Beach, Vacation, Paris, and so on. You can then organize and search based on keywords.
Like iPhoto, iMovie has a small set of keywords already defined. They’re a good start, but you’ll want to create your own keywords to reflect the subjects in your footage.
Begin by displaying the Keywords window: click the toolbar’s Keywords button.
To create a keyword, click in the New Keyword box, type the keyword, then press Return. The new keyword appears in the Keywords window.
The first nine keywords get a single-key shortcut—a numeral 1 through 9. If you want a keyboard shortcut for a particular keyword, drag it so that it’s one of the first nine in the Keywords window.
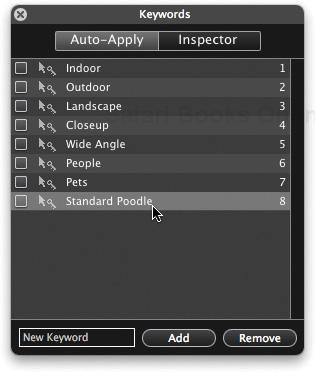
To delete a keyword, select it and click Remove.
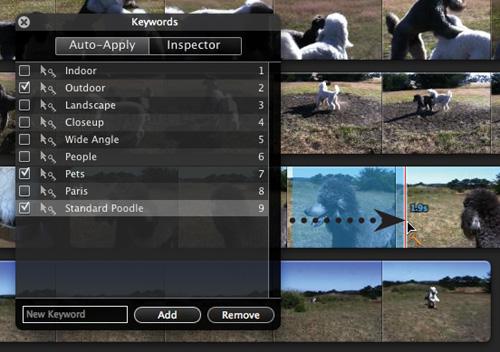
To assign keywords to some footage, again summon the Keywords window. Next, check the boxes next to the keywords you want to assign. (You can also tap the single-key number shortcuts for keywords that have them.)
Finally, select the footage that you want to mark with those keywords. Below, I’m assigning a few keywords to some footage of a famous dog.
Tip
You can also select a range of footage, click the Keywords button on the toolbar, and then choose the keywords in the Keywords Window.
Here’s where your organizational fortitude pays off. You can view your footage by keyword.
First, click the Keyword Filtering button (![]() ). This displays the Keyword Filtering pane.
). This displays the Keyword Filtering pane.
Next, check the box next to each keyword you want to search for. Use the buttons at the bottom of the pane to specify how you want to search. To search for all the keywords you’ve checked, click All. (Example: “Show me all the footage with the keywords Paris, Outdoor, and Close-up.”) To search for any of them, click Any. (“Show me anything that has Paris or Outdoor or Close-up.”)
With the Exclude button, you can hide footage that has the keywords you’ve selected. (“I don’t want to see any close-ups from Paris right now.”)

One of the many beauties of iMovie ’08 is that you don’t actually have to do any editing in order to enjoy your video. You can relive those memorable events by simply browsing footage that you’ve imported into your Event library—just as you can enjoy your photos in iPhoto without having to publish a book.
But as we saw with iPhoto, something special happens when you turn raw material into a finished, polished product. An iPhoto book (or any other iPhoto project) shows your photos at their best and lets you tell a story.
The same applies when you create a project in iMovie. Select just the best parts of an event, and then sequence them in a way that tells a story, brings a laugh, or simply recalls good times. Then share your project in a variety of ways.
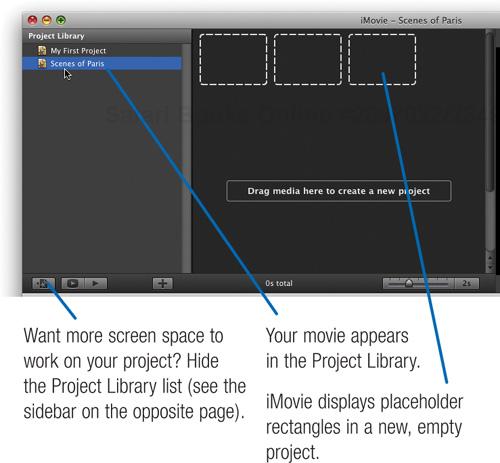
iMovie lets you create as many projects as you like. Your projects appear in the Project Library, and you can switch from one project to another with the click of a mouse. iMovie even automatically saves your work as you go along.
Here’s how to get started.
Click the New Project button (or choose File > New Project or press
 -N).
-N).
The New Project dialog box appears.
Renaming. To change a project’s name, double-click it in the Project Library, then type a new name and press Return.
Deleting. To delete a project, select it and press ![]() -Delete. Change your mind? Choose Edit > Undo Delete Project—and do this before you do anything else.
-Delete. Change your mind? Choose Edit > Undo Delete Project—and do this before you do anything else.
Duplicating. To make a duplicate of a project, Control-click on the project’s name and choose Duplicate Project from the shortcut menu. This is a great way to experiment with different editing approaches.
Format flexibility. You can change the aspect ratio of a project at any time: choose File > Project Properties (![]() -J). You can combine this flexibility with the Duplicate Project command to create, for example, one version of a movie for your 16:9 widescreen TV, and another version for your 3:2 iPhone: duplicate a completed project, then select the duplicate, and change its aspect ratio.
-J). You can combine this flexibility with the Duplicate Project command to create, for example, one version of a movie for your 16:9 widescreen TV, and another version for your 3:2 iPhone: duplicate a completed project, then select the duplicate, and change its aspect ratio.
A clip in the Event Library is like a baseball player on the bench. To put the clip on the playing field, you must add it to a project.
Tip
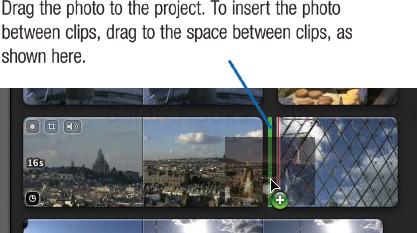
Want to insert a clip between two clips that are already on the timeline? Just drag the clip between them—a green vertical line appears between the clips to indicate the insertion.
Usually, you work with one clip at a time, dragging it to the project as you sequence your movie. But there’s more than one way to work with clips.
Drag several at once. You can add multiple clips to a project at once. Select each clip by ![]() -clicking on it, then drag the clips to the project as a group.
-clicking on it, then drag the clips to the project as a group.
Add to Project button. With a clip or range of frames selected in the Event browser, click this button or simply press E. iMovie adds the selected footage to the end of your movie.
This can be a fast and efficient way to build a movie: select some footage, press E, select more footage, press E, and so on.
Paste from the Clipboard. You can also add a clip to a project using the Paste command. Select a clip in the Event browser—or a clip that’s already in your movie—and cut or copy, then paste. You can even paste clips from a different iMovie project.
Using the Add to Project tool. Here’s another great rapid-fire editing technique. In iMovie’s preferences dialog box, check the Show Advanced Tools box.
This changes the workings of the Add to Project button. Click it and select some footage in the Event browser—the footage is immediately added to the end of your project.
Here’s the best part: the tool is still active and ready for action. Drag across some more footage in the Event browser, and iMovie adds it to the project. Try it—you’ll be impressed with how fast it lets you sling footage into your project.
More Room to Work
When you’re in the throes of editing, you may not need to see your list of projects or even your Event library. You can hide both to free up space in iMovie’s window: just click the hide button below each. To show them, click the buttons again.
To gain even more work space for your project’s timeline, swap the position of the event and

iMovie also provides a few preset window arrangements: to explore them, choose Window > Viewer. You might prefer the Large setting when cropping footage or photos, or when using the Ken Burns effect (page 258). When you’re working mostly in the timeline and Event browser, the Small setting gives you more room.
And finally, you can change how iMovie divides its window by clicking and dragging any blank area of the toolbar. Take advantage of these interface-customizing features. You’ll spend less time scrolling and more time editing.
In a well-edited video, the cuts between scenes occur at exactly the right moments. In movies, the action cuts between two actors as they converse, reinforcing both the dialog and the drama. Every moviegoer has experienced this, probably without even thinking about it.
iMovie provides several features that let you edit with precision. You can trim the start or end point of a clip within the project timeline or, for more precision, by using a separate window called the trimmer.
You can change which part of a clip appears without changing the clip’s overall duration—a technique called a slip edit.
When you’re just slinging together some favorite pieces of footage, you probably won’t need these advanced editing techniques. But when you need to cut with precision, iMovie can be a surprisingly sharp scalpel.
Here’s a tour of these tools, along with some details on how you can adjust the appearance of the video footage and photos in your projects. For more editing tips, see the following pages, as well as pages 282–285.
Trimming is the process of changing where a clip starts and ends. You might need to trim clips when editing dialog or when timing clips to match a musical background or narration.
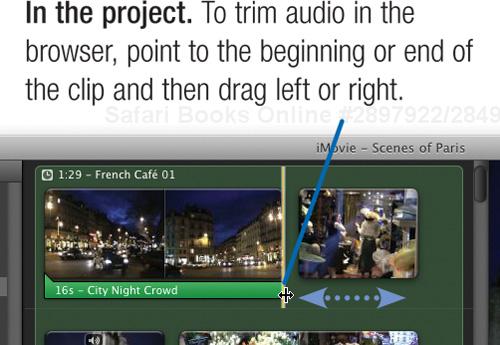
Trimming directly. To trim a clip directly in the project, drag across a clip to specify the range of frames you want to keep. Then, choose Edit > Trim to Selection (![]() -B).
-B).
Alternatively, you can drag to select frames you want to remove, then press the Delete key.
In either case, iMovie doesn’t delete the footage you’ve trimmed; it simply hides it. You can restore the footage by using the trimmer.
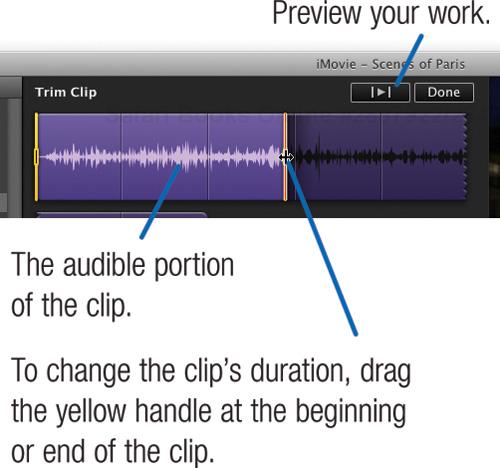
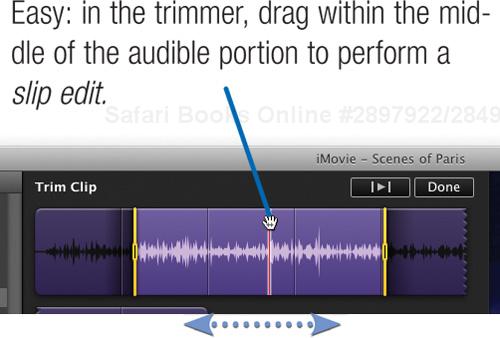
Using the trimmer. For more trimming precision, use the trimmer. Select the clip you want to trim, then choose Edit > Trim. (You can also click the tiny clock icon on the clip.)
Your project’s timeline is temporarily replaced by the trimmer.

Slip editing. You may sometimes want to use a different part of a clip that you’ve added to a project. Maybe you have a five-second shot of a beach, and you realize that a different part of the original source clip looks better.
Open the clip in the trimmer, then drag the entire yellow selection border left or right (the mouse pointer looks like a hand with an arrow on it). This tells iMovie to use a different part of the source clip, but to keep the duration the same. This is called a slip edit.
Splitting a clip. There are times when you might want to split one clip into two—to insert a photo, for example. To split a clip, drag to select some frames, then choose Edit > Split Clip.
More precision in the Project browser.
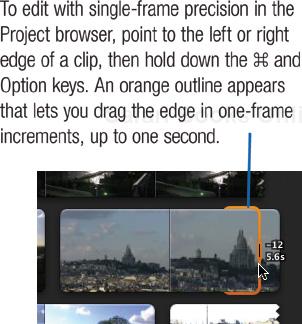
Tip
Like this option? Choose iMovie > Preferences, and check the Show Fine Tuning Buttons box. Now when you select a clip, tiny fine-tuning buttons appear at the left and right side of the clip. Click the appropriate button to change the start or end point of the clip.
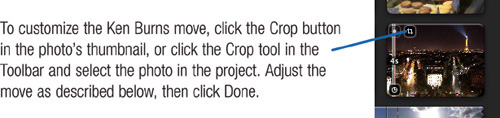
iMovie lets you crop and rotate not only stills (page 258), but also video clips.
Select a clip, then click the toolbar’s Crop button or the tiny Crop button on the clip’s thumbnail.
To crop the clip to improve its composition, click the Crop button in the Viewer, then resize the crop rectangle.
To rotate a clip, click one of the rotation arrows. You might rotate a clip if you accidentally thought your camcorder was a still camera and shot a scene in vertical orientation—or if you want to present a scene upside-down.
To preview your work, click the Viewer’s Play button. When you’re finished, click Done.
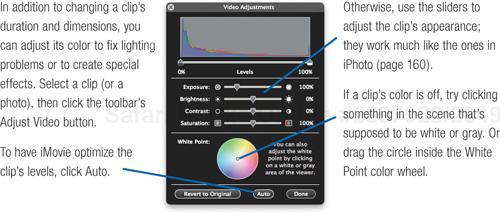
Adjusting Color, Exposure, and More
Tips
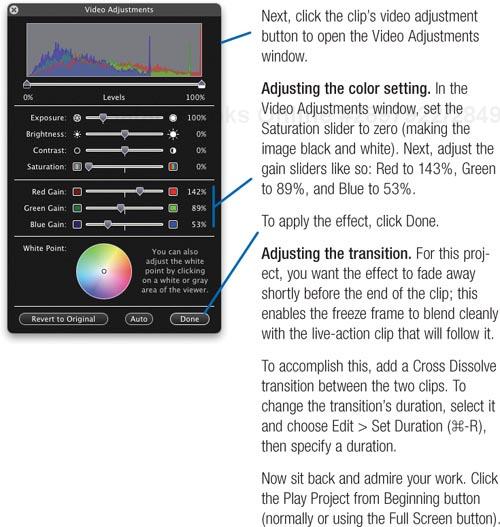
To make the clip black and white, drag the Saturation slider to zero. To create strange video effects, experiment with all the sliders. To add more color-adjustment sliders, activate the advanced editing tools in the Preferences dialog box. To apply the identical adjustments to other clips, use the Paste Adjustments command (page 282).
A cutaway is a common video-production technique. Think of Barbara Walters nodding solemnly while Fabio describes what kind of tree he’d like to be. Or maybe the video changes to show a close-up of Grandma’s garden as she talks about it.
Try it yourself. Want to experiment with cutaways? Go to www.macilife.com/imovie and download the Cutaway Example Footage archive. Double-click the archive after downloading it, then open the folder named Cutaway Footage and read the instructions inside.
Begin planning cutaway shots when shooting your video. After Grandma talks about her garden, shoot some close-ups of the plants she talked about. While you’re shooting the school play, grab a couple of shots of the audience laughing or clapping. Or after you’ve shot an interview, move the camera to shoot a few seconds of the interviewer nodding. (In TV news, this kind of shot is called a noddie.)
Tip
Still have an old VHS or 8mm camcorder? Dust it off, pop it on a tripod, and use it to shoot short cutaway shots. Dub the footage to your current camcorder, then import it into iMovie. The video quality won’t match exactly, but your viewers may never notice. And your cutaways will be authentic rather than staged.
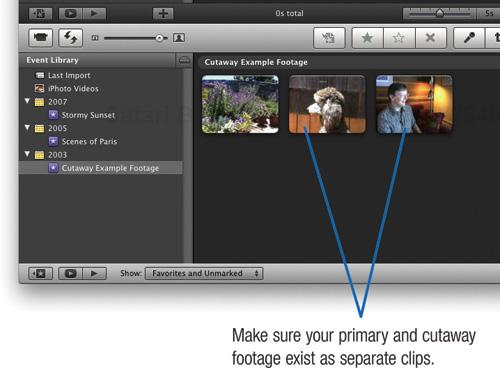
With your footage imported, you’re ready to set up for the edit. With cutaway shots, you retain the audio from the primary clip and discard the audio from the cutaway shot.
Add your primary footage to the Project browser, and then click it to select the clip.
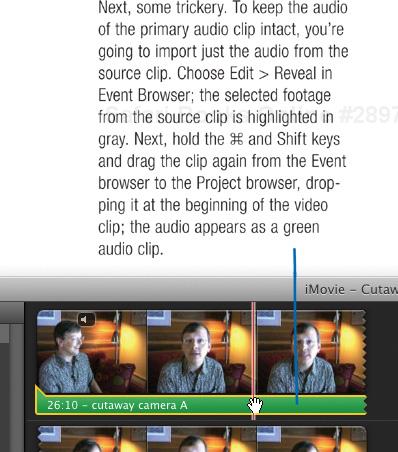
Set the video clip’s audio to zero (click the Adjust Audio button and drag the volume slider to 0%) so only the green audio clip is audible.
In the Event Browser, drag to select the cutaway footage and choose Copy from the Edit menu (![]() -C).
-C).
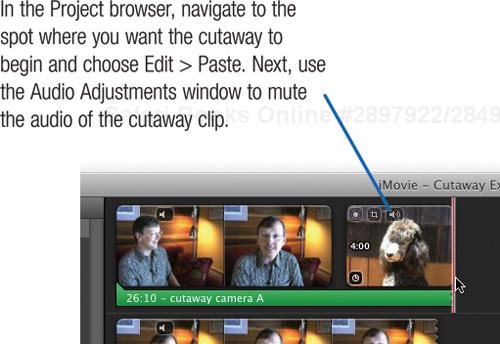
Adding the cutaway throws off the primary clip’s audio synchronization. To fix that, make note of the duration of the cutaway, then remove an equal amount of footage from the beginning of the primary clip that follows the cutaway. For example, if the cutaway is three seconds long, select three seconds of the clip that follows the cutaway, then choose Edit > Cut.
Cutaway Notes and Tips
You may find that cutaways are easier to wrangle if you view clip durations as timecode instead of as seconds. Choose iMovie > Preferences and check the Display Timecodes box.
If your video and audio have gotten hopelessly out of sync, you can fix it without fussing with the cutaway edits. Highlight the portion of your primary footage before the cutaway and choose Reveal in Event Browser, then
Photographs are mainstays of many types of movies, especially montages and documentaries. With the Photos browser in iMovie, you can add photos from your iPhoto library to your movies. You can also add photos that aren’t stored in your iPhoto library by dragging them into iMovie.
When adding photos to movies, consider taking advantage of iMovie’s Ken Burns effect to add a sense of dynamism to your stills. Why name a feature after a filmmaker? Think about Ken Burns’ documentaries and how his camera appears to move across still images. For example, a shot might begin with a close-up of a weary face and then zoom out to reveal a Civil War battlefield scene.
That’s the Ken Burns effect. Now, Ken Burns himself would probably call it by its traditional filmmaking terms: pan and scan or pan and zoom. These terms reflect the fact that you can have two different kinds of motion: panning (moving across an image) and zooming (moving in or out).
Whatever the effect’s name, its result is the same: it adds motion and life to otherwise static images.

To pan-zoom a photo, specify the start and finish settings for the move: that is, how you want the photo to look when it first appears, and how you want it to look at the end of its duration.


Photos from elsewhere. You can also use photos that aren’t stored in your iPhoto library. To access a folder of photos, drag the folder to the top of the Photos browser; it appears in a folder named Folders (what folderol!). You can also drag an image file from the Finder directly to the project. The Photos browser also shows pictures from Photo Booth and from Apple’s Aperture software, if you have them.
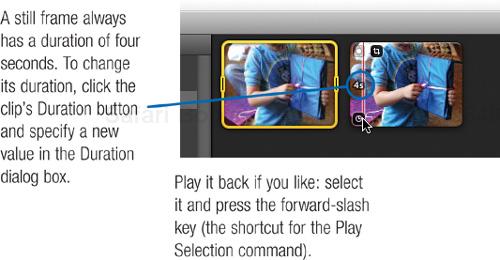
Change photo duration. Click the Duration button (the tiny clock) on a clip, or choose Edit > Set Duration. Enter a new value, and specify whether the new duration applies to the selected photo or to all photos in the project.
Adding a photo overlay. Instead of dropping a photo in the space between clips, drop it directly onto a clip. The image appears as a blue bar above the filmstrip (much like a title; page 274), complete with its own cross-dissolve transitions at the start and end. This approach lets you keep the video’s audio while a photo appears, without having to trim the video clip.
For even more fun, create an image with transparency, save it as a PNG file, and add it to a movie using this technique. The underlying video shows through the transparency, while the opaque pixels of your image appear overlaid on top. (For example, you could make a logo appear in a corner without obscuring the entire screen.)
iMovie’s support for multiple video formats introduces some special Ken Burns considerations.
4:3 formats. Working in a standard (4:3) format, such as DV? If you plan to show a photo at actual size, be sure your photos’ proportions match the 4:3 aspect ratio of these formats. Otherwise, the photos won’t completely fill the video frame: they will have black borders.
Most digital camera photos have a 4:3 aspect ratio. If the photos you want to use don’t have these proportions, you have two options. The easiest option is to simply crop in iMovie: in the Viewer, click the Crop button. A green crop area appears; its aspect ratio matches that of your project. To change which part of the photo appears, resize the crop area.
The more drastic option is to crop your photos in iPhoto. From the Constrain pop-up menu in iPhoto’s edit view, choose 4 x 3 (DVD). Remember, cropping alters the photo in your library and anywhere else it appears. If you want an uncropped (or differently cropped) version of a photo, duplicate the photo before cropping it.

Simply use iMovie’s Crop tool to crop the photo to match your project’s 16:9 aspect ratio. If you’d prefer to give iMovie cropped photos to begin with, use iPhoto’s Constrain pop-up menu to specify a custom crop proportion of 16 × 9 (HD).
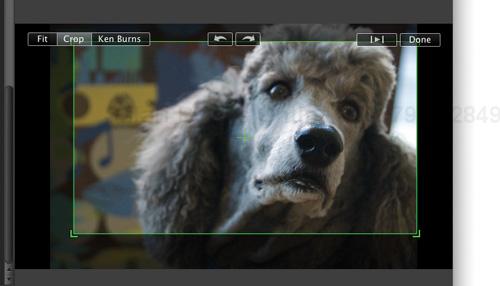
You’ve applied the Ken Burns effect and now decide that you want to change the clip’s pan or zoom settings. Select the clip in the project timeline, then click the Crop button on the clip or on the toolbar. Now make the desired adjustments in the Viewer and click Done.
Starting over. If you don’t like the way you’ve set up a Ken Burns move or a crop, it’s easy to restore the photo to its original state. First, click the photo’s Crop button or select the Crop tool and then click the photo in the project timeline. Next, click the Fit button in the Viewer.
iMovie imports photos at their full resolution. This lets you zoom in on part of a photo and still retain image sharpness.
However, if you zoom in on a low-resolution image or one that you’ve cropped heavily in iPhoto, you will probably notice some chunky-looking pixelation. So think twice about zooming in on low-resolution images unless you want that pixelated look.
![]() If you’re working in a high-definition format, you may find that you can’t zoom in very far on photos that have relatively low resolution (for example, two megapixels), at least not without seeing ugly visual artifacts.
If you’re working in a high-definition format, you may find that you can’t zoom in very far on photos that have relatively low resolution (for example, two megapixels), at least not without seeing ugly visual artifacts.
Creative use of zooming can help tell your story. When you zoom in, you gradually focus the viewer’s attention on one portion of the scene. You tell the viewer, “Now that you have the big picture, this is what you should pay attention to.”
When you zoom out, you reveal additional details about the scene, increasing the viewer’s sense of context. You tell the viewer, “Now that you’ve seen that, look at these other things to learn how they relate to each other.”
Unless you’re after a special effect, avoid very fast pans and zooms. It’s better to pan and zoom slowly to allow your viewers to absorb the changes in the scene.
One way to control the speed of the zoom is to extend the duration of the clip. A ten-second Ken Burns move is smoother than a two-second one.
Another way to control the speed of the zoom is to simply zoom less. A gentle zoom is less visually jarring anyway.
Variety is the spice of zooming. If you’re creating a photo montage and zooming each image, consider alternating between zooming in and zooming out. For example, zoom in on one image, then zoom out on the next. If you add several photos at once, iMovie automatically sets up their Ken Burns moves this way.
A fine example of this technique lives elsewhere within iLife: iPhoto’s automatic Ken Burns effect alternates between zooming in and zooming out. So does the screen saver in Mac OS X.
Cropping is a good way to make a photo fit the aspect ratio of a project, but that isn’t its only application, of course. You can also crop to simply improve photo’s composition.
If you’ve used earlier iMovie versions, you’re probably used to waiting a lot. For example, when you created a Ken Burns move, iMovie would have to generate, or render, each of the video frames necessary to create the move.
iMovie ’08 eliminates the need to render by taking advantage of the graphics power in Mac OS X. As a result, you have more freedom to experiment—and less waiting to do.
Ken Burns has some limitations. One is that you can’t “hold” on a certain frame. You might want to have a 10-second clip in which the photo zooms for the first eight seconds and then remains static for the last two. Or maybe you want to zoom in part way, freeze for a couple of seconds, and then continue zooming.
Ken can’t do that.
Another limitation is that you can’t combine multiple moves in a single clip. For example, you might want to pan across a photo and then zoom in on part of it.
Ken can’t do that, either.
At least not without a little finessing. It’s actually possible to accomplish both of these tasks in iMovie. Here’s how.
To hold on a frame, start by adding a photo to the project timeline.
Copy the clip (press ![]() -C) and then paste it (
-C) and then paste it (![]() -V) to create a duplicate right after the original.
-V) to create a duplicate right after the original.
Click the Crop button to remove the Ken Burns effect but retain the same cropping as the last frame of the original clip.

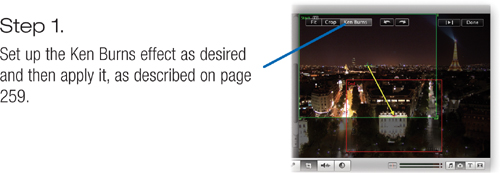
Combining two kinds of moves involves importing the same photo twice and applying different Ken Burns settings each time.
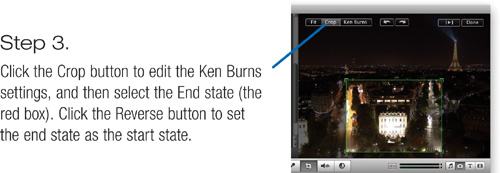
Click the Crop button to edit the photo, and click the Reverse button.
This reverses the Ken Burns settings that you set up for Step 1: its end point becomes the new start point.
Specify the End settings for the second Ken Burns move and then click Done.
Beyond Ken Burns: Other Pan-Zoom Tools
Ken Burns isn’t the only game in town. Other pan-zoom tools are available that work with iMovie.
Photo to Movie. Photo to Movie by LQ Graphics (www.lqgraphics.com) makes it very easy to create pan-zoom effects. Create your effect in Photo to Movie, export it as a QuickTime movie, and then bring it into iMovie and add it to your project.
Photo to Movie’s results are superior to those created by the Ken Burns effect. Photo to Movie does a better job of what animators call ease in and ease out: rather than motion abruptly starting and ending, the motion starts and ends gradually. The results have a more professional appearance.

Motion Pictures HD. This scaled-down version of Photo to Movie is included with Roxio’s Toast.
In movie making, sound is at least as important as the picture. An audience will forgive hand-held camera shots and poor lighting—The Blair Witch Project proved that. But give them a noisy, inaudible soundtrack, and they’ll run for the aspirin.
Poor quality audio is a common flaw of home video and amateur movies. One problem is that most camcorders don’t have very good microphones—their built-in mikes are often located on the top of the camera where they pick up sound from the camera’s motors. What’s more, the microphone is usually far from the subject, resulting in too much background noise. And if you’re shooting outdoors on a windy day, your scenes end up sounding like an outtake from Twister.
If your camcorder provides a jack for an external microphone, you can get much better sound by using one. On the following pages, you’ll find some advice on choosing and using microphones.
If you’ve already shot your video or you can’t use an external mike, there is another solution: don’t use the audio you recorded. Instead, create an audio bed consisting of music and, if appropriate, narration or sound effects (see page 267).
iMovie provides several features that you can use to sweeten your soundtracks. Take advantage of them. And if they don’t do the job, consider bringing your movie into GarageBand for additional sonic seasoning (page 376).
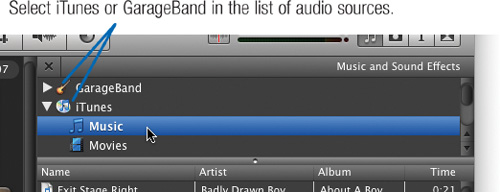
Use the Music and Sound Effects browser to bring in music from your iTunes library or GarageBand.

Note
In order to be able to preview a GarageBand project in the media pane, or add the song to your movie, the project needs to be saved with an iLife preview.

For details, see page 361.

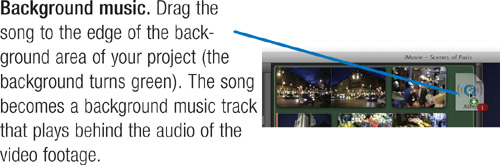
Drag a song to your project. Where you drop the song determines how iMovie treats it.
Tip
You can stack as many audio clips as your ears can bear. For details on managing audio, see page 268.
You can record narration directly within iMovie.
To begin recording, click the Voiceover button in the toolbar (or press O) and then click the point in your movie where you want to begin recording. iMovie gives you a three-second countdown and then starts recording. To stop recording, click again in the browser. (To cancel recording, press Esc.) When you’re done, close the Voiceover window.
As you record, iMovie adds your narration to the filmstrip (as a purple audio clip), positioning it at the playhead’s location.
Setting levels. For the best sound, you want to record loud, but not too loud. At its loudest, your voice should illuminate iMovie’s volume meter as mostly green. If you push the levels into the red, your sound will be distorted.

To get better sound, get a high-quality external microphone and place it close to your subject.
Before you buy an external mike, determine whether your camcorder can accept one. Some inexpensive camcorders don’t provide a jack for an external mike; others may require an adapter that connects to the bottom of the camera. Most mid-range and all high-end camcorders have external mike jacks. On most cameras, it’s a ⅛-inch stereo minijack.
Clip-on. Microphones come in all sizes and designs. Some are specialized—for example, a lavaliere mike, which clips to a lapel or shirt, is great for recording a single voice, such as that of a teacher (or TV host). But a lav mike is unsuitable for recording a musical performance.
Shotgun approach. When you can’t get the mike close to your subject but still want to reduce extraneous noise, consider a shotgun mike. In a shotgun mike, the microphone capsule is mounted within a long barrel designed to reject sound coming from the side of the mike. Shotgun mikes are popular in TV news and movie making. They’re sensitive enough to be located out of the video frame, and their highly directional sensitivity means they won’t pick up noise from cameras and crew members.
A shotgun mike works best when mounted on a boom, a long pole (often hand-held) that allows the mike to point down at the subject. When you see a video crew with one person who appears to be holding a fishing pole with a long tube on the end of it, you’re seeing a shotgun mike (and a sound technician) in action.
Two in one. The most versatile mike you can buy is a single-point stereo mike. A stereo mike crams two microphone capsules into a single package. Each capsule is precisely positioned relative to its companion, thus eliminating one of the biggest challenges of stereo recording: getting accurate balance and separation between the left and right channels. I use the AT822 from Audio-Technica (www.audio-technica.com).

With high-quality extension cables, the mike and camera can be up to about 25 feet apart. At greater distances, you risk losing some high frequencies and picking up hum and other electrical noise.
A balanced alternative. When you need to run cables longer than 25 feet or so—or when you want the best possible quality and are prepared to pay for it—consider a balanced mike. All of the aforementioned mikes are available in balanced and unbalanced versions. A balanced mike is wired in a way that reduces electrical noise and allows for cable runs of up to 100 feet or so. Balanced mikes cost more than unbalanced ones, but professionals and serious amateurs prefer balanced mikes due to their resistance to electrical noise and their support for longer cable runs.
A balanced mike typically uses an XLR connector, and only high-end camcorders have XLR jacks. But there is a way to connect a balanced mike to an unbalanced miniplug jack: the DXA-2 adaptor from BeachTek (www.beachtek.com). A compact metal box that attaches to your camera’s tripod mount, the DXA-2 requires no external power supply and has built-in knobs for adjusting volume levels.
To do justice to any mike, position it properly. For that school play or recital, use a mike stand and position the mike high, pointing down toward the stage at about a 45-degree angle. If you can’t set up your own mike stand, just try to get the mike at least a few feet off the stage and as close to center stage as possible.
How close should the mike be? That depends on what you’re recording (see the table at right). The closer the mike is to a sound source, the less room noise and reverberation it picks up.
But if the mike is too close, stereo separation is exaggerated—some sounds come only from the left speaker, others only from the right, and sounds in the center are louder than they should be. Move the mike too far away, and you get a muddy-sounding recording with too much room reverb.
When recording a live performance, try to show up for rehearsals so that you have time to experiment with different mike distances. If your camera has a headphone jack, connect a good pair of headphones—ones whose cups surround your ears and thus block out external sounds. Record a test, play it back, and listen.
For recording narrations, consider assembling a makeshift sound booth that will absorb room echo and block computer and hard drive noise. Glue some sound-absorbing acoustical foam onto two sheets of plywood or foamcore. (See www.soundsuckers.com for a wide selection.) Position the two sheets in front of you in a V shape, with the mike at the narrow end. If you’re on a tight budget, use blankets, pillows, carpet remnants, or even a coat closet. The idea is to surround yourself, and the mike, with sound-absorbing material.
Another major microphone manufacturer, Shure, has published some excellent mike-placement tutorials. Download them at www.shure.com.
Table . A Field Guide to Mike Placement
Scenario | Ideal Mike Position |
|---|---|
Solo piano | About a foot from the center of the piano’s harp, pointed at the strings (open the piano’s recital lid). |
Wedding ceremony | As close to the lovebirds as possible. Many wedding videographers attach a wireless lavaliere mike to the groom or the officiator. (Bridal gowns tend to rustle too much.) A mike hidden in a flower arrangement may also work. |
Narrator | 6 to 9 inches from the speaker’s mouth, angled downward. To avoid plosive problems, use a windscreen and position the mike just off to the side, pointing at the mouth. Alternative: a lavaliere mike. |
Choral group | 1 to 3 feet above and 2 to 4 feet in front of the first row of the choir. |
Birthday party around a table | On an extended floor stand, angled downward. Alternative: on a tabletop desk stand, pointing at the birthday kid. |
If you weren’t able to get good audio when you originally shot your video, consider muting your video’s audio track and just putting a music bed behind your shots. Create a montage of shots, using bookmarks and direct trimming to help you time your edits to the music.
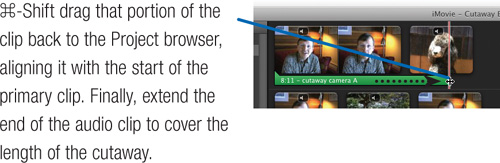
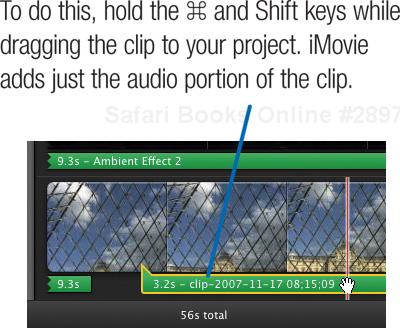
And finally, a related tip: If you’re shooting scenes where the audio is mostly ambient sound—the waves at the beach, the din of a party—shoot a few minutes of uninterrupted video, keeping the camera stationary. After importing the video, you can use only the clip’s audio. In iMovie, hold ![]() and Shift while dragging the clip into your project; it appears as an audio clip below the filmstrip. Now mute the audio of the other clips (see page 268). This technique eliminates jarring sound changes between shots.
and Shift while dragging the clip into your project; it appears as an audio clip below the filmstrip. Now mute the audio of the other clips (see page 268). This technique eliminates jarring sound changes between shots.
Adjusting the volume of an audio track is a common task. And when you combine audio in any way—mixing music, sound effects, dialog, and background sounds—you almost always need to adjust the relative levels of each sound to create a pleasing mix.
iMovie provides several ways to work with sound levels. You can reduce the volume of an entire sound clip. You might do this if you’re mixing music with the sound of the surf, and don’t want the waves to drown out the music.
You can also vary a track’s volume level over time. When combining music and narration, you might want the music to start at full volume, fade when the narrator talks, then return to full volume when she stops—a feature called ducking.
Just as with video, you can change the duration of audio clips. You can trim directly in the project timeline or, for more precision, summon the trimmer, which has the added benefit of displaying audio waveforms. A waveform looks a bit like the penmanship of an earthquake seismograph. Back-and-forth lines indicate the intensity of the shaking—in this case, of the sound wave. Being able to see your sound is a big help when trimming audio tracks.
To control audio levels, use the Audio Adjustments window. Click the toolbar’s Audio Adjustments button (or press A), then, in your project, click the clip that has the audio you want to adjust. (Shortcut: Click a clip’s Audio Adjustments button—the tiny speaker.)
Quiet down (or speak up):

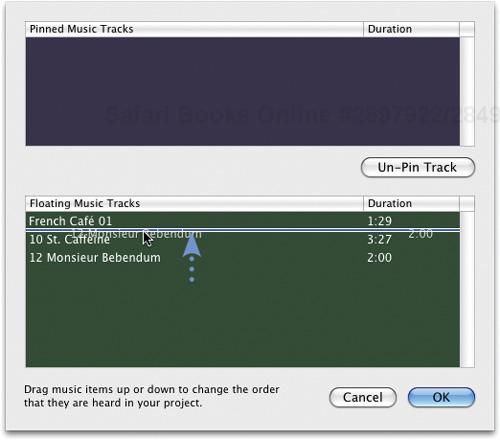
Adding background music to a project is easy, but there’s more to the story. You can have multiple songs in a project—just drag them to the project’s background, as shown on page 265. When you add multiple songs to the background, they play one after the other, separated by a one-second crossfade.
Rearranging background music. To change the playback order of your project’s songs, choose Edit > Arrange Music Tracks.
Drag the songs to change their playback order, then click OK.
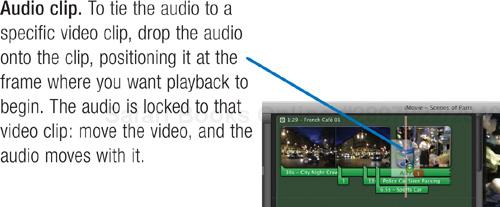
Pinning audio. You can pin a background song to a specific clip so that it begins playing when that clip appears—and so that it moves along with the clip as you edit and change your project.

To make the song float again, select it and choose Edit > Un-Pin Music Track.
Tips
For projects with several pinned tracks, it’s often easier to use the Edit menu’s Arrange Music Tracks command to unpin tracks.
If you pin a music clip and then add another background song, the new song fills in any gap between the last floating song and the pinned clip.
To change the duration of an audio clip, trim it—either directly in the project or in the trimmer.
In the trimmer. For more control, use the trimmer: select the song and choose Edit > Trim Music (![]() ).
).
Slipping audio edits. Sometimes, you may want to keep the duration of a clip the same, but change which part of it plays—maybe you need 50 seconds of a song behind some footage, but you want a different 50 seconds.
To work with more precision when viewing waveforms in the Trimmer, zoom in: drag the thumbnail slider to the right, and drag the clip size slider to its leftmost position (the half-second setting).
You can trim the start and end of an audio clip using the same techniques described on page 255. As with video clips, you can reclaim audio that’s outside of a clip’s boundaries by resizing the clip.
Here’s a handy way to locate the exact spot to trim or split an audio clip. First, be sure that audio skimming is on: choose View > Audio Skimming (![]() -K). Next, open the clip in the trimmer, and slowly skim across its waveform. Your audio plays back, but is slowed down. The sound even plays backwards when you skim to the left. (Beatles fans: import some White Album songs from your iTunes library and have fun.)
-K). Next, open the clip in the trimmer, and slowly skim across its waveform. Your audio plays back, but is slowed down. The sound even plays backwards when you skim to the left. (Beatles fans: import some White Album songs from your iTunes library and have fun.)
At times, you may want to use only the audio portion of a clip. For example, you’re making a documentary about your grandmother’s childhood and you’d like to show old photographs as she talks.
You can now position still images and other clips in the space above the audio in the filmstrip. You can also drag the audio elsewhere in the timeline.
You might want some sound effects to play for a long period of time. For example, iMovie’s Hard Rain sound effect is less than 10 seconds long, but maybe you need 30 seconds of rain sounds for a particular movie.
For cases like these, simply repeat the sound effect by dragging it from the Music and Sound Effects browser to the project as many times as needed. You can also duplicate a sound by Option-dragging it in the project. If the sound effect fades out (as Hard Rain does), overlap each copy to hide the fade.
You can build magnificently rich sound effect tracks by overlapping sounds. To create a thunderstorm with a bit more punch, for example, drag the Thunder and Rain sound effect so that it overlaps Hard Rain. And don’t forget to use iMovie’s audio controls to fine-tune the relative levels of each effect.
Most miniDV camcorders provide two sound-recording settings: 12-bit and 16-bit. Always record using the 16-bit setting. If your sound and picture synchronization drift over the course of a long movie, it’s probably because you recorded using 12-bit audio.
Get links to sources of sound effects and music. www.macilife.com/imovie
You’ve adjusted an audio clip and would like to apply the same adjustments to other audio clips. Select the adjusted clip and choose Edit > Copy. Then select other clips and choose Edit > Paste Adjustments > Audio.
When you don’t want to use the audio from a series of video clips, this is the easiest way to mute the clips. Mute one, choose Copy, select the others (![]() -click on each one), then paste the adjustment.
-click on each one), then paste the adjustment.
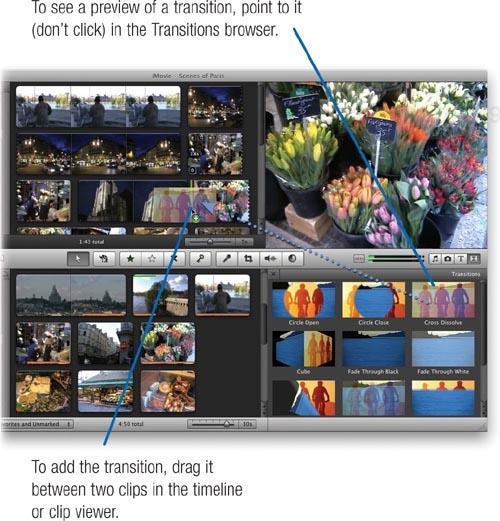
Visual transitions add a professional touch to your project. Transitions also help tell a story. For example, a cross-dissolve—one clip fading out while another fades in—can imply the passage of time. Imagine slowly dissolving from a nighttime campfire scene to a campsite scene shot the following morning.
Similarly, iMovie’s wipe transitions, where one clip pushes another out of the frame, are each a visual way of saying “meanwhile...” Imagine using a wipe transition between a scene of an expectant mother in the delivery room and a shot of her husband pacing in the waiting room, chain-smoking nervously. (Okay, so this is an old-fashioned maternity movie.)
The Fade Through Black and Cross Dissolve transitions are “desert-island” transitions—the ones you’d want when stranded on an island (perhaps while editing an episode of Survivor). But unless you are stranded on an island, don’t limit yourself—experiment with other types of transitions.
Like effects, transitions are visual spice. Season your video with them, but don’t let them overpower the main course: your subject.

After adding a transition, you can change its duration: select it and choose Edit > Set Duration from the Edit menu (![]() ). Enter a new duration in seconds, and specify whether the new duration applies to just that one transition or to all transitions in the project. Finally, click OK.
). Enter a new duration in seconds, and specify whether the new duration applies to just that one transition or to all transitions in the project. Finally, click OK.
To see the finished transition, select it and choose View > Play Selection (or press the forward-slash key).
If you aren’t happy with the transition, you can delete it (press the Delete key) or choose Undo.

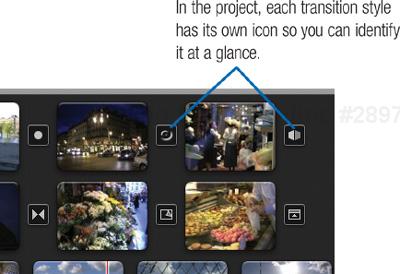
When you create a transition between two clips, you establish a connection between those clips.
If you need to insert a new clip between those two clips, simply drag it to either side of the transition, and iMovie drops it into place.
Change your mind about using a particular transition style? To change an existing transition, grab a new transition from the browser and drop it directly onto the old one.
You can have iMovie automatically add a transition between every clip in your project. This can be a nice way of adding visual polish to a “video slide show”-style project.
To begin, choose File > Project Properties (![]() -J).
-J).
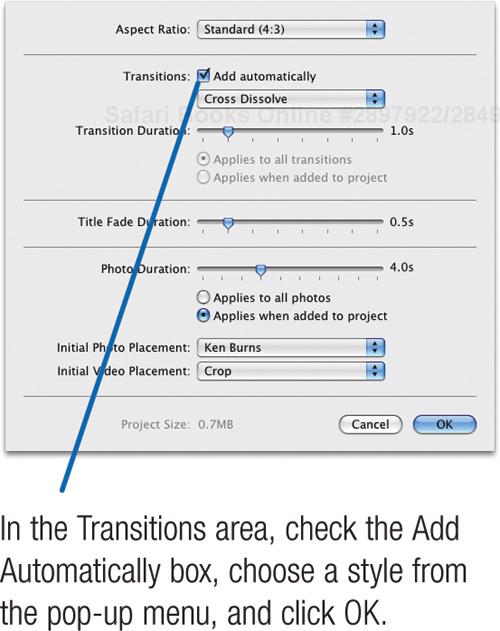
Next, iMovie asks how you’d like to apply the transitions—and it asks using two very verbose and not entirely clear options.
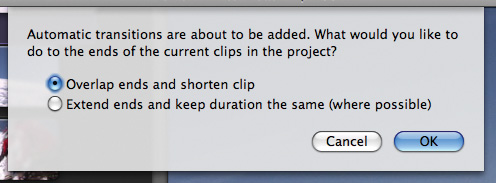
The first option works well when you want to guarantee that the footage you selected before the transition is the footage that’s seen, regardless of what it does to the project’s overall duration.
Choose the second option if you’ve already edited the video to synchronize with an audio clip (such as background music) and don’t want the project’s overall duration to change. The risk with the latter choice is that frames you deliberately edited out could become visible during the transition—your awesome rollerblade jump becomes less awesome when the viewer sees that you polished the pavement half a second after your initial edit.
After you’ve activated auto transitions, iMovie continues to add transitions when you add new clips to the project.
Removing auto transitions. If that’s too much lockstep conformity, return to Project Properties and uncheck Add Automatically. After you click OK, you have another choice to make: whether to keep the footage that was used by the transitions; to maintain the clips’ durations; or to leave all the transitions in place so you can remove or edit them individually.

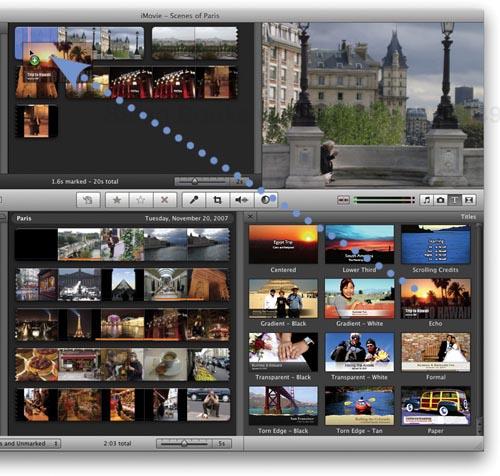
What’s a movie without titles? Incomplete. Almost any movie can benefit from text of some kind: opening and closing credits, the superimposed names of people and places, or simply the words “The End” at, well, the end.
iMovie’s Titles browser is your ticket to text. There are a dozen title styles, and you can customize their text in a variety of ways.
Regardless of the style you choose, you’ll get the best results with sturdy fonts that remain legible despite the limited resolution of television. For example, at small text sizes, Arial Black often works better than Times, which has ornamental serifs that can break up when viewed on a TV set.
You’ll also get the best-looking titles if you choose colors conservatively. Avoid highly saturated hues, especially bright red, which can “bloom” when viewed on a standard-definition TV set. High-definition formats are less prone to these problems, but since your video may still end up being viewed on standard-definition TVs, a conservative approach is smart.
Roll the credits.
Creating a title involves choosing the title style, dragging the title to the project, and then editing the text and its formatting.
Click the Titles button to display the Titles browser.

Choose the title style you want and drag its icon into your project. You can superimpose title text over a video or photo clip or have it appear against a black background.
Superimposing. To superimpose text over a clip, drop the title onto the clip. As you drag the title near the clip, a purple highlight indicates where the title will appear: over the first half of the clip, the last half, or the entire clip. (You can change this later.)
Over black. To have the title text appear on a solid black background, drop the title between two clips.
Specify the title text and font settings.
See the opposite page for an overview of title settings.
Click the Done button in the Viewer.
Need to change an existing title? In the project, select the title. Next, make your changes in the Viewer. Finally, click the Done button.
To move a title, drag it within your project. To change its duration, drag either of its edges.
Tip
If you want to change the title style, you must delete the existing title and add a new one. But you can at least retain any special text formatting you’ve already done. Select the existing title’s text and choose Edit > Copy. Next, delete the old title, add a new title in its place; then paste the text.

First things first: the Internet isn’t the best medium for sharing digital video. The huge size of digital video files means that anything but a very short movie will take a long time to transfer, particularly over a modem line.
But if you have made a short movie—or you have a fast Internet connection and expect that your viewers will, too—you can use iMovie to prepare your work for cyberspace.
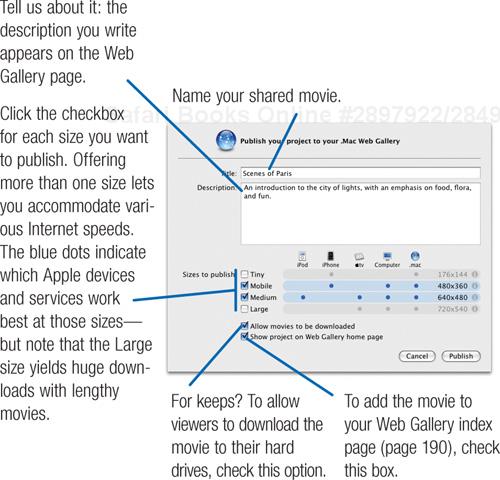
From the Share menu, you can publish a movie to your .Mac Web Gallery (if you’re a .Mac subscriber), upload it to YouTube, or prepare it for a video-capable iPod, iPhone, or Apple TV. For Internet movies, iMovie compresses the movie heavily to make its file size smaller. In the process, you get an introduction to The Three Musketeers of Internet video: jerky, grainy, and chunky.
A movie compressed for the Internet contains fewer frames per second, so motion may appear jerky. The movie’s dimensions are also much smaller—as small as 176 by 144 pixels, or roughly the size of a matchbook. And depending on the options you choose, the sound quality may not be as good as the original.
The best way to watch a movie is on a big screen. (That’s where Apple TV shines: share your movie to iTunes, and you can sync it to Apple TV and watch it on your widescreen TV set.) But if you’re willing to trade some quality for the portability of an iPod or the worldwide reach of the World Wide Web, iMovie is ready.
iMovie can upload movies directly to the popular and addictive YouTube video sharing site. (You’ll need a free account; sign up at www.youtube.com.)
Choose Share > YouTube.
Type a title and description, but don’t stop there. Choose a category and enter keywords in the Tags field—make your video easier to find in searches.
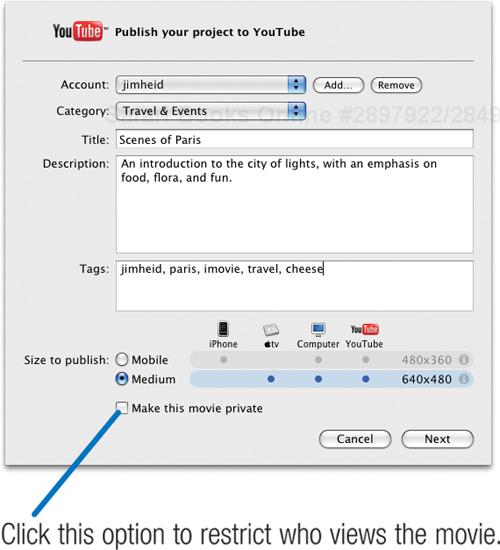
Click Next to review the YouTube Terms of Service (welcome to the entertainment business!), then click Publish to upload the movie.
Sharing your movie to iTunes is the key to getting your movie to an iPod, iPhone, or Apple TV.

After iMovie compresses the movie, it copies the movie to your iTunes library. Use iTunes to sync the movie to your iPod, iPhone, and Apple TV (page 108).

Most of iMovie’s sharing features are directed to specific outlets, such as YouTube or iTunes. But your movies can play in other venues, too. Want to add a movie to an iDVD or iWeb project? Share it to the Media browser, and it becomes available to any program that offers a Media browser—not only iDVD, iWeb, and GarageBand, but Apple’s iWork applications, too.
You can also export a movie in a way that gives you access to the full range of QuickTime compression settings. Normally, iMovie’s sharing features insulate you from compression technicalities, but when you want to get your hands dirty, iMovie provides the gardening tools.
iMovie can also export a Final Cut XML file, which is a plain text file containing instructions for Final Cut Pro or Final Cut Express to build a project based on your edits. It’s the easiest way to move from a rough cut in iMovie to finer finishing work in Final Cut.
When you share a project to the Media browser, the movie becomes available in the Media browsers of other iLife programs, such as iDVD and iWeb, not to mention other software that supports Apple’s Media browsers.
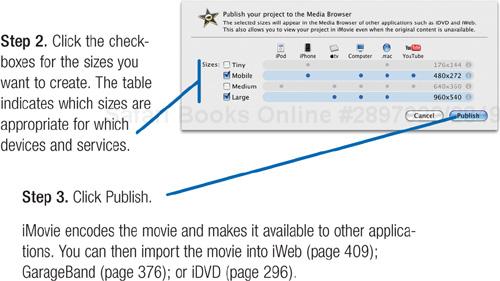
Why bother? Here’s one way you might use this feature. Say you’re creating a DVD containing some video. How about also including a standalone version of the video, encoded for viewing on an iPod or iPhone? Export the movie to your hard drive, then add it to your DVD’s DVD-ROM folder (page 312). Instruct your DVD’s recipients that they can insert the DVD in their computers, copy the mobile version of your movie to their iTunes library, and then carry it with them.
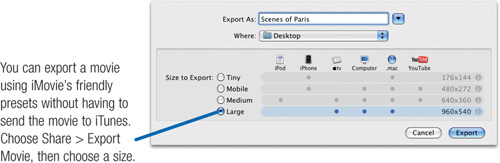
You might also use the Export Movie command to create a movie file that you’ll upload to a Web server. Use the Tiny preset, and you can even create a movie file small enough (more or less) to email to someone.
To export your project as a QuickTime movie, choose Export Using QuickTime from the Share menu.
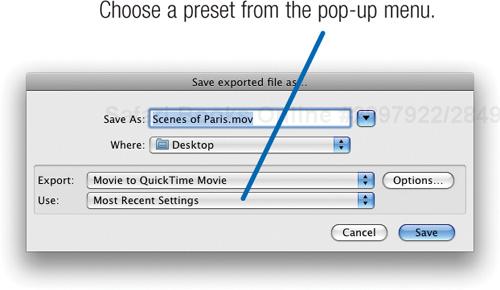
Now what? iMovie’s Tiny, Mobile, Medium, and Large sharing presets deliver great results for most uses. The additional presets in the Export dialog box give you even more options. But to really plumb the depths of QuickTime’s exporting options, choose Movie to QuickTime movie from the Export pop-up menu, and then click the Options button.
This leads to an increasingly technical maze of dialog boxes that let you adjust everything from the video frame size to the sound sampling rate. Unless you know your compression, you’re best off leaving the settings to iMovie.
Filter fun. There is one fun and easy thing to explore. Click the Filters button, and you can access some filters, including one that adds an old-movie effect to your footage—dust specks and scratches. (The freely downloadable iMovie HD 6 provides friendlier access to this filter and more; see page 238.)
To learn about compression, see iMovie ’08 & iDVD ’08 for Mac OS X Visual Quickstart Guide, by Jeff Carlson (Peachpit Press, 2008). For more QuickTime resources, see www.macilife.com/imovie.
You see it all the time in movies and TV shows: a scene begins with the action frozen, and suddenly the still image springs to life. The frozen image often has a special effect, too—maybe it’s been altered to look like a faded photograph. When what appears to be an old photo suddenly turns Technicolor and starts moving, the effect can be magical.
In Hollywood, they use expensive equipment and expensive artists for cinematic tricks like this. You can do it for free using iMovie, and it’s a cinch. Simply save a still image from the very beginning of a particular clip, then apply one or more video adjustments to it. Once you’ve altered the freeze frame, it just takes a few clicks to complete the effect.
This effect can be a fun way to introduce an event that just screams nostalgia—a kid opening presents, a family sitting down to a Thanksgiving feast, or some kids hitting a slope for some sloppy sledding. Start your scene with this effect, superimposing some title text if you like, and you’ve instantly gone beyond a run-of-the-mill home movie.
Once you’ve chosen a video clip for this project, trim its start point so the clip begins at the most appropriate spot. For example, if there are a few seconds of jerky camera movement before Junior starts opening presents, trim the clip to remove the bad footage.
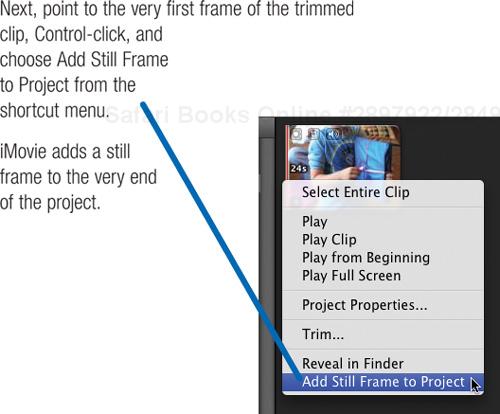
Before applying the effect, move the freeze-frame clip by dragging it to the space just before the video clip.
Now you’re ready to alter the appearance of the freeze frame. If you’re after a nostalgic look, try giving the clip a sepia tone.
First, make sure iMovie’s advanced tools are enabled in the Preferences dialog box—this gives you access to all of iMovie’s color-adjustment features.
Optional steps. Want to jazz up your effect even more? Apply the Ken Burns effect so that the freeze frame first appears zoomed in a bit, then zooms out to its actual size just before the dissolve.
To add a title to the freeze-frame clip, use the Titles browser as described on page 274.
Variations on a frozen theme. You can also turn this trick around: have a scene suddenly freeze and then turn into an old movie frame. This can be a fun way to end a scene.
To do it, save a frame from the last frame of a clip. Then, put the modified freeze frame after the clip from which it came and add the transition between the two.
You can make additional copies of a clip by copying it to the Clipboard and pasting it into the Project browser (you can’t paste into the Event browser). If you want to experiment with different effects or cropping schemes, select the clip and choose Edit > Copy, then choose Edit > Paste. Another way to duplicate a clip is to press the Option key while dragging the clip.
You can even move clips from one project to another by copying and pasting them. You aren’t using additional disk space when you do—you’re simply making additional references to the source footage in your Event library.
Just as you can copy and paste clips, you can also copy and paste the adjustments that you apply to clips. For example, if you’ve used the Video Adjustments window to brighten a murky clip, you can apply the same settings to other clips shot at the same time. You can copy and paste video adjustments, audio adjustments, and cropping settings, including the Ken Burns effect.
First, select an adjusted clip and choose Edit > Copy. Next, select the clip or clips to which you want to apply the adjustment. Finally, sprint up to the Edit menu and choose the appropriate command from the Paste Adjustments submenu: All (![]() -Shift-V), Video (
-Shift-V), Video (![]() -Option-I), Audio (
-Option-I), Audio (![]() -Shift-U), or Crop (
-Shift-U), or Crop (![]() -Shift-R).
-Shift-R).
Pasting replaces any previous adjustments you may have made to the clips.
When you open the Music and Sound Effects browser, iMovie presents the contents of your iTunes library in a list. To customize the columns that appear, Control-click on the list, then use the Show Columns submenu to change which information appears.
And if you’re a visual-memory person? Check out the Display as Icons option—it displays each track as an icon with its album art.

Customizing the Photos browser. Want to see larger (or smaller) photo thumbnails? Drag the size slider to the right (or left). To see photos displayed as a list, Control-click in the photo thumbnails area and choose Display as List from the shortcut menu.
And if you don’t need to see the list of albums and events all the time, drag the divider between the albums and the photos toward the top of the browser; the source list becomes a pop-up menu. This tip applies to the Music and Sound Effects browser, too.
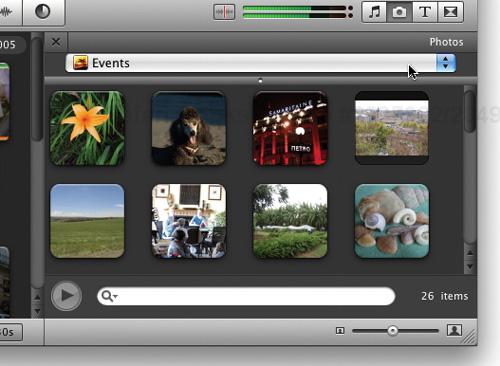
No, that isn’t a mistake. iMovie can print your video (on paper) as a handy visual reference. Select either a project name or an event (or multiple events) and choose Print Project or Print Event from the File menu. Choose a number from the Preferred Number of Pages pop-up menu and choose whether to include the colored bars for event metadata, such as favorites or keywords (but not, alas, the keywords themselves).

Click Print, and iMovie runs off a copy for you. The Clips Size slider determines how many thumbnails appear on the page.
You can add movie clips taken by a digital camera to your iMovie projects. If a movie you want is in your iPhoto library, you can locate it by clicking the iPhoto Videos item in the Event Library. If the movie isn’t in your library, simply locate its icon on your hard drive and drag it into the Event Library.
But let’s step back and look at the greater question: why bother? Compared to the quality you get from a real video camera, the movies from most digital cameras look genuinely awful.
And yet there are some good reasons to consider using a digital camera movie in an iMovie project.
It’s all you have. If you don’t have a camcorder but want to include some video in a movie project (as opposed to still photos and Ken Burns clips), use your digital camera. Adjust its menu settings to get the largest frame size and highest quality your camera is capable of. iMovie enlarges the video frames to fill the screen, so you’ll get better results from larger movies.
For a special effect. Video producers often spend big bucks to get video that looks pixilated and has jerky motion. With digital-camera movies, those “effects” are standard equipment. Have a video camera? Shoot some footage using it and your digital camera’s movie mode. Then cut between the two for a cool effect.
For the sound. When I was in Paris, I wanted to capture the sound of the many street musicians who play in Metro stations. I shot digital camera movies and imported them into my iPhoto library. In iMovie, I added still photos of the street musicians to the timeline and applied the Ken Burns effect to the photos. Then, I added the audio portions of the digital camera movies by holding ![]() -Shift while dragging the movie to the Project browser. The result: a montage of still photos with an authentic soundtrack.
-Shift while dragging the movie to the Project browser. The result: a montage of still photos with an authentic soundtrack.
Hard disk filling up? Get another one. Or, in the meantime, consider using iMovie’s Space Saver command. Space Saver can mark clips as rejected if they aren’t added to any project, not marked as a favorite, or both. You won’t be able to dig into your archives for unused footage later, but you will free up space.
Choose File > Space Saver, choose which type of footage to reject, and then click Reject and Review.
The Rejected Clips view appears in the Event browser, where you can verify that you do want to get rid of the nixed footage. To delete the clips from the Event library, click the Move Rejected to Trash button. Finally, switch to the Finder and empty the Trash.
In older iMovie versions, a movie project was stored in a package, a special kind of Mac OS X folder, and its media assets, reference movies, and shared movies were stored within it.
iMovie ’08 works differently. Its files are freely accessible in the Finder—making it easier to find source files, but also increasing the risk of damaging a project by removing or altering files you shouldn’t.
Project files are located in a folder called iMovie Projects; it’s located in the Movies folder of your Home directory. The file names end in the extension .rcproject. (Those files, incidentally, are packages that contain the editing data as well as the thumbnails iMovie generates.)
Your imported source footage is stored in the iMovie Events folder in your Movies folder, with each event in its own folder. When working in iMovie, you can Control-click a clip and choose Reveal in Finder to locate the media file directly.
If you specified an external hard disk as the location for an event while importing (see page 244), you’ll also find an iMovie Events folder at that disk’s top-level directory. Even if you use footage from an external hard disk, the project files remain saved in your Home directory.
Normally, you shouldn’t have to delve into any of these folders—let iMovie manage their contents for you. But should you have the need or urge to go spelunking, now you have a map.
There may be occasions when you want to export part or all of the audio track of your project. Maybe you want to bring it into an audio-editing program, such as SoundStudio or Amadeus, for fine-tuning. Or maybe you recorded a music recital and you’d like to bring the performance into iTunes or GarageBand.
To export your project’s soundtrack, choose Export Using QuickTime from the Share menu. In the Save dialog box that appears, choose Sound to AIFF from the Export pop-up menu. Click Options, then choose the desired audio settings.
If you’ll be bringing your audio back into iMovie, use the default options. If you’ll be importing the audio into iTunes or GarageBand, choose 44.1 kHz from the Rate pop-up menu.
The best way to share a finished movie on a shiny platter is to burn it to a DVD. But you can also burn a movie to a CD that will play on any Mac or Windows computer that has QuickTime. You might take this route if you want to send a movie to a friend who has a computer, but no DVD player. (While you’re at it, make a note to buy a cheap DVD player for your friend.)
To start, choose Share > Export Movie, choose the Mobile option, and click Export. Next, insert a blank CD into your Mac’s optical drive and copy the movie to the CD.
If you have Roxio’s Toast software, you can also create a Video CD. This video format is very popular in Asia, and somewhat obscure everywhere else. But most stand-alone DVD players can play Video CDs, as can all current personal computers. (To play Video CDs on a Mac, use Mireth Technology’s MacVCD X software, available at www.mireth.com. And if you don’t have Toast Titanium, you can also make Video CDs using Mireth Technology’s iVCD.)
Get more iMovie tips. www.macilife.com/imovie
Video on a Video CD is compressed in MPEG-1 format. The image quality is a far cry from that of the MPEG-2 format used on DVDs; Video CD image quality is more akin to that of VHS videotape. One reason is because the video frame size is smaller—352 by 240 pixels, instead of DVD’s 720 by 480. Another reason is that the video itself is compressed more heavily—about 90:1, compared to roughly 30:1 for MPEG-2. But on the plus side, a Video CD can shoehorn about an hour of video onto a CD-R disc.
A variation of the Video CD format is called Super Video CD, or SuperVCD. On a SuperVCD, video is stored in MPEG-2 format, yielding better quality than a Video CD. The SuperVCD format also allows for many DVD-like features, such as alternate language tracks. Its video quality still falls short of a DVD’s, however.
Video CD and SuperVCD are second-best alternatives to DVDs, but any alternative is better than none. For background on the Video CD and SuperVCD formats, see www.vcdhelp.com.
Editing takes more than software. You also need the right raw material. Advance planning will help ensure that you have the shots you need, and following some basic videography techniques will make for better results.
Planning a movie involves developing an outline—in Hollywood parlance, a storyboard—that lists the shots you’ll need to tell your tale. Professional movie makers storyboard every scene and camera angle. You don’t have to go that far, but you will tell a better story if you plan at least some shots.
Consider starting with an establishing shot that clues viewers in on where your story takes place—for example, the backyard swimming pool. To show the big picture, zoom out to your camcorder’s wide-angle setting.
From there, you might cut to a medium shot that introduces your movie’s subject: little Bobby preparing to belly flop off the diving board. Next, you might cut away to Mary tossing a beach ball. Cut back to Bobby struggling to stay afloat, and then finish with a long shot of the entire scene.
Keep in mind that you don’t have to shoot scenes in chronological order—sequencing your shots is what iMovie is for. For example, get the shot of Mary’s throw any time you like and edit it into the proper sequence using iMovie.
Nausea-inducing camera work is a common flaw of amateur videos. Too many people mistake a video camera for a fire hose: they sweep across a scene, panning left and right and then back again. Or they ceaselessly zoom in and out, making viewers wonder whether they’re coming or going.
A better practice is to stop recording, move to a different location or change your zoom setting, and then resume. Varying camera angles and zoom settings makes for a more interesting video. If you must pan—perhaps to capture a dramatic vista—do so slowly and steadily.
And, unless you’re making an earthquake epic, hold the camera as steady as you can. If your camera has an image-stabilizing feature, use it. Better still, use a tripod or a monopod, or brace the camera against a rigid surface. Keeping the camera steady is especially critical for movies destined for the Internet—because of the way these videos are compressed, minimizing extraneous motion will yield sharper results.
The photographic composition tips on page 234 apply to movie making, too. Compose your shots carefully, paying close attention to the background. Get up close now and then—don’t just shoot wide shots.
Try to shoot a couple of minutes of uninterrupted background sound: the waves on a beach, the birds in the forest, the revelers at a party. As I’ve mentioned previously, you can extract the sound from this footage and use it as an audio bed behind a series of shots. It doesn’t matter what the camera is pointing at while you’re shooting—you won’t use the video anyway.
After importing the footage, extract its audio, as described on page 270.
If you know that you’ll be distributing your movie via the Internet—either through a Web site or email—there are some steps you can take during the shooting phase to optimize quality. These steps also yield better results when you’re compressing a movie for playback on a mobile device, and they even help deliver better quality with iDVD.
First, minimize motion. The more motion you have in your movie, the worse it will look after being heavily compressed. That means using a tripod instead of hand-holding your camera, and minimizing panning and zooming. Also consider your background: a static, unchanging background is better than a busy traffic scene or rustling tree leaves.
Learn more about digitizing old tapes and movies. www.macilife.com/imovie
Second, light well. If you’re shooting indoors, consider investing in a set of video lights. A brighter picture compresses better than a poorly lit scene. To learn about lighting, read Ross Lowell’s excellent book, Matters of Light and Depth (Lower Light Management, 1900).
Your movie will be more visually engaging if you vary the length of your shots. Use longer shots for complex scenes, such as a wide shot of a city street, and shorter shots for close-ups or reaction shots.
Be sure your camcorder’s batteries are charged; consider buying a second battery so you’ll have a backup, and take along your charger and power adapter, too. Bring plenty of blank tape or media cards, and label them immediately after ejecting them. To protect a tape against accidental reuse, slide the little locking tab on its spine.