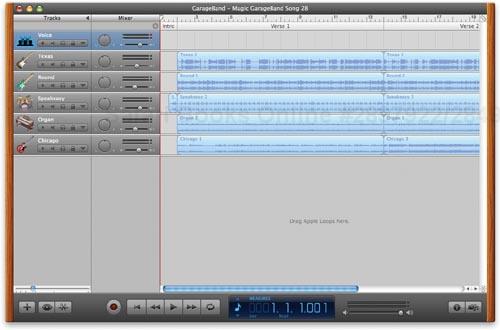
GarageBand turns your Mac into a musical instrument and a multitrack recording studio. Not a musician? The Magic GarageBand feature builds songs for you on a virtual bandstand. It’s a great way to see and hear what GarageBand is about.
Feeling creative? Explore GarageBand’s library of pre-recorded musical phrases, called loops. Assemble the loops you like into a tune. For extra credit, change the pitch of some loops by transposing them.
If you play the piano, plug a music keyboard into your Mac and go to town—GarageBand’s software instruments enable your Mac to mimic instruments ranging from pianos to guitars to drums and beyond. Use loops to create a rhythm section, and then play along. Edit your performance to make it shine.
If you sing or play an instrument, connect a microphone, electric guitar, or other audio input to your Mac and hit the Record button. Create a three-part harmony by laying down vocal tracks one at a time. Or record multiple tracks at once.
As you compose, you may want to enhance certain tracks with effects. Refine your mix as you go. When you’re finished, export to iTunes or burn a CD.
Here’s how to become a one-Mac band.
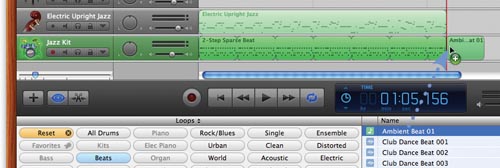
To locate and audition loops, use the loop browser. Find loops by clicking buttons or typing search terms, such as conga (page 333). To hear a loop, click its name.

Refine your performance using the track editor.
Editing notes. With the track editor for software instruments, you can edit individual notes, either in piano-roll format (above) or in standard music notation (below); see page 340.
Editing audio. With the track editor for real instruments, you can modify recordings (page 347).
How you use GarageBand depends on your musical experience and your musical tastes. Here’s a look at a few different paths you can take. And note that you aren’t restricted to just one route—you might move from path to path as a song comes together.

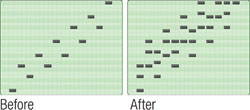
If you aren’t a musician—and even if you are—your first moments with GarageBand might be a bit intimidating. Software designers call it the “blank canvas syndrome”—you see GarageBand’s empty window and wonder what your first steps should be.
If you’re new to GarageBand, your first steps should be magic. Try out the Magic GarageBand feature: it lets you build a song in one of nine genres in just a couple of mouse clicks. Use a virtual bandstand to customize the instrumentation of your song, choosing between different guitar, bass, drum, and keyboard combinations. All told, there are over 3,000 combinations in each genre.
When you’re done, GarageBand builds a song to your specifications. Play it back. Record your own solo or vocals. Practice along with it. Use parts of it in your own projects. Along the way, you’ll learn how GarageBand works its magic. And you’ll be hooked.
Choose File > New, and click the Magic GarageBand button.

The Magic GarageBand screen appears.
Choose a genre by clicking its button.
To preview the genre’s song, click the Play button. The button to its left lets you preview a short snippet or the entire song.
Shortcut: You can preview any genre by simply double-clicking its button.
Click the Audition button.
The bandstand appears, and it’s where the fun happens. Move the mouse pointer over each instrument. When you do, a spotlight illuminates it.
To change an instrument, click it, then choose a different instrument.

Work your way across the bandstand, choosing a different instrument for each player, if you like. Explore how different instrumentation creates a completely different sound.
When you’re done, click Create Project.
GarageBand creates a song containing the tracks of each part.
Your GarageBand canvas is no longer blank. What next? Here are a few ideas.
Record a solo. If you set up the song to have your own part, your turn has arrived. Use the techniques on later pages to record your own performance.
Get acquainted. Experiment with each track’s controls to get a feel for working in GarageBand. Adjust levels, and mute or solo some tracks (page 334). Pan instruments to change their position in the stereo mix (page 354). Change effects settings (page 352).
Rearrange. Magic GarageBand builds songs that have arrange regions (page 350). Try rearranging the song: click a region heading (for example, Verse 1), and drag it elsewhere in the song.
Change the tempo and key. This is a good time to get familiar with GarageBand’s LCD (see the sidebar below). Choose the Project option, then choose a key. Speed up the tempo or slow it down.
Go beyond. Already know your way around GarageBand? Use Magic GarageBand to create building blocks for your own songs. Copy and paste regions from a Magic GarageBand project into your own. Build a song by creating several Magic GarageBand tunes, then copy the solos out of each one into another song. With this technique, you can combine some of the great solos that are part of each Magic GarageBand template—for example, copy a horn solo from one project and then paste it into another project, placing it after a guitar solo.
The regions in each Magic GarageBand template also make great Apple Loops. You can add them to your loop library using the steps on page 362.
Get to Know the LCD
GarageBand’s LCD is a counter and control center. Use its pop-up menu to switch between functions.
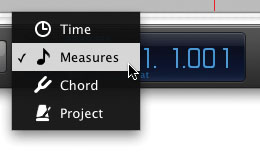
Time. Shows the playhead’s position in absolute time (hours, minutes, seconds, and fractions thereof). Ideal for podcasting and movie scoring, where beats and measures are less important than minutes and seconds.
Measures. Shows the playhead’s position in bars and beats. Ideal for music projects.
Chord/Tuner. See chords as you play them (page 358), or use the instrument tuner (page 345).
Project. View and change a song’s key, tempo, and time signature.
You can change numeric values in the LCD by dragging across them or by double-clicking them, then typing. For example, to jump to measure 33, you can drag up or down on the bar readout, or double click it (its numerals flash) and then type 33 and press Return.
When you compose in GarageBand, you work with two very different types of tracks: real instrument tracks and software instrument tracks. The loops that GarageBand provides also fall into these two broad categories: loops with a blue icon are real instrument loops, and loops with a green icon are software instrument loops.
But what’s the difference between a real instrument and a software instrument? The answer lies in the fact that today’s Macs are powerful enough to generate sound using more than one technique. In fact, GarageBand is able to generate sound using multiple techniques at once.
Here’s a look a how GarageBand makes its noise—and at what it all means to you.
A real instrument track holds a digital audio recording—a riff played by a bass player, some strumming on an acoustic guitar, a phrase played by a string section, or a vocal that you record.

A real instrument track is blue, and a real instrument loop has a blue icon ![]() . Notice that the track and the icon depict a waveform—a graphical picture of sound, similar to what we saw back on pages 44 and 268.
. Notice that the track and the icon depict a waveform—a graphical picture of sound, similar to what we saw back on pages 44 and 268.
Variations. When you record an audio source, its regions are purple. If you import an audio file, its region is orange. See page 347 for all the colorful details.
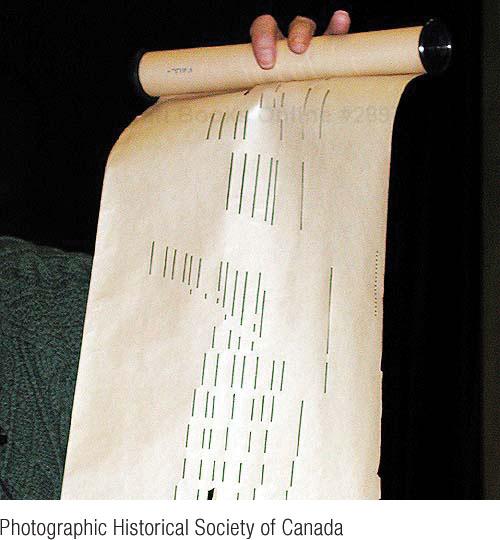
A software instrument track doesn’t hold actual sound. Instead, it holds only data that says what notes to play and how to play them. The sounds you hear when you play a software instrument track are being generated by your Mac as the song plays back.
A software instrument track is a bit like the music rolls that a player piano uses—just as the holes in the music roll tell the piano which notes to play, the bits of data in a software instrument track tell your Mac which notes to generate.

A software instrument track is green, and a software instrument loop has a green icon ![]() . Instead of depicting a waveform, a software instrument region shows individual notes—why, it even looks a bit like an antique player piano roll (see photo, left).
. Instead of depicting a waveform, a software instrument region shows individual notes—why, it even looks a bit like an antique player piano roll (see photo, left).
Each type of track has advantages and capabilities that the other lacks.
The real advantage. When it comes to realism, you can’t beat real instrument tracks. Listen to the Orchestra Strings loops that come with GarageBand. They don’t just sound like a string section—they are a string section. Compare their sound to that of the software instrument loop named 70s Ballad Strings 02.
Another advantage of real instrument tracks is that they can hold your digital audio. When you plug a microphone into your Mac and belt out My Way, your voice is stored in a real instrument track.
The software advantage. The primary advantage of software instrument tracks is versatility. Because software instrument tracks store individual note data, you can edit them in almost any way imaginable. You can even change the instrument entirely. Want to hear how your bass line would sound when played by a synthesizer instead of an electric bass? Just double-click on the software instrument track’s header and choose a synth.
On the down side, software instrument tracks make your Mac work harder than real instrument tracks—it’s harder to generate sound on the fly than it is to play back a recording.
Common ground. Although real instruments and software instruments work differently, you can do many of the same things with both types of tracks. You can repeat loops within both types of tracks, and you can apply effects to both types. You can even transpose both types of tracks, including audio that you’ve recorded. However, you can’t transpose audio regions across as wide a range as you can software instruments—they’d sound too artificial.
By supporting audio recordings (real instruments) and also being able to generate sound on the fly (software instruments), GarageBand gives you the best of both worlds.
For many GarageBand musicians (including yours truly), a composing session often begins with some loops: a bass line, some percussion, a repeating synthesizer riff, or maybe all three.
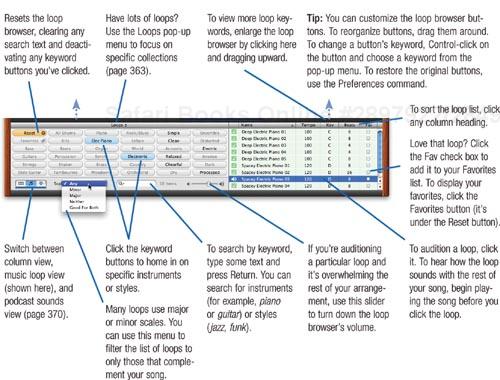
The gateway to GarageBand’s library of loops is the loop browser, whose buttons and search box let you quickly home in on loops of specific instruments or specific styles.
Once you find a loop that sounds interesting, you can add it to your song by dragging it into GarageBand’s timeline. Once that’s done, you can repeat the loop over and over, edit it, and transpose it.
GarageBand lets you audition loops even as your song is playing back—simply click on a loop in the loop browser. This is a great way to hear how a particular loop will fit into the arrangement you’re building.
Working with loops is as easy as clicking and dragging. But as you master GarageBand, there’s a powerful subtlety behind loops that you may want to take advantage of. Specifically, you can use software instrument loops in real instrument tracks in order to lighten the load on your Mac’s processor.
If that makes no sense to you now, don’t worry. When your arrangements become complex and you want to wring every bit of performance out of your Mac, you’ll find all the details on pages 351 and 366.
To display the loop browser, click ![]() or use the
or use the ![]() -L keyboard shortcut. To add a loop to a song, drag the loop into the timeline.
-L keyboard shortcut. To add a loop to a song, drag the loop into the timeline.
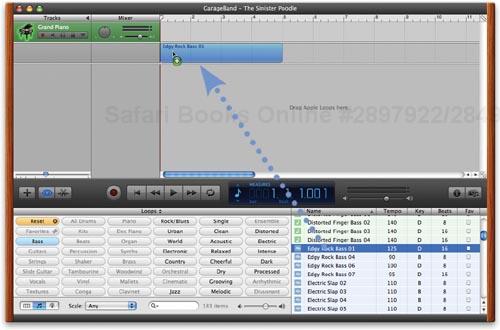
Creating a new track. When you drag a loop into an empty area of the timeline where there is no existing track, GarageBand creates a new track for the loop. The vertical bar indicates where the loop will begin playing. To move the loop after you’ve added it, drag it left or right (if the loop is too tiny to drag, zoom in).
Adding to an existing track. You can add a loop to an existing track. Mixing loops within a track is one way to add variety to a song.
Tip
You can drag a software instrument loop into a real instrument track, but not vice-versa. For more details, see page 351.
Variations. Many loops include several variations, and are named accordingly. To change to a different loop from the same family, click the tiny arrows in the upper-left corner of the loop, then choose a different loop.
Tracks can be a lot easier to work with than musicians. Tracks never show up late for a gig, they always play in tune, their sense of timing is impeccable, and they never trash the hotel room.
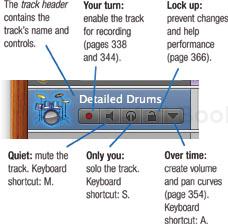
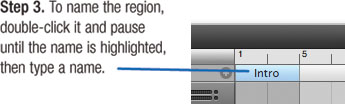
Nonetheless, there are some important points to know about working with tracks and the regions that they hold. (A region is a set of notes or a snippet of sound. When you drag a loop into the timeline or record a performance, you create a region.) For starters, when creating multitrack arrangements, you should rename tracks so you can tell at a glance which parts they hold: the melody, a solo, an alternate take of a solo.
As you compose, you may want to silence, or mute, certain tracks. Maybe you’ve recorded a few versions of some background strings, each on its own track, and you want to audition each one to hear which sounds best.
On the other hand, there may be times when you want to solo a track—to mute all the other tracks and hear only one track. Soloing a track can be useful when you’re fine-tuning a track’s effects settings or editing a region in the track.
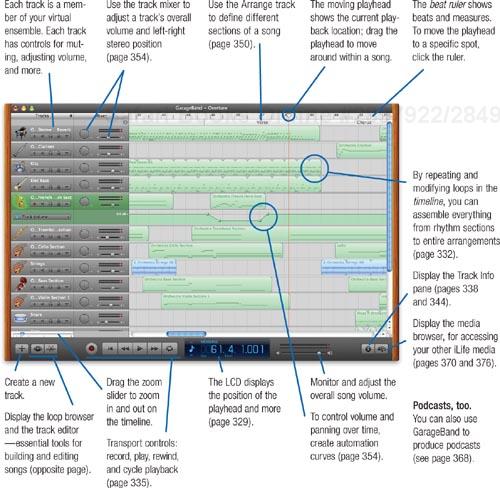
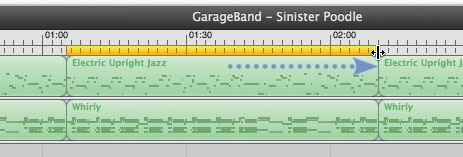
A big part of creating an arrangement involves copying regions within a track or from one track to another. And as you move regions around, you often have to work with the beat ruler at the top of GarageBand’s timeline. By fine-tuning the ruler’s snapping feature, you can have your regions snap into place on exactly the right beat.
Here’s how to get along with the members of the band.
Normally, GarageBand names a track after the instrument you’ve assigned to it. When you have multiple tracks that use the same instrument, it’s hard to tell the tracks apart. Give your tracks descriptive names, such as Third Verse Strings. To rename a track, click its name in the track header, hold the pointer over the name for a moment, and, when the name is highlighted, type a new name.
You can move tracks up and down by dragging their headers. Consider grouping related tracks together—put all your rhythm section tracks together, then all your solo tracks, and so on.
When a track header is selected, you can use your keyboard’s up- or down-arrow keys to select the track above or below the current track. This shortcut teams up nicely with those described above.
When you’re rehearsing, mixing, or recording, it’s often useful to have part of a song play over and over. To do this, click the Cycle button and then drag in the area just below the beat ruler to indicate the region that you want to repeat.
The yellow region repeats until time comes to an end or your parents pull the plug, whichever comes first. To resize the region, drag its left or right edge. To move the region, drag it left or right.
When cycling is on, playback always begins at the start of the cycle region.
Turning cycling on is also the first step to using GarageBand’s multiple-take recording feature (page 348).
You can make a duplicate of a track: a new, blank track with the same instrument and effect settings as the original. Select the track’s header, then choose Duplicate from the Track menu (![]() -D).
-D).
Duplicating a track is another way to record multiple takes of a part: record each take in its own track, then copy and paste the best parts into a single track.
Copying a region is a common task, and GarageBand provides a couple of ways to accomplish it. You can copy and paste: select a region, choose Copy, move the playhead to the destination, and paste. You can also press the Option key while dragging the region you want to copy.
You can repeat a region by either looping it or copying it. So which technique should you use? Looping is the fastest way to repeat a region over and over again: just drag the loop pointer as described on page 333.
The advantage of copying a region is that each copy becomes an independent region that you can edit without affecting other copies. With a repeating loop, if you edit one note in the loop, that edit is present in each repetition.
When moving a region, you almost always want to move it to the exact beginning of a particular measure or beat. GarageBand’s timeline grid supplies this precision: when the grid’s snapping feature is active, GarageBand automatically snaps to beats and measures as you drag regions, move the playhead, drag loops to the timeline, and perform other tasks.
Normally, GarageBand adjusts the sensitivity of its grid to match the way you’re viewing your song. If you’re zoomed all the way out, GarageBand assumes you’re performing fairly coarse adjustments, such as dragging a region from one part of a song to another. In this case, GarageBand’s grid will snap to the start of each measure.
If you’re zoomed all the way in, GarageBand figures you must be making precise adjustments, so it adjusts its grid to snap in sixty-fourth-note increments.
You can override GarageBand’s automatic grid sensitivity: just choose the desired value from the grid menu.
Click the timeline grid button (![]() ) to display the grid menu.
) to display the grid menu.
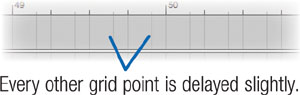
The “swing” options delay every other grid point. This lets you maintain a swing feel when dragging regions. The amount of delay is greater with the “Heavy” options.
Unless they’re from the soundtrack of Wayne’s World, most songs aren’t built around just one chord. Most songs contain chord changes or progressions—variations in key that add harmonic interest. Chord changes can be simple, such as those of a 12-bar blues, or they can be complex, such as those of Billy Strayhorn’s jazz classic, Lush Life.
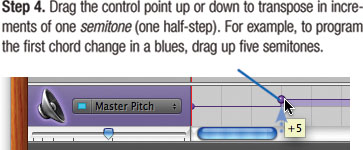
You can build chord changes in a couple of ways. For fast results, use the master track to create a pitch curve that transposes every track in your song (with two exceptions, noted at right).
When you want more control, transpose individual regions as described on the opposite page. This approach lets you be selective about what you transpose. For example, you can transpose some piano or guitar chords while keeping your bass track at the root key of your song. You can also edit individual regions to better fit your song’s chord changes.
Creating a pitch curve in the master track is the fastest way to “program” chord changes.
Audio limitations. A pitch curve will not transpose any audio regions that you recorded (purple regions) or imported (orange ones). To transpose purple regions, see the opposite page. To transpose orange regions, convert them into purple ones first; see page 347.
Changing a change. To remove a control point, select it and press the Delete key. To change its pitch, drag the control point up or down. To change the point when the chord change occurs, drag the control point left or right.
Adjusting precision. The point in time when GarageBand places control points is determined by the current timeline grid setting (see the previous page). If you want more precision in placing or adjusting a control point’s position in time, zoom in or choose a smaller note value from the timeline grid button.
Unlock first. If you’ve locked any tracks (page 334), you can’t adjust the pitch curve. If you try, GarageBand displays a dialog box that lets you unlock all locked tracks.
This method is more work than creating a pitch curve, but as I noted on the opposite page, it offers more options and creative control.
The fastest way to use this technique is to repeat a loop for the entire duration of a verse (for example, 12 measures), split the loop at each point where you need a chord change, and then transpose the appropriate regions. This is a quick way to lay down a bass track.
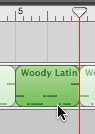
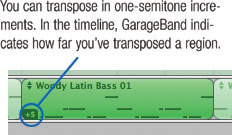
If you’d like to follow along with the steps below, create a new song in GarageBand and add the loop named Woody Latin Bass 01 to it.
Drag a loop into the timeline and use the loop pointer to drag it out to the desired length.
Split the loop at the start of the change.
Drag the playhead to the beginning of the measure that needs to be transposed, then choose Edit > Split (
 -T).
-T).Split the loop at the end of the change.
Drag the playhead to the end of the measure that needs transposing, and choose Split again. You now have an independent region that you can transpose.
Prepare to transpose.
Select the region you just created and open the track editor by clicking the track editor button (
 ). Shortcut: Double-click the region to open it in the track editor.
In the track editor, drag the Pitch slider or type a value in the box.

Editing a region to fit the changes. Building a bass line from software instrument loops? You can build a better bass line by editing regions so that they complement your chord changes. For example, if you’re going from F to C, you might make the last note of the F measure a C# or a B. That way, the bass will “lead in” to the new chord change. Edits like these can also take some of the repetitiveness out of tracks built from loops.
First, double-click the region you want to edit. Then, in the track editor, drag the last note of the region up or down to the desired note. GarageBand plays the note as you drag it, making it easy to determine where the note should be.
For details on editing software instrument tracks, see pages 340–343.
Transposing real instrument regions. You can also transpose regions in real instrument tracks, but within a narrower range: one octave in either direction, as opposed to three octaves for software instrument tracks. And although you can’t change individual notes as you can with software instrument tracks, you can perform some edits to regions in real instrument tracks; see page 347.
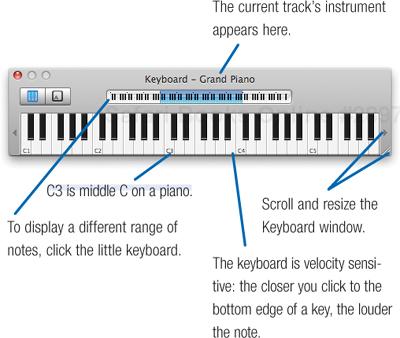
When you connect a music keyboard to your Mac, you unlock a symphony’s worth of software instruments that you can play and record. There are pianos and keyboards and guitars of all kinds. There are synthesizers, strings, a flute, and some horns. And there are some drums you just can’t beat.
As the following pages describe, you can edit your recordings and use effects to refine your tracks. You can even create completely new instruments of your own design.
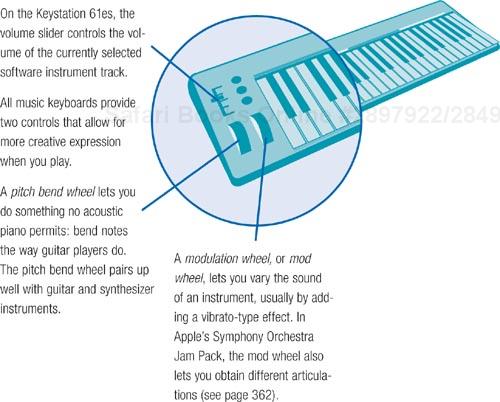
If you don’t have a music keyboard and don’t want to spend a fortune on one, check out the offerings from M-Audio (www.m-audio.com). Its Keystation 61es is a 61-key (five octave) keyboard that sells for under $200. Its “semi-weighted” action gives it a piano-like feel, and its keyboard is velocity sensitive: it measures how hard each key is pressed. Most of GarageBand’s software instruments respond to this velocity information, changing their loudness and other characteristics to allow you to play (and record) with expression.
You can also use a costlier keyboard that requires a separate MIDI interface. (MIDI stands for Musical Instrument Digital Interface, and is a standard for interconnecting electronic instruments and computers. Think of it as USB with a music degree.) Pricier keyboards often provide weighted action—their keys respond like a piano’s instead of like an organ’s, and thus feel more natural to experienced pianists. You’ll also find more keys—up to 88 of them.
Create a new track. Click the New Track button (
 ) or choose New Track from the Track menu (Option--N).
In the New Track dialog box, click Software Instrument, then click OK or press Return.

Tip
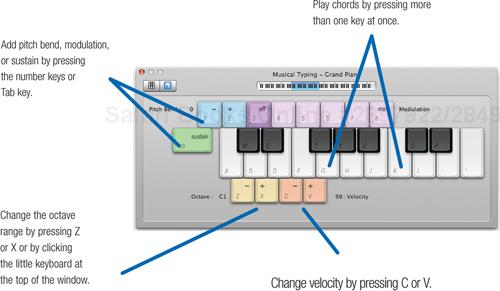
You can try out the selected instrument by playing keys on your music keyboard or by clicking the on-screen keys in GarageBand’s Keyboard or Musical Typing windows (see page 359).
Get ready. Position the playhead a few measures before where you want to begin recording. To give yourself time to get ready, choose Count In from the Control menu.
Hit it. Click the Record button (
 ) or press the R key. To stop recording, press the spacebar or click the Play button (
 ).
).
Watch your playing. As you record, GarageBand displays the new region (and its notes, in piano-roll style) in the timeline. Display the track editor for the current track, and your performance appears as you play—even in music notation.
Recording in an existing track. The instructions at left assume you’re starting a brand-new track. You can, of course, also record in an existing software instrument track. Just select the track’s header to enable it for recording. To change the track’s instrument—before or after you record—double-click the track header to display the Track Info pane.
Multitrack recording. You can record one software instrument track and some real instrument tracks at the same time: record a vocal while you play, or record a couple of acoustic instrumentalists. For details, see page 346.
Multiple-take recording. By turning cycling on, you can record take after take, and then choose the best one; see page 348.
Anatomy of a Music Keyboard
Like many keyboards, M-Audio’s Keystation 61es contains no sound-generating circuitry. When you play, the keyboard transmits MIDI data that describes which keys you pressed, how hard, and for how long. Keyboards that lack sound-generating circuitry are often called controllers.
Most keyboards can accept an optional foot pedal that plugs into the back of the keyboard and acts like a piano’s sustain pedal. If you frequently play piano software instruments, you’ll want a pedal. Some keyboards also accept a volume pedal that many software instruments respond to, giving you more expressive options.

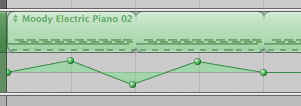
We’ve already encountered one form of software instrument region editing: transposition (page 337). That’s just the beginning. There’s almost no end to the ways you can edit MIDI data, and unlike when you’re onstage, you can always undo any disasters.
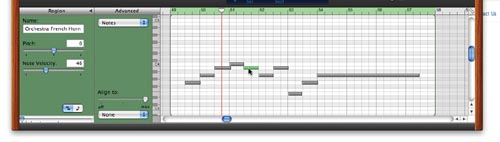
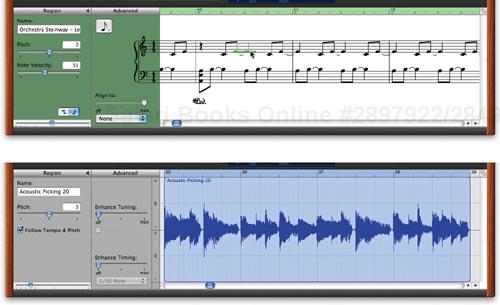
You can edit regions you record or regions that you create by dragging loops from the loop browser. And you can edit in either of two views: the piano roll-style graphic view or music-notation view. In either view, you can change notes, modify their duration, change their velocity values, draw new notes, and more. And in notation view, you can print a track’s music.
To switch views, click the ![]() button in the lower-left corner of the track editor.
button in the lower-left corner of the track editor.
You often need to select multiple notes—for example, prior to duplicating them or adjusting their velocity. To select more than one note, Shift-click on the notes or drag a selection rectangle around them.
Editing is easy in the graphic view’s piano-roll display.
Fixing wrong notes. To fix a wrong note, drag it up or down until it becomes the right note. If the note is very high or low, scroll the track editor or make it taller by dragging the area to the left of the Record button.
If you fumbled and accidentally hit two keys when you meant to hit just one, delete the extra wrong note: select it and press the Delete key.
Improving expression. By editing the velocity values of some notes, you can improve expression and realism. This is especially true for software instruments, such as Classical Acoustic, that change dramatically depending on how hard you play a note.
To edit a note’s velocity, select it and then specify the desired velocity in the Note Velocity box. To change the velocity of a range of notes, select the notes first.
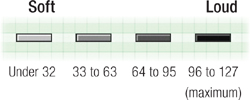
Velocity values can range from 1 (quiet as a hoarse mouse) to 127 (way loud). To give you a visual hint at a note’s velocity, GarageBand uses shading:
Moving a note in time. To move a note backward or forward, drag it left or right. To zoom in for more precision, drag the track editor’s zoom slider to the right. You may also want to adjust the track editor’s grid sensitivity by using its grid ruler button. Or turn the grid off entirely (![]() -G).
-G).
Changing a note’s duration. To make a note longer or shorter, drag its right edge to the right or to the left.
Drawing a new note. To draw a new note, press ![]() and then drag within the track, using the little vertical piano key legend (and your ears) as guides.
and then drag within the track, using the little vertical piano key legend (and your ears) as guides.
Chords in a hurry. You can create chords by duplicating notes: press the Option key, click on a note, and then drag up or down by the desired note interval. This also works on a range of notes: select the notes, then Option-drag them.
Read music? Want to learn? Notation view is for you. It’s also an ideal place to draw new notes and edit or create sustain-pedal information.
The techniques on the opposite page also apply to notation view, with the following differences.
Adjusting grid precision. When working in notation view, you’ll want to use the grid ruler pop-up menu in the track editor to specify the degree of precision you want. For example, to move a note in quarter-note increments, choose 1/4 note. If you choose a small grid increment, you may see a lot of strange and small note or rest values, such as sixty-fourth notes.
Using the arrow keys. You can move notes by selecting them and pressing the arrow keys on your keyboard. To move selected notes back or forward one full measure, press Shift-left arrow or Shift-right arrow. Similarly, to transpose notes up or down one octave, press Shift-up arrow or Shift-down arrow. You can also drag notes with the mouse.
Changing a note’s duration. To change a note’s duration, select the note, then drag the green duration bar left or right. The duration bar works exactly like the piano roll-style notes in graphic view: drag to the left to shorten the note, and drag to the right to lengthen it.
Drawing new notes. To draw a new note, first click the note value button in the Advanced area of the track editor, and choose the note value you want.
Then, press ![]() and click within the staff to create the note. You can also draw in pedal symbols: choose the pedal symbol from the pop-up,
and click within the staff to create the note. You can also draw in pedal symbols: choose the pedal symbol from the pop-up, ![]() -click where you want the pedal-down symbol, then drag to where you want the pedal-up symbol.
-click where you want the pedal-down symbol, then drag to where you want the pedal-up symbol.
Enlarging the notes. To make the notation view larger, make the track editor taller: drag the area to the left of the Record button upwards. Similarly, to increase the horizontal spacing between notes, drag the track editor’s zoom slider.
Notation Notes
Choosing a clef. Normally, notation view displays both the bass and the treble clef. That makes sense for instruments with a broad note range, such as piano. But for instruments with a narrower range—such as bass or piccolo—you may not need to see both clefs.
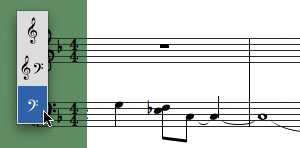
To make a choice appropriate to the instrument, click the clef at the left edge of the notation display, then choose the clef you want.
Here’s a bass line as it should appear.

Printing music. You can print a track’s contents as sheet music. Select the track’s header, then be sure that the note grid is displayed at a setting that makes sense for hard copy. If you have it set for a very fine, sixty-fourth-note resolution, for example, you’ll have strange-looking notation with lots of short-duration notes. To adjust the resolution, use the grid ruler pop-up menu in the track editor.
To control how many measures appear in each row of music, drag the zoom slider in the lower-left corner of the track editor. Generally, you’ll want to drag the slider to the left and zoom out.
To print the music, choose File > Print. To preview the sheet music first, click Preview in the Print dialog box. GarageBand adds little niceties to your hard copy: the song name at the top of the page, the tempo, instrument name, and your name (as it’s stored in the My Info portion of the Preferences dialog box).
Modulation and sustain are just two forms of MIDI controller data that you can edit. Here’s a look at more controller editing options.
Pitch bend. A music keyboard generates pitch bend data when you move its pitch bend wheel. You can edit this data or draw your own.
Expression. True to its name, expression data lets you increase or decrease the loudness of a region. You might draw in expression data to create a crescendo or decrescendo. Try recording a chord with a horn section instrument, then adding an expression curve to it.
With Apple’s Symphony Orchestra Jam Pack, moving the pitch bend wheel generates expression data.
Tip
If you have a volume (expression) pedal connected to your music keyboard, you can have GarageBand respond to and record the data it transmits. Be sure your keyboard is transmitting the pedal’s data as expression data (MIDI controller #11), not volume data (MIDI controller #7).
Foot control. Apple’s Symphony Orchestra Jam Pack uses foot control data to control articulation for some of the orchestral instruments, such as strings.
You can create a duet by duplicating a region in a different track. Create another track of the same type (software instrument or real instrument), then Option-drag the region into that track. (You can also copy and paste.) To start with the same instrument and effect settings, duplicate a track: select it and press ![]() -D.
-D.
Next, refine your duet. If it’s a software instrument track, experiment with different instruments. You might also transpose one of the tracks to create a harmony or put each part an octave apart. You might also experiment with different effects, panning, and volume settings.
Tip
One way to add richness to a duet is by very slightly offsetting the second track’s region. Turn grid snapping off (![]() -G), zoom in on the region, then nudge it ever so slightly to the left or right. This way, the regions won’t play back at exactly the same time, strengthening the illusion of multiple musicians.
-G), zoom in on the region, then nudge it ever so slightly to the left or right. This way, the regions won’t play back at exactly the same time, strengthening the illusion of multiple musicians.

You can have GarageBand quantize a region—move its notes so that they fall exactly on the beats in the beat ruler.
Before quantizing a region, choose a note value from the Enhance Timing pop-up menu in the Advanced area of the track editor. If you’re quantizing a walking bass line in 4/4 time, try the quarter-note (1/4 Note) setting. If you’re quantizing a more nuanced performance, use a higher resolution. For jazz or other syncopated styles, try one of the swing settings.
With all settings, you can “dial down” the quantization by dragging the Enhance Timing slider to the left. Experiment with different settings. If the results sound strange, try again or choose Undo.
You can also quantize individual notes within a region: select the notes, then perform the above steps.
Quantizing can be a mixed bag; it works well with extremely mechanistic music styles (such as dance and even some classical), but expect disappointing results when quantizing a jazz piano solo or any musical form that plays somewhat fast and loose with beats. Experiment. If you don’t like the results, choose None from the pop-up menu to turn quantizing off.
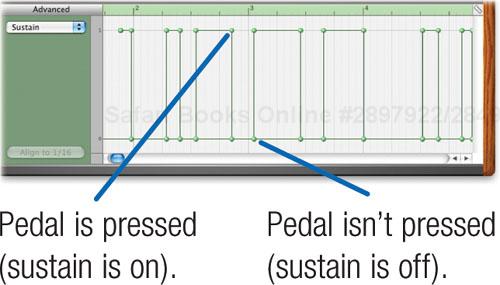
Not all MIDI data deals with notes. A keyboard’s pitch and modulation wheels also generate data, as does a sustain pedal. You can edit and create this controller data in the track editor’s graphic view.
Editing controller data involves working with control points similar to those of pitch, volume, and panning curves. By adjusting this data, you can change the expressiveness applied by a pitch or mod wheel, adjust your pedal work, and more.
Say you have a software instrument whose sound timbre “sweeps” when you move the modulation wheel (examples include Star Sweeper, Aquatic Sunbeam, Cloud Break, and Falling Star). If you want that sweep to change over a specific number of measures, create a modulation curve.
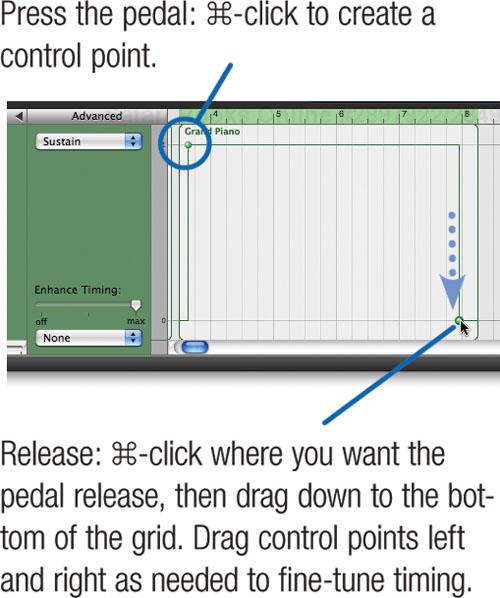
To create controller data from scratch, choose the controller type from the pop-up menu in the Advanced area of the track editor. ![]() -click to create control points, then drag them as needed.
-click to create control points, then drag them as needed.
You’ll find an example of this on my Web site, at www.macilife.com/gbandexamples.zip. Expand the archive by double-clicking it, then open the folder. Check out the GarageBand project named Modulate Me. It contains two regions, each playing the identical note. But in the second region, I drew a modulation curve to create a precisely timed sweep.
As for editing sustain data, you can clean up sloppy pedal work by fine-tuning the position of the control points that represent each pedal push: just drag the control points left or right.
And if you don’t have a sustain pedal, you can draw your own sustain data. Check out the project named Add Sustain in the aforementioned examples folder. I recorded the first region without using my sustain pedal. Then I duplicated the region and added sustain data to the duplicate.
I wouldn’t want to draw in sustain data for a Billy Joel ballad, but for the occasional sustained arpeggio, it works.
If you sing or play an instrument—sax, guitar, kazoo—GarageBand provides yet another dimension to explore. Connect a microphone or other sound source to your Mac, and you can record a performance in a real instrument track.
Most mikes and guitars don’t produce a loud-enough signal for the Mac, which works best with a line-level signal like that of a cassette deck, for example. No problem—products aplenty await your wallet. M-Audio, MOTU, and others sell first-rate audio interfaces for the Mac. Guitar players on a budget (and aren’t they all?) might consider SoundTech’s LightSnake, a cable that connects between a guitar or bass and the Mac’s USB port.
GarageBand lets you apply effects to audio that you record. You can even have GarageBand simulate the sound of a vintage guitar amplifier. But your audio is always recorded and saved with no effects—unprocessed, or dry. GarageBand applies its effects as your music plays back, so you can experiment with effects settings.
Before recording a real instrument track, be sure your audio hardware is properly configured. You may need to visit the Sound system preference and GarageBand’s Preferences dialog box to ensure that the audio input is set to the hardware you plan to use. And be sure you have plenty of free disk space before you start—your recording will use 10MB per minute for a stereo track.
Create a new track. Click the New Track button (
 ) or choose New Track from the Track menu (Option--N).
Click the Real Instrument Track button and click Create or press Return.
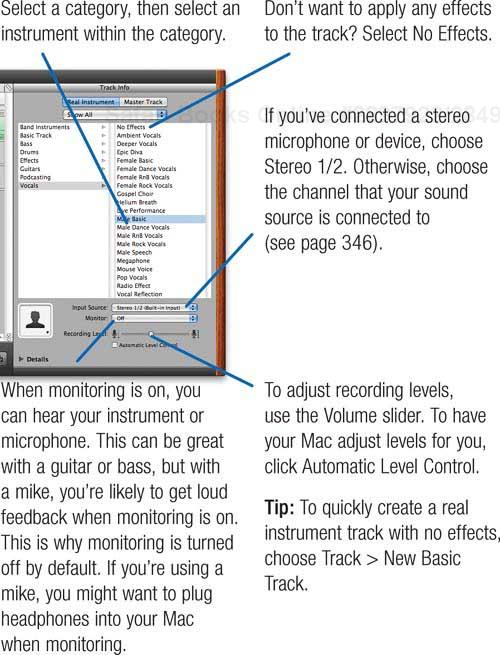
Choose an instrument.
When you select an instrument, you’re choosing a set of effects that GarageBand will apply when playing back the track. You can change this setting later if you like: double-click the track header and choose a different setting in the Track Info pane.
Explore some audio-interface options. www.macilife.com/garageband

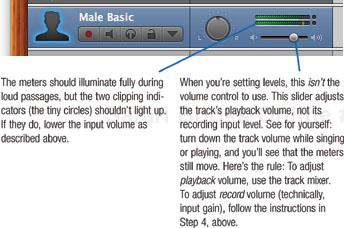
Adjust recording levels.
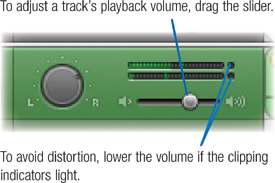
Sing or play some notes, and watch the level meters in the track’s header. If the clipping indicators light (see below), ugly distortion looms. Lower the volume of your input source—for example, lower the Volume slider in the Track Info pane, or, if you’re using a mixer or audio interface, adjust its volume controls.
Get ready.
Move the playhead a few measures before where you want to start recording, or use the Count In command in the Control menu to give yourself time to get ready.
Press Record (
) and make us proud.
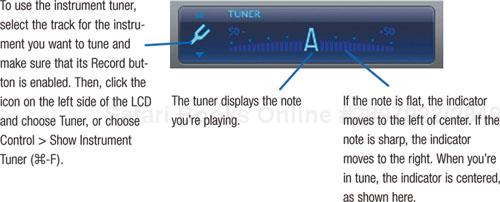
Get In Tune with the Instrument Tuner
Is your axe in tune? GarageBand can help. Its instrument tuner listens to the audio coming into a real instrument track and displays its note value.
This works with single notes only, not with chords. However, the LCD can display chords that you play using a software instrument; see page 358.
GarageBand is a great tool for musicians who labor alone. But what if you want to record a couple of musicians simultaneously and put each performer on a different track? Or what if you’d like to record yourself singing a vocal while strumming a guitar or playing a MIDI keyboard?
If your Mac has a basic stereo input, you can record two real instrument tracks simultaneously, plus one software instrument track: two singers and some GarageBand piano, for example. Connect multichannel audio hardware, and you can record up to eight real instrument tracks and one software instrument track: a real garage band.
Here’s how to record two simultaneous audio tracks using your Mac’s built-in audio input or a basic adaptor, such as Griffin’s iMic. These basic steps apply to more ambitious multitracking tasks, too.
Get jacked up. Your Mac’s built-in audio input can accommodate two signals: left channel and right channel. When multitrack recording, forget left and right: you’re using one channel for one audio source (say, a mike), and the other channel for another source (for example, an electric guitar).
Use a splitter cable or Y-adaptor that has a ⅛-inch stereo miniplug on one end and two audio jacks on the other. Those two audio jacks can be RCA phono jacks, ¼-inch mike jacks—whatever meshes with the gear you plan to connect.
Connect each audio source to one of the splitter’s input jacks.
Assign channels. Next, assign one input channel to one track and the other channel to a different track. Double-click a real instrument track’s header (or create a brand-new track), and use the Input pop-up menu in the Track Info panel to assign the input to Channel 1. Adjust your audio device’s level to get a good input level as described on the previous page.
Next, repeat this process for the other track, assigning it to Channel 2.
Arm the tracks. Make sure that the two tracks are enabled for recording: click the red Record button in their track headers. If you want to record a software instrument along with the two real instrument tracks, now’s the time to create that track and enable it for recording, too.
Get down. Set up the metronome and count-in as desired, and record.
Panning your tracks. The technique I’ve described here creates two mono audio channels. And yet when you play your recording, you’ll hear each channel coming from both speakers. To control each track’s position in the stereo field, use the track’s panning knob in the track mixer. For panning advice, see page 355.
Hard drive labor. Recording two simultaneous audio tracks puts your Mac’s hard drive to work, especially if you’re also playing back some existing real instrument tracks. If you have a slower Mac—or a laptop Mac or Mac mini, all of which have slower hard drives—you might need to mute some existing real instrument tracks to lighten the load on your hard drive and to avoid an error message.
The same applies to software instrument tracks that you’ve locked (see page 366): if GarageBand displays an error message while recording, try muting those tracks.
Multi-take recording. GarageBand’s multi-take recording feature works with real instrument tracks, too. In fact, it even works when you’re doing multi-track recording. Turn on track cycling, and each band member gets as many takes as he or she needs to get the part right. For details on multi-take recording, see page 348.
You can modify real instrument regions—either ones you’ve recorded or those you created by dragging blue loops into the timeline—in several ways.
Copy, paste, and dupe. You can duplicate a region by copying and pasting or by simply Option-dragging it. Duplicating a lengthy region doesn’t use any additional disk space.
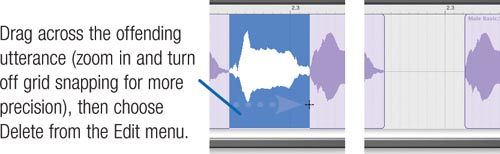
Digital splicing. You can also do some basic editing. Maybe you belted out a yeah that sounded more like Howard Dean than James Brown. Double-click on the region to open it in the track editor. You can also copy and paste part of a region: select it in the track editor, then choose Copy. Now paste it at a different position or in a different real instrument track.
Tip
To “double” a vocal and add a richer sound, offset the duplicate slightly using the technique on page 342. And pan each member of your chorus to a different position (see page 354).
Enhancing tuning and tempo. Singer sour? Drummer dragging? Use the track editor’s Enhance Tuning or Enhance Timing slider. Every track is different, so drag the slider until things sound good.
When adjusting pitch, you can have GarageBand limit enhancement to the song’s key (check the Limit to Key box) or to the chromatic scale (uncheck the box). And to try your hand at an effect first popularized by Cher back in the last century, crank Enhance Tuning all the way up.
Track editor tips. Want to turn a selection into an independent region? Just click within the selection.
And with some strategic mouse positioning, you can move, resize, and loop regions directly within the track editor—no need to journey up into the timeline. To move a region, position the pointer near its upper-left corner. When the mouse pointer changes to a ![]() , drag left or right.
, drag left or right.
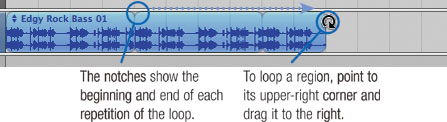
To resize a region within the track editor, point to its lower-left corner and drag. To loop a region, point to its upper-right corner and drag.
Orange Loops: Imported Audio and More
You can import audio from iTunes and the Finder: just drag the audio file into the timeline. GarageBand accepts AIFF, WAV, Apple Lossless, MP3, and AAC formats.
(You can’t import a song purchased from the iTunes Store. The workaround: burn the song to a CD, then rip it back into iTunes and import that version. This limitation doesn’t apply to iTunes Plus purchases.)
GarageBand displays imported audio regions in orange.

You can’t shift the tempo of orange audio regions, nor can you transpose them—at least not without a little trickery. If you know that your song’s tempo and key match those of the orange region (or if you don’t care—maybe you just want to slow down a solo to figure it out), here’s the secret: select the orange region, press Control-Option-G, and then click elsewhere in the timeline. GarageBand “stamps” the region with your project’s key and tempo settings and turns the orange region into a purple one. Now you can transpose it and stretch its tempo. This is great for doing remixes of iTunes tracks.
Incidentally, if you open a project created in GarageBand 1.x, its once-purple regions will be orange. Use the Control-Option-G trick to convert them.
Sometimes it takes more than one try to get a performance just right. If you’re like me, it may take dozens of tries. If at first you don’t succeed, GarageBand makes it easy to try, try again. With the multi-take recording feature, you can record a passage over and over again—without having to start and stop, or click buttons, between attempts. GarageBand records each try as a separate take.
Multi-take recording is easy to set up, and as I mentioned on previous pages, it works with software instruments and real instruments alike. Indeed, you can even do multi-take recording when you’re doing multitrack recording—each member of the band gets multiple takes. (Keep in mind that recording multiple takes on multiple real-instrument tracks will gobble up disk space.)
After you record multiple takes, you can switch among them and choose the one you like best. And, armed with the region-editing skills you picked up on previous pages, you can pick and choose the best parts of each take and edit them into a perfect performance.
Here’s how to keep on trying.
Turn cycling on by clicking the
 ) button.
Adjust the size of the yellow cycling bar to match where you want the recording to start and end.
For more details on cycling, see page 335.
Enable one or more tracks for recording, then start recording—and start playing.
When the playhead reaches the end of the cycling region, it returns to the beginning and GarageBand starts recording another take.
It’s that easy. Keep recording takes until your hands fall off, your voice turns into gravel, your hard disk fills, or you never want to hear the song again, whichever comes first.

The region displays the very last take you recorded. To switch to a different take, click the tiny number and choose the take you want.
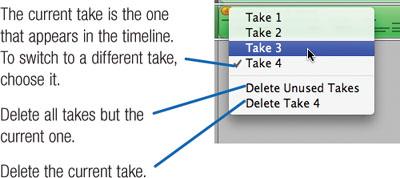
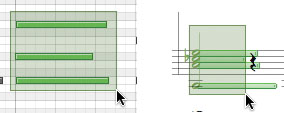
Regions and takes. When you use multi-take recording, each region in a track can have its own set of takes. Indeed, if you use the Split command to split a region containing multiple takes, you’ll see that each region retains all the takes. This makes possible some slick take-management tricks. For example, you can split a multiple-take region into two regions, and then delete all but one of the takes from one of the regions.
Merging takes. When you’re recording multiple takes on a software instrument track, you have an additional option: the ability to merge each take into a single region.
This option is great for building up a drum track. Record the bass drum on your first take, the hi-hat on the second take, ride cymbal on the third, snare on the fourth, and so on. When you’re done, you’ll have a full drum track contained in one region.
To activate this option, choose GarageBand > Preferences, click the General button, and click the oh-so-wordy option named Automatically Merge Software Instrument Recordings When Using the Cycle Region.
Multi-take recording is great, but it doesn’t let you pick and choose parts of each take to build a single track containing the best parts. To do that, you have a few options.
Record on separate tracks. Use the Duplicate Track command to create multiple duplicates of a track, and record each take on its own track. Then, use the region editing techniques covered on previous pages to copy and paste the best parts of each track into one.
Splitting a multi-take region. Say you like the first part of Take 1 and the last part of Take 3. Display Take 1, then move the playhead to the spot just before it goes bad. (If you need extra playhead precision, zoom in and use the Control menu to turn off grid snapping.) Choose Edit > Split; GarageBand splits the region into two. Finally, in the second region, use the tiny pop-up menu to display Take 3.
Multiple takes to one track. Use the multi-take recording feature to record as many takes as you like. Next, use the Duplicate Track command to create one duplicate of the track. Now return to the track containing all the takes, and switch from one take to another, copying and pasting the best parts into the duplicate track.
Songs typically have structure: an introduction, verses, a chorus or bridge, and an ending. You can see this in the tunes created by the Magic GarageBand feature (page 328).
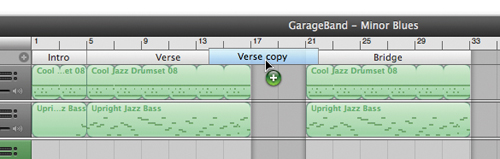
With GarageBand’s arrange track, you can create arrange regions that define these elements in your projects. Once you do, you can perform all manner of arranging tricks. Build the arrangement for a verse—the rhythm tracks, chords, background vocals, and so on—and then copy it as many times as needed throughout your song. (You can edit each copy, too, to add variety.)
By adding structure to your song, you also have more opportunity to experiment. Should the chorus repeat twice at the end of the tune? How about a different intro treatment? Without the arrange track, questions like these are harder to answer, requiring a lot of copying and pasting and dragging of regions.
With the arrange track, the creative answers you seek are a few clicks away.
To work with arrangements, start by displaying the arrange track: choose Track > Show Arrange Track.

You can also create an arrange region by simply dragging within an empty area of the arrange track—no need to click the little plus sign first.
To resize an arrange region, drag its left or right edge. But note that if you lengthen a region, the region that follows it will be shortened accordingly. For example, if you add four bars to an intro that is followed by a verse, the verse is shortened by four bars. To avoid that, move the adjacent region to create some empty measures between it and the one you want to lengthen.
After you’ve defined one or more arrange regions, you can work with them in several ways.
Moving a region. To move an arrange region to a different spot in your song, click its heading and then drag left or right in the arrange track. When you move a region, everything in the region—notes, automation curves, and so on—moves accordingly.
Duplicating a region. To duplicate a region, press Option and drag the region elsewhere in your song. If you position a region between two existing ones, the region to the right moves to accommodate the region that you’re dragging.
Tip
Get in the habit of renaming duplicates after you create them, lest you end up with region names like Verse Copy Copy Copy—a great name for the Xerox corporate anthem, but not all that descriptive otherwise.
Deleting a region. Don’t want that second chorus after all? Click the arrange region’s header to select the region, then press Delete.
Splitting regions. To split an arrange region into two, select the region, position the playhead at the point where you want to split the region, then choose Edit > Split (![]() -T).
-T).
Joining regions. You can also join adjacent arrange regions. Shift-click on each region’s header to select it, then choose Edit > Join.
Selecting multiple regions. You can duplicate, move, or delete more than one region at once: just Shift-click on each region before using the techniques above.
To select every single region in the song—maybe to add the intro that you just decided your tune needs—click the track header of the arrange track; it’s the blank area directly below the word Tracks.
Effects can be just as important to your final arrangement as the notes you play. With effects, you can add richness to a track—or brain-liquefying distortion, if that’s your idea of fun. You can add some spice to a track, or change it beyond recognition.
Effects alter the “color” of sound. Some effects simulate real-world phenomena, such as reverberation and echo. Other effects let you sculpt your sound to enhance certain frequencies, much like the equalizer in iTunes. Still other effects process (and sometimes mangle) audio in ways that could only exist in the digital world.
Recording studios have racks of hardware effects boxes. GarageBand’s effects exist in software: by applying complex math to your sound, GarageBand can simulate the reverb of a concert hall, the characteristics of an old guitar amplifier, and much more. Best of all, you can customize GarageBand’s effects in a limitless number of ways to create sounds that are yours alone.
You can apply GarageBand’s effects to software and real instrument tracks alike. And as I’ve said previously, GarageBand never alters your original audio; effects are applied as your song plays. This lets you experiment with effects until you arrive at just the right amount of sonic seasoning.
Here’s a look at how GarageBand applies its effects and how you can customize them.
All of GarageBand’s software instruments employ effects to some degree. Similarly, when you create a real instrument track and choose an instrument, GarageBand assigns a collection of effects to that track (page 344). And as I describe on page 356, a song’s master track can apply effects to your entire song.
To examine and change a track’s effects settings, double-click the track header, then click the Details button in the Track Info pane.

Compressor, Visual EQ, Echo, and Reverb are mainstay effects, the salt and pepper of sonic seasoning.
Compressor. A compressor is a kind of automatic volume control that adjusts volume thousands of times per second. Most popular music is heavily compressed, and FM radio stations often compress it even more. Compression can add punch to drum tracks and vocals, but too much compression can add an annoying “pumping” quality to sound.
Visual EQ. Visual EQ is a sophisticated equalizer for adjusting bass, mid-range, and treble. It’s described on page 358.
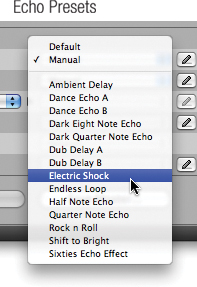
Echo. Also called delay, the echo effect simulates evenly timed sound reflections. Tip: GarageBand’s echo repeats at a rate that matches your song’s tempo. Try applying echo to vocal or synthesizer “stabs” in a dance, electronica, or hip-hop tune. To have different echo rhythms on each track, use the Track Echo effect.
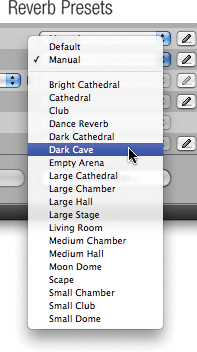
Reverb. A distant cousin to echo, reverb consists of thousands of randomly timed sound reflections. Reverb simulates the sound of an acoustic space: a concert hall, a small lounge, a stadium. GarageBand provides a reverb effect that is controlled by the master track (page 356). A separate Track Reverb effect lets you apply different reverb to a specific track.
You can customize effects in several ways.
Turn them off. Maybe you love GarageBand’s Arena Run synth, but you don’t like the way it echoes every note. Just turn off the Echo effect by unchecking its box.
Turn them on. GarageBand’s most intriguing effects lurk within the four pop-up menus in the Effects area. Want to add a rich, swirling texture to a track? Try Flanger, Phaser, or both. Want to liquefy your listeners? Unleash Distortion, Bitcrusher, or Amp Simulation. Want a track to continuously pan between the left and right channel? Try the Tremolo effect’s Circular Structure setting. Want to turn a male singer into a female—or a chipmunk? Try the amazing Vocal Transformer.
Automate them. You can automate an effect so it changes as your song plays—have the reverb get stronger, increase and decrease the amount of tremolo, and so on. For details, see page 361.
Try different presets. Many of GarageBand’s effects have an assortment of presets that you can apply with a click.
Create your own presets. Click the little pencil (![]() ) next to an effect’s Preset pop-up menu, and a dialog box appears where you can adjust the effect’s parameters.
) next to an effect’s Preset pop-up menu, and a dialog box appears where you can adjust the effect’s parameters.

When you change a track’s effects, you’re customizing the way GarageBand has defined that software or real instrument. If you switch to a different instrument or effect preset, GarageBand asks if you want to save the changed instrument before switching.
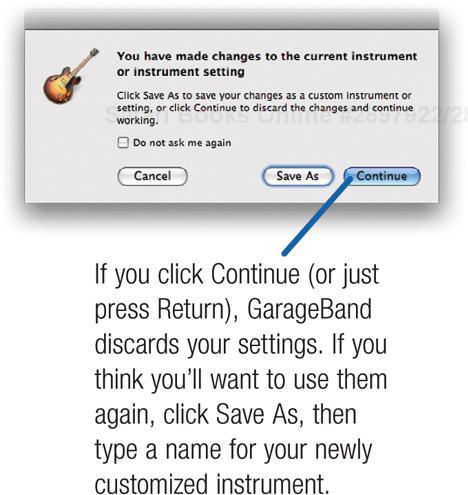
If you like tinkering with effect settings and you don’t want GarageBand pestering you about saving them all the time, check the Do Not Ask Me Again box. You can also use GarageBand’s Preferences command to control this paranoia mode.
For more details on creating instruments, see page 364.
A good song has a pleasing mix of melody, chord changes, and maybe lyrics. A good recording of a song has a pleasing mix between instruments. It’s possible to have a poorly mixed version of a great song, and as a spin of the radio dial will confirm, it’s also possible to have a well-mixed version of a lousy song.
As a GarageBand-based recording engineer, the job of mixing is yours. Adjust each track’s volume so all the tracks mesh—no single instrument should overwhelm the others, but important instruments or voices should be louder than less important ones.
And to create a rich stereo field, pan some instruments toward the left channel and others toward the right. You’ll find some tips for panning on the opposite page.
To adjust a track’s playback volume level and panning position, use the Mixer area of GarageBand’s window. If the Mixer isn’t visible, display it by clicking the little triangle at the top of the Tracks area or by choosing Show Track Mixer from the Track menu (![]() -Y).
-Y).
To have a track’s volume or panning change as the song plays, create a volume curve or panning curve—a set of control points that tell GarageBand how to change volume or panning over time.
Note
If you’ve edited a track’s volume or panning curve, you can’t drag the volume slider or turn the panning knob. Instead, make volume or panning adjustments to the curve.
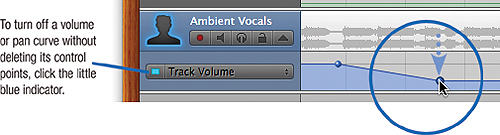
To create fades, add expression, or mute a track for part of a song, edit the track’s volume curve.
Click the triangle next to the track’s Lock button or select the track header and press the A key.
Choose Track Volume from the pop-up menu and click the little box at the left edge of the pop-up menu to turn on the curve for editing.
The horizontal line represents the track’s volume. Click the line to create a control point where you want the volume change to begin.
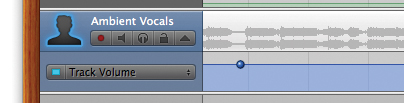
Click at a different point on the line to create a second control point, then drag it down to lower the volume, or up to raise it.
To pan a track, drag its pan knob to turn it clockwise (toward the right speaker) or counterclockwise (toward the left). To return to dead center, Option-click the knob.
To pan a track from one channel to the other as the song plays, edit the track’s pan curve. Display the track’s curve by clicking its triangle or pressing A. Then, choose Track Pan from the pop-up menu and click the little box at the left edge of the pop-up menu to turn on the curve for editing.
Next, create control points and drag them. To pan toward the left channel, drag a control point up. To pan toward the right, drag a control point down.
Tips for curves. To adjust a control point’s location in time, drag it left or right. To delete a control point, click it and press the Delete key. To delete or move multiple control points at once, select them by Shift-clicking or dragging across them.
If you move regions within your song, any curves you created for them don’t move along with the regions. To fix that, choose Control > Lock Automation Curves to Regions. Now, when you move a region, any automation curves beneath it will go along for the ride.
By sweating the details of your stereo mix, you can make your song more aurally interesting. Two ears, two speakers—take advantage of them.
Sit right. Your position relative to your speakers will affect how you hear a stereo mix. When refining your track panning, sit directly between your speakers. Test your mix with headphones if you like, but don’t rely exclusively on them—your listeners won’t.
Panning hard. Think twice about panning tracks completely to the left or right. In the real world, sound reaches both ears even when a musician is at the far side of the stage. Of course, some songs have little to do with the real world, so feel free to bend this rule.
Panning for realism. If you’re after a realistic stereo mix, visualize your ensemble and pan accordingly. In a jazz combo, the drums might be slightly to the left, bass in the middle, piano slightly to the right, and sax further right.
Panning a duet. If your song contains a vocal duet or two instruments that trade solos, pan one of the vocalists or instruments somewhat left (about 10 o’clock on the pan wheel) and the other somewhat right.
To simulate backup singers, record each part on a separate track and pan the tracks near each other on one side of the stage—for example, one track at 9 o’clock and the other at 10 o’clock.
Panning similar instruments. If your song contains multiple instruments that have a similar frequency range—for example, a solo guitar and a rhythm guitar—pan each instrument to the opposite side of center. The 10 o’clock and 2 o’clock positions are good starting points.
Consider your effects. If you’ve applied an effect that enhances a track’s stereo—for example, Chorus, Flanger, or Tremolo—think twice about panning that track heavily to one channel. You’ll lose many of the benefits of the effect.
Panning percussion. If you’ve built up a drum kit by recording different drums and cymbals on different tracks, pan the tracks to increase realism. Put the snare and kick drum dead center. Pan the hi-hat slightly right, and the ride and crash cymbals slightly left. If you’re using tom-toms, pan them according to their pitch: high-pitched toms slightly right, low-pitched toms slightly left. This layout mirrors the typical layout of a drum kit: the hi-hat is on the drummer’s left and the floor tom is on his or her right.
In a recording studio, once each track has been recorded and refined, the final mix takes place. Everyone settles into the control room and takes a seat between monitor speakers as a golden-eared recording engineer adjusts the levels and left-right panning of each track.
Then they make decisions about the entire song. If it is to fade out, at what point should the fade take place, and how long should the fade be? Which effects should be applied to the entire mix to add punch and clarity?
The producer and everyone involved with the song listens, tweaks, and listens again. When the song is mixed to their satisfaction, it’s released.
In GarageBand, these jobs are yours. But GarageBand helps. It contains dozens of mastering presets aimed at most every musical genre. Use a preset as is, and you’ve applied a golden-eared engineer’s knowledge to your work. Or customize it to suit your ears.
When that’s done, you can release your tune by exporting it in a variety of formats. Have fun at the release party.
GarageBand’s master track is a special kind of track that doesn’t hold notes or regions, but instead controls certain aspects of your entire mix. Specifically, you can transpose the entire song (page 336) and you can apply effects to the master track and create a volume curve to have your song fade in or fade out.
To show the master track, choose Show Master Track from the Track menu (![]() -B).
-B).
Applying mastering presets. GarageBand includes dozens of final-mastering presets for common musical genres. To use them, double-click the master track’s header. In the Track Info pane, choose a genre on the left, then a preset. And, of course, you can customize the presets and create your own final-mix presets using the techniques I’ve described on previous pages.
Creating a fade. To fade a song, choose Track > Fade Out. GarageBand adds a multi-point volume curve to the master track. Tip: To create a musically appealing fade, edit the volume curve so that the fade ends at the very beginning of a verse or measure. Don’t have a fade end in the middle of a measure—it feels abrupt.
Customizing reverb and echo. As described on page 352, GarageBand provides reverb and echo on both a master level and a track level. To adjust the echo and reverb parameters that GarageBand applies to an entire song, use the master track’s Track Info pane.
GarageBand’s dozens of reverb and echo settings (shown at left) are worth exploring. The reverb presets are spectacular—everything from a living room to a large cathedral, with some offbeat stops in between. Explore them to add just the right sonic ambience to your track. And if you’re into dance and electronic music, you can while away a weekend trying out and customizing GarageBand’s echo presets.
With the commands in the Share menu, you can burn your project to a CD. You can also export the project, post it on your iWeb site, add it to your iTunes library, and more.
Optimizing loudness. Before exporting your project, adjust GarageBand’s master volume slider to get loud (but not distorted) playback levels. Play back the loudest parts of your project, and make sure the master volume slider’s clipping indicators don’t light. Check the levels of individual tracks while you’re at it (page 354).
To have GarageBand optimize loudness levels of the exported project, choose GarageBand > Preferences, click Advanced, then check the Auto Normalize box. GarageBand will export the project at an optimum level (a process, incidentally, that’s a bit like iTunes’ Sound Check feature, and identical to the Normalize Clip Volume option in iMovie’s Audio Adjustments window).
When you export a project, GarageBand mixes your tracks down to two stereo channels. What happens next depends on your destination.
To CD. To burn an audio CD of a song, choose Share > Burn Song to CD, then insert a blank CD.
Tip
Normally, GarageBand burns a project as one CD track. To define multiple tracks, choose Track > Show Podcast Track and add a chapter marker at each spot where you’d like a new track to begin. For details on chapter markers, see page 373.
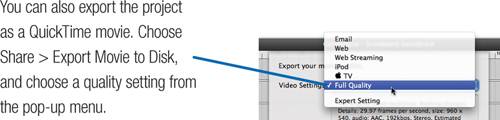
To disk. Choose Share > Export Song to Disk to export a project in any of a few audio formats (see below).
To iTunes. Export a project to iTunes, and you can add it to playlists and burn CDs—and sync it to your iPod, iPhone, or Apple TV. Choose Share > Send Song to iTunes. Edit the song information if you like (see “Customizing Tags,” at right).
Format options. To export an uncompressed AIFF file, uncheck the Compress box. For a smaller file size with great audio quality, choose the AAC Encoder and Higher Quality options. For a recap of audio format options, see page 22.
To iWeb. To post your project on your iWeb site, choose Share > Send Podcast to iWeb. Choose an audio format, keeping in mind that higher-quality settings mean bigger downloads. For details on blog and podcast publishing in iWeb, see page 400.
Customizing tags. To customize how your song is categorized in iTunes—artist name, album name, and so on—use the My Info portion of GarageBand’s Preferences dialog box.
Exporting an excerpt. At times, you may want to export only part of a song. Maybe you want to email it to a collaborator or mix it down in order to bring it back into GarageBand (see page 367). To export a portion of a song, turn on cycling and then resize the yellow cycling region in the beat ruler to indicate the portion you want to export.
GarageBand’s Visual EQ is a powerful four-band equalizer for optimizing the bass, mid-range, and treble portions of a track or your entire project. With Visual EQ, you can add punch to bass parts, add brightness and clarity to vocals, reduce sibilant “S” sounds, and much more.
Visual EQ lives in the Effects area of the Track Info window. Like other effects, it sports a pop-up menu containing a large selection of presets aimed at specific sonic enhancements. And as with other effects, you can customize the presets and create your own.
To do that, click the tiny pencil button to the right of Visual EQ’s pop-up menu. The Visual EQ window appears.
Choose a preset from the pop-up menu, and notice how the window changes: the graph depicts how certain frequency ranges will be boosted or attenuated.

Here’s the fun part: drag across the graph, and you can adjust the EQ curve. Drag up and down to increase or attenuate a certain frequency range, and left or right to define which frequency range you want to change.
Here’s the even-more-fun part: you can make these adjustments while your song plays back. Try it.
If your heart can take even more joy, click the Analyzer checkbox during playback. Visual EQ displays a real-time graph that depicts the frequency curve. Besides being cool, the curve can help you determine which frequency ranges may need boosting or attenuating. Tip: The analyzer uses a lot of processor power, so turn it off when you aren’t using it.
To make precise adjustments, click the Details triangle. You can then drag up or down on the frequency and decibel values to change them, or double-click them and type exact values.
As with many effects, you can apply Visual EQ to individual tracks, to the master track, or to combinations of both.
Speaking of effects, GarageBand lets you rearrange the order in which some effects are applied to a track. By changing the order of the effects chain or signal chain, as engineers call it, you can obtain different sounds. For example, if you place the Distortion effect after the Track Echo or Chorus effect, you get a very different sound than if you place Distortion before those effects. Give it a try and you’ll immediately hear what I mean.
GarageBand’s effects chain goes from top to bottom in the Track Info window: the effect at the very bottom is applied last, and thus affects every effect that precedes it. To change the order of the effects chain, drag effects up or down in the Track Info window.
The Web contains some useful articles on effects chains. I’ve linked to some on www.macilife.com/garageband.
If you have a project containing real instrument recordings you’ve made, you can reduce the disk storage requirements of the project by compacting it. You’ll sacrifice some sound quality, but the resulting project file will be smaller—helpful if you’re collaborating with someone and emailing project files around.
Choose File > Save As, and in the Save dialog box, check the Compact Project box. Choose an audio quality option from the pop-up menu.
When a software instrument track is selected, you can have GarageBand show you what chord you’re playing on a music keyboard. In the LCD, choose Chord from the pop-up menu, or choose Control > Show Chord in LCD. Now play a chord, and GarageBand tells you what it is.

If you like the chord display, check out Wonder Warp Software’s SimpleChord, an inexpensive and incredibly powerful chord utility.
Playing GarageBand’s Keyboards
GarageBand provides two on-screen keyboards that let you audition (and even record) software instruments without having to reach for (or even have) a music keyboard.
Keyboard window. To view this simulated piano keyboard, choose Window > Keyboard (![]() -K).
-K).
Musical Typing window. Play notes by pressing keys on your Mac’s keyboard. Choose Window > Musical Typing (Shift-![]() -K).
-K).
I’ve already mentioned the most common tasks you’re likely to perform with regions: looping them, moving and copying them, splitting them, transposing them, and editing them.
There’s more. Here are a few additional ways you might work with regions.
Resizing a region. To extend a region—make it longer—point to its lower-right corner and drag to the right.
Why extend a region? Say you recorded a riff that you want to loop. If your recorded region doesn’t end at the proper measure boundary, the region won’t loop properly. By extending the region, you can have it loop.
Another reason to extend a region is to be able to draw in additional notes or controller data using the track editor. Yet another is to add some silence before a region’s content repeats.
To make the region shorter, drag its lower-right corner to the left. You might shorten a region in order to “crop out” some unwanted notes—possibly as a prelude to rerecording them. When you shorten a region, you don’t delete the notes in the hidden portion of the region. To restore the notes, lengthen the region.
You can also resize a region from its beginning by dragging its lower left corner. This enables you to add silence to the beginning of a region (drag to the left) or to crop out audio from the beginning of a real instrument recording (drag to the right).
Joining regions. You’ve transposed a set of loops using the Split technique from page 337, and now you want to transpose the entire verse to a different key. Select all the loops and choose Join from the Edit menu (![]() -J). GarageBand turns all the regions into one region that you can transpose.
-J). GarageBand turns all the regions into one region that you can transpose.
When you join real instrument regions that you’ve recorded, GarageBand combines those regions into a single audio file.
When you’re working with loops, it’s easy to create overly repetitious arrangements. Fortunately, it’s also easy to add variety.
Vary loops. Many of the bass and drum loops that come with GarageBand and Apple’s GarageBand Jam Packs have variations that sound similar but not identical. Rather than relying on just one loop for a bass or drum track, switch between some different but similar-sounding ones. To switch loops within the same family, click on the tiny arrows in the upper-left corner of a loop region, then choose another loop (see page 332).
Edit some loops. Make your own loop variations. Make a copy of a software instrument loop and edit it—delete a few notes or transpose others. For real instrument loops, select part of the loop, copy it, and then paste it elsewhere.
Another way to edit loops is to change the instrument played by a software instrument loop. Try assigning an electric piano or clavinet to a bass loop.
Record your own bass track. Use bass loops to sketch out an arrangement and choose instruments, then replace the loops with your own bass line.
Take breaks. Add a drum break now and then—silence your drums for the last beat or two of a measure or for an entire measure. You can split the region and then delete part of it. Or you can edit the region if it’s a software instrument drum track. Or leave the region alone and create a volume curve that plunges the track’s volume down all the way, then brings it back up.
Add fills. Don’t want to edit a drum loop? Create a new track that uses a software instrument drum kit. Use this track to hold drum fills, such as an occasional cymbal crash or tom-tom fill. Want a kick drum to mark the beat during a drum break? Put it in this track.
Vary the percussion. Add one or more percussion tracks to some verses—shakers, tambourines, claves, congas, bongos.
Add a pad. A pad is a note, a series of notes, or a chord that forms a sonic background for a song. It’s often a lush string section or an atmospheric synthesizer that plays the root note or a fifth (for example, G in a song written in C). One way to add variety to an arrangement is to have a pad play throughout one verse. Stop the pad at the start of the next verse, or add another track with a pad that uses a different instrument.
A song doesn’t have to have the same tempo throughout. Add a ritard (a gradual slowing of the tempo) to the end of a song, or kick up the beat during a solo.
To add tempo changes, use the master track. Choose Tracks > Show Master Track. In the master track header, choose Master Tempo from the pop-up menu, then add control points and drag them up (to increase the tempo) or down (to decrease it). As you drag a control point, GarageBand displays its tempo, in beats per minute.
GarageBand applies tempo changes gradually. For a sudden tempo change, add two control points and position one directly above or below the other.
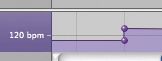
For more details on working with control points, see page 355.
Another way to add variety is to change how an instrument’s effects sound over time. For example, you might want a synthesizer solo to start out mellow, then get more gnarly as the solo builds in intensity. One way to do this is to add the Distortion effect to the track, then automate it.
To add automation to a track, click the triangle in its header (![]() ), or select the header and press the A key. From the automation pop-up menu, choose Add Automation. A dialog box lists the types of items that you can automate, given the instrument and effects in use. Click the triangle in the dialog box to show automation options, then check the one you want to automate.
), or select the header and press the A key. From the automation pop-up menu, choose Add Automation. A dialog box lists the types of items that you can automate, given the instrument and effects in use. Click the triangle in the dialog box to show automation options, then check the one you want to automate.

Next, choose those options from the track automation pop-up menu, and add control points.
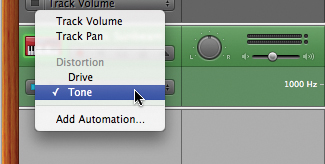
For a GarageBand musician, loops are like groupies: you can’t have too many. A large loop library is a source of creative inspiration. A few minutes of clicking in the loop browser is often all it takes to get the songwriting juices flowing.
There’s no shortage of loop collections for GarageBand. Apple offers several great collections of its own: the GarageBand Jam Pack series includes not only thousands of loops, but some ear-stunning software instruments and effects, too (see the opposite page).
Many other companies have also created loop packages for GarageBand; you can sample many of them through GarageBand community sites, such as iCompositions (www.icompositions.com).
GarageBand can also work directly with loops in the ACID format. (ACID is a pioneering loop-based music program that debuted on Windows computers back in 1998.) There are more ACID loops available than you can fit on your hard drive.
GarageBand also lets you create your own loops. Record a riff or edit an existing loop, then—with a few mouse clicks—turn it into a new loop. Try it—create a Magic GarageBand project and turn your favorite regions into loops that you can use in your own songs.
You can turn any region into a loop with a few mouse clicks.

If you’ve installed multiple Jam Packs and other loop collections, there may be times when you want to browse for loops from one specific collection.
To focus on a specific loop collection in the loop browser, point to the word Loops (![]() ), hold down the mouse button, and then choose a collection.
), hold down the mouse button, and then choose a collection.
To switch back to browsing your entire loop library, choose Show All. To view GarageBand’s original, factory-installed loops, choose GarageBand.
As I’ve described previously, GarageBand provides a similar feature when you’re assigning an instrument to a track.
In GarageBand, a software instrument is based on a foundation called a generator, and every generator has settings that you can tweak. You can create your own software instrument by picking a generator and then adjusting its settings.
For example, say you want to create an instrument that has a funky electronic synthesizer sound. Here’s one way you might approach the task.
Create a new software instrument track, and pick an instrument—any instrument.
Double-click the track’s header and examine the Generator pop-up menu.
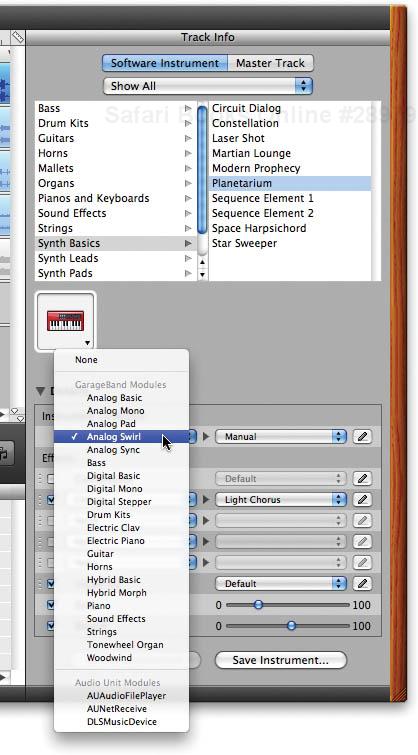
Some generators are based on short recorded samples of actual instruments, such as piano and guitar. Other generators create their sound “from scratch,” based on sound synthesis techniques.
Choose a generator.
Examine the generator’s presets. Try them out—you might find one you like.
Click the pencil to the right of the generator’s preset pop-up menu. This displays the settings that apply to the generator you chose.
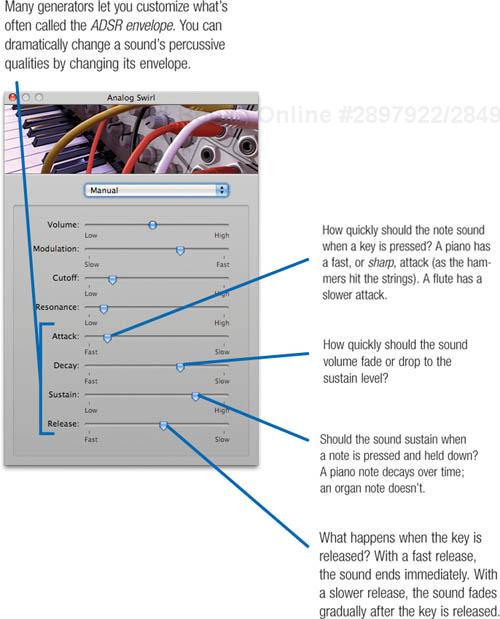
Play with the settings until you arrive at a sound you like. While you’re at it, adjust effects as desired—they’re stored along with the generator settings.
Click the Save Instrument button in the Track Info pane and type a name for the new instrument. GarageBand saves the instrument settings on your hard drive (see the sidebar on the opposite page).
You can expand GarageBand’s sound-generating and effects capabilities with software plug-ins called Audio Units. Some absolutely stunning software instruments are available in Audio Unit format. My favorite is Native Instruments’ B4, which mimics the legendary Hammond B3 organ with frightening realism. And yes, it runs within GarageBand.

I’m also a big fan of Pluggo from Cycling ‘74 (www.cycling74.com).
Pluggo is a collection of more than 100 synthesizers and effects, and it lets you run software instruments that use other plug-in formats, such as the popular VST format.
High-end software instruments like B4 cost several times what iLife ’08 costs. If you don’t want to spend that much, there are some great-sounding Audio Unit instruments and effects that don’t cost a dime. To explore what’s available, go to www.icompositions.com or do a Google search for audio units. Don’t expect to get any work done for a while.
Where they live. Commercial Audio Unit plug-ins usually include an installer program that puts things where they belong, but some free Audio Units don’t have these installers. So for the record, Audio Units are stored in Library > Audio > Plug-Ins > Components. They can also reside in your home directory, in the same path.
There’s also a large selection of Audio Unit effects, and the aforementioned sites are great places to find them.
You might also explore ChannelStrip from Metric Halo (www.mhlabs.com). This legendary set of mastering effects has long been popular among recording professionals, and now it’s available for GarageBand.
And while most people think of Apple’s Jam Packs as being primarily a source of loops and software instruments, they’re also a source of effects.
If you have a Jam Pack and would like to see what additional effects it provides, double-click any track’s header, then choose the Jam Pack’s name from the pop-up menu at the top of the Track Info pane. Next, choose an effect and explore its pop-up menu of presets.
How GarageBand Stores Instruments
GarageBand stores a software instrument as a file with a name that ends with .cst—for example, if you named your instrument Wacko, its file will be Wacko.cst. GarageBand stores its instrument files deep inside your hard drive’s Library folder.

Tip
To put your custom instrument in a different category in GarageBand’s Track Info pane, move its file into the appropriate category folder. For example, to move an instrument from the Synth Leads category to the Bass category, move its file from the Synth Leads folder to the Bass folder.

With apologies to the great James Brown, GarageBand is the hardest-working program in show business. It synthesizes sound, plays back audio tracks, generates effects—and never skips a beat.
Of course, this assumes that your Mac is fast enough. On slower Macs—for example, older G4 iMacs or iBooks—GarageBand can stumble and display an error message if it isn’t able to perform its duties. GarageBand works hard to avoid stopping the music. For instance, if your Mac starts working up a sweat during playback, GarageBand defers scrolling the screen and updating its time readout.
To let you know how hard it’s working, GarageBand changes the color of its playhead: from white (don’t worry, be happy) to yellow (I will survive) to orange (the thrill is gone) to red (the sound of silence). If you see the red playhead, anticipate an error message—GarageBand is on the verge of maxing out your Mac.

But as I tell my guitar player friends, don’t fret. You can do a lot to bring the music back—besides buying a faster Mac.
Lock tracks. If your song has numerous software instrument tracks or real instrument tracks that use a lot of effects, locking some tracks should be your first step. For details, see the opposite page.
Add memory. A memory upgrade will improve your Mac’s overall performance.
Quit other programs. Let your Mac devote all its attention to GarageBand.
Quit and relaunch. Clear GarageBand’s head: quit the program and then launch it again.
Use the audio in software instrument loops. If you plan to use a software instrument loop as is (that is, you aren’t going to edit the loop or change its instrument or effects assignments), you can lighten the load on your Mac by dragging the loop into a real instrument track. For more details, see the sidebar on page 351.
Tweak preferences. Choose GarageBand’s Preferences command and click the Advanced button. There you can examine and change settings that GarageBand normally makes automatically. Try reducing the number of voices per instrument. Note that this restricts the number of simultaneous notes you can play.
Simplify your song. Mute some tracks and turn off some effects. The Amp Simulation effects are particularly power hungry. You can greatly lighten GarageBand’s burden by unchecking Reverb and Echo in the Master Track’s Track Info pane, but doing so will eliminate the ability to use these effects in your song. Still, you might find this a worthwhile price to pay for extra tracks. You can always transfer your song to a faster Mac to get the polish that good reverb provides.
Use an external drive. A high-performance external FireWire hard drive may be able to keep up with multiple real instrument tracks better than your Mac’s built-in drive, especially if you have a laptop Mac or Mac mini.
Optimize laptop performance. If you’re using a laptop Mac, open the Energy Saver system preference and choose Highest Performance from the Optimize Energy Settings pop-up menu.
Turn off FileVault. Mac OS X’s FileVault feature can dramatically slow the reading of data from the Home directory of your hard drive. Turn off FileVault using the Security system preference, or store your songs outside your Home directory.
If the measures I’ve described here don’t do it for you, there’s still hope: an update of a technique that us old fogies—people who grew up with analog multitrack recording—know about all too well.
Back in the analog multitrack days, when you approached the limit of your four-track cassette deck, you would mix down the three tracks you had already recorded and put them on the fourth track. After the mix-down, you could erase and re-use the original three tracks.
This technique was often called bouncing, and it’s alive and well in GarageBand. Say you’ve laid down a sweet rhythm section groove—some drums, some bass, and maybe a keyboard or synthesizer pad.
You want to play a synth solo over this, but your PowerBook doesn’t have the power.
Solution: save your project with an iLife preview (page 361), then add the project to a new GarageBand project.
Fine-tune your mix. Adjust every setting—panning, volume, effects, everything—until your mix sounds exactly as you want it.
Save with preview. Use the Preferences command to activate the save-with-preview feature, as described on page 361. Then, save the project. GarageBand creates a stereo mixdown of your tune and saves it along with the project.
Start over. Start a new GarageBand project. Be sure to set the key signature and tempo to match your song’s settings. Locate your song in the GarageBand media browser, then drag it into the new project.
Add tracks and have fun. Because your rhythm groove is now one audio track—not a whole bunch of different, system-taxing tracks—your Mac can devote its energy to the new tracks.
Making changes. If you decide to change your rhythm groove, just open up your original project, make your changes, and save again. Because GarageBand maintains a link between the two projects, your changes will be incorporated in the second project when you reopen it.
I’ve already described how you can use iTunes and your iPod to listen to podcasts of all kinds (pages 34–37). With GarageBand, you can go from listener to producer.
GarageBand turns your Mac into a radio studio—with broadcast engineer. Connect a microphone to your Mac or use the built-in mike that most Macs provide. You can also use the microphone built into Apple’s standalone iSight video camera. GarageBand contains audio filters that optimize the sound produced by an iSight or built-in Mac mike.
Record your rants, vacation dispatches, family interviews—whatever you like. You can even record remote interviews with iChat users. Your audio is recorded into real-instrument tracks, so you can edit it using the same techniques described earlier.
Need theme music? Compose your own or use one of the many royalty-free music jingles included with iLife ’08. Use the ducking feature to have GarageBand automatically lower and raise the music volume when you start and stop talking—just like the radio.
But don’t stop there. Consider creating an enhanced podcast. Add chapter markers that enable listeners to conveniently jump around through your show. Add artwork that appears during playback in iTunes and on any iPod that can display photos. And add Web URLs that let iTunes users jump to specific Web pages as your show plays.
When you’re finished, send your completed production to iWeb for publishing on the Internet. Here’s how to become a podcaster.
Use the loop browser to explore and choose from more than 100 jingles, including many sets that provide the same song in lengths of 7, 15, and 30 seconds. You can also choose from hundreds of sound effects and music stingers—and even use the Musical Typing window to play them as you do your show (page 359).
Use the media browser to add photos (page 372) or movies (page 376). Use the search box to quickly locate what you need.

Want your listeners to be able to jump to Web pages that relate to your subject? Add Web addresses (URLs) to your markers (page 373).
There are as many types of podcasts as there are types of songs. But no matter what topic you cover, you have a common set of planning and production options to consider.
Script (or at least sketch). You don’t have to script every word of your podcast, but at least sketch out the structure of your show. And because they’re the critical bookends for your barking, consider scripting your introduction and conclusion.
How long? Around 20 to 30 minutes is a good balance between depth and reasonable download times, not to mention listener attention span.
How much? You can record one non-stop rant, but I’m unlikely to listen to it. Consider covering several topics, limiting each to five minutes or so.
What’s the theme? Start your podcast with an introductory music jingle. Compose your own or use the ones that come with GarageBand. To explore them, display the loop browser, then click the (![]() ) button.
) button.
GarageBand’s jingles come in several durations. Consider using a 30-second version for your intro and a seven-second version as a separator, called a bumper, between topic segments.
Tip
Don’t waste time by letting your intro music play and play. Your listeners want to hear you, so let the music play for just a few seconds, then start your intro. Use GarageBand’s automatic ducking feature to lower the music’s volume when you start talking.
Who else? Will you have guests? A variety of voices makes for more interesting listening. You can record guests via phone or iChat (page 374) or, ideally, in person, with a second microphone.
Get started. As shown on the previous pages, when you click Create New Podcast Episode while creating a new GarageBand project, you get a set of tracks for male and female voices. You also get jingles and radio sounds, such as sound effects and stingers, which are short, sonic spices of the kind you hear on the radio before traffic and weather reports.
If you’ll need additional tracks—perhaps to record a guest with a second microphone, or some music using a software instrument and your music keyboard—add the tracks using the techniques described earlier in this chapter.
Prepare for recording. Record in a quiet location and with the best microphone you can use. (For advice on obtaining good sound, see page 266.) If you’re using multiple mikes or audio sources, assign inputs to each track (page 348). Adjust your recording levels (page 347).
Cue the band. When should you add music to your podcast? I recommend waiting until after you’ve recorded and refined the core content of your podcast. Save the music for the post-production phase. The way GarageBand lets you drag audio regions around makes it easy to time where you want the music to come in.
On the air. To begin recording, click the Record button or press the R key. Make a mistake? Pause for a second or two, then pick up at a point before your blunder. You can edit out the flub later using the techniques on page 339.
Optional: Adjust effects. The male and female tracks that GarageBand provides in a new podcast project are fine for most efforts. But you might want to open the Track Info pane and explore some of GarageBand’s effects and audio-enhancement options. Double-click on the track header for the track you want to tweak, then click the Details button in the Track Info pane.
The Speech Enhancer effect can sweeten a voice in several ways. Explore the presets in the pop-up menu, then click the pencil button to view all your options. If you’re using an iSight camera’s mike or the mike built into your Mac, you can choose options that will optimize sound quality. You can also apply a noise-reduction filter.

To add punch to a spoken voice, apply the Compressor effect, but don’t go overboard.
Add music and refine timing. Now’s the time when I like to add theme and bumper jingles and refine the timing of my podcasts. To take advantage of GarageBand’s volume-ducking feature, be sure the down-pointing arrow is active in the Jingles track (or other music tracks you may have added) and the up-pointing arrow is active in your primary voice track or tracks.
Optional:Enhance your podcast. If you’re creating an enhanced podcast—one with artwork, chapter markers, URL markers, or any combination thereof—add those items now. See the following pages.
Preview and proofread. Before exporting the final podcast, play it all the way through. If you’ve added artwork, chapter, or URL markers, use the Podcast Preview pane to verify that they appear when they should. Click any URL markers to ensure that they go to the proper Web address. (If the Podcast Preview pane isn’t visible, double-click on the track header for the Podcast track.)
Make sure there are no odd audio glitches caused by editing. Adjust volume levels as necessary to deliver a strong signal with no clipping. Adjust ducking settings for the best balance of voice and background (page 374).
Export your podcast. Use the Share menu to send your podcast to iWeb or iTunes, or save it to disk. Choose the MP3 or AAC formats, and choose an audio quality setting.
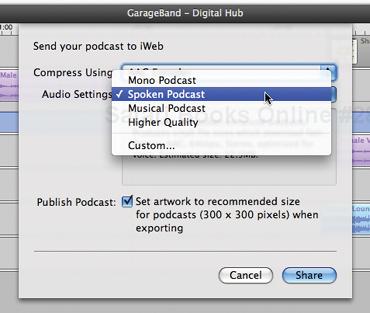
You can also burn your podcast to an audio CD. For details, see page 357.
With enhanced podcasts, your options go beyond sound to include photos, chapter markers, and URL markers. You can use just one of these enhancements in your podcasts, or you can use all three.
By adding images to the podcast track, you can add photography and artwork that appears in the iTunes window or on photo-capable iPods. Create a training podcast that illustrates the steps involved in performing a task. Or an art history podcast that shows famous works as you talk about them. Or a vacation travelogue that shows your stops.
With chapter markers, you can add convenient navigation to your podcast. When your podcast is played in iTunes, a chapter menu appears that allows listeners (and viewers) to jump to sections of interest. When playing your podcast on an iPod, your audience can navigate the chapters using their click wheels or touch screens.
With URL markers, you can add the immediacy of the Internet. Create links to pages that relate to your subject. The link appears in the iTunes window, and your podcast’s audience can jump to the link’s URL by clicking it.
The one downside to an enhanced podcast is that you must deliver it in the AAC audio format, which means that the podcast will play only in iTunes and on iPods and Apple TV. If you’re planning to deliver your podcast in MP3 format to reach the broadest possible audience, keep your podcasts unenhanced.
Display the media browser by clicking its button.

In the media browser, click the Photos button, then locate the photo you want to add.
Drag the photo to a location in the podcast track.
To fine-tune the amount of time the artwork appears, drag the edges of its region left or right.
You can also drag the entire artwork region left and right, just as you can other GarageBand regions. Tip: To have regions snap toward each other as you drag, choose Control > Alignment Guides. This helps prevent you from accidentally replacing part of a region by dragging another region over it.
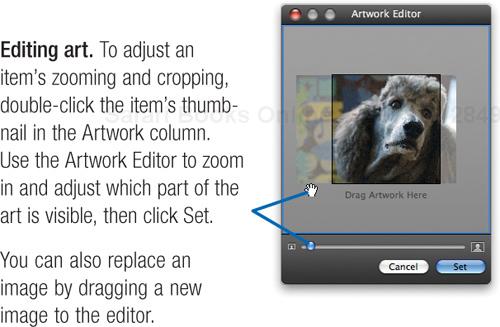
Art from elsewhere. You can also add an image to the podcast track by dragging it from the Finder. You can even add an image from a Web page by dragging it from the Safari browser.
More than just art. An artwork region can also represent a chapter marker and a URL marker. For example, maybe you’d like a chapter to begin when a particular image appears. In the podcast track, select the image. Next, in the podcast track editor, click in the Chapter Title box and type a name for the chapter. For more details, see the opposite page.


As with chapter markers, you can assign a URL to a region that contains artwork; just skip to Step 2 below.
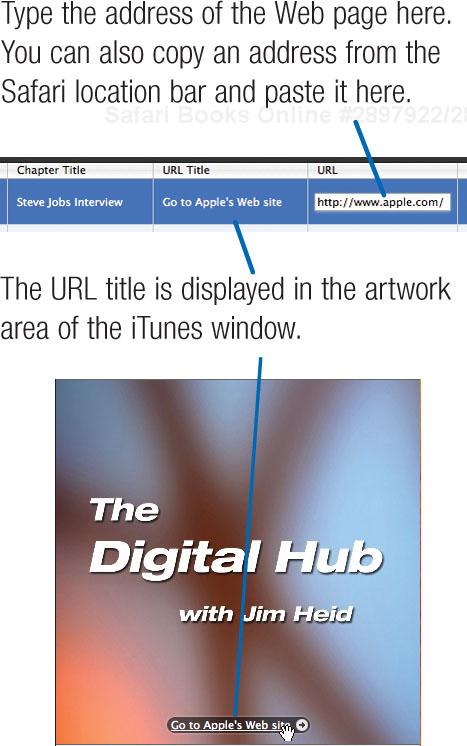
Episode artwork is a single image that appears in iTunes while your podcast is playing. iWeb also uses episode artwork when you add a podcast to a Web page (page 400). You might use episode artwork to display your company logo, a favorite photo from your vacation pod-cast, or a graphic created in Photoshop or Photoshop Elements that contains a few words about the podcast’s topic.
If your podcast also contains artwork regions as described on the opposite page, the regions replace the episode artwork as the podcast plays back. When those artwork regions end, the episode artwork reappears.
To add episode artwork, drag an image from the media browser (or elsewhere) to the Episode Artwork well at the left edge of the podcast track editor. To tweak the cropping of the artwork, double-click it in the Episode Artwork well, then use the Artwork Editor as described on the opposite page.
GarageBand’s ducking feature makes it easy to create a podcast in which you talk over background music. Activate ducking, and GarageBand lowers the volume of the music when you talk, then brings it up again during pauses. There’s no need to manually create volume automation curves that adjust the music’s volume.
But the ducker may not always lower the volume as much as you’d like—and as any boxer will tell you, partial ducking just isn’t enough.
If your voice is still getting a left hook from your background music, adjust the ducker. Double-click the header for the master track, turn to the Track Info window, and choose one of the presets from the Ducker pop-up menu.
The presets let you choose how quickly music volume is lowered and restored, and to what degree. You can also create a custom preset by clicking the tiny pencil button next to the pop-up.
Many podcasters like to begin each episode with a very brief announcement of the podcast’s name and date: This is The Digital Hub, Episode 3, for August 17, 2008. This little “stamp” is handy for listeners who are using iPods. It lets them immediately verify that they’re listening to the right episode—without having to take their eyes off the road.
The Leopard angle. In Mac OS X 10.5 (Leopard), iChat can record audio and video chats, provided all chat participants are using Leopard. After starting the chat, click the Record button in iChat. iChat notifies the participant that he or he is about to be recorded.
When you’re done, locate the recording. (You’ll find it in Documents > iChats, unless you’ve changed your preferences.) Drag it into GarageBand. If you recorded a video chat but you want only the audio, simply choose Track > Show Podcast Track after you import the video. GarageBand discards the video but keeps the audio.
If you want to record within iChat but your chat participant isn’t using Leopard, check out Ecamm Network’s Conference Recorder, an iChat add-on that can record audio and video chats conducted with pre-Leopard iChat versions—and even with Windows audio-video chat programs.
If you use Mac OS X 10.4 Tiger or a later version, you can use Apple’s iChat conferencing software to record audio interviews with distant guests. GarageBand stores each participant’s voice in its own track. And if you’re conducting a video conference, GarageBand grabs a still shot of each participant when he or she begins speaking and adds that image to the podcast track.
To record iChat interviews, you must initiate the audio or video conference—that is, you must be the one to invite the other guests to the conference. Do that, and then chat with your guests for a minute or two to make sure that your Internet connection, and the Internet as a whole, are behaving themselves. I’ve had best-laid interview plans shattered by Internet difficulties that were out of my control. Use this testing time to remind your guests that you’ll be recording them.
When you’re ready to begin recording, click GarageBand’s Record button or press the R key. GarageBand asks if you want to record the chat.
In my experience, you need a fairly fast Mac to get good results when recording iChat conferences. My 1.67GHz PowerBook G4 sometimes stumbles, but a G5 or Intel Duo system does a good job. And needless to say, a fast Internet connection is a must, particularly for multi-guest interviews.
The Leopard angle. In Mac OS X 10.5 (Leopard), iChat can record audio and video chats, provided all chat participants are using Leopard. After starting the chat, click the Record button in iChat. iChat notifies the participant that he or he is about to be recorded.
When you’re done, locate the recording. (You’ll find it in Documents > iChats, unless you’ve changed your preferences.) Drag it into GarageBand. If you recorded a video chat but you want only the audio, simply choose Track > Show Podcast Track after you import the video. GarageBand discards the video but keeps the audio.
If you want to record within iChat but your chat participant isn’t using Leopard, check out Ecamm Network’s Conference Recorder, an iChat add-on that can record audio and video chats conducted with pre-Leopard iChat versions—and even with Windows audio-video chat programs.
iChat interviews can be fun, but you might prefer to back away from the cutting edge and conduct your interviews the way many radio stations do: via telephone.
You have a few options for recording a telephone call. Radio Shack sells several phone-recording adaptors for under $30. Connect the adaptor to your phone and attach it to your Mac’s microphone jack, and you’re underway.
The problem with inexpensive recording devices, though, is that your voice also sounds like it’s coming over the phone (which, from your Mac’s standpoint, it is). What you want is for your voice to be recorded by that high-quality microphone that you were smart enough to buy. For this, you need a specialized piece of hardware called a telephone hybrid.
A telephone hybrid is a box that contains jacks for the telephone line and your microphone. Connect your mike and your phone to the hybrid, then connect the audio output of the hybrid to your Mac’s microphone jack. Some hybrids also have volume knobs that let you adjust the mix between your mike and your guest’s phone.
A good source for telephone hybrids is JK Audio (www.jkaudio.com). The company’s least expensive device, the AutoHybrid, sells for under $200. A Google search for telephone hybrid will yield more sources.
The Skype angle. If you use the Skype software to make Internet phone calls, you can conduct interviews via Skype and record the results. You can use Rogue Amoeba Software’s Audio Hijack Pro to record Skype calls, but many podcasters swear by Ecamm Network’s Call Recorder, a simple and inexpensive utility designed specifically for the task.
Thinking of doing a music podcast? Note that you can’t legally publish a podcast containing commercial recordings—at least not without paying for the rights to do so.
To learn the latest about the frequently changing world of digital music licensing, do some Google searches for podcast music licensing and podcast music rights.
You might also investigate music sources that permit rebroadcasting and podcast use. A great stop is Magnatune (www.magnatune.com), which has refreshingly simple policies for podcasters: “Magnatune is one of the only record labels on the planet whose music you can legally use in your podcast, without paying for a licensing agreement. Because we work directly with artists, we can legally do this.”
And you have to love a record label whose corporate slogan is “We are not evil.”
iMovie’s audio features are adequate for many projects, but your soundtrack options don’t end there. You can bring video into GarageBand and apply GarageBand’s audio and music-making features to the movie’s soundtrack.
GarageBand’s video features aren’t for editing the picture; that’s a job for iMovie. Rather, you bring a finished edit into GarageBand for additional sonic seasoning. Punch up the sound with GarageBand’s effects. Record and edit narration with more precision than iMovie provides. Or compose your own music soundtracks by using loops and by recording your own performances. When you’re finished, send the final movie to iTunes, iWeb, or iDVD.
You might also use GarageBand’s video features to create a video podcast: a podcast that adds the dimension of motion. As with GarageBand’s audio podcasting features, you can add chapter and URL markers to the video. When you’re done, you can send your final product to iWeb or save it for manual uploading to a Web server.
You’ll need a fast Mac with a fast hard drive for movie scoring. If you have playback problems, consult the advice on page 366 to optimize GarageBand’s performance.
In iMovie, finish your edit, then share the movie to the media browser (Share > Media Browser; see page 278).
In GarageBand, display the media browser, click the Movies button, then locate your movie and drag it into the tracks area of the GarageBand window.
iMovie imports the movie and displays it in the video track (opposite page).
Enhance to your ears’ content: add tracks, record narration, apply effects, or add chapter and URL markers for a video podcast.
Use the commands in the Share menu to send your finished movie to iTunes, iWeb, or iDVD, or to export it as a QuickTime movie (opposite page).
Chapters for iDVD. iMovie ’08 doesn’t let you create chapter markers for a DVD, but you can use GarageBand to do the job. In iMovie, share your project to the media browser, choosing the Large quality setting. Bring the movie into GarageBand as described above.
Next, select the movie track and click the track editor button. Use the track editor to add chapter markers. Give each chapter a title—iDVD will use it to label each chapter’s button.
Finally, choose Share > Send to iDVD. iDVD creates a new project and adds the movie to it, creating a Scene Selection menu for accessing the chapters.
Movies from elsewhere. In addition to using the media browser to add a movie to GarageBand, you can also simply drag a movie’s icon from any location on your hard drive into the GarageBand window.
When you’ve brought a movie into GarageBand, here’s what you see—and what you can do.
Tips for Video
Enhancing narration. If you’ve recorded a voice-over or other narration in GarageBand (or, for that matter, in iMovie), consider applying GarageBand’s audio effects to it. For example, use the Compressor effect to add punch to a narration. Use the Speech Enhancer filter to reduce noise and optimize male or female voices.
Exporting your final effort. When you’ve finished refining a movie’s soundtrack, you can use the Share menu to send your final effort to iTunes, iWeb, or iDVD.
To customize export settings, choose the Expert option, then adjust the settings in the subsequent dialog box. Your options are identical to those described on page 278.