
With iWeb, you can put your world on the Web. You can create Web sites containing text, photos, movies, podcasts, and more. iWeb insulates you from Web publishing technicalities, such as markup languages and servers.
Start by choosing one of the site design templates that are built into iWeb. Many of those designs have counterparts in other iLife ’08 programs. For example, the Travel template in iWeb resembles the Travel theme in iPhoto and iDVD. Thus, you can create a Web site about your vacation and have it match your iPhoto books and calendars, and the DVD containing your video and travel slide shows—a consistent visual identity, as the marketers would say.
Each iWeb template provides several types of pages. As you create a site, you simply add new pages as needed to accommodate what you want to publish.
Decided on a design? Just add content. Replace the placeholder photos and text with your own. Use the page design as is, or use iWeb’s formatting tools to customize it to your own liking. You can add maps and ads from Google, as well as .Mac photo galleries, with a few clicks, too. If you’ve used Apple’s Pages or Keynote software, you’ll feel at home with iWeb’s formatting features.
iWeb also simplifies creating blogs and podcasts. Creating a new blog or podcast entry is as easy as creating a new email message. iWeb also manages the chores of creating archive pages and RSS feeds.
When you’re finished, one click publishes your site to Apple’s .Mac service.
Each iWeb template provides eight page styles, each aimed at a specific type of content. Not shown here: the Blank style, which shares the template’s background and color scheme, but lacks placeholder text and graphics.
Welcome

An introductory home page, ideal for welcoming visitors and stating the purpose of your site.
About

A good place to describe yourself, your business, your organization—whatever your site is about.
Photos
A photo album, with small photo thumbnails and a button for displaying photos as a slide show. You can also create a photos page from within iPhoto (page 394).
My Albums

An index page that acts as a gateway to photos and movie pages. Drag iPhoto albums and movies here to quickly publish them (pages 394–399).
Movie
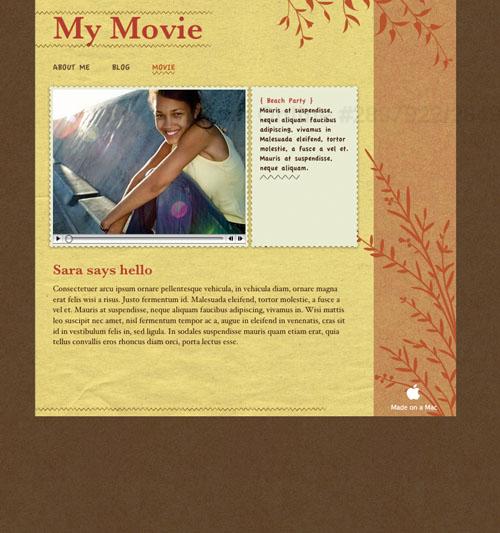
A page designed to present a QuickTime movie (page 409).
Blog

Your blog’s main page, with links to individual blog entries. You can also create a blog entry from within iPhoto (page 400). A similar page style holds podcasts.
What do you want to publish? A few iPhoto albums? The occasional movie? A podcast? Or a full Web site containing numerous pages as well as photo albums, a blog, and a podcast?
iWeb can handle any of these tasks. If you’re planning an ambitious site, though, consider sketching out the site’s structure on paper before you start. You might want to draw an organizational chart, with the home page at the top and other pages beneath it—much like the DVD menu diagram on page 304. This kind of advance planning can help you map out your site and organize your thoughts.
After you’ve planned your attack, perform it. Start by creating a new site and choosing a page template for its design. Then replace the placeholder content with your own text and graphics. Tweak the text formatting if you like, but be careful—the “wrong” kinds of formatting can cause iWeb to create large pages that load slowly (page 386).
As your site comes together, you’ll add additional pages and create links to connect them. You might also create links to other sites on the World Wide Web. You’ll add graphics and adjust their appearance. And then you’ll publish your site on Apple’s .Mac service.
I cover each of these phases, and more, in the pages that follow. Here’s how to get started.
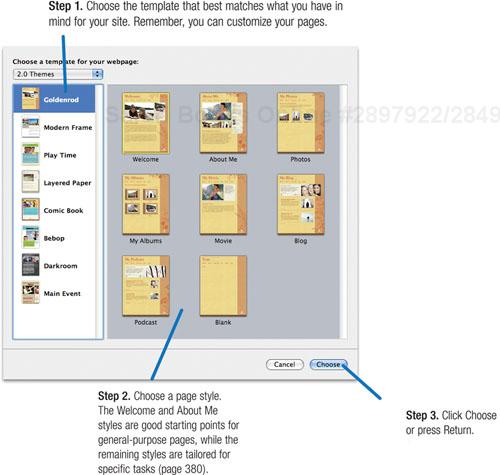
You can create multiple Web sites and switch between them with the click of a mouse. When you want to create a new site, choose New Site from the File menu (Shift-![]() -N), then choose a template and page style as described above.
-N), then choose a template and page style as described above.
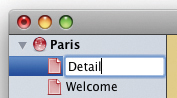
To change the name of a site or page, double-click it in the sidebar, then type a new name.
Brevity rules. Unless you specify otherwise (page 385), iWeb adds a navigation menu link for a new page. If you use a wordy page name, the link may not display correctly—and it will definitely look hokey.
Note that if you use spaces in page names (as in Main Menu), iWeb will translate them into underscores (for example, Main_Menu) when you publish your site. The links will still work, but they’ll look unwieldy and will be hard to recite over the phone. For the tidiest page addresses, avoid spaces.

After you choose a page style, iWeb gives you a page filled with placeholder graphics and text. By replacing this placeholder content with your own, you can create an attractive Web page.
Here’s a look at the basic techniques behind iWeb page design. In the following pages, I describe how you can tailor a page design to your tastes.
To add a new page to a site, choose New Page from the File menu or click the ![]() button. Choose a template and page style as described on the opposite page.
button. Choose a template and page style as described on the opposite page.
Off the menu. Normally, iWeb includes a new page in your site’s navigation menu. In some cases, you may not want this—maybe you plan to use a text link or other button to provide access to that page. Use the Inspector to remove a page from the navigation menu; see page 385.
iWeb stores all of your sites and their pages in one place: a file named Domain tucked deep within your hard drive. Specifically, the Domain file lives in your home directory, within Library > Application Support > iWeb.
Get in the habit of backing up the Domain file now and then. If you use Apple’s Backup 3, included with a .Mac subscription, you can have this done automatically. Time Machine, part of Mac OS X 10.5 (Leopard) will also automatically back up the Domain file unless you specifically exclude a folder that contains that file.
If you aren’t a tailor, it’s better to buy off the rack than to try to make your own suit. And if you aren’t a Web designer, it’s a good idea to stick with the built-in page styles that each iWeb template provides.
But the temptation to tinker may beckon. Maybe a certain page style requires a few more graphics to meet your needs, and maybe one of those graphics could use some work. Maybe you’d like to use a different type font, or adjust the line spacing of some text. Maybe a page needs another block of text, or a different background color.
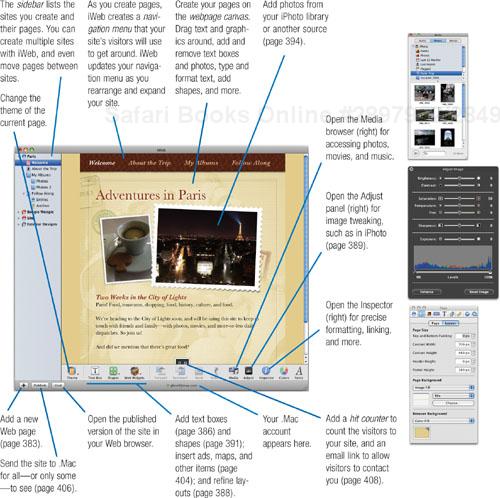
You can perform many design tweaks directly on the webpage canvas. Click and drag blocks of text or graphics to move them around. Resize an item by selecting it and then dragging one of its selection handles.
For other design tasks, you’ll turn to iWeb’s Inspector. This small floating window is actually numerous control panels in one; you display the Inspector you need by clicking a button at the top of the Inspector window. With the Inspector, you can specify paragraph formatting, add and remove page backgrounds, create special graphics effects, and more.
For still other tasks, you’ll use menu commands and the tools at the bottom of the iWeb window. Add additional text boxes to a page. Add shapes, such as lines and boxes. Control how objects overlap, specify colors and fonts, insert Web widgets, modify images, and more.
Here’s a tour of your design studio.
To move an object (for example, a text box or a graphic), click and drag it to the desired location.
Go straight. If you press the Shift key while dragging, iWeb constrains the item’s movement to horizontal, vertical, or a 45-degree angle.
Keyboard control. To nudge an item in one-pixel increments, select the item and then press one of the arrow keys on your keyboard. To nudge in 10-pixel increments, press Shift along with an arrow key.
Have another. To duplicate an item, press the Option key while dragging the item.
To resize an object, select it and drag one of its selection handles. If you resize a text box, its text reflows to fit the new size.

Each page style in an iWeb template has four regions. Each region serves its own purpose, and by changing the dimensions of the regions, you can change the appearance and dimensions of a Web page.
To see each of the four regions, choose Show Layout from the View menu (Shift-![]() -L). iWeb displays faint gray lines between each region.
-L). iWeb displays faint gray lines between each region.
Some page styles use some regions, but not others. For example, the page styles in the Travel template lack header regions. You can add those regions, however, by using the Page Inspector as described at right.

The Inspector is the gateway to many design and formatting tasks in iWeb. To display the Inspector, click the  button near the lower-right corner of the iWeb window, or choose Show Inspector from the View menu (Option-
![]() -I).
-I).

iWeb’s page styles tend to have short pages that your site’s visitors can scroll through with just a click or two. That’s convenient, but maybe you have more content than will fit within a page’s confines. As long as your design is uncluttered (and your content interesting), there’s nothing wrong with having a longer Web page.
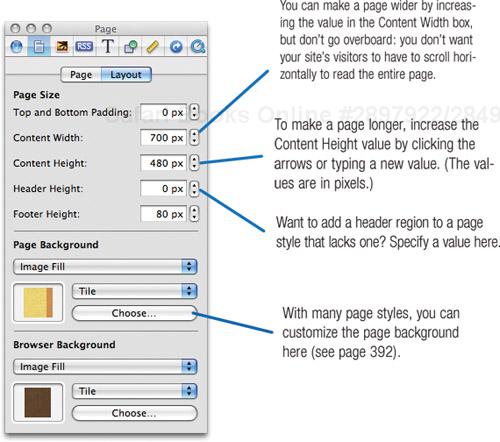
To change a page’s dimensions, use the Page Inspector. Display the Inspector, then click ![]() to display the Page Inspector.
to display the Page Inspector.
The Page Size values determine the dimensions of a page and each of its regions.
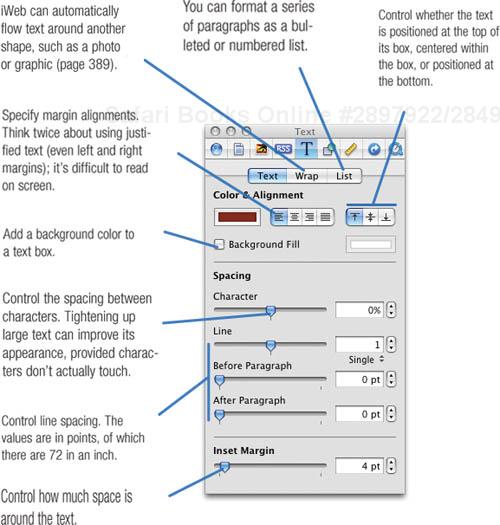
To state the obvious, text plays a large role on Web sites. iWeb gives you plenty of text control. You can use the fonts that Apple has used for page templates, or you can summon the Fonts panel and format as you prefer.
But there’s a peril to this typographic freedom. If you use fonts that aren’t commonly available on Macs and Windows PCs, or if you perform some non-standard formatting (as I describe on the opposite page), iWeb renders that text as a graphic. Instead of getting a full page of fast-loading text, you get a large “picture of text” that makes your Web page load slowly. And because the text won’t really be text, if your site’s visitors try to print the page, they’ll get poor-quality hard copy.
The best way to avoid this problem is to format large passages of text conservatively: stick with the fonts in iWeb’s templates, or with fonts that are common on Macs and Windows PCs, such as Verdana. If you want a headline in a fancy font, create a separate text box for it.
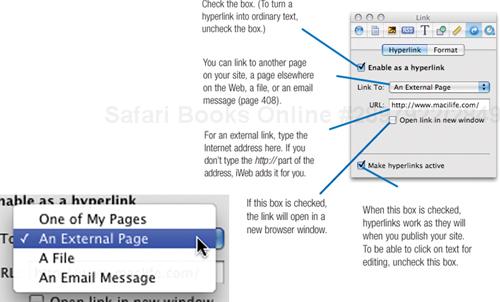
Finally, because Web sites aren’t Web sites without hyperlinks, you can turn a word or series of words into a link that whisks your visitors off to another page—elsewhere on your site or elsewhere in the world.
Mind your placeholder. iWeb’s page styles have placeholder text boxes, but you don’t have to fill every box with text. If you don’t need a particular box, select it and press the Delete key. Note that you can’t delete the text boxes on the blog and podcast page styles.
You can always recognize a text box that iWeb won’t let you delete: when you select it, its selection handles are gray. On objects that you can delete, selection handles are white.

Adding a text box. You can also add a new text box to a page by clicking the Text Box button or choosing Insert > Text Box.
Linking to another page. It’s easy to turn a word or phrase into a hyperlink that connects to another Web page. Select the word or phrase, then turn to the Link Inspector. Click the button, then, in the Inspector, click ![]() .
.
Formatting characters. To change your text’s font, size, and style, use the Fonts panel. To display the panel, click the ![]() button or choose Format > Font > Show Fonts (
button or choose Format > Font > Show Fonts (![]() -T). Select the text you want to format, then use the Fonts panel to do the job. Important: Avoid using the text shadow feature available in the Fonts panel. Adding a text shadow to even one character causes iWeb to render the entire text box as a graphic.
-T). Select the text you want to format, then use the Fonts panel to do the job. Important: Avoid using the text shadow feature available in the Fonts panel. Adding a text shadow to even one character causes iWeb to render the entire text box as a graphic.
Formatting paragraphs. You can also apply paragraph-level formatting: line spacing, alignment, and so on. For these tasks, use the Text Inspector. Click the button, then, in the Inspector, click ![]() .
.
Copying and pasting style. To copy one text box’s formatting to another, select the formatted text and choose Format > Copy Text Style. Then select the text you want to format and choose Format > Paste Text Style.
Lose the text, keep the style. You may prefer to write your text in a word processor, then paste it into iWeb when you’re done. At the same time, though, you may want to retain the existing font formatting of some placeholder text. No problem. After copying your text to the Clipboard, switch back to iWeb, select the text box where you want your new text to reside, then choose Edit > Paste and Match Style. iWeb pastes the new text but gives it the formatting of the old.
Resizing and rotating. You can resize text boxes using the mouse or the Metrics Inspector. You can also use the Metrics Inspector to rotate text, but note that iWeb will turn the text into a graphic.
Opacity and more. To change the opacity of text—for example, to make it appear faint—use the Graphics Inspector (page 388). You can also add a solid or dotted border around a text box.
Formatting links. To format the text links on your page, use the Format portion of the Link inspector. Removing underlining from text links can make your page’s text easier to read. I like to disable underlining except when the mouse is pointing at a link (the rollover state). Just be consistent across your site.
Words are important, but a picture can be worth at least few of them. iWeb makes it easy to add images to your pages. Just drag them from the media browser (or from any location on your hard drive) to the webpage canvas.
Then, you can modify the photos—make them larger or smaller, crop them, and more. You can also use iWeb’s layering controls to change how the photos stack with other objects on the page.
Chances are most of the images you’ll be adding will be photos, but you might also add non-photo graphics: your company’s logo, an elaborate headline created in Photoshop, and so on.
Basic formatting. You can resize an image by dragging its selection handles (see page 384). For more precision, click the Inspector’s ![]() button. This summons the Metrics Inspector, where you can specify exact pixel dimensions. (To squish or squeeze a photo, uncheck the Constrain Proportions box.)
button. This summons the Metrics Inspector, where you can specify exact pixel dimensions. (To squish or squeeze a photo, uncheck the Constrain Proportions box.)
You can also use the Metrics Inspector to rotate images and specify their exact location on the page. And you can use the Graphics Inspector to add shadows, reflections, borders, and more. To make the image faint so you can superimpose text over it, use the Graphic Inspector’s Opacity slider.
Fixed versus inline. When you add a photo to a page, its location is fixed at the point where you drag it. However, you can also insert a photo inside a text box. That’s called an inline graphic, and because it lives among the letters, it moves when you move them. It also moves within the text box as you edit and format.
Use inline graphics for images that need to stay close to specific pieces of text—a photo of a business executive next to her biography; or the photos or illustrations in a report, an educational page, or a lengthy travelogue.
To add a photo as an inline graphic, press the ![]() key while dragging the photo into a text box. As you drag, position the vertical insertion point where you want the graphic to appear—for example, just before the first letter in a paragraph. When you release the mouse button, iWeb inserts the photo, which you can resize as needed. You can also cut (
key while dragging the photo into a text box. As you drag, position the vertical insertion point where you want the graphic to appear—for example, just before the first letter in a paragraph. When you release the mouse button, iWeb inserts the photo, which you can resize as needed. You can also cut (![]() -X) a photo that’s already on a page, click the insertion point in a text box, and paste (
-X) a photo that’s already on a page, click the insertion point in a text box, and paste (![]() -V).
-V).
You can also use the Text Inspector to have iWeb wrap the text around the graphic (see the opposite page).
Replacing a placeholder image. iWeb’s placeholder images remind me of those photos of strangers that are tucked inside new wallets. To replace an iWeb stranger, drag a photo to the placeholder photo.
Make it link. You can turn a graphic into a button that, when clicked, takes your site’s visitors to another Web page. Select the graphic, display the Link Inspector, and specify the link details (see page 386).
Forward and Backward: Layering Controls
As you add items to a page, you may have objects that overlap. For example, in the Travel template’s Welcome page, two photos overlap each other, and the photos themselves overlap a couple of design elements (the passport stamps).
When you add a new object to a page, it appears at the top of the “stack.” You can control how objects overlap by using the Forward and Backward buttons at the bottom of the iWeb window, or the commands in the Arrange menu.
For example, to change the layering order so that a dog photo appears atop a cat photo, select the dog photo and click Forward, or select the cat photo and click Backward.

I guess you can tell: I’m a dog person.
In iWeb’s world, cropping is called masking. To crop out part of an image, you must adjust the size of the image’s mask. (You can also mask an image with a shape; see page 390.)
Select the image.
Click the toolbar’s Mask button (
 ) or choose Format > Mask.
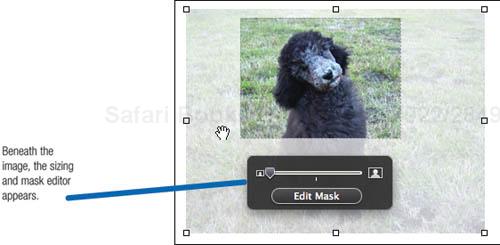
Click Edit Mask.
Drag the mask and its selection handles to indicate the part of the image you want to retain. You can also nudge the mask using the keyboard’s arrow keys and zoom the photo in and out by dragging the slider.
When you’re finished, click outside of the image, press Return, or click Edit Mask again.
iWeb hides the portion that was outside of the mask. To remove the cropping, click the Unmask button in the toolbar or choose Format > Unmask.
iWeb’s Adjust panel works much like its counterpart in iPhoto, with one big exception: your original photo isn’t altered. iWeb simply applies your adjustments to the copy of the photo that you add to the page.
For inline graphics, you can set up a text wrap so that text flows around vertical and horizontal boundaries of the photo.
In some of iWeb’s page styles, photos have a reflection effect, as though they’re suspended over a piece of frosted glass.
You can apply the reflection effect to photos that you add, too—but don’t overdo it.

Select the photo, then display the Graphic Inspector ( ![]() ). Check the Reflection box. To adjust the intensity of the reflection, drag the slider.
). Check the Reflection box. To adjust the intensity of the reflection, drag the slider.
To remove the reflection in an iWeb template that uses it, select the graphic and uncheck the Reflection box.

In some iWeb page styles, photos are slightly askew to add visual interest. You can rotate photos you add: press the ![]() key while dragging a photo’s corner handle.
key while dragging a photo’s corner handle.

For more precision, type a value in the Metrics inspector. You can also twiddle the little Rotate dial in the Metrics inspector.
Behind the scenes, iWeb creates a new version of the image, with transparency enabled to let the background show through. iWeb also creates a separate image for a reflection if you’ve added one.
With the Shapes pop-up menu, you can endow a page with anything from straight lines to comic-book speech bubbles.
You can turn a shape into a hyperlink, and you can resize and modify shapes using the Graphic Inspector, the Color window, and the techniques discussed throughout this chapter.
Some shapes have settings panels for specifying details, such as the number of points in a star.
Inline shape. To insert a shape as an inline graphic, first click within a text box at the spot where you want the shape to live.
Text in a shape. You can type text within a shape: double-click in the shape, and start typing. If you type more text than will fit in the shape, a little plus sign (+) warning appears at the bottom of the shape.
Masking a photo with a shape. When you add a photo to an iWeb page, the photo has a mask—a rectangle. You can use other shapes to mask a photo, however, and doing so gives you more creative options for breaking away from all the rectangles and straight lines that you see on Web layouts.
To mask a photo with a shape, select the photo, then choose Format > Mask With Shape > the shape you want.

Adjust the mask and the photo’s position within it using the techniques described on the previous pages.
If you’ve already added a photo and a shape to a page, you can marry the two: select both (Shift-click on each one), then choose Format > Mask with Selected Shape (![]() -Shift-M). Finally, drag the photo to the shape.
-Shift-M). Finally, drag the photo to the shape.
Don’t want the mask shape after all? Select the masked photo and click the Unmask button (or choose Format > Unmask or press ![]() -Shift-M).
-Shift-M).
With Instant Alpha, you can selectively remove the background of an image. Instant Alpha (which is also part of Apple’s Pages program) replaces the often tedious process of painting out the background of an image.
You might use Instant Alpha when you want to seamlessly blend an image into the background or have part of an image appear over or behind some text. You can also combine two photos to remove a background and place the subject of the photo into another scene.
Instant Alpha is easy to use: just drag across the color you want to remove. As you drag, iWeb masks out similar colors. The phrase “similar” is key: you’ll get the best results with large areas of solid color. It’s easier to remove a blue-sky background than a crowded city street background.
Drag a photo onto a page or select a photo that’s already on the page.
Choose Format > Instant Alpha.
A crosshair pointer appears when you point to the photo.
Slowly drag across the area you want to remove.
As you drag, the selection grows to encompass areas that use the same color.

To remove a differently colored area, repeat step 3. Each time you click, you get a new selection, and can select more color.
When you’re finished, press Return.

The page background now shows through the areas you’ve masked.

Removing Instant Alpha. To remove Instant Alpha, select the photo to which you’ve applied it, and choose Format > Remove Instant Alpha.
Creating a new background for a photo. To create a different background for a photo, use Instant Alpha to remove the background of one shot, then position that shot over another one, using the Forward and Backward buttons as needed to have the photos stack properly.

Original photo

With Instant Alpha

With a new background
Many of iWeb’s page templates have background images or patterns. By using the Page Inspector, you can customize the backgrounds of Web pages in several ways. Open the page that has the background you want to customize, then display the Layout portion of the Page Inspector. Choose one of the following options from the pop-up menu in the Page Background area.
Color Fill. Give the page a solid background color. After choosing Color Fill, click the color well (located below the pop-up menu), then choose a color.
Gradient Fill. Add a gradient (a gradual shift from one color to another). After choosing this option, use the controls below the pop-up menu to fine-tune the gradient.
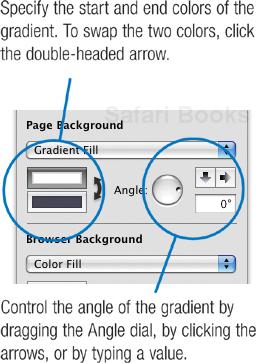
Image Fill. Add a photo or other graphic to the background. Use the controls below the pop-up menu to fine-tune the fill (see “Using Background Images,” at right).
Tinted Image Fill. Similar to Image Fill, this option lets you add a color tint to the background image. To make the color more or less transparent, use the Opacity slider in the Colors window.
At the bottom of the Page Inspector are options for customizing the background color of the browser window. This is the area outside the dimensions of your Web page: if you imagine your Web page as a sheet of paper, the browser background color is the color of the desk on which the paper rests.
Visitors to your site who have relatively small displays may not even see the browser background color, but those lucky folks with 30-inch Apple Cinema Displays are quite likely to.
Normally, the browser background color is white, but you can change the color. Choose Color Fill from the pop-up menu, click the color well, and pick a color. Tip: To pick up a color that is present elsewhere on your Web page, click the magnifying glass in the Colors window, and then click on the color you want to match. This trick works in any Mac program that uses the Colors window.
Web browsers have a cool capability: they can repeat, or tile, a small image so that it completely fills the background of the Web page.
Web designers take advantage of tiles to create page backgrounds that have interesting textures or patterns. Because a Web browser can tile a small image, the Web designer doesn’t have to worry about creating a massive background graphic that’s big enough to accommodate any size of browser window.
You can download an astronomical quantity of free page-background textures from a variety of Web sites. Do a Google search for web page backgrounds, and prepare to spend a lot of time exploring.
Once you’ve found a pattern you like, drag it to your desktop. In the Page Inspector, choose Image Fill from either the Page Background or Browser Background pop-up menu, depending on which background you want to change. Finally, drag the image into the Page Background or Browser Background image well.
You’ll find a lot of garish, busy background patterns out there. Avoid them—they’ll make your page look amateurish and will impair the legibility of your text.
Adding a background image or texture to a Web page can be a nice way to dress it up—provided that the image or texture doesn’t impair the legibility of the page’s text.
To add a background image to a page, choose Image Fill from the Page Background or Browser Background pop-up menu in the Page Inspector. Then add the image and specify how you want iWeb to display it.
Here, I’m dragging a photo from the media browser, but you can also drag an image from any location on your hard drive. You can also click the Choose button and locate the image in the subsequent dialog box.
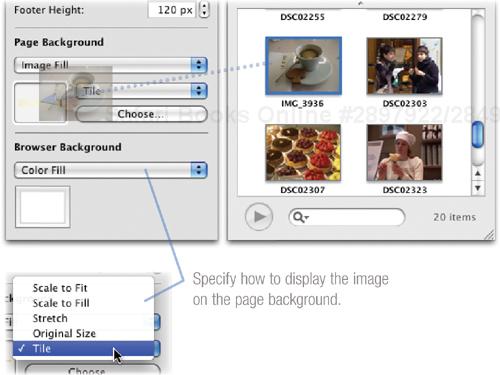
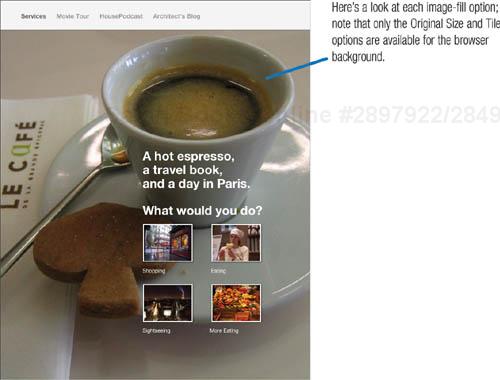
Scale to Fill. iWeb enlarges the image to fill the page dimensions; the outer portions of the image are cropped off. This is the most useful option when you want an image to fill a page.
For this example, I added a solid white shape to the navigation bar so that its text didn’t appear superimposed over the image.
Scale to Fit. iWeb displays the entire image, with no cropping. With horizontally oriented images, this option is likely to leave large borders above and below the image.
Stretch. iWeb fills the page with the image, altering the image’s proportions to avoid any cropping. The image is likely to have a squished or stretched appearance.
Original Size. iWeb displays the image at its original size. For large images, such as digital camera photos, you’re likely to see only a small part of the image on the page.
Tile. iWeb repeats the image across the background. Use this option to create background textures, as described on the opposite page.
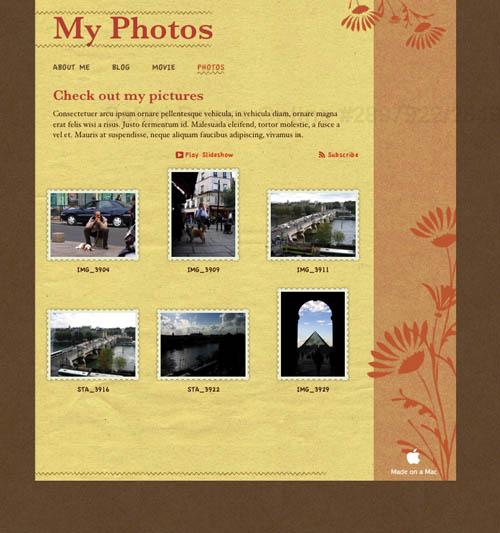
With iWeb photos pages, you can create online photo albums with a few mouse clicks. The album pages contain rows of small thumbnail images that your visitors can click to see larger versions. They can also view a slide show. You can even allow visitors to add comments.
Thanks to the way the iLife programs work together, you can start your foray into photos pages in either iPhoto or iWeb. In iPhoto, stash some photos in an album and then sequence them in the order you want them to appear. Then use the Share menu to send the photos to iWeb.
Prefer to start in iWeb? Create a new page and choose a Photos page style. Then drag photos into the placeholder area, or better yet, drag an entire event or album from the media browser. Have lots of photos pages? Create a My Albums page to act as a table of contents for all of them (see page 398).
iWeb places a caption beneath each thumbnail image. And here’s another good reason to use iPhoto to assign titles to your photos (page 140): iWeb uses a photo’s title as its caption.
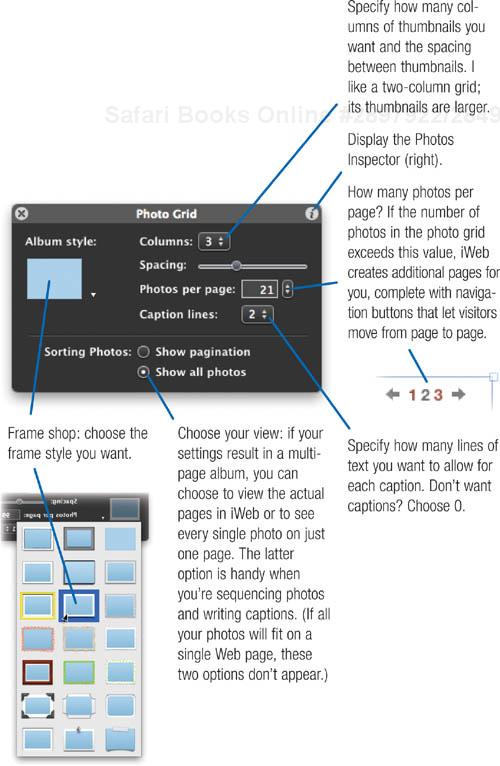
A photos page in iWeb can contain up to 500 photos. You can customize numerous aspects of a photos page: how many columns of thumbnail images to display; how much room to leave for text captions; the kind of frame you want to appear around each thumbnail; and more. And you can apply all the other design techniques described earlier in this chapter: add text, change backgrounds, and tweak formatting.
Mix and match. You can mix and match approaches: create a photos page using iPhoto, then switch to iWeb to add additional photos to the existing page. You can’t take the opposite route, however—when you send photos from iPhoto to iWeb, the photos are always added to a new photos page.
Rearrange and refine. To change the order of the photos in a photos page, simply drag the photos. To remove a photo, select it and press the Delete key. To change a photo’s caption, click it and start typing.
Photos page or Web gallery album? iPhoto creates lovely Web gallery albums (page 188), so why bother with photos pages? Control. Photos pages offer far more formatting options, and they allow visitors to comment on your photos.
Want to share some photos quickly and enable other iPhoto users to subscribe to them? Create a Web gallery album. Want full control over your design, along with goodies like comments, fancy slide show options, and RSS support? Create a photos page.
And it isn’t an either/or proposition. You can publish the same iPhoto album or event as both a Web gallery album and a photos page. And as the following pages describe, you can add Web gallery albums that you’ve already created to your iWeb site.
Movies, too. Don’t let the name fool you: a photos page can also hold movies. Just drag movies from the media browser or any location on your hard drive into the thumbnail grid.
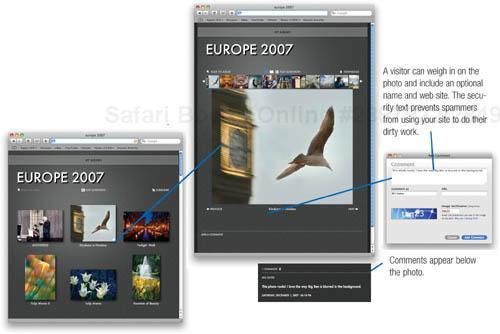
When visitors click a thumbnail on a photos page, they see a detail page. This page contains a large version of the photo, as well as controls for downloading the photo and displaying other photos in the album. If you’ve enabled photo comments (see the following page), a link appears that allows visitors to add their two cents’ worth.
iWeb’s photos pages look great right off the rack, but if you’d prefer to tailor your photos pages, here’s your sewing machine.
Customizing the thumbnail grid. To customize the grid of thumbnail photos on a photos page, select any thumbnail. The Photo Grid window appears.
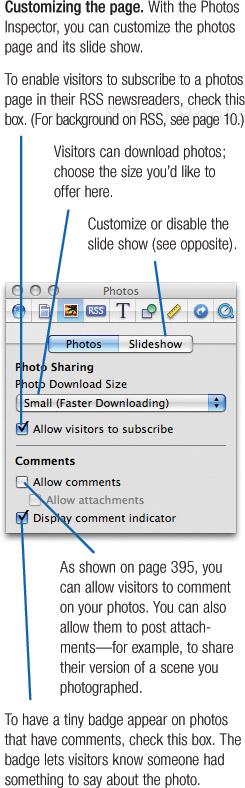
Customizing the slide show. To customize (or disable) the slide show, click the Slideshow button in the Photos Inspector.

Customizing captions. To customize the appearance of the captions beneath photo thumbnails, use the Text Inspector and the Fonts panel. For example, you can have the captions be left-aligned beneath each thumbnail instead of centered, and you can change the font.
To be sure that iWeb applies your formatting changes to every caption, select the thumbnail grid but not any thumbnails within it. Click near one of the edges of the grid. If you end up selecting a thumbnail, too, ![]() -click it to deselect.
-click it to deselect.
Customizing photo borders. By selecting the photo grid and then displaying the Graphic Inspector, you can add a drop shadow behind photo thumbnails, customize the color of the border around the thumbnails, and more.
Managing Comments and Attachments
If visitors comment on your photos, how do you know? Choose File > Check for New Comments. If someone commented on a photo, iWeb adds the comment to the photo’s detail page.
Sometimes, you might want to delete a comment. Maybe someone posted a large attachment, and you don’t want it taking up space on your iDisk. Or maybe someone posted something inappropriate.
You can delete a comment in two ways.
In iWeb. Use the sidebar to go to the page containing the comment. Scroll down until you see the comment, then click the X that appears in its upper-right corner. If you’re connected to the Internet, iWeb deletes the comment immediately; you don’t have to republish the site.

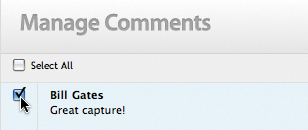
A page appears asking for your .Mac name and password. Supply them, and the Manage Comments page appears, where you can select individual comments for deletion, or delete all comments on that photo.
If you like to publish photos on your iWeb site, you’ll quickly create a lot of photos pages. If you’re into iMovie, you’ll create a lot of movie pages, too. You could let iWeb create a link in your site’s navigation bar for every single media page that you create, but your navigation bar will get big and unwieldy.
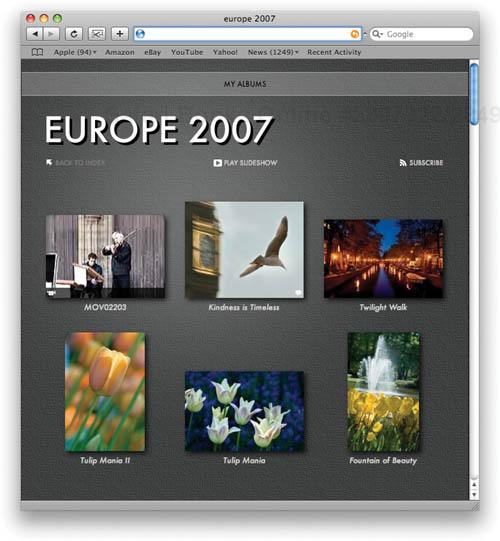
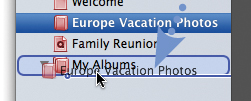
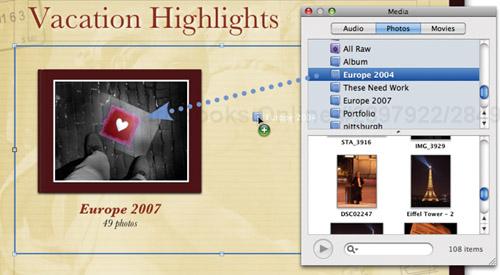
A book has an index that lets people find and jump to the page they need. iWeb provides My Albums pages that perform the same role. A My Albums page is an index page, a jumping-off point that consolidates access to your media pages.
A My Albums page can have up to 99 albums on it. You can create as many My Albums pages as you like—one for your vacation photos, another for your vintage family photos, and another for movies. Each albums page provides elegant animation effects, including a skimming feature that lets visitors preview the photos in a photos page. You can let visitors subscribe to the page in their RSS newsreaders, and you can customize the look of the page.
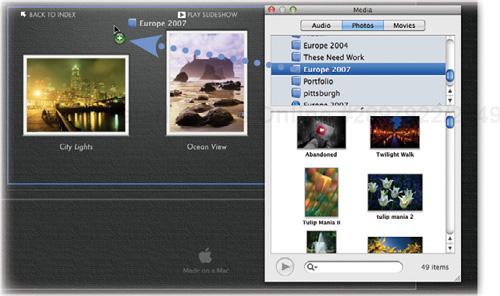
You can create an albums page after you’ve published a lot of media pages, or before. In fact, if you anticipate creating a lot of media pages, you can save yourself some time by creating an albums page first. Then, you can create new photos pages or movie pages by simply dragging photos or movies to the My Albums page.
Choose File > New Page or click the
 button.
Choose a template, then select its My Albums page style.
Click Choose or press Return.
iWeb names the page My Albums, but you can rename it in the sidebar.
You can build your albums page in any of several ways.
Adding existing media pages. If you’ve already created some photos or movies pages, you can add them to the albums page by dragging them within the sidebar.
You can also click the My Albums page, and then drag photos or movies pages from the sidebar into the albums page.
Creating new media pages. To create a new photos page and add it to the My Albums page all in one step, display the My Albums page, then drag photos into it.
iWeb creates a photos page and adds it to the My Albums page. To customize the photos page, see page 396.
You can also create a blank photos page: select the albums page in the sidebar, then create a new photos page.
To create a new movies page, the drill is similar: drag a movie from the media browser or any location on your hard drive to the My Albums page.
You can customize the look of your My Albums page using many of the same techniques described on previous pages.
Tweak the grid. Each photos page and movies page on a My Albums page has its own thumbnail. To customize the grid of thumbnails, click one of the thumbnails. The Media Index window appears.
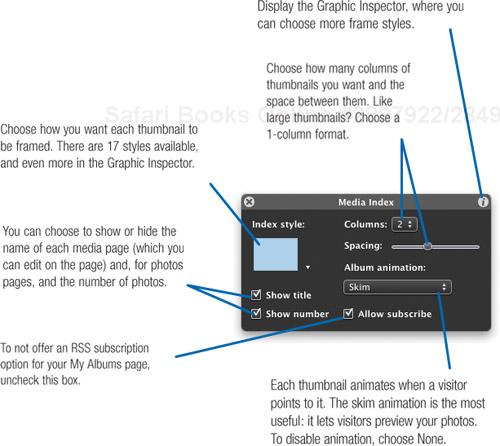
Offering a subscription option. You can let visitors subscribe to your My Albums page in their RSS newsreaders or in Safari. Indeed, if you frequently add photos pages to your site (or change existing ones), it makes more sense for folks to subscribe to your My Albums page than to individual photos pages.
iWeb adds the Subscribe link automatically. If you’d rather not offer a subscription option, uncheck the box in the Media Index window or in the Photos Inspector’s Photos tab.
Customizing the album frame. If you don’t like the faux album frame styles, you can turn the frame off. In the Media Index window, choose the upper-left style from the Index Style pop-up menu.
To have a line as a border, select the album region, open the Graphic Inspector, and choose Line from the Stroke pop-up menu. You can choose a color, style, and thickness. The Graphic Inspector also offers a wider set of frame choices.
Reorganizing albums. You might want to change the order of the album thumbnails in the My Albums page. Easy: Just drag the thumbnails. You can also change their order by dragging your media pages up and down in the iWeb sidebar.
Formatting flexibility. As with any iWeb page, you can change the font formatting of a My Albums page. The techniques are identical to those described on page 397.
Adding a Web Gallery album. If you’ve published some Web gallery albums using iPhoto (page 188), you can add them to your My Albums page, too. Display your My Albums page, then choose Insert > .Mac Web Gallery > the album you want.
The term blog sounds like something that would make you reach for the stain remover, but it’s actually a corrupt contraction of the words Web log.
My Webster’s defines blog thusly: “A personal Web site that provides updated headlines and news articles of other sites that are of interest to the user; also may include journal entries, commentaries and recommendations compiled by the user.”
I’ll build on that definition to add that a blog’s contents, called postings or entries, are generally presented in reverse chronological order: the most recent entry appears first. I’ll also add that blogs almost always use RSS to let readers subscribe and have new postings delivered to their RSS newsreaders.
And I’ll amend the definition to remove the word personal. It’s true that blogs are often personal journals. But businesses of all kinds have embraced blogging, too, relying on blogs to conduct conversations with their customers and engage in a dialog that’s often more honest than the public relations people would like (see Publish & Prosper: Blogging for Your Business, by DL Byron and Steve Broback, New Riders, 2006).
iWeb makes it easy to create a basic blog. Apple’s .Mac service even allows visitors to leave comments and search your blog.
The process of publishing podcasts is nearly identical to that of publishing blogs; simply choose the Podcast page style instead of Blog. For details on podcast production, see the previous chapter.
Choose File > New Page or click the
button.Choose a template, click its Blog page style, then click Choose or press Return.
The Entries page appears.

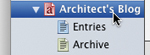
In the course of managing a blog, iWeb creates and manages three types of pages.
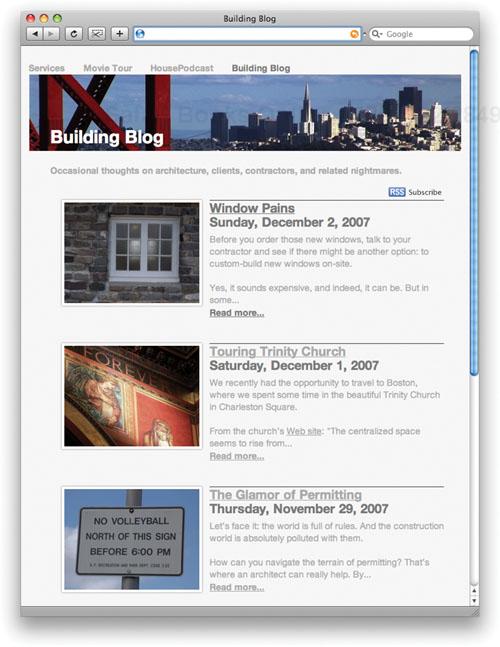
The blog page is the main lobby for your blog. Visitors see excerpts of up to 50 of your most recent entries, and each excerpt has a link that lets them read the full entry. (You can customize the number and size of excerpts as described on the following pages.)
In the sidebar, the main blog page has the name Blog, although you can rename it as you can any iWeb page.

An entry page contains one blog posting: your rant of the day (or the hour). Each entry page also contains links, labeled Previous and Next, that allow your site’s visitors to step through each of your blog entries. You can delete these links if you’d prefer that your visitors use your blog and archive pages to navigate.

The archive page is the dusty newspaper morgue where old back issues live; that is, it’s where visitors can access all of your blog posts, not just recent ones.
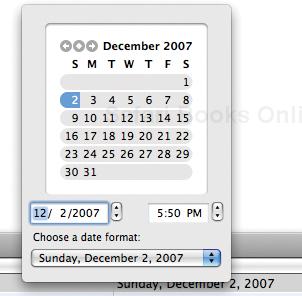
Today’s the day. It’s common for each entry in a blog to be stamped with the day of its posting. When you create a new blog entry, iWeb gives it the current date.
However, you can bend time to your will. To change the date of a blog entry, double-click the entry’s date—either in the list of blog entries or on a blog entry page itself—then choose a new date (and date format, if you like).
Room for everyone. You can have as many blogs and podcasts within a Web site as you like. Have several family members (or colleagues) with something to say? Each one can have his or her own blog.
As with all of the pages that iWeb creates, you can use blog pages as they are or customize them to suit your tastes and needs.
Some of your customizing options involve the structure of the blog: how many excerpts appear on the main page, for example, whether an RSS subscription button is available, and whether you want to allow visitors to comment on your blog entries and to search your blog.
Other customizing options are design-oriented. With the Blog Summary window, you can customize many aspects of your blog’s layout.
Here’s a look at your blog customizing options.
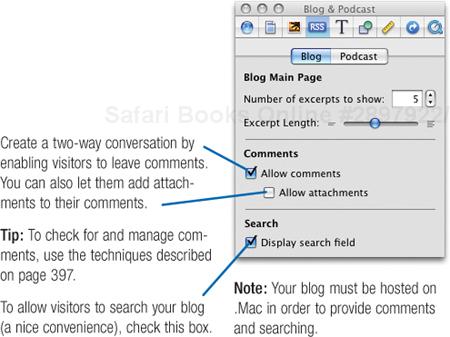
You can use the Blog & Podcast Inspector to specify how many excerpts appear on your blog’s main page as well as the length of each excerpt.
In the sidebar, select the blog’s main page, then display the Inspector and click its ![]() button.
button.
You can show as few as one excerpt or as many as 50. To avoid creating a huge, slow-loading page, think twice about showing more than five or 10 excerpts.
Control how much of each entry iWeb excerpts. If you drag the slider all the way to the left, your visitors will see only the entry title and the Read More link.
Normally, iWeb adds a Subscribe button to your blog’s main page. Visitors to your site can use this button to subscribe to the RSS feed that iWeb creates for your blog. If you don’t want to offer an RSS subscription option, delete the Subscribe button.
Excerpts and RSS. The excerpts that iWeb creates for each entry are also what subscribers see when they update your subscription. If you want to deliver the entire blog post to your subscribers—a nicety that many newsreader users appreciate—drag the Excerpt Length slider all the way to the right.
You can customize the layout of your blog summary page (the main page that visitors to your blog see).
To begin, select your blog’s name in the iWeb sidebar. The Blog Summary window appears.

You can also customize the formatting of your blog entry pages. Don’t like the font or size that an iWeb template uses? Change it. Want shorter lines of text so you can place photos in the margins? Resize the text box that holds the entry’s main text.
To change the formatting of an item on an entry page, display that entry page, select the item, then use the Fonts panel as described on page 387. You can also add graphics and other embellishments using the techniques described earlier in this chapter.
If you change formatting in one entry page, iWeb does not change other entries in your blog. So what if you want to use your new design for all future blog entries? It’s easy. When you’re ready to create a new blog entry, select the entry with the formatting you modified, and choose Edit > Duplicate. iWeb makes a duplicate of the entry. The duplicate is now your newest blog post: just edit its date (page 401) and update its content.
Each time you want a new blog post, duplicate one of your specially formatted entry pages.
The Podcast Angle
As I mentioned on page 400, publishing a podcast with iWeb is similar to creating a blog. In the template chooser, pick the Podcast page style. Then, drag the podcast that you exported from GarageBand into the entry page.

box is checked, then choose File > Submit Podcast to iTunes. In the dialog box that appears, specify copyright and category information, then click Publish and Submit.
With Web widgets, you can endow your site’s pages with special features: Google maps, Google ads, YouTube videos, .Mac Web gallery albums, and more.
With the Google Maps widget, you can insert a map of any location you choose. Provide directions to your business, show the address of the park where you took your latest photos, or share a satellite view of your favorite tourist spot. You can customize a map’s appearance, scale, and size.
With the Google AdSense widget, you can add advertisements to your site. Google uses its industrial-strength search technology to match ads that it thinks are appropriate to the content of a given page—and when visitors click an ad on your site, you make a tiny sum.
Finally, with the HTML Snippet widget, you can add HTML code to your pages. (HTML, you’ll recall, is the markup language used to create Web pages.) You’ll use this widget to embed YouTube videos in your iWeb sites.
The Web is filled with HTML widgets that you can add. With just some copying and pasting, you can add news tickers, games, RSS readers, and much more to your iWeb pages. Start your exploration at SpringWidgets (www.springwidgets.com). And check out the iTunes widgets I describe on page 408.
And if you’re an HTML jockey, you can write your own code to add effects or features that are difficult or impossible to create with iWeb’s built-in features.


To resize the map, drag its selection handles. To hide the address bubble and zoom controls, uncheck their boxes in the Google Map window.
To fine-tune the area shown by the map, drag within it. To switch between map, satellite, and hybrid views, click their buttons in the map.
Find Web widgets galore. www.macilife.com/iweb

Google’s AdSense program lets you display ads on your site. You can choose from three categories—text ads, text and image ads, and text links—and each category provides several sizes of ads.
From the Web Widgets button, choose Google AdSense Ad. (Or choose Insert > Google AdSense Ad.)
If you already have an account with Google, click I Already Have an Account and follow the steps provided. No account yet? Enter your preferred email address, then click Submit.
The Google AdSense Ad window appears.

Choose an ad format and color.

To add a YouTube video to a page, use the HTML Snippet widget.
Go to the YouTube page containing the video you want to embed.
On the YouTube page, select all of the HTML code in the Embed box, then choose Edit > Copy.

(To customize how the video will appear in your page, click the Customize link first.)
From the Web Widgets pop-up menu, choose HTML Snippet.

Click in the large box at the top of the HTML Snippet window to create a blinking insertion point, then choose Edit > Paste.
Click the Apply button.
The YouTube video loads and appears on your page.
As described on previous pages, you can insert a .Mac Web Gallery album on any page. Choose .Mac Web Gallery from the Web Widgets button (or the Insert menu), then choose a gallery you’ve published.
An animated thumbnail of the Web gallery appears. You can change the position of this thumbnail, but not its size.
When your site is ready for its debut, you’ll publish it on Apple’s .Mac service. Click iWeb’s Publish button, and iWeb translates your designs into HTML (Hypertext Markup Language, the coding language used to describe the appearance of Web pages). iWeb also prepares your graphics, and then transfers everything to Apple’s servers, which dish it out the world.
Similarly, when you change your site—create a new blog entry, fix a typo, or add an entire set of pages—you must publish it in order for your changes to become available. When you publish a site that you’ve updated, iWeb transfers only those pages that changed since the last time you published the site.
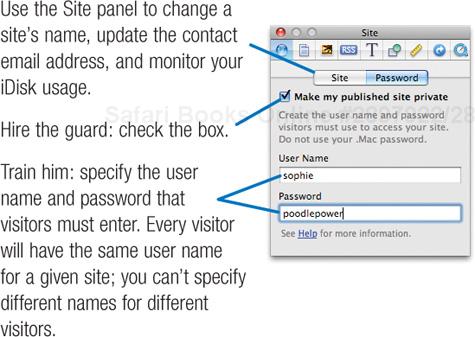
Normally, the sites you publish are available for anyone to see. But you can also post a guard at the door: using the Site Inspector, you can specify a user name and password that visitors must specify before they can see your site.
iWeb meshes best with .Mac, but you can also publish your sites to a folder on your hard drive. You might take this path if you plan to transfer your site to a different Internet provider or burn your site to a CD or DVD.
Important
As mentioned on previous pages, in order to have comments, blog and podcast searching, password protection, and hit counters, your site must be hosted on Apple’s .Mac service.
Before publishing your work, be sure that you’ve signed up for a .Mac account and entered your user name and password in the .Mac system preference.
Then, choose File > Publish to .Mac or click the ![]() button.
button.
A dialog box lectures you to verify that you have the rights to publish your material. To avoid this legal nag in the future, check the Don’t show this again box, then click Continue.
iWeb publishes the site while you get onto other tasks, and then alerts you when it’s done. You can then choose to visit the site or send an announcement email containing the site’s address. Tip: To visit a specific page, select it in the iWeb sidebar, then press the Option key while clicking the Visit button.
In the sidebar, published pages have blue icons, while blog archive pages appear green. Modified or new pages have red icons.
To protect a site with a password, select the site in the sidebar, open the Inspector, click the ![]() button, then click the Password button.
button, then click the Password button.
Get more tips for iWeb publishing. www.macilife.com/iweb
iWeb stores your sites on your iDisk, the virtual storage locker that is included with your .Mac subscription. To view your iDisk, switch to the Finder, then choose Go > iDisk > My iDisk.
Within your iDisk is a folder named Web, and within that folder is folder named Sites. Your iWeb-created sites are in the Sites folder.
When you publish to .Mac, iWeb transfers only those pages that you added or changed since you last published. However, you can force iWeb to transfer everything: press the Option key, then choose File > Publish All to .Mac. (You can’t choose to publish just certain sites or pages.)
If you notice that links between your iWeb sites aren’t working, try this technique to fix the problem.
To have iWeb publish your site on your hard drive, choose File > Publish to a Folder. A dialog box appears that lets you specify a location for the published site. Normally, when you publish to a folder, iWeb saves the site in the Sites folder within your home folder.
Note
If you’ll be uploading the site to a Web server and your site contains RSS links, be sure to enter your site’s URL in the Publish to a Folder dialog box. iWeb uses this URL to build the RSS feed to your site.
Each time you publish a site to a folder, iWeb generates every page in the site, whether the page changed or not. That can make it tricky to figure out which pages you need to upload to a Web server. Some iWeb users have developed cumbersome but serviceable work-arounds for this; for links to them, see my Web site.
You’ve changed a page and published it, but the page looks the same when you visit your site. That’s probably because your Web browser has retained the previous version of the page in its cache. A browser keeps recently loaded graphics in its cache to avoid having to load them again should you revisit a page.
If you’re using the Safari browser, you can empty the browser cache by choosing Safari > Empty Cache. If you’d rather not empty the entire cache, you can force Safari to reload the entire page by pressing the Shift key while clicking Safari’s ![]() button.
button.
Normally, when you publish your site on .Mac, your Web site’s address begins with web.mac.com. However, if you’ve registered your own domain name (for example, www.jimheid.com), you can set up .Mac to use your domain name. It adds a professional touch to your Web site.
To set up a personal domain name in iWeb, choose File > Set Up Personal Domain. Your browser will take you to .Mac. Log in to your account, and click the Personal Domain button, and follow the instructions.
The process involves modifying your domain information with the company where you registered your domain—for example, Domain Direct. It’s a straightforward process that usually involves visiting the company’s site, logging in, and adjusting a setting called CNAME. If you get stuck, contact your domain registrar’s technical support department.
When you set up a personal domain, your site is still being published on .Mac. You simply set up an alias that lets your domain name point to your pages on .Mac.
You can add several kinds of goodies to your pages.
It’s a hit. A hit counter is a Web odometer that displays how many times a particular page has been viewed. To add a counter to a page, choose Insert > Button > Hit Counter. iWeb inserts the hit counter.
You can position the hit counter wherever you like, but be sure it fits entirely within the webpage canvas.
Notes
A hit counter works only if you serve your site through Apple’s .Mac service. To reset the hit counter to zero, delete the hit counter, publish the page, then add a new hit counter and publish the page once more.
Keep in touch. Want to provide a convenient way for your site’s visitors to email you? Add an Email Me button: choose Insert > Button > Email Me. When a visitor clicks that button, his or her email program will open a new message addressed to you.
To specify your email address, open the site inspector, click the Site button, and complete the Contact Email field.
If you want incoming email messages to go to a different address, create a text or graphic hyperlink and, in the Link Inspector, choose An Email Message from the Link To pop-up menu. Specify the address and subject for the email in the boxes that appear.
Date and time. It’s common for a Web page to contain a date listing when the page was last modified. When you want to date-stamp your pages, don’t look at your calendar—let iWeb do the work. Click within a text box to create a blinking insertion point, then choose Insert > Date & Time. A dialog box appears giving you a choice of date and time formats. Select the one you want, then click Insert or press Return. If you’d like the date and time to be updated whenever you launch iWeb, check the Automatically Update box.
If you’ve worked on a page and would like to update its date or time stamp, Control-click on the date and time and choose Update Date & Time Now from the shortcut menu. You can also double-click the date and time to change its display format and the date and time shown.
Playlists. Want to share a list of your favorite tunes with your site’s visitors? Drag an iTunes playlist from the media browser into the webpage canvas. iWeb creates a set of links for each song.

When visitors click song links (or their link arrows), they’ll be taken to those songs on the iTunes Store, where they can buy, buy, buy.
By the way, you can also link to any item on the iTunes Store by simply dragging the item from iTunes into the webpage canvas.
Your iTunes widgets. Make that My iTunes widgets. Whatever. You can create flashy widgets that list your most recent iTunes purchases, favorite artists, and reviews.
In iTunes, choose Store > View My Account, and sign in. Click the Manage My iTunes button, then choose the widgets you want. iTunes supplies their HTML code, which you can paste into iWeb (page 405).
Get more iWeb tips and resources. www.macilife.com/iweb
Want to go beyond the templates that are built into iWeb? Go visit Suzanne Boben. A graphic designer who’s apparently also a glutton for punishment, she hacked her way through iWeb’s templates to figure out how they work. Then she wrote documentation describing how to modify them, and came up with her own line of templates—some of which are free.
Check out her amazing contributions to the iWeb world at www.11mystics.com.
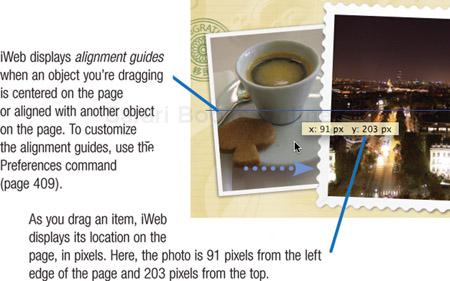
With the Preferences command, you can customize the alignment guides that iWeb displays as you drag items on the webpage canvas. You can change the color of the guides and you can have iWeb display guides at the edges of an object as well as at its center.

Activating this second option can make it easier to align items. (Apple’s iWork ’08 programs provide a similar convenience.)
Speaking of iWork, it’s worth noting that you can paste elements created in Keynote or Pages into iWeb. Need a chart or a price list table on your Web page? Create it in Pages or Keynote, then select it, copy it, and paste it into iWeb.
Each iWeb template provides a page style designed specifically for holding a QuickTime movie. But you aren’t restricted to just that page style. You can add a QuickTime movie to any iWeb page: simply drag it from the media browser or any location on your hard drive. If the movie is larger than 10MB, iWeb warns you that it may take a lifetime to download on slower connections.
As with graphics, movies can stand alone on a page or they can be in line with text. You might format a movie as an inline object if you want to have text wrap around it. For details on working with inline objects, see page 388.
If you drag a movie to the image placeholder in a blog entry, the movie becomes a video podcast.
Controlling movie display. To customize how a movie plays, select the movie and open the QuickTime Inspector. You can control the start and stop point and pick the poster frame that appears before the movie plays.
To have the movie play when the page loads, check the Autoplay box. To have it play over and over, check Loop. Don’t want to give your visitors any playback controls? Uncheck the Movie Controller box. But think twice about this measure—friendly Web sites give visitors control.
Audio only. You can also add an audio file to a Web page by dragging it from the media browser or any location on your hard drive.
When iWeb creates a blog entry page, it gives the page a fairly long URL. If you try to email that URL to a friend so he or she can read a specific entry, the link may not work—email programs are notorious for breaking links that take up more than one line.
The solution? TinyURL. Go to www.tinyurl.com, where you can paste a lengthy link and have it turned into a small one that you can email.