
Millions of photographs lead lives of loneliness, trapped in unorganized boxes where they’re never seen. Their digital brethren often share the same fate, exiled to cluttered folders on a hard drive and rarely opened.
With iPhoto, you can free your photos—and organize, print, and share them, too. iPhoto simplifies the entire process. You begin by importing images from a digital camera, your hard drive, a CD from a photofinisher, or another source. Then you can create albums, organizing the images in whatever order you want. You can even have iPhoto create the albums for you.
Along the way, you might also use iPhoto’s editing features to make your photos look better. And you might use iPhoto’s organization and searching features to help you file and locate images.
When you’ve finished organizing and editing photos, share them. Order prints or make your own. Design gorgeous photo books, arranging photos on each page and adding captions. Design calendars and greeting cards. Create slide shows, complete with music from iTunes, and then watch them on the Mac’s screen, burn them to DVDs, or transfer them to an iPod or Apple TV.
Prefer to share over the Internet? Email photos to friends and family. Have an Apple .Mac account? Create Web photo galleries with iPhoto (page 188), or Web albums with iWeb (page 394).
Welcome to the Photo Liberation Society.


Like the digital audio world and other specialized fields, digital imaging has its own jargon and technical concepts to understand. You can accomplish a lot in iPhoto without having to know these things, but a solid foundation in imaging essentials will help you get more out of iPhoto, your digital camera, and other imaging hardware.
There are two key points to take away from this little lesson. First, although iPhoto works beautifully with digital cameras, it can also accept images that you’ve scanned or received from a photofinisher.
Second, the concept of resolution will arise again and again in your digital imaging endeavors. You’ll want big, high-resolution images for good-quality prints, and small, low-resolution images for convenient emailing to friends and family. As described on page 187, you can use iPhoto to create low-resolution versions of your images.
iPhoto can work with digital images from a variety of sources.
Digital cameras are more plentiful and capable than ever. One key factor that differentiates cameras is resolution: how many pixels of information they store in each image. Even inexpensive digital cameras now provide resolutions of between 6 and 10 megapixels—more than enough to make large prints.
Most digital cameras connect to the Mac’s USB port. Images are usually stored on removable-media cards; you can also transfer images into iPhoto by connecting a media reader to the Mac and inserting the memory card into the reader (page 134).
With a scanner, you can create digital images from photographs and other hard-copy originals.
Scanners also connect via USB, although some high-end models connect via FireWire. Film scanners are a bit pricier, but can scan negatives and slides and deliver great image quality (page 226). Save your scanned images in JPEG format, and then add them to iPhoto by dragging their icons into the iPhoto window (page 135).
For tips on getting high-quality scans, visit www.scantips.com.
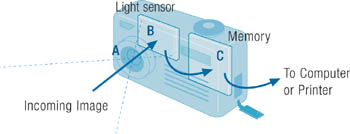
In a digital camera, the image is focused by the lens (A) onto a sensor (B), where tiny, light-sensitive diodes called photosites convert photons into electrons. Those electrical values are converted into digital data and stored by a memory card or other medium (C), from which they can be transferred to a computer or printer.
So you’re the person who’s still shooting film? Good news: for an extra charge, most photofinishers will burn your images on a compact disc in Kodak Picture CD format. You get not only prints and negatives, but also a CD that you can use with the Mac.
To learn more about Picture CD, google the phrase picture cd.
Many photofinishers also provide extra-cost Internet delivery options. After processing and scanning your film, they send you an email containing a Web address where you can view and download images. After downloading images, you can drag their icons into iPhoto’s window.
A Short Glossary of Imaging Terms
artifacts. Visible flaws in an image, often as a result of excessive compression or when you try to create a large print from a low-resolution image.
CompactFlash. A removable-memory storage medium commonly used by digital cameras. A CompactFlash card measures 43 by 36 by 3.3 mm. The thicker Type 2 cards are 5.5 mm wide.
compression. The process of making image files use less storage space, usually by removing information that our eyes don’t detect anyway. The most common form of image compression is JPEG.
EXIF. Pronounced ex-if, a standard file format used by virtually all of today’s digital cameras. EXIF files use JPEG compression but also contain details about each image: the date and time it was taken, its resolution, the type of camera used, the exposure settings, and more. iPhoto retrieves and stores EXIF information when you import images. EXIF stands for Exchangeable Image File.
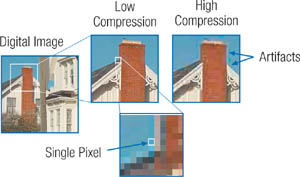
JPEG. Pronounced jay-peg, the most common format for storing digital camera images. Like MP3, JPEG is a lossy compression format: it shrinks files by discarding information that we can’t perceive anyway. And as with MP3, there are varying degrees of JPEG compression; many imaging programs enable you to specify how heavily JPEG images are compressed. Note that a heavily compressed JPEG image can contain artifacts. JPEG stands for Joint Photographic Experts Group.
megapixel. One million pixels.
pixel. Short for picture element, the smallest building block of an image. The number of pixels that a camera or scanner captures determines the resolution of the image.
raw. An image containing the data captured by the camera’s light sensor, with no additional in-camera image processing applied (see page 172).
resolution 1. The size of an image, expressed in pixels. For example, an image whose resolution is 640 by 480 contains 480 vertical rows of pixels, each containing 640 pixels from left to right. 2. A measure of the capabilities of a digital camera or scanner.
SmartMedia. A commonly used design for removable-memory storage cards.
The first step in assembling a digital photo library is to import photos into iPhoto. There are several ways to import photos, but the most common method is to connect your camera to your Mac and transfer the photos using a USB cable. iPhoto can directly import photos from the vast majority of digital cameras.
iPhoto gives you plenty of control over the importing process. You can import every shot in the camera, or you can be selective and import only some. iPhoto stores your photos in the iPhoto Library, located inside your Pictures folder (see page 135).
iPhoto can also import the movie clips that most cameras are capable of taking. If you shot some movie clips along with your photos, iPhoto imports them, too. (For more details on shooting movies with a digital camera, see page 282.)
You take photos of the events in your life: vacations, parties, fender benders on the freeway. When you import a set of photos, iPhoto stores them as an event. You can (and should) type a name and description of an event’s photos before importing them. Think of it as the digital equivalent of writing notes on an envelope of prints.
You can manage events—split one event into many, merge multiple events into one, and more—using techniques described on page 138. But that can wait—let’s get those shots into your Mac, shall we?
Connect your camera to one of your Mac’s USB ports (the port on the keyboard is particularly convenient) and turn the camera on. When iPhoto recognizes your camera, it displays the Import panel.
Tip
If your camera has a battery-saving sleep mode, adjust it so that the camera won’t drift into slumber while your photos are still importing.

Type a name that best describes this set of photos. You can also type a brief description if you like.
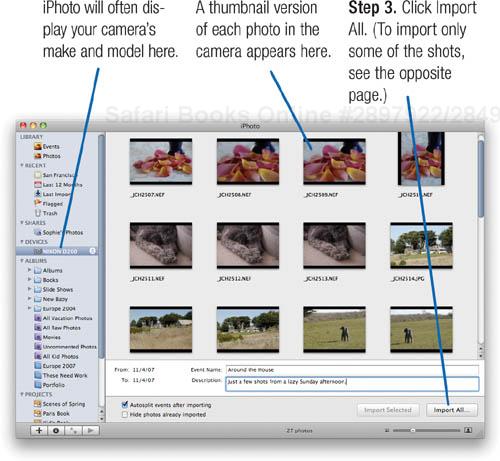
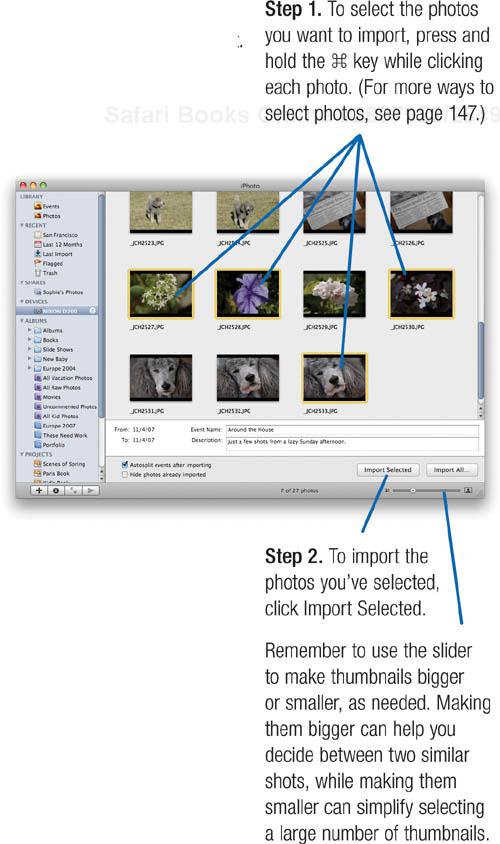
As you look over the thumbnails in the Import panel, you see some shots that you just know you aren’t going to want. So why waste time importing them to begin with? You can be selective and import only those shots you want.
When iPhoto finishes importing, it displays a message asking if you’d like to keep or delete the original photos from the camera.
I recommend clicking Keep Originals. It’s best to erase your memory card using your camera’s controls. Specifically, use your camera’s “format” command, not its “delete all” function.
What’s the difference? Formatting the card not only deletes photos, it creates a brand-new directory—that digital table of contents that’s so critical to any storage device. When you simply “delete all,” the camera wipes the shots, but doesn’t create a fresh directory. This increases the odds that little glitches of fate could cause directory corruption that leads to lost photos.
So click Keep Originals, then use your camera’s menu controls to reformat the card.

What happens after iPhoto imports a set of photos? That’s up to you. Admire your shots. Start filing and organizing them. Email a few favorites to a friend.
If you’re like me, you’ll want to check out your shots right away. A couple of clicks gives you a full-screen slide show, complete with music—perfect when you have a circle of eager friends and family watching over your shoulder. Or be selective: display thumbnails of your new photos, then take a close-up look at the best of the bunch.
Some housekeeping may await, too. Delete the shots you don’t want. Rotate vertically oriented shots, if necessary. As you tidy up, you’ll probably start getting ideas for sharing the photos. Email, prints, books, calendars, cards, Web galleries, DVDs, YouTube: if you like to share images, this is a great time to be alive.
And along the way, you’ll want to celebrate your inner librarian. Organize your photo library with events, titles, captions, keywords, and albums. Trust me: you’ll accumulate thousands of photos in no time. A few simple steps will make them easier to find.
But filing can wait. We have some fresh photos to explore.
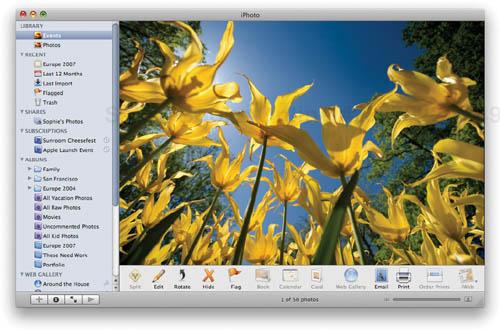
Start by clicking the Last Import item in the Library area. This is the fastest way to access the most recent set of shots.
Selective viewing. Adjust the size of the photo thumbnails to your liking: jump down to the lower-right corner and use the size slider.
To magnify a photo so that it fills the iPhoto window, double-click its thumbnail, or select the photo and press the spacebar. Tip: Maximize your viewing area: choose Window > Zoom or click the green zoom button in the upper-left corner.
To return to thumbnails, click the mouse or press the Esc key.
Full-screen variation. To fill the entire screen with a photo, click ![]() . To return to the thumbnails, double-click the mouse or press Esc. (For more about full-screen view, see page 168.)
. To return to the thumbnails, double-click the mouse or press Esc. (For more about full-screen view, see page 168.)
Tip
To move to the next or previous photo in either magnified view, press your keyboard’s right- or left-arrow key.
Instant slide show. To screen your photos with more style, display a slide show. Hold down the Option key on your keyboard and click ![]() . To stop the slide show, click the mouse or press Esc.
. To stop the slide show, click the mouse or press Esc.
(Pressing the Option key bypasses a step: choosing a soundtrack song. When you want to take time for that extra step, don’t press Option. See page 179 for soundtrack details, and pages 178–183 to learn all about slide shows.)
Some cameras automatically rotate photos taken in vertical orientation. If yours doesn’t, the job is yours. Select the photo or photos and then click the Rotate button or press ![]() (to rotate counterclockwise). To rotate clockwise, Option-click the Rotate button or press
(to rotate counterclockwise). To rotate clockwise, Option-click the Rotate button or press ![]() -Option-R. You can also rotate photos while viewing a slide show; see page 179.
-Option-R. You can also rotate photos while viewing a slide show; see page 179.
Tip
If you find yourself doing a lot of clockwise rotation, you can tweak iPhoto preferences to eliminate having to press Option while clicking Rotate. Choose iPhoto > Preferences, click the General button, then click the leftmost Rotate option:

Now you can rotate clockwise by simply clicking the Rotate button.
See a photo that you know you don’t want to keep? Trash it. To delete a photo, select it (click it once), then press the Delete key. You can also delete a photo by dragging it to the Trash on the left side of the iPhoto window.
When you put a photo in the Trash, iPhoto doesn’t actually erase the photo from your hard drive; that doesn’t happen until you choose Empty Trash from the iPhoto menu. If you change your mind about deleting a photo, click the Trash item in the library list, select the photo you want to keep, and choose Photos > Restore to Photo Library (keyboard shortcut: ![]() -Delete.)
-Delete.)
If your last import included a movie clip, you can play it by double-clicking its thumbnail. iPhoto starts the QuickTime Player program, which loads the movie. To play the movie, press the spacebar or click the Play button.
Customizing iPhoto’s Appearance
As the tip above described, the Preferences dialog box is the key to customizing how iPhoto’s Rotate button works.
The Preferences dialog box is also the gateway to many other iPhoto settings, which we’ll explore as we go along. But you might want to begin by exploring the options in the Appearance pane—they let you tweak how iPhoto looks.
Choose iPhoto > Preferences, then click Appearance.
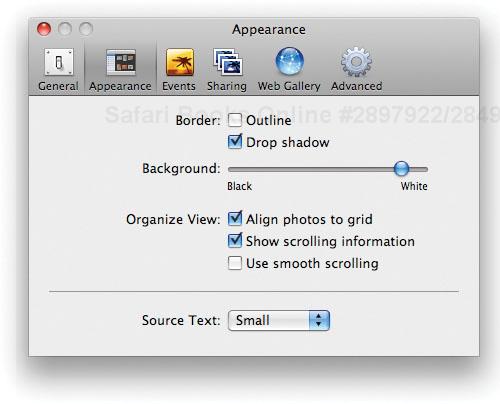
Want to see your thumbnail photos against a dark gray background? Drag the Background slider to the left.
With the Border options, you can turn off the shadow effect that iPhoto puts behind each photo, and display a thin border around each photo.
If you’d prefer larger text in the Library area of the iPhoto window, choose Large from the Source Text pop-up menu.
Event customizing. With the Events pane of the Preferences dialog box, you can fine-tune how iPhoto displays events. For more details, see page 138.
Window customizing. You can adjust the width of the Library area of the iPhoto window. Position the mouse pointer over the vertical line that separates the Library area from the rest of the window. It changes into a double-headed arrow:![]() . Drag left and right to adjust the width. A thinner Library area gives you more room for photo thumbnails, as well as a larger canvas for magnified views.
. Drag left and right to adjust the width. A thinner Library area gives you more room for photo thumbnails, as well as a larger canvas for magnified views.
Most people import photos directly from a camera using the technique I described on the previous pages. But you have more than one way to get photos into iPhoto.
A media reader is a great way to import photos from a camera’s memory card. Plug the reader into your Mac, then insert the memory card into the reader. Because you aren’t using your camera to transfer photos, its battery charge will last longer.
Be sure to get a reader that supports the type of memory cards your camera uses. Or get a multi-format reader that supports several types of memory cards. And look for a reader that connects to the Mac’s FireWire jack or to its USB 2.0 jack. FireWire and USB 2.0 readers transfer images much faster than the older, USB 1.0 interface.
You can also import images by dragging their icons into the iPhoto window. If you’ve scanned a batch of images, you can use this technique to bring them into iPhoto. You can also use this technique to save photos that people email to you or that you find on Web sites.
Here’s the photo-importing technique I use most often.
Connect the media reader to your Mac.
Be sure your camera’s power is off, then remove the memory card from the camera and insert it into the reader. iPhoto recognizes the card and displays the Import panel shown on page 130.
Type a name and description for the photos you’re about to import, then import all or some of the photos, as described on the previous pages.
After iPhoto has imported the photos, click the Eject button next to the memory card’s name in the Devices list. Finally, remove the memory card from the reader, return the card to your camera, and then erase the card.
Laptop Media Readers. You can buy a media reader that plugs into the PC Card slot of a PowerBook. If you’re traveling with a PowerBook, a PC Card-based reader is a compact alternative to a FireWire or USB reader.
Media readers are also available for the ExpressCard/34 slot provided by the MacBook Pro laptops, too. Unfortunately, the ExpressCard/34 slot is too small to accommodate a Compact Flash card, requiring you to use an awkward adaptor. If you use Compact Flash cards and own a MacBook Pro, you’re probably better off with an external FireWire or USB 2.0 reader. Look at it this way: at least your external modem will have company in your briefcase.
To import an entire folder full of images, drag the folder to the Photos item or into the photo area.

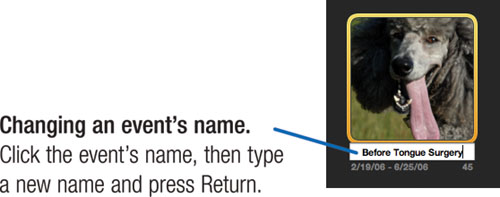
iPhoto gives the new event the same name as the folder from which its images came. You can rename the event using the techniques described on page 138.
To import only some images, select their icons and then drag them to the Photos item or into the iPhoto window.

A friend has emailed some photos to you, and you want to add them to your iPhoto library. If you’re using Mail, the email program included with Mac OS X, simply drag the photos from the email message into the iPhoto window. If the email message contains several photos, Shift-click on each one to select them all before dragging.
If you use Microsoft Entourage, your job is a bit more difficult. First, save the photos on your Mac’s desktop. Next, drag them into the iPhoto window as shown at left. Finally, delete the photos from your desktop.
To save a photo that’s on a Web page, just drag the photo from your Web browser into the iPhoto window. In Apple’s Safari browser, you can also Control-click on a photo and choose Add Image to iPhoto Library from the shortcut menu.
iPhoto can also import images saved on a Kodak PhotoCD or Picture CD. (PhotoCD is an older format that you aren’t likely to see too often. Picture CD is a newer format that most photo finishers use.)
Picture CD. Choose Import to Library from iPhoto’s File menu, locate the Picture CD, and then locate and double-click the folder named Pictures. Finally, click the Import button. Or, use the Finder to open the Pictures folder on the CD and then drag images into iPhoto’s window.
PhotoCD. Simply insert the PhotoCD in your Mac’s optical drive. iPhoto launches and displays its Import panel. Type a name and description for the photos, then import some or all of the photos, as described on the previous pages.
iPhoto gives you plenty of control over the importing process. Do you want iPhoto to automatically split up the photos into numerous events? If so, what time interval do you want to use?
If you’re adding photos by dragging them from folders on your hard drive, where do you want iPhoto to store the photos?
If questions like these burn in your brain, your fire extinguisher has just arrived. Otherwise, feel free to skip on. You can always return here when the embers begin to glow.
You wisely took my page 129 advice and told iPhoto to not delete photos from your camera after an import (see page 129). But you forgot to erase the card before shooting another two-dozen shots.
No problem. When you connect your camera and switch to iPhoto’s Import panel, check the box labeled Hide Photos Already Imported. Photos you’ve already imported will disappear from the Import panel, making it easy to import some or all of the new shots.
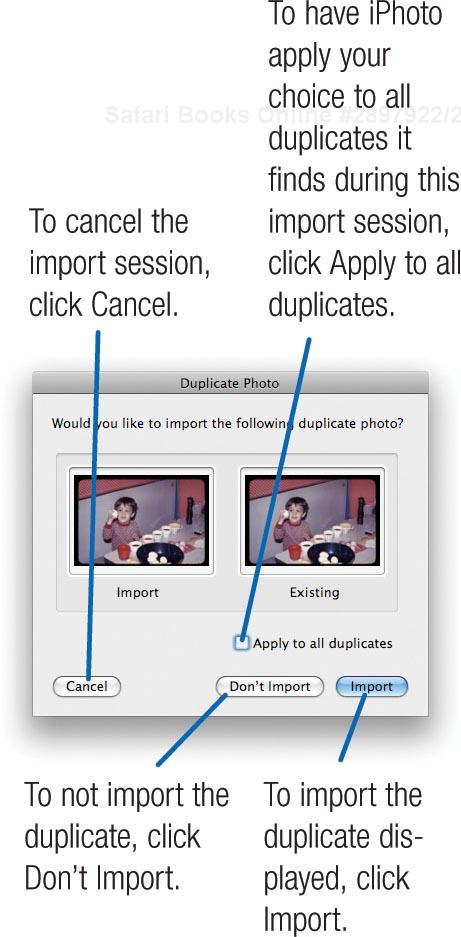
Even if you forget to check the aforementioned box, iPhoto has you covered. If you try to import a photo that already exists in your library, iPhoto asks if you really want to import the duplicate.
As I mentioned on page 128, iPhoto stores imported shots as events. When you import photos from a camera, iPhoto automatically splits them into events (unless you uncheck the Autosplit Events After Importing box in the Import pane).
Normally, iPhoto considers one day’s worth of photos to represent an event. For example, if you import some shots taken over a weekend, you’ll have two events: Saturday’s photos and Sunday’s.
Using the Preferences command, you can change the interval of time iPhoto uses when splitting photos into events. Choose iPhoto > Preferences, then click Events. You have three additional choices.

One event per day. iPhoto creates a new event for each 24-hour period. Take a week’s vacation, import all your shots, and you’ll have seven events.
This is an ideal option for vacations and similar getaways.
Two-hour gaps. iPhoto creates a new event every two hours. Say you do a day’s worth of shooting: a sunrise hike at 6:00 a.m., a brunch with friends at 10:00 a.m., and a party at night. Import the shots, and iPhoto will create three events.
When you shoot a lot of shots throughout a day, this option can help corral them into manageable (and related) chunks. Surviving the busy day is your problem.
Eight-hour gaps. iPhoto creates a new event every eight hours. In the busy-day example above, you’d end up with two events: the first containing the hike and brunch photos, and the second containing the party pix.
Before you import a set of photos, think about what kind of time intervals the photos represent, then consider tweaking the interval preference to match.
Or don’t bother. You’re never locked into the way iPhoto divvies up your life. You can move photos between events in whatever way you like, and you can have iPhoto autosplit events for you after you’ve imported photos. Pages 138–139 have all the details.
When you import photos from the Finder—by dragging their icons into iPhoto, as described on the previous page—iPhoto does not split the photos into events. That makes sense when you think about it: if you’re importing a dozen scanned images of photos that are decades old, how would iPhoto know how to divvy them up?
But in some circumstances, you might want iPhoto to automatically split photos imported from the Finder. For example, maybe you’re about to import a CD’s worth of digital photos that a friend burned for you.
For times like these, return to the Events portion of the Preferences dialog box, and check the box labeled Imported Items From Finder.
Since the dawn of time—well, since the dawn of version 1.0—iPhoto has always stored images in the iPhoto Library. Generally, that’s exactly what you want: when you copy photos from a camera or memory card, you want them stashed safely in your iPhoto Library.
But under some circumstances, iPhoto’s “do things my way” approach to organization can work against you. When you add photos that are already stored on your hard drive—for example, images that you’ve scanned and saved—iPhoto makes additional copies in the iPhoto Library.
After adding photos to your Library that are already on your hard drive, you need to delete the originals. That isn’t exactly a sweat-breaking chore, but it does take time. And you might prefer to stick with your existing filing system.
You have the option to not copy image files to the iPhoto Library. If you have a large library of meticulously filed scanned images on your hard drive, you might want to take advantage of this option. You won’t have duplicate photos to delete, and you won’t have to change the filing system you’ve developed for your scanned images.
To activate this option, choose iPhoto > Preferences, click the Advanced button, and then uncheck the box labeled Copy Items to the iPhoto Library.
From now on, when you add items from your hard drive to your iPhoto library, iPhoto simply creates aliases for each item. (In Mac OS parlance, an alias is a small file that simply points to an existing file.) If you edit an image, iPhoto stores the edited version in your iPhoto Library.
And by the way, unchecking this option does not change how iPhoto stores photos that you’re importing from a camera or media reader. Photos that you import from a location other than a hard drive are always stored in your iPhoto Library.
Unlike any shoebox, iPhoto gives you several ways to browse and explore your photo library. Use Events view to get an at-a-glance look at your library. Forget which photos are in an event? Move your mouse pointer across the event thumbnail, and its photos flash before your eyes.
Events view is the most convenient way to work with your photo library, and chances are it’s the view you’ll use most of the time. But there’s another way to see your shots. Click the Photos item in the Library list, and iPhoto displays your events in a different format—one that you may find useful for some browsing and photo-management tasks.
(If you’re an iPhoto veteran, you’ll recognize the Photos view—it’s similar to the “film rolls” view provided by earlier versions of iPhoto.)
In both views, iPhoto provides little conveniences that help you home in on the photos you seek. For example, as you scroll the iPhoto window, semi-transparent scroll guides appear that show the date and title of each event.
Knowing the basics of photo browsing is important—the faster you can get around in your photo library, the greater the chances that you’ll explore and enjoy your photos.
Here’s an overview of the ways iPhoto lets you browse.
Here are the basic techniques you’ll use when working with events.
Skimming thumbnails. Pass your mouse pointer over the event without clicking. Tip: You can also skim by combining the mouse and keyboard: point to an event, then press the left- or right-arrow keys. I like to use this technique when an event has a lot of photos in it, or when I’ve used the size slider to make the event thumbnails small.
Tips
Want to browse using just the keyboard? First, be sure the mouse pointer isn’t over an event. Then, use the arrow keys to select an event. Press Return to see its thumbnails. Press Esc to return to Events view, then arrow-key your way to a different event and repeat.
When you’re viewing an event’s photos, you can jump to the previous or next event by clicking the arrows in the upper-right corner of the iPhoto window.
Setting the key photo. Each event is represented by one photo, called the key photo or the poster photo. You can change the key photo to one that best represents the event. Skim across the event, and when you see the photo that you want to be the new key photo, press the spacebar. You can also Control-click on the photo and choose Make Key Photo from the shortcut menu. (This latter technique also works in Photos view.)
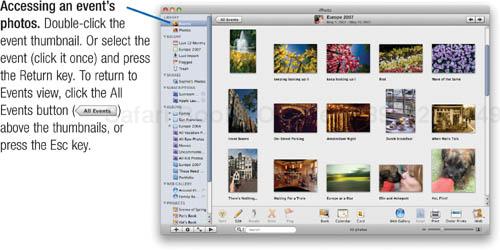
Detail view. Sometimes, you need to view the photos of more than one event at once. Maybe you’re organizing some recent imports and you want to work on multiple events at the same time—to move some photos from one event to another, for example.
To open more than one event, select each event (click it once), then double-click one of the selected events or press Return. iPhoto opens each selected event.

To return to Events view, click All Events or press Esc.
Separate event window. You can also open an event in its own window: select the event, then choose Events > Open Event in Separate Window. A new window opens containing the event’s photos.
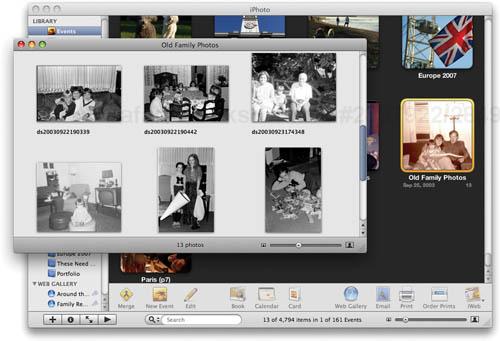
The separate window is a great way to focus in on the shots in one event while retaining quick access to the rest of your library. The window provides its own size slider for adjusting the size of photo thumbnails. You can even zoom the separate window to fill your screen or a second display, if your Mac has one: choose Window > Zoom.
The following pages describe more uses for the separate event window.
Note
The separate event window debuted in iPhoto 7.1. If you don’t see its command in the Events menu, use the Software Update system preference to update to the latest iPhoto version.
Another Way to Look: Photos View
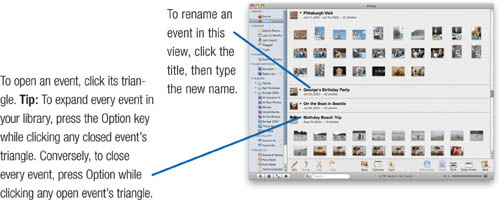
The Events view is so efficient and versatile that you’ll probably spend most of your time there. But there’s another option: Photos view. To use it, click the Photos item in the Library area.
The Photos view can be handy for moving photos between events and for combining and splitting events, though as the following pages describe, you can do all of these tasks in Events view, too.
Anxious to start having fun with your photos? Go ahead and skip to page 146, where you can learn about creating photo albums and much more.
Eventually, you’ll want to learn about the power tools that iPhoto provides for managing photos and events. These maneuvers can help you organize your iPhoto Library and make it easier to corral photos prior to sharing them.
A lot of photos fall into that middle ground between bad and beautiful: not awful enough to trash, not good enough to look at all the time. iPhoto lets you hide those mediocre shots to tidy up an event, but bring them back whenever you like.
Hiding photos is also a good strategy when you’ve taken several nearly identical shots—some portraits, each with a different smile. Pick the best, hide the rest.
To hide a photo, select it and click the Hide button (or press ![]() -L). The photo vanishes, and adjacent photos snuggle in to fill the void.
-L). The photo vanishes, and adjacent photos snuggle in to fill the void.
Bringing them back. When you’re viewing an event, iPhoto lets you know if any of its photos are hidden.


To hide the photos again, click the message again. To unhide a photo, select it and click Unhide or press ![]() -L.
-L.
You can split one event into two. Say you have an event containing a hundred shots from an afternoon bike ride and an evening dinner. You may prefer to split the event into two separate, more manageable ones.
To split an event, open it to display its thumbnails. Then, select the photos you want to split off (the dinner shots, for example), and click the Split button. Finally, name the new event.
Merging events. You can also combine two or more events into one. Maybe you fired off some shots at a party, imported them so everyone could see, then took some more. You want all the party shots to be in one event. Easy: drag one event to the other.
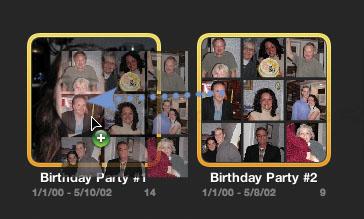
You can also merge more than two events: Shift-click or ![]() -click on each event, then drag them to another event. Or select all the events, then click the Merge button.
-click on each event, then drag them to another event. Or select all the events, then click the Merge button.
Sometimes, your life as an event planner requires you to move individual photos between events. Maybe you want to fine-tune the way iPhoto autosplit an event. Or maybe a travel companion emailed you some shots that she took, and you want to add a few of them to your vacation event.
There are moving plans aplenty.
Dragging. Open the events in detail view: select them and double-click one of them (page 137). Now drag thumbnails from one event to another. To give yourself more dragging room, zoom the iPhoto window (Window > Zoom) and make the thumbnails smaller (drag the size slider).

The separate event window, described on page 137, can be handy when dragging photos between events, especially if the events aren’t near each other in your library.
Cut and paste. Select the photos you want to move, and choose Edit > Cut. Select the event where you want them, then choose Edit > Paste. When dragging seems like too much work—too many photos, too many events—this is an efficient alternative.
Flagging. This can be the most powerful way to move photos, and it’s described at right.
You can create a new, empty event and then add photos to it. Be sure no events are selected, then choose Events > Create Event.
(You can also use Create Event to merge events or split photos off into their own event: Select the events or individual photos, then choose Create Event.)
Flagging is like attaching a sticky note to a photo. Trying to decide which shots to add to a book? Flag the best candidates, and you can return to them in a flash.
To flag a photo, select it and click the Flag button or press ![]() -period. A flag badge appears on the photo’s thumbnail.
-period. A flag badge appears on the photo’s thumbnail.

You can flag multiple photos at once–select them first, then click Flag–and you can flag as many shots as you like. To quickly see the shots you’ve flagged, click the flagged item in the Recent area of the Library list.
You’ve flagged some shots. Then what?
Move them to an existing event. After flagging the shots, return to Events view. Select the event where you want to move the photos, then choose Events > Add Flagged Photos to Selected Event. If you need to move some shots that are scattered throughout your library, this is the best way to do it.
Move them to a new event. To move flagged photos into a new event of their own, choose Events > Create Event From Flagged Photos. Keep in mind, though, that iPhoto will move those photos from their original events.
Work with them. Select the Flagged item in the Library area. The flagged shots lurk there, ready to be edited, shared—whatever you like.
Lower the flags. Done working with some flagged photos? Here’s the easiest way to unflag them all: click the little number next to the Flagged item in the Library area.
Normally, when you double-click an event thumbnail, you see the event’s photos. With this trick, you can double-click to magnify whichever photo is visible under the mouse pointer. Skim across an event, see a photo you want to magnify, and double click.
Choose Preferences > iPhoto, click Events, then choose the Magnifies Photo option.
You can also tweak iPhoto so that a double click opens a photo in edit view (page 152)—the way earlier iPhoto versions worked. Choose iPhoto > Preferences, click General, and choose the Edits Photo option.
iPhoto forces some organization on you by storing each set of imported images as a separate event. Even if you never use iPhoto’s other organizational features, you’re still ahead of the old shoebox photo-filing system: you will always be able to view your photos in chronological order.
But don’t stop there. Take the time to assign titles and descriptions to your favorite shots. By performing these and other housekeeping tasks, you can make photos easier to find and keep your library well organized.
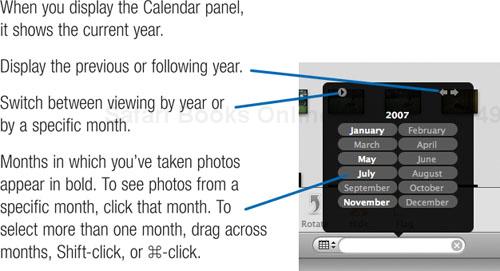
Titles are names or brief descriptions that you assign to photos and events: Party Photos, Mary at the Beach, and so on. iPhoto can use these titles as captions for its Web photo albums and books. Using the View menu, you can have iPhoto display titles below each thumbnail image. You can also search for photos by typing title or description text in the Search box (page 142a).
There’s one more benefit to assigning titles to photos: when you’re working in other iLife programs, you can search for a photo by typing part of its title in the photo media browser’s Search box.
Of course, you don’t have to type titles and descriptions for every photo in your library. But for the ones you plan to share in some way—or that you’ll want to search for later—it’s time well spent.
When you want to give photos titles and descriptions, turn to the Information pane. To display the Information pane, click the ![]() button.
button.

On a roll. Want to quickly title (or describe) one photo after another? Press ![]() -] after typing a title or description, and iPhoto selects the next photo and highlights its title or description field so you can immediately begin typing. To move to the previous photo, press
-] after typing a title or description, and iPhoto selects the next photo and highlights its title or description field so you can immediately begin typing. To move to the previous photo, press ![]() -[. And to keep your hands on the keyboard, press Tab and Shift-Tab to jump from one field to the next in the Information pane.
-[. And to keep your hands on the keyboard, press Tab and Shift-Tab to jump from one field to the next in the Information pane.
Check your spelling. Want to check the spelling of your titles and descriptions? Select the text you want to proofread, then choose Edit > Spelling > Check Spelling. Or select the text you want to proofread and press ![]() -;.
-;.
Many at once. To change information for many photos at once, select them and choose Photos > Batch Change (see the opposite page). If you’re like me and are often too lazy to assign titles and descriptions to individual photos, this can be a good compromise: assign a phrase to a set of related photos, and you can search for that phrase later.
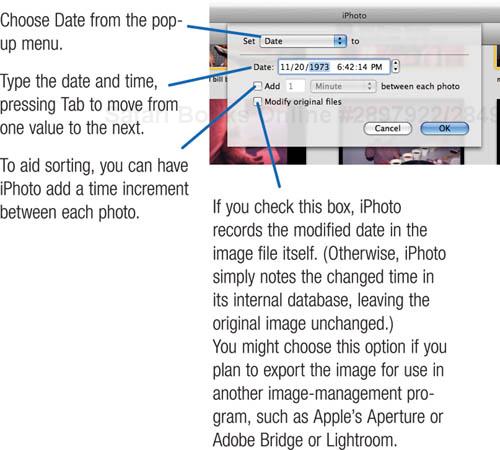
The Information pane is a great place to view and change all kinds of details: a photo’s title, its description, the date and time it was taken, and more.
But there’s another way to edit photo information, and it’s often more convenient than opening the Information pane. Simply click the title beneath a photo’s thumbnail, and start typing:

(If you don’t see titles beneath your photo thumbnails, choose View > Titles.)
The keyboard-shortcut tips described at lower left work here, too: type a title, and press ![]() -] to jump directly to the title field of the next photo. Or move the next and previous photo by pressing Tab and Shift-Tab.
-] to jump directly to the title field of the next photo. Or move the next and previous photo by pressing Tab and Shift-Tab.
As the following pages describe, you can also assign keywords and ratings by working directly beneath photo thumbnails. You can’t, however, type a description or change a photo’s date or time. For those tasks, turn to the Information pane.
Time is important. The date stored along with a photo determines how iPhoto sorts the photo. Accurate dates also simplify searching and organizing your library.
All digital cameras store date and time information along with the image (see the sidebar on page 145). But what if your camera’s clock is off? Maybe you forgot to adjust its time zone when you flew to Hawaii.
Or maybe you’ve scanned some old family photos and you want their dates to reflect when they were taken, not scanned. That Aunt Mary photo is from 1960, not 2008.
Time travel is easy in iPhoto. You can edit the date of an event, a selection of images, or just one photo. The steps differ depending on what you want to change.
An event. Select the event, choose Photos > Adjust Date & Time.
More than one photo. Select the photos, and choose Photos > Batch Change.
Just one photo. Select the photo, open the Information panel, and type new dates and times.
Chances are that many of your photos fall into specific categories: baby photos, scenic shots, and so on. By creating and assigning keywords, you make related images easier to find.
Keywords are labels useful for categorizing and locating all the photos of a given kind: vacation shots, baby pictures, mug shots, you name it.
iPhoto has several predefined keywords that cover common categories. But you can replace the existing ones to cover the kinds of photos you take, and you can add as many new keywords as you like.
You can assign multiple keywords to a single image. For example, if you have a Beach keyword, a Dog keyword, and a Summer keyword, you assign all three to a photo of your dog taken at the beach in July.
Keywords are one way to categorize your photos; ratings are another. You can assign a rating of from one to five stars to a photo—rank your favorites for quick searching, or mark the stinkers for future deletion.
As with many iPhoto housekeeping tasks, assigning keywords and ratings is entirely optional. But if you take the time, you can use iPhoto’s search and Smart Albums features to quickly locate and collect photos that meet specific criteria.
Choose Window > Show Keywords (
 -K).
-K).Click the Edit Keywords button.
Edit keywords as shown below, then click OK.

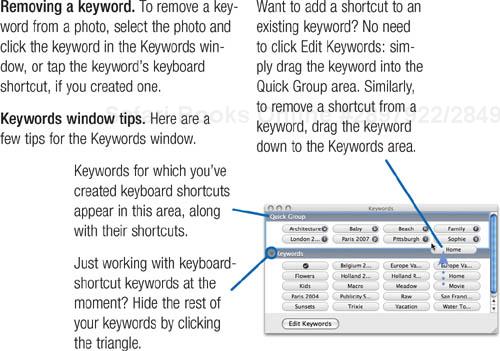
Displaying keywords. To have iPhoto display keywords beneath photo thumbnails, choose View > Keywords.
Creating a keyword directly. When viewing keywords beneath thumbnails, you can create a new keyword by simply typing it beneath a photo thumbnail. Point beneath the thumbnail until the text add keywords appears.

You have a few ways to assign keywords.
The keywords window. Choose Window > Show Keywords. Select the photo(s), then click one or more keywords.
The keyboard. If you assigned a keyboard shortcut to the keyword, reap your reward now. Select the photo(s), and tap the shortcut key.
If you have to assign various keywords to a set of photos, combine shortcut keys with the arrow keys. Select a photo, tap a key, tap an arrow key to move to a new photo, tap a key. There’s never been a faster way to assign keywords in iPhoto.
Directly beneath the thumbnail. See the tip on the opposite page, at lower left.
Art Critic: Rating Your Photos
You can assign a rating of from one to five stars to a photo, and there are a few ways to do it.
The Photos menu. Choose a rating from the My Rating submenu.
The keyboard. Press ![]() along with 0 (zero) through 5. This shortcut pairs up nicely with the arrow keys: rate a photo, press an arrow key to move to the next photo, and repeat.
along with 0 (zero) through 5. This shortcut pairs up nicely with the arrow keys: rate a photo, press an arrow key to move to the next photo, and repeat.

The shortcut menu. Control-click on a photo and choose a rating from the My Rating submenu.
In one fell swoop. Want to give a bunch of photos the same rating? Select them, then use one of the previous techniques.
With the Information pane. Select a photo and then click the stars in the Information pane.
During a slide show. Move the mouse, then click the desired rating. Or just press 0 (zero) through 5 to rate the currently displayed photo.
<division> <title>Ratings Tips</title>To see ratings beneath your photo thumbnails, choose View > Rating (Shift-![]() ). When ratings are visible, you can change them by clicking the stars and dots.
). When ratings are visible, you can change them by clicking the stars and dots.
Browsing is fun, but not when you’re looking for something specific. When you’re on the hunt, you want help: directions from your car’s navigation system, a directory in a shopping mall, or a search feature in your digital photography program.
iPhoto lets you search in several ways. For quick searches, jump down to the Search box and start typing. As you type, iPhoto narrows down the photos it displays—much as iTunes does during song searches. The more time you spend giving titles and descriptions to your best shots (page 140), the better the search feature works.
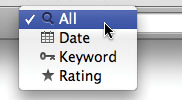
Next to the Search box, a pop-up menu lets you search in more specific ways. Look for photos taken on certain dates. Or photos with a four-star rating, or with certain keywords.
And when your searching needs are very specific—show me the four-star photos of the dog taken before noon at the beach with my Nikon camera during the month of July—iPhoto can accommodate. Just create a smart album (page 150).
So go ahead and browse when you want to relive random memories. But when you’re on a mission? Search.
No matter what kind of search you perform, keep this in mind: iPhoto searches whatever item you’ve selected in the Library list. If you want to search your entire library, be sure to click Events or Photos. To search the last year’s worth of photos, click Last 12 Months. To search a specific album, click the album. You get it.
Searching by rating. From the Search box pop-up menu, choose Rating. Click the dots to specify a minimum number of stars a photo must have.
Note
Higher-rated photos also appear: if you click three stars, four- and five-star photos also appear. To find just three-star photos, for example, create a smart album.

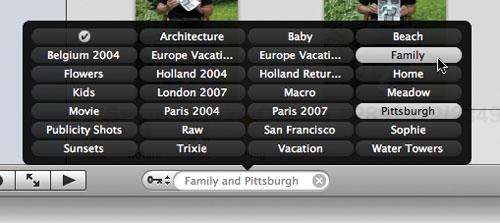
Searching by keyword. From the Search box pop-up menu, choose Keyword, then click one or more keywords. (For tips on keyword searching, see the opposite page.)
Searching by date. From the Search box popup menu, choose Date, then specify a date or range of dates (see the opposite page).
Even if you never give a photo a title, description, or keywords, you can always search by date, since your camera records the date and time when you take a photo.
And remember, you can use iPhoto to adjust the dates of your photos to make date searches as accurate as possible (page 141).
Getting photos back from a lab is always exciting, but what’s really fun is creating a photo album that turns a collection of photos into a story.
An iPhoto album contains a series of photographs sequenced in an order that helps tell a story or document an event. Creating an album is often the first step in sharing a set of photos. For example, before creating a slide show or book, you’ll usually want to create an album containing the photos you want to use.
Creating albums in iPhoto is a simple matter of dragging thumbnail images. You can add and remove photos to and from albums at any time, and you can sequence the photos in whatever order you like. You can even include the same photo in many different albums.
The photos in an album might be from one event, or from a dozen different events. Just as an iTunes playlist lets you create your own music compilations, an iPhoto album lets you create your own image compilations.
You don’t have to create albums for every set of photos you import. But when you want to combine photos from different events, particularly when you’re planning to share the photos in some way, albums are the answer.
Choose File > New Album
You can also use the
-N keyboard shortcut, or click the  button and then choose Album in the subsequent dialog box.
Type a name, then click Create or press Return.
Add photos.


Tips for Selecting Photos
Selecting photos is a common activity in iPhoto: you select photos in order to delete them, add them to an album, move them around within an album, and more.
When working with multiple photos, remember the standard Mac selection shortcuts: To select a range of photos, click on the first one and Shift-click on the last one. To select multiple photos that aren’t adjacent to each other, press ![]() while clicking on each photo.
while clicking on each photo.
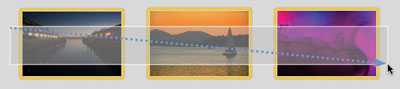
As the screen below shows, you can also select a series of pictures by dragging a selection rectangle around them.
You don’t have to create an album in order to share photos: you can create slide shows, books, calendars, and Web pages by simply selecting photos in your library, and then using the appropriate button or command.
This has always been true in iPhoto, but it’s more applicable than ever in iPhoto ’08. By hiding less-than-perfect photos (page 138), you can “edit” an event to contain only those photos you want to use in a project.
Still, when you’re about to create a photo project of some kind, it’s better to create an album first. Albums give you the ability to change the sequence of photos. You can resequence photos while creating slide shows, books, and the like, but creating these items is easier when you start with the photos that are in roughly the final order that you plan to use.
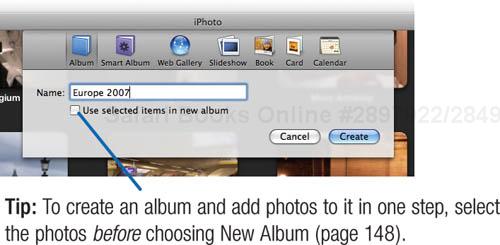
You can create an album and add images to it in one step. Select one or more images and choose File > New Album. In the dialog box that appears, check the box labeled Use Selected Items in New Album. Or select some photos, then choose File > New Album from Selection (Shift-![]() -N).
-N).
You can also drag the images into a blank spot of the Library area. When you use this technique, iPhoto gives the new album a generic name, such as untitled album. To rename the album, double-click its name and type a new name.

If you have photos on a storage device—your hard drive, a Picture CD, or a digital camera’s memory card—you can import them into iPhoto and create an album in one fell swoop.
Simply drag the photos from the Finder into a blank area of the Library list. iPhoto imports the photos, storing them in their own event. iPhoto also creates an album and adds the photos to it.
Tip
As your collection of albums and other items grows, you may find that you no longer have a “blank area” at the bottom of the iPhoto window. To create one, close some of the items in the Library list—for example, close the Albums list by clicking its triangle.
Albums and flagging. iPhoto’s flagging feature (page 138) teams up nicely with albums. Want to create an album of shots that are scattered throughout your library? Flag the shots, then select the Flagged item in your Library list. Next, choose Edit > Select All, then choose File > New Album from Selection.
You’ve created an album containing the best photos of a friend’s wedding. The photos are from various events; indeed, some were emailed to you from other attendees.
You’d prefer that the photos were in an event of their own. Easy. Select the album, choose Edit > Select All, then choose Events > Create Event. iPhoto creates a new event, and moves the photos in the album into the event. Note, however, that the photos are removed from the events where they originated.
You can have iPhoto display the number of photos in each album next to each album’s name. In the Preferences dialog box, click General, then check the Show Item Counts box.
You have a photo that appears in multiple albums, but you want to edit its appearance in just one album, leaving the original version unchanged in other albums. Time for the Duplicate command: select the photo and choose Duplicate from the Photos menu (![]() -D). Now edit the duplicate.
-D). Now edit the duplicate.
Duplicating an album. There may be times when you’ll want several versions of an album. For example, you might have one version with photos sequenced for a slide show and another version with photos organized for a book. Or you might simply want to experiment with several different photo arrangements until you find the one you like best.
iPhoto makes this kind of experimentation easy. Simply duplicate an album by selecting the album and choosing Duplicate from the Photos menu. iPhoto makes a duplicate of the album, which you can rename and experiment with.
You can make as many duplicates of an album as you like. You can even duplicate a smart album—perhaps as a prelude to experimenting with different search criteria. Don’t worry about devouring disk space. Albums don’t include your actual photos; they simply contain “pointers” to the photos in your library.
Another good reason to create albums surfaces elsewhere in iLife: iMovie, iDVD, GarageBand, and iWeb all display iPhoto albums in their photo media browsers.
Have a batch of photos you want to use in another iLife program? Rather than searching through your library using those programs’ media browsers, first stash the photos in an album. Then, choose that album in the other iLife program.
iPhoto album support is also built into other programs, including Mac OS X’s screen saver and Apple’s iWork programs. And you can choose to sync only certain albums to a photo-capable iPod (page 210) or Apple TV (page 214).
Organize Your Library with Folders
As you create albums, slide shows, and books, your Library list may become cluttered. iPhoto helps a bit by providing separate areas for albums, slide shows, projects, and other items. But you can do your part, too. Take advantage of the ability to create folders in the Albums area of the Library list.
Folders in iPhoto have the same benefit that they have on your hard drive: they let you store related items. And as with the documents on your hard drive, the definition of “related items” is up to you.
Filing strategies. You can use folders in any way you like. You might want to set up a project-based filing system: create a folder for a project, then stash albums, books, and slide shows in that folder.
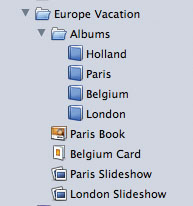
Or you might prefer an object-oriented filing system: stash all your albums in one folder, all your slide shows in another, and all your books in yet another.
You might want to mix and match these approaches or come up with something completely different. What’s important is that you create a filing scheme that helps you quickly locate items.
Creating a folder. To create a folder, choose New Folder from the File menu. Or, Control-click on a blank area of the Library list and choose New Folder from the shortcut menu. iPhoto names a new folder untitled folder, and selects its name. To rename the folder, just start typing.
Working with folders. To move an item into a folder, simply drag it to the folder until you see a black border around the folder. To close or open a folder, click the little triangle to the left of its name.
Like folders in the Mac’s Finder, iPhoto folders are “spring loaded”—if you drag something to a closed folder and pause briefly, the folder opens.
Folders within folders. You can create folders inside of folders. You might use this scheme to store all the albums, books, and slide shows that relate to a specific event or theme.
To open a folder and all the nested folders within it, press Option while clicking on the folder’s triangle.
iPhoto can assemble albums for you based on criteria that you specify. The smart album feature works much like the smart playlist feature in iTunes: spell out what you want, and your Mac does the work for you.
A few possibilities: Create an album containing every shot you took in the last week. Or of every photo you took in November 2002. Or of every November 2002 photo that has Sophie in its title. Or of every photo from 2007 that has Paris as a keyword, croissant in its title, and a rating of at least four stars.
If you’ve taken the time to assign titles, comments, and keywords to your photos, here’s where your investment pays off. You can still use smart albums if you haven’t assigned titles and other information to photos; you just won’t be able to search on as broad a range of things.
You can also create smart albums that have criteria based on information that your camera stores with each photo (see page 229). Create one smart album that corrals all the shots you took with your Sony camera, and another that collects all your Canon shots. Or create a smart album of all your photos shot at a high ISO speed (page 232), or at a fast shutter speed, or with a telephoto lens.
Smart albums are a great way to quickly gather up related photos for printing, backing up, browsing, emailing—you name it.
Choose New Smart Album from the File menu (Option-
-N).You can also create a new smart album by pressing the Option key and clicking on the
 button in the lower-left corner of the iPhoto window.
Specify what to look for.
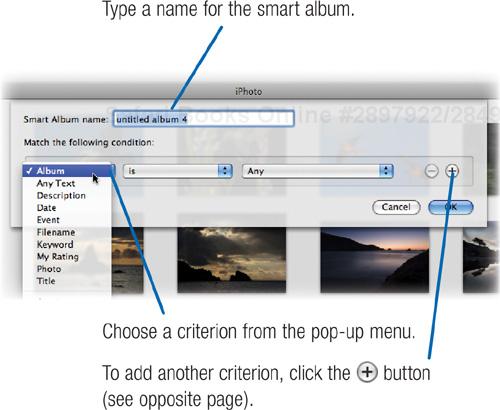
Click OK or press Return.
In the Albums area, iPhoto indicates smart albums with a special icon:
 .
.
To modify a smart album, select it in the Albums area and choose File > Edit Smart Album or Photos > Smart Album Info (![]() -I).
-I).
Get more smart album ideas. www.macilife.com/iphoto

By adding additional criteria, you can be very specific about what you want to find.

Tips for Smart Albums
They’re alive. iPhoto is always watching. If you import photos that meet a smart album’s criteria, iPhoto adds those photos to the album. iPhoto may also add to a smart album when you edit photo information. For example, if you change a photo’s title to Beach picnic, iPhoto adds the photo to any smart album set up to search for beach in the title.
From smart to dumb. You can’t turn a smart album into a static one—unlike iTunes, iPhoto doesn’t provide a Live Updating check box. Here’s a workaround. Click the smart album in the Album list, then select all the photos in the album. (Click one photo, then press ![]() -A.) Next, choose New Album from Selection from the File menu. This creates an album containing the photos currently in the smart album.
-A.) Next, choose New Album from Selection from the File menu. This creates an album containing the photos currently in the smart album.
Deleting photos. To delete a photo from a smart album, select it and press ![]() -Option-Delete. Note that this also deletes the photo from your library and moves it to the iPhoto Trash.
-Option-Delete. Note that this also deletes the photo from your library and moves it to the iPhoto Trash.
Table . Smart Album Suggestions
For a Compilation of | Specify These Criteria |
|---|---|
All your movies | Photo is Movie |
All your raw-format photos | Photo is Raw |
All flagged or hidden photos | Photo is Flagged or Photo is Hidden |
Recent favorites | Date is in the last 1 month (for example) and My Rating is greater than three stars |
All your Winter photos | Date is in the range 12/21/2006 to 3/20/2007 |
All photos that aren’t in any album | Album is not Any |
Photos from a specific camera | Camera Model is model |
Photos from the second-to-last event you imported | Event is not in the last 1 event and Event is in the last 2 events |
Photos from two weeks ago | Date is not in the last 1 week and Date is in the last 2 weeks |
Photos taken with a telephoto lens | Focal Length is greater than 150 (for example) |
Many photos can benefit from some tweaking. Maybe you’d like to crop out that huge telephone pole that distracts from your subject. Maybe the exposure is too light, too dark, or lacks contrast. Or maybe the camera’s flash gave your subject’s eyes the dreaded red-eye flaw.
iPhoto’s edit view can fix these problems and others. And it does so in a clever way that doesn’t replace your original image.
Better still, a significant improvement in iPhoto ’08 gives you more editing flexibility. In earlier iPhoto versions, making changes to an already-edited image wasn’t the best idea—because of JPEG compression (there’s that word again), you’d lose a bit of image quality with each editing session.
iPhoto ’08 works differently. When you edit a photo, iPhoto keeps a list of the changes you made. If you reopen an edited image and make more changes, iPhoto applies your entire list of changes to the original version of the photo. It’s called nondestructive editing, and the result is fewer passes through the JPEG-compression meat grinder—and better photo quality. (For more about iPhoto non-destructive editing, including an important caveat, see page 229.)
As you get accustomed to iPhoto editing, you might want to experiment with full-screen editing (page 168), the separate editing window (page 170), and the ability to tweak some editing preferences (pages 24 and 175).
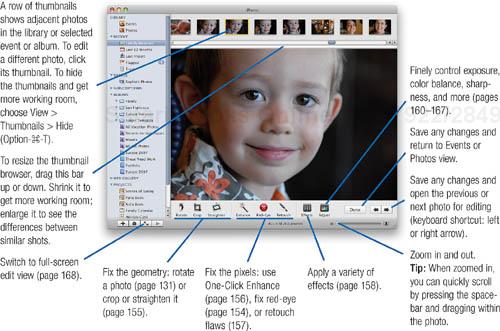
To work on a photo, open it in iPhoto’s edit view.
Select the photo you want to edit.
Click the Edit button.

The photo opens in edit view, and new tools and buttons appear (opposite page).
Now what? Here are some the ways iPhoto can help an ailing photo.
Table . Photo First-Aid
Symptom | Cure (and Page) |
|---|---|
Red-eye from flash | Red-Eye tool (154) |
Poor contrast and “punch” | Enhance button (156); for more control, the Adjust panel (162) |
Crooked and/or badly framed | Straighten and/or Crop tools (155) |
Scratches or blemishes | Retouch tool (157) |
Color balance is incorrect | Adjust panel (164) |
Photo is “grainy” from low light | Adjust panel (167) |
Change your mind? To exit edit view without saving any changes, press the Esc key.
Global or local? When you edit a photo, you change the photo everywhere you’ve used it—in slide shows, books, and calendars, for example. There’s another way to fine-tune an image. When printing a photo or using it in a book, greeting card, or calendar, you can modify the photo’s appearance in just that place—without changing its appearance elsewhere.
I’ll remind you of these local editing opportunities as we go.
Some photos can benefit from...less. Maybe you weren’t able to get close enough to your subject, and you’d like to get rid of some visual clutter. Or maybe a scenic vista is marred by a dumpster that you didn’t notice when you took the shot. Or maybe you want to order a print, and you want your photo’s proportions to match the size you want.
iPhoto’s Crop tool is the answer for jobs like these. By cropping a photo, you can often improve its composition and better highlight its subject matter.
Similarly, some photos need a bit of straightening. It’s easy to tilt the camera when you’re shooting, making the whole world look just a little crooked.
To put your world on the level, use the Straighten tool. A drag of the mouse is all it takes.
Then there’s red-eye. Biologically, it’s caused by the bright light of an electronic flash reflecting off a subject’s retinas and the blood vessels around them. Aesthetically, it makes people look like demons.
iPhoto can help here, too. The RedEye tool gives you a couple of ways to get the red out.
Open the photo in edit view.
Drag the size slider to zoom in on the subject’s eyes.
Click the Red-Eye tool.
Click the red eyes.
If you aren’t happy with the results—maybe there’s some red left over—choose Edit > Undo, then customize the Red-Eye tool and try again.

To turn off the Red-Eye tool, click it again or choose a different tool.

Constraining the crop. You can make the crop area any size you like. But sometimes, you may want to control the proportions of the crop area—to ensure that your photo’s proportions match a certain print size, for example.
Click the Constrain box, then choose an option.
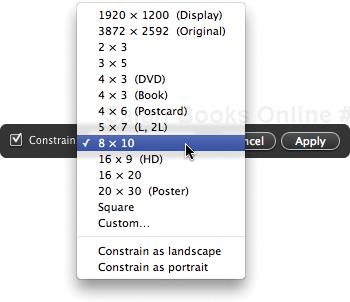
For example, if you plan to order an eightby ten-inch print of the photo, choose 8 × 10.
To switch between a horizontal and vertical crop area, choose Constrain as Landscape or Constrain as Portrait. To override the constrain setting, press Shift while resizing the crop area.
Resetting the crop. To start over, press Option—the Cancel button changes to Reset. Click Reset, and iPhoto restores the original crop rectangle.
Cropping and resolution. When you crop a photo, you throw away pixels, lowering the photo’s resolution. If you print a heavily cropped photo, you may notice ugly digital artifacts. Always shoot at the highest resolution your camera provides; this gives you more flexibility to crop later (see page 232).
The local option. If you’re printing a photo on your own printer, or using the photo in a slide show or print project, you might prefer to use iPhoto’s zoom tools to crop—that way, you won’t change the photo everywhere you’ve used it. See pages 181 (for slide shows), 198 (for printing), and 211 (for print projects).

Old photos can appear faded, their color washed out by Father Time. They might also have scratches and creases brought on by decades of shoebox imprisonment.
New photos can often benefit from some enhancement, too. That shot you took in a dark room with the flash turned off—its color could use some punching up. That family photo you want to use as a holiday card—the clan might look better with fewer wrinkles and blemishes.
iPhoto’s enhance and retouch tools are ideal for tasks like these. With the enhance tool, you can improve a photo’s colors and exposure, and rescue a photo you might otherwise delete. With the retouch tool, you can remove minor scratches and blemishes, not to mention that chocolate smudge on your kid’s face.
iPhoto’s editing features make it easy to fix many common image problems, but iPhoto isn’t a full-fledged digital darkroom. You can’t, for example, remove power lines that snake across an otherwise scenic vista, nor can you darken only a portion of an image. For tasks like these, you’ll want to use Adobe Photoshop or Photoshop Elements—both of which pair up beautifully with iPhoto (see page 176).
To apply one-click enhance, open a photo in edit view, and then click the Enhance button at the bottom of the iPhoto window.

If at first you don’t succeed, click, click again. Each time you click Enhance, iPhoto processes the image again. But too much enhancement can make an image appear grainy and artificial. If that happens, choose Undo Enhance Photo from the Edit menu as many times as needed to backtrack.
If the Enhance tool isn’t doing the job—maybe its results are too harsh—undo your enhancements and turn to the tools in the Adjust panel (see page 160).
Zoom for precision. To retouch with more precision, use the size slider to zoom in on the area of the image that you’re working on. You can also zoom by pressing the 0 (zero), 1, or 2 keys.
Undo and revert. You can undo each mouse click or drag by choosing Edit > Undo Retouch from the Edit menu.
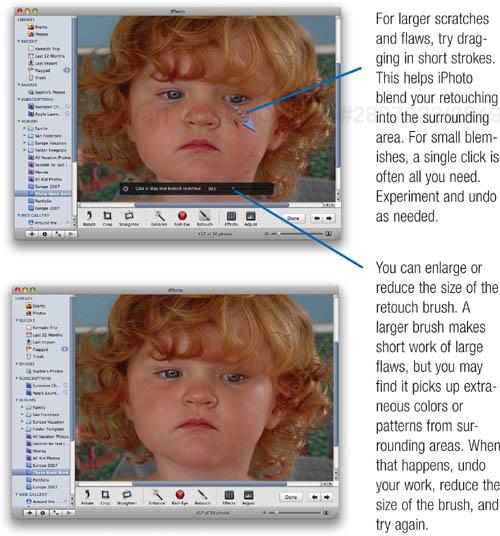
To undo all of your retouching, choose Photos > Revert to Previous. Note that you’ll also lose any other edits, such as cropping, that you performed since switching into edit view. Because of this, you might want to retouch first—that way, you won’t lose work if you decide to revert. Or take a different approach: Do your cropping and other adjustments, then click Done to exit edit view. Reopen the photo, and retouch.
Brush keyboard shortcuts. To make the retouch brush smaller, press the leftbracket ([) key. To make the brush larger, press the right-bracket key.
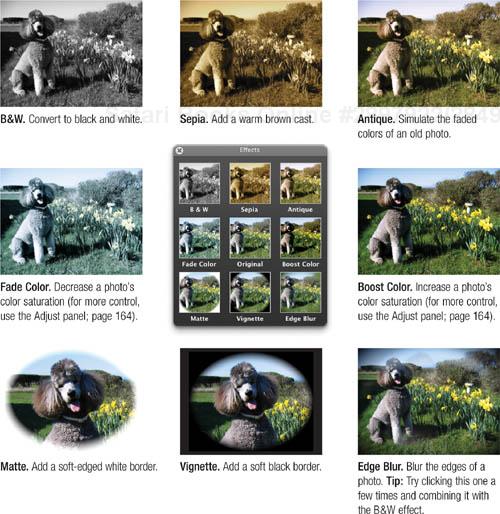
With the Effects panel, you can alter a photo to give it a unique look. Evoke the colors of an old, faded tintype. Turn a color photo into a black-and-white one. Blur the edges of a scene to create a gauzy, romantic look. Juice up the colors in a photo or tone them down.
As the tips at right describe, you can apply more than one effect to a photo, and you can apply an effect more than once.
Keep in mind that applying an effect to a photo changes that photo everywhere it appears—in albums, books, slide shows, and so on. If you want to retain the previous version of a photo, be sure to duplicate it before applying an effect: select the photo and choose Duplicate from the Photos menu or use the ![]() -D keyboard shortcut.
-D keyboard shortcut.
And there’s a local editing angle, too: You can apply black-and-white or sepia effects locally in a slide show. In print projects, you can apply these effects as well as an antique effect.
Combining effects. Some effects pair up particularly well. For a dream-like look, try combining Edge Blur with the B&W effect. For an old-fashioned look, pair the Sepia or Antique effects with the Vignette effect. To create an oval border around a photo, combine the Matte and Vignette effects.
Don’t be afraid to try offbeat combinations, either. It might seem contradictory to follow the Boost Color effect with the Fade Color effect, but you can get some interesting results when you do.
If you effect yourself into a corner, just click the Original button in the center of the Effects panel to return to safety.

When once isn’t enough. You can apply most effects up to nine times: simply click the desired effect’s button over and over again. (The two exceptions are the B&W and Sepia effects; clicking their buttons repeatedly will only wear out your mouse.)
iPhoto lets you know how many times you’ve applied an effect. To backtrack one time, click the left-pointing arrow.
Refining an effect. You can refine the appearance of an effect by using the controls in the Adjust panel (discussed on the following pages). In particular, you can improve the contrast and tonal range of a black-and-white conversion by adjusting the Saturation, Tint, and Temperature sliders. For details, see page 165.
Some photos need more help than others. That portrait captures the essence of your subject—but it’s just a bit dark. That shot of a beautiful white gardenia would be prettier if the flower didn’t have a jaundiced yellow color cast. And that shot of the dog playing in the park would be cuter if you could actually see the dog.
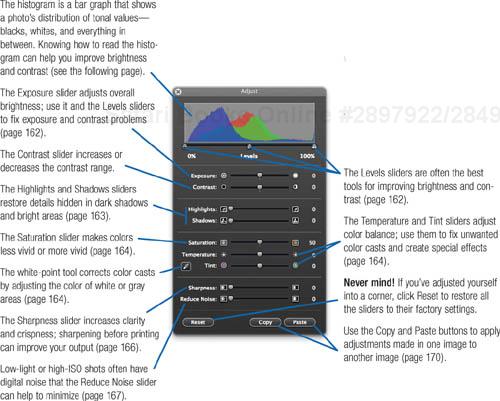
To fix problems like these, use the Adjust panel—its controls let you fine-tune exposure, tweak color balance, sharpen details and more.
The basics of the Adjust panel are a cinch: after opening a photo for editing, summon the Adjust panel by clicking the Adjust button in the edit view toolbar. Then, drag the appropriate sliders left or right until you get the desired results.
That last part—getting the desired results—isn’t always a cinch. Adjusting exposure, color balance, and sharpness can be tricky, and knowing a few digital imaging concepts can help you reach your goals. You’ll find a detailed look at these concepts in the following pages. Here’s the big picture.
Use the Exposure and Levels sliders to brighten or darken photos and improve contrast (page 162).

Use the Saturation, Temperature, and Tint sliders to remove unwanted color casts, increase or decrease color vividness, and more (page 164).

Use the Shadow and Highlight sliders to bring detail out of dark shadows and overly bright areas (page 163).

The local angle. You’ll find an Adjust panel elsewhere in iPhoto: there’s one in the custom print view (page 198) and in the calendar, greeting card, and book views (page 211). These Adjust panels aren’t identical to the one in edit view, but they’re very similar—and they’re great places to adjust a photo without changing it everywhere you may have used it.
iPhoto’s Enhance button often does a good job of punching up a photo, but it’s a “my way or the highway” feature: you either like its results or you undo.
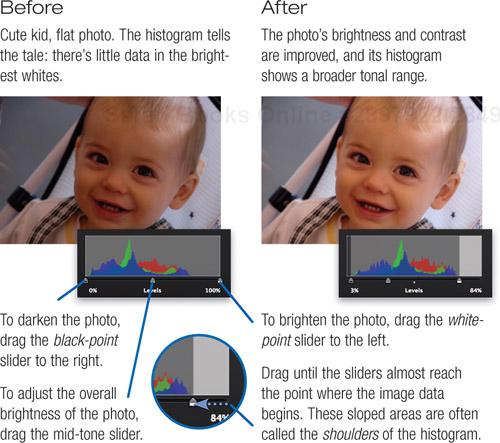
The Adjust panel is a more accommodating place to fix brightness and contrast problems. For improving a photo’s exposure and contrast, use the Levels sliders and the Exposure slider. By adjusting them—while keeping a close eye on the photo’s histogram—you can often make dramatic improvements in a photo’s appearance.
Which tools should you use? It depends on the photo. Some photos respond better to the Exposure slider, while others benefit from levels adjustments. Still other photos benefit from both approaches: do some initial tweaks with the Exposure slider, then fine-tune the levels.
When you drag the these sliders, you tell iPhoto to stretch the photo’s existing tonal values to cover a broader tonal range. Oversimplified, when you change the black point, you tell iPhoto, “See this grayish black? I want you to treat it as a darker black and adjust everything else accordingly.”
The Levels sliders can often work wonders, but they can’t work miracles. If a photo has an extremely narrow contrast range, you may see visible banding—jarring color shifts instead of smooth gradations—after adjusting levels. You’re telling iPhoto to stretch a molehill into a mountain, and there may not be enough data to allow for smooth gradations in shading and color.
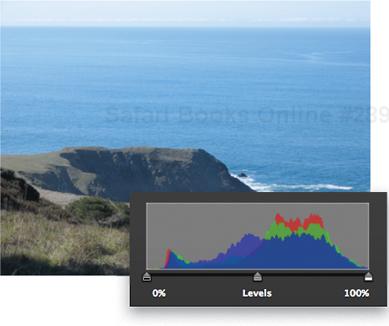
A histogram is a bar graph that shows how much black, white, and mid-tone data a photograph has. Pure black is on the left, pure white is on the right, and the mid-tones are in between. iPhoto displays a color histogram that breaks this information down into an image’s three primary-color channels: red, green, and blue.
Beneath the histogram is a set of sliders that let you change what iPhoto considers to be pure black, pure white, or mid-tone values.
This properly exposed shot has a good distribution of dark, bright, and mid-tone areas. Notice that the histogram shows a lot of bright blue data: the ocean and sky.
This overexposed shot has very little data in the blacks; everything is bunched up toward the right side—the white side—of the histogram.
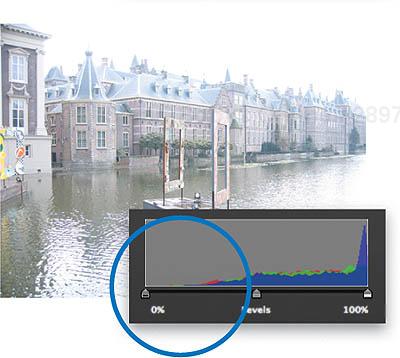
Nice close-up, but the whites could be a bit whiter; notice the absence of data at the right end of the histogram.

The Adjust panel’s Exposure slider makes a photo brighter or darker.

I enhanced this underexposed photo by dragging the Exposure slider to the right. Notice that its histogram is broader than the original (see opposite page).
Note
The Exposure slider works best with raw-format images. For JPEG-format images, the Levels sliders tend to provide more precision. For more details, see page 175.
Cameras don’t perceive high-contrast scenes as well as our eyes do. As a result, high-contrast photos are often missing something. Shadows are dark and devoid of detail, or bright areas are washed out to nearly pure white. Take a photo of a friend under a beach umbrella, and you’ll probably see a silhouette, not a smile.
The Shadow and Highlight sliders in the Adjust panel can help. To bring out details hidden in dark areas of a photo, use the Shadow slider. It might just bring a smile to your silhouetted friend’s face. And to recover details in the brilliantly lit beach sand, drag the Highlights slider.
But a little goes a long way. It’s easy to end up with an artificial-looking photo that has strange halos where bright and dark areas meet. To recover shadow details, try brightening the photo with the mid-tone or white-point Levels slider, then drag the Shadow slider a bit. You might even try brightening the photo until highlights appear too bright, then darken them a bit by using the Highlights slider.
And that’s a good guideline for all your Adjust panel endeavors: the best results often come from combinations of several adjustments, not just one.
The Adjust panel lets you perform several types of color-related adjustments. With the Saturation slider, you can adjust the vividness of a photo’s colors. Turn down the saturation to create a muted look or to compensate for a camera’s overly enthusiastic built-in color settings. Or turn up the saturation to make a photo’s colors more intense.
With the Temperature and Tint sliders, you can change a photo’s color balance. Fix a color cast introduced by artificial light or caused by fading film. Or create a special effect to make a photo feel warmer or colder.
How can you tell if the colors you see on your screen will accurately translate to an inkjet or photographic print? Advanced Photoshop users rely on display-calibration hardware and other tools to calibrate their systems so that displayed colors match printed colors as closely as possible.
You can apply this strategy to iPhoto. Or you can take a simpler approach. First, calibrate your screen using the Displays system preference. Second, if you’ll be creating your own inkjet prints, make test prints as you work on a photo, duplicating the photo as necessary to get different versions.
Finally, as with many aspects of the Adjust panel, there’s a local angle to color adjustments. When you’re printing a photo or using it in a print project, you can use the Adjust panel in those views to change colors without changing the photo everywhere you’ve used it.
To make a photo’s colors more vivid, drag the Saturation slider to the right. To make colors more muted, drag the slider to the left.
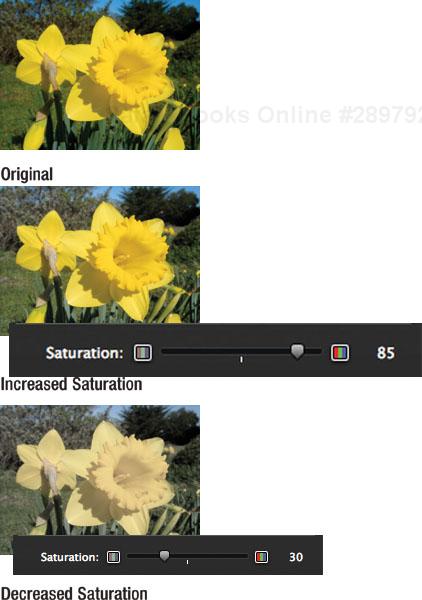
Pale and pastel. To give a pastel-like quality to a photo’s colors, decrease the saturation.
Going gray. If you drag the Saturation slider all the way to the left, you create a grayscale version of the photo. Generally, the B&W button does a better job, but experiment and see which version you like best.
Watch your gamut. If you significantly increase a photo’s saturation, you probably won’t be able to print a version that matches what you see on screen. Printers have a much narrower color range, or gamut, than does the Mac’s screen.
To adjust a photo’s color balance, use the Temperature slider, the Tint slider, or both.
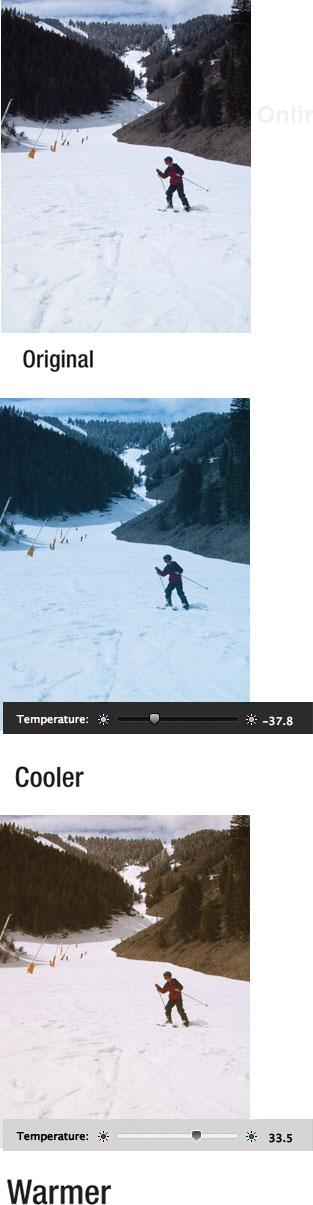
Temperature. The Temperature slider adjusts a photo’s color temperature. To make a photo appear cooler (more bluish tones), drag the slider to the left. To make a photo appear warmer (more yellow/orange tones), drag the slider to the right.
Tint. The Tint slider adjusts red/green color balance. If you drag the slider to the left, iPhoto adds red, making a photo appear less green. If you drag the slider to the right, you add green and lessen the amount of red. The Tint slider can help remove the greenish color cast that you may find in photos taken under fluorescent lighting.
Temperature Tips. Photos taken under incandescent light with your camera’s flash turned off tend to have a yellowish cast to them. I like this warm look, but if you don’t, try dragging the Temperature slider to the left to cool things off. If the corrected image looks dark, bump up the Exposure or mid-tone Levels slider.
You can often simulate different lighting conditions by shifting a photo’s color temperature slightly. Warm up a photo to simulate late afternoon sun, or cool it down to simulate shade or twilight.
Old color photos often take on a reddish-yellow appearance as their color dyes fade. To fix this, drag the Temperature slider to the left a bit.
Gray Balancing. If you have an off-color photo containing an object that you know should be gray or white, click the eyedropper tool (![]() ), then click on part of the photo that should be gray or white. iPhoto adjusts the Temperature and Tint sliders as best it can to make the object a neutral gray.
), then click on part of the photo that should be gray or white. iPhoto adjusts the Temperature and Tint sliders as best it can to make the object a neutral gray.
iPhoto’s B&W effect does a good job of converting a color photo to black and white, but you can often improve on its efforts: after clicking B&W, adjust the Saturation, Temperature, and Tint sliders.
When you drag the color sliders after converting a photo to black and white, iPhoto blends the photo’s red, green, and blue color channels in different ways. To make a black-and-white photo appear richer, bump up the saturation after clicking the B&W button. While you’re experimenting, drag the Temperature and Tint sliders to see how they alter the photo’s tonal values. (For you film fogies, this is the digital equivalent of exposing black-and-white film through color filters.)
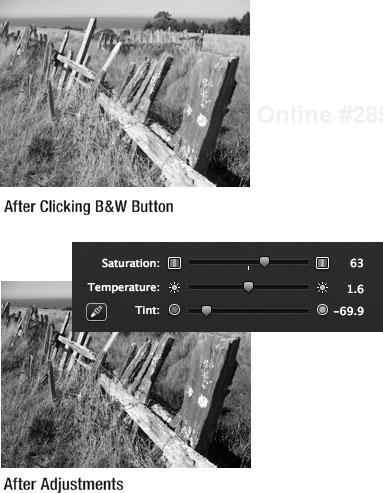
All digital images—whether captured by a scanner or a camera—have an inherent softness. Some softness is introduced by inexpensive lenses. Still more is introduced by imaging sensors and their fixed grid of pixels.
Digital cameras compensate for this inherent softness by applying some sharpening immediately after you take a photo. You can often adjust the amount of sharpness they apply; I like to turn down the sharpness settings on my cameras, preferring to sharpen later, if necessary. (If you shoot in raw mode, your camera applies little or no sharpening to the image; see page 172.)
Inkjet printers and offset printing presses (including the kind used to print iPhoto books, greeting cards, and calendars) also introduce some softness. The bottom line: several factors are working against your image to obscure fine details.
And that’s where sharpening can help. By sharpening a photo just before printing it, you can often get a much better print.
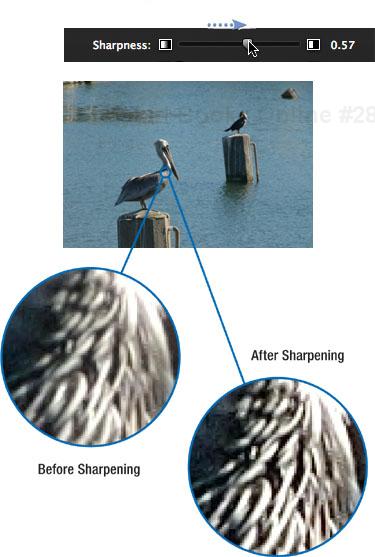
Just because digital images have an inherent softness doesn’t mean that you should apply sharpening to every photo you take. First, consider the photo itself. A photo that lacks fine details—say, a close-up of a baby’s face—won’t gain much from sharpening, and may even be hurt by it. Conversely, a photo containing fine details—such as the one on the opposite page—may benefit greatly from sharpening.
Also consider how you’ll be using the photo. A photo destined for an iDVD slide show or iMovie project probably doesn’t need sharpening. A photo that you plan to print—either yourself or by ordering prints or a book—is a better candidate for sharpening, especially if the photo contains fine details.
Printing? Sharpen heavily. Don’t be afraid to heavily sharpen a photo that you’re going to print. Even if the photo looks a bit too sharp on screen, chances are it will print nicely.
iPhoto’s edit view introduces some softness of its own when it scales a photo to whatever zoom setting you’ve made. To get the most accurate on-screen view possible, view your photo at 100 or 200 percent when making sharpness adjustments: press the 1 key to view at 100 percent, and the 2 key to view at 200 percent.
Also consider the paper you’re using. Premium glossy photo paper shows fine details best, so photos destined for it can benefit from sharpening. On the other hand, matte- and luster-finish photo papers have a fine texture that obscures detail a bit.
The local angle. Just want to sharpen a photo for printing on your inkjet printer? Don’t forget the option of sharpening using the Adjust panel in the custom print view—see page 199.
Regardless of what you see on TV, no digital imaging program can turn a blurry photo into a sharp one. Instead, iPhoto detects boundaries of light and dark, and it makes light edges a bit lighter and dark edges a bit darker. When it’s done right—that is, not to excess—our eyes perceive this as increased sharpness.
When you’re editing and enhancing a photo, it’s often helpful to see the big picture—that is, to display your photo at as large a size as possible. When you go big, it’s easier to perform color and exposure adjustments and to find flaws that need retouching.
iPhoto’s full-screen editing view gives you a picture window into your pictures. Click the Full Screen button, and your Library list and iPhoto’s buttons and controls step aside to make room for your photos. Move the mouse pointer to the top or bottom of the screen, and the menu bar or toolbar glide into view.
If you prefer to use full-screen view for all your editing tasks, use iPhoto’s Preferences command to always have photos open in full-screen view; see page 170.
Full-screen view teams up nicely with another iPhoto feature: the ability to compare two or more photos in order to find the best shot in a series. You can display two or more photos side-by-side and even edit them.
It’s worth noting that you can also compare photos in iPhoto’s standard edit view and in the editing window (see page 232). But, because full-screen view maximizes your screen space, it’s the best place for your photo-comparison sessions.
To edit a photo in full-screen view, select the photo and then click the Full Screen button (![]() ).
).
If you’re already in the standard edit view, you can switch to full-screen view by clicking the same button.
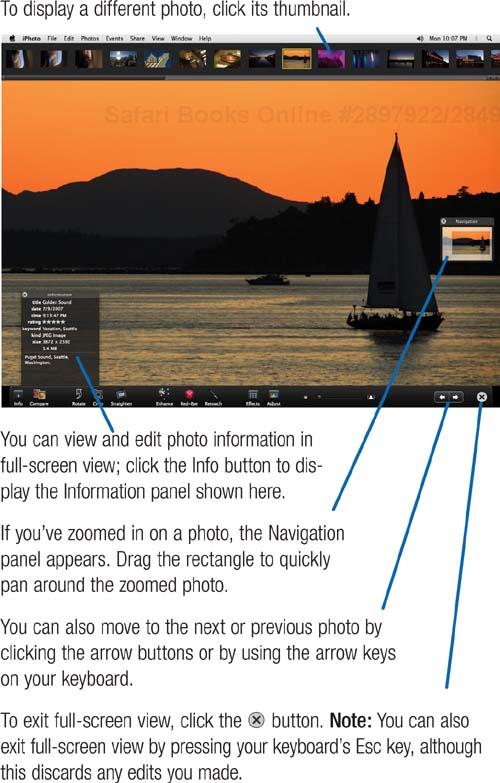
It’s always smart to take more than one version of an important shot—to experiment with different exposure settings or to simply increase your chances of capturing that perfect smile.
After you’ve imported those multiple variations into iPhoto, compare the photos to find the best one. (And if you don’t want to see the rest, consider hiding them; see page 138.)
Comparing in edit view. If you’re already working in full-screen edit view (opposite page), click the Compare button ( ). iPhoto loads the next photo and displays both side-by-side.
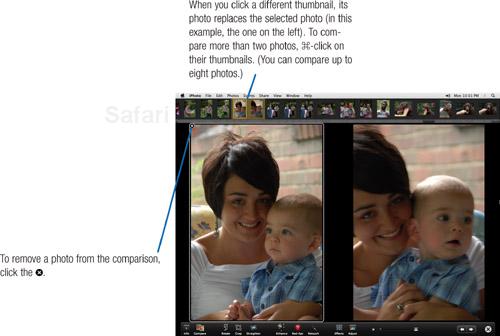
From browsing to comparing. You can also set up a comparison before entering edit view. Select the photos first, then click the Full Screen button (![]() ). For a review of ways to select photos, see page 147.
). For a review of ways to select photos, see page 147.
Normally, iPhoto displays the image you’re editing within the iPhoto window itself. But you can also open and edit a photo in a separate window that has its own editing toolbar.

You can have multiple edit windows open simultaneously, which makes it easy to compare images. For example, if you’ve duplicated a photo a few times and are trying out different sharpening or exposure-correction approaches, you can open each version in its own window and compare them—and work on them at once.

To open an image in a separate window, Control-click on it and choose Edit in Separate Window from the shortcut menu.
Prefer editing in full-screen view? Or in the separate editing window? Use the Preferences command to control where iPhoto opens your photos for editing.
Choose iPhoto > Preferences, click General, then choose an option from the Edit Photo pop-up menu. To always edit in full-screen view, choose Using Full Screen. For the separate edit window, choose In Separate Window.
Here are a few tips for taking advantage of the edit window.
Showing thumbnails. Normally, the edit window doesn’t display a photo browser containing thumbnails of adjacent images. If you’d like to see them, choose View > Thumbnails > Show.
Switching between windows. When you have multiple edit windows open simultaneously, use the Window menu to switch between them and the main iPhoto window. Or use the keyboard: press ![]() -~ (that’s the tilde, located above the Tab key) to cycle through open windows. That key sequence works in many Mac programs.
-~ (that’s the tilde, located above the Tab key) to cycle through open windows. That key sequence works in many Mac programs.
Zooming differently. Unlike iPhoto’s standard edit view, the edit window has a Size pop-up menu that lets you choose a specific zoom percentage for your photo. As I mentioned on the previous page, if you’re sharpening, you’ll get the most accurate preview of your work by viewing at 100 or 200 percent.
Resizing the window. Remember that you can quickly resize the edit window to fill your screen by clicking the green button in the upper-left corner of the window or choosing Window > Zoom.
Sometimes, you might have a series of photos that can benefit from the same adjustments—maybe they’re all similarly dark, for example, or all have the same color cast.
With the Copy and Paste buttons in the Adjust panel, you can apply one photo’s adjustments to other photos. After tweaking a photo to perfection, click the Copy button in the Adjust panel. Next, open a different photo in edit view, display the Adjust panel, and click Paste.
You can activate various editing tools by pressing a single key on your keyboard (see the table below).
Table . Keyboard Editing
For this tool | Press |
|---|---|
Crop | C |
Straighten | S |
Red-eye | R |
Retouch | T |
Adjust panel | A |
Effects panel | E |
White-point tool | W |
While you’re pawing your keyboard, remember that you can open a photo for editing by selecting the photo and pressing the Return key—you don’t have to click the Edit button. To save changes and return to thumbnail browsing, press Return. To save changes and edit an adjacent photo, press an arrow key. To discard changes and exit edit view, press Esc. And to switch to full-screen edit view, press Option-![]() -F.
-F.
Want to go straight from browsing photos to editing one? Press Option while double-clicking a photo’s thumbnail, and it opens in edit view. (And remember, if you always want iPhoto to work this way, use the Preferences command to set it up.)
Most of the time, you probably enter edit view while browsing your library or an album. But you can also enter edit view while working on a book, calendar, or greeting card: just Control-click on the photo and choose Edit Photo from the shortcut menu.
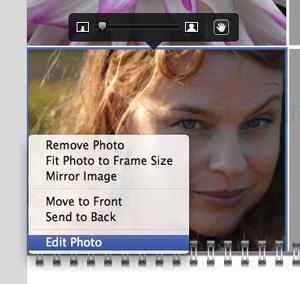
The thumbnail browser—that row of images at the top of the edit view—is a handy tool for quickly accessing another photo in the same event or album.
But it has another use, too: you can drag a thumbnail from the photo browser directly into an album, book, or slide show. If you’re on an editing binge and suddenly realize that a certain photo would go nicely in a specific album, slide show, or book, there’s no need to exit edit view. Just drag the photo from the photo browser to the album, slide show, or book.
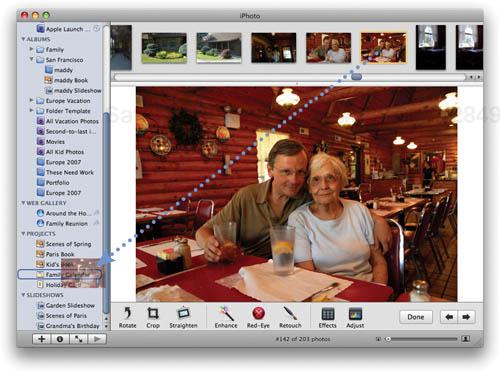
If you’re an advanced photographer, a control freak, or both, there’s an image format that may change the way you shoot. The image format is called raw, and it’s supported by many mid-range and virtually all high-end cameras.
Here’s why raw matters. When you shoot in JPEG format, your camera permanently alters the photo: tweaking color balance and saturation, adjusting sharpness, and compressing the image to use less space.
Today’s cameras do these jobs well, but you pay a price: you lose some control. You can still adjust the color balance, exposure, and sharpness of a JPEG image, but within a relatively narrow range. Exceed those limits, and you risk visible flaws.
When you shoot in raw mode, your camera saves the exact data recorded by its light sensors. Instead of being locked into the camera’s alterations, you get the original, unprocessed image data: the raw data. Transfer this raw image to the Mac, and you can use iPhoto or other imaging software to fine-tune the image to a degree that the JPEG format doesn’t permit.
Shooting raw has drawbacks, and many photographers prefer the convenience and efficiency of JPEG. But for pixel perfectionists who want maximum control—especially over shots taken in tricky lighting conditions, such as candlelight—raw is the best way to shoot.
To shoot in raw mode, venture into your camera’s menus—specifically, to the menu that controls image format. In some cameras, you’ll find this option in the Mode menu. With others, such as the Canon EOS-10D shown here, this option is in the Quality menu.
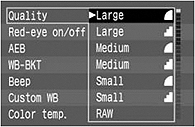
Make sure. It’s a sad fact of life: each camera company has created its own raw format. Even if iPhoto supports your camera, it may not recognize its raw-format images. Before shooting raw, verify that iPhoto supports your camera’s raw format. You may find that you need to update to a newer Mac OS X version—Apple often adds support for new cameras when it releases a Mac OS update. For a current list of supported cameras, go to www.macilife.com/iphoto.
Make room. Raw files are often several times larger than their JPEG equivalents. For example, an eight-megapixel JPEG might use 4MB while its raw version uses 16MB. Because you’ll get fewer raw images on a memory card, you might want to buy a few extra cards.
Make time. With some cameras, raw images can take longer to save after you snap the shutter. If you’re shooting a fast-changing scene, verify that your camera’s raw mode is fast enough to keep up with your subject.
Those large raw files also take longer to transfer to the Mac. If your camera and Mac don’t provide USB 2.0 interfaces, get a FireWire media reader and use it to transfer your shots (see page 133).
Learn more about raw-format photography. www.macilife.com/iphoto
In some ways, working with raw photos in iPhoto is no different than working with JPEG photos. You can import raw photos into your library, edit them using all of the edit-view features I’ve described previously, and share them using all of iPhoto’s sharing features.
Importing raw photos. Aside from making sure you have plenty of free disk space, you don’t have to do anything special to import raw photos into iPhoto. If iPhoto supports your camera’s raw format, it imports the raw photos and stores them in your photo library.
JPEG companions. When you import raw photos, iPhoto creates JPEG versions of them. You don’t see thumbnails for these JPEG companions in your photo library, but they’re there.
iPhoto creates these JPEG versions for use by programs that don’t understand the raw format. For example, when you access your iPhoto library from a different program, such as iDVD, that program uses these JPEG versions.
However, when you open a raw photo in edit view, iPhoto does indeed use the original raw-format image. For details on how iPhoto handles raw images during and after the editing process, see the following pages.
Raw plus JPEG. Some cameras save a JPEG version of a photo at the same time that you shoot a raw version. This is a handy convenience that gives you the best of both worlds: a compact JPEG and a digital negative—a phrase often used to describe raw-format images.
When you import photos from such a camera, iPhoto imports both the JPEG and the raw versions of each shot. It also displays both versions, and if you’re planning to do some editing, you’ll want to make sure you open the raw version—you want iPhoto to base your changes on the highest-quality version available.
To see which photo is the JPEG version and which is the raw version, open the Information pane and select one of the photos. iPhoto displays its format in the Kind area of the Information pane.
Raw and Leopard. Mac OS X 10.5 (Leopard) provides improved image quality for raw-format images. For more details, see the following pages.
If you edit a raw photo that you’ve already edited, iPhoto returns to the original raw version of the photo, and applies all the changes you’ve made—today’s as well as yesterday’s. This is a big step forward—as I mentioned on page 124, iPhoto ’08’s non-destructive editing gives you far more flexibility than earlier iPhoto versions provided. You can edit an image as many times as you like without worrying about introducing quality loss each time.
The exception to the rule. Ah, but there’s an exception. If you edited a raw photo using an earlier iPhoto version, iPhoto ’08 applies your latest edits to the edited JPEG that the older version of iPhoto created. Open that edited raw photo in edit view, and you won’t see the RAW badge at the bottom of the iPhoto window—and any new edits you make are applied to the JPEG version.
So what do you do if you’ve been using iPhoto for a while and you want the full power of non-destructive editing? Select the edited version of the raw photo and choose Photos > Revert to Original. iPhoto discards the JPEG version (and any edits you made). Now you can bring iPhoto ’08’s non-destructive editing power to bear.
Get links to the best Photoshop resources. www.macilife.com/iphoto
There’s another way to get to your original raw data after making edits: export the original raw file from iPhoto.
First, select the JPEG version of the photo that iPhoto created after you edited the raw file. Next, choose Export from the File menu. Finally, in the Export Photos dialog box, choose Original from the Kind pop-up menu. Save the file somewhere convenient, such as on your desktop.
When might you use this approach? Here’s one scenario. You’ve edited a raw photo in iPhoto, but then you decide to try editing the original raw file in Adobe Photoshop Elements. You want to keep the version you edited in iPhoto, so instead of reverting the photo or duplicating the edited version, you export a raw version for use in Photoshop.
As I describe on the following pages, iPhoto pairs up beautifully with the Adobe Photoshop family. This marriage is particularly happy where raw images are concerned: in my experience, Adobe’s Camera Raw software does a better job than iPhoto when it comes to decoding and processing raw files. Camera Raw, even the version included with Photoshop Elements, provides more control than iPhoto’s edit view—and control is what raw is all about.
I use iPhoto to import and store raw photos, but when I’m after maximum quality, I bring those photos into Photoshop. I fine-tune the photos in Photoshop, export them as JPEGs, then import those JPEGs back into iPhoto for sharing. It’s more work, but the results are better.
To ensure that iPhoto supplies Photoshop with the original raw file and not the JPEG stand-in, choose Preferences from the iPhoto menu, click Advanced, and then check the box labeled Use RAW Files with External Editor. If you don’t, iPhoto will hand Photoshop a JPEG when you double-click the raw file—exactly what you don’t want.
Given that you’re obsessed enough with image quality to be shooting in raw mode to begin with, you might lament the fact that iPhoto saves your edited images in the lossy JPEG format. You have a higher-quality alternative: tell iPhoto to use the TIFF format when saving edits to raw images.
To do so, choose Preferences from the iPhoto menu, click Advanced, and check the box labeled Save Edited RAW Files as 16-bit TIFFs. The resulting file will be much larger than a JPEG, but it will have that 16-bit headroom described on page 173, and it won’t have any lossy compression.
Is it worth the extra storage space? Possibly, particularly for images whose brightness or levels you’ve altered dramatically. JPEG versions of these images might show that undesirable banding I mentioned on page 162. Consider doing some tests—let your eyes be your guide.
The Adjust panel’s Exposure slider works differently when you’re editing a raw photo. When you’re editing a raw image, the Exposure slider works hard to avoid clipping blacks or whites: as data approaches the black or white limits of the histogram, it tends to bunch up before it finally spills over the brink into the abyss of clipping.
With JPEG photos, the Exposure slider shifts tonality in a different way, one that is more analogous to decreasing or increasing the camera’s shutter speed.
One side effect of this approach is that it’s much easier to introduce clipping by dragging the slider too far in either direction. A little bit goes a long way. For this reason, it’s best to use the Levels sliders, particularly the mid-tone slider, to brighten or darken JPEG images.
The editing features in iPhoto can handle many image-tuning tasks, but at the end of the day, Adobe Photoshop is a better-equipped digital darkroom. Photoshop and Photoshop Elements, its lighter-weight, less-expensive cousin, provide far more sophisticated retouching tools and more ways to improve a photo’s lighting and exposure. And as I mention on the previous page, Photoshop is also a better tool for serious raw-format work.
Photoshop (and Elements—everything on these pages applies to both) has slick features that have no counterparts in iPhoto. A library of exotic visual effects lets you simulate pastels, watercolors, brush strokes, and more. You can cut out the subject of a photo and superimpose it over a different background. You can stitch photos together into dramatic panoramas.
Using Photoshop for retouching doesn’t mean abandoning iPhoto. The two programs work well together: you can use iPhoto to import, organize, and share photos, and Photoshop to enhance and retouch them.
Here’s an introduction to some ways to turn iPhoto and Photoshop into collaborators.
A photo in your iPhoto library needs some help. How do you open it in Photoshop? You have a few options.
Drag and drop. If you’ve already started Photoshop, its icon appears in your dock. To open a photo, simply click on the photo in your iPhoto library and drag it to the Photoshop icon in the dock. When the icon highlights, release the mouse button, and Photoshop opens the photo directly from your iPhoto library. This drag-and-drop technique is handy if you use Photoshop only occasionally.
Direct connection. If you end up using Photoshop for all your image editing, you can set up iPhoto to directly hand off photos to Photoshop.
Choose Preferences from the iPhoto menu and click the General button. From the Edit Photo pop-up menu, choose In Application. In the dialog box that appears, navigate to your Applications folder, then locate and double-click the icon for your version of Photoshop.
From now on, when you double-click a photo in your library, iPhoto will hand that photo off to Photoshop.
Note
If you plan to send raw images from iPhoto to Photoshop, be sure to follow the instructions on the previous page.
Middle ground. Maybe you use Photoshop frequently, but you also use iPhoto’s edit view for cropping and other simple tasks. Head for the middle ground: specify Photoshop as your external image editor as described above, then return to the Preferences dialog box and choose one of the other Edit Photo options, such as In Main Window or Using Full Screen.
This restores iPhoto’s factory setting: double-clicking a photo opens it in Edit view. But iPhoto doesn’t forget that you’re also a Photoshop user. To open a photo in Photoshop, Control-click on the photo and choose Edit in External Editor from the pop-up shortcut menu.
iPhoto does shadow and highlight recovery (page 163); Photoshop does it better, providing finer control and better quality—especially if you shoot raw.
One of the best reasons to use Photoshop is a feature called layers. In Photoshop, an image can have multiple layers, and each layer can contain imagery or image-correction information. By using layers, you can make dramatic modifications to an image without ever altering the original data. This not only gives you more editing flexibility, it helps preserve image quality.
One particularly powerful use of layers involves selective lightening and darkening: changing the brightness of part of a photo without affecting other areas. It’s a common technique in darkrooms, it’s easy in Photoshop—and impossible in iPhoto.
There is more to layers than I can describe here. To learn about them, open Photoshop’s online help and search for layers and adjustment layers.
iPhoto’s Retouch tool does a good job of removing blemishes, dust specks, and other minor flaws. But it’s no plastic surgeon.
In this photo, a pair of utility wires slice across a scenic vista. I used two retouching tools to improve the view.
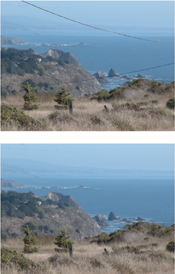
Spot healing brush. Photoshop’s spot healing brush works much like iPhoto’s Retouch tool, only better. Click the spot healing brush tool in the tool palette, then specify a brush size that’s slightly larger than the flaw you want to remove. You can choose a brush size in the Tool Options toolbar, but it’s more efficient to use the keyboard: press the right bracket key (]) for a larger brush, and the left bracket key ([) for a smaller one.
Next, simply click on the flaw you want to remove. To remove a larger flaw, such as a scratch or utility wire, click and drag to paint over it.
Clone stamp tool. The spot healing brush works best when the area surrounding the flaw is similar to the area containing the flaw. For this example, the spot healing brush did a great job of removing the wires from the areas surrounded by open sky or water, but it had trouble with areas that were surrounded by fine details, such as the offshore rocks and distant shoreline.
To fix those areas, I used Photoshop’s clone stamp tool, which copies pixels from one area of an image to a different area.
After activating the clone stamp tool, point to an area adjacent to the flaw you want to fix. Then, hold down the Option key and click. Option-clicking tells Photoshop what area to use as a guide when healing the flaw, a process Photoshop gurus refer to as “defining the source point.” After you’ve done that, paint across the flaw to copy pixels from the source point.
With iPhoto’s slide show features, you can display on-screen slide shows, complete with background music from your iTunes music library. iPhoto even displays a gorgeous transition between images. With the dissolve effect, for example, one photo fades out as the next one fades in.
And with the automatic Ken Burns effect, you can have iPhoto pan and zoom across each photo.
You can create two different types of slide shows: a basic slide show that provides quick results, and a saved slide show that allows for much more control, including the ability to specify different durations and transitions for every photo, and to design your own Ken Burns panning and zooming moves (see page 180). Apple calls this kind of slide show a cinematic slide show.
Most of the time, you’ll want to add photos to an album before viewing them as a basic slide show. That way, you can arrange the photos in a sequence that best tells your story. If you’re in a hurry, though, just select some photos in your library and then display the slide show as described at right. Or fine-tune an event, hiding photos you don’t want to show, then select the event thumbnail.
Somebody get the lights.
In a hurry? Select the album or photos you want to screen, press the Option key, click the ![]() button near the bottom of the iPhoto window, and sit back and watch.
button near the bottom of the iPhoto window, and sit back and watch.
Want more control? Follow these instructions to customize your slide show’s music, transitions, and more.
Select the photos you want to show. To show an entire album or event, select the album or event.
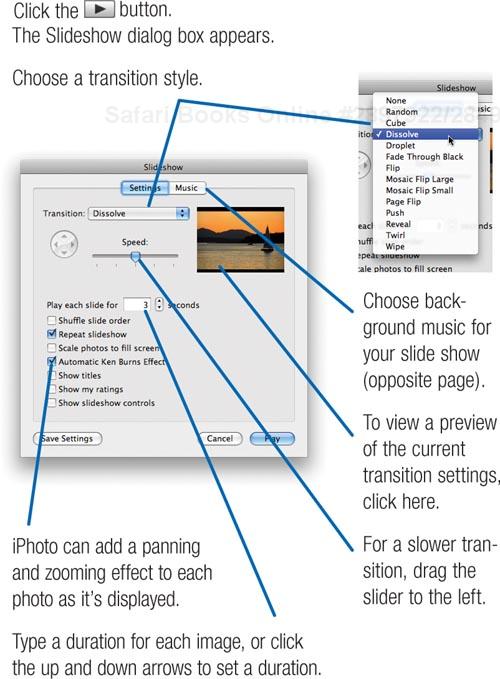
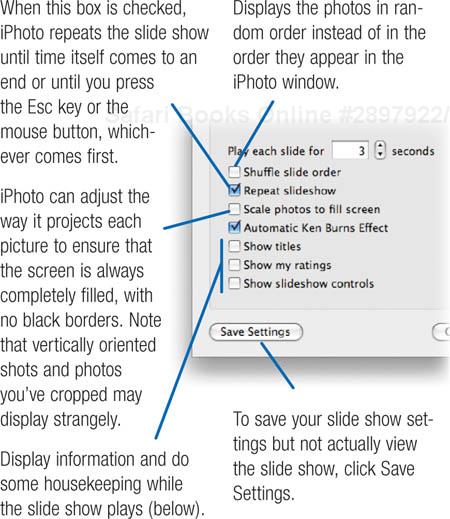
Click ![]() to begin.
to begin.
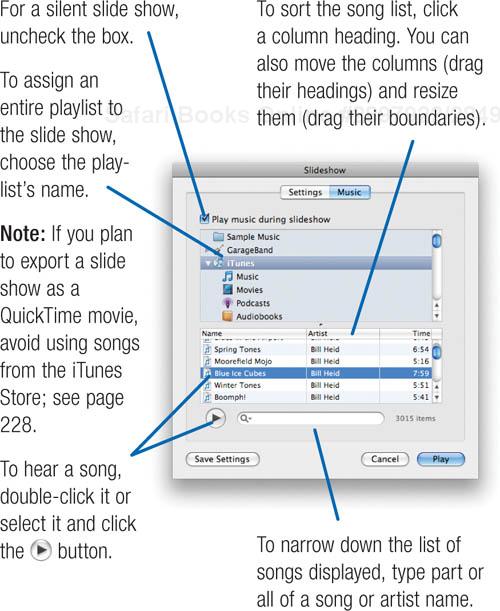
Screen Test: Reviewing Photos
If you move the mouse while a slide show plays back, a set of controls appears that lets you rotate, rate, and delete the currently displayed photo. This is a handy way to perform common housekeeping chores on a freshly imported set of photos: click Last Import, start the slide show, and get to work.
Note
The workings of the Trash button depend on what you’re viewing. If you’re viewing a slide show of an album, clicking the Trash button removes a photo from the album. If you’re viewing photos directly from the Photo Library (for example, you clicked the Last Import item), clicking the Trash button moves the photo to the iPhoto Trash.
iPhoto’s basic slide shows are easy to create, but they have design limitations. Every photo appears on the screen for the same amount of time. All photos have the same transition between them. And you can’t design your own Ken Burns pan-and-zoom moves.
iPhoto provides a second type of slide show that shatters these limitations. Depending on whom you ask, it’s called a saved slide show or a cinematic slide show. You’ll call it cool.
With a saved slide show, you can specify different durations for each shot. That opening view of the Parisian skyline? Five seconds. That montage of mouth-watering bakery shots? Just a couple of seconds apiece.
A saved slide show also lets you mix and match transitions. For example, you might want a dissolve between most shots, but when you change major themes, spice things up with a page peel.
With a saved slide show, you can also tell Ken Burns exactly what to do. Set up your own pans and zooms to highlight a photo’s subject. Or simply zoom in to crop a photo—no need to change the original photo in your library.
Similarly, you can apply black-and-white and sepia effects to the photos in a saved slide show without having to edit the original photos.
When you’ve finished designing your slide show, you can view it on screen, export it as a QuickTime movie (page 220), or send it to iDVD (page 298).
Select the photos you want to include in the slide show. To include an entire album, select its name in the Albums list.
Choose File > New Album, select the Slideshow item, then click Create.
iPhoto creates a saved slide show, adds it to your Slideshows list, and displays the slide show editor.
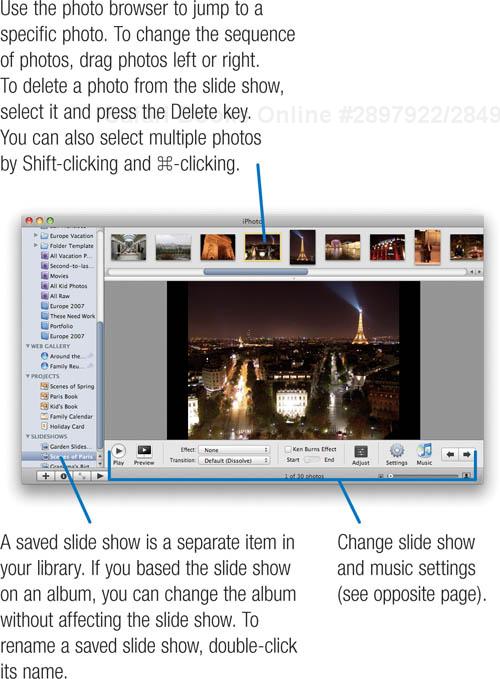
Use the tools in the slide show editor to design your slide show.
Most of these tools operate on the currently selected photo—the one that appears above the tools and is selected in the photo browser. But you can also apply some settings, such as transition, to several photos at once: select the photos’ thumbnails in the photo browser, then make your settings.
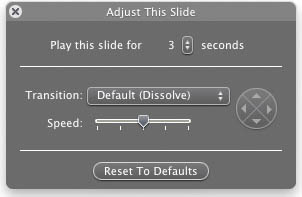
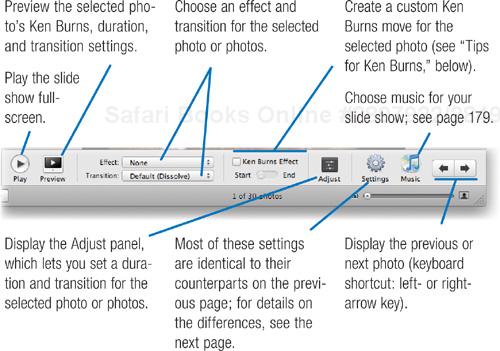
When you’re creating a saved slide show, you have some additional settings options. Use the Transition pop-up menu to specify a default transition for the slide show—that is, a transition that iPhoto will use unless you specify a different transition for a specific photo or photos.
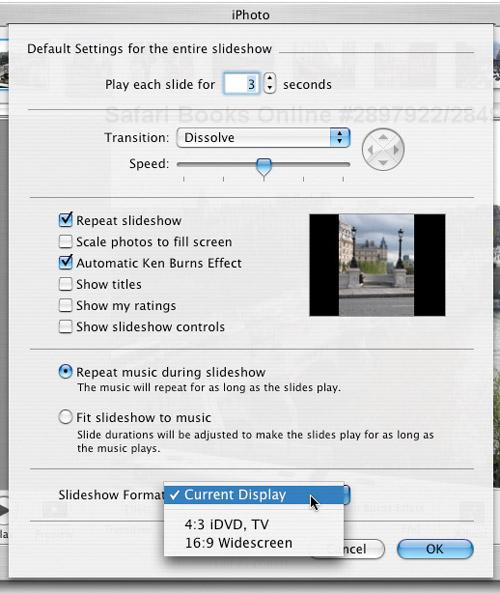
You can also have iPhoto fit the slide show’s duration to match the length of its music soundtrack: click the Fit Slideshow to Music option.
And finally, you can have iPhoto create a widescreen (16:9 format) version of your slide show—ideal if you have an Apple Cinema display or want to create a widescreen-format DVD in iDVD. To create a widescreen slide show, choose 16:9 Widescreen from the Slideshow Format pop-up menu.
You’ve crafted a gorgeous slide show and decide you want to add more photos to it. It’s easy: just drag the photos to the slide show’s item in your Slideshows list. You can even drag photos from the edit view’s photo browser into a slide show.
Planning to use the Ken Burns effect in a slide show? There’s something you should know about Ken: he prefers the dissolve transition and the fade through black transition.
If you use any other type of transition in a slide show, a Ken Burns move will end right before the transition starts, and won’t begin for the next photo until the transition has finished displaying. Having those smooth moves abruptly stop and start before and after each transition can appear jarring with some transitions.
Bottom line: if you’re using Ken Burns, lean toward the dissolve or fade through black transitions.
Want more than one song to play back during a slide show? In iTunes, create a playlist containing the songs you want to use. Then, return to iPhoto and choose the playlist’s name when assigning music to the slide show or album.
Basic slide shows—the kind you see when you click the Play button in the iPhoto window—provide a couple of customizing opportunities.
A song for each album. You can assign a different song to each of your albums. When you view a particular album as a basic slide show, iPhoto plays the song you’ve assigned to it.
To assign a song to a specific album, select the album in your Albums list. Next, drag a song from the iTunes window into the iPhoto window. iPhoto asks if you’d like to “make the selection your default slideshow music.” Click OK. To assign a different song to a different album, repeat this drill.
Custom settings, too. Every album can have its own basic slide show settings—and not just for music. All of the other options that you can adjust in the Slideshow dialog box—transition style, photo scaling, and so on—can also apply on an album-by-album basis. Just select the album whose settings you want to adjust, click the Play button near the bottom of the iPhoto window, make your adjustments, and click Save Settings.
Keep in mind that these tips refer to basic slide shows—the kind I described on pages 178–179. Saved (cinematic) slide shows can obviously have their own settings, too, but you adjust them using the slide show editor.
If you frequently create saved slide shows, you might want to add a Slideshow button to iPhoto’s window—it’s a bit more convenient than using the New Album command. Choose View > Show in Toolbar > Slideshow.
While you’re customizing the toolbar, consider adding or removing other buttons to reflect the way you use iPhoto.
You can add some interesting special effects to your slide shows by duplicating photos, modifying the duplicates, then sequencing them in the slide show. For example, you can have a photo start out in black and white and then dissolve or wipe into a color version.
To duplicate a photo, select it, then choose Duplicate from the Photos menu (![]() -D).
-D).
You can have iPhoto display additional information and other items during a slide show. For a basic slide show, use the Slideshow dialog box. For a saved slide show, use the Settings dialog box.
Display Titles. Each photo’s title appears in the upper-left corner of the screen.
Table . Slide Show Keyboard Controls
To Do This | Press |
|---|---|
Pause the slide show | Spacebar |
To resume the slide show, press the spacebar again. | |
Adjust the speed of the slide show | The up arrow and down arrow keys |
Manually move through the slide show | The left arrow and right arrow keys |
Rate the currently displayed photo | 0 (zero) through 5 |
Rotate the currently displayed photo |
|
Stop the slide show | Esc (or click the mouse button) |
Display My Ratings. Each photo’s rating appears in the center at the bottom of the screen.
Display Slideshow Controls. The rotation, rating, and deletion tools described on page 181 appear immediately—no need to move the mouse first.
Want to email a slide show to someone or post it on a Web site? Configure the slide show settings as desired, then use the Export command to create a QuickTime movie as described on page 220. Feeling ambitious? Take things a step further: Import the movie into GarageBand and add narration and chapter markers to create a “slide show podcast” (page 376).
Note
If you plan to distribute your slide show’s movie, avoid using iTunes Store purchases as soundtracks—the songs won’t play on computers that aren’t authorized for your iTunes account (for a workaround, see page 229). Note that this restriction does not apply to iTunes Plus purchases, which lack DRM protection.
To earn some extra style points, sprinkle some titles into a slide show. For example, create a set of titles—one for each destination—for your vacation slide show.
You already have a great program for making titles. It comes with pre-designed styles that are ready for your own photos and text. The program is called iPhoto.
By combining iPhoto’s greeting card features with the Mac’s ability to create a PDF file of just about anything, you can create great-looking titles and add them to your slide shows.
Select the photo or photos that you want to be part of your title.
Click the Card button at the bottom of the iPhoto window.
Choose the Postcard style, then choose a theme. (For details on creating greeting cards, see page 218.)
Want text? In the greeting card editor, use the Design pop-up menu to choose a design that allows for text. Type your text and perform any other design tweaks.
Choose File > Print.
In the Print dialog box, click the From button and be sure that the page range is 1 to 1. (There’s no need to create a PDF of the “back” of your postcard, unless you want to use it in your slide show, too.)
Click the PDF pop-up menu and choose Save PDF to iPhoto.
iPhoto and Mac OS X go to work, and a few moments later, your library contains a PDF of your postcard. To see it, click the Last Import item in the Recent list.

Your PDF title is ready for its screen debut. If you’ve already created a slide show, drag the title to the slide show in your Slideshows list. If you haven’t created the slide show yet, add the title to the album where you’ve stashed the slide show’s images.
Variations. To animate your title slides, use the Ken Burns effect. Here’s a fun trick: Follow your title with the same photo that you used in the title. Apply the Ken Burns effect to the title so that it zooms in slowly, ending at a point where the photo almost fills the viewing area. Use a cross-dissolve effect between the title and the following photo. When you play your slide show, the title will zoom in, then its background and text will fade away, leaving just the photo.
Here’s another way to put Ken to work. Use one of the postcard styles that holds two or more photos, then create a Ken Burns move that slowly pans across the photos.
You can also save a book or calendar page as a PDF and add it to a slide show. Making a slide show of a three-week road trip? Start it with a calendar page whose dates contain photos from the trip. Then, use the Ken Burns effect to pan across the calendar page.
If you use Mac OS X 10.5 (Leopard), you have yet another way to share a slide show: iChat Theater. This sublimely cool addition to Apple’s instant-messaging software lets you broadcast a slide show (among other things) to people with whom you’re chatting. They’ll see Ken Burns moves and transitions, and will even hear your background music.
And your friends don’t have to be using Leopard, either—earlier iChat AV versions can also view iChat Theater broadcasts, as can compatible instant-messaging software for Windows.
Choose File > Share iPhoto With iChat Theater.
A media browser appears.

In the media browser, select an album, then click Share.
iChat tells you to invite a buddy to a video chat.

Establish a video chat: select a name in iChat’s Buddy List window, then click the video camera button (
 ) at the bottom of the window.
As soon as your victim accepts the invitation, the slide show begins.

Your Mac switches to iPhoto, where a window lets you control the slide show.

Already connected? The instructions above assume that you haven’t yet begun a video chat with someone. If you’re already in a video chat, skip Step 3.
Sound options. Your chat buddy will hear whatever music you’ve assigned to basic slide shows (page 179). If your Mac has a microphone, your chat buddy will also hear you talk. If you’d rather not broadcast a music soundtrack—maybe you’d prefer to narrate—uncheck the Play Music During Slideshow box in iPhoto’s Slideshow dialog box. (You’ll need to do this before starting the slide show broadcast.)
Conversely, if you don’t want your buddy to hear you type or talk during a slide show, click the Mute button (![]() ) in the Video Chat window.
) in the Video Chat window.
Sharing other items. The iPhoto/iChat connection goes beyond slide shows. Want to broadcast the photos from an event without creating an album? Start a video chat, then drag the event thumbnail into the Video Chat window.
You can also broadcast just a few photos: select them, then drag them into the Video Chat window.
Email takes the immediacy of digital photography to a global scale. You can take a photo of a birthday cake and email it across the world before the candle wax solidifies. It takes just a few mouse clicks—iPhoto takes care of the often tricky chores behind creating email photo attachments.
iPhoto can also make images smaller so they transfer faster. Take advantage of this feature, and you won’t bog down your recipients’ email sessions with huge image attachments.
Normally, iPhoto uses the Mac OS X Mail program to email photos. Using a different email program, such as Microsoft Entourage? Use the Preferences dialog box to specify your email program.
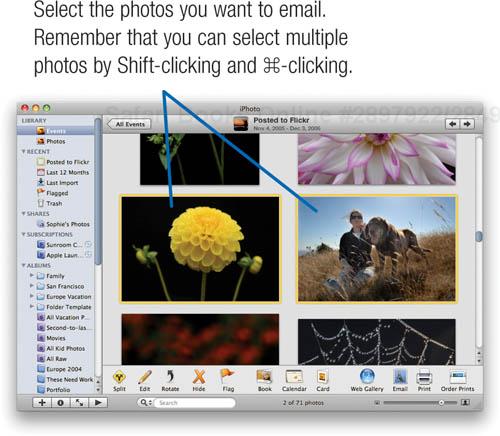


Exporting Photos By Hand
When you email a photo using iPhoto’s Email button, iPhoto uses the name of the original photo’s disk file as the name of the attachment. Problem is, most of your photos probably have incomprehensible filenames, such as 200203241958.jpg, that were assigned to them by your digital camera.
You might want an attachment to have a friendlier file name, such as holidays.jpg. For such cases, export the photo “by hand” and then add it to an email as an attachment. Choose Export from iPhoto’s File menu, and be sure the File Export tab is active.
Export the photo as described at right. Save the exported photo in a convenient location, such as on your desktop. (You can delete it after you’ve emailed it.) Finally, switch to your email program, create a new email message, and add the photo to it as an attachment.
The settings below are good starting points for exporting a photo by hand. Here are a few more details and pointers.
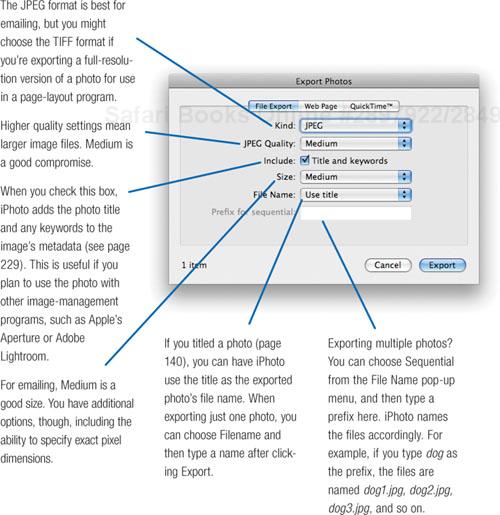
Email is an easy way to share photos over the Internet, but it has its drawbacks. Emailing photos to a large group of friends and family is a chore. And your recipients end up with a collection of photos scattered throughout their email inboxes.
If you have an account with Apple’s .Mac Internet service, you have a much better way to share photos over the Internet: Web gallery albums. Publish some photos as a Web gallery album, and friends and family can view the photos on the Web. Instead of dealing with clumsy email attachments, they can visit a sharp-looking Web page that makes your photos look their best.
That isn’t all. You can set up a Web gallery album with options that no email program can match. Allow visitors to download your photos so they can print them or add them to their own photo collections.
You can even allow visitors to upload their own photos to a gallery album. If the entire family was shooting photos at the reunion, set up a gallery album that lets everyone contribute his or her best shots.
It gets even better. Other iPhoto ’08 users can subscribe to your Web gallery albums—much as they would subscribe to a podcast. Add new shots to an album, and they’ll automatically appear in someone else’s iPhoto. And if you have an iWeb site, you can add your gallery albums to any iWeb page (page 405).
Emailing photos seems kind of old-fashioned, doesn’t it?
Select some photos, or better yet, select an album or event.
Click the Web Gallery button or choose Share > Web Gallery.

Specify your Web gallery options, then click Publish.
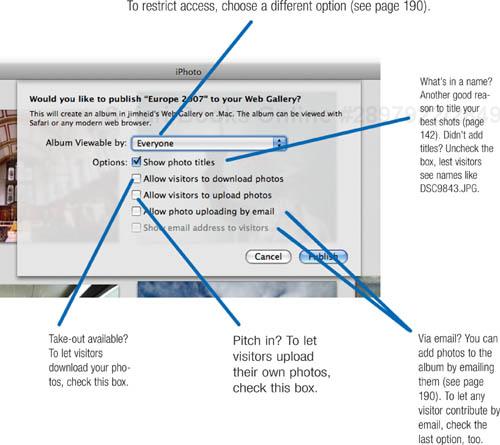
When you click Publish, iPhoto uploads your photos to .Mac. The gallery album appears in the Web Gallery list.
Select this item, and the album’s photos appear along with the album’s Web address, which you can click (see page 190).
To email someone about your new album, click Tell a Friend.
You can change a gallery album that you’ve published—keep it fresh, change settings, and more.
Change the content. To add new photos to the gallery album, drag them to the album in the Web Gallery list. To remove a photo from the gallery album, select the photo and press the Delete key. You can also edit photo titles and change the order of photos.
After making changes, click the update icon (![]() ) next to the published album’s name. iPhoto updates the album on the Web.
) next to the published album’s name. iPhoto updates the album on the Web.
Change settings. Changed your mind about allowing downloads? Did you decide to make a public album private? Select the published album, then click the Settings button to access the same options shown on the opposite page.
Collect contributions. If you’ve allowed others to upload photos to the album, you can update the album to grab the latest additions. Click the update icon; if iPhoto finds new photos, it downloads them.
Delete an album. To completely remove a gallery album from your .Mac account, select the album in the Web Gallery list, and then press the Delete key.
You can subscribe to a gallery album that another iPhoto ’08 user has created. When you do, the album appears in your copy of iPhoto. You can enjoy and share the photos without having to visit the Web page, and if the creator of the album changes it, iPhoto can update your copy.
On the gallery album page, click Subscribe.

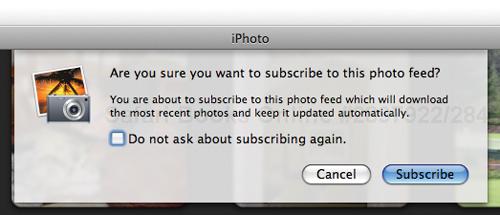
Click the Subscribe button or press Return. iPhoto loads the photos from .Mac and adds the gallery album to the Subscriptions area.
Now what? You can do almost anything with the photos in a subscribed album: print them, use them in slide shows, create calendars, and so on. You can assign titles and keywords and hide the shots you don’t like. But you can’t edit a photo—not without some simple trickery (see page 190).
Updating. To update an album to which you’ve subscribed, click the update icon to the right of its name (![]() ). iPhoto downloads any new photos.
). iPhoto downloads any new photos.
Auto update. To have iPhoto check your subscriptions automatically, choose iPhoto > Preferences, then click Web Gallery. Choose an interval from the pop-up menu.
Unsubscribing. No longer want to subscribe to an album? Select it in the Subscriptions list and press the Delete key. iPhoto gives you the option of moving the photos into your library—if you still want to access the photos but don’t care about updating, for example.
Here’s a look at the Web gallery albums your online fans will see, along with a tour of their features.

The index page. Click the My Gallery button on a gallery album, and you see a visual table of contents for all the albums you’ve published. Each album has its own thumbnail, and you can skim across the thumbnails to see its photos.
Changing the index page name. Is the name “My Gallery” too generic, too dorky, or both? Change it. Choose iPhoto > Preferences, click Web Gallery, then type a name.
Tip
You can also use the Preferences dialog box to stop publishing an album: select it and click Stop Publishing.
iPhone and iPod touch. You can view Web galleries using the Safari browser on an iPhone or iPod touch—they appear in a special format for the small screen.
Who gets to see your albums? You decide when publishing the album, or afterwards. Choose one of these options from the Album Viewable By pop-up menu.
Everyone. Any stranger who finds your gallery pages can see the album.
Only me. Only you—to see the album, you must type your .Mac account name and password.
Aunt Fern. Okay, it doesn’t say that. But you can specify a name and password that visitors must type to see the album. To create a name and password for the album, choose Edit Names and Passwords. In the next dialog box, click the plus sign, and type a name and password. Give that name and password to everyone who needs to see the album.
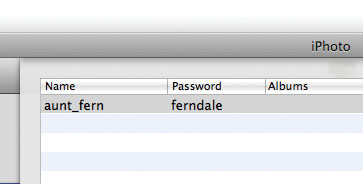
When you set up a gallery album to allow uploads via email, .Mac gives you a “secret” email address for that album. To see the address, select the album in your Web Gallery list—the address appears in the upper-right corner of the iPhoto window. Give this email address to your friends, and they can add photos via email.
To upload a photo via email, send the photo as an attachment to the album’s secret email address. The email’s Subject field becomes the photo title. You can send multiple photos in one email, if you like.
The iPhone angle. You can use the secret email address to upload photos from an iPhone, but there’s an easier way that eliminates pecking out the address.
On your iPhone, display the photo you want to upload. Tap the ![]() button, then tap Send to Web Gallery. In the next screen, tap the name of the album where you want the photo to be stored.
button, then tap Send to Web Gallery. In the next screen, tap the name of the album where you want the photo to be stored.
Normally, iPhoto doesn’t let you edit a photo from an album that you’ve subscribed to. If you open the photo in edit view, all the tools are disabled.
The workaround is easy: Add the photo to an album in your iPhoto library. Then, select the photo in that album and open it in edit view.
Chances are most of the Internet sharing you do will be through email, .Mac Web gallery albums, and iWeb photo albums. But when you’re in the mood for something completely different, iPhoto is ready. You can also create custom Web photo albums as well as slide shows that are shared through Apple’s .Mac service.
.Mac slide shows are a fun way to share photos with other Mac users. Publish some photos as .Mac slides, and other Mac OS X users can configure their Macs to use those photos as their screen savers.
You might create a custom Web album if you already have your own Web site, perhaps one that is served by your local Internet provider rather than Apple’s .Mac service.
If you’re a Web publisher, you can modify these pages as you see fit. You might open them in a program such as Adobe Dreamweaver, embellish them with additional graphics or other tweaks, and then upload them to a Web site. It’s a lot more work than creating Web albums with iWeb, but has the potential to give you much more control over your designs.
iPhoto’s Web pages are on the bland side. To spice up iPhoto’s HTML exporting, try an iPhoto add-on called BetterHTMLExport (www.geeksrus.com). BetterHTMLExport provides numerous design templates for you to choose from and modify.
Select the photos you want to publish. To select an entire album or event, click its name.
Choose .Mac Slides from the Share menu.
iPhoto connects to .Mac, then displays a message asking if you’re sure you want to publish the slide show.
Click the Publish button.
iPhoto transfers your images to your iDisk. When the transfer is complete, a message appears enabling you to send an announcement email. The announcement contains instructions on how users can access the slide show.
To view a .Mac slide show, use the Desktop & Screen Saver system preference.
You can export photos and albums as Web pages to post on Web sites or burn to CDs (opposite page). iPhoto creates small thumbnail versions of your images, as well as the HTML pages that display them. (HTML stands for HyperText Markup Language—it’s the set of codes used to design Web pages.)
To export a Web page, select some photos or an album, choose Export from the File menu, then click the Web Page tab. Specify the page appearance and dimensions of the thumbnails and the images, then click Export. In the Export dialog box, click the New Folder button to create a new folder. (The export process will create several folders, so it’s a good idea to stash everything in one folder.)
Check out my Flickr photos. www.flickr.com/photos/jimheid/
If you aren’t a .Mac subscriber and you don’t want to fuss with Web servers, you have other Web album options. Most online photofinishers provide free Web album features, but given that the primary focus of these sites is to sell prints and photo gifts, your albums tend to be surrounded by ads and e-commerce clutter.
A better choice is a site designed specifically for online photo sharing. I’m a huge fan of Flickr (www.flickr.com), which combines photo-sharing and print-ordering services with an inspiring community of creative photographers who comment on each other’s photos.
Flickr is packed with slick features you won’t find elsewhere, starting with an uploading tool that lets you transfer photos directly from iPhoto’s Export dialog box. (Try out the Flickr export plug-in for iPhoto at www.connectedflow.com.)
You can also assign descriptive tags, such as beach, to your photos, and other Flickr users can search for images based on those tags. The Flickr iPhoto plug-in even supports iPhoto titles, comments, and keywords. Titles and comments are displayed along with your photos, and keywords are converted into Flickr tags.
Best of all is Flickr’s pervasive support for RSS and newsreaders. Subscribe to another user’s photo stream, and small thumbnails appear in your newsreader whenever that user uploads new photos. You can also subscribe to specific tags. Subscribe to the beach tag, and your newsreader will display everyone’s beach photos as they’re uploaded. You can even subscribe to photo feeds using iPhoto itself (see page 230).

Flickr can also automatically publish, on your blog, your recent photos. It’s a happy marriage between photography and the latest geek technologies. A Flickr account is free, although if you upload many photos, you may reach the 100MB-per-month bandwidth limit of a free account. A Pro account costs $24.95 per year and allows for unlimited uploads and much more.
If you have more than one Mac on a network, you can share each Mac’s photo library and make it accessible to the other Macs on the network.
Network photo sharing leads to all kinds of possibilities. Keep your “master” photo library on one Mac, and then access it from other Macs when you need to—no need to copy the library from one Mac to another and worry about which library is the most current.
Don’t like centralization? Embrace anarchy: let everyone in the family have his or her own photo library, and then use sharing to make the libraries available to others.
Have an AirPort-equipped laptop Mac? Sit on the sofa (or at poolside) and show your photos to friends and family. Or take your laptop to their house and browse their libraries. Network sharing, a laptop Mac, and AirPort form the ultimate portable slide projector.
You can choose to share an entire photo library or only some albums. And you can require a password to keep your kids (or your parents) out of your library.
To share your photo library with other Macs on a network, choose Preferences from the iPhoto menu, then click the Sharing button.

To access shared photos, choose Preferences from the iPhoto menu, click the Sharing button, and be sure the Look for Shared Photos box is checked. iPhoto scans your network and, if it finds any shared photo libraries, adds their names to the Shares area of the Library list.
To view a shared library, click its name.

Internet photo sharing is great, but hard copy isn’t dead. You might want to share photos with people who don’t have computers. Or, you might want to tack a photo to a bulletin board or hang it on your wall—you’ll never see “suitable for framing” stamped on an email message.
iPhoto makes hard copy easy. If you have a photo-inkjet printer, you can use iPhoto to create beautiful color prints in a variety of sizes. This assumes, of course, that your photos are both beautiful and in color.
When printing your photos, you can choose from several formatting options, called themes. You can produce standard prints, but you can also choose themes with elegant borders and mat designs.
Want event more control? A click of the mouse gives it to you. Adjust a photo’s appearance, add a text caption, choose different background styles, and more.
So go ahead and beam your photos around the world on the Internet. But when you want something for your wall (or your refrigerator door), think ink.
A standard print contains just the photo, with no ornamental borders or mats.
Select the photo or photos you want to print.
Choose File > Print or click the Print button.
Choose printing options, then click Print.
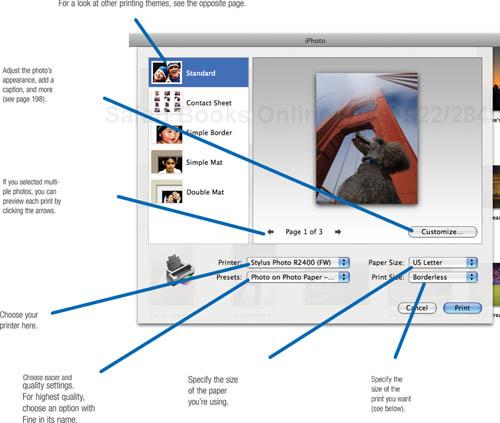
Choosing a print size. Most of the time, you’ll want a photo to fill the page. But you can also choose a print size that is smaller than the paper size you’ve chosen. A small image floating within a large expanse is a common framing technique.
Another reason to choose a small print size is to get more than one photo on a sheet of paper—to shoehorn a couple of 4- by 6-inch prints onto a letter-sized sheet, for example (see page 199).
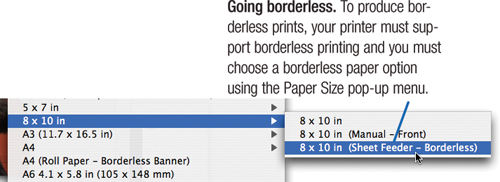
With the print themes in iPhoto, you can produce prints with borders, mats, and more. And by clicking the Customize button in the Print dialog box, you can personalize the themes to match your photos and tastes. For details on customizing print jobs, see the following pages.

Prints numerous photos on a page—a handy quick-reference to the photos in an event or album. Be sure to select a bunch of photos (or select an entire album or event) before choosing Print.
Customizing: Change the background of the page as well as how many images appear across each row. Print titles, captions, dates, and exposure information beneath thumbnails.
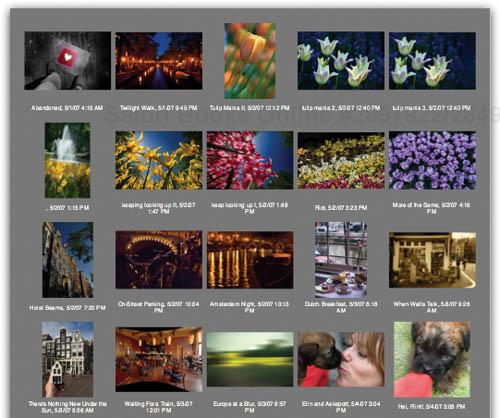

Adds a wide border around the image.
Customizing: Change the border style and choose from several layouts, some with text captions and multiple photos on a page.


Simulates the stiff cardboard mat that a framing shop uses to accent a photo and set it off from its frame. The mat has a bevel-cut opening through which the photo appears.
Customizing: Choose from 26 mat colors and styles. Add a white border inside the mat. Choose from several layouts, some with text captions and multiple photos on a page.


Simulates a framing technique that involves using two mats to provide a richer look. A top mat has a large opening that reveals a bottom mat, whose smaller opening reveals the photo.
Customizing: Choose from 26 mat colors and numerous border styles. Choose from several layouts, some with text captions and multiple photos on a page.

For creating basic prints, the steps on the previous pages are all you need. But you can go beyond the basics to customize many aspects of a print job.
Change the eye candy. Every print theme lets you add a text caption and choose various design layout options. Even the Standard theme provides customizing opportunities.
Adjust the photo. Here’s one of those “local editing” opportunities I discussed back on page 152. You can crop a photo and adjust its exposure, sharpness, and other settings for just a single print—no need to edit the original (and thus change the photo’s appearance elsewhere, such as in a slide show).
To customize a print job, click the Customize button in the Print dialog box. This opens iPhoto’s print settings view.

Here are the two most common adjustments you can make—ones from which any print job can benefit.
Adjust “cropping.”. A photo’s proportions rarely match the proportions of the paper size you’re using. I don’t know of any digital camera whose photos perfectly fit an 8.5- by 11-inch sheet.

With some programs, mismatched proportions yield prints with uneven borders. iPhoto eliminates that problem by enlarging an image until it fits the dimensions of the print size you chose. That gives you nice, even borders (or a fully borderless print), but at a price: parts of the photo’s edges are cut off. In this example, iPhoto cut off part of the dog’s legs and tail (ouch).
By positioning a photo within the print area, you can control how the photo is cropped. Click the photo, then use the controls above it to zoom and reposition the photo. You can see the results on the opposite page: I dragged the dog (gently!) to fix the unwanted leg surgery.
Adjust appearance. To adjust exposure, contrast, and other image settings, select the photo and click the Adjust button. The Adjust panel is similar to its counterpart in edit view (pages 160–167), but changes you make here apply only to this print job.
Sharpen up. The single best adjustment you can make is to sharpen. As I said on page 166, ink-jet printers introduce some softness, and sharpening can help. Don’t be afraid to crank the sharpness way up—even to 100 percent. Make some before-and-after prints and judge for yourself.
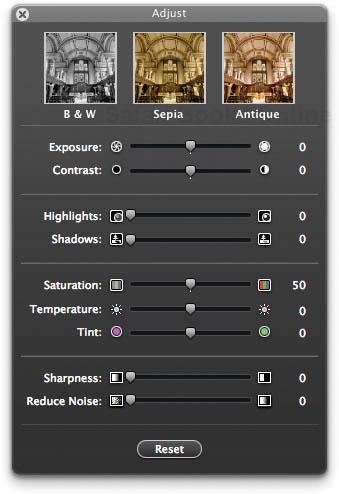
Tip
The one downside of making “local” image adjustments is that iPhoto doesn’t save your settings. If you want to make another print a week later using the same settings, you’ll have to recreate them by hand. If you anticipate wanting to repeat a print job, jot down the Adjust panel settings you’ve made.
More Ways to Customize
Use the Background, Borders, and Layout pop-up menus to explore each theme’s design options. Here are some tips.
Add a caption. To print a text caption at the bottom of a print, use the Layout pop-up menu to choose a layout with text.
Type the text below the photo. To change the font and size of the entire caption, click Settings. To mix and match fonts within the caption, use the Fonts panel. For details and tips, see page 210.
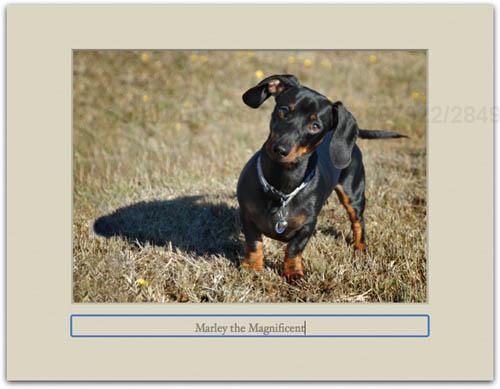
Multi-photo layouts. Most theme layouts provide options that print two or more photos on a page. But what if you selected only one photo before choosing Print?
No problem—just add more photos to the print job. When you open print settings view, an item named Printing appears in your Recent list. To add photos to the print job, drag their thumbnails to the Printing item.
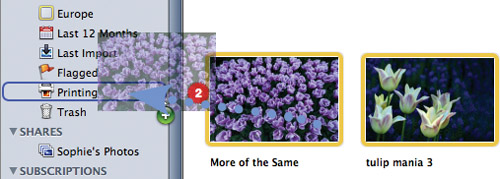
Then, click the Printing item. iPhoto automatically creates additional pages for the new photos, but you can rearrange the photos as you see fit. To remove a photo from a page, select it and press Delete. To see all the photos in the print job, click the ![]() button in the thumbnail browser.
button in the thumbnail browser.
Mix and match settings. Normally, when you change a print background or border, iPhoto applies the change to all the pages in the print job. But you can also apply changes on a page-by-page basis: just hold down the Option key while choosing a background or border.
By tweaking a few print settings, you can print multiple copies of a photo on a single sheet of paper. Have a cute kid photo that you want to send around? Print multiple 4- by 6-inch photos on a letter- or legal-sized sheet, then cut them apart.
Select the photo and choose File > Print.
Choose the paper size you’re using, such as Letter or Legal.
From the Print Size pop-up menu, choose a smaller size, such as 3 × 5 or 4 × 6.
Click the Customize button.
From the Photos Per Page pop-up menu, choose Multiple of the Same Photo Per Page, then click OK.
Click the Print button.
You can also use this technique to print multiple photos (but not the same one) on a single sheet of paper. Select several photos, then perform steps 1–5. In Step 6, choose the option labeled Multiple Photos Per Page.
On previous pages, I discussed how iPhoto prevents uneven borders by enlarging a photo until it fills the paper size you’ve chosen. And I described how you can use print settings view to zoom and pan a photo to crop it as you see fit.
But what if you don’t want any cropping at all? Easy. In print settings view, Control-click on a photo and, from the shortcut menu, choose Fit Photo to Frame Size.
Your print will almost certainly have some uneven borders, but it will contain every precious pixel of your original image. You can trim the borders by hand after printing.
Remember that you can save a print job as a PDF file and use it elsewhere, such as in an iPhoto or iDVD slide show, a print project, or an iMovie project. After customizing the print job, click the Print button. In the final print dialog box (the one you see when you’re actually ready to commit ink to paper), use the options in the PDF pop-up menu to create a PDF. To create a PDF and add it to your iPhoto library in one fell swoop, choose Save PDF to iPhoto.
PDF to photographic print. You can combine this PDF technique with Apple’s online print-ordering service (page 202). The result: the ability to design a fancy print and then have it printed by Apple.
Design a print, first making sure to choose a paper size that corresponds to the print size you’ll order. (For example, if you plan to order an 8 by 10, choose the 8 × 10 paper size.)
Next, use print settings view to choose mats and borders and adjust the photo as desired. Click the Print button, then choose the Save PDF to iPhoto option.
When iPhoto has finished importing the PDF, select it and click the Order Prints button. Complete your print order as described on page 202.
When your prints aren’t charming, read on.
Verify paper choices. In iPhoto’s Print dialog box, be sure to choose the preset that matches the type of paper you’re using and the quality you’re seeking. It’s easy to overlook this step and end up specifying plain paper when you’re actually using pricey photo paper.
Check ink. Strange colors? Check your printer’s ink supply. Many printers include diagnostic software that reports how much ink remains in each cartridge.
Clean up. The nozzles in an inkjet printer can become clogged, especially if you don’t print every day. If you’re seeing odd colors or a horizontal banding pattern, use your printer’s cleaning mode to clean your ink nozzles. Most printers can print a test page designed to show when the nozzles need cleaning. You may have to repeat the cleaning process a few times.
After all the effort you put into making inkjet prints, it may disappoint you to learn that they may not last long.
Many inkjet prints begin to fade within a year or two—even faster when displayed in direct sunlight. Most printer manufacturers now offer pigment-based inks and archival papers that last for decades, but pigment-based printers are pricier than the more common dye-based printers.
If you have a dye-based printer, consider using a paper rated for longer print life. Epson’s ColorLife paper, for example, has a much higher permanence rating than Epson’s Premium Glossy Photo Paper.
To prolong the life of any print, don’t display it in direct sunlight. Frame it under glass to protect it from humidity and pollutants. (Ozone pollution, common in cities, is poison to an inkjet print.)
Allow prints to dry for at least a few (preferably 24) hours before framing them or stacking them atop each other. For long-term storage, consider using acid-free sleeves designed for archival photo storage.
Finally, avoid bargain-priced paper or ink from the local office superstore. Print preservation guru Henry Wilhelm (www.wilhelm-research.com) recommends using only premium inks and papers manufactured by the same company that made your printer.
Is all this necessary for a print that will be tacked to a refrigerator for a few months and then thrown away? Of course not. But when you want prints to last, these steps can help.
To learn more about digital printing, read Harald Johnson’s Mastering Digital Printing, Second Edition (Muska & Lipman, 2005).
Inkjet photo printers provide immediate gratification, but not without hassles. Paper and ink are expensive. Getting perfectly even borders is next to impossible, and getting borderless prints can be equally frustrating.
There is another path to hard copy: ordering prints through iPhoto. Click the Order Prints button, specify the print sizes you want, and iPhoto transmits your photos over the Internet to Kodak’s print service. The prints look great, and because they’re true photographic prints, they’re much more permanent than most inkjet prints.
You can also order prints from other online photofinishers, many of whom also offer free online photo albums and other sharing services. Using these services isn’t as straightforward as clicking a button in iPhoto, but it isn’t difficult, either. Many services, such as Shutterfly (www.shutterfly.com), offer software that simplifies transferring your shots. The Flickr online photo-sharing site also offers print-ordering services.
And some services offer output options that iPhoto doesn’t, such as mouse pads, T-shirts, and even photo cookies. For links to some online photofinishers, see www.macilife.com/iphoto.
Select the photos you want prints of, then click the Order Prints button or choose Order Prints from the Share menu.


If you’re ordering prints from many different events, create an album and use it to hold the photos you want to print. Give the album an obvious name, such as Pix to Print. This makes it easier to keep track of which photos you’re printing. After you’ve placed your order, you can delete the album.
As an alternative to creating an album, you can flag photos you want to print. After you’ve done so, click the Flagged item, then click Order Prints.
The proportions of most standard print sizes don’t match the proportions of a typical digital camera image. As a result, Kodak automatically crops a photo to fill the print size you’ve ordered.
The problem is, automatic cropping may lop off part of the image that’s important to you. If you don’t want your photos cropped by a machine, do the cropping yourself, using iPhoto’s edit view, before ordering. Use the Constrain pop-up menu to specify the proportions you want.
If you plan to order prints in several sizes, you may have even more work to do. A 5 by 7 print has a different aspect ratio than a 4 by 6 or an 8 by 10. If you want to order a 5 by 7 and one of these other sizes, you need to create a separate version of each picture—for example, one version cropped for a 5 by 7 and another cropped for an 8 by 10.
To create separate versions of a picture, make a duplicate of the original photo for each size you want (select the photo and press ![]() -D), and then crop each version appropriately.
-D), and then crop each version appropriately.
If you crop a photo to oddball proportions—for example, a narrow rectangle—Kodak’s automatic cropping will yield a weird-looking print. If you have an image-editing program, such as Adobe Photoshop Elements, here’s a workaround. In the imaging program, create a blank image at the size you plan to print (for example, 5 by 7 inches). Then open your cropped photo in the imaging program and paste it into this blank image. Save the resulting image as a JPEG file (use the Maximum quality setting), add it to iPhoto, and then order your print.
Kodak can’t print a photo whose file name contains a question mark (?). No digital camera creates files that are so named, but if you scan and name images yourself, keep this restriction in mind.
Resolution’s Relationship to Print Quality
If you’re working with low-resolution images—ones that you’ve cropped heavily or shot at a low resolution, for example—you may see iPhoto’s dreaded low-resolution warning icon (![]() ) when ordering prints or a book.
) when ordering prints or a book.
This is iPhoto’s way of telling you that an image doesn’t have enough pixels—enough digital information—to yield a good-quality print at the size that you’ve chosen.
Don’t feel obligated to cancel a print job or an order if you see this warning. But do note that you may see some fuzziness in your prints.
The table here lists the minimum resolution an image should have to yield a good print at various sizes.
Something special happens to photos when they’re pasted into the pages of a book. Arranged in a specific order and accompanied by captions, photos form a narrative: they tell a story.
Put away your paste. With iPhoto’s book mode, you can create beautiful, full-color books in several sizes and styles. Arrange your photos in the order you want, adding captions and descriptive text if you like. Choose from a gallery of design themes to spice up your pages with layouts that complement your subject.
When you’re done, iPhoto connects to the Internet and transfers your book to Apple’s printing service, where the book is printed on a four-color digital printing press (a Hewlett-Packard Indigo, if you’re curious), and then bound and shipped to you.
iPhoto books are great for commemorating a vacation, wedding, or other special event. They’re also open for business: architects, artists, photographers, and designers use iPhoto to create spectacular portfolios, proposals, and brochures.
So don’t just print those extra-special shots. Publish them.
The most efficient way to create a book is to first add photos to an album, and then tell iPhoto to create a book based on that album. Here’s an overview of the process.
Create a new album containing the photos you want to publish (page 146). Arrange the photos in approximately the same order that you want them to appear in the book. (You can always change their order later.)
Choose a book type and a theme, then click Choose. For a summary of the types of books you can order, see the sidebar at right.
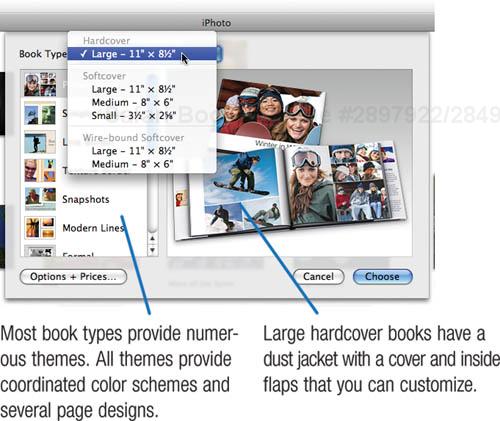
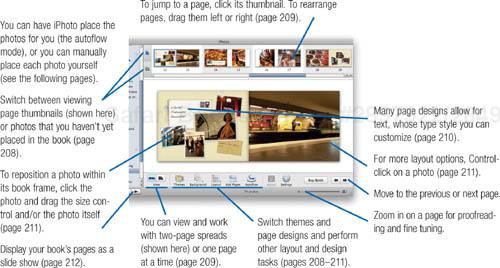
Click ![]() and pay up using your Apple ID (page 15).
and pay up using your Apple ID (page 15).
Book Types and Sizes
You can create several kinds of books with iPhoto. To preview the books, explore the options in the pop-up menu shown in Step 3 on the opposite page. The cost of a book depends on the type of book you order and on its number of pages; see apple.com/iphoto.


Hardcover. The classiest book option, and the priciest. Also called a keepsake book, it measures 11 inches wide by 8.5 inches tall. The book’s title is foil-stamped on a suede-like hardcover, and a customizable dust jacket protects the entire affair.
Softcover. Available in three sizes: 11 by 8.5 inches, 8 by 6 inches, and 2.6 by 3.5 inches. The tiniest size is sold in packs of three.
Wire-bound softcover. Available in 11 by 8.5 inch and 8 by 6 inch sizes, this softcover variation has a wire binding that lets the book lay flat.
A book project doesn’t begin in a page-layout program. It begins with an author who has something to say, and with photo editors and designers who have ideas about the best ways to say it.
When you create a photo book, you wear all of those hats. iPhoto works hard to make you look as fetching as possible in each of them, but you can help by putting some thought into your book before you click the Book button.
What do you want your book to say? Is it commemorating an event? Or is it celebrating a person, place, or thing? Does the book need a story arc—a beginning, a middle, and an ending? Would the book benefit from distinct sections—one for each place you visited, for example, or one for each member of the family?
And no publishing project occurs without a discussion of production expenses. Is money no object? Or are you pinching pennies?
Your answers to these questions will influence the photos you choose, the book designs you use, and the way you organize and present your photos and any accompanying text. The very best time to address these questions isn’t before you start your book—it’s before you start shooting. If you have a certain kind of book in mind, you can make sure you get the shots you need.
Here’s more food for thought.
Here’s a look at some of the factors that may influence your choice of book sizes and themes.

Large hardcover books include a paper dust jacket that can hold text and photos. Besides having front and back covers that you can customize, dust jackets also have inside flaps that tuck behind the front and back covers.
You can customize these flaps, too. In publishing, it’s common for the front flap to describe the book, and for the back flap to describe the author. If there’s a lot to say about the book or its subject, the text on the front flap may continue on to the back flap.
Each book theme has several flap layouts: just a photo, text and a photo, just text, and blank. When creating a hardcover book, decide how much you want to talk about your book—and yourself—and choose the appropriate layout.

When you create a book, you can choose to have iPhoto lay out the book automatically by clicking the Autoflow button, or you can take the wheel and drive yourself by dragging photos onto the book’s pages. When you create a new book, iPhoto reminds you of these options.
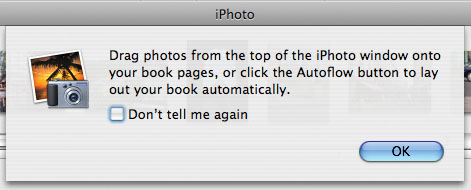
Regardless of the option you choose, iPhoto always creates a book with 20 pages—the minimum a book can contain.
iPhoto also assigns a layout to each page. And that’s why I prefer to lay out books manually instead of clicking the Autoflow button. I often want to change the designs that iPhoto has chosen, and if I’m going to do that, I might as well start with a blank slate—why have iPhoto position photos that I’m going to be rearranging anyway?
But that’s just me. If you’d rather get immediate results and then fine-tune, click Autoflow. Or mix both approaches. If you want to do something fancy at the beginning of your book—maybe have a full-page photo opposite an introduction text page—lay out those first couple of pages. Then click the Autoflow button to have iPhoto do the rest.
Note that the Autoflow feature adds additional pages to your book if necessary to accommodate the rest of your unplaced photos. Those extra pages will cost you, so if you’re watching your production budget, keep an eye on your total page count.
Each book theme includes numerous layouts, each with a different arrangement of text and photos. Some layouts contain just text, some hold just photos, and some hold both.
Choosing a layout. First, navigate to the page you want to change: click the left- or right-arrow buttons or click the page in the thumbnail browser. (If you don’t see page thumbnails there, click the ![]() button.)
button.)
Next, use the Layout pop-up menu to choose a design.

Background options. To change a page’s background, use the Background pop-up menu. Background designs vary depending on theme. All themes also let you use a photo as a full-page background; see page 211.
Adding photos. Add photos to the empty frames by dragging them from the thumbnail browser (click the ![]() to see photo thumbnails).
to see photo thumbnails).
Adding to a full page. If you drag a photo from the photo browser to a page that already contains photos in each photo frame, iPhoto changes the page type, adding an additional photo frame to accommodate the photo.
With some themes and page designs, iPhoto may add more than one photo frame. For example, in the Picture Book theme, the available page types jump from four photos per page to six. If you add a photo to a fully populated four-photo page, iPhoto switches to the six-photo page type. You can either add a sixth photo or ignore the empty frame. iPhoto will omit it when you order your book.
Incidentally, if a page already has the maximum number of photos supported by that theme, iPhoto won’t let you add another one.
Moving to a different page. You can move a photo to a different page. Be sure that your page thumbnails are visible (click the ![]() button), then drag the photo to its new page. The same points mentioned previously apply: if the destination page is full, iPhoto may change its page type to accommodate the new photo.
button), then drag the photo to its new page. The same points mentioned previously apply: if the destination page is full, iPhoto may change its page type to accommodate the new photo.
Removing a photo. To remove a photo, select the photo and press the Delete key, or drag the photo up to the photo thumbnails browser. iPhoto moves the photo to the thumbnails area.
You can also remove a photo by Control-clicking on it and choosing Remove Photo from the shortcut menu.
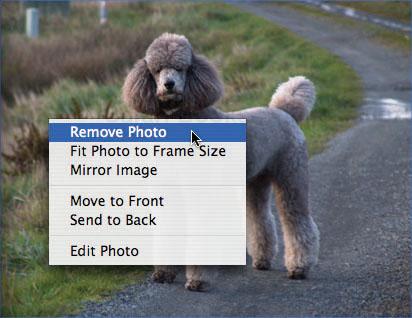
To remove the photo’s frame, switch to a page type that provides fewer photos, or simply ignore the empty frame—that’s what iPhoto will do when you order your book.
Swapping photos. To swap two photos on a page or spread, simply drag one photo to the other one.
Editing a photo. Need to edit a photo that you’ve placed on a page? Control-click on the photo and choose Edit Photo from the shortcut menu.
Adding photos from your library. To add additional photos to a book, drag them from your library to the book’s name in the Projects list.
To add a page, click the Add Pages button. If you’re viewing two-page spreads, iPhoto adds a full spread, which is two pages. To add just one page, switch to single-page view (click the ![]() View button).
View button).

To insert a new spread or page between two existing pages, use the page thumbnails browser to select the page that you want to precede the new page. For example, to add a new page between pages 4 and 5, select page 4, then click Add Pages.
When you add a page or spread, iPhoto gives the page or pages a layout from the book’s current theme, filled with empty photo frames. Customize the layout as desired.
Removing a page. To remove a page, select it in the pages thumbnail browser and press the Delete key. Or, Control-click on a blank area of the doomed page and choose Remove Page from the shortcut menu.
When you delete a page containing photos, iPhoto moves its photos to the photo thumbnail browser so you can use them elsewhere, if you like.

You can format your book’s text in several ways.
Globally: the Settings button. When you want to change the font iPhoto uses for every occurrence of an element in your book (such as its captions), use the Settings button. Tip: Each book theme provides its own text elements, and some provide more than others. The Settings dialog box is a convenient way to see what elements a theme provides.
Locally: the Fonts panel. Typographic consistency is important for a book like the one you’re reading, but for a photo book that contains only a few text elements, a bit of variety can be fun. You can format individual text elements—indeed, individual letters, if you want to—by using the Fonts panel. Select the text you want to format, and choose Edit > Font > Show Fonts (![]() -T)
-T)
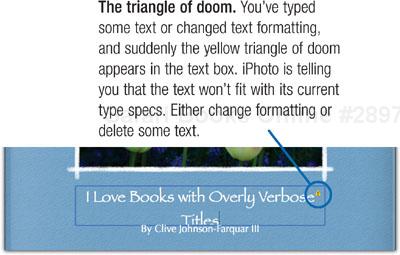
Here are more textual tips.
Low-rent formatting control. All themes provide at least one Introduction layout. But don’t feel obligated to write an introduction. You can adapt the Introduction page to other uses, such as a title page. You can also move items around on the page by using the spacebar or Tab key to bump a line of text to the right, and by pressing Return to move text down. These tricks don’t provide page-layout precision, but they work.
Consider a word processor. Planning a lot of text in your book? Consider using your favorite word processor to write and format the text. Then, move the text into iPhoto as needed: select the text you need for a given page, and copy it to the Clipboard. Next, switch to iPhoto, click in the destination text box, and paste. iPhoto even retains your formatting.
This approach lets you take advantage of a word processor’s superior editing features, not to mention its Save command—something iPhoto lacks.
Controlling paragraph formatting. iPhoto doesn’t provide controls for adjusting the spacing between lines (leading) or paragraph indents. Solution: Use your word processor. Format your text in a word processor, then copy and paste it into the text box on your book page.
Saving custom text styles. You’ve pasted in some custom formatting and would like to save it to apply to future books or to other pages in the same book. Here’s how.
First, click within the text box that contains the custom text. Then, Control-click and choose Styles from the shortcut menu’s Font submenu. In the dialog box that appears, click the Add to Favorites button. In the next dialog box, type a name for your custom style, click both check boxes, then click the Add button.
To use that custom style, select the text you want to format, and Control-click on it to summon the shortcut menu. Choose Styles from the Font submenu, then click the Favorite Styles button. Locate and choose your style in the pop-up menu, and click Apply.
Fun with glyphs. Some of Mac OS X’s fonts contain beautiful alternative characters, such as ornamental swashes and flourishes. To explore and use these alternative glyphs, choose Typography from the ![]() pop-up menu at the bottom of the Fonts panel. Then, explore the options in the Typography panel.
pop-up menu at the bottom of the Fonts panel. Then, explore the options in the Typography panel.
For a good example, choose the Zapfino font, then check out the Stylistic Variants portion of the Typography panel. The Apple Chancery font also has some interesting alternate characters.
Also, many fonts have old-style numerals that lend a classic look, as shown here with the Didot font.

If a font provides old-style numerals, you’ll see a Number Style entry in the Typography panel.
Who needs page numbers? Unless you’re putting a table of contents or index in your book, you have little reason to print a page number on each page. To remove page numbers, use the Settings dialog box or Control-click on a blank area of a page and make sure that the Show Page Numbers command is unchecked in the shortcut menu.
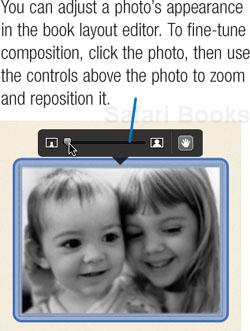
If you zoom in too far for a given photo’s resolution, iPhoto displays the yellow triangle of doom to let you know that you won’t get good quality at that zoom setting.
To adjust a photo’s exposure or add an effect, click the photo, then click the Adjust button. As with inkjet prints, some sharpening can improve quality.
You can, of course, also open the photo in edit view and do your cropping and exposure adjustments there. But doing so changes the photo everywhere you’ve used it.
You can use a photo as the background of a page. Put a photo behind the text that introduces your vacation book. Or use a close-up of a garden as the background for a page of weekend-getaway photos.
Start by clicking the Background pop-up menu and choosing the option with a faint palm tree on it:

Next, choose a layout and add photos and/or text to the page, as appropriate.


Before you click the Buy Book button to place your order, do one last proofreading pass of any text in your book. And remember, your Mac can help: select the text in a text box, Control-click, and choose Spelling > Check Spelling.
Placeholder text. Also check to see that you haven’t left placeholder text on any pages. (This is the stuff iPhoto inserts for you when you choose a page design that supports text. It usually reads Insert a description of your book.) But don’t sweat it: if your book contains placeholder text and you click Buy Book, iPhoto warns that the placeholder text won’t be printed.
Unused photo frames. Don’t worry if any pages have unused (gray) photo frames. iPhoto simply ignores them.
Tip
The fact that iPhoto ignores empty photo frames opens up additional design options. For example, say you’re creating a book in the Picture Book theme and you want a page with five photos on it—a page type Picture Book doesn’t provide. Solution: choose the six-photo page type, but put only five photos on it.
Preview. To preview your book, Control-click on a blank area of a page and choose Preview Book from the shortcut menu. iPhoto assembles the book and displays its pages in Mac OS X’s Preview program.
iPhoto’s book editor view provides a Play button that lets you display the pages of your book as a slide show. This opens up some interesting creative possibilities: you can take advantage of iPhoto’s book themes and page designs to create “slides” containing multiple images and text. (In the interest of readability, think twice about using a lot of small text.)
You can also send a “book slide show” to iDVD; while in book-edit view, choose Share > Send to iDVD.
iPhoto provides a somewhat hidden (and completely undocumented) command that helps prepare a book for its voyage to Apple’s printing service. The command is called Clean Up Book; to access it, Control-click on the gray area outside of your book’s page boundaries to bring up a shortcut menu.
Here’s what happens when you choose the Clean Up Book command.
iPhoto scans through the book from back to front to find the last-filled photo frame, called the anchor.
For all pages preceding the anchor, iPhoto removes empty photo frames and changes those pages’ page types, if possible.
Beginning with the page immediately following the anchor, iPhoto places all unplaced photos by first filling any empty photo frames, then by adding pages.
Because this command can potentially alter your book’s formatting (for example, by changing a three-photo page type to a two-photo page type), you might think twice before choosing it. It’s better to go through your book yourself for final fine-tuning.
If you do use Clean Up Book and aren’t happy with the results, choose Undo before doing anything else to restore your book’s design.
iPhoto’s Print command is alive and well when you’re in book view: you can print some or all of your book for proofreading or to bind it yourself.
Tip
If you know that you’ll be printing a book yourself and not ordering it through Apple’s print service, create the book in single-sided format. In the book editor, click Settings, then uncheck the Double-sided Pages box.
Printing a specific page is a bit cumbersome. Here’s the easiest way to do it: in iPhoto’s Print dialog box, click the Preview button. When Mac OS X’s Preview program starts, display its sidebar (choose View > Sidebar, or, in earlier Mac OS X versions, View > Drawer) to find the number of the page you want to print. Then, while still in the Preview program, choose the Print command and specify that page number.
It’s worth noting that you can order hardcover books with single-sided pages—just uncheck the Double-Sided Pages box as noted on the opposite page. In a single-sided book, the left-hand page of each spread is blank. That’s unlike any coffee-table book I’ve ever seen, but if it’s what you want, iPhoto can accommodate. (Softcover and wire-bound books always have double-sided pages.)
Want to flip a photo so that it appears “backwards”? Select the photo in its book frame, then Control-click on it and choose Mirror Image from the shortcut menu.
Here’s an easy design trick: Add the same photo to the left and right pages of a two-page spread. Then, mirror one of the photos so that the two photos appear to reflect one another.
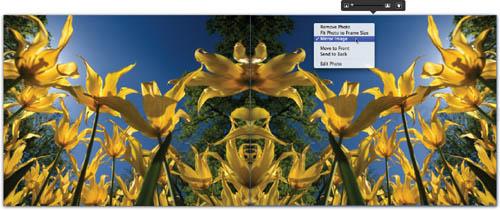
When you have multiple items on a page, you can change the way they overlap. For example, some themes position photos so they overlap. To change the way two photos overlap, Control-click on a photo and choose Move to Front or Send to Back.
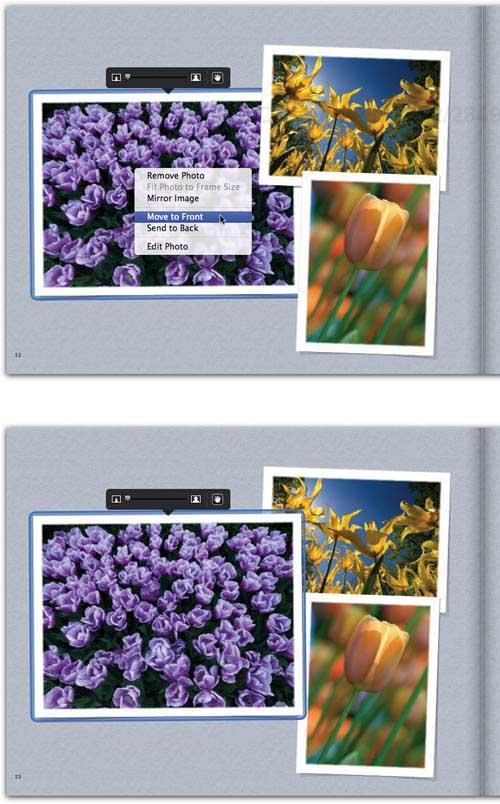
You can perform several PDF-related tricks with your books. For more details on these tricks, see www.macilife.com/iphoto.
Combining book designs. You love one of the page designs from the Family Album theme, but you really want to use the Line Border theme for your book. No problem—if you’re using Mac OS X Leopard, where the Preview program boasts some powerful PDF-manipulation talents.
Here’s the big picture. Create the page that you’ll want to add to a different book. Preview your book to create a PDF in the Preview program. Extract the page that you want to put in the different book, and save it as a JPEG, with maximum quality. Then, choose Tools > Adjust Size, and specify a width of at least 3,000 pixels. Save this enlarged JPEG, add it to your iPhoto library, and then add it to the book project, choosing a layout that provides one photo per page. The result: two different themes within one book.

Here’s a spread that presents some old photos using the Family Album theme opposite some new photos and the Line Border theme.
Book page to poster. How would you like take one page of a book and turn it into a 20 by 30 inch poster? Create a high-resolution version of a page using Preview as described above, then use edit view to crop it to the proportions of the specific print size you want (such as 20 by 30 inches). Then order a print of the page.
PDFs everywhere. Use the Print command to create a PDF of your book (choose Save as PDF in the Print dialog box). Email the PDF to a friend. Post it on your Web site. Include it in the DVD-ROM portion of an iDVD project (page 312). Or stash it in your iTunes library, if that’s your idea of fun (page 86).
Store-bought calendars can be gorgeous, but they lack a certain something: your photos. Why build your year around someone else’s photos when you can build it around your own?
With the calendar-publishing features in iPhoto, you can create calendars containing as few as 12 months and as many as 24. Choose from numerous design themes, each of which formats your photos and the dates of the month in a different way. Then drag photos into your calendar, fine-tuning their cropping and appearance along the way, if you like.
Commercial calendars usually have national holidays printed on them. Yours can, too—and then some. You can add your own milestones to your calendar: birthdays, anniversaries, dentist-appointment reminders. If you use Apple’s iCal software (page 118), you can even import events from iCal and have them appear in your calendar.
When you’re finished, click the Buy Calendar button. iPhoto transfers your photos and design to Apple’s printing service, which prints your calendar and ships it to you. A 12-month calendar costs $19.99. Each additional month is $1.49.
And you don’t have to postpone your foray into calendar publishing until next year. You can have your calendar begin with any month you like.
The most efficient way to create a calendar is to first add the photos you want to publish to an album.
Click the Calendar button. The Themes panel appears.
Choose a theme (click its name to see a preview of its design), then click Choose or press Return.
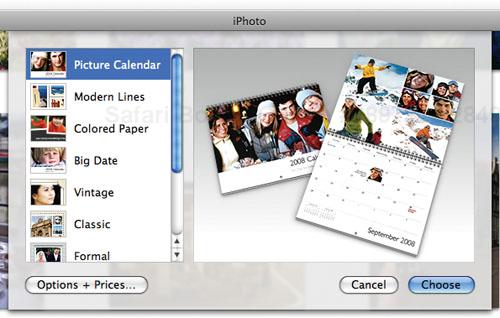
A bigger year. For iPhoto ’08, calendars measure 10.4 by 13 inches—70 percent larger than iPhoto ’06 calendars.


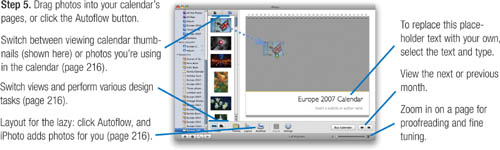
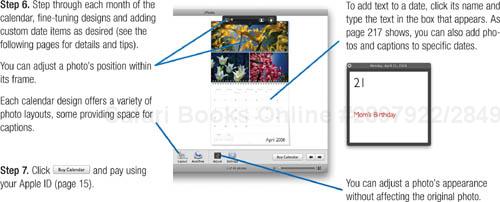
When creating a calendar, try to choose photos that relate to a given month. Use photos of a family member for the month of his or her birthday. If you have some particularly fine holiday shots, use them for the month of December. This sounds obvious, I know, but you’d be surprised how many times I see iPhoto calendars with photos that bear no relationship to the months in which they appear.
Think vivid. I’ve ordered several calendars, and in my experience, photos with soft, muted colors often print poorly. You’re likely to see faint vertical stripes, sometimes called banding, in the photos. I get the best results when I use photos that have bright, vivid colors. Black-and-white photos work beautifully, too, provided they have strong contrast.
Laying out a calendar involves many of the same techniques behind book creation (pages 204–213). You can add photos by hand, dragging them from the thumbnails area into specific months, or you can click the Autoflow button and have iPhoto sling the photos into your year as it sees fit. As with books, I prefer the manual layout technique for calendars.
How many photos in a month? iPhoto’s calendar themes, like its book themes, provide multiple page designs. Some designs provide for just one photo for a given month, while others allow for a half dozen or more.
I like to minimize the number of photos I use each month. Bigger photos have a more dramatic look, and they’re easier to see and appreciate when the calendar is hanging on a wall at the opposite end of a room. For most of my calendars, I put just one photo on each month.
That’s a rule that begs to be broken, and I do break it now and then. If I have relatively low-resolution photos and iPhoto displays its yellow warning triangle, I’ll switch to a page design that has smaller photo frames. Or if I have a series of photos that tells a story about a particular month, I’ll choose a page design that lets me use all of those photos.
Top, bottom, or both? Normally, iPhoto’s calendar view displays both halves of a given month—that is, the upper portion, where your photos appear, and the lower portion, where the days and weeks are displayed. Between those two halves is the spiral binding that holds the calendar together.
But when you’re fine-tuning a calendar’s design, you may find it useful to display only the upper or lower portions. The answer? Tear out the spiral binding. Click the single-pages View button (![]() ), and iPhoto displays only the upper or lower portion of a month.
), and iPhoto displays only the upper or lower portion of a month.
To switch between viewing the upper or lower portion of a month, display the calendar’s page thumbnails (click the ![]() button at the top of the thumbnails area), then click the thumbnail of the page you want to view.
button at the top of the thumbnails area), then click the thumbnail of the page you want to view.
When creating a calendar, your photo options aren’t limited to just the page above each month. You can also add photos to individual dates. To commemorate a birthday, add a photo to the birthday girl’s date. To never forget your anniversary, put a wedding photo on the date. (Another good way to never forget an anniversary is to forget it just once, but this method is not recommended.)
To add a photo to a date, drag it from the thumbnails area of the calendar.

To remove a photo from a date, select the date and press the Delete key.
When creating a new calendar, you can choose to have iPhoto include event information from iCal (discussed on page 222). You can also add iCal data to an existing calendar by clicking the Settings button and checking the appropriate Import iCal Calendars box.
Don’t use iCal to manage your life? As I mentioned on page 223, you can download thousands of calendars from iCalShare (www.icalshare.com). Because I like my calendars to include the phases of the moon, I subscribed to a lunar calendar at iCalShare. When I’m creating a new calendar, I simply check the moon-phases calendar and iPhoto does the rest.
Many of the typographic tips that apply to books (pages 210–211) also apply to calendars.
Global formatting. You can change the fonts that iPhoto uses for various elements of the calendar—its dates and captions, for example—by clicking the Settings button, then clicking Styles. Most of the items in the Settings dialog box are self-explanatory. The two that are less than obvious are Page Text and Comments. The Page Text item controls the font in which dates, days of the week, and the month appear. The Comments item controls the formatting of custom text that you add.
Local formatting. As with books, you can also override iPhoto’s font settings and apply formatting to individual text items, but within limits: you can’t apply local formatting to a specific date. (For example, you can’t have February 14 appear in a bold red font.) You can apply local formatting only to comments and photo captions. To do so, display the item’s text box (click on the date, and the text box zooms into view), then select the text and use the Fonts panel as described on pages 210–211.
Curl those quotes. It’s common to use apostrophes in calendars: Sophie’s Birthday, President’s Day, and so on. But iPhoto commits a cardinal typographic sin by using those heinous “typewriter quotes” instead of true typographer’s quotes:
Heinous: Sophie’s Birthday
Correct: Sophie’s Birthday
Fortunately, it’s easy to make your quotes typographically correct. To get a true typographer’s apostrophe, press Shift-Option-] (that’s the right-bracket key, just above the Return key).
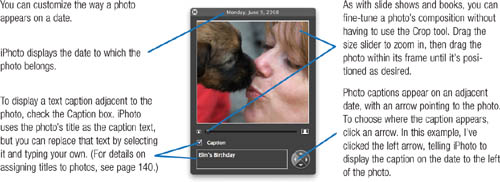

Let us hereby resolve to never buy a greeting card from a store rack again. Okay, maybe that’s a bit strong. But with the greeting card and postcard features in iPhoto, you can definitely curtail your contributions to Hallmark’s balance sheet.
An iPhoto greeting card measures 5 by 7 inches, and is of the “tent” variety—folded on its top. (Assuming you use a horizontally oriented photo, that is: if you use a vertically oriented photo, the card’s fold is on the left side.) In quantities of 1 to 24, cards cost $1.99 each. Order 25 to 49 cards for $1.79 each; 50 or more cards are $1.59 each.
As for postcards, they measure 4 by 6 inches and cost $1.49 each (1–24), $1.29 each (25–49), or $.99 each (50 or more). The back of a postcard can contain a full block of text or you can use a standard postcard-mailing format, complete with a “place postage here” box.
Greeting cards and postcards are printed on a heavy card stock and include matching envelopes. Even if you order a postcard with a “place postage here” box, you still get an envelope—complete with an embossed Apple logo on its flap.
So forget this era of email and instant messaging, and use iPhoto to create some old-fashioned correspondence. Your recipients will thank you.
Select the photo that you want on the greeting card.
Click the Card button.

Choose Greeting Card from the pop-up menu, choose a theme, then click Choose or press Return.

I’m partial to the Picture Card theme, which prints a borderless photo.
Replace the card’s placeholder text with your own and then fine-tune the design, if desired (opposite page).
Proofread any text you added, then proofread it again. Then, click Buy Card and pay using your Apple ID (page 15).
Click the Card button.
Choose Postcard from the pop-up menu, choose a theme, then click Choose or press Return.
The themes are similar to their greeting-card counterparts.
Replace the card’s placeholder text and then fine-tune the design, if desired.
Do that proofreading thing you do so well, then click Buy Card and pay using your Apple ID.
Tip
Want to use a book layout as a card? Follow the instructions on page 213, then add the resulting JPEG to a card that uses the Picture Card theme.
Card Design Tips
Switching postcard styles. To switch between a self-mailing postcard and one that tucks into an envelope, select the back of the postcard, then use the Design pop-up menu.
Switching designs and backgrounds. All card themes provide more than one design option for the front of the card. Many themes, for example, provide an option that lets you type some text on the front of the card. To access different designs, select the front of the card, then use the Design pop-up menu.
Many theme designs also offer a selection of background colors or textures. You can access them by using the Background pop-up menu.

To fine-tune the photo’s exposure, click the Adjust button.
Fun with fonts. As with books and calendars, you can customize the font formatting of your card in two ways: by using the Settings button, or by bringing up the Fonts panel (![]() -T). The latter option lets you format text on an individual word (or character, if you want to taunt the design police) basis.
-T). The latter option lets you format text on an individual word (or character, if you want to taunt the design police) basis.
And while you’re having fun with fonts, note that the text-formatting tips outlined on pages 210–211 also apply to cards.
Print it yourself. As with books, you can print greeting cards and postcards on your own color inkjet printer. Just choose the Print command while the card editor is visible. Note that if you plan to use both sides of the card, you’ll need to use inkjet paper designed for double-sided printing.
Kill the apple. Ever conscious of brand recognition, Apple prints its logo on the back of a greeting card. If you’d rather not provide the free advertising, click the Settings button and uncheck the box labeled Include Apple logo on back of card.
By using the Export command in the File menu, you can turn a photo album—or any set of photos that you’ve selected—into a portable slide show.
iPhoto can combine a series of photos into a QuickTime movie, complete with a music soundtrack from your iTunes library. You can publish the resulting movie on a Web site, burn it to a CD, or bring it into iDVD and burn it to a DVD. Think of an iPhoto QuickTime movie as a portable slide show. It will play back on any Mac or Windows computer that has QuickTime installed.
As you know, you can create two kinds of slide shows in iPhoto—basic and saved (see pages 178–185). You can export either type as a QuickTime movie. If you export a saved (cinematic) slide show, the resulting movie will have all your Ken Burns moves and custom transition and duration settings. On the other hand, if you simply export an album or selection of photos as a movie, each photo is always separated by a dissolve transition. You can’t use the other transitions, such as Cube, that iPhoto’s Slideshow dialog box provides, nor will your movie have any automatic Ken Burns moves. When your sweet tooth craves eye candy, you’ll want to create a saved slide show and export it.
Looking for still more ways to share? Redecorate your Macintosh desktop with your favorite photo. Or, use a set of photos as a screen saver.
It’s obvious: if your digital photos aren’t getting seen, it isn’t iPhoto’s fault.
In the Slideshows list, select the saved slide show that you want to export. Note: If you plan to distribute your slide-show movie, don’t use songs from the iTunes Store; see page 228.
Choose Export from the File menu, and specify export settings.
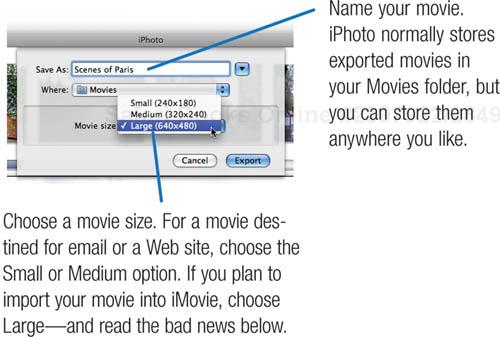
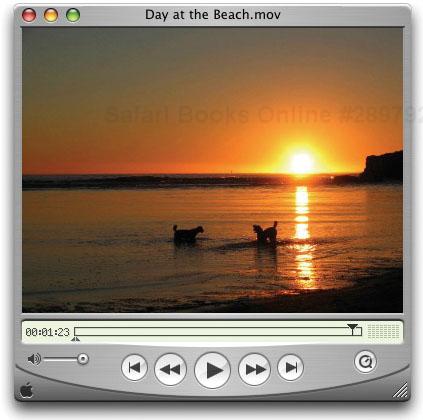
Portable slide show:
An iPhoto-created QuickTime movie playing back in the QuickTime Player program.
Heading for iDVD? If you want to include a cinematic slide show in an iDVD project, you have an alternative to the Export command: just choose Send to iDVD from the Share menu. iPhoto creates a movie version of your slide show and sends it directly to iDVD.
Heading for iMovie? Want to add your exported movie to an iMovie project? Alas, at this writing, iMovie ’08 won’t let you. There is a workaround; see www.macilife.com/imovie. Or just make your slide shows directly in iMovie.

Using Photos as Desktop Images and Screen Savers
iPhoto lets you share photos with yourself. Select a photo and choose Share > Set Desktop, and iPhoto replaces the Mac’s desktop with the photo you selected.
If you select multiple photos or an event or album, your desktop image will change as you work, complete with a cross-dissolve effect between images. It’s an iPhoto slide show applied to your desktop.
Another way to turn an iPhoto album or event into a desktop screen saver is to use the Desktop & Screen Saver system preference—choose the album in the Screen Savers list (right).

The phrase “burning photos” can strike terror into any photographer’s heart, but fear not: I’m not talking about open flames here. Fire up your Mac’s burner, and you can save, or burn, photos onto CDs or DVDs. You can burn your entire photo library, an album or two, some favorite events, a slide show, or even just one photo.
iPhoto’s burning features make possible all manner of photo-transportation tasks. Back up your photo library: burn the entire library and then stash the disc in a safe place. Move photos and albums from one Mac to another: burn a selection, then insert the disc in another Mac to work with them there.
iPhoto doesn’t just copy photos to a disc. It creates a full-fledged iPhoto library on the disc. That library contains the images’ titles and keywords, any albums that you burned, and even original versions of images you’ve retouched or cropped. Think of an iPhoto-burned disc as a portable iPhoto library.
That’s all grand, but your burning desires may be different. Maybe you want to burn photos for a friend who uses Windows, or for printing by a photofinisher. That’s easy, too.
So back away from that fire extinguisher—we’ve got some burning to do.
Burning photos involves selecting what you want to burn, then telling iPhoto to light a match.
Select items to burn.
Remember that you can also select multiple items by Shift-clicking or
-clicking on each one (page 147).You can also select multiple books, folders, and slide shows—iPhoto can burn them, too. Indeed, burning a disc is the only way to move a book or saved slide show from one Mac to another.
Choose Burn from the Share menu.
iPhoto asks you to insert a blank disc.
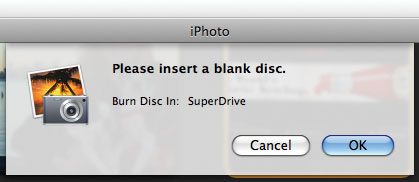
Tip
If you burn discs frequently, you can have iPhoto display a Burn button in its toolbar. Choose View > Show in Toolbar > Burn.
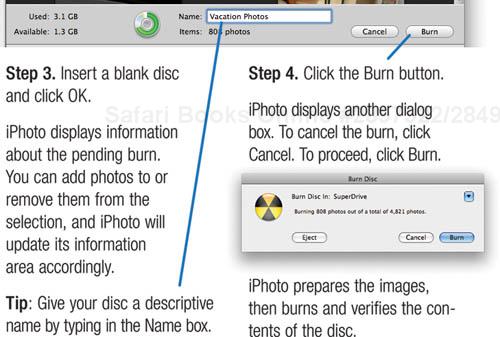

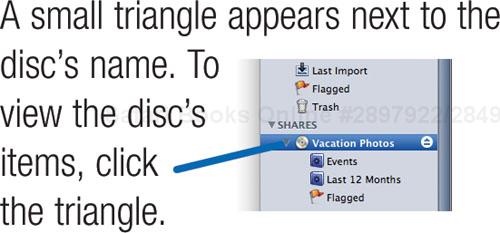
You can display photos on a disc using the same techniques that you use to display photos stored in your iPhoto library. You can also display basic slide shows, email photos, and order prints.
However, you can’t edit photos stored on a burned disc, nor can you create an iWeb photo album, a Web gallery album, a saved slide show, a book, a calendar, or a greeting card. To perform these tasks, add the photos to your photo library as described at right.
To modify an item that’s stored on a burned disc, you must copy it to your iPhoto library.
To copy an item, select it and drag it to the Events or Photos item in the Library area.
Note
When copying a book or saved slide show to a different Mac, be sure that the destination Mac contains the same fonts or music used in the book or slide show.
Burning for Windows or Photofinishers
Here’s how to burn photos for a friend who uses Windows, or for printing by a photofinisher. You can also use these steps to burn a disc for a fellow Mac user who doesn’t use iPhoto.
Prepare a disc. Insert a blank CD or DVD in your Mac’s optical drive. The dialog box below appears.
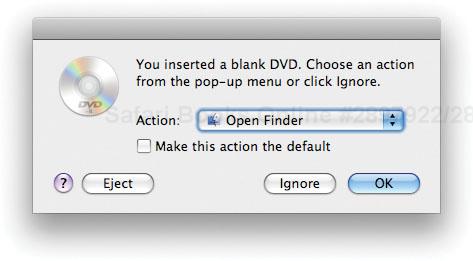
Type a name for the CD and click OK. The blank disc’s icon appears on your desktop.

Copy the photos. Position the iPhoto window so that you can see it and the blank disc’s icon. Drag the photos that you want to burn to the icon of the blank disc.
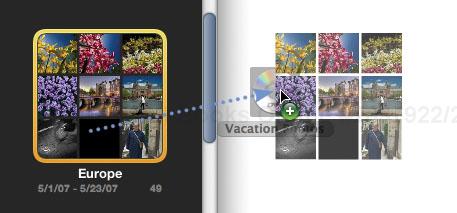
As an alternative to dragging photos, you can also select them and use the File menu’s Export command to export copies to the blank disc. This approach gives you the option of resizing the photos and changing their file names.
Burn. To burn the disc, drag its icon to the Burn Disc icon in your dock. (The Burn Disc icon replaces the Trash icon when you’ve selected a blank disc.) In the dialog box that appears next, click the Burn button.
As your photo library grows to encompass thousands of photos, locating specific images can be cumbersome. A huge photo library is also more difficult to back up, since it may not fit on a CD or even a DVD.
One solution: create more photo libraries. iPhoto lets you have multiple photo libraries and switch between them. If your photo library has reached gargantuan proportions, back it up and create a new, empty one.
How often should you create a new library? That depends. You might base your decision on disk space: if you back up your library by burning it to a DVD-R, create a new library each time the size of your current library reaches about 4GB (or, if you burn to dual-layer discs, 8GB). That way, you can always be sure your library will fit on a DVD. (To see how much space your library uses, select the Events or Photos items in the Library area, then look in the Information pane.)
Or, you might prefer a chronological approach. If you take hundreds of photos (or more) every month, consider creating a new library each month. Then again, maybe a subject-oriented approach is best for you. Use one iPhoto library to hold your family shots, and another to hold work-related shots.
The latest iPhoto versions are fast enough to manage tens of thousands of photos. But if dividing your photo collection across multiple libraries makes managing and backing up photos easier for you, here’s what you need to know.
Before creating a new library, you may want to back up your existing library by dragging your iPhoto Library to another hard drive or to a blank CD or DVD. For some backup strategies, see the sidebar on the opposite page.
Quit iPhoto.
Locate your iPhoto Library and rename it.
To quickly locate the library, choose Home from the Finder’s Go menu, then double-click the Pictures folder, where you’ll find the iPhoto Library.
Start iPhoto.
iPhoto asks if you want to locate an existing library or create a new one.
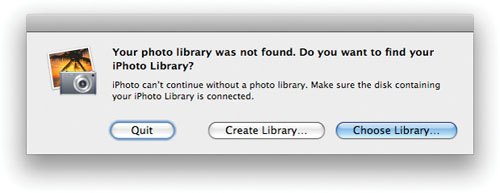
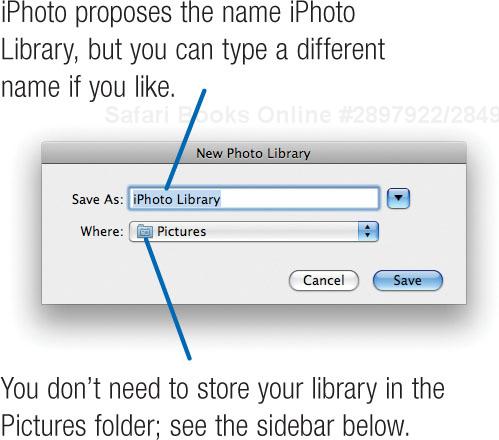
Click Save, and iPhoto creates the new, empty library.
There may be times when you want to switch to a different iPhoto library—for example, to access the photos in an older library. Here’s how.
Quit iPhoto.
Locate your current iPhoto Library and change its name.
Start iPhoto.
iPhoto asks if you want to find an existing library or create a new one.
Click Choose Library. The Open Photo Library dialog box appears.
Tip
You can also display the Open Photo Library dialog box by pressing the Option key while starting iPhoto.

You love your digital camera and the convenience of iPhoto, and it would take an act of Congress to force you to use film again.
And yet the past haunts you. You have boxes of negatives and slides that you haven’t seen in years. If you could get them into iPhoto, you could organize them into albums and share them through Web albums, slide shows, prints and books, and even movies and DVDs.
To bridge the gap between pixels and print, you need a scanner. Here’s an overview of what to look for, and some strategies for getting those old photos into iPhoto.
Before you buy a scanner, take stock of what types of media you’ll need to digitize. Do you have negatives, prints, slides, or all three? Not all scanners are ideal for every task.
Flatbed scanners. If you’ll be scanning printed photos, a flatbed scanner is your best bet. Place a photo face down on the scanner’s glass, and a sensor glides beneath it and captures the image.
Repeating this process for hundreds of photos can be tedious. If you have a closet full of photos, you may want to look for a scanner that supports an automatic document feeder so you can scan a stack of photos without having to hand-feed the scanner. Some flatbeds include photo feeders that can handle up to 24 prints in sizes up to 4 by 6 inches. Other scanners accept optional document feeders. Just be sure to verify that the document feeder can handle photos—many can’t.
Film scanners. A print is one generation away from the original image, and may have faded with time or been poorly printed to begin with. Worse, many photos are printed on linen-finish paper, whose rough texture blurs image detail when scanned. Bottom line: you’ll get better results by scanning the original film.
Many flatbed scanners include a film adaptor for scanning negatives or slides. With some scanners, the adaptor snaps on to the scanner’s bed. A more convenient option is a scanner with the adaptor built into the lid, such as Epson’s Perfection V750-M Pro. Like many high-end flatbed units, this scanner can scan negatives, mounted slides and, unlike many flatbeds, medium-format film, such as the 120 format popular in old cameras.
A flatbed scanner with a film adaptor is a versatile scanning system, but a film scanner provides much sharper scans of negatives and slides. Unfortunately, this quality will cost you: film scanners cost more than flatbeds.
Many film scanners provide a dust- and scratch-removal option called Digital ICE (short for image correction/enhancement). Developed by Kodak’s Austin Development Center (www.asf.com) and licensed to numerous scanner manufacturers, Digital ICE does an astonishingly good job of cleaning up color film. However, it doesn’t work with black-and-white negatives.
Whether you use a flatbed or film scanner, you’ll encounter enough jargon to intimidate an astronaut: histograms, tone curves, black points, white points. Don’t fret: all scanners include software that provides presets for common scanning scenarios, such as scanning for color inkjet output. Start with these presets. As you learn about scanning, you can customize settings to optimize your exposures.
The right resolution. A critical scanning setting deals with how many dots per inch (dpi) the scanner uses to represent an image. Volumes have been written about scanning resolution, but it boils down to a simple rule of thumb: If you’re using a flatbed scanner and you plan to print your scans on a photo inkjet printer, you can get fine results with a resolution of 180 to 240 dpi. If you plan to order photographic prints from your scans, scan at 300 dpi. Scanning at more than 300 dpi will usually not improve quality—but it will definitely use more disk space.
Film scanners are different. A film scanner scans a much smaller original—for example, a 35mm negative instead of a 4 by 6 inch print. To produce enough data for high-quality prints, a film scanner must scan at a much higher resolution than a flatbed. The film scanner I use, Minolta’s Scan Elite 5400, scans at up to 5400 dpi.
This difference in approach can make for even more head scratching when it comes time to decide what resolution to use. Just do what I do: use the presets in the scanning software. I typically choose my film scanner’s “PhotoCD 2048 by 3072” option, which yields a file roughly equivalent to a six-megapixel image.
Special circumstances. If you plan to apply iPhoto’s or iMovie’s Ken Burns effect to an image, you’ll want a high-resolution scan so you can zoom in without encountering jagged pixels. Experiment to find the best resolution for a specific image and zoom setting.
In a related vein, if you plan to crop out unwanted portions of an image, scan at a higher resolution than you might normally use. Cropping discards pixels, so the more data you have to begin with, the more cropping flexibility you have.
Format strategies. Which file format should you use for saving images? The JPEG format is lossy: it sacrifices quality slightly in order to save disk space. If this is the last time you plan to scan those old photos, you may not want to save them in a lossy format. When scanning my old slides and negatives, I save the images as TIFF files.
Once you’ve scanned and saved your photos, you can import them into iPhoto.
Filing photos. To take advantage of iPhoto’s filing features, you may want to have a separate iPhoto event for each set of related photos. In the Finder, move each set of related photos into its own folder, giving each folder a descriptive name, such as Vacation 1972. Next, drag each folder into the iPhoto window. iPhoto gives each event the same name as its corresponding folder.
You can delete the folders after you’ve imported their shots, since iPhoto will have created duplicates in iPhoto Library. (If you prefer to retain your existing filing system, you can set up iPhoto to not copy the photos to the iPhoto Library; see page 135.)
Turn back the clock. To make your iPhoto library chronologically accurate, change the date of the photos and events to reflect when the photos were taken, not when they were imported (see page 141).
Time for retouching. You can use iPhoto’s Retouch tool to fix scratches and dust specks, and its Enhance button and Adjust panel to fix color and exposure problems. For serious retouching, though, use Photoshop Elements or Photoshop. To learn more about digital retouching, I recommend Katrin Eisman’s Photoshop Restoration and Retouching, Third Edition (New Riders, 2005).
Plug in to photo enhancement. Old photos do fade away, typically acquiring a blue or red tint as their dyes, well, die. If you have patience and a good eye for color, you can improve an old photo’s color using iPhoto’s Adjust panel or Photoshop.
If you have $99, you can buy a Photoshop plug-in that does the job for you. Digital ROC Pro, from Kodak, does an amazing job of improving faded photos. Digital ROC also works in Photoshop Elements. You can download a trial version of it, and more, at www.asf.com.
You can use the Adjust panel’s color-adjustment sliders to apply a color tint to a black-and-white photo. After converting the photo to black and white (and improving on it using the tip on page 165, if you like), save the photo. Then reopen it in edit view and drag the color sliders.
You can use songs from the iTunes Store for slide show soundtracks. But if you plan to export the slide shows as QuickTime movies, note that the songs will play only on computers authorized for your iTunes account. The workaround: burn the songs to an audio CD, then re-rip them into iTunes, and use those unprotected versions for your soundtracks.
Note that this limitation does not apply to iTunes Plus songs, which are not copy-protected.
Normally, when you connect a camera or an iPhone, your Mac plops you into iPhoto. You might prefer that it didn’t—it can be annoying when you’re simply syncing your iPhone, for example.
To control what happens when you connect a camera to your Mac, choose iPhoto > Preferences. Click the General button, and in the Connecting Camera Opens pop-up menu, choose No Application.
Normally, assigning keywords to photos is your job (page 142). But iPhoto automatically assigns keywords to two types of items that you import: movie clips and raw-format images.
Movies get the keyword Movie, and raw images get the keyword Raw. Remember, you can use smart albums to quickly display items with one or more keywords. For example, to see all the movies in your iPhoto library, create a smart album whose criterion is Keyword is Movie.
With the Constrain pop-up menu in edit view, you can tell iPhoto to restrict cropping rectangles to standard proportions (page 155). If you want non-standard proportions, choose Custom from the Constrain pop-up menu and enter the proportions in the boxes that appear. Note that you can’t enter fractional values: 8.5, for example, is rounded up to 9.
If you’re browsing your photo library in Photos view, you can have iPhoto hide event titles and show your entire library as one massive set of thumbnails. In Photos view, choose View > Event Titles. It’s a cumbersome way to view your library, but you might find it useful when assigning keywords or renaming photos.
To restore some sanity to Photos view, choose View > Event Titles again.
If iPhoto is acting up—for example, taking forever to launch, running unusually slowly, or not displaying photo thumbnails—try rebuilding your iPhoto library. Quit iPhoto, then hold down the ![]() and Option keys while starting iPhoto. A dialog box appears asking if you’re sure you want to rebuild your library and giving you several options for doing so.
and Option keys while starting iPhoto. A dialog box appears asking if you’re sure you want to rebuild your library and giving you several options for doing so.
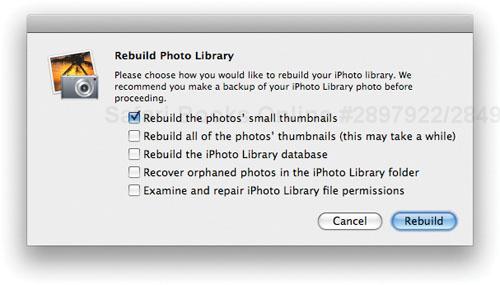
If your image thumbnails appear gray or blank, try selecting the first two options. If iPhoto crashes or refuses to load photos when you first launch it, try the third option. If some of your photos seem to have disappeared, try the “recover orphaned photos” option. And if iPhoto is misbehaving in several ways, check all five options.
Important
To avoid the risk of making a bad situation worse, consider backing up your iPhoto Library before trying to rebuild your library.
Get links to iPhoto add-ons and additional online photo services. www.macilife.com/iphoto
On page 152, I discussed how iPhoto ’08 has non-destructive editing that maximizes quality by always applying your edits to the original version of an image.
There’s an exception to this rule, and it concerns older iPhoto libraries that you’ve upgraded to work with iPhoto ’08. Specifically, if you edit a photo that you previously edited using an older iPhoto version, iPhoto ’08 applies your latest changes to the edited photo, not to the original. Thus, you don’t have the full advantage of non-destructive editing.
The solution? If you want to edit a photo that you’ve already edited using an older iPhoto version, revert to the original version of the photo. Choose Photos > Revert to Original (or, for raw images, Reprocess Raw). This discards edits you made in the past, and new edits will be applied to the original version of the photo.
With previous iPhoto versions, the iPhoto Library item was a folder: you could open it and change its contents—and doing so was a good way to damage your photo library and to lose photos.
In iPhoto ’08, the iPhoto Library item is a package—a special kind of Mac OS X folder. If you double-click the iPhoto Library item, your Mac simply starts or switches to iPhoto.
But there is a way to get inside if you must. Control-click on the iPhoto Library item and choose Show Package Contents from the shortcut menu. Inside, you’ll find a bevy of folders and files that constitute your library.
Leave them be. Always use iPhoto to add or remove photos to or from your library: drag photos into and out of the iPhoto window.
EXIF Exposed: Getting Information About Photos
Digital cameras store information along with each photo—the date and time when the photo was taken, its exposure, the kind of camera used, and more. This is called the EXIF data. It’s also often called metadata.
iPhoto saves this EXIF data when you import photos. To view it, select a photo and choose Photos > Show Photo Info (![]() -I).
-I).
Not all of this information will be useful to you, but some of it might. If you have more than one digital camera, for example, you can use the window’s Photo tab to see which camera you used for a given shot. And as I mentioned on page 150, you can use smart albums to search for various metadata items. At the very least, you can see what kind of exposure settings your camera is using.

You may want to include photos in documents that you’re creating in Microsoft Word or other programs. It’s easy: just drag the image from iPhoto into your document.
If you use Apple’s iWork software—Keynote, Pages, and Numbers—your job is even easier. All three programs provide media browsers much like those in the iLife programs: access your photo library directly, search for a photo, and then add it to a document by dragging it from the media browser.
If you drag an image to the Finder desktop or to a folder window, iPhoto makes a duplicate copy of the image file. Use this technique when you want to copy a photo out of your library.
If you used iPhoto ’06, you may remember the photocast feature. It allowed you to publish an album that others could subscribe to using iPhoto or an RSS newsreader—similar to a Web gallery album, but geekier.
Photocasts were cool, at least according to the 16 people who used them. I’m exaggerating, but it’s true that relatively few iPhoto users created or subscribed to photocasts. The Web gallery albums in iPhoto ’08 provide many of the same automatic updating advantages, but are easier to create and far nicer looking.
iPhoto ’08 can’t create photocasts, but it can subscribe to them. Simply get the Web address of the photocast and copy it to the Mac’s Clipboard. Then, choose File > Subscribe to Photo Feed and paste the address into the dialog box.
The Flickr angle. The Subscribe to Photo Feed command has another use: you can use it to subscribe to photo feeds created by the Flickr online photo sharing service (page 193). Subscribe to a feed, and its photos appear directly in iPhoto. You can view slide shows, make prints, and more. Alas, Flickr provides the photos in low resolution, so you won’t be able to make very large prints, and even slide shows will appear chunky. Still, it’s good geek fun.
Here’s how to do it. Say you’d like to subscribe to my photo feed. (I’m flattered!) Go to my Flickr page (www.flickr.com/photos/jimheid), scroll to the bottom of the page, and locate the Subscribe links. Control-click on the one that reads Latest, then choose Copy Link from the shortcut menu.

Next, switch to iPhoto, and choose File > Subscribe to Photo Feed. Choose Edit > Paste, then press Return.
My photo feed is added to your Subscriptions list, and iPhoto loads thumbnails of my most recent posts.
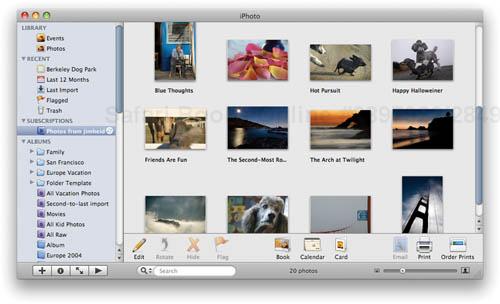
And remember, Flickr generates feeds for just about everything, including groups. Want to keep an eye on photos added to the Standard Poodle group? Subscribe to its feed. And by the way, you’re my kind of person.
iPhoto can store movie clips that your digital camera takes, but it can’t email them. When you select a movie, the Email button is disabled.
The workaround is easy. Start a new, blank email message, then position the iPhoto window so you can see the movie thumbnail and your message. Finally, drag the movie thumbnail from the iPhoto window into the blank email message.
What’s better than a great photo? Dozens or hundreds or even thousands of great photos combined into a photo mosaic.
Here are a few ways to make mosaic magic.
Use Leopard’s screen saver. The screen saver in Mac OS X 10.5 (Leopard) has a dazzlingly cool mosaic option. A full-screen version of a photo appears, then grows gradually smaller as other photos appear around it. As the photos get ever tinier, you see what’s going on: they’re forming a mosaic of yet another photo. The process then repeats with a different photo—it’s mesmerizing.

Open the Desktop & Screen Saver system preference, click the Screen Saver button, then choose the Mosaic display style.
Make a life poster. With Zykloid Software’s Posterino, you can turn a collection of photos into a full-page poster. Choose from a variety of layout options and templates, then add the poster to iPhoto and order a print or make your own. Or use the poster in an iMovie project, and pan across a year’s worth of photos with the Ken Burns effect.
Make a photo mosaic. With a free program called MacOSaiX, you can create a stunning photo mosaic—a single photo made up of thousands of separate photos, each chosen by the software to match the color and tonal qualities of part of the original photo.
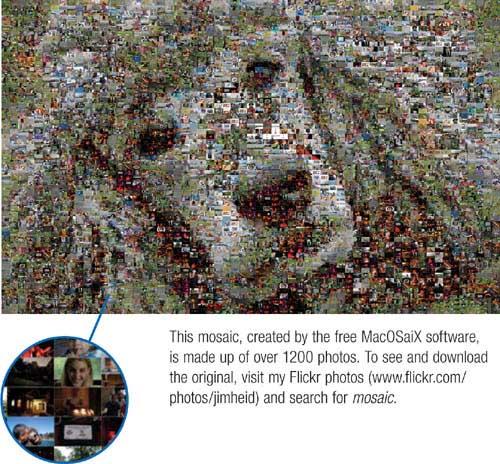
Always shoot at your camera’s highest resolution. This gives you maximum flexibility for cropping, for making big prints, and for the Ken Burns effect in iPhoto and iMovie. You can always use iPhoto to make photos smaller (for example, for emailing or Web publishing).
Many digital cameras suffer from a curse called shutter lag—a delay between the time you press the shutter button and the moment when the shutter actually fires.
Shutter lag occurs because the camera’s built-in computer must calculate exposure and focus. If you’re shooting fast-moving subjects, it’s easy to miss the shot you wanted.

The solution: give your camera a head start. Press and hold the shutter button partway, and the camera calculates focus and exposure. Now wait until the right moment arrives, then press the button the rest of the way.

In the film world, if you want to take low-light shots, you can buy high-speed film—ISO 400 or 800, for example. Fast film allows you to take nighttime or indoor shots without the harsh glare of electronic flash.
Digital cameras allow you to adjust light sensitivity on a shot-by-shot basis. Switch the camera into one of its manual-exposure modes (a common mode is labeled P, for program), and then use the camera’s menus to adjust its ISO speed.
Note that shots photographed at higher ISO speeds—particularly 400 and 800—are likely to have digital noise, a slightly grainy appearance. For me, it’s a happy trade-off: I’d rather have a sharp, naturally lit photo with some noise than a noise-free but blurry (or flash-lit) photo.
Higher ISO speeds can also help you capture fast-moving action by day. The higher speed forces the camera to use a faster shutter speed, thereby minimizing blur. That shot on this page of Mimi leaping into the air? Shot at ISO 400.
Few light sources are pure white; they have a color cast of some kind. Incandescent lamps (light bulbs) cast a yellowish light, while fluorescent light is greenish. Even outdoors, there can be light-source variations—bluish in the morning, reddish in the evening. Each of these light sources has a different color temperature.
Our eyes and brains compensate for these variances. Digital cameras try to do so with a feature called automatic white balance, but they aren’t always as good at it. That’s why many cameras have manual white balance adjustments that essentially let you tell the camera, “Hey, I’m shooting under incandescent (or fluorescent) lights now, so make some adjustments in how you record color.”
White balance adjustments are usually labeled WB, often with icons representing cloudy skies ![]() , incandescent lamps
, incandescent lamps ![]() , and fluorescent lighting
, and fluorescent lighting ![]() . You’ll probably have to switch to your camera’s manual-exposure mode to access its white balance settings.
. You’ll probably have to switch to your camera’s manual-exposure mode to access its white balance settings.
Digital cameras do more than simply capture a scene. They also manipulate the image they capture by applying sharpening and color correction (including white balance adjustments).
Some photographers don’t like the idea of their cameras making manipulations like these. If you’re in this group, consider exploring your camera’s menus and tweaking any color and sharpness settings you find.
For example, many cameras have two color modes: “standard” and “real.” The “standard” mode punches up the color saturation—something you can do yourself with iPhoto. I’d prefer to capture accurate colors and make adjustments later. A “real” mode—or its equivalent on your camera—gives you more-natural color. You can always punch it up in iPhoto if you must.
The same applies to sharpness. Most cameras offer a variety of sharpening settings, and when I’m shooting JPEG images, I like to reduce the camera’s built-in sharpening. If I feel an image needs some sharpening later, I’ll do the job in iPhoto or Photoshop.
And of course, remember that for maximum control, you should shoot in raw mode, in which the camera doesn’t apply any color or sharpness adjustments.
Most cameras also let you create a custom white-balance setting. Generally, the process works like this: put a white sheet of paper in the scene, get up close so the paper fills the viewfinder, and then press a button sequence on the camera. The camera measures the light reflected from the paper, compares it to the camera’s built-in definition of white, and then adjusts to compensate for the lighting.
If you’re a stickler for color and you’re shooting under strange lighting conditions, creating a custom white balance setting is a good idea.
Better still, shoot in raw mode if your camera allows it. Then you’ll have complete control over color balance.
A camera’s built-in LCD screen is great for reviewing a shot you just took. But the screen is so tiny that it’s often hard to tell whether the photo is in sharp focus.
Most cameras allow you to zoom in on a photo while displaying it. I like to zoom in and verify that my photo isn’t blurred—especially if the subject is still in front of me and I have another chance.
If your camera has an electronic viewfinder, it can be a superior alternative to the LCD screen for reviewing your shots, especially in bright light.
If you read through pages 162 and 163, you’ve seen the value that a histogram display can offer for making exposure adjustments.
Many mid-range and all high-end cameras can display a histogram, too, which you can use to adjust exposure settings before you take a photo.
With your camera in one of its manual-exposure modes, activate the histogram display. Then adjust your exposure settings—shutter speed, ISO speed, and aperture—so that the histogram’s data is as far to the right-hand side of the graph as possible without introducing white clipping. (Remember, white clipping means lost highlight detail.)
Photography gurus call this technique exposing to the right, and it ensures that you’re getting as much image data as your camera is capable of capturing.
Photographer Michael Reichmann, publisher of the magnificent Luminous Landscape site, has written an excellent tutorial on using histograms when shooting. I’ve linked to it on www.macilife.com/iphoto.
Too many photographers shy away from their subjects. Get close to show detail. If you can’t get physically closer, use your camera’s zoom feature, if it has one. If your camera has a macro feature, use it to take extreme close-ups of flowers, rocks, seashells, tattoos—you name it. Don’t limit yourself to wide shots.
Don’t just shoot from a standing position. Get down into a crouch and shoot low—or get up on a chair and shoot down. Vary your angles. The LCD screen on a digital camera makes it easy—you don’t press your eye to the camera to compose a shot.
Changing your angle can be a great way to remove a cluttered background. When photographing flowers, for example, I like to position the camera low and aim it upwards, so that the flowers are shot against the sky.

Many digital cameras supplement their optical zoom lenses with digital zoom functions that bring your subject even closer. Think twice about using digital zoom—it usually adds undesirable artifacts to an image.
In landscape shots, the position of the horizon influences the mood of the photo. To imply a vast, wide open space, put the horizon along the lower third of the frame and show lots of sky. (This obviously works best when the sky is cooperating.) To imply a sense of closeness—or if the sky is a bland shade of gray—put the horizon along the upper third, showing little sky.
This rule, like others, is meant to be broken. For example, if you’re shooting a forlorn-looking desert landscape, you might want to have the horizon bisect the image to imply a sense of bleak monotony.
You can often use iPhoto’s cropping tool to fix composition problems. But note that cropping results in lost pixels, and that can affect your ability to produce high-quality prints. Try to do your cropping in the camera’s viewfinder, not iPhoto.
I turn off my camera’s built-in flash and rarely turn it on. Existing light provides a much more flattering, natural-looking image, with none of the harshness of electronic flash.

Dimly lit indoor shots may have a slight blur to them, but I’ll take blur over the radioactive look of flash any day.
More accurately, be aware of the background. Is a tree growing out of Mary’s head? If so, move yourself or Mary. Are there distracting details in the background? Find a simpler setting or get up close. Is your shadow visible in the shot? Change your position. When looking at a scene, our brains tend to ignore irrelevant things. But the camera sees all. As you compose, look at the entire frame, not just your subject.
A blurred photo is a ruined photo, right? Not necessarily. Blur conveys motion, something still images don’t usually do. A photo with a sharp background but a car that is blurred tells you the car was in motion. To take this kind of shot, keep the camera steady and snap the shutter at the moment the car crosses the frame.

You can also convey motion by turning this formula around: If you pan along with the moving car as you snap, the car will be sharp but the background will be blurred. A canine-oriented example is above.
Following a couple of rules of thumb can help you compose photos that are more visually pleasing.
First, there’s the age-old rule of thirds, in which you divide the image rectangle into thirds and place your photo’s subject at or near one of the intersections of the resulting grid.
Place your photo’s subject at or near these intersections.

This composition technique yields images that are more visually dynamic. The Crop tool in iPhoto’s edit view makes it easy to crop according to the rule of thirds (page 155).
A second technique is to draw the viewer’s eyes to your subject and add a sense of dynamism by using diagonal lines, such as a receding fence.
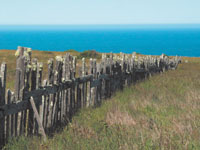
If you want to take sharp photos in low light, mount your camera on a tripod. If you don’t have a tripod handy, here’s a workaround: turn on your camera’s self-timer mode—the mode you’d usually use when you want to get yourself in the picture—then set the camera on a rigid surface and press the shutter button. Because you won’t be holding the camera when the shutter goes off, you won’t risk getting a blurred shot.