27. Creating Add-Ins
IN THIS CHAPTER
Characteristics of Standard Add-Ins
Converting an Excel Workbook to an Add-In
Having Your Client Install the Add-In
Using a Hidden Workbook as an Alternative to an Add-In
Using VBA, you can create standard add-in files for your clients to use. After the client installs the add-in on his PC, the program will be available to Excel and loads automatically every time he opens Excel.
This chapter discusses standard add-ins.
Be aware that there are two other kinds of add-ins: COM add-ins and DLL add-ins. Neither of these can be created with VBA. To create these types of add-ins, you need either Visual Basic.NET or Visual C++.
Characteristics of Standard Add-Ins
If you are going to distribute your applications, you might want to package the application as an add-in. Typically saved with an .xlam extension for Excel 2007-10 or an .xla extension for Excel 97-2003, the add-in offers several advantages:
• Usually, clients can bypass your Workbook_Open code by holding down the Shift key while opening the workbook. With an add-in, they cannot bypass the Workbook_Open code in this manner.
• After the Add-Ins dialog is used to install an add-in (select File, Options, Add-Ins, Manage Excel Add-Ins, Go), the add-in will always be loaded and available.
• Even if the macro security level is set to disallow macros, programs in an installed add-in can still run.
• Generally, custom functions work only in the workbook in which they are defined. A custom function added to an add-in is available to all open workbooks.
• The add-in does not show up in the list of open files in the Window menu item. The client cannot unhide the workbook by choosing Window, Unhide.
Caution
There is one strange rule for which you need to plan. The add-in is a hidden workbook. Because the add-in can never be displayed, your code cannot select or activate any cells in the add-in workbook. You are allowed to save data in your add-in file, but you cannot select the file. Also, if you do write data to your add-in file that you want to be available in the future, your add-in codes need to handle saving the file. Because your clients will not realize that the add-in is there, they will never be reminded or asked to save an unsaved add-in. You might add ThisWorkbook.Save to the add-in’s Workbook_BeforeClose event.
Converting an Excel Workbook to an Add-In
Add-ins are typically managed by the Add-Ins dialog. This dialog presents an add-in name and description. You can control these by entering two specific properties for the file before you convert it to an add-in.
To change the title and description shown in the Add-Ins dialog, follow these steps:
- Select File. Excel displays the Document Properties pane on the right side of the window.
- From the Properties drop-down, select Show All Properties
- Enter the name for the add-in in the Title field.
- Enter a short description of the add-in in the Comments field (see Figure 27.1).

Figure 27.1. Fill in the Title and Comments fields before converting a workbook to an add-in.
- Select another tab such as the Home tab, to return to your workbook.
There are two ways to convert the file to an add-in. The first method, using Save As, is easier, but has an annoying by-product. The second method uses the VB Editor and requires two steps, but gives you some extra control. The sections that follow describe the steps for using these methods.
Using Save As to Convert a File to an Add-In
Select File, Save As. In the Save as Type field, scroll through the list and select Excel Add-In (*.xlam).
Note
If your add-in might be used in Excel 97 through Excel 2010, choose Excel 97-2003 Add-In (*.xla).
As shown in Figure 27.2, the filename changes from Something.xlsm to Something.xlam. Also note that the save location automatically changes to an AddIns folder. This folder location varies by operating system, but it will be something along the lines of C:Documents and SettingsCustomerApplication DataMicrosoftAddIns. It is also confusing that, after saving the XLSM file as an XLAM type, the unsaved XLSM file remains open. It is not necessary to keep an XLSM version of the file because it is easy to change an XLAM back to an XLSM for editing.

Figure 27.2. If you are creating an add-in for your own use, the Save As method changes the IsAddIn property, changes the name, and automatically saves the file in your AddIns folder.
Caution
When using the Save As method to create an add-in, a worksheet must be the active sheet. The Add-In file type is not available if a Chart sheet is the active sheet.
Using the VB Editor to Convert a File to an Add-In
The Save As method is great if you are creating an add-in for your own use. However, if you are creating an add-in for a client, you probably want to keep the add-in stored in a folder with all the client’s application files. It is fairly easy to bypass the Save As method and create an add-in using the VB Editor:
- Open the workbook that you want to convert to an add-in.
- Switch to the VB Editor.
- In the Project Explorer, click ThisWorkbook.
- In the Properties window, find the property called
IsAddInand change its value toTrue, as shown in Figure 27.3.
Figure 27.3. Creating an add-in is as simple as changing the
IsAddInproperty ofThisWorkbook. - Press Ctrl+G to display the Immediate window. In the Immediate window, save the file, using an .xlam extension:
ThisWorkbook.SaveAs FileName:="C:ClientFilesChap27.xlam", FileFormat:= xlO-
penXMLAddIn
Note
If your add-in might be used in Excel 97 through Excel 2003, change the final parameter from xlOpenXMLAddIn to xlAddIn.
You’ve now successfully created an add-in in the client folder that you can easily find and e-mail to your client.
Having Your Client Install the Add-In
After you e-mail the add-in to your client, have her save it on her desktop or in another easy-to-find folder. She should then follow these steps:
- Open Excel 2010. From the File menu, select Options.
- Along the left navigation, select Add-Ins.
- At the bottom of the window, select Excel Add-Ins from the Manage drop-down (see Figure 27.4).
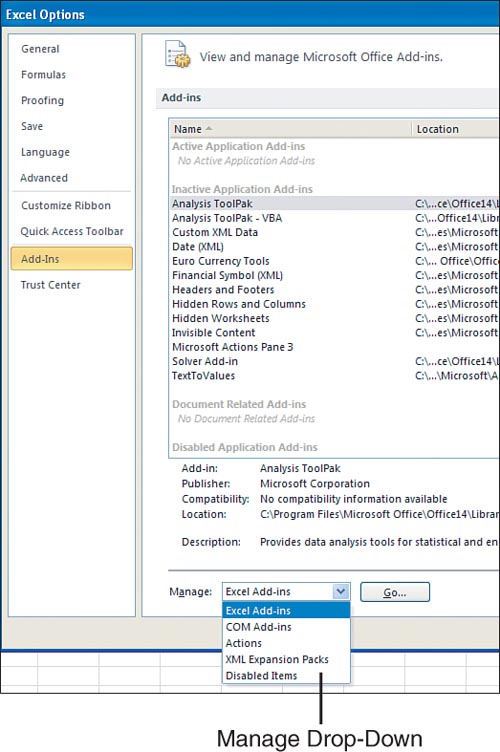
Figure 27.4. The Excel 2010 Add-Ins tab in Options is significantly more complex than in Excel 2003. Select Excel Add-Ins from the bottom and click Go.
- Click Go. Excel displays the familiar Add-Ins dialog.
- In the Add-Ins dialog, click the Browse button (see Figure 27.5).

Figure 27.5. Your client selects Browse from the Add-Ins dialog.
- Browse to where you saved the file. Highlight your add-in and select OK.
The add-in is now installed. If you allow it, Excel copies the file from where you saved it to the proper location of the AddIns folder. In the Add-Ins dialog, the title of the add-in and comments as specified in the File Properties dialog are displayed (see Figure 27.6).

Figure 27.6. The add-in is now available for use.
Standard Add-Ins Are Not Secure
Remember that anyone can go to the VB Editor, select your add-in, and change the IsAddin property to False to unhide the workbook. You can discourage this process by locking the XLAM project for viewing and protecting it in the VB Editor, but be aware that plenty of vendors sell a password-hacking utility for less than $40. To add a password to your add-in, follow these steps:
- Go to the VB Editor.
- From the Tools menu, select VBAProject Properties.
- Select the Protection tab.
- Select the Lock Project For Viewing check box.
- Enter the password twice for verification.
Closing Add-Ins
Add-ins can be closed in three ways:
- Clear the add-in from the Add-Ins dialog. This closes the add-in for this session and ensures that it does not open during future sessions.
- Use VB Editor to close the add-in. In the VB Editor’s Immediate pane, type this code to close the add-in:
Workbooks("YourAddinName.xlam").Close
- Close Excel. All add-ins are closed when Excel is closed.
Removing Add-Ins
You might want to remove an add-in from the list of available add-ins in the Add-In dialog box. There is no effective way to do this within Excel. Follow these steps:
- Close all running instances of Excel.
- Use Windows Explorer to locate the file. The file might be located in %AppData%MicrosoftAddIns.
- In Windows Explorer, rename the file or move it to a different folder.
- Open Excel. You get a note warning you that the add-in could not be found. Click OK to dismiss this box.
- Go to File, Options, Add-Ins, Manage Excel Add-Ins, Go. In the Add-Ins dialog box, clear the name of the add-in you want to remove. Excel notifies you that the file cannot be found and asks whether you want to remove it from the list. Select Yes.
Using a Hidden Workbook as an Alternative to an Add-In
One cool feature of an add-in is that the workbook is hidden. This keeps most novice users from poking around and changing formulas. However, it is possible to hide a workbook without creating an add-in.
It is easy enough to hide a workbook by selecting Hide from the Window menu in Excel. The trick is to then save the workbook as Hidden. Because the file is hidden, the normal File, Save choice does not work. This can be done from the VB Editor window. In the VB Editor, make sure that the workbook is selected in the Project Explorer. Then, in the Immediate window, type the following:
ThisWorkbook.Save
Case Study: Using a Hidden Code Workbook to Hold All Macros and Forms
Access developers routinely use a second database to hold macros and forms. They place all forms and programs in one database and all data in a separate database. These database files are linked through the Link Tables function in Access.
For large projects in Excel, I recommend the same method. You use a little bit of VBA code in the Data workbook to open the Code workbook.
The advantage to this method is that when it is time to enhance the application, you can mail a new code file without affecting the client’s data file.
I once encountered a single-file application rolled out by another developer that the client had sent out to 50 sales reps. The reps replicated the application for each of their 10 largest customers. Within a week, there were 500 copies of this file floating around the country. When they discovered a critical flaw in the program, patching 500 files was a nightmare.
We designed a replacement application that used two workbooks. The data workbook ended up with about 20 lines of code. This code was responsible for opening the code workbook and passing control to the code workbook. As the files were being closed, the data workbook would close the code workbook.
There were many advantages to this method. First, the customer data files were kept to a very small size. Each sales rep now has one workbook with program code and ten or more data files for each customer. As enhancements are completed, we distribute new program code workbooks. The sales rep opens his or her existing customer data workbook, which automatically grabs the new code workbook.
Because the previous developer had been stuck with the job of trying to patch 500 workbooks, we were extremely careful to have as few lines of code in the customer workbook as possible. There are maybe ten lines of code, and they were tested extremely thoroughly before being sent out. By contrast, the code workbook contains 3,000+ lines of code. So if something goes wrong, I have a 99 percent chance that the bad code will be in the easy-to-replace code workbook.
In the customer data workbook, the Workbook_Open procedure has this code:
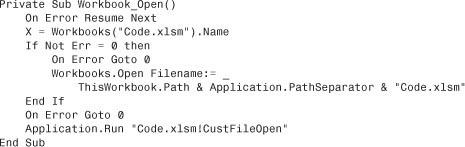
The CustFileOpen procedure in the code workbook handles adding a custom menu for the application. It also calls a macro named DeliverUpdates. If we ever have to change the 500 customer data files, the DeliverUpdates macro will handle this via code.
This dual-workbook solution works well and allows updates to be seamlessly delivered to the client without touching any of the 500 customer files.
Next Steps
If as authors we’ve done our job correctly, you now have the tools you need to design your own VBA applications in Excel. You understand the shortcomings of the macro recorder yet know how to use it as an aid in learning how to do something. You know how to use Excel’s power tools in VBA to produce workhorse routines that can save you hours of time per week. You’ve also learned how to have your application interact with others so that you can create applications to be used by others in your organization or other organizations.
If you have found any sections of the book that you thought were confusing or could have been spelled out better, we welcome your comments, and they will be given consideration as we prepare the next edition of this book. Write to us:
Whether your goal was to automate some of your own tasks or to become a paid Excel consultant, we hope that we’ve helped you on your way. Both are rewarding goals. With 500 million potential customers, we find that being Excel consultants is a friendly business. If you are interested in joining our ranks, this book is your training manual. Master the topics, and you will be qualified to join the team of Excel consultants.