
17. Tools for Longer Documents
Word’s versatility kicks into high gear when you create long documents. Unless you’re a professional blurb writer and your documents are destined to always be one-page in length or less, then you might be interested to know about all the features Word offers for longer types of documents. If you use Microsoft Word to write research papers, term papers, legal contracts, manuscripts, and other lengthy tomes, you can take advantage of a wide variety of tools for outlining, inserting footnotes, endnotes, captions, indexes, cross-references, and so on. The References tab is the place to look for most of these features, and in this chapter, how to put several of these tools to work.
Structuring Documents with Outline View
Often an overlooked feature in Word, Outline view can help you construct documents based on a hierarchy of headings, subheadings, and body content. Use Outline view when you want to focus on the document’s structure rather than its formatting. When you’re crafting any type of document that requires you to group ideas or arrange thoughts in a hierarchical fashion (which means top to bottom with levels of importance), switch over to Outline view and get busy organizing your thoughts. You can assign and change heading levels (such as Heading 1, Heading 2, and so on) as needed as your document develops. This hierarchical framework is incredibly practical for planning out elements that go into your document, whether you’re formulating a letter or list or plotting a full-blown script for the next big television series (good luck with that, by the way).
Let’s say you’re working on a particularly lengthy document, like a thesis, report, or dissertation. Chances are you’re going to use headings and subheadings throughout to plan and develop your topic and coverage. You might start with a rough outline of all the main points you want to make, so your outline might look like Figure 17.1. Then within each of those main points you’ll add subtopics, much like you see in Figure 17.2. Within each subheading, you’ll start adding content. You can do all of this in Word using Outline view.

FIGURE 17.1 An outline in Outline view showing the headings I plan on writing about for my report.
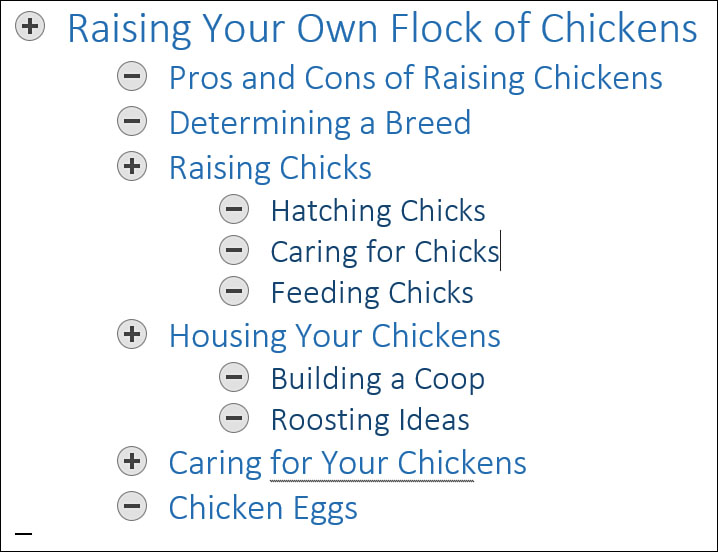
FIGURE 17.2 Here’s the same outline, but with subheadings developing under each main topic point.
At first glance you might think “Hey, I can do that in Word without using a special view,” in which case you would be right. But you’re overlooking something. When you use Outline view, you’re tapping into some powerful tools to help you work with your outline—namely the Outlining tab, shown in Figure 17.3. This tab offers tools to help you promote and demote items in the hierarchy with a click, and expand and collapse groups so you can focus on important points. It also offers a menu of heading levels you can select from as you build the document.

FIGURE 17.3 The Outlining tab offers a variety of tools to help you build and work with your outline.
To turn on the Outline view, click the View tab on the Ribbon, then click the Outline button (located in the Views group of tools). Word displays the Outlining tab, and the text you type into the document is organized into levels, starting with a default level until you specify another. Notice in Figure 17.3 that the headings and subheadings have icons in front of the text. A plus sign indicates subheadings exist within that heading level, and a minus sign indicates no subheadings.
You can click in the document and start typing; press the Enter key to start a new topic. You can use the following tools to make changes to the outline:
• To assign a heading level, click the line of text, click the Outline Level drop-down menu, shown in Figure 17.4, and choose a level.
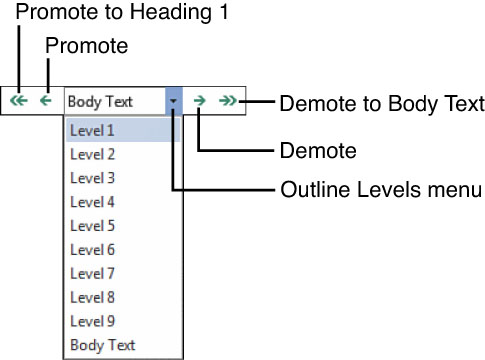
FIGURE 17.4 Assign levels with the Outline Levels menu.
• To promote text one level, click the Promote button.
• To promote text to heading 1, click the Promote to Heading 1 button.
• To demote text one level, click the Demote button.
• To demote text to body text, click the Demote to Body Text button.
• To move a topic up in the hierarchy, click the Move Up button (see Figure 17.5).

FIGURE 17.5 Use the Outlining tools to move your document points around.
• To move a topic downward in the hierarchy, click the Move Down button.
• To expand a group to view all the subpoints and body content, click the Expand button.
• To collapse a group and just view its main heading level, click the Collapse button.
![]() Tip
Tip
Many people are confused by Word’s heading styles and the idea of promoting/demoting levels, but it’s a simple system: The lower the heading number, the higher the ranking of that heading. So Heading 1 style is applied to the most important topics you address in your document. (Think of them as “number one points to get across to my audience.”) Apply Heading 2 styles to subtopics within your Heading 1 topics, Heading 3 styles to issues that are subordinate to your Heading 2 topics, and so on. Word has nine heading levels you can apply to the various topics and sections in your document to organize its structure.
You can drag and drop lines of text in your document to change their positioning in the hierarchy. You can also choose to view only certain levels in your document, which simplifies reviewing the overall structure and organizing the outline. For example, maybe you need to print out a copy of the main points of your report without all the subheadings and body content. You can use the Show Levels drop-down menu, shown in Figure 17.6, to choose to view all the Level 2 text, for example.

FIGURE 17.6 Control what levels appear in the document view using this menu.
You can use the Show Text Formatting check box to show or hide formatting. Click the Show First Line Only check box to reveal only the first line of body text and not the whole paragraph of body text. This might come in handy when reviewing a longer outline.
After you’ve finalized your document’s structure in Outline view, you can switch over to Print Layout view and make it look nice with formatting attributes. To close Outline view, click the Close Outline View button. This returns you to Word and the outline appears as normal text—with all the proper headings and levels assigned, of course.
Inserting Footnotes and Endnotes
If you’re working with the type of document that requires resource notations—extra explanations or comments in addition to the text, or other references—you can insert footnotes and endnotes. A footnote is an explanatory flagged note inserted at the bottom of a page to cite a source. Endnotes appear at the end of a section or at the end of a document rather than at the bottom of a page. You can find buttons for adding footnotes, endnotes, and other reference features on the Ribbon’s References tab, shown in Figure 17.7.
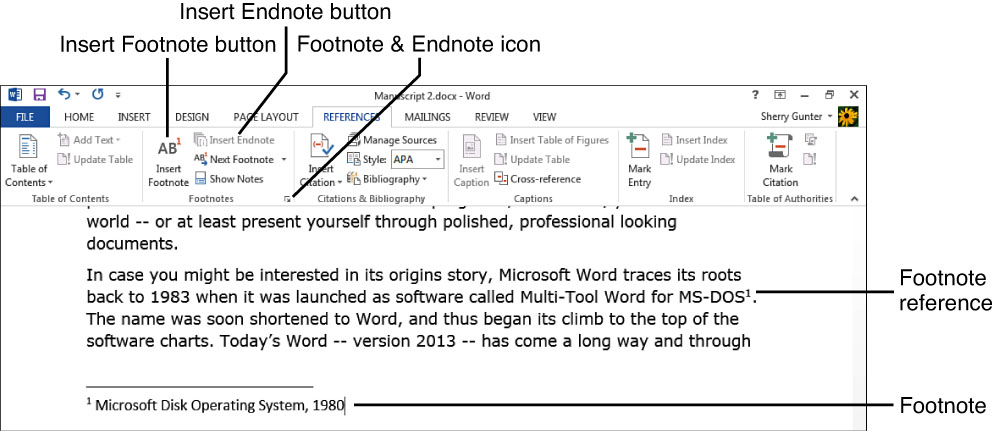
FIGURE 17.7 Find footnote and endnote tools on the References tab.
To insert a footnote or endnote, use these steps:
1. Click where you want to add the numeral or symbol indicating a footnote or endnote.
2. Click the References tab on the Ribbon.
3. Click Insert Footnote or Insert Endnote.
4. Word inserts a superscripted reference mark to flag the note.
5. Type your footnote or endnote text at the bottom of the page or section. As you keep adding footnotes or endnotes throughout your document, Word keeps track of the sequencing for you and continues the numbering automatically. To customize how the footnotes and endnotes appear, including what type of numbering format is used (such as Arabic numbers or Roman numerals), open the Footnote and Endnote dialog box shown in Figure 17.8. To display the dialog box, click the Footnote & Endnote icon in the corner of the Footnotes group of tools on the References tab. You can also right-click a footnote or endnote and choose Note Options to open the dialog box.
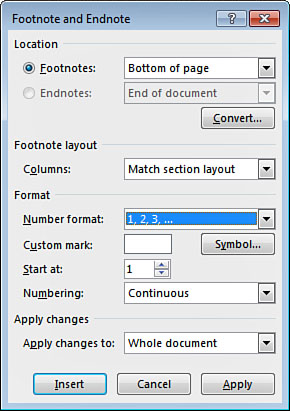
FIGURE 17.8 The Footnote and Endnote dialog box has customizing options you can apply.
The dialog box offers several ways to customize your notes. For example, to control where on the page the footnote or endnote should appear, click the corresponding location drop-down arrow and choose a placement. To change the number format, click the Number format drop-down arrow and choose the format you want. To control the sequence of numbering, such as continuing the sequence throughout the whole document or just within a particular section, click the Numbering drop-down arrow and choose an option. You can also insert a custom mark or symbol to use in place of a superscripted number. After you make your changes to the customizing options, click Apply.
![]() Tip
Tip
The cool thing about using Word’s automatic footnote/ endnote numbering is that if you move the text containing the note, Word automatically fixes the numbering for you.
To work with footnotes or endnotes, you can use these options:
• You can move your mouse pointer over a note’s superscripted character to view a ScreenTip with the footnote or endnote text.
• To edit a footnote or endnote, click in the footnote or endnote text and make your changes.
• To move between footnotes, click the Next Footnote drop-down arrow on the References tab and choose which direction to move in the document.
• To remove a footnote or endnote, select the superscripted numeral or symbol that flags the note, then press the Delete key.
Adding Captions
You can add captions to pictures, charts, tables, text boxes, and other graphic objects you place in a document. A caption is basically a numbered label. In fact, I’ve been using them throughout this book to alert you to screen captures that go along with whatever topic we’re discussing. Every time I refer to a figure, the text reads Figure 17.1 or 17.2, and so forth—those numbers refer to caption numbers assigned to each figure in the book (in this example, we’re in Chapter 17 and the figure numbers start at 1, so 17.1 is the first figure reference in the sequence).
Word’s captioning feature includes preset labels to use: Figures, Equation, or Table. If those preset labels won’t work for you, you can create your own custom label.
Word also handles the caption numbering for you, such as Figure 1, Figure 2, and so forth. As with footnote/endnote numbering, Word keeps your captions in order even if you move everything around in the document. Another bonus to captioning using the official caption styles is you can use the captions in cross-references (see the next section to learn more about this concept).
To add a caption, use these steps:
1. Select the object to which you want to add a caption.
2. Click the References tab on the Ribbon.
3. Click Insert Caption.
4. The Caption dialog box opens, as shown in Figure 17.9. Click the Label drop-down arrow and choose your label type.

FIGURE 17.9 The Caption dialog box.
5. You can position the caption above or below the object; below is the default setting. Click the Position drop-down arrow to change the position.
6. Click OK.
7. Word inserts the caption, similar to Figure 17.10. Type in any additional text you want the caption to include.

FIGURE 17.10 Captions can appear above or below the figure, table, or equation.
You can apply formatting to your captions to make them look good. Look for text formatting tools on the Home tab.
Inserting Cross-References
You can use cross-references in your documents to refer readers to another section of the document or to additional information. You can insert cross-references to refer readers to existing text that is styled as a heading, to footnotes or endnotes, to captions and bookmarks, figures, and even to numbered paragraphs. The key to make them work properly is to make sure your document has that reference type somewhere within the document. For example, if you want to refer the reader to another section, make sure you assign the section title a heading level using Word’s styles (see Chapter 10, “Advanced Formatting,” to learn more about styles), or if you want to refer the reader to a figure located elsewhere, make sure the document has captioned figures to refer to. So before you attempt to insert a cross-reference, first make sure you include the reference types in the document. After you have the reference types in place, follow these steps to insert a cross-reference:
1. Click in the document where you want to insert a cross-reference.
2. Click the References tab on the Ribbon.
3. Click Cross-reference.
4. The Cross-reference dialog box opens, as shown in Figure 17.11. Click the Reference type drop-down arrow and choose the type of document element to which the cross-reference refers.

FIGURE 17.11 The Cross-reference dialog box.
5. Click the Insert reference to drop-down arrow and select what type of information the cross-reference will contain.
6. Select the specific item to which the cross-reference should refer.
7. Leave the Insert as hyperlink check box selected if you want readers to be able to navigate directly to the cross-reference item.
8. Click Insert and Word inserts the cross-reference, as shown in Figure 17.12.
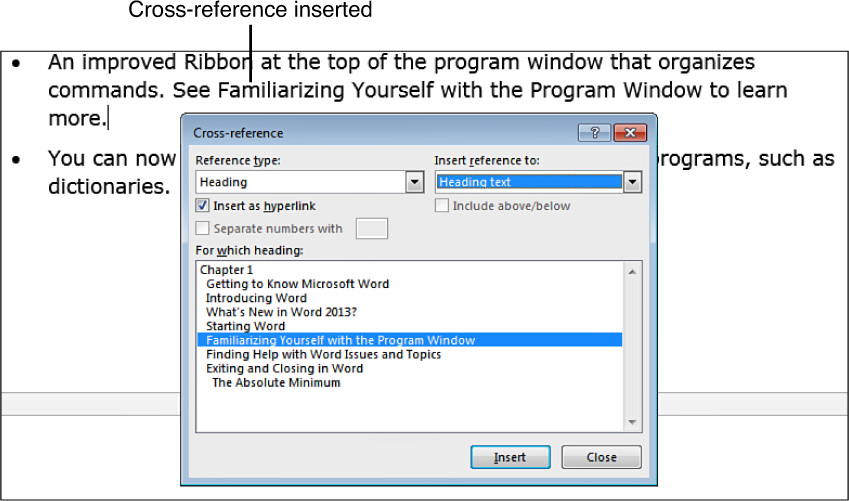
FIGURE 17.12 You can pick which reference to insert from the list of choices.
9. Click Close.
After you insert a cross-reference, you can tweak it with additional text and punctuation as needed. To remove a cross-reference you no longer want, select it and press the Delete key.
Creating an Index
Would your lengthy document benefit from an index? An index is a list of important terms that appear in the document along with the page numbers on which they appear. Indexes are used to help readers look up content and topics, and typically appear at the end of a document. You’ve probably encountered plenty of indexes in various types of books, such as reference books or even how-to manuals. It turns out that adding an index in Word is fairly easy, as long as you’re not frightened by paragraph marks and indexing fields. Don’t worry, there’s nothing scary about either of these.
To start the process, you have to mark your index words using a special field. After you’ve marked all the important words you want to include in the index, you can turn them into a tabbed columnar list that Word automatically updates for you. Word’s indexing feature allows you to customize your index to include leader characters and preset index designs.
To start building an index, begin marking words you want to designate as index terms. Select the word or phrase in the document, click the References tab, and then click the Mark Entry button. Word opens the Mark Index Entry dialog box, shown in Figure 17.13. Click the Mark button to create an entry for the word or phrase on this page only, or click Mark All to create entries for all occurrences in the document.

FIGURE 17.13 You can use the Mark Index Entry dialog box to mark words and phrases for indexing.
When you mark the entry, Word adds a special XE indexing field to your document and turns on paragraph marks, as shown in Figure 17.14. The indexing field is enclosed in braces ({ }) and marked with an XE tag (for “index entry”). You can continue adding more indexing markers; just keep selecting words and clicking the Mark button in the dialog box to mark them as you read through the document. The dialog box stays open while you work. When you finish, click Cancel to close the dialog box.

FIGURE 17.14 Word turns on the display of paragraph marks and adds an indexing field to the document.
You don’t have to mark all of your document’s index entries in a single session. You might prefer to mark entries in multiple sessions, refreshing the index as you go along.
![]() Tip
Tip
You can drag the dialog box around on the screen to move it out of the way while you mark words and phrases. Drag it by its title bar and drop it somewhere out of the way.
The next part of making an index is clicking at the end of the document, or wherever you want the index to appear. From the References tab, click Insert Index. This opens the Index dialog box, shown in Figure 17.15.
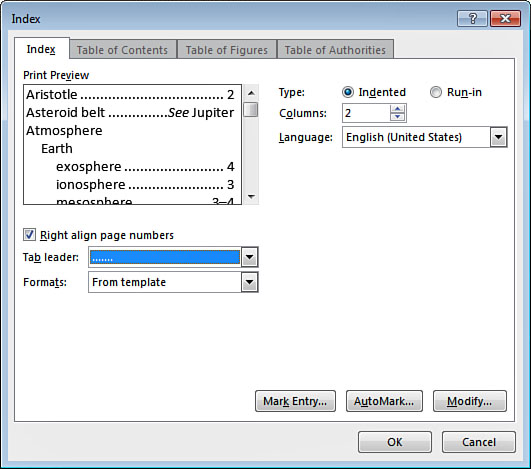
FIGURE 17.15 The Index dialog box.
Click the Right align page numbers check box, then click the Tab leader drop-down arrow and choose a design. Click OK and Word inserts an alphabetical index, similar to Figure 17.16. That’s all there is to it.
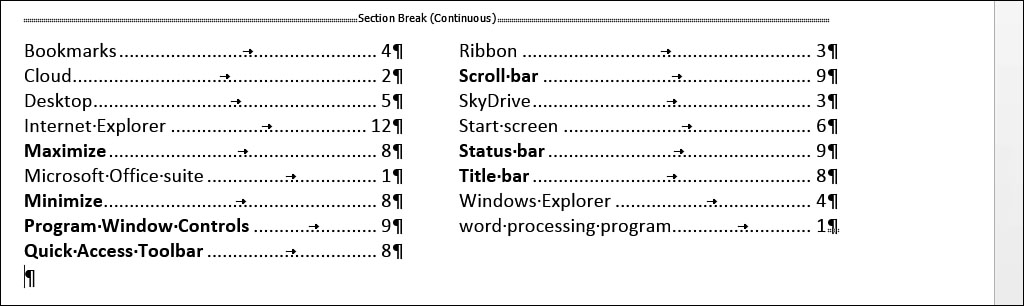
FIGURE 17.16 Here’s an example of an index.
![]() Tip
Tip
You can turn off paragraph marks by clicking the Show/Hide ¶ button on the Home tab. Look for it in the corner of the Paragraph group of tools.
To remove an XE field, select the entire field and press the Delete key, and then update the index. Click the References tab and click the Update Index button.
Fields are special containers you add into your Word documents to hold data that often requires updating, such as dates or page numbers. Word updates fields automatically when the reference changes. However, sometimes you need to update a field manually. To quickly update a single field, click it and press F9.
Creating a Table of Contents
The front end of your long document might benefit from a table of contents—a quick reference of where to find what content within your document. You can instruct Word to generate a table of contents, or TOC for short, based on the predefined heading styles you assigned throughout the document. Of course, first assigning the headings is up to you. (You can find headings listed in the Styles gallery found on the Home tab.) After your headings are ready to go, you can create a table of contents using these steps:
1. Click where you want to place your table of contents. For best results, place your TOC on a blank page at the front of the document.
2. Click the References tab on the Ribbon.
3. Click Table of Contents.
4. Click a TOC style from the menu, as shown in Figure 17.17, and Word immediately inserts it, similar to Figure 17.18.
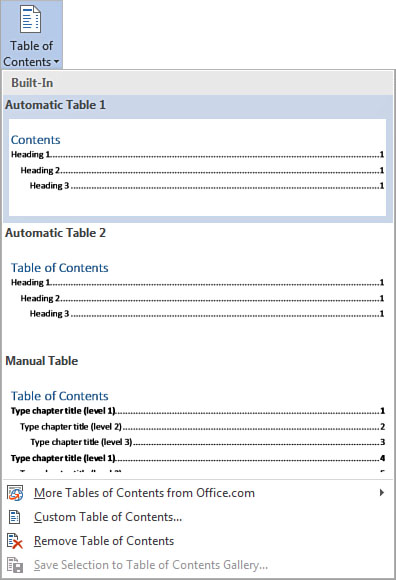
FIGURE 17.17 Use the Table of Contents drop-down menu to choose a TOC style.

FIGURE 17.18 Word creates a TOC based on the headings assigned in your document.
Here’s what you can do with your table of contents:
• When you click inside the TOC, two special tool buttons appear at the top. These duplicate the TOC tools found on the References tab. You can use either the shortcut buttons or the Ribbon buttons to edit your TOC, your choice.
• You can edit your TOC by changing which level headings are listed. Click the Add Text button and choose a heading to add.
• To switch to another TOC style, click the Table of Contents button again and choose another style.
• If you make changes to your document headings and content, click the Update Table button to make your TOC current.
Inserting Bookmarks
You can add bookmarks to help you navigate longer documents. Digital bookmarks act a lot like actual bookmarks, allowing you to mark a location in the document for easy access later. For example, you might use a bookmark to quickly navigate to a key word or phrase, or bookmark text you want to revisit after you’ve researched a few things. You might also use a bookmark to help you quickly jump to another spot in your document, such as a table of contents.
In order for Word to keep track of all the bookmarks in a document, you have to give them individual names. When naming your bookmark, you must follow very strict naming rules. Bookmark names must begin with a letter, and names can include numbers along with letter characters. However, no spaces are allowed in the bookmark name. Instead of a space, use an underscore character, such as in Chapter_3.
Use these steps to add a bookmark:
1. Select the text you want to turn into a bookmark.
2. Click the Insert tab on the Ribbon.
3. Click Links.
4. Click Bookmark, as shown in Figure 17.19.

FIGURE 17.19 Find the Bookmark tool on the Insert tab.
5. The Bookmark dialog box opens, as shown in Figure 17.20. Type a name for the bookmark.
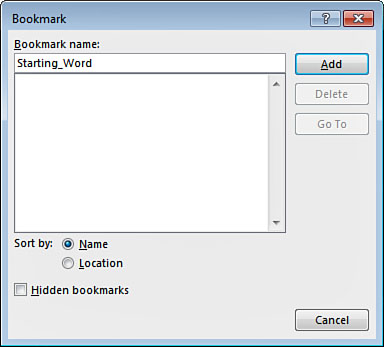
FIGURE 17.20 Give your bookmark a name in the Bookmark dialog box.
6. Click Add.
To use the bookmark later, click the Home tab, click the Find drop-down arrow, and choose Go To. This opens the Find and Replace dialog box (you can learn more about the Find and Replace tools in Chapter 18) to the Go To tab, as shown in Figure 17.21. Click the Bookmark element and then choose the particular bookmark you want to jump to, then click the Go To button to transport yourself to the location in the document. To exit the dialog box when finished jumping around the document, click the Close button.

FIGURE 17.21 You can use the Find and Replace dialog box to navigate the document using bookmarks.
![]() Tip
Tip
You can also use the Go To tab in the Find and Replace dialog box to navigate to other designated elements in your documents, including footnotes, endnotes, and headings.
Word 2013 also bookmarks the last place you were working in a document when you last saved and closed your file, and it offers to jump you right back there when you reopen the file. A bookmark prompt icon appears, as shown in Figure 17.22, which you can click to return to the spot. If you don’t want to pick up where you left off, just ignore the icon.

FIGURE 17.22 Word 2013 automatically bookmarks your last editing location in a document and offers to take you there.
![]() Note
Note
Bookmarks are a part of the document, so if you hand off your document to another user, just remember everyone who reads your document reads your bookmarks as well. For that reason, you may want to remove them from a document first, or simply make sure they’re acceptable for all audiences.
Navigating Long Documents with the Navigation Pane
The longer your document grows, the more important it is to learn how to move around in it. Word has just the tool for you to zip back and forth to the places you want to view—the Navigation pane. This pane, shown in Figure 17.23, displays your document headings as a list, or shows each page as a thumbnail image (small image), and also doubles as a search function. To turn on the Navigation pane, click the View tab on the Ribbon, and click the Navigation Pane check box. (A check mark means the pane is turned on, no check mark means the pane is off.) You can also press Ctrl+F to open the pane.
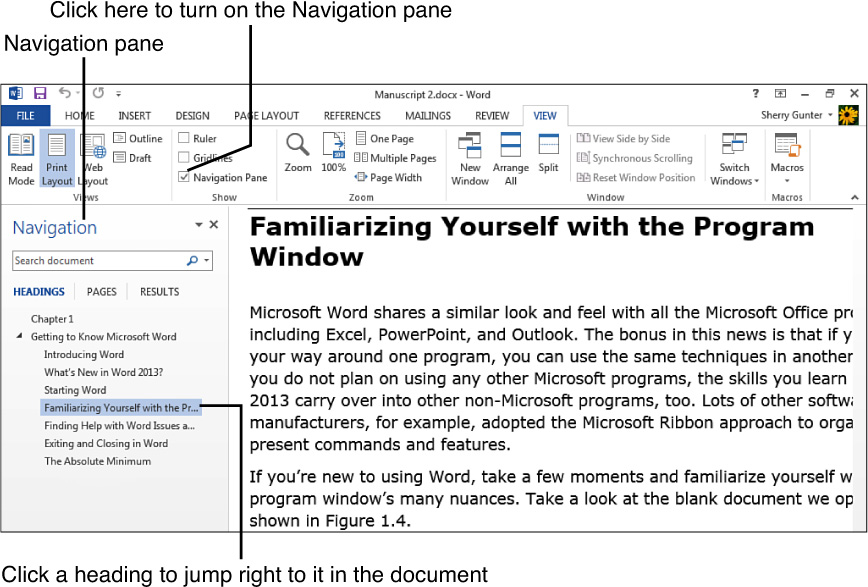
FIGURE 17.23 You can use the Navigation pane to view all the headings in a document and navigate to a particular one.
Click the Headings link at the top of the pane to view all the headings listed in the pane, as demonstrated in Figure 17.23. To jump to a heading, click it in the pane.
Click the Pages link to view your pages as thumbnail images, as shown in Figure 17.24. To jump to a page, click it in the list.
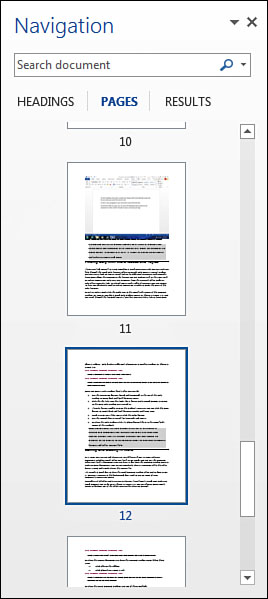
FIGURE 17.24 You can also use the Navigation pane to view all your pages as thumbnails and navigate to a particular one.
To use the pane as a search tool, click the Results link, and then click in the Search box and type in your keyword or phrase. Press Enter or click the Search button. Any matching results are listed in the pane, similar to Figure 17.25. Click a result to jump to that spot in the document. You can also use the pane to find objects, like drawings, amongst the text, or figure references and section numbers and the like. You might also use the Navigation pane to scan through pages to spot errors.

FIGURE 17.25 You can use the Navigation pane to search for words or phrases in the document.
To close the pane, click its Close button (the X button in the upper-right corner), or deselect the Navigation Pane check box on the View tab.
![]() Tip
Tip
The Navigation pane is moveable—just click and drag its title bar to turn it into a free-floating box. To dock it again to the side of the window, double-click its title bar.