
18. Using Proofreading Tools
Proofreading your documents is always an important step before you send them out into the world for others to view. Because we’re not all trained editors, Word offers some handy tools to help us check over our documents for errors and other spots that need special attention. Sort of like grading your own papers at school, proofreading tools can help you sort out mistakes before they make it to a final printout or launch from your email account.
You can find a variety of tools to help you check over your documents, mark areas with special notations to yourself, and generally make sure everything’s in order. They say you should never proofread your own work, but when you’re all you’ve got, you might just have to do it yourself. Don’t despair, though; Word has your back, as I’m about to show you in this chapter.
Highlighting Text with a Highlighter Pen
You can go over documents and highlight parts with a digital highlighter pen. This tool works just like a real highlighter you use to mark up textbooks, study materials, magazines, and printed documents. You can even control what color you use to highlight with—try doing that with a real highlighter pen.
When you activate the highlighter, the mouse pointer takes the shape of—wait for it—a highlighter pen! When you see this icon, you can start marking up your text. You might use this technique to draw attention to important parts of your document that you need to revisit, or to help another user notice the text. I daresay you can devise your own reasons for highlighting in a document, but after you see how fun this tool is, you might not need any reason at all.
Before you get started, I should at least warn you about the color you pick to highlight with; the palette offers several choices, but watch out for darker colors. Unless you are highlighting white text on a dark background, darker highlighting colors might cause some issues with legibility. If they do, just choose another color from the palette until you find one that works with your situation.
To use the highlighting feature, follow these steps:
1. Click the Home tab.
2. Click the Text Highlight Color drop-down arrow and choose a color from the palette (see Figure 18.1).
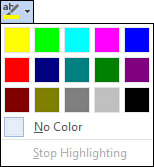
FIGURE 18.1 You can choose a highlighting color from the drop-down palette.
3. Click and drag across the text you want to highlight.
Word adds the highlighting color to the text, as shown in Figure 18.2.
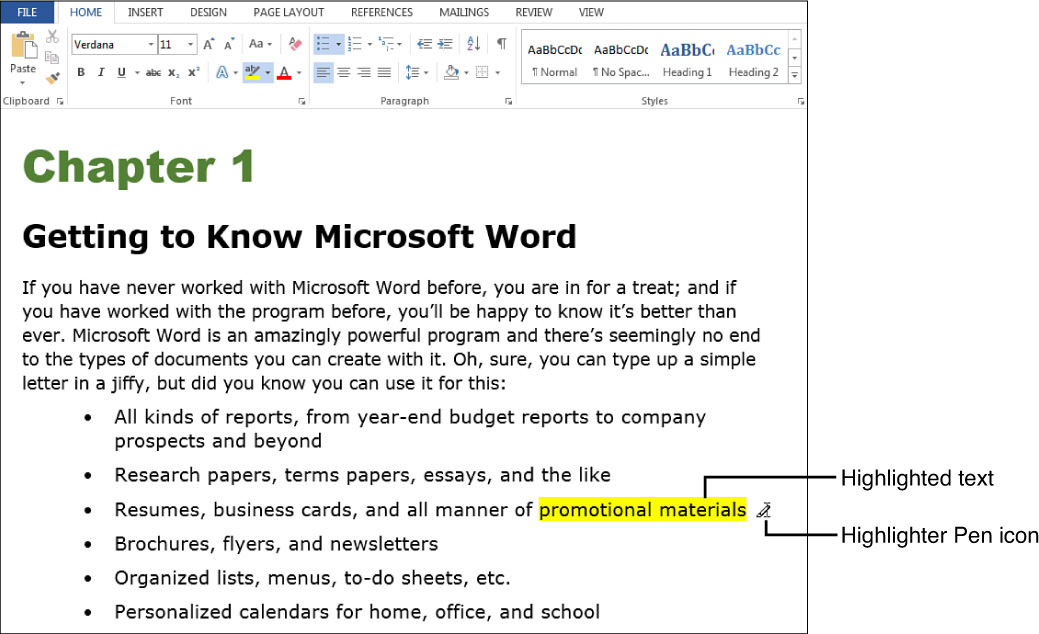
FIGURE 18.2 Here’s an example of highlighted text.
The Highlighter Pen stays on until you perform another action or turn the feature off. You can turn it off just by clicking its button on the Home tab again.
To remove highlighting from text, select the highlighted text and display the tool’s palette again, this time picking the No Color option.
Inserting Comments
Occasions might arise where you want to add a note to the text without inserting anything actually in the text, such as a reminder to check something later or a question about a certain fact or figure. You can use Word’s Comments feature to add comments to your text. Word then tracks all the comments in the Revisions pane so you can revisit them in an orderly fashion. The beauty of adding comments is that they don’t print out with the rest of the text (unless you tell Word to print them). Comments can apply to a word, a sentence, a paragraph, or the whole document.
Comments are particularly useful if your document is being edited by multiple users. Each person can respond to a comment, or start a new comment, and everybody’s input includes their initials. Learn more about sharing and reviewing documents in Chapter 20, “Collaborating On and Reviewing Documents,” along with using comments in the capacity of collaboration.
Word nabs each users initials from data gleaned during installation. If you’re using someone else’s computer, their initials appear in any comments you insert. To view or change your comment’s initials, click the File tab and click Options to open the Word Options dialog box, and then click the General category to find the personalizing options.
To insert a comment, follow these steps:
1. Click where you want to insert a comment, or select the text pertaining to the comment.
2. Click the Insert tab.
3. Click the Comment button.
4. Word immediately opens the Revisions pane and places your name at the top of the comment as well as your initials next to the designated area in the document, as shown in Figure 18.3.

FIGURE 18.3 Word opens the Revisions pane when you add comments.
5. Type in your comment text.
You can also open and close the Revisions pane using the Reviewing Pane button on the Review tab.
You can close the Revisions pane, when finished. If the pane is closed, you can still view a comment simply by hovering the mouse pointer over the comment in the document, as shown in Figure 18.4. To edit the comment, right-click it and choose Edit Comment.
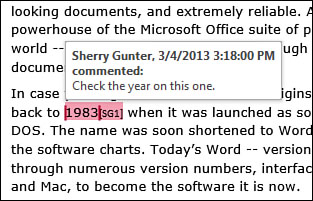
FIGURE 18.4 To quickly view a comment, move the mouse pointer over the comment.
![]() Tip
Tip
That’s not all you can do with comments. When you’re using them in conjunction with other collaborators, you can reply to someone else’s comment, or mark a comment as done if everyone’s finished with it. Learn more about collaborating on documents in Chapter 20, including using the Comments tools on the Review tab.
Finding and Replacing Text
Sometimes you not only need to find text in a long document, but also replace it with something else. For example, maybe you referred to the wrong person in a report or need to update the text with a different company name. Word’s Find and Replace tools take the tedium out of making the same changes in several places. Whenever you find yourself about to change something manually throughout your entire document, stop and see whether Word’s Find and Replace feature could do this work for you.
To start a find and replace operation, click the Ribbon’s Home tab and look for the Replace button (it’s located on the far right side of the tab). Click it to open the Find and Replace dialog box to the Replace tab, as shown in Figure 18.5. Click in the Find what box and type the word or phrase you’re looking for in the document. Next, click the Replace with box and type in the replacement text.
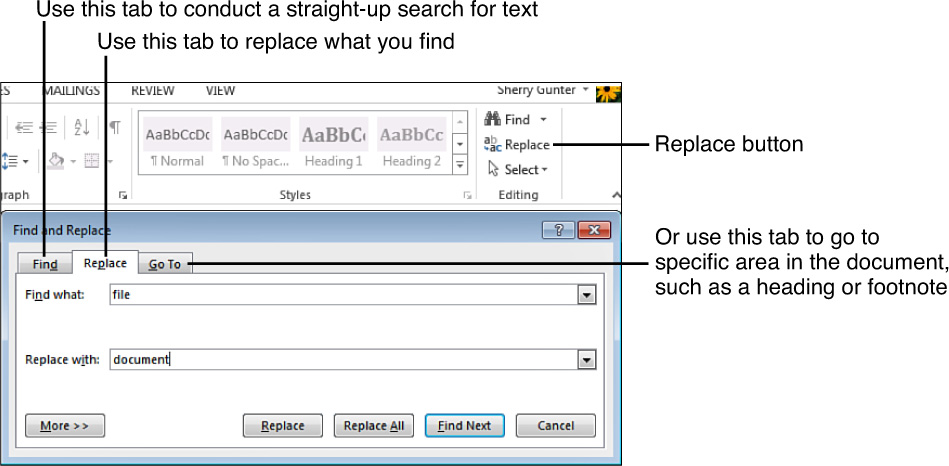
FIGURE 18.5 Use the Find and Replace dialog box to conduct a search and replace mission in your document.
When you’re ready to start searching and replacing, click in the document where you want to begin, like the very top, and click the Find Next button in the dialog box. Word moves you to the first occurrence of the text and highlights it in the document, similar to what’s shown in Figure 18.6. To replace it, click the Replace button in the dialog box. (To replace all the occurrences with the new text, click Replace All.) To keep looking for more instances of the text, click Find Next again.
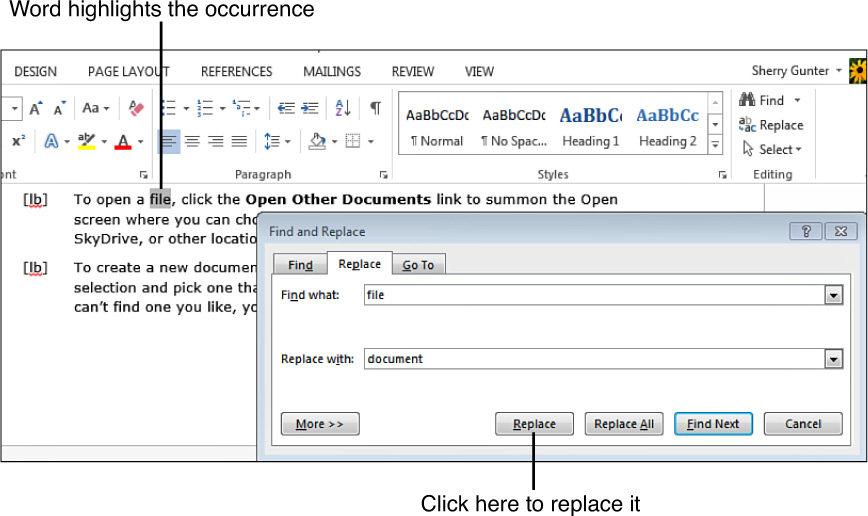
FIGURE 18.6 You can move through the document finding and replacing text while the dialog box remains open onscreen.
![]() Caution
Caution
Don’t use Replace All unless you’re absolutely sure you won’t change something that shouldn’t be changed. For example, if you confidently replace all instances of your company’s old name with its new name in the annual report, you could accidentally change “In 2012, ABC Company became XYZ Company” to say “In 2012, XYZ Company became XYZ Company.” Making yourself (or your boss) look stupid is never a good idea.
When you reach the end of the search, Word displays a prompt box; click OK. Lastly, click the Close button to exit the Find and Replace dialog box.
In the corner of the Find and Replace dialog box is a button labeled More. Click it to expand the dialog box and view some additional search criteria you can apply, such as matching case, whole words only, and so on (see Figure 18.7).
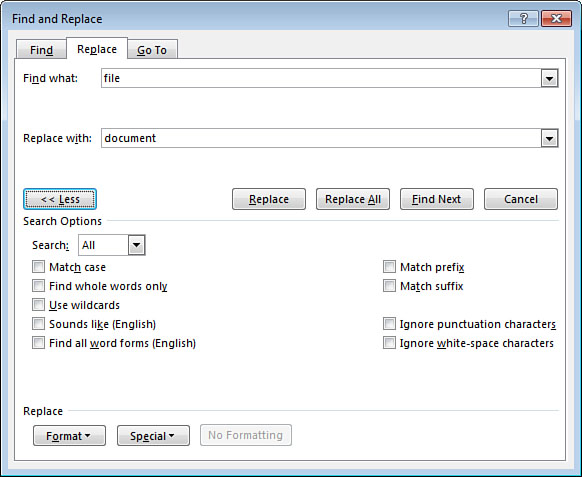
FIGURE 18.7 Expand the Find and Replace dialog box to view more search criteria.
If you would rather just look up a word or phrase rather than replace it with anything, use the Find portion of the Find and Replace tools. You can click the Find button on the Home tab to open the dialog box to the Find tools. You then type in what you want to locate and press Enter to jump right to it.
![]() Tip
Tip
The Navigation pane (explained in Chapter 17, “Tools for Longer Documents”) also has a search feature you can use to look up terms in your document.
Checking Spelling and Grammar
One of the most important proofreading tools you can use is Word’s Spelling and Grammar checker. It can help you correct spelling and grammatical issues that come up in your document. By default, the spelling and grammar checking functions are turned on when you start using Word. The Spell Checker underlines any problems it encounters in your text with a wavy red line. The Grammar Checker identifies grammar issues with wavy green lines. You can run a spell check anytime you want to review the document. The feature takes you through each problem, one at a time, until the check is complete.
To check your document, click at the top of the document, click the Review tab, and then click the Spelling & Grammar button. Word displays the Spelling and Grammar pane, shown in Figure 18.8, and highlights the first misspelling or grammar error in the document, along with correction suggestions; click the suggestion you want to apply. For example, in Figure 18.8, I need to change the misspelling of “smple” to “simple,” so I highlight the word “simple” in the pane and click the Change button.

FIGURE 18.8 The Spelling pane helps you check your document for spelling errors.
Here’s what else you can do with the Spelling pane:
• If you know you’ve misspelled a word throughout, you can click the Change All button. (Be sure you’re right before doing this!)
• If you know the word is correct, such as a person’s name, click the Ignore button. If it appears throughout the document, click Ignore All.
• To add the word, such as a properly spelled name, to Word’s dictionary, click the Add button.
• If you click outside the Spelling pane, like to fix something else in the document, you can click the Resume button that appears in the pane to restart the spell check.
• To close the Spelling pane, click its Close button.
Word checks the grammar of your document alongside the text, and if it encounters anything that looks suspicious, the Grammar pane appears, as shown in Figure 18.9. Keep in mind that not all the issues the grammar check points out are legitimate. For example, in Figure 18.9, it’s trying to tell me I need to capitalize something in my figure caption. Like the Spelling pane, you can ignore the suggestion by clicking the Ignore button, or you can fix the problem with the Change button.

FIGURE 18.9 The Grammar pane helps you check your document for grammatical errors.
![]() Note
Note
You can control how the spelling and grammar checking works, including whether it’s turned on by default. Click the File tab and click Options to open the Word Options dialog box. Click the Proofing category to view all the options available. Click OK when you finish making your changes to the settings.
Using AutoCorrect
Word’s AutoCorrect feature fixes spelling errors for you automatically as you type. You might have noticed it at work when you mistyped a word, such as changing teh to the without being prompted. This feature is turned on by default when you first open Word. AutoCorrect makes corrections based on suggestions from the Spell Checker. It also has its own list of many commonly misspelled words, and you can add your own favorite typos to the list. In addition, you can use AutoCorrect to automatically enter special symbols, long names, or phrases you type frequently.
To find your way to the AutoCorrect options, click the File tab and click Options to open the Word Options dialog box (see Figure 18.10). Click the Proofing category, and then click the AutoCorrect Options button.
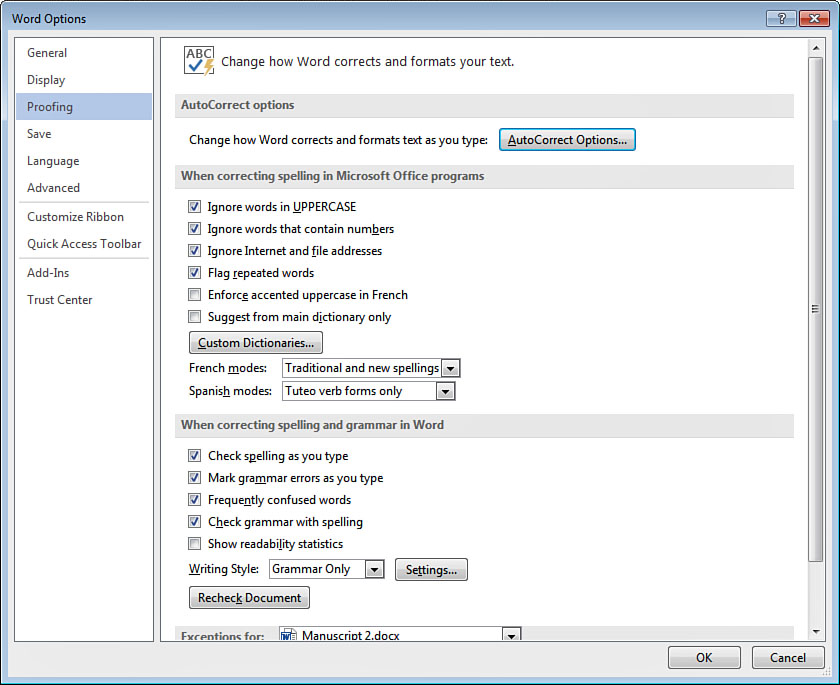
FIGURE 18.10 Find your way to AutoCorrect through the Word Options dialog box.
This opens the AutoCorrect dialog box, similar to Figure 18.11. The AutoCorrect tab lists all the associated options you can turn off and on, plus a pretty long list of commonly misspelled words that it checks for you as you happily type along. To add your own commonly misspelled word, click in the Replace box and type it just as you typically misspell it. Click in the With box and type the correction. Click the Add button and Word adds it to the AutoCorrect list. Click OK to exit the dialog box, and then click OK again to close the Word Options dialog box.
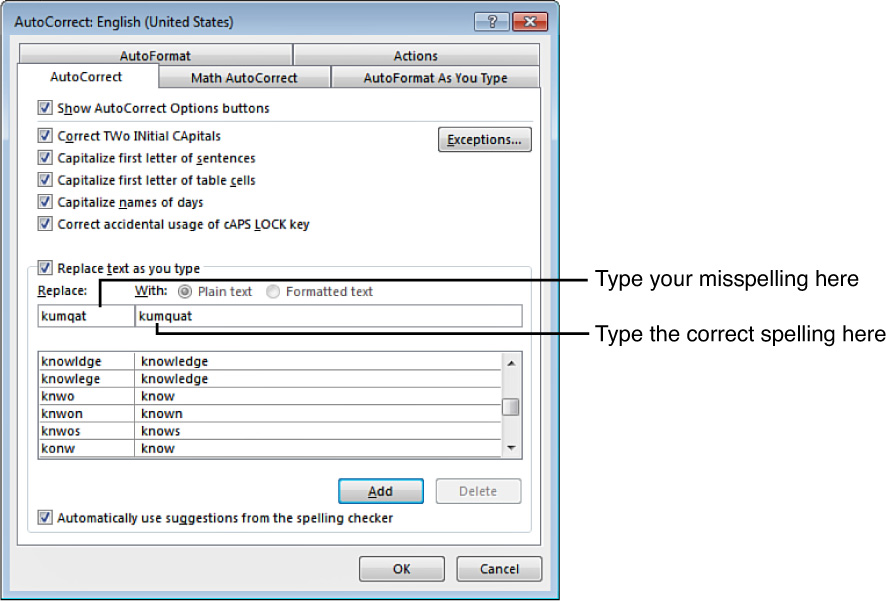
FIGURE 18.11 You can use the AutoCorrect dialog box to add your own common misspellings.
![]() Tip
Tip
To turn off AutoCorrect, deselect the Check spelling as you type check box in the Word Options dialog box (see Figure 18.10).
If you find yourself typing in a long company name or similar phrase over and over again, you can turn it into an AutoCorrect entry. Designate an abbreviation for the name and the next time you type the abbreviation, AutoCorrect substitutes the full name. Brilliant idea, right? Here’s how you do it—from the AutoCorrect dialog box, click in the Replace box and type the abbreviation for the long name. In the With box, type in the full name you want to swap the abbreviation for, and then click Add.
![]() Tip
Tip
To remove a word from the AutoCorrect list, select it and click the Delete button.
Using the Word Thesaurus
Here’s a common scenario (or at least it’s common for me)—as you’re proofreading your document you start to notice you’ve used a lot of the same words on a page and it’s looking a little redundant, but you can’t think of another word that conveys the same meaning. Luckily for you (and me), Word has a built-in Thesaurus feature to help you look up synonyms—words that mean the same thing.
To use the Thesaurus, follow these steps:
1. Select the word you want to look up.
2. Click the Review tab.
3. Click the Thesaurus button.
4. Word opens the Thesaurus pane, shown in Figure 18.12, listing synonyms. To replace the selected word with one from the list, move the mouse pointer over the right end of the word you want and click Insert.

FIGURE 18.12 Use the Thesaurus pane to look up synonyms.
• To find more synonyms for a word in the list, click it.
• To return to the previous word’s list, click the Back button.
• To look up a new word, type it in the Search box and press Enter.
• To exit the pane, click its Close button.
![]() Tip
Tip
You can also right-click a word and choose Thesaurus to open the pane.
Researching and Translating Words
Just when you thought you had seen enough, here’s another interesting feature I can show you—Word’s language tools, or specifically, the Translate tools. You can use them in ways that help you communicate with others around the globe in languages such as Spanish, French, or Arabic. The Review tab’s Translate button offers the following options:
• Translate Document Use this tool to translate the entire document and display it in an Internet browser window, with a little help from Microsoft’s translation website.
• Translate Selected Text You can translate a paragraph, sentence, or phrase using this tool and the Research pane.
• Mini Translator Use this tool to quickly translate a word you point at with your cursor.
You can translate words and phrases and easily specify which language using the Research pane, and that’s the method I’m going to show you. Start by right-clicking the word in your document you want to translate (you can also select a phrase and right-click, too). Choose Translate from the pop-up menu, as shown in Figure 18.13. Word opens the Research pane, shown in Figure 18.14. Click the From drop-down arrow to specify the source language (if needed), and click the To drop-down arrow to choose a language to translate to; in the example shown, it’s Spanish. The results immediately appear in the pane.

FIGURE 18.13 Right-click the word you want to translate.
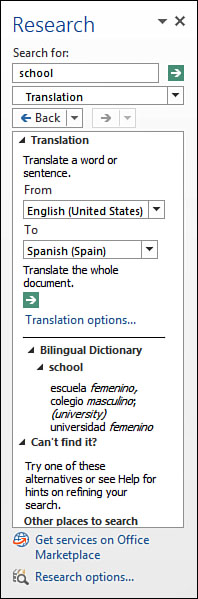
FIGURE 18.14 Use the Research pane to choose a language and view the results.
To send the entire document for translation, click the arrow icon under the Translate the whole document heading in the Research pane. This opens a prompt box; click Send to continue to the website.
Checking a Document for Hidden Data
You can use Word’s Document Inspector tool to check your document for sensitive information or hidden data. For example, if you plan on sharing the document with other users, you might want to remove any personal information from the file. Hidden data, also called metadata, includes elements such as comments, tracked changes, and information about who created the document. With the Document Inspector, you can control what type of content is inspected and see whether any issues need to be addressed.
1. Click the File tab.
2. Click Info.
3. Click Check for Issues (see Figure 18.15).
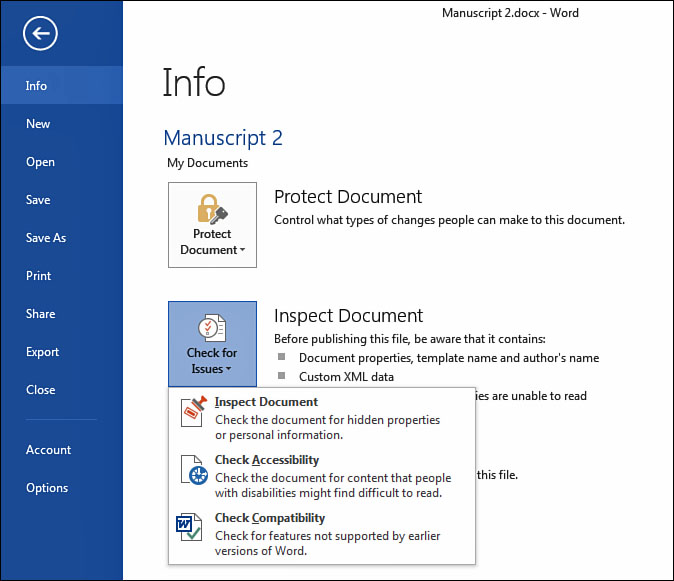
FIGURE 18.15 Activate the Document Inspector through the Info window.
4. Click Inspect Document.
5. This opens the Document Inspector dialog box, shown in Figure 18.16. Choose the type of information you want to check and click Inspect.
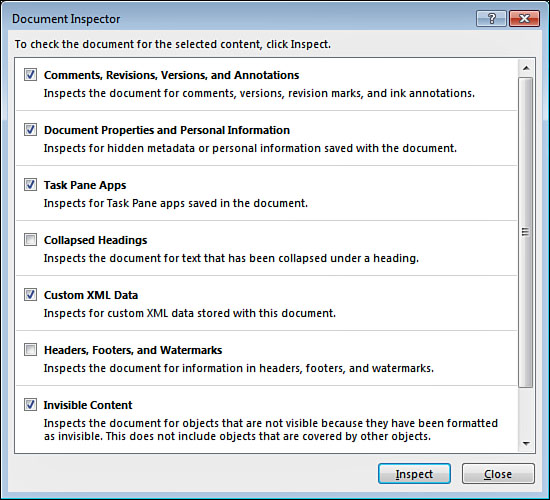
FIGURE 18.16 The Document Inspector dialog box.
6. The inspector checks the document and lists any potential issues you need to address, similar to what you see in Figure 18.17. Click Remove All to fix an issue.
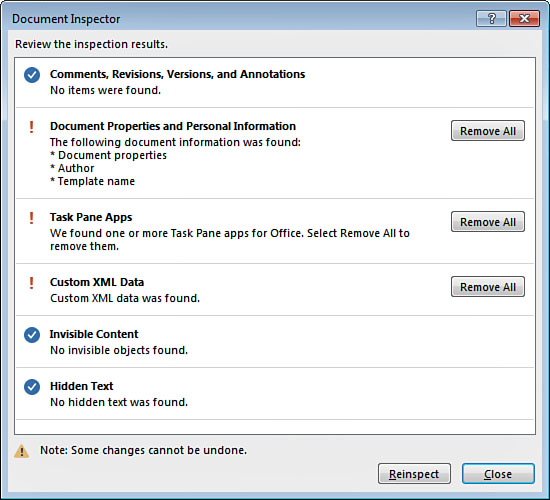
FIGURE 18.17 The Document Inspector results.
7. Click Close to exit the dialog box.