
In order for us to get started with other recipes in this chapter, we need to first build the application that we will be using in each of the following recipes. Oddly enough, the ability to build out your entire application without having any data storage or data access already in place is a common occurrence. You might not be on the team that builds the data-access layer or you might work in a dev shop where the database is under tight control of the database administrators. There are many scenarios where mocking or faking out the database and data access layer may come in handy or be a requirement.
In this recipe, we will be building a simple blog post and commenting system. We will create an application that allows the user to add, edit, and delete posts. With each post the user will also have the ability to add and delete comments to and from a blog post. This is going to be a simple system for the sole purpose of demonstrating data storage functionality. Primarily, we will be looking at how to perform select, insert, update, joins, and delete statements in various environments using all sorts of tools.
In this recipe, we will be using StructureMap and NBuilder. Both of these are in the dependencies folder. You may be interested in getting the latest copies of both of these tools, as they are constantly being updated!
- Let's get started by creating a new ASP.NET MVC application using the default application (rather than the empty template); we named ours AccessAndStorage.
- Add references to StructureMap and NBuilder.
- We need to add some folders to the existing
Modelsdirectory. This will help us stay organized as we build out our solution. Add aDomain, Repository, and aStructureMapdirectory to theModelsdirectory. TheDomainfolder will hold the domain (business) objects for our application. TheRepositoryfolder will hold each of the new recipes form of data access. - Inside the
Repositorydirectory, create aMockRepositoryfolder. TheMockRepositoryfolder will hold the data access for this recipe—the NBuilder implementation. - Next we are going to move to creating our domain objects. Specifically, we need to create
PostandCommentclasses. ThePostobject will represent our blog post. TheCommentclass will represent a comment being added to aPost. Create these two new classes in theModels/Domainfolder.Models/Domain/Post.cs:
public class Post {
public Guid PostID { get; set; }
public DateTime CreateDate { get; set; }
public string Title { get; set; }
public string Body { get; set; }
public string Slug { get; set; }
private List<Comment> comments { get; set; }
public List<Comment> Comments {
get {
//implementation discussed later...
throw new NotImplementedException();
}
}
}
Models/Domain/Comment.cs:
public class Comment { public Guid CommentID { get; set; } public Guid PostID { get; set; } public string Body { get; set; } public DateTime CreateDate {get; set; } } - With our two business objects created, we can now create some interfaces that will represent the functionality that all of our data access classes should implement. The first interface for us to create is the
IRepositoryConfigurationin theRepositoryfolder. This will provide us with a hook for any data access tool that we might use that will need configuration performed when our application starts up. We will expose one method calledConfigure.Models/Repository/IRepositoryConfiguration.cs:
public interface IRepositoryConfiguration { void Configure(); } - Next, we will create the
IPostRepositoryinterface, again in theRepositoryfolder. This interface will require the following methods to be created:AddPost, UpdatePost, DeletePost, GetPost, andGetPosts.Models/Repository/IPostRepository.cs:
public interface IPostRepository { void AddPost(Post post); void UpdatePost(Post post); void DeletePost(Post post); Post GetPost(Guid postId); List<Post> GetPosts(); } - Lastly, we will create the
ICommentRepositoryinterface, which will require the following methods:AddComment, DeleteComment, GetComment, andGetCommentsByPostID.Models/Repository/ICommentRepository.cs:
public interface ICommentRepository {
void AddComment(Comment comment);
void DeleteComment(Comment comment);
Comment GetComment(Guid commentId);
List<Comment> GetCommentsByPostID(Guid postId);
void DeleteComments(Guid postId);
}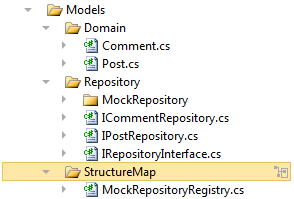
- Now that we know what we are working to build, we can start to build out our first implementation. The first class that we can create is
MockRepositoryConfiguration, which will implementIRepositoryConfiguration. All we need is a placeholder here, as the mock implementation doesn't actually require any pre-configuration. Place this file in theMockRepositoryfolder.Models/Repository/MockRepository/MockRepositoryConfiguration.cs:
public class MockRepositoryConfiguration : IRepositoryConfiguration { public void Configure() { } } - Next we will create the
MockPostRepository. This is the most important repository of our repositories, as it will help us to manage and display our posts. As we are creating only a mock implementation so that we can create our application, we only really need to fake out the display side of our implementation. We will do this by creating new posts and new lists of posts using NBuilder. As you will see shortly, the NBuilder syntax is very simple.Models/Repository/MockRepository/MockPostRepository.cs:
public class MockPostRepository : IPostRepository { public void AddPost(Post post) { } public void UpdatePost(Post post) { } public void DeletePost(Post post) { } public Post GetPost(Guid postId) { return Builder<Post>.CreateNew().With( p => p.PostID = postId).Build(); } public List<Post> GetPosts() { return Builder<Post>.CreateListOfSize(10).Build().ToList(); } } - This leaves us with one more repository class to create, the
MockCommentRepositoryclass, which will handle the display of comments for each post. There is a bit of logic baked into this though, as I wanted to create a variable number of comments for each post. To do this, I used a random number to generate a random length list of comments.Models/Repository/MockRepository/MockCommentRepository.cs:
public class MockCommentRepository : ICommentRepository {
public void AddComment(Comment comment) {
}
public void DeleteComment(Comment comment) {
}
public Comment GetComment(Guid commentId) {
return Builder<Comment>.CreateNew().With( c => c.CommentID == commentId).Build();
}
public List<Comment> GetCommentsByPostID(Guid postId) {
int init = Convert.ToInt32(String.Format("{0:ffffff}", DateTime.Now));
Random r = new Random(init);
int listSize = r.Next(1,10);
List<Comment> result = Builder<Comment>.CreateListOfSize( listSize).WhereAll().Have(c => c.PostID = postId). Build().ToList();
return result;
}
public void DeleteComments(Guid postId) {
}
}
Now that we have our business objects, interfaces, and implementation created, we can start to wire StructureMap into place. By using interfaces, we have detached the implementation of our data layer for the rest of our application. StructureMap will allow us to plug in any data layer, which implements our interfaces.
Note
A more comprehensive description of the Inversion of Control (IoC) pattern, as implemented by StructureMap, is beyond the scope of this recipe. As you'll see from this recipe though, once the basics are grasped, the pattern is easy to implement (when using a library like StructureMap). For further information, you could do a lot worse than to look at the article by Martin Fowlers at http://martinfowler.com/articles/injection.html.
Let's take a look at what is required to get StructureMap working. We will start by creating a
MockRepositoryRegistryclass in theModels/StructureMapfolder. This class will inherit from theStructureMap.Configuration.DSL.Registryclass, which provides us with the ability to map ourMockRepositoryclasses to the repository interfaces that we created. We will also create aRegistrymethod that will actually tell StructureMap to use our configuration.Models/StructureMap/MockRepositoryRegistry.cs:
public class MockRepositoryRegistry : Registry { public MockRepositoryRegistry() { For<ICommentRepository>() .Use<MockCommentRepository>(); For<IPostRepository>() .Use<MockPostRepository>(); For<IRepositoryConfiguration>() .Use<MockRepositoryConfiguration>(); } public static void Register() { ObjectFactory.Initialize(x => x.AddRegistry( new MockRepositoryRegistry())); } } - With this configuration helper class created, we now need to add a line of code to our
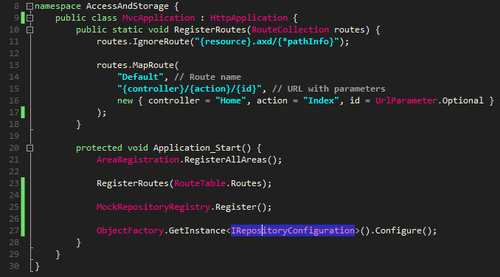
Global.asax.csfile to configure StructureMap when the application first starts. The call to our registry is what tells StructureMap which implementation to use for the given interface. Open theGlobal.asax.csfile. In theApplication_Start()method add the following lines:Global.asax.cs:
protected void Application_Start() { AreaRegistration.RegisterAllAreas(); RegisterRoutes(RouteTable.Routes); MockRepositoryRegistry.Register(); } - While we are in the
Global.asax.csfile, we can also add a call to ourMockRepositoryConfiguration.Configure()method. We will do this with StructureMap syntax using theObjectFactoryentry point. This is the class that provides us with access to all of our classes. Directly under the call to ourMockRepositoryRegistry, add the following line, which will call the appropriateConfiguremethod on whatever data access we are using at the time (which is controlled by the registry that we called earlier).ObjectFactory.GetInstance<IRepositoryConfiguration>().Configure();
- With StructureMap wired into place and all of our interfaces and repositories mocked out, we now need to revisit our
Postclass. It has a property on it calledComments, which should return the list of related comments. It is not currently implemented. Let's implement it by making a call to our newMockCommentRepository.Models/Domain/Post.cs:
public List<Comment> Comments { get { if (comments == null) { if (PostID != Guid.Empty) comments = ObjectFactory .GetInstance<ICommentRepository>() .GetCommentsByPostID(PostID); else comments = new List<Comment>(); } return comments; } set { comments = value; } } - At this point, you should be able to build and run your application. The normal MVC starter template application should appear. When the application begins, StructureMap should be configured. Then the
Configuremethod will be called (which does nothing in this implementation). If this works, we can now start to mock out our UI. - This application will largely be a scaffolding of our objects. By that I mean we will create actions in our
HomeControllerto add, edit, and delete our posts. We will also have actions to add and delete our comments. We will entirely rely upon StructureMap to provide us with the correct implementation of a given interface, which will allow us to swap out data-access methods in later recipes. Here is ourHomeController. The only place that you might need to pay some special attention is in theaddactions, as they generate a custom ID for the new record, as well as set the create date (something that might be better handled in a service layer rather than in the controller). Let's first see the post-oriented actions and the home page action (index).Controllers/HomeController.cs:
public class HomeController : Controller { public ActionResult Index() { ViewData["Message"] = "Welcome to ASP.NET MVC!"; List<Post> result = ObjectFactory.GetInstance<IPostRepository>().GetPosts(); return View(result); } public ActionResult AddPost() { return View(new Post()); } [HttpPost] public ActionResult AddPost(Post post) { post.CreateDate = DateTime.Now; post.PostID = Guid.NewGuid(); ObjectFactory.GetInstance<IPostRepository>().AddPost(post); return RedirectToAction("Index"); } public ActionResult EditPost(Guid id) { Post post = ObjectFactory.GetInstance<IPostRepository>().GetPost(id); return View(post); } [HttpPost] public ActionResult EditPost(Post post) { ObjectFactory.GetInstance<IPostRepository>().UpdatePost(post); return RedirectToAction("Index"); } public ActionResult DeletePost(Guid id) { Post post = ObjectFactory.GetInstance<IPostRepository>().GetPost(id); return View(post); } [HttpPost] public ActionResult DeletePost(Guid id, FormCollection form) { ObjectFactory.GetInstance<IPostRepository>().DeletePost( new Post { PostID = id }); return RedirectToAction("Index"); }} - The comment-oriented actions are pretty much identical.
Controllers/HomeController.cs:
... public ActionResult AddComment(Guid id) { return View(new Comment { PostID = id }); } [HttpPost] public ActionResult AddComment(Guid id, Comment comment) { comment.CreateDate = DateTime.Now; comment.CommentID = Guid.NewGuid(); comment.PostID = id; ObjectFactory.GetInstance<ICommentRepository>().AddComment( comment); return RedirectToAction("Index"); } public ActionResult DeleteComment(Guid id) { Comment comment = ObjectFactory.GetInstance<ICommentRepository>(). GetComment(id); return View(comment); } [HttpPost] public ActionResult DeleteComment(Guid id, FormCollection form) { ObjectFactory.GetInstance<ICommentRepository>(). DeleteComment(new Comment { CommentID = id }); return RedirectToAction("Index"); } } - With all of our actions defined, you can now right-click each of the unique action names and add a new strongly typed view. Even the home page has been updated to a list of posts as its model! For the most part, the views that are in my application are from the wizard's template generation (take a look at the provided source code). The home page is probably the only view worth looking at, in that it displays a collection of Posts, as well as each Post's comments. I started this page by generating a details page for a
Post. I then wrapped the generated details view with aforeachloop and then put another loop at the bottom of the details view to show the comments.
Views/Home/Index.aspx:
<%@ Page Title="" Language="C#" MasterPageFile="~/Views/Shared/Site.Master" Inherits="System.Web.Mvc.ViewPage<List<AccessAndStorage.Models. Domain.Post>>" %>
<asp:Content ID="Content1" ContentPlaceHolderID="TitleContent" runat="server">
Index
</asp:Content>
<asp:Content ID="Content2" ContentPlaceHolderID="MainContent" runat="server">
<h2>
Index
</h2>
<fieldset>
<legend>Posts</legend>
<% foreach (AccessAndStorage.Models.Domain.Post post in Model) {%>
<div class="display-label">
PostID
</div>
<div class="display-field">
<%: post.PostID %></div>
...
<div class="display-label">
Comments</div>
<div class="display-field">
<blockquote>
<% foreach (AccessAndStorage.Models.Domain.Comment comment in post.Comments)
{ %>
<p>
<%= comment.Body %>
<br />
<%= String.Format("{0:MM/dd/yyyy}", comment.CreateDate) %>
-
<%= Html.ActionLink("Delete", "DeleteComment", new {id = comment.CommentID}) %>
</p>
<% } %>
<p>
<%= Html.ActionLink("Add new comment", "AddComment", new {id=post.PostID}) %></p>
</blockquote>
</div>
<hr />
<% } %>
</fieldset>
...
</asp:Content>
Note
Be aware that this implementation of showing data is not performance-oriented. We are loading the comments for a post in a lazy loading fashion, one
Postobject at a time. If you display 50 posts on one page then you are possibly making 51 requests to the database at a time. You are making one query for the list of posts and one query for each set of comments for each post. Some data access tools may handle this eloquently...others may not. - You should now be able to run your application and click through adding posts, editing posts, deleting posts, adding comments, and so on. None of this is real, obviously, as our data access is totally mocked out using NBuilder!

There are two all stars in this recipe—StructureMap and NBuilder. StructureMap has allowed us to build our application in a manner that will let us swap out our data access implementation easily. NBuilder has let us create mocks of our future repository implementation. It has also allowed us to generate the presentation side of our application by providing us with placeholder data.
StructureMap is usually the more complex and confusing topic, so let's start there. StructureMap, if you are not already familiar with it, is an Inversion of Control (sometimes referred to as Dependency Injection) container that takes care of handing us the appropriate implementation of a given type, based on the requested interface.
By creating interfaces that define generic functionality and then wiring in the actual implementation later, the implementation is isolated from the rest of the application. At the end of this chapter, we will have several implementations and registries that can easily be swapped in and out with each other. Using StructureMap in this manner will make your application considerably easier to test, too.
NBuilder has all sorts of purposes. Any place that you might need to be able to generate some data of a given type, consider using NBuilder. I find myself using it most frequently for creating mock data sources. I also use it for proof of concepts and demos where I don't want to have to worry about creating a data store and data-access code. The NBuilder tool is quite flexible and allows for all sorts of custom scenarios.
For more information on StructureMap take a look here: http://structuremap.github.com/structuremap/. For more information regarding NBuilder take a look here: http://nbuilder.org/.