
In this recipe, we are going to take the initial base application that we built in the first recipe and add a LINQ to SQL data access layer to the project. As the first project didn't require a database, we will have to also create a database to support this application.
This recipe requires that you copy the existing code base from the previous recipe. We will work from that recipe and spot weld in the new LINQ to SQL data access. You will also need to add a reference to a library called AutoMapper. More information, as well as the DLL, can be found at http://automapper.codeplex.com/. Basically, AutoMapper will allow us to map our domain models to the ones generated by LINQ to SQL.
- The first thing that we need to do to get LINQ to SQL working is to create our SQL database. Right-click the
App_Datafolder and select Add | New Item. Create a database calledDatabase1.mdf.
- Double-click on the
Database1.mdffile. This will open the database in the Server Explorer | Data Connections section. You can then expand the database, where you will see a list of database objects. - We need to create some tables to hold our data. Create a table called
commentsand one calledposts. Match the schema as I've indicated in the following screenshot. I've also added a foreign key constraint between the two tables.
- With the database created, we can now get LINQ to SQL up and running. Do this by adding an
L2SRepositoryfolder to theModels/Repository. Inside of our newL2SRepositoryfolder, add a new LINQ to SQL Classes file. Name thisBlog.dbml, which will expose an object calledBlogDataContext; we'll be using this further down the line. - Once you have your
Blog.dbmlfile added to Visual Studio, you should see a new designer window opened up. Drag the two table items from the Data Connections pane onto the design surface. This will generate two LINQ to SQL objects for you to work within your data access.
- Build the application to generate your LINQ to SQL classes.
- Next we will create some new LINQ to SQL repository classes that will implement the interfaces that we created earlier. We will start by creating the
L2SPostRepository. Add a new class calledL2SPostRepositoryto theL2SRepositoryfolder. Then make that repository implement theIPostRepositoryinterface. Once that is done, you can right-click on the interface and chooseImplementInterface. This should generate a bunch of empty methods that are defined by theIPostRepository.Models/Repository/L2SRepository/L2SPostRepository.cs:
public class L2SPostRepository : IPostRepository { public void AddPost(Domain.Post post) { throw new NotImplementedException(); } public void UpdatePost(Domain.Post post) { throw new NotImplementedException(); } public void DeletePost(Domain.Post post) { throw new NotImplementedException(); } public Domain.Post GetPost(Guid postId) { throw new NotImplementedException(); } public List<Domain.Post> GetPosts() { throw new NotImplementedException(); } } - Next we can create the other repository,
L2SCommentRepository, in the same fashion. Add a newL2SCommentRepositoryto theModels/Repository/L2SRepositoryfolder. Have the class implement theICommentRepositoryinterface. Then right-click on the interface and choose to implement the interface. - With our two repositories created, all that is left to conform to our interfaces scheme is to create an
L2SRepositoryConfigurationclass. This goes in the same directory as our repository classes. Set this class to implement from theIRepositoryConfigurationinterface. Then make that class implement that interface. - Now that our repositories are implementing their interfaces, we are ready to start putting LINQ to SQL to work for us. As we are actually going to be interacting with a database, this time we will need to create some type of connection object so that we can control how we communicate with our database. But before we create the connection object, we need to first devise a way to manage our connection string. We will do this by first adding a new connection string to our
Web.configin the connections section.Web.config:
<connectionStrings>
...
<add name=" Database1ConnectionString" connectionString="Data Source=.SQLEXPRESS; AttachDbFilename=|DataDirectory|Database1.mdf; Integrated Security=True; User Instance=True" providerName="System.Data.SqlClient" />
</connectionStrings>
- Then you need to add a reference to
System.Configurationby right-clicking on your project and choosing to add a reference. Then locate theSystem.Configurationnamespace and add it to your project. - Now we need to create a class that will wrap the
ConfigurationManagerclass provided to us by .NET. This class will be calledConfigurationServiceand will live in the root of ourModelsfolder. This class will currently have two methods—one to get keys from our config, and another to give us methods to hide the magic string key away from our application.Models/ConfigurationService.cs:
public class ConfigurationService { public string GetBlogDBConnectionString() { return GetConfigValue("Database1ConnectionString"); } private string GetConfigValue(string key) { return ConfigurationManager.ConnectionStrings[key].ToString(); } } - With our new
ConfigurationServicecreated, we need to create a new registry file for our new repository implementations. Add a new class file calledL2SRepositoryRegistry.cs.Models/StructureMap/L2SRepositoryRegistry.cs:
public class L2SRepositoryRegistry : Registry {
public L2SRepositoryRegistry() {
For<ICommentRepository>().Use<L2SCommentRepository>();
For<IPostRepository>().Use<L2SPostRepository>();
For<IRepositoryConfiguration>() .Use<L2SRepositoryConfiguration>();
}
public static void Register() {
ObjectFactory.Initialize(x => x.AddRegistry( new L2SRepositoryRegistry()));
}
}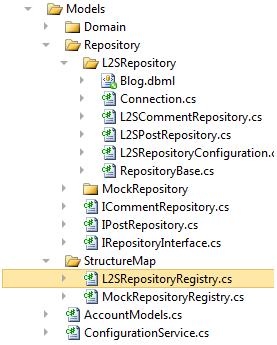
- Before we move on the
DataContextmappings, we should point our application to our new LINQ to SQL data layer. We do this by making the following change to theGlobal.asax.csfile:Global.asax:
protected void Application_Start() { AreaRegistration.RegisterAllAreas(); RegisterRoutes(RouteTable.Routes); L2SRepositoryRegistry.Register(); ObjectFactory.GetInstance<IRepositoryConfiguration>(). Configure(); } - With everything wired into place, we are now ready to create a new class in the
Models/Repository/L2SRepositoryfolder calledConnection.cs. Our connection object is essentially a wrapper to ourBlogDataContext, which was generated by our LINQ to SQL classes object. We don't want our data-access choice to leak out into our application, yet we need to be able to control when a connection is opened, closed, or when to submit the changes made in our data context.Note
I have used this class on a few projects and so it has a few methods in it that we won't be using in this recipe. I figured that you might like to see some of the other capabilities that can be handled by this class though, such as rolling back changes.
Models/Repository/L2SRepository/Connection.cs:
public class Connection : IDisposable { private BlogDataContext _dc; private string _connectionString; public Connection(ConfigurationService configurationService) { _connectionString = configurationService.GetBlogDBConnectionString(); } public BlogDataContext Context { get { return _dc; } set { _dc = value; } } public void Open() { _dc = new BlogDataContext(_connectionString); } public void Close() { if (_dc != null) { _dc.SubmitChanges(); _dc.Dispose(); _dc = null; } } public void SubmitChanges() { _dc.SubmitChanges(); } public void RollbackChanges() { _dc.Transaction.Rollback(); } public void Dispose() { Close(); } } - Now that our
Connectionobject is ready for consumption in our application, we can turn our attention to the mappings between our data layer and theL2Sclasses. We will use ourL2SRepositoryConfigurationclass to describe the mapping between our POCO (Plain Old CLR Object) domain models and the L2S-generated models. This configuration simply tellsAutoMapperto expect mappings from object A to object B and vice versa.Models/Repository/L2SRepository/L2SRepositoryConfiguration.cs:
public class L2SRepositoryConfiguration : IRepositoryConfiguration { public void Configure() { ConfigureAutoMapper(); } public void ConfigureAutoMapper() { Mapper.CreateMap<Models.Domain.Post, Models.Repository.L2SRepository.post>() .ForMember(dest => dest.id, opt => opt.MapFrom( src => src.PostID)) .ForMember(dest => dest.created, opt => opt.MapFrom( src => src.CreateDate)); Mapper.CreateMap<Models.Repository.L2SRepository.post, Models.Domain.Post>().ForMember(dest => dest.PostID, opt => opt.MapFrom(src => src.id)) .ForMember(dest => dest.CreateDate, opt => opt.MapFrom(src => src.created)); Mapper.CreateMap<Models.Domain.Comment, Models.Repository.L2SRepository.comment>() .ForMember(dest => dest.id, opt => opt.MapFrom( src => src.CommentID)) .ForMember(dest => dest.post, opt => opt.MapFrom( src => src.PostID)) .ForMember(dest => dest.created, opt => opt.MapFrom( src => src.CreateDate)); Mapper.CreateMap<Models.Repository.L2SRepository.comment, Models.Domain.Comment>().ForMember(dest => dest.CommentID, opt => opt.MapFrom(src => src.id)) .ForMember(dest => dest.PostID, opt => opt.MapFrom( src => src.post)) .ForMember(dest => dest.CreateDate, opt => opt.MapFrom( src => src.created)); } } - With
AutoMapperreferenced and configured, we can create theRepositoryBaseclass in theModels/Repository/L2SRepositoryfolder. I found a variation of this base class some while back and have been tweaking it over time. It is a generic class that works by being told what POCO object you are working with and which entity class (LINQ to SQL class) that POCO maps to. This then allows the base class to focus its attention on those two types when it is performing its various duties. When it is done running a query on an entity type, it can map the result to a POCO type and can return business objects, rather than LINQ to SQL objects. This base class allows you to remove a great deal of CRUD and mapping code from your application.Models/Repository/L2SRepository/RepositoryBase.cs:
public abstract class RepositoryBase<T, P> where T : class, new() //entity where P : class, new() //poco { private Connection _connection; public RepositoryBase(Connection connection) { _connection = connection; } public void DeleteByQuery(Expression<Func<T, bool>> query) { T entity = GetEntity(query); if (entity != null) _connection.Context.GetTable<T>().DeleteOnSubmit(entity); } public void Add(P poco) { T entity = Mapper.Map(poco, new T()); _connection.Context.GetTable<T>().InsertOnSubmit(entity); } public void Update(P poco, bool commitNow = false) { T entity = Mapper.Map(poco, new T()); _connection.Context.GetTable<T>().Attach(entity, true); } public void Update(P poco, Expression<Func<T, bool>> query) { T entity = Mapper.Map(poco, new T()); object propertyValue = null; T entityFromDB = _connection.Context.GetTable<T>(). Where(query).SingleOrDefault(); if (null == entityFromDB) throw new NullReferenceException("Query Supplied to " + "Get entity from DB is invalid, NULL value returned"); PropertyInfo[] properties = entityFromDB.GetType().GetProperties(); foreach (PropertyInfo property in properties) { propertyValue = null; if (null != property.GetSetMethod()) { PropertyInfo entityProperty = entity.GetType().GetProperty(property.Name); if (entityProperty.PropertyType.BaseType == Type.GetType("System.ValueType") || entityProperty.PropertyType == Type.GetType("System.String")) propertyValue = entity.GetType().GetProperty(property.Name). GetValue(entity, null); if (null != propertyValue) property.SetValue(entityFromDB, propertyValue, null); } } } public P Get(Expression<Func<T, bool>> query) { T t = GetEntity(query); if (t == null) return null; return Mapper.Map(t, new P()); } private T GetEntity(Expression<Func<T, bool>> query) { T t = _connection.Context.GetTable<T>(). Where(query).FirstOrDefault(); if (t == null) return null; return t; } public virtual IEnumerable<P> GetAll(Expression<Func<T, bool>> query) { IEnumerable<T> list = null; if (null == query) list = _connection.Context.GetTable<T>(); else list = _connection.Context.GetTable<T>().Where(query); if (list.Count() == 0) return new List<P>(); return Mapper.Map(list, new List<P>()); } } - Let's open up our
L2SPostRepositoryand provide the actual implementation. First, we need to inherit from ourRepositoryBaseclass.Models/Repository/L2SRepository/L2SPostRepository.cs:
public class L2SPostRepository : RepositoryBase<Models.Repository.L2SRepository.post, Models.Domain.Post>, IPostRepository { - Now that we have our
RepositoryBasein place, we can work with its functionality. Let's take a look at the implementation in our repository. I think most of the methods are self-explanatory; we are opening a connection, passing information about the domain model, and then closing down the connection again. TheDeletePostmethod is a touch more involved, as we first remove the corresponding comments before deleting the post.Models/Repository/L2SRepository/L2SPostRepository.cs:
private Connection _connection; public L2SPostRepository(Connection connection) : base(connection) { _connection = connection; } public void AddPost(Domain.Post post) { _connection.Open(); base.Add(post); _connection.Close(); } public void UpdatePost(Domain.Post post) { _connection.Open(); base.Update(post, p => p.id == post.PostID); _connection.Close(); } public void DeletePost(Domain.Post post) { _connection.Open(); ObjectFactory.GetInstance<ICommentRepository>() .DeleteComments(post.PostID); _connection.SubmitChanges(); base.DeleteByQuery(p => p.id == post.PostID); _connection.Close(); } public Domain.Post GetPost(Guid postId) { Domain.Post result; _connection.Open(); result = base.Get(p => p.id == postId); _connection.Close(); return result; } public List<Domain.Post> GetPosts() { List<Domain.Post> results; _connection.Open(); results = base.GetAll(p => p.id != Guid.Empty).ToList(); _connection.Close(); return results; } - With the new implementation of
IPostRepositoryout of the way, we can turn our attention to the implementation ofICommentRepository. This will pretty much be exactly like ourL2SPostRepository.Models/Repository/L2SRepository/L2SCommentRepository.cs:
public class L2SCommentRepository : RepositoryBase<Models.Repository.L2SRepository.comment, Models.Domain.Comment>, ICommentRepository { private Connection _connection; public L2SCommentRepository(Connection connection) : base(connection) { _connection = connection; } public void AddComment(Domain.Comment comment) { _connection.Open(); base.Add(comment); _connection.Close(); } public void DeleteComment(Domain.Comment comment) { _connection.Open(); base.DeleteByQuery(c => c.id == comment.CommentID); _connection.Close(); } public void DeleteComments(Guid postId) { _connection.Open(); base.DeleteByQuery(c => c.post == postId); _connection.Close(); } public Domain.Comment GetComment(Guid commentId) { Domain.Comment result; _connection.Open(); result = base.Get(c => c.id == commentId); _connection.Close(); return result; } public List<Domain.Comment> GetCommentsByPostID(Guid postId) { List<Domain.Comment> results; _connection.Open(); results = base.GetAll(c => c.id == postId).ToList(); _connection.Close(); return results; } } - You should now be able to build your application and add posts and comments, as well as edit posts and delete both posts and comments.

Notice that we were able to pretty easily snap in a new form of data access using only StructureMap, pre-determined interfaces, and AutoMapper. By providing ourselves with a configuration hook, we were able to wire up AutoMapper to handle mapping LINQ to SQL types to our POCO classes. This allowed us to continue working with our domain objects, rather than inflicting its LINQ to SQL entities on our application. And because our application was built on the assumption that our repository classes provided a specific set of methods, we were able to add LINQ to SQL-specific implementation in our repository classes, as well as some other classes with very little change to our actual application. Most importantly, we can easily swap back to the mocked-out version of our application by changing one line in our Global.asax.cs file.
Global.asax.cs:
protected void Application_Start() {
AreaRegistration.RegisterAllAreas();
RegisterRoutes(RouteTable.Routes);
L2SRepositoryRegistry.Register();
ObjectFactory.GetInstance<IRepositoryConfiguration>(). Configure();
}