
6 Network access protection beyond the VPC
- Connecting to AWS services via VPC endpoints
- Creating custom VPC endpoint services
- Writing custom firewall rules
- Understanding AWS Shield protections
- Integrating third-party firewalls
In the last chapter we examined the networking primitives available in AWS, including VPCs, subnets, and security groups. We saw how we can use these to limit the traffic we allow to our EC2 instances and other networked resources. In this chapter we’ll take that even further, looking at more advanced ways of securing networks.
One of the benefits of VPC peering, which we talked about in chapter 5, is that it allows you to route traffic between resources without going over the public internet. In this chapter we’ll talk more about the issues around routing traffic over the public internet and two additional ways of avoiding it.
The first way deals with privately connecting to an AWS service from one of your resources using VPC endpoints. An example would be if you had an EC2 instance that called another AWS service like SQS. Figure 6.1 shows how VPC endpoints fit into the network in that situation, allowing a private instance to connect to various AWS services.

Figure 6.1 Interface VPC endpoints allow you to access AWS services, such as API Gateway, Kinesis, or SQS, from a private subnet. No internet gateway is required.
In addition to networking with AWS services, you can create VPC endpoints for your own applications, using AWS PrivateLink. Suppose your customers call your service through an API. You could set up PrivateLink for your API, then your customers could privately access your API from a VPC by routing through an interface VPC endpoint instead of over the public internet. This scenario is depicted in figure 6.2.

Figure 6.2 An interface VPC endpoint can be used to privately connect to a PrivateLink-enabled application running in another VPC.
In chapter 5 we also created basic firewall rules, using security groups and network ACLs. In this chapter we’ll introduce more sophisticated firewalls you can integrate into your VPC. The first is AWS Web Application Firewall (WAF). A WAF is a type of firewall that understands web traffic and can filter based on the content. With security groups and network ACLs, you can only block traffic based on IP addresses, ports, and network protocols. With AWS WAF, you can block traffic to a web application that contains something malicious in the HTTP request body. There are also many other firewalls in the AWS Marketplace that can be used with your VPC. At the end of this chapter, we’ll go over a few different kinds of firewalls and how they can be integrated.
We’ll also look at AWS Shield in this chapter. Shield is a service that protects against DDoS attacks. AWS Shield Standard provides a defense against common DDoS attacks against your AWS infrastructure. AWS Shield Standard is free and enabled automatically. It can even be enabled for applications that aren’t hosted on AWS if they are fronted by Amazon CloudFront (Amazon CloudFront is a CDN [content delivery network] that can be used in front of many AWS services, or even your own on-premises web servers). AWS Shield Advanced provides even further protections against DDoS attacks. AWS Shield Advanced is a paid service specifically for larger-scale, sophisticated denial of service attacks.
6.1 Securing access to services with VPC endpoints and PrivateLink
In chapter 5 we talked about VPC peering connections, which allow you to create connections between VPCs without having to route the traffic through an internet gateway. In this section we’ll introduce VPC endpoints, which provide similar routing for connections between resources in your VPC and other AWS services like API Gateway, Kinesis, or SQS. If you have an EC2 instance that reads from or writes to an SQS queue, you would normally need to create an internet gateway in your VPC, so your instance can call the SQS API. With VPC endpoints, you can create an interface VPC endpoint in your VPC that allows you to call the SQS API without creating an internet gateway or routing any traffic out of your VPC. You can see the difference in the network diagrams in figure 6.3.

Figure 6.3 Compare two methods of connecting an EC2 instance to an AWS service like SQS. The first instance is placed in a public subnet and connects over the public internet using an internet gateway. The second instance uses an interface VPC endpoint to connect from a private subnet. Since the instance is in a private subnet, it can’t access any other outside services and, more importantly, the instance cannot be reached from the outside.
AWS PrivateLink is like VPC endpoints but for your own services. If you have a service like an API, you can use PrivateLink to create a private endpoint for consumers of the API. Whether it’s for customers or other teams in your organization, those consumers can create a private endpoint for your API in their own VPCs. That private endpoint lets them call your API without routing traffic over the public internet. What VPC endpoints provide for many AWS services, PrivateLink lets you provide for your services.
6.1.1 What’s wrong with public traffic?
The primary benefit of VPC endpoints and PrivateLink is that you can use the services you need without having to route traffic via the public internet. But why is it so bad if traffic is going through the public internet?
The main reason you don’t want to route traffic over the public internet if you don’t have to is that it exposes your networked resources to unnecessary risk. When your resources are publicly accessible, you open them up to attack by anyone on the internet. There are ways to protect yourself against these network-based attacks, many of which are described in this chapter and the previous one. But if you can cut your resources off from the public internet, you can proactively and completely seal yourself off from a large number of attacks.
We talked about several ways to block inbound access to your resources in the previous chapter, like security groups, network ACLs, and NAT gateways. But with all of those methods there is still a risk of misconfiguring routes or firewall rules and accidentally exposing your resources. However, if you don’t have an internet gateway in your VPC at all, the risk of accidental exposure is vanishingly small. Not all applications work without public internet access, though. But if the only reason you needed internet access was for connecting to other AWS services, then switching to VPC endpoints can remove one of the biggest attack vectors for your application.
6.1.2 Using VPC endpoints
Now that we know why we might want to use VPC endpoints, let’s see how it’s actually done. Consider an application running on EC2 that processes messages out of an SQS queue. Let’s start with an instance running in a private subnet, as shown in figure 6.4. Right now the instance cannot connect to the SQS service.

Figure 6.4 An EC2 instance in a private subnet cannot access AWS services like SQS without additional networking resources.
All we need to do to connect to SQS privately from our EC2 instance is create an interface VPC endpoint for SQS in the same VPC and subnet as our instance. We can do this in the AWS CLI by running the create-vpc-endpoint command in the EC2 service. Note that this should be done in a VPC with DNS hostnames enabled.
Listing 6.1 Creating a VPC endpoint for SQS
aws ec2 create-vpc-endpoint
--vpc-id vpc123                                ①
--vpc-endpoint-type Interface                  ②
--service-name com.amazonaws.us-east-1.sqs     ③
--subnet-id subnet-123                         ④
--security-group-id sg-123                     ⑤
① The ID of the VPC your instance is in
② Most services use Interface. DynamoDB and S3 are the only outliers that use gateway.
③ The name and region of the AWS service to connect to
④ The ID of the subnet of the instance to put the interface VPC endpoint into. If it is in the same subnet as the instance, then the default security groups do not need to be modified.
⑤ The security group to apply to the VPC endpoint. If this uses the default security group rules and is the same security group applied to the instance, then no changes to the security group are necessary.
After adding this interface VPC endpoint, our new network diagram looks like figure 6.5.

Figure 6.5 The addition of an interface VPC endpoint allows a private instance to connect to SQS, without allowing connections anywhere else on the internet.
And that’s all we need to do. We can now connect to SQS from our instance in the private subnet. You can test that it works by running the receive-message command from the EC2 instance.
Listing 6.2 Testing the SQS VPC endpoint by calling the receive message API
① The URL of the queue you want to access
If everything has been set up correctly, then the output of the previous command will show messages from your SQS queue, rather than a network or unauthorized access error:
> {
  "Messages": [{
    "Body": "Example SQS message.",
    "ReceiptHandle": "...",
    "MD5OfBody": "...",
    "MessageId": "...",
    ...
  }]
}
The following popular AWS services each support VPC endpoints, and they can be configured in a similar manner.
Services marked with an asterisk (DynamoDB and S3) support VPC endpoints through a slightly different process—using gateway endpoints, rather than interface endpoints. The difference with gateway endpoints is that they live in a VPC outside of any subnet, and traffic from a subnet can be routed to it through a route table. The create-vpc-endpoint command allows you to specify a route table ID when creating a gateway endpoint. If you do so, the route table will automatically be updated to include a route to the new gateway endpoint. The network for a gateway endpoint is shown in figure 6.6.
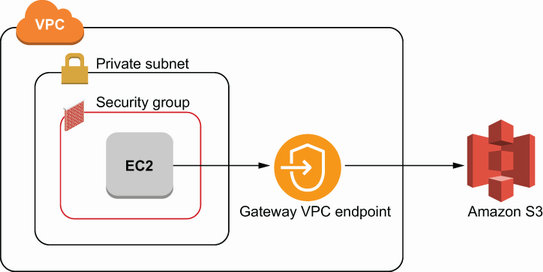
Figure 6.6 Gateway VPC endpoints are used for privately accessing Amazon S3 and DynamoDB. Gateway VPC endpoints are different from interface VPC endpoints in that they live at the VPC level, rather than the subnet level.
6.1.3 Creating a PrivateLink service
AWS PrivateLink is a service that allows you to do what we just did for SQS for your own applications. If you have an application that runs in a VPC, you can create a VPC endpoint service for that application. Then, clients of your application can access it without going over the public internet. The clients would create an interface VPC endpoint in their VPC. That would trigger a notification to you, which allows you to accept or reject the endpoint. If you allow it, then the client can connect directly to your application the same way we connected to SQS before.
In figure 6.7 we show several methods of communicating between two VPCs. The top-left one is with PrivateLink and shows VPCs in two separate accounts. One VPC contains an API that is consumed in the other VPC. This network uses VPC endpoint services to connect. One alternative to a VPC endpoint service, shown as the lower diagram in figure 6.7, is just routing over the public internet by putting an internet gateway in both VPCs. With the VPC endpoint service, we don’t need those internet gateways, and we don’t have to route traffic over the public internet. Another alternative, the top-right diagram in figure 6.7, is to use VPC peering, which we described in the previous chapter. Recall that VPC peering is a mechanism that allows you to route private connections between separate VPCs. This is good, but peering can allow access to all resources in the VPC, and can allow traffic in both directions. With VPC peering, we have to be careful about setting our route tables and firewall rules, which determine what traffic we allow between the VPCs, and that could easily be misconfigured. That’s not something we want to do if we don’t trust the other VPC. With private endpoints, we don’t have to worry about limiting access within our VPC because the only connection allowed is to the single endpoint and only in one direction.

Figure 6.7 Compare three methods of inter-VPC communication: PrivateLink, VPC peering, and public access.
Let’s walk through how we can set up the PrivateLink enabled application network shown in figure 6.7. Let’s assume we already have our API running behind a network load balancer (NLB) in a private subnet in Account 1. In Account 2 we have an instance in a private subnet that tries to call that API. The steps we need to take are
To create a VPC endpoint service configuration, we can run the following command using the AWS CLI, using the credentials from Account 1.
Listing 6.3 Creating a VPC endpoint service configuration
aws ec2 create-vpc-endpoint-service-configuration
--network-load-balancer-arns arn:aws:
➥ elasticloadbalancing:us-east-1:123456789012:
➥ loadbalancer/net/nlb-vpce/e94221227f1ba532      ①
--acceptance-required                              ②
--privateDnsName example.com                       ③
① The ARN of the network load balancer fronting your application
② Setting this means you can approve or reject any requests to create a VPC endpoint to your application.
③ The private DNS name customers can use to connect to your application instead of the private IP address associated with the interface VPC endpoint.
After running this command, take note of the service name in the response. You will need it for the next step, which is to make a connection request from Account 2. To do that we will run the same create-vpc-endpoint command we used before to connect to SQS, but this time we’ll use the service name from the VPC endpoint service configuration we just created. The command to create the connection request is shown in the following listing.
Listing 6.4 Creating a new VPC endpoint from a custom service configuration
aws ec2 create-vpc-endpoint
--vpc-id vpc-ec43eb89                 ①
--vpc-endpoint-type Interface         ②
--service-name com.amazonaws.vpce.us-east-1.vpce-svc-
➥ 0e123abc123198abc                  ③
--subnet-id subnet-abababab
--security-group-id sg-1a2b3c4d
① The ID of the VPC to create the interface VPC endpoint in
② Always use Interface for VPC endpoint services.
③ The name of the VPC endpoint service created in the last step
The final step is to accept the VPC endpoint connection request in Account 1. We’ll first look for all connection requests using the describe-vpc-endpoint-connections command.
Listing 6.5 Listing the pending connection requests for your VPC endpoints
aws ec2 describe-vpc-endpoint-connections
--filters Name=vpc-endpoint-state,Values=
➥ pendingAcceptance                       ①

Response: {
"VpcEndpointConnections": [{
  "VpcEndpointId": "vpce-0123abc",         ②
  "ServiceId": "vpce-svc-0123abc",         ②
  "CreationTimestamp": "2020-03-01T00:00:00.000Z",
  "VpcEndpointState": "pendingAcceptance",
  "VpcEndpointOwner": "123456789012"
}]
}
① Filters for VPC endpoint requests that are pending your approval
② Take note of the VpcEndpointId and ServiceId to accept or reject the request.
Look for the VpcEndpointId in the response. To accept this request, we then just need to run the code in the following listing.
Listing 6.6 Accepting a VPC endpoint connection request
aws ec2 accept-vpc-endpoint-connections
--service-id vpce-svc-0123abc
--vpc-endpoint-ids vpce-0123abc
Now the instance in the private subnet in Account 2 can connect to the API in Account 1. And all of this can happen without needing to route traffic over the public internet or create a peering connection between the two VPCs.
6.2 Blocking malicious traffic with AWS Web Application Firewall
In chapter 5 we looked at some of the built-in firewall features of VPCs. These were security groups and network ACLs. Recall that with these two firewall tools, we were able to create rules that block traffic based on the source or destination IP address, the port, and the network protocol. In this section we’ll look at AWS Web Application Firewall and how it gives us a whole lot more parameters, which we can use to block traffic.
Let’s start with a simple example to show some of the things we can do with AWS WAF. Suppose you’re running a website like Twitter, on which users can upload short messages. If you have a limit of 140 (or 280) characters per message, then your server probably expects small HTTP requests—maybe 1 KB maximum. But what happens if an attacker sends you a request that is over 1 GB, one million times larger than what you were expecting? Requests like that could very easily overload your server. This is a form of a DoS attack.
This is one type of attack that we can’t block with security groups or network ACLs. However, we can block it with AWS WAF by creating a firewall rule that checks the size of the request and blocks requests that exceed a certain size. This situation is depicted in figure 6.8.
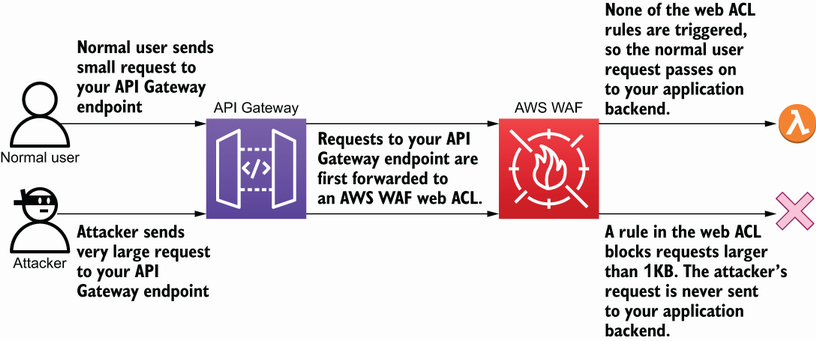
Figure 6.8 AWS WAF rules can block traffic before it hits your application. In this case, very large requests are blocked to prevent a potential DoS attack.
To implement this, we’ll create an AWS WAF rule to block any requests larger than 1 KB. The steps required to create that rule are as follows:
First, we’ll create a file called size_constraint_rules.json with the following contents.
Listing 6.7 A WAF rule that restricts payload size to 1,000 bytes
[{
  "Name": "PayloadSizeConstraintRule",
  "Priority": 1,                        ①
  "Statement": {
     "SizeConstraintStatement": {
        "FieldToMatch": {
           "Body": {}                   ②
        },
        "ComparisonOperator": "GT",     ③
        "Size": 1000                    ④
    }
  },
  "Action": {
    "Block": {}                         ⑤
  },
  "VisibilityConfig": {                 ⑥
    "SampledRequestsEnabled": true,
    "CloudWatchMetricsEnabled": true,
    "MetricName": "PayloadSizeConstraintRule"
  }
}]
① If there were multiple rules, they would be evaluated in order of priority with lower numbers being evaluated first.
② Indicates that the SizeConstraint is for the Body of the request. Some other options are the query string parameters or the URI path.
③ Indicates that the rule triggers when the size from the request is greater than the size specified here
④ Sets the size threshold to 1,000 bytes
⑤ Indicates that when this rule is violated, the request should be blocked. You can run rules in the other direction as well, where traffic is blocked by default and only allowed when it triggers or violates one of the rules.
⑥ Configuration for recording metrics around rule execution in CloudWatch
Now, we can move to step 2, which is to create a new web ACL that uses our rules configuration file.
Listing 6.8 Creating a new web ACL in AWS WAF
aws wafv2 create-web-acl
    --name SizeConstraintWebAcl
    --scope REGIONAL                                  ①
    --default-action "Allow={}"                       ②
    --description "Blocks requests with BODY > 1KB"
    --visibility-config SampledRequestsEnabled=true,
     ➥ CloudWatchMetricsEnabled=true,
     ➥ MetricName=TestWebAclMetrics
    --rules file://size_constraint_rules.json
① Use REGIONAL for ALB or API Gateway. Use CLOUDFRONT for CloudFront.
② If a request doesn’t trigger any of the firewall rules, then the request is allowed.
Now, we can use this web ACL to block large requests from hitting our web server. Rather than attaching to instances or subnets like security groups and network ACLs do, web ACLs are instead associated with a CloudFront distribution, an application load balancer (ALB), or an API Gateway. Association to one of those services is done through the wafv2 associate-web-acl command.
6.2.1 Using WAF managed rules
Admittedly, it takes a bit of work to create new firewall rules for AWS WAF. One way in which you can get a lot of security value very easily from AWS WAF is by using managed rule groups. Managed rule groups are sets of firewall rules that are created and maintained by either AWS or a third party in the AWS Marketplace. These managed rule groups are usually based around a specific set of attacks. For example, two of the managed rule groups offered by AWS are the Windows Operating System and WordPress Application groups. These each have rules tailored to those environments. There are also general web application managed rule groups, like the OWASP Top 10 rule groups from Fortinet and Cyber Security Cloud, Inc.
note OWASP Top 10 is a list of the top 10 security risks for web applications, compiled by the OWASP (Open Web Application Security Project) Foundation. You can see more information about the project here: https://owasp.org/www-project-top-ten/.
These managed rule groups can be added to an existing web ACL. Let’s go ahead and add the Known Bad Inputs managed rule group from AWS to the web ACL we created earlier. This rule group protects against various kinds of attacks wherein a user supplies malicious input. First, we’ll call the list-available-managed-rule-groups to find the Name and VendorName of the rule group we want to use (this information is also available in the AWS WAF documentation).
aws wafv2 list-available-managed-rule-groups --scope REGIONAL

> {
    "ManagedRuleGroups": [
    ...
    {
            "VendorName": "AWS",
            "Name": "AWSManagedRulesKnownBadInputsRuleSet",
            "Description": "Contains rules that allow you to block request patterns
                            that are known to be invalid and are associated with
                            exploitation or discovery of vulnerabilities. This can
                            help reduce the risk of a malicious actor discovering a
                            vulnerable application."
    },
    ...
    ]}
With this information, we can create a new web ACL to use this rule group. The process is very similar to what we did to create the size constraint rule earlier in this section. We’ll create a rule configuration file called managed_rules_configuration.json with the contents shown in the following listing.
Listing 6.9 A WAF rule configuration that references a managed rule group
[{
  "Name": "EnableAWSManagedRuleGroup",
  "Priority": 1,
  "Statement": {
     "ManagedRuleGroupStatement": {
             "VendorName": "AWS",                             ①
             "Name": "AWSManagedRulesKnownBadInputsRuleSet"   ①
    }
  },
  "VisibilityConfig": {
     "SampledRequestsEnabled": true,
     "CloudWatchMetricsEnabled": true,
     "MetricName": "ManagedRuleGroupStatement"
  }
}]
① Use the VendorName and Name values found earlier with the list-available-managed-rule-groups command or from the AWS WAF documentation.
After that we can create a new web ACL that uses that rule configuration file.
Listing 6.10 Creating a web ACL using an existing rule configuration file
aws wafv2 create-web-acl
    --name ManagedRuleGroupWebAcl
    --scope REGIONAL                                     ①
    --default-action "Allow={}"
    --description "Enables one of the AWS Managed Rule Groups"
    --visibility-config SampledRequestsEnabled=true,
     ➥ CloudWatchMetricsEnabled=true,
     ➥ MetricName=TestWebAclMetrics
    --rules file://managed_rules_configuration.json      ②
① Use REGIONAL for ALB or API Gateway. Use CLOUDFRONT for CloudFront.
② If a request doesn’t trigger any of the firewall rules, then the request is allowed.
And now this new managed rule group is being applied to our Twitter-like application and blocking requests with known bad input. Table 6.1 lists the other AWS managed rule groups that are available within AWS WAF.
Table 6.1 AWS managed rule groups for AWS WAF
You can also find more information about the available managed rule groups, like the ones offered by third parties, in the AWS WAF console (http://mng.bz/gwxG) under the AWS Marketplace tab, as shown in figure 6.9.

Figure 6.9 Screenshot of the AWS WAF console, showing the available third-party managed rule groups that can be subscribed to in the AWS Marketplace
6.2.2 Blocking real-world attacks with custom AWS WAF rules
If the managed rule groups for AWS WAF don’t cover a specific use case you want to block, then you’ll have to write your own rules like we did at the beginning of this section. Here, we’ll look at a few common use cases that aren’t covered by managed rule groups. The first is enforcing a rate limit to protect against DoS attacks, and the second is using a honeypot to block bad bots. The term bad bot refers to malicious automated activity on your application. This could be a competitor scraping all the content from your website to reuse on their own site. This is in contrast to good bots, like those from the major search engines, which are beneficial to your site and follow rules you set for bots in a robots.txt file.
Suppose you are running a small social media website with a few thousand active users. The traffic to your site doesn’t usually exceed 1,000 requests per minute (RPM), and your servers can handle as much as 5,000 RPM. But suddenly, an attacker starts sending 10,000 RPM, overloading your system. Your users can’t access your site because all of your resources are taken up by the attacker. This is a classic denial of service attack. What can you do to defend against it?
This is a very good case for rate limiting. Rate limiting is the process of limiting the number of requests that can be made to your service in a given period of time by each source. For example, with rate limiting, you can limit each IP address to only making 100 requests to your website in a 5-minute period, or an RPM of 20. This doesn’t affect your real users, who only make a small number of requests in 5 minutes, but significantly cuts down the number of requests from the attacker. With this rate limit in place, to sustain a denial of service attack with 10,000 RPM, the attacker would need to send requests from 500 distinct IP addresses. While still possible, this falls into the category of a DDoS attack and is significantly more expensive for the attacker to perform. While there are many ways that rate limits can be implemented, one way is with an AWS WAF rule.
To configure this rate limit in AWS WAF, we’ll follow a process similar to the SizeConstraint rule we created previously, but this time we’ll use a RateBasedStatement. First, create a file called rate_limit_rules.json that contains the rule definition. The contents of the file should match the code in the following listing.
Listing 6.11 A WAF rule rate limits IP addresses to 100 requests per 5 minutes
[{
  "Name": "Rate Limit Rule",
  "Priority": 1,                          ①
  "Statement": {
     "RateBasedStatement": {
             "Limit": 100,                ②
             "AggregateKeyType": "IP",    ②
     }
  },
  "Action": {
    "Block": {}
  },
  "VisibilityConfig": {                   ③
     "SampledRequestsEnabled": true,
     "CloudWatchMetricsEnabled": true,
     "MetricName": "rate-limit-rule"
  }
}]
① If there were multiple rules, they would be evaluated in order of priority, with lower numbers being evaluated first.
② Sets rule to match when there have been 100 requests from a single IP address in a 5-minute period
③ Configuration for recording metrics around rule execution in CloudWatch
Then, use the following command in the AWS CLI to create a WAF web ACL with our rate limit rule.
Listing 6.12 Creating a web ACL in AWS WAF with an existing rule file
aws wafv2 create-web-acl
    --name RateLimitWebAcl
    --scope REGIONAL                      ①
    --default-action "Allow={}"
    --description "Rate limit for social media site"
    --visibility-config SampledRequestsEnabled=true,
     ➥ CloudWatchMetricsEnabled=true,
     ➥ MetricName=TestWebAclMetrics
    --rules file://rate_limit_rules.json
① Use REGIONAL for ALB or API Gateway. Use CLOUDFRONT for CloudFront.
Suppose that our website is running on API Gateway, and the ARN of the API Gateway stage is arn:aws:apigateway:us-east-1::/restapis/abc123/stages/production. We can add our new web ACL to this API Gateway stage by running the command shown in the following listing.
Listing 6.13 Associating a WAF web ACL with an API Gateway stage
aws wafv2 associate-web-acl
    --web-acl-arn "arn:aws:waf:us-east-1:123456789012:web-acl-123"
    --resource-arn "arn:aws:apigateway:us-east-1::
      ➥ /restapis/abc123/stages/production"
If we weren’t using API Gateway, and instead, our application was routed through an ALB, we could run the same command but use the ARN of the ALB in the resource-arn field. Now that the web ACL is associated with your site, AWS WAF will stop DoS attacks. When the attacker sends thousands of requests in a minute, only the first 100 requests will make it to your site. The rest will be blocked by AWS WAF and never make it to your site. The attacker won’t be able to send any more requests from that IP address for 5 minutes, at which point it can only send 100 requests before being blocked again.
Consider another attack on your social media website. Let’s say that all the content from users is public, but you don’t want that information being scraped by bots or crawlers. You can put a disallow statement in a robots.txt file to indicate that you don’t want certain pages to be crawled, but that doesn’t stop bad bots from doing it anyway. So how can you stop the bad bots?
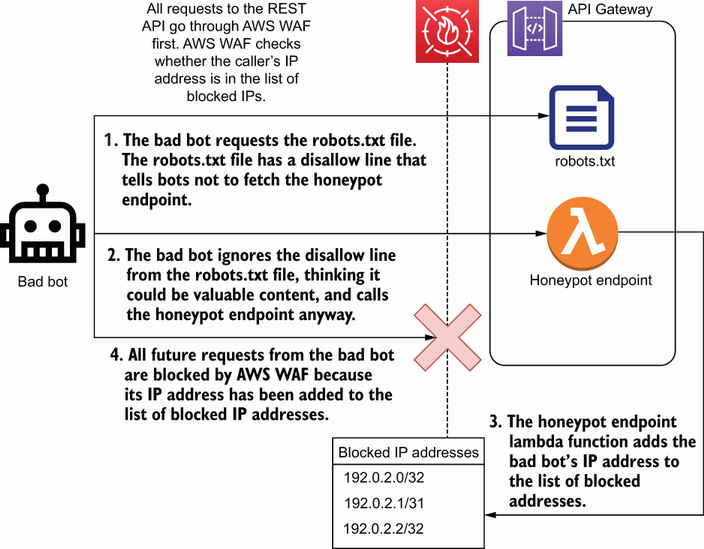
One way to stop bad bots is with a honeypot. A honeypot refers to a way of identifying or monitoring malicious users by baiting them into accessing some fake resource. In the case of bad bots, we’ll create a page in our website that a normal user would never find. Then, we’ll put links to the page in a few places that only a bot would find. We’ll then block any IP address that tries to access our honeypot page. A diagram of this scenario is shown in figure 6.10. This idea is very similar to the concept of using fictitious entries for detecting copyright infringement. Some works, like dictionaries, will put in a fictional word or two. If another dictionary uses that word, then they know it was copied. Map makers do the same by creating fictional locations, called paper towns.
We can implement this honeypot by making some small modifications to the website and using a WAF rule. We’ll start with the AWS WAF rule. The WAF rule we create is just going to block all traffic from a list of IP addresses. That is done with an IP set and a rule, using an IPSetReferenceStatement.
Listing 6.14 Creating an IP set in AWS WAF
aws wafv2 create-ip-set             ①
    --name "MyIpSet"
    --scope REGIONAL
    --ip-address-version IPV4       ②
    --addresses 192.0.2.0/32        ③
① Creates an IP set, which stores a list of CIDR ranges
② A single IP set can contain IPv4 or IPv6 addresses, but not both, in the same IP set.
③ The IP set needs to be initialized with at least one IP address/CIDR range.
The IP set must have at least one IP address to block. If you already have one to block, you can use it now, or you can use one of the restricted documentation IP addresses like 192.0.2.0/32. After that we can create a web ACL using that IP set.
Listing 6.15 Creating a web ACL in AWS WA
aws wafv2 create-web-acl
    --name HoneypotWebAcl
    --scope REGIONAL
    --default-action "Allow={}"
    --description "Honeypot for social media site"
    --visibility-config SampledRequestsEnabled=true,
     ➥ CloudWatchMetricsEnabled=true,
     ➥ MetricName=TestWebAclMetrics
    --rules file://honeypot_rules.json
honeypot_rules.json is a file with the following contents.
Listing 6.16 A WAF rule that blocks requests from IPs within an IP set
[{
  "Name": "Honeypot Rule",
  "Priority": 1,
  "Statement": {
    "IPSetReferenceStatement": {
        "ARN": "arn:aws:...",     ①
    }
  },
  "Action": {
    "Block": {}
  },
  "VisibilityConfig": {
    "SampledRequestsEnabled": true,
    "CloudWatchMetricsEnabled": true,
    "MetricName": "rate-limit-rule"
  }
}]
① Replace with the ARN of the IP set created earlier.
Now that the web ACL is created, you can add it to your site using the associate-web-acl command. Then, we need to make the changes to your site to add the honeypot. In this example we’ll assume you’re using API Gateway, but the process is similar no matter how your site is architected. The steps we are going to take are
To create a honeypot page in API Gateway, we’ll create a new GET resource that triggers a Lambda function. As you probably know, AWS Lambda is a function as a service tool. With Lambda we can upload a block of code and trigger it to run when a specific endpoint is called on our API Gateway. The following commands will create a new Lambda function and an API Gateway resource that calls it.
Listing 6.17 Creating an API Gateway endpoint for a honeypot
aws lambda create-function
    --function-name honeypot-lambda
    --runtime python3.7
    --role arn:aws:...:HoneypotLambdaRole                             ①
    --handler honeypot.register_ip_address                            ②

aws apigateway create-resource
    --rest-api-id abc123                                              ③
    --parent-id a1b1                                                  ④
    --path-part ‘totally-not-a-honeypot’                              ⑤

aws apigateway put-integration                                        ⑥
    --rest-api-id abc123
    --resource-id def456                                              ⑦
    --http-method GET
    --type AWS_PROXY                                                  ⑧
    --uri aws:apigateway:us-east-1:lambda:honeypot-lambda/invoke      ⑨
① The ARN of an IAM role to run the Lambda function as. It needs permission to call the UpdateIPSet action in WAF.
② This identifies the file and method name that will be executed when the Lambda function runs.
③ The ID of the existing API Gateway REST API
④ The ID of the parent resource under which to place the new honeypot resource
⑤ The name of the path for the honeypot resource (relative to the parent)
⑥ Configures our new honeypot resource to trigger our Lambda function on GET requests
⑦ The ID returned by the create-resource call for the honeypot resource
⑧ Configures API Gateway to proxy the incoming request to an AWS service
⑨ Configures API Gateway to invoke the honeypot-lambda function on requests of this resource
Now, if you try visiting https://{your_site}.com/totally-not-a-honeypot, the honeypot Lambda function will run. The next step is to modify that Lambda function to add the requester’s IP address to the IP set. We’ll do this by using the following code listing as a file named honeypot.py in the Lambda function.
Listing 6.18 Python Lambda code to register the calling IP address into an AWS WAF IPSet
import boto3                                            ①
import os

def register_ip_address():
    source_ip = event[‘headers’][‘X-Forwarded-For’].
    ➥ split(‘,’)[0].strip()                            ②
    waf_client = boto3.client(‘waf’)                    ③
    waf_client.update_ip_set(                           ④
        IPSetId=os.environ[‘IPSetId’],                  ⑤
        ChangeToken=waf.get_change_token()[‘ChangeToken’],
        Updates=[{
            ‘Action’: ‘INSERT’,
            ‘IPSetDescriptor’: {
                ‘Type’: ‘IPV4’,
                ‘Value’: source_ip + ‘/32’              ⑥
            }
        }]
    )
① boto3 is the AWS SDK for Python.
② Retrieves the IP address from the headers of the request
④ Updates the IP set to add the requester’s IP address
⑤ The ID of the IPSet to update is pulled from an environment variable. You can replace this with the ID of your IPSet, or you can set the environment variable on the Lambda with your IPSetId.
⑥ Creates a CIDR range representing the single IP address of the caller.
If you want to test that it’s working, you can visit the honeypot URL, and see that it actually adds your IP address to the IP set. Once you try this, you shouldn’t be able to visit any pages on your website anymore. All of your requests will be blocked by WAF. As mentioned earlier, you can unblock yourself by manually editing the IP set in the AWS WAF console.
Now, the final step is to add some links to the honeypot. The first place you’ll want to put one is in the robots.txt file. Add a disallow statement for the page. This way any bots that are specifically violating the robots.txt file will be immediately blocked. The robots.txt statement would look like the following listing.
Listing 6.19 Sample robots.txt file
① Refers to any User-agent string
② Replace this with the relative URL of your honeypot page.
Another place you might want to put a link is in a high-traffic page that might be used as a starting point for crawling the site, like your home page. You should set the display of the link to none, so real users don’t ever see it. You should also set the nofollow tag on the link, so good bots don’t crawl it either. The link might look something like the following listing.
Listing 6.20 A hidden link with nofollow, indicating to bots that it shouldn’t be crawled
This was just a simple implementation of a honeypot, but it should be good enough to block most bad bots. A more complete version of this honeypot mechanism is available on GitHub: https://github.com/awslabs/aws-waf-security-automations.
6.2.3 When to use AWS WAF
We’ve talked a lot about the features of AWS Web Application Firewall, but we haven’t really talked about how to know when you should use it. In this section we’ll go through a simple framework for deciding whether to enable AWS WAF. This framework is depicted as a flowchart in figure 6.11.
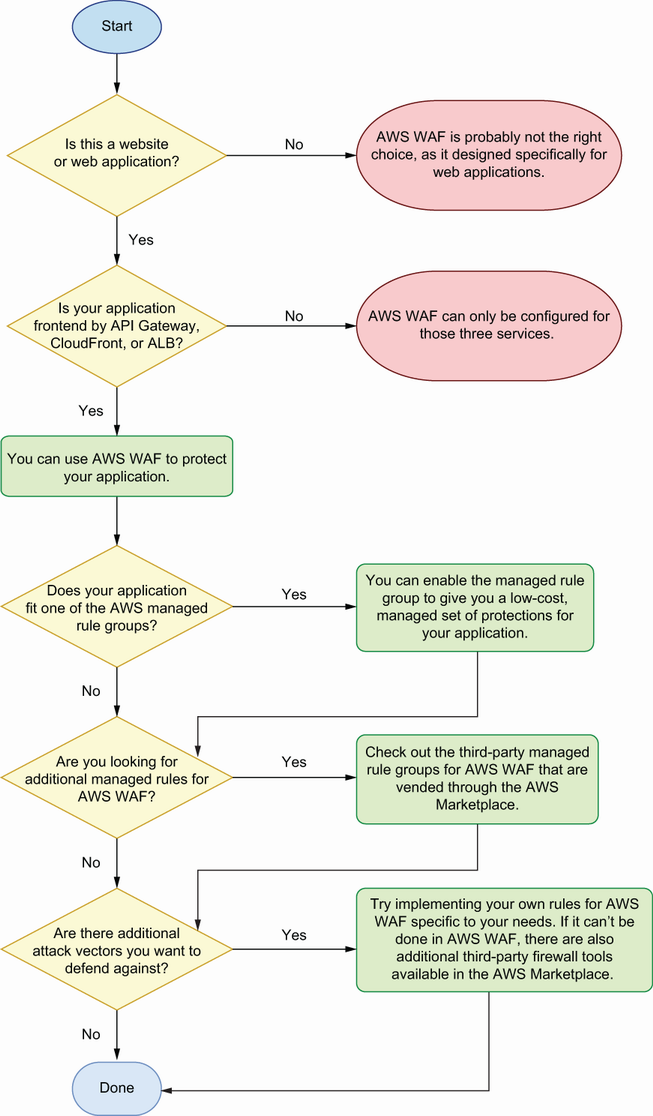
Figure 6.11 Flowchart describing whether AWS WAF can be used for your application and which features may be most useful
The first question to ask is whether your application is a web application. AWS WAF is a firewall designed specifically for understanding web application traffic, so if you’re not running a web application, then AWS WAF is probably not going to help you. The next question is whether your application uses an AWS service that supports WAF. The services that support it are API Gateway, ALB, and CloudFront. If your application doesn’t use one of these services, then you won’t be able to use WAF. But, you may want to consider using one of them in the future, as they are generally the best tools for fronting web applications.
If you are running a web application, and it supports WAF, then it’s generally a good idea to use it. Compared to other web application firewalls, WAF provides a lot of security value for a low cost with the managed rule groups from AWS. For example, if your web application serves five million requests per month, then enabling the AWSManagedRulesCommonRuleSet managed rule group will cost you less than $10 per month. This rule group covers tons of common attacks that apply to almost any web application.
Once you’ve enabled the common rule set, you should look at the rest of the AWS managed rule groups for any that apply to your web application. For example, are you communicating with a SQL database? If so, the AWSManagedRulesSQLiRuleSet will protect you against attempted injection attacks to your database. Even if you are already sanitizing user inputs, this rule group provides defense in depth in case you accidentally missed something.
Are you trying to block a specific type of attack that’s not covered by a managed rule group? This could be like one of the attacks described in section 6.2.2: DoS and bad bots. In this case, AWS WAF is a good place to start for creating rules to block that malicious traffic, especially if it requires looking at data within the web requests. While WAF cannot do everything, it does have a lot of features, and it’s generally cheaper than other firewalls, which makes it a good candidate for experimenting with new firewall rules. If AWS WAF doesn’t cover your situation, read on to section 6.4, which introduces other types of firewalls from third-party vendors that you can integrate into your AWS environment.
6.3 Protecting against distributed denial of service attacks using AWS Shield
A distributed denial of service (DDoS) attack is an enhanced version of a denial of service attack, like the one described in section 6.2.2. As the name implies, the difference is that rather than sending all the traffic from a single source, the malicious requests come from many different sources. The difference between a standard DoS attack and a DDoS attack can be seen in figure 6.12. Because the requests are distributed, some of the simpler methods for stopping DoS attacks, like blocking a handful of IP addresses, don’t work for DDoS attacks.

Figure 6.12 DDoS attacks are characterized by the large number of clients that malicious requests come from.
Since blocking DDoS attacks can be difficult, AWS offers a service called Shield to help. There are two levels to AWS Shield. The first is Shield Standard, which provides protection against the most common DDoS attacks. AWS Shield Standard is free and is automatically enabled on the services that support it, such as Application Load Balancer (ALB), Classic Load Balancer (ELB), CloudFront, and Route 53. Then there is also Shield Advanced, which provides much more sophisticated DDoS protections as well as access to the AWS DDoS Response Team.
6.3.1 Free protection with Shield Standard
As mentioned, Shield Standard is free and automatically applied. There is nothing you need to do, and if you’re using one of the supported services, then you already have Shield Standard enabled and protecting your application. The supported services for Shield Standard are Application Load Balancer, Elastic Load Balancer, Amazon CloudFront, and Amazon Route 53. Since Shield Standard is free and provides a good level of protection against DDoS attacks, it can be a good reason to use a service like CloudFront or ALB in front of your application, if you’re not already.
6.3.2 Stepping up protection with Shield Advanced
When would you want to upgrade to Shield Advanced? Generally, this would be when you’re at risk of very large DDoS attacks from sophisticated attackers. Maybe you run a high-profile website, or you’re in a higher-risk industry. Or if you’re particularly unlucky, maybe you’ve just caught the eye of an activist hacking group. AWS Shield Advanced can defend you against these attacks, but it comes with a pretty steep price tag, at least relative to the other tools we’ve talked about so far. Shield Advanced costs $3,000 per month, plus an additional charge for data transfer. To decide whether you should upgrade to Shield Advanced, you should think about whether or not you’re at risk of very large DDoS attacks. Some things to consider when deciding whether Shield Advanced is necessary include
-
Are you in an industry, like healthcare or finance, where you store lots of valuable information?
-
Is your application high profile, where an attacker would gain credibility by taking it down?
-
Is your application mission critical; could your organization handle being down for a few hours?
-
Would your application going down for a few hours cost you much more than the cost of Shield Advanced?
-
Are you already facing DoS attacks that aren’t being mitigated by AWS Shield Standard or any of your other firewall rules?
If you do think that Shield Advanced is necessary, there are some additional features that you should be aware of. The first is that you get access to the AWS DDoS Response Team, assuming you already have AWS Premium Support. The DDoS Response Team can help you manage the attack while it’s happening or help with analyzing your application after the attack to see what you can do to further mitigate future attacks. Shield Advanced also offers insurance against cost spikes during an attack, where customers will be reimbursed for costs associated with attacks on protected resources.
6.4 Integrating third-party firewalls
So far we’ve implemented firewall rules for our AWS resources using security groups, network ACLs, and AWS WAF web ACLs. While these are the firewall services offered by AWS, you are not restricted to only using AWS tools. Third-party firewalls can be integrated into your applications running on AWS. Many third-party firewall tools are sold through the AWS Marketplace and provide easy integration to your resources. In this section we’ll look at some of the firewalls offered in the AWS Marketplace. We’ll see what kind of protections they provide and how you can set them up in your environment.
6.4.1 Web application and next-gen firewalls
Recall that a web application firewall is a type of firewall that can filter traffic based on the content of a request to a web application. AWS WAF is a type of web application firewall. There are a couple of reasons you might want to use a third-party web application firewall over AWS WAF. The first is that some will have additional features not supported by AWS WAF. For example, Barracuda Networks vends a firewall in the AWS Marketplace called CloudGen WAF. CloudGen WAF is able to read responses that come back from your web application to check for sensitive data being returned. The firewall can then mask the sensitive information or block the response. This is not something you could implement with AWS WAF.
Another reason you might want to use a third-party firewall is because you already use it in an on-prem environment or with another cloud provider. Citrix networking products are used in many on-prem environments. If you are already using something like Citrix NetScaler on-prem, you may wish to use it in AWS as well.
There is a related type of firewall called a next-gen firewall. Exactly what features are provided by a next-gen firewall and what the boundaries are between next-gen and web application firewalls are not always clearly defined. Some of the common features of next-gen firewalls are deep packet inspection and intrusion detection systems. An intrusion detection system might look for known suspicious traffic patterns or anomalies. It can either block traffic or send you an alert. Table 6.2 shows some of the web applications and next-gen firewalls offered in the AWS Marketplace.
Table 6.2 Sample of firewall products in the AWS Marketplace
6.4.2 Setting up a firewall from AWS Marketplace
The AWS Marketplace makes it easy to deploy these firewalls into your infrastructure. Once you’ve picked the product you want to use from the AWS Marketplace website, you just have to click Continue to Subscribe and follow the configuration instructions. Figure 6.13 shows what the AWS Marketplace web page looks like for a next-gen firewall from Fortinet. After following the directions in the console, it should deploy an EC2 instance (or, potentially, a CloudFormation template) in your account.

Figure 6.13 This screenshot shows what the AWS Marketplace console looks like for a third-party firewall product. The link to subscribe to the product is highlighted.
Once the instance is deployed, you can follow the usage instructions listed in the AWS Marketplace page to finish setting up your firewall. Figure 6.14 shows where you can find the usage instructions from the product page in the Marketplace console. Each of the firewall providers will have different setup instructions, but generally, the process is to configure the VPC, subnet(s), and security groups for the deployed firewall. Then, you either SSH into the firewall instance or visit a website running on the instance to configure the firewall settings.

Figure 6.14 This screenshot shows how to find the detailed steps necessary to integrate a third-party firewall into your environment after you have subscribed.
Answers to exercises
C. You don’t want to route traffic over the public internet.
D. You only need to communicate with a single endpoint in one of the VPCs
6.3 Web application firewalls understand web app traffic and can create rules based on common web patterns and parameters.
6.4 No, rate limiting cannot be implemented with security groups or network ACLs. Rules for those firewalls do not permit keeping the additional state needed to track rate limits.
6.5 Your answer will be similar to listings 6.11 and 6.12.
6.6 DDOS attacks are denial of service attacks that come from multiple hosts or machines, which makes them harder to block.
A. Shield Advanced protects against sophisticated DDoS attacks.
D. Shield Advanced offers refunds for increases in infrastructure costs during an attack.
Summary
-
VPC endpoints allow you to privately access AWS services like SQS and API Gateway, without exposing the resources in your VPC to the public internet.
-
Setting up your own VPC endpoint service with PrivateLink allows clients to connect to your applications without exposing the traffic to the public internet.
-
Turning on relevant AWS WAF managed rule groups protects you against common attacks on web applications for a low price.
-
Additional firewall rules can be written in AWS WAF to cover specific security concerns that aren’t mitigated by managed rule groups.
-
AWS Shield Standard protects your applications on supported AWS services from DDoS attacks automatically and for free.
-
Subscribing to AWS Shield Advanced equips you to handle very large-scale DDoS attacks.
-
Third-party firewall tools can provide additional security coverage for your AWS applications and can be conveniently integrated from the AWS Marketplace console.