
7 Protecting data in the cloud
- Modelling applications with data flow diagrams
- Using AWS Key Management Service for encryption at rest
- Enabling backups or versioning to protect against and remediate attacks
- Using and enforcing secure protocols when transferring data
- Keeping detailed logs with built-in AWS services
- Identifying and protecting potentially sensitive data with Amazon Macie
It seems that every week or so there’s another high-profile data breach in the news. Just in the last couple of weeks, I’ve seen announcements from a major hotel chain, a large video game company, and two cruise lines about leaks of customer data. The alarming rate at which these breaches occur is evidence of how common vulnerabilities in data security are as well as the persistence of the attackers looking for your data. The information in this chapter can help you protect your organization from the attacks that have put these companies in the headlines.
When planning on protecting data in the cloud, there are three things to keep in mind that we’ll explore in section 7.1. The first is confidentiality: How can you ensure that data is only read by authorized users? While confidentiality is the main focus of data security, it is not the only thing we need to concern ourselves with. The other piece is data integrity. Ensuring data integrity refers to defending against tampering or corruption of data. The last idea is defense in depth. Misconfiguration of data security controls happens all the time. It’s important to have multiple layers of defense to protect data in the face of those misconfigurations or other vulnerabilities.
The processes for securing data are generally broken down into two categories: protections for data at rest and protections for data in transit. Data at rest refers to things like files and objects stored in Amazon S3 or records in a database. Data in transit refers to data being communicated over the network, like the data in network calls between your own servers or between your server and Amazon S3. In section 7.2 we’ll look specifically at protecting data at rest. This includes topics like encryption at rest, least privilege access to resources, and backup and versioning options within AWS. The following section, section 7.3, covers data in transit. This section primarily covers secure transport protocols that maintain confidentiality and integrity of your data as well as methods for enforcing them. This section also discusses enforcing least privilege network access controls where your data is transmitted.
While the first three sections are focused on proactive measures for protecting data, sometimes attacks still happen. If an attack does happen, having detailed logs is absolutely critical. You’ll want to know exactly what data was compromised, to assess the damage, and how it was accessed, so you can mitigate or stop the attack. In section 7.4 we will look at how to gather detailed data access logs for various data sources in AWS.
Amazon Macie is an AWS security service that helps to classify data stored in AWS and detect potential unauthorized access. Section 7.5 looks at the benefits of data classification and ways to implement it within AWS. The section also touches on a few ways to detect data breaches using your access logs. Finally, the section shows you how to use Amazon Macie to automate some of these tasks.
7.1 Data security concerns
Whether from customers, stakeholders, or business leaders, there’s a question that often gets asked: “Is my data secure?” But that’s not an easy question to answer, even ignoring that security questions are rarely ever a binary yes or no. Data is stored in several places and transmitted to many more. Just one weak link where data is not properly secured is enough for it to be compromised. In this section we’ll look at a framework for data security that can be used to analyze an existing system for vulnerabilities or to consult during development to secure data from the start.
In chapter 6 we talked about threat modeling, which is essentially structured brainstorming about potential attacks on your system. One threat-modeling tool that’s helpful here is a data flow diagram. A data flow diagram is a graphic that shows where data is stored and where it is transmitted in the system. Figure 7.1 shows an example data flow diagram.

The first step in the framework for analyzing data security is creating these data flow diagrams for your system. At each of the points where data is either stored or transmitted, consider three things:
-
Confidentiality—What mechanisms are in place that prevent unauthorized access of data at this point in the diagram?
-
Data integrity—How do you prevent or detect malicious modification of data in this case?
-
Defense in depth—What happens if one of your security measures fails? Is it possible to implement additional layers of security to protect the confidentiality or integrity of the data at this point?
In this section, we’ll dive deeper into each of these three points.
7.1.1 Confidentiality
Confidentiality refers to keeping data secret. In practice, this generally means restricting read access to data to only authorized users. In AWS this can be implemented through access control mechanisms specific to the service or by encrypting the data. In the first case, authorized users are defined in AWS IAM as principals. In the latter case, an authorized user is anyone who has the key to decrypt the data. This can also be set in AWS IAM if you use AWS Key Management Service (KMS). KMS is an AWS service for managing encryption keys.
Let’s look at an example of addressing confidentiality in a data flow diagram. In figure 7.2, we have a subset of the data flow diagram we saw before. How are we addressing data confidentiality at points A and B?

At point A we have data stored in an Amazon S3 bucket. How can we ensure that only authorized users can access the data in S3? One way we’ve talked about in the past is with IAM policies. We can use a resource-based policy on the S3 bucket, also called a bucket policy, that restricts which users can access the data in the bucket. Listing 7.1 shows an example bucket policy that restricts GetObject access to objects in a bucket to a specific IAM role. Now, a user can only read the contents of objects in the S3 bucket if they can first assume the role. In section 7.2 we’ll look at more ways to protect data at rest in S3 and other AWS storage services.
Listing 7.1 S3 bucket policy restricting GetObject access to a specific IAM role
{
  "Version": "2012-10-17",
  "Statement": [
    {
     "Effect": "Deny",                       ①
     "Principal": "*",                       ①
     "Action": "s3:GetObject",               ①
     "Resource": "arn:aws:s3:::MyBucket/*",  ②
     "Condition": {
           "StringNotLike": {                ③
                 "aws:userId": [             ③
               "AROAEXAMPLEID:*",            ④
               "111111111111"
                 ]
           }
     }
    }
  ]
}
① Denies access to GetObject for all users that match the condition
② Replace with your S3 bucket ARN.
③ The condition matches any user that is not currently assuming the specified role.
④ This is the principal ID of the IAM role that should be allowed to call GetObject.
At point B we are transferring data from S3 to an EC2 instance. How can we preserve confidentiality in this case? Here we’re looking at data in transit. We want to make sure no one is eavesdropping on the network traffic between our EC2 instance and S3. While a man-in-the-middle (MitM) attack here would be pretty hard to pull off, it is still possible. The best way to protect confidentiality here is to encrypt the data in transit. This is easiest to do by requesting the S3 object over a secure protocol like HTTPS. We can even use the bucket policy to enforce always using HTTPS. The bucket policy in listing 7.2 does not allow requesting objects over HTTP. More information on encryption in transit for Amazon S3 and other services will be discussed in section 7.3.
Listing 7.2 S3 bucket policy enforcing secure transport for all actions
{
  "Version": "2012-10-17",
  "Statement": [
    {
      "Action": "s3:*",                     ①
      "Effect": "Deny",                     ①
      "Principal": "*",                     ①
      "Resource": [
        "arn:aws:s3:::MyBucket",            ②
        "arn:aws:s3:::MyBucket/*"           ③
      ],
      "Condition": {
        "Bool": {
          "aws:SecureTransport": "false"    ④
        }
      }
    }
  ]
}
① Denies access to all S3 actions for all users that meet the condition
② Replace with your bucket ARN.
③ The two similar resource lines are both needed. The first is for bucket operations, and the second is for object operations.
④ This condition matches any actions that are not using a secure transport protocol.
As we’ve seen here, we can use encryption and secure transport to ensure confidentiality of data in our applications. In the next section we’ll look at ways to protect data integrity.
7.1.2 Data integrity
Preserving data integrity means protecting against unwanted modification. This encompasses a few different ideas. The first is working to prevent tampering, which could be either modification or deletion of existing data or insertion of new, potentially malicious data. The second is implementing processes for detecting tampering. The last is having mechanisms in place to recover from a situation in which tampering has occurred. These three ideas are common in a lot of areas of security and are typically called prevention, detection, and remediation.
Let’s think again about the example in figure 7.2, this time thinking about data integrity. For point A, data stored in Amazon S3, how can we prevent unauthorized users from modifying data? One way is to use the bucket policy to restrict who has write access to the data. Like the previous section where we restricted read access to a bucket to a specific role, listing 7.3 restricts PutObject access. This will prevent anyone who can’t assume the role from changing the data in our S3 bucket.
Listing 7.3 S3 bucket policy restricting PutObject access to a specific IAM role
{
  "Version": "2012-10-17",
  "Statement": [
    {
     "Effect": "Deny",                        ①
     "Principal": "*",                        ①
     "Action": "s3:PutObject",                ①
     "Resource": "arn:aws:s3:::MyBucket/*"    ②
     "Condition": {
           "StringNotLike": {                 ③
                 "aws:userId": [              ③
               "AROAEXAMPLEID:*",             ④
               "111111111111"
                 ]
           }
     }
     }
  ]
}
① Denies access to PutObject for all users that match the condition
② Replace with your S3 bucket ARN.
③ The condition matches any user that is not currently assuming the specified role.
④ This is the principal ID of the IAM role that should be allowed to call PutObject.
By using a policy with an explicit deny for any users who aren’t the intended user, we go a long way toward preventing any malicious tampering. But if something did happen, how could we recover from it? The best way to recover from tampering is to have good backups of your data. For Amazon S3, one great way we can keep backups is by enabling versioning on our S3 bucket. Versioning allows us to restore an object from any of its revisions. If an object is tampered with, we can restore it to its previous version. Even if an object is deleted, we can still recover any of the old versions of the object. We can use the command in the following listing to enable versioning for our S3 bucket.
Listing 7.4 S3 command to enable versioning
① The name of the bucket to enable versioning on
② Tells S3 to enable versioning for the bucket. This same action is also used for disabling versioning.
Now, let’s talk about the data in transit at point B. Data is being passed between our EC2 instance and an Amazon S3 bucket. To protect against modification of data in transit, the easiest option is to use a secure protocol like HTTPS. Retrieving data from S3 over HTTPS ensures that the data has not been modified between S3 and our instance. One way to implement this would be to use the GetObject method from the AWS SDKs or CLI, which use HTTPS by default. If you retrieve data from S3 using a public object URL, just use the HTTPS URL rather than HTTP. Additionally, we can prevent any access to S3 that doesn’t use a secure protocol. This is achieved via the same method used in listing 7.2, which sets the bucket policy to deny requests that don’t use secure transport.
While the data integrity and confidentiality concepts just discussed protect your data from unauthorized access and modification, in the next section we’ll look at how to add extra layers of defense to your application.
7.1.3 Defense in depth
Defense in depth is a practice of implementing redundant security controls, just in case something goes wrong. It’s like locking your car doors in a locked garage. If someone forgets to lock the garage door or if an attacker breaks the garage door lock, they still can’t get inside the car. Defense in depth for your data is similar. You want to implement some redundancy in how you secure the data. If one of your security mechanisms fails, if it gets misconfigured, or if a clever attacker finds a way around it, your data will still be protected if you’ve implemented multiple layers of defense. Let’s look at how we can add some defense in depth to the previous examples of confidentiality and integrity. The diagram we’re looking at is the one shown in figure 7.2.
Recall the concerns about confidentiality at point A: data at rest in Amazon S3. Earlier we used a bucket policy to restrict read access to the bucket to only a specific IAM role. In addition to that, we can also encrypt the data in S3 with an encryption key that we store in AWS Key Management Service. If we do so, then a user needs to have permission to access the key in KMS before they can decrypt the data to read it. Now, to read data from our S3 bucket, a user needs to have permission to assume the role that can access the bucket and have permission to use the key in KMS. If, somehow, an attacker found a way to assume the role, or if we accidentally misconfigured the S3 bucket policy and granted open access, our data would still be confidential because only authorized users can decrypt the data. This gives us a second layer of protection for our data in S3.
7.2 Securing data at rest
In data security we often distinguish between data at rest and data in transit. As I briefly mentioned at the beginning of this chapter, data at rest refers to data that is stored, perhaps in object storage like Amazon S3, in a database like DynamoDB, or even in block storage like Elastic Block Store (EBS). Data in transit refers to data that’s being transmitted throughout your application. This could be copying files from an EC2 instance over FTP, using the AWS CLI to call Amazon S3, or a customer fetching data from a web application. While in both cases we still want to preserve the confidentiality and integrity of the data, the methods of doing so are different. In this section we’ll look specifically at how to secure data at rest.
One of the best ways to protect confidentiality of data at rest is to encrypt the data. In the following section we’ll look at how to encrypt data in various storage systems within AWS. While just encrypting data is a huge step towards protecting confidentiality, it’s important to understand some of the more subtle details of encryption. We’ll look at some of these details, like how to safely manage encryption keys in AWS and the trade-offs between AWS-owned keys, AWS-managed keys, and bring-your-own-key (BYOK).
Another important component to ensuring confidentiality of data at rest is restrictive access controls. We’ll look at implementing least privilege access controls in IAM, specifically for storage and database services. This includes restricting principals with identity-based policies as well as scoping down permissions on supported resources with resource-based policies. We’ll also take a look at some of the additional access control features within Amazon S3 like access control lists.
Lastly, we’ll talk about backups and versioning of data stored in AWS. There are many reasons to back up data that aren’t related to security, but we’ll talk about why it’s important for data security and integrity as well as how you can implement it for common data storage services in AWS.
7.2.1 Encryption at rest
As mentioned earlier, encryption is a great way to ensure confidentiality of data at rest. One of the tools you’ll want to use for encrypting data at rest in AWS is Key Management Service (KMS). AWS KMS is a service that makes it easy to create, manage, and use encryption keys throughout your AWS environment. Using KMS, as well as the built-in KMS integrations into many other services, simplifies the encryption process and removes a lot of the minutiae of trying to implement all of the encryption yourself. Let’s look at a simple example of how we can create and use encryption keys in KMS.
Note This example is illustrative and not intended to be the best solution. A better way to securely store secrets like API keys is in AWS Secrets Manager.
Suppose we have an application that calls a third-party API and authenticates using an API key. If an attacker figured out our API key, they could call the third-party API on our behalf. To reduce the chances of that happening, we’ll encrypt the API key wherever we store it and only decrypt it when we need to use it. To start, we need a key to encrypt the data. In KMS such keys are called customer master keys (CMKs). Running the command in the following listing will create a new CMK in KMS.
Listing 7.5 Creating a customer master key
$ aws kms create-key

> {
   "KeyMetadata": {
          ...
       "KeyId": "44592625-b9a7-4a5f-b96f-a2ce037b196a",  ①
   ...
       }
}
① The output contains the KeyID of the newly created CMK.
Since we didn’t specify the CustomerMasterKeySpec field, it created a symmetric key for us. A symmetric key is one for which the same key is used for encryption and decryption. In contrast, asymmetric keys have separate keys for encryption and decryption, sometimes called the public key and the private key. Asymmetric keys are common for public key encryption and for digital signing. In this example we don’t need separate keys, so a simple symmetric key fits our use case. Now that we’ve created a CMK, all we need to do to encrypt our API key is call the encrypt method in KMS and pass the ARN of the CMK and our API key, as shown in the following listing.
Listing 7.6 KMS command to encrypt a plaintext string
$ aws kms encrypt
--key-id 1234abcd-12ab-34cd-56ef-1234567890ab                               ①
--plaintext "MyApiKey"                                                       ②

> {
   "CiphertextBlob":
➥ "AQICAHhaYby0ER/F0r2fJ8leIiEYT8hF6p2FKW+OqoeitzZIBQGCeM8xeUu7RPzqIOnNUaA9A③
➥ AAAZjBkBgkqhkiG9w0BBwagVzBVAgEAMFAGCSqGSIb3DQEHATAeBglghkgBZQMEAS4wEQQMEt2③
➥ IqCUVQQmo0gyAAgEQgCNGhkZ4AzqDYy1mxD58eyOslb4nomwIgixHyiXyv1YRDiWGvw==",   ③
   ...
}
① Replace with the KeyID of the CMK created previously.
② Replace with the API key you want to encrypt.
③ The output contains the "CiphertextBlob", which is the encrypted API key.
The output of the command contains our encrypted API key. Now, we can store this somewhere until we need to use it. To decrypt it again later, all we need to do is call the decrypt method on the encrypted API key, as shown in the following listing.
Listing 7.7 KMS command to decrypt a ciphertext blob in base64
$ aws kms decrypt
--ciphertext-blob fileb://<(echo
"AQICAHhaYby0ER/F0r2fJ8leIiEYT8hF6p2FKW+OqoeitzZIBQGCeM
➥ 8xeUu7RPzqIOnNUaA9AAAAZjBkBgkqhkiG9w0BBwagVzBVAgEAMFAGC
➥ SqGSIb3DQEHATAeBglghkgBZQMEAS4wEQQMEt2IqCUVQQmo0gyAAgEQ
➥ gCNGhkZ4AzqDYy1mxD58eyOslb4nomwIgixHyiXyv1YRDiWGvw=="       ①
| base64 -d)                                                   ②

> {
   ...
   "Plaintext": "TXlBcGlLZXk="                                 ③
}

$ echo "TXlBcGlLZXk=" | base64 -d                              ④
> MyApiKey
① Replace with the encrypted API key, which is the CiphertextBlob from the encrypt command.
② This command within the CiphertextBlob is needed, so KMS can read the ciphertext as a binary file.
③ The output contains a base64 encoded version of the original API key in the Plaintext field.
④ Decoding the base64 plaintext reveals the original API key.
Notice that we don’t even need to specify the CMK in the decrypt method. This is because the encrypted API key contains metadata from KMS that indicates which CMK to use. However, this shortcut only works when you use a symmetric key. If you encrypted the API key with an asymmetric key, then you would need to identify the CMK for decryption when calling the decrypt method.
So now that we know the basics of encryption with KMS, let’s see how we can implement encryption at rest in some AWS data storage services. Most services in AWS for storing data have integrations with KMS to make encryption at rest easy. This feature is typically referred to as server-side encryption (SSE). Some of the services that support server-side encryption with KMS are listed here:
Let’s say we have an S3 bucket we want to use to store some private information. How can we ensure that all of that data is encrypted at rest? First, we have a couple of decisions to make. Through the service we can encrypt S3 objects as we upload them, or we can configure an S3 bucket to automatically encrypt any new objects added to the bucket. In this case we’ll configure the bucket to encrypt all new objects.
Note Enabling encryption for the S3 bucket only encrypts objects added after the change. Existing objects will not be encrypted.
The next decision is what key we want to use. Amazon S3 allows you to choose your own KMS key or to use a key managed by S3. These encryption options are called AWS-KMS and AES-256, respectively, in S3. As to which one you should choose, using a key managed by S3 is a bit easier to set up, while choosing your own key provides a bit more flexibility in how your data is encrypted and how the key is managed. For now, let’s use the key managed by S3.
Now that those decisions are out of the way, we can set up encryption at rest for the bucket. All it takes in this case is a single command to update our bucket encryption configuration. The method we’ll use is PutBucketEncryption.
Listing 7.8 AWS CLI command to enable default encryption for an S3 bucket
$ aws s3api put-bucket-encryption
--bucket my-bucket                       ①
--server-side-encryption-configuration
‘{"Rules": [{"ApplyServerSideEncryptionByDefault": {"SSEAlgorithm":
➥ "AES256"}}]}’
① Replace with the name of the bucket to encrypt.
And that’s all we need to do to enable encryption at rest on an S3 bucket. Now, any objects uploaded to the bucket will be automatically encrypted. All of the encryption and decryption operations are done behind the scenes, so you don’t have to write any additional code to handle them. The only thing you may need to change is adding permissions to allow kms:Encrypt and/or kms:Decrypt to any IAM principals that read or write data to this bucket. An example IAM policy that includes these permissions is shown in the following listing.
Listing 7.9 IAM policy allowing access to encrypt and decrypt with a KMS key
    {
        "Version": "2012-10-17",
        "Statement": {
            "Effect": "Allow",
            "Action": [
                "kms:Encrypt",                              ①
                "kms:Decrypt"                               ①
            ],
            "Resource": [
                "arn:aws:kms:us-east-1:123456789012:key
                ➥ /1234abcd-12ab-34cd-56ef-1234567890ab"   ②
            ]
        }
    }
① Allows the user to encrypt and decrypt with KMS for a certain key
② Replace with the ARN of your newly created key.
KMS integrations like this are available in many services, though the interfaces may be slightly different. For example, in DynamoDB, you can create an encrypted table by setting the SSE specification property when calling CreateTable. Like with S3, you can choose your own KMS key, or you can use one managed by DynamoDB.
Listing 7.10 Command to create a new DynamoDB table with SSE-KMS
aws dynamodb create-table
  --table-name Music                                ①
  --attribute-definitions
     AttributeName=Artist,AttributeType=S           ②
     AttributeName=SongTitle,AttributeType=S        ②
  --key-schema
     AttributeName=Artist,KeyType=HASH              ③
     AttributeName=SongTitle,KeyType=RANGE          ③
  --provisioned-throughput
     ReadCapacityUnits=5,WriteCapacityUnits=5       ④
  --sse-specification Enabled=true,SSEType=KMS       ⑤
① Defines a new DDB table with the name Music
② Defines two string attributes in the table: Artist and SongTitle
③ Sets the key of the table to be a combination of a hash key on the Artist attribute and a Range key on the SongTitle attribute
④ Sets the read and write capacity units to 5. These define the rate at which read and write calls can be made to the table.
⑤ This line enables encryption at rest with KMS.
7.2.2 Least privilege access controls
One way to think about integrity and confidentiality of data is that data integrity protects against unauthorized write access to data, and confidentiality protects against unauthorized read access to data. Ultimately, both are concerned with unauthorized access, and the primary tool for preventing unauthorized access in AWS is IAM. We discussed IAM at length in chapters 2 through 4, but here we’ll briefly discuss some of the specifics of IAM for data storage services as well as additional access controls available in Amazon S3.
A powerful feature of IAM is resource-based policies. Recall from chapter 2 that resource-based policies are IAM policies that are applied to certain AWS resources and not IAM principals. These resource-based policies determine which principals can access the resource. Resource-based policies are great for protecting data at rest, since we can define exactly which users have access to a particular data storage resource in a single place. As an example, imagine that we have an S3 bucket, and we want to prevent tampering of the data in the bucket. Let’s say that only a single IAM user, Alice, should be able to modify data in the bucket. How can we ensure that only Alice has write access to the bucket?
We can easily grant access to Alice using identity policies, but that doesn’t prevent another user from getting access. If we want to prevent another user from getting write access, we need to use a resource-based policy on the S3 bucket itself. We can use the policy shown in the following listing to allow write access for Alice and deny access to all other users.
Listing 7.11 S3 bucket policy denying access to all users except Alice
{
    "Version": "2012-10-17",
    "Statement": [{
        "Effect": "Deny",
        "NotPrincipal": {"AWS": [
            "arn:aws:iam::123456789012:user/Alice",
        ]},
        "Action": "s3:*",
        "Resource": [
            "arn:aws:s3:::mybucket",
            "arn:aws:s3:::mybucket/*"
        ]
    }]
}
In addition to identity and resource-based policies, Amazon S3 also offers another access control mechanism called an access control list (ACL). ACLs are just another way of granting access to S3 resources. You can write your own ACLs, or you can use one of the canned ACLs, which are ACLs created by S3 that serve common use cases. Table 7.1 lists several canned ACLs and what access they allow. For information on the syntax for writing your own ACLs, see the documentation available at http://mng.bz/6XNp.
7.2.3 Backups and versioning
In the previous section we talked about using IAM to prevent tampering with data at rest. But what do you do if you detect that your efforts failed and an attacker has modified your data?
Stepping back for a minute, many application security concerns have analogous application operations concerns. For example, protecting against the denial of service attacks we talked about in chapter 5 is quite similar to building highly available applications. Coming back to the problem at hand, recovering from an attacker tampering with data is a very similar problem to building resilience against data loss or corruption. This may be a much more familiar domain to you, where the solution is almost always to keep frequent backups. The same solution works for recovering from malicious tampering. Keep frequent backups, so you can restore data back to its original state.
Let’s walk through creating a backup for a DynamoDB table. If we just want to create a single backup, all we have to do is call the CreateBackup method, as shown in the following listing.
Listing 7.12 Command to create a backup for a DynamoDB table
① The name of the table to back up
Restoring from this backup is similarly easy. We just have to call the RestoreTableFromBackup command, as shown in the following listing.
Listing 7.13 Command to restore a DynamoDB table from an existing backup
$ aws dynamodb restore-table-from-backup
--target-table-name BackupTable            ①
--backup-arn MusicBackup                    ②
① The name of the table to restore into
② The ARN of the backup to use. Get this from the response of create-backup or by calling list-backups.
You can verify this works by creating a DynamoDB table, creating a backup, modifying some of the data, and then restoring to the backup. You should see that the data has been restored to its original state before you made modifications.
DynamoDB also has a feature called point-in-time recovery (PITR). PITR automatically takes incremental backups of your table and allows you to restore the table to any point in time. To enable PITR, call the UpdateContinuousBackups method on your table, as shown in the following listing.
Listing 7.14 Command to turn on PITR for a DynamoDB table
$ aws dynamodb update-continuous-backups
--table-name Music                                    ①
--point-in-time-recovery-specification PointInTimeRecoveryEnabled=True
① The name of the table to enable PITR for
Once PITR is enabled for your table, you can restore the table to the state it was in at any time between now and when PITR was enabled, as shown in the following listing.
Listing 7.15 Command to restore a DynamoDB table from a PITR backup
$ aws dynamodb describe-continuous-backups            ①
--table-name Music                                     ②

$ aws dynamodb restore-table-to-point-in-time
--source-table-name Music                             ②
--target-table-name MusicEarliestRestorableDateTime   ③
--restore-date-time 1519257118.0                       ④
① First, call describe-continuous-backups to determine the versions available to restore to.
② The name of the table to restore from
③ The name of the new table to restore into. Continuous backups are restored into new tables, rather than the same table.
Similar to point-in-time recovery, Amazon S3 has a feature called versioning. When versioning is enabled for a bucket, S3 stores all changes to objects within that bucket and allows you to recover an object at any of its previous versions. To enable versioning on an S3 bucket, call the PutBucketVersioning method, as shown in the following listing.
Listing 7.16 Command to enable versioning for an S3 bucket
① The name of the bucket to enable versioning on
② Tells S3 to enable versioning for the bucket. This action is also used for disabling versioning.
When you call GetObject to retrieve an S3 object, it automatically gets the latest version. To get an older version, pass the version ID into the GetObject method, as shown in the following listing.
Listing 7.17 Commands to get a version of an S3 object
$ aws s3api list-object-versions
--bucket my-bucket                                               ①
--prefix index.html                                               ②

{                                                                 ③
...
"Versions": [                                                     ④
        {
            "LastModified": "2020-10-10T00:00:00.000Z",           ⑤
            "VersionId": "Rb_l2T8UHDkFEwCgJjhlgPOZC0qJ.vpD",      ⑥
            "IsLatest": false,                                    ⑦
            ...
        }, {
            "LastModified": "2020-11-10T00:00:00.000Z",
            "VersionId": "rasWWGpgk9E4s0LyTJgusGeRQKLVIAFf",
            "IsLatest": true,
            ...
        }
    ]
}


$ aws s3api get-object
   --bucket my-bucket
   --key my-key
   --version-id "Rb_l2T8UHDkFEwCgJjhlgPOZC0qJ.vpD"                ⑧
① The name of the bucket the object is in
② The object key. It can also be a prefix and will return all objects matching that prefix.
③ The response to the list-object-versions command
④ The response is an array of objects under the Versions key.
⑤ Each version has the date and time when it was last updated.
⑥ The version ID is what you’ll use later to access the contents of a versioned object.
⑦ Tells you whether you’re looking at the latest version of the object
⑧ This is the version ID we got from calling list-object-versions earlier.
7.3 Securing data in transit
Recall that data in transit is any data that is being passed between components of your application or to external parties like customers. When data is being transmitted around, it’s at risk of different kinds of attacks than when it is at rest. These new attacks require different mechanisms for protecting the data. Attacks against data at rest typically involve attacking the storage mechanism or the auth controls. Attacks against data in transit typically involve exploiting the communication channel where the data is being transferred. One example of an attack against data in transit is a MitM attack. Figure 7.3 illustrates a MitM attack.

In figure 7.3, Alice wants to communicate with http://example.com. The attacker pretends to be example.com to Alice and pretends to be Alice to example.com, communicating with both of them. The attacker relays the communications between them, and neither Alice nor example.com have any idea that the attacker is reading and passing all of their information. It’s clear in this attack how the confidentiality of the data is compromised. But the integrity of the data can be compromised in a MitM attack as well. Figure 7.4 shows a slightly modified situation.

In this case, Alice is attempting to make an online transfer through her bank’s website. Again, the attacker is acting as a man in the middle. When Alice sends the request to transfer $10 to Bob’s account, the attacker modifies the request to transfer $1,000,000 to the attacker’s account before passing it along to the bank.
To combat these kinds of attacks on data in transit, we’re going to look at using secure protocols that guarantee confidentiality and integrity of data. In the following two sections, we’ll see how to use secure protocols for transferring data into and out of AWS as well as how to enforce that all clients use secure protocols when interacting with your data.
7.3.1 Secure protocols for data transport
It is something of a golden rule in the security realm that you should never write your own crypto protocols. This is because it is really hard to come up with protocols that are completely secure. If you overlook some kind of attack (and there are a lot of different types of attacks) and have one vulnerability, it’s not mostly secure or almost secure; it’s insecure, and anything you transmit over that protocol is at risk. For this reason it is best to just use established data transport protocols when you want to send data securely in your application.
When you use existing secure protocols for transmitting data throughout your application, you guarantee the confidentiality and integrity of the data in transit. So all you need to do is use a secure transfer protocol like HTTPS or SFTP, or whichever protocol is appropriate, when sending data. In fact, if you’re transferring data using the AWS CLI or SDKs, like when you put a file in S3 or read a record from a DynamoDB table, the AWS SDK automatically uses HTTPS. There’s nothing additional you need to do in those cases.
However, you still want to check that you’re using secure protocols in any cases where you’re transmitting data and not using the AWS SDK. For example, if you’re sending data to a third party, communicating with an RDS database instance, or sending data between two instances, you may be at risk of an attack if you do not use a secure protocol.
7.3.2 Enforcing secure transport
The last section advocated trying to use secure protocols where possible. We can take this a step further. In this section we’ll look at how to enforce secure protocols for communication, so there’s no risk of any client trying to connect using an insecure protocol. There are three general ways we can enforce this, and the method to use depends on the application and AWS services you’re using:
-
The first way is with IAM conditions, and this is used typically for forcing secure access to Amazon S3.
-
The second way is to configure security groups or other firewall rules to block insecure traffic. These rules are often applied at the subnet level and can generally be used for any resources that are configured to run in a VPC.
-
The last way is through an application-specific configuration and is used when you have something like an RDS PostgreSQL database, where you need to do additional setup to enable and enforce secure transport. This last case is highly specific to the individual application being used and won’t be addressed here. You will have to refer to the documentation for the application to see how to enable and enforce secure communications.
Let’s start with enforcing secure access to Amazon S3. Access to Amazon S3 over the AWS CLI/SDKs is secure by default. However, as I mentioned in the last section, there are additional ways to access S3 that are not. We can ensure that clients always securely access our S3 bucket by adding a Deny statement to the bucket policy when a secure protocol is not used. The policy shown in listing 7.2 is reproduced in the following listing.
Listing 7.18 S3 bucket policy enforcing secure transport for all actions
{
  "Version": "2012-10-17",
  "Statement": [
    {
      "Action": "s3:*",                     ①
      "Effect": "Deny",                     ①
      "Principal": "*",                     ①
      "Resource": [
        "arn:aws:s3:::MyBucket",            ②
        "arn:aws:s3:::MyBucket/*"           ③
      ],
      "Condition": {
        "Bool": {
          "aws:SecureTransport": "false"    ④
        }
      }
    }
  ]
}
① Denies access to all S3 actions for all users that meet the condition
② Replace with your bucket ARN.
③ The two similar resource lines are both needed. The first is for bucket operations, and the second is for object operations.
④ This condition matches any actions that are not using a secure transport protocol.
The key here is that we’re checking the aws:SecureTransport condition and rejecting any requests where that is false.
To enforce secure transport for resources within a VPC, we can tighten our security groups a bit further. For example, suppose we have a typical web server running on an EC2 instance that serves HTTP traffic over port 80 and HTTPS traffic over port 443. Our current security group allows inbound TCP traffic on port 80 and port 443. This is shown in figure 7.5.

All we need to do is remove the security group rule that allows traffic over port 80. This prevents any clients from actually accessing the web server over the insecure protocol.
This is only a simple block, but it will work for most cases. In some cases web servers are configured to serve HTTP traffic on a different port. In that case, you would want to block whichever port your application uses to serve insecure traffic. An alternative to blocking individual ports with security groups is to use a WAF to explicitly block traffic over HTTP. Refer back to chapter 6 for more information on configuring firewall rules with security groups and WAFs.
7.4 Data access logging
So far in this chapter we’ve primarily talked about how to prevent attacks against your data. While prevention is great, it’s also important to be able to detect when an attack happens and to determine the scope of that attack. You will not be able to do so, unless you have adequate access logs. In this section we’ll look at three different ways to gather access logs in AWS and how you can implement them. The first is S3 access logging, which is a feature built in to the Amazon S3 service. The second is CloudTrail logs, which we’ve talked about previously in chapter 4 and which we can use to track access to services like DynamoDB. The last is VPC Flow Logs, which tracks network traffic and can be used to record any access to data we store in a VPC.
Many of the examples in this section involve analyzing access logs from CloudTrail, S3, and VPC Flow Logs. Doing so requires having the logging services already enabled before you start, with some additional time to collect data. If you want to run the examples on your own account, consider enabling the services first, then come back later and try the analysis. This also highlights an often-overlooked aspect of secure access logging. You need to start logging before an attack happens!
7.4.1 Access logging for Amazon S3
Access logs for Amazon S3 are useful for tracking all requests made to an S3 bucket. If access logging is enabled, AWS will put all the access logs in an S3 bucket that you specify. It can be helpful to put the logs for all of your buckets into a single new bucket used only for collecting access logs. This keeps all the logs in a single location, to make them easier to find. It also keeps your logs separate from your data, which may have different access requirements. However, it’s important to note that access log delivery is delayed and best effort. This means it can take several hours before access logs will be available, and in rare cases, some log events may be lost.
All it takes to enable access logging for a bucket is to call the PutBucketLogging method. In the following commands, we’ll create a new S3 bucket to hold all of our access logs and then configure an existing bucket to put logs into the new bucket. Note that access logging is configured for each bucket individually. If you have multiple S3 buckets, you’ll need to turn on access logging for each of them separately, as shown in the following listing.
Listing 7.19 Commands to create an S3 bucket and enable access logging
$ aws s3api create-bucket
--bucket MyAccessLogsBucket                    ①


$ aws s3api put-bucket-logging
--bucket MyExistingBucket                      ②
--bucket-logging-status file://logging.json    ③

logging.json:
{
  "LoggingEnabled": {
    "TargetBucket": "MyAccessLogsBucket",      ④
    "TargetPrefix": "MyExistingBucketLogs/"    ⑤
  }
}
② We’re updating an existing bucket to start logging access, not the new bucket we just created.
③ The logging status is easiest submitted as a separate file in the same directory.
④ The target bucket is the destination for the access logs.
⑤ The target prefix is prepended to all access log file names. It is primarily used for organization.
Now, logs from the ExampleBucket should show up in the AccessLogBucket. You can verify this by making a request to the ExampleBucket (e.g., ListObjects) and then checking that logs were delivered to the AccessLogBucket. Recall that, in some cases, it can take several hours for logs to be delivered.
Now that we have access logs delivered, let’s see how we can use them. First, let’s look at the log format. Logs are delivered as objects in the specified S3 bucket with a key name that has the date, time, and a random string. Each component of the example key, 2020-07-04-09-00-00-202D373E5200FEDD, is shown in figure 7.6. The log objects may also have an additional prefix if you specified one in the access logging configuration.

Next, let’s look inside one of those log objects. The following listing is an example of a single entry within an S3 access log file.
Listing 7.20 An example S3 access log entry
79a59df900b949e55d96a1e698fbacedfd6e09d98eacf8
➥ f8d5218e7cd47ef2be                             ①
awsexamplebucket1                                 ②
[06/Feb/2019:00:01:57 +0000]                      ③
192.0.2.3                                         ④
79a59df900b949e55d96a1e698fbacedfd6e09d98eacf8f8  ⑤
➥ d5218e7cd47ef2be                               ⑤
DD6CC733AEXAMPLE
REST.PUT.OBJECT                                   ⑥
s3-dg.pdf                                         ⑦
"PUT /awsexamplebucket1/s3-dg.pdf HTTP/1.1"
200
- - 4406583 41754 28 "-" "S3Console/0.4" –
➥ 10S62Zv81kBW7BB6SX4XJ48o6kpcl6LPwEoizZQQxJd5qDSCTLX0TgS37kYUBKQW3+bPdrg1234
➥ = SigV4 ECDHE-RSA-AES128-SHA AuthHeader awsexamplebucket1.s3.us-west-
➥ 1.amazonaws.com TLSV1.1
① The request ID associated with the logged action
② The bucket that was operated on
④ The IP address of the caller
⑤ The request ID associated with the logged action
⑥ The action that was performed
⑦ The object that was operated on
While quite verbose, this log entry says that a new file called s3-dg.pdf was put into the location of /awsexamplebucket1/s3-dg.pdf. There’s some other information we can gather from this as well:
-
The call to
PutObjectwas authorized and successful, since the response code was 200. -
The user was authenticated using signature version 4, Amazon’s latest authentication mechanism.
For more information on the format of log entries for Amazon S3 access logs, see the documentation here: http://mng.bz/o2Gy.
Clearly, reading the logs manually like this would take a long time. However, there are a few ways we can speed up the process of searching or analyzing S3 bucket access logs. One way would be to sync the logs to your local machine and use a tool like grep to find log entries that match certain criteria. These commands will sync all the logs to your computer and search for log entries that contain PutObject calls, as shown in the following listing.
Listing 7.21 Commands to download and search through S3 access logs
① Sync the access logs in S3 to a local directory.
② Search for log events for PutObject actions.
However, syncing all of the logs to your computer can be time consuming. It can also be expensive due to data transfer costs if you have other files in the bucket, particularly large files. Another option is to use Amazon Athena. Athena is an AWS service that allows you to use SQL queries to search on data stored in Amazon S3. To start using Amazon Athena to search your S3 access logs, go to the Athena console. In the query editor, create a database and a table with a schema that mirrors the format of the S3 access logs. You can find the schema that matches the S3 access log format in the AWS documentation: http://mng.bz/nN2V.
Now, you can start making queries against the log data in S3. Let’s go through an example scenario. First, suppose an important object was deleted from your S3 bucket. The query shown in the following listing will show you which IAM user deleted the object and when.
Listing 7.22 Querying for a delete event
SELECT RequestDateTime, RemoteIP, Requester, Key
FROM s3_access_logs_db.mybucket_logs
WHERE key = ‘images/picture.jpg’ AND operation like ‘%DELETE%’;
Now, suppose that you want to see if that IAM user deleted any other objects. You can use the query shown in the following listing to answer that.
Listing 7.23 Querying for events where a specific user deleted from a bucket
SELECT *
FROM s3_access_logs_db.mybucket_logs
WHERE requester=‘arn:aws:iam::123456789123:user/user_name’;
7.4.2 CloudTrail logs for resource access
While Amazon S3 access logs give us detailed information about requests to S3 buckets, CloudTrail provides a similar service for all AWS services. With S3 access logs we were able to search for S3 requests made by a particular IAM user. With CloudTrail we can extend that even further and search for any requests made by a particular IAM user to any service. Let’s try that now.
Suppose we have an IAM user, arn:aws:iam::123:user/Alice, and we want to see all of the AWS actions performed by that user in the last 6 months. We can do this by searching through CloudTrail logs. To do so, you have to have enabled CloudTrail logs at least 6 months ago. If you haven’t, then the second best time to enable CloudTrail logs is right now. It can be done through the CloudTrail console or through the AWS CLI or SDKs. The following command will create a new trail.
Listing 7.24 Command to create a new multiregion trail in AWS CloudTrail
$ aws cloudtrail create-trail
--name "MyTrail"
--is-multi-region-trail
--s3-bucket-name "my-cloudtrail-bucket"
A trail defines which logs get recorded by CloudTrail. In the create-trail command, we created a trail that records actions to AWS services in all regions. The reason this captures all regions is because we passed the --is-multi-region-trail flag. Otherwise, the default is to capture events only in the region in which the trail was created.
Fast-forward a bit, and we have 6 months of log data recorded by CloudTrail. Now, we want to search on those logs. The first thing to know is that the logs are stored in S3, similar to S3 access logs, though the format of the log files is different. The following listing shows an example CloudTrail log entry.
Listing 7.25 Sample CloudTrail log entry
{
"eventVersion": "1.0",
"userIdentity": {
          "type": "IAMUser",
          "principalId": "EX_PRINCIPAL_ID",
          "arn": "arn:aws:iam::123456789012:user/Alice",   ①
          "accountId": "123456789012",
          "accessKeyId": "EXAMPLE_KEY_ID",
          "userName": "Alice"
   },
   "eventTime": "2014-03-06T21:01:59Z",
   "eventSource": "ec2.amazonaws.com",
   "eventName": "StopInstances",                           ②
   "awsRegion": "us-east-2",
   "sourceIPAddress": "205.251.233.176",
   "userAgent": "ec2-api-tools 1.6.12.2",
   "requestParameters": {                                  ③
          "instancesSet": {"items": [{"instanceId": "i-ebeaf9e2"}]},
          "force": false
   },
   "responseElements": {"instancesSet": {"items": [{       ④
          "instanceId": "i-ebeaf9e2",
          "currentState": {
              "code": 64,
              "name": "stopping"
          },
          "previousState": {
                 "code": 16,
                 "name": "running"
          }
   }]}}
}
① Identifies the IAM principal that performed the action
② The name of the action that was performed
③ The parameters that the user passed to the API call. Sensitive fields in the request parameters may be omitted from the CloudTrail logs.
④ The response returned by the service. Sensitive fields in the response elements may be omitted from the CloudTrail logs.
The example log entry in listing 7.4 has a lot of information, but there are just two fields that we’re interested in for our search. The first is the userIdentity.arn field. This uniquely identifies the IAM principal that made the API call. The second is the eventName field; this is the API call that was made, StopInstances, from the EC2 service, in this case.
Now, we can start our search. There are several ways we can search through CloudTrail logs. Downloading all of the CloudTrail log files and searching locally is one way. Using Athena to search, as shown in the previous section, also works. CloudTrail also provides some limited search functionality in the CloudTrail console. To perform a search, visit the CloudTrail console, and navigate to the Event History tab (figure 7.7).

To search for all actions performed by Alice, change the filter to User Name, and enter Alice in the following textbox. To expand the search to include the last 90 days, update the Time Range field as well (figure 7.8).
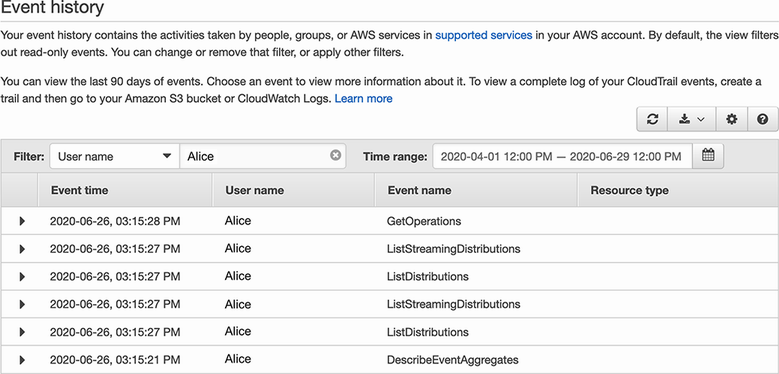
Figure 7.8 Search for actions performed by a single IAM user by filtering event history in the CloudTrail console.
7.4.3 VPC Flow Logs for network access
For some data within your AWS environment, access may not be controlled through AWS API calls and won’t be recorded by CloudTrail. However, if this data is stored within a VPC, then we can still record some access information with VPC Flow Logs. VPC Flow Logs is a service that records traffic going in and out of network interfaces within your VPC. One such scenario where your data is not controlled through AWS API calls and is in a VPC is when you use a service like Amazon Relational Database Service (RDS), which helps to set up various relational databases.
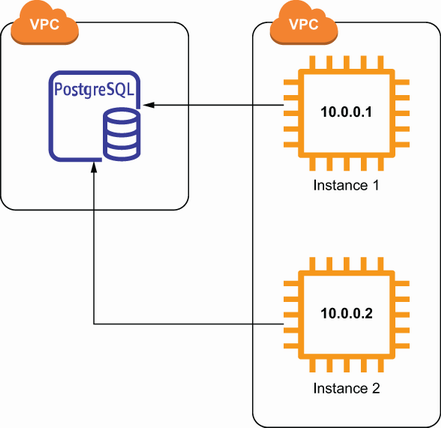
Suppose we have a PostgreSQL database running that we created with RDS. Let’s say that all of the traffic to that database should come from one of our EC2 instances, which have the IP addresses 10.0.0.1 and 10.0.0.2. Figure 7.9 depicts this scenario.
Now, imagine there was a security incident, and we want to know if anyone else accessed this database. How could we know whether anyone accessed this database? We can do this with VPC Flow Logs. Assuming VPC Flow Logs is already enabled for the subnet or network interface of our database, we can search the Flow Logs for records associated with the ENI of our PostgreSQL database. Then, we can inspect those remaining log entries for any source IP addresses that do not match the ones of our EC2 instances. Let’s do that now.
To start, we’ll enable VPC Flow Logs. This just requires running a single command to start recording flow logs for the VPC the database is running in:
Once the flow logs have been enabled for a while, and there has been some traffic to the database, we can start searching the logs. VPC Flow Logs are recorded in Amazon CloudWatch Logs. The quickest way to search CloudWatch Logs is to use the CloudWatch console. To get there, start by going to the VPC console and selecting your VPC. Under the Flow Logs tab at the bottom, there will be a link to the CloudWatch Logs group that contains your flow logs, as shown in figure 7.10.

Figure 7.10 Locate the CloudWatch Logs destination for VPC Flow Logs by selecting the Flow Logs tab in the VPC console.
From there, you can click the Search Log Group button. In the search field, enter the ID of the elastic network interface (ENI) attached to your PostgreSQL database. After searching, you should see a list of log entries that represent the network traffic to your database, similar to figure 7.11. In each entry, the first four elements are the version, the account ID, the ENI, and the source IP address.

Figure 7.11 VPC Flow Log events are shown in CloudWatch Logs. The source and destination IP addresses are the fourth and fifth elements of the log entry, respectively.
In this case we want to look at the source IP address. We can inspect each of these log entries and check whether the source IP address for any of the log entries does not match the IP address of one of our EC2 instances. If we find one that doesn’t match, then we know that someone else accessed our database.
NOTE If there are a large number of log entries showing in CloudWatch, this data can be exported into S3. From S3 you can download the files to your computer to perform the search, or you can use Athena to search the data in S3 like we did for the S3 access logs.
We’ve seen several tools and services for access logging in this section, and each has slightly different use cases. Table 7.2 summarizes the access logging options that were introduced and the types of information they would record.
Table 7.2 Access logging options in AWS
7.5 Data classification
While, ideally, we would use the highest level of protection for all data, sometimes that’s not feasible. If we have to make choices, it’s important to identify which types of data are more important to protect than others. Some examples of sensitive data that need a high level of security include the following:
If we’re storing any of this information, we probably want to enforce stricter security measures for this data compared to other, less sensitive data. One way to simplify this process of managing separate security measures is to come up with a data classification scheme. This scheme would have different levels of data and what security measures need to be implemented for them. An example data classification scheme is shown in table 7.3.
Table 7.3 A sample data classification scheme
Having this documented scheme makes it easy to know what security measures should be implemented for a given dataset. This promotes consistency across a large application, where different operators might otherwise have different standards for security controls.
7.5.1 Identifying sensitive data with Amazon Macie
Consider again the example data classification scheme shown in table 7.3. In this case it’s clear from your data what you need to implement. For example, if the data has PII, then you need to encrypt the data at rest and enforce access using TLS. However, if you already have a lot of datasets, and you want to verify that each one is meeting the security requirements for the respective data classification level, that’s not so easy. You would have to look at all of the data to check whether it contains fields like names, email addresses, and others to determine its classification level. And only after you’ve checked the classification levels of the data can you verify that the security controls are correctly applied. This can be very time consuming if you have a lot of data. This problem is even worse if you have to meet certain compliance standards. Compliance regimes like PCI and HIPAA have certain data classification requirements that can be quite complex.
This is where Amazon Macie can help. Macie is a service that can automatically discover sensitive data in S3. Rather than having to manually search for any PII in your S3 buckets, Amazon Macie can periodically scan your data and alert you when it finds something sensitive. This is useful if you have compliance requirements around storing sensitive data, and you want to ensure that you’re only storing that data in intended buckets with appropriate access controls. It can also help you to identify which S3 buckets or objects may be misconfigured. Even if you don’t do either of those things, it is still useful as a tool for understanding where sensitive data lives in your application.
We can test out Amazon Macie by creating some sample sensitive data files in S3, then enable Macie’s sensitive data discovery feature and see if it can find it. We’re going to do the following:
-
Create a sample CSV file with fake PII, like first and last names, email addresses, and IP addresses.
-
View the results of the job, and see that it discovered our fake data.
For the first step of generating fake data, we can use a tool called Mockaroo (https://www.mockaroo.com/). Mockaroo allows you to generate random data files in a specific format. The default settings on Mockaroo generate a CSV file with first names, last names, email addresses, and IP addresses. That’s perfect for this use case. Click the Download Data button, and upload the resulting file to your S3 bucket. An example set of random data generated using this tool is shown in table 7.4.
Table 7.4 Randomly generated set of personally identifiable information
To enable Macie, you need to go to the Macie console. Once there, you just need to click the Enable Macie button. In addition to enabling the service, it also creates the IAM roles that are necessary to use the service. From there, we can move on to step 3, which is creating a sensitive data discovery job. To do this, choose S3 Buckets in the navigation bar. Select the check box next to the S3 bucket you put the fake data file in. Choose Quick Create. Enter a name for the job. Finally, click Submit to run the data discovery job. This job will scan all of the objects in the S3 bucket you chose. If there are a lot of objects, this may take some time. You can check on the status of the job in the Macie console in the Jobs tab. Figure 7.12 shows the Jobs tab of the Macie console and the information given for a running job.

Figure 7.12 A running data discovery job is shown in the Macie console. The page shows the status and other metadata about your jobs.
After a short period of time, you can check your Macie findings. These are available in the Macie console under the Findings tab. You should see findings related to the randomly generated data file having sensitive information. Specifically, you should see a finding with the type SensitiveData:S3Object/Personal, which indicates there is personal information in the bucket. The findings in the Macie console are shown in figure 7.13. Now, you can follow the same steps on other S3 buckets in your account to detect whether you have sensitive data stored anywhere else.

Figure 7.13 Security findings in the Macie console. Sensitive data findings are shown, which indicate personal information is being stored in the scanned S3 bucket.
Now that you’ve seen some of the key ideas surrounding data security, we’re ready to move into secure logging and auditing of an AWS environment. In the next chapter we’ll look at securing and centralizing application logs, maintaining audit trails for important actions, and using that information to detect and respond to attacks.
Answers to exercises
A. An attacker deleting objects from an S3 bucket
C. An attacker modifying a record in a PostgreSQL database
7.2 A. Encryption at rest protects data confidentiality.
7.3 B. Using secure protocols for transmitting data
7.4 Logs are important for detection and investigation.
A. A user creates a bucket in Amazon S3.
C. A user deletes an Amazon RDS database.
Summary
-
Data flow diagrams help you identify potential points where data can be compromised in your application and how you can mitigate them.
-
The AWS Key Management Service integrates with many other AWS services and allows you to easily encrypt data at rest, protecting the confidentiality of your data.
-
Service-specific backup features, like S3 versioning and DynamoDB point-in-time recovery, make it easy to implement backup solutions to mitigate tampering attacks.
-
Secure protocols protect the integrity and confidentiality of data in transit. Enforcing the use of secure protocols protects against certain network attacks, like a man-in-the-middle attack.
-
Data access logs are critical for maintaining data integrity and responding to attacks. CloudTrail, CloudWatch Logs, VPC Flow Logs, and S3 access logging all make it easy to collect detailed data access logs.
-
Amazon Macie can discover and alert you to sensitive data stored in Amazon S3, which helps to ensure that sensitive data always has the appropriate security controls.