
11 Securing a real-world application
- Identifying potential threats against an application based on the architecture and data flow
- Evaluating proposed mitigations based on business risk and level of coverage
- Implementing safeguards for common threats against web applications
- Implementing an authentication and authorization flow using Amazon Cognito
In this chapter we’re going to take what we’ve learned throughout this book and see how we can apply it in a realistic scenario. We’ll start by introducing a sample application and identifying the key areas where we need to apply better security practices. This involves examining the architecture, identifying potential threats, and coming up with potential mitigations for the highest-risk threats. We’ll also see how to implement some of those mitigations. At the end we’ll dive deeper into one of the trickiest parts, application access control, and implement that end to end.
11.1 A sample application
Imagine this: With all the AWS security knowledge you’ve built up, you’re now in charge of security for a new social media company. The company has a photo sharing application like Instagram, hosted on AWS, and they want you to beef up their security. Where do you start?
First, it’s probably best to dive into the application to see how it works. There are a few things you’re going to need so you can understand what you’re working with, starting with the following:
Once you have those, then you can start thinking about how to secure it. So let’s get those out of the way.
11.1.1 Diving into the application
Let’s go through the actions a user can perform in this application. First, we have the basic access management actions:
Now, the way this photo sharing app works is that you upload photos and they show up on your page. So let’s define a few more actions that you can perform:
With this you can view your own photos, but it’s not really a photo sharing app yet. You need a way to search for other people and view their photos. In this application you have two different types of accounts: public and private. To view the photos of a public account, you just have to follow them. However, to view the photos of a private account, you need to send a follow request, which the account holder can accept or reject. Let’s see the actions you have for this:
To simplify, we’re going to limit the features of the application to just the actions that have been listed. Now that you know what the application does, let’s look at a high-level architecture diagram, so you know what you’re working with (figure 11.1). At a high level, you’re using the following services:

There are quite a few resources in that diagram, so let’s break it down into a couple parts. First, let’s look at the data storage pieces. We have a few DynamoDB tables. One is for storing user account information. Another is for storing the follow relationships. The last one is for storing photo metadata. We also have S3 buckets for storing the actual photos, and then there’s another S3 bucket that stores the frontend assets, like the HTML, JavaScript, and CSS files that make up the website. These are served to clients through CloudFront. This section is reproduced in figure 11.2.
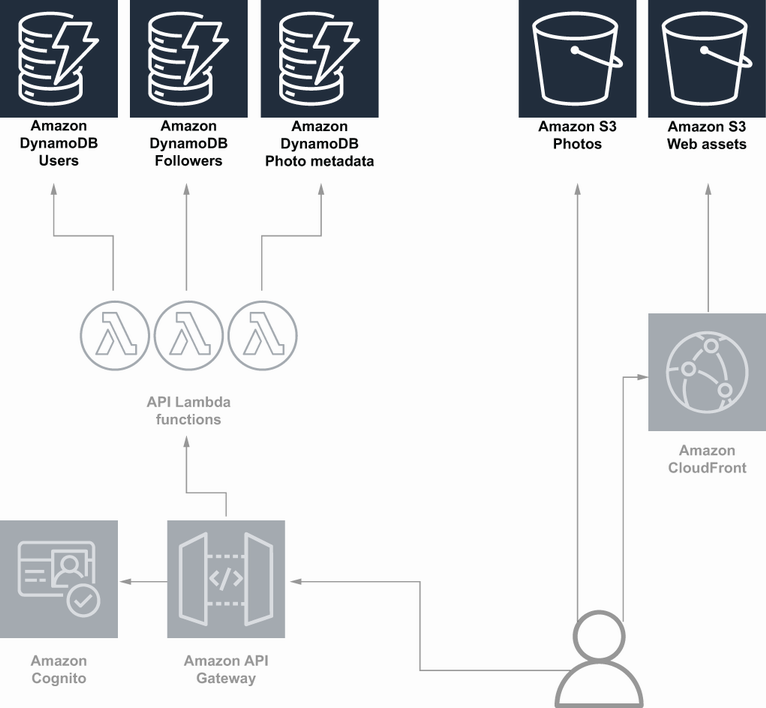
Figure 11.2 The storage components highlighted in the architecture diagram for a simple photo sharing application
Then we have the API layer, shown in figure 11.3. Here we have all the customer-facing and internal APIs fronted by API Gateway and backed by Lambda functions. Also in this diagram, we have Cognito. Recall that Cognito is an AWS service for handling user accounts, simplifying some of the work around sign-up, sign-in, and access control.

Figure 11.3 The API components highlighted in the architecture diagram for a simple photo sharing application
Now, we have a good idea of the architecture that we’re working with. One last thing we need before we can start our threat model is a data flow diagram. You can probably guess what this is going to look like, but let’s take a look at a data flow diagram for one of the key actions (figure 11.4).

Data flow diagrams like this help us understand how the architecture fits together and how data is being passed around. Many of the data flow diagrams will be quite similar to this one, and we’ll revisit some other data flow diagrams as we go, but for now, let’s get started on the threat model.
11.1.2 Threat modeling
There are numerous ways to do threat modeling, but many of them start with a common step of identifying potential threats. What are some potential threats for our photo sharing application? This can be a difficult question if you don’t have a lot of experience with the applications you’re working with, or if you haven’t spent much time thinking about security threats before. One way to get ideas for potential threats is to start with common categories of threats and think about what specific instances could apply to your application. For example, in chapter 4 we talked about a common threat modeling acronym: STRIDE (spoofing, tampering, repudiation, information disclosure, denial of service, elevation of privilege; see https://en.wikipedia.org/wiki/STRIDE_(security)). Those are categories of threats that we can use to identify potential issues in our system. Another source of categories of threats, specifically for web applications, is the Open Web Application Security Project (OWASP) Top 10 (see https://owasp.org/www-project-top-ten/). The Top 10 is a list of common web application security risks, shown here:
Let’s use some of the items in this list to come up with threats for our photo sharing application.
We’re going to start with injection. Injection attacks are where user-supplied data is interpreted as part of a query, and malicious users craft requests that cause those queries to behave in an unintended manner. SQL injection is perhaps the most common, but anywhere that commands or queries use input from users, there’s a potential for an injection attack.
Our photo sharing application has actions that take user input to perform a query against DynamoDB. The Search for Accounts feature, for example, allows the user to type a name, and it queries for users that match that name. Since we’re supplying user input to a database query, we have the potential for an injection attack. In this case, it would be considered a NoSQL injection. Let’s look at an example of how a NoSQL injection attack might work against a vulnerable application that queries DynamoDB.
Imagine we have the following scenario for the feature to search for users. When you’re searching for users, you can either search by their name or by their email address. However, we don’t want private accounts to show up in the search. Imagine that, in the Lambda function, we have the following code that constructs the query to DynamoDB. The intent in this code is to take the search type that the user supplied, either by name or by email, and filter out the users who don’t match the search or whose accounts are private. However, the way this query is written makes it vulnerable to injection attacks:
search_type = params.get(‘search_type’)                                    ①
query_string = params.get(‘query_string’)                                  ②
accounts = table.query(
    FilterExpression=search_type + ‘ = :query_string AND private = false’  ③
)
① search_type is expected to be Name or Email.
② This is the string the user searched for.
③ This is intended to match the query string on the field the user supplied and only for nonprivate accounts.
One injection attack type would send a different type of search—not name or email. Any other data that’s in the users table here could be used to search on. For example, if we had phone numbers in the users table, an attacker could supply the name of the phone number column as the search type to search on that field.
Another injection vulnerability here is that a malicious user can bypass the private account filter. Consider what would happen if you passed part of an expression as the search type, rather than just a field name. Since the filter expression is just blindly concatenating strings, it will interpret whatever you put in as part of the expression. Therefore, we could use the following string as the search type:
The final filter expression would be the following:
The way the operators work for DynamoDB expressions, the above statement is effectively just checking whether the name matches the query string. So we’ve identified our first potential threat for our application: injection vulnerabilities in our search APIs. In the next section we’ll investigate options for mitigating this threat. For now, let’s continue looking for more threats.
Identification and authentication failures
The next category we’re going to look at is identification and authentication failures. Broken authentication is one area of this category that refers to allowing attackers to obtain credentials and authenticate as other users. For our photo sharing application, how could attackers gain access to another user’s account?
One way would be by credential stuffing. Credential stuffing is when an attacker has access to a large number compromised credentials for some other service or services, possibly from an old breach. The attacker then uses scripts or bots to test those credentials on lots of different sites. This attack works quite well because people tend to reuse their passwords across different applications. This is one potential threat that we can expect for our application.
Another potential threat is that attackers can brute force or guess passwords of normal users. This is also quite common. Troy Hunt’s Have I Been Pwned (HIBP) tool collects the data from many of the large customer account breaches. The tool shows that, as of this writing, it has found twenty-four million cases of people using the password 123456. It shows almost four million instances of the passwords password and qwerty. When people reuse passwords for multiple applications, or when they use simple, easily guessed passwords, the risk of compromise increases considerably. This is another potential threat that we should address for our application. We will look at options for mitigating for both of these threats in the next section on strong authentication mechanisms.
Another category of threats in the OWASP Top 10 is cryptographic failures. In addition to being common, it’s also one of the most publicized attacks. Often, when users’ sensitive data is not properly protected and gets exposed, companies are required to notify those customers. This is definitely an area you want to make sure you address.
One way our photo sharing application could be vulnerable is if we’re leaving photos unencrypted. A user might upload a photo to the site, but if we’re not enforcing that upload over a secure protocol, then the user could be at risk of a man-in-the-middle attack. Additionally, once we store the photo, there’s a risk that someone could gain access to that data store. We want to have protections that ensure that an attacker can’t view the photos just because they have access to the data store.
Different types of data have varying levels of sensitivity. For example, photos might be considered very sensitive, but photo metadata, like the ID of the user who uploaded it and when it was uploaded, might be considered less sensitive. We wouldn’t necessarily need to apply all of the same security measures we take for photos to photo metadata. In a later section on data protection we’ll look at some of these security measures we can take and how to figure out which types of data we should apply it to.
Whereas broken authentication refers to attackers being able to authenticate as other users, broken access control refers to an attacker’s ability to gain additional access or privileges without having to authenticate as another user. Let’s explore some ways this could happen in our application.
One way we might have broken access control is if the policies we grant to users are overly permissive. If the policies aren’t least privilege, then we’re granting more access than we intended to. For example, a user might be given some limited amount of access to S3 to view images. But if that policy were not scoped correctly, there’s a risk that users could gain unauthorized access to other users’ photos.
Similar to an incorrect policy, we could also set authorization incorrectly for our API gateway. The API gateway may have different methods with different authorization configurations. We have some user-facing APIs that use the Cognito authorizer, but we may have other authorizers as well. We could use IAM_AUTH for employee or admin-level APIs, and we may use no authorization at all for any public APIs that don’t require users to sign in. If these aren’t applied correctly, we risk an anonymous person having the same access as a user or a user having the access of an admin.
A final broken access control threat we face is with root or admin access. A lot of our access control depends on correctly scoped AWS IAM policies, but there’s a risk that someone might grant admin permissions to a policy. All of the rest of our access control is for naught if someone can gain access to our entire infrastructure. It’s not even just adding admin permissions to a policy that we have to worry about; there’s also the root user that’s created for managing every AWS account. Access to the root user needs to be closely guarded, so our access controls cannot be bypassed. We’ll address this and the other broken access control threats we’ve talked about in the next section on strong authentication and access controls.
Security misconfiguration is the issue I see most often in security incidents of applications running on AWS. The worst case of this is making data stores world readable. When I hear about a breach on AWS, my first guess is always a publicly accessible S3 bucket or database instance. We should be sure that we’re finding ways to prevent these kinds of security misconfigurations in our application.
In our photo sharing app, our two primary data storage services are DynamoDB and S3. Misconfiguring DynamoDB is a possibility, but making it world readable isn’t possible, and we’ll cover most of the other security configurations in the section on data protection. Instead, let’s look at risks for misconfiguration of S3. We can imagine that the website is loading a photo on a page. To make the site as performant as possible, we might want to let the client call S3 directly to get the image data, rather than having a layer of indirection between the client and S3. However, we need to open up S3 permissions in a way that allows end users to access photos in certain situations but doesn’t allow unauthorized access.
I’ve seen many situations like this where the end result is the S3 bucket getting opened up to the world. Sometimes well-intentioned developers will apply a randomized naming scheme to hide the buckets or the objects. Having a long random name for the bucket or the object means that an attacker can’t find the objects, even if they’re world readable, the thinking goes. However, this has been exploited over and over again. Teams of security researchers do extensive scanning for public buckets and find these kinds of issues all the time. And that’s just from white-hat security professionals. You can bet that there are attackers doing the same thing; they just aren’t publishing their results.
Cross-site scripting refers to the ability of an attacker to exploit an application to run malicious code on another user’s browser when they’re interacting with the application. For example, imagine that our application rendered a user’s username as raw HTML on their profile page. An attacker could make their username <script src=evil .com/exploit.js />. When another user came across their profile, it would load the malicious script. That script then runs in the user’s browser and can access that user’s data and interact with the application as that user. Cross-site scripting is just another type of injection attack, but instead of injecting custom queries or commands to the application backend, this attack is injecting custom code into another user’s environment. The best way to prevent these kinds of attacks is with input sanitization and serialization. However, those aren’t specific to AWS, and mistakes can still be made. So, in a later section, we’ll look at a second line of defense against cross-site scripting attacks.
Security logging and monitoring failures
The last category of threats we’re going to look at is security logging and monitoring failures. Prevention of threats is key, but ultimately, you’re not going to be able to prevent every kind of attack. You should also think about how you’re going to identify and respond to attacks that do happen. Without good logging and monitoring you’re going to have a very difficult time with incident response.
We should think about areas in our application where, if we didn’t have good logging or monitoring, they would hinder our ability to detect or address an attack. One case would be if we didn’t have logs for access to sensitive data and APIs. In the broken access control section, we talked about the possibility of a user being able to access an API that was intended for admins. What would happen if we didn’t have logs for that API? We wouldn’t be able to see which users had accessed the API. We would have no idea how often it was accessed. It would be impossible to tell what the impact of the vulnerability was. With good monitoring, we might have even been able to detect the issue earlier.
Now that we’ve identified these threats, the next thing we’ll want to do is to come up with strategies to mitigate the threats. In section 11.2 we’ll look at how we can implement strong authentication and access control mechanisms to mitigate the threats from the broken authentication and broken access control categories. Then, in section 11.3, we’ll focus on data protection strategies. This will help to prevent or minimize the threats we identified in the sensitive data exposure, security misconfiguration, and insufficient logging and monitoring categories. Lastly, in section 11.4, we will explore web application firewalls as a protection against the threats from the injection and cross-site scripting categories.
11.2 Strong authentication and access controls
In the previous section we identified several potential threats to our application specific to authentication and access control. As a reminder, those threats were
In this section we’ll identify mitigations for each of these threats and see how they can be implemented.
11.2.1 Credential stuffing
Recall that credential stuffing is when attackers take leaked credentials from another application and try to use them to gain access to our application. This attack makes use of the fact that many people reuse passwords across applications. Let’s think about a few ways that we could mitigate this threat.
The attack involves trying a large number of credential pairs to find a few that work. These credentials typically come from breaches of other applications, when many users’ credentials have been posted publicly or sold. Because of this, we could put in place some rate limiting or IP blocking when we find an unusual number of failed login attempts with different credentials. This works because the attacker has a huge number of potential credentials and has to try out a lot of them to find some that work. This would partially mitigate the threat, but attackers could distribute the attack or use other techniques to make it look like they’re sending requests from different sources. There’s also the potential that we block legitimate user access with this approach. If we’re just looking at IP addresses, we could accidentally block large corporate networks that many users are connected to. For example, if a lot of your users are college students, and they’re connected to the campus Wi-Fi, you might end up blocking or rate limiting all of their access when a couple users mistype their password.
Another option would be to use multi-factor authentication (MFA). The credential-stuffing attack has one authentication factor, but only a legitimate user would have access to the second factor. Our photo sharing application uses Cognito user pools to authenticate users. You can configure a Cognito user pool to require MFA. The MFA options for Cognito are SMS and time-based one-time password (TOTP). The SetUserPoolMfaConfig method in the Cognito API can be used to enable this feature. But this still adds some difficulty to legitimate users, who now need to check a text message or use an app like Google Authenticator every time they want to sign in. Fortunately, Cognito has advanced security features that can help with this.
The first advanced security feature is called adaptive authentication. This allows you to configure what type of authentication is required for different risk levels of sign-in attempts. For example, for low-risk sign-in attempts, you could allow signing in without a second factor. A low-risk sign-in attempt might be a user signing into their account from a device that has signed into that account many times before. But for a high-risk sign-in, you could require MFA. A high-risk sign-in might be a sign-in from a new device with multiple failed password attempts. If the user has a second factor configured, they will be asked to provide it, and if they don’t have a second factor, the sign-in request will be blocked. Figure 11.5 shows the Cognito UI that lets you configure the adaptive authentication settings, and table 11.1 describes the adaptive authentication options.
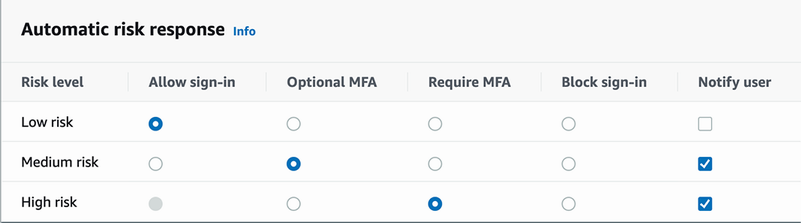
Figure 11.5 The Cognito Adaptive Authentication configuration screen, showing the options for high-, medium-, and low-risk login attempts
Table 11.1 Description of Cognito advanced security adaptive authentication options
The other advanced security feature we can use is compromised credential checks. With this feature, AWS checks against a large set of compromised credentials found from other applications. This can be configured to run every time a user signs in or just on events like sign-up or password change. When Cognito finds that a user’s credentials match one of the compromised credentials, you can force that user to change their password. This is useful for protecting against credential stuffing, as it’s essentially performing the credential stuffing attack yourself, except you’re doing it preemptively and having users change their passwords before an attacker can compromise the account. This isn’t a perfect solution to credential stuffing though, as attackers may have access to different sets of exposed credentials that AWS doesn’t have. However, it still mitigates some of the risk, and it’s an easy feature to turn on.
11.2.2 Brute forcing
The next threat is brute forcing, or guessing passwords. We mentioned rate limiting in the previous section, and that mitigation is relevant here too. If we can limit the number of wrong attempts that an attacker can make, we can reduce some of the risk of this threat. We discussed how to implement rate limiting for an API gateway in chapter 6. Let’s think about how we can improve on that mitigation.
Even with rate limiting, we still have the risk that users have really simple and easily guessed passwords. If you use password or 123456 as your password, an attacker may only need one or two guesses. We can mitigate some of this risk by enforcing more complex passwords. Cognito allows setting some complexity requirements on your user pool. You can set any of the following requirements:
This can help force users to set strong passwords. These password complexity requirements are not a silver bullet though. Password1! fits all of the requirements listed, but that doesn’t make it a good password. Still, this method is better than nothing, and it does usually make it more difficult to brute force passwords.
11.2.3 Overly permissive policies and incorrect authorization settings
Overly permissive policies and incorrect authorization settings threats are both a form of misconfiguration. In the case of overly permissive policies, we have IAM policy documents that grant permissions we did not intend. With incorrect authorization settings, we have API gateway methods that aren’t using the correct authorizer.
One of the easiest ways to prevent issues like this is to review the configurations. When you make changes to these settings, you should have another person double-check them. If these are managed via CloudFormation or some infrastructure-as-code tool, then this could be part of a regular code review process. Unfortunately, sometimes there are processes that you’re stuck doing manually. For manual update processes that have potential security risks or other negative impact, many organizations implement a two-person rule. This is where a second set of eyes is required before making these kinds of changes. Having that kind of second check can be useful for finding issues that might be missed by someone moving too quickly.
Out-of-band auditing of these configurations can be useful as well. It would be a good idea to periodically review the IAM policies applied to anonymous and signed-in users to make sure that they match expectations. Sometimes, bad changes can slip through the cracks. But also, sometimes applications change over time, and certain permissions become unnecessary. In that case, there was never a change to policy, so it didn’t show up in the code review or two-person review. Periodic audits can catch hidden issues like this. (Refer to chapter 4 for different ways to audit your IAM configurations.)
11.2.4 Inadvertent admin or root access
Any application has the threat of misuse of admin or root user permissions. The unlimited damage potential makes this threat particularly dangerous. For that reason we should find strong safeguards to prevent this type of issue. We can use AWS Config rules to help us here.
To prevent unauthorized admin access, we want to limit the number of policies that allow admin access. We can use the iam-policy-no-statements-with-admin-access rule to alert us whenever there’s a new policy with admin access. This way we know as soon as an admin policy is created, and we can take action. That action might be to remove the policy or to scope it down. We also might want to add stronger authentication to any users that have this policy. We can use the iam-user-mfa-enabled Config rule to alert us when users don’t have MFA enabled. If one of our admin users shows up here, we can fix that right away.
In addition to admin permissions that we create, we also need to concern ourselves with the root user. There are a few config rules that we can use to help here as well. The first is iam-root-access-key-check. This one checks whether there’s an access key associated with the root user. Anyone with the access key would be able to make API calls on behalf of the root user. This is definitely something that we want to check for, and we should remove the access key if there is one. Another Config rule we can use is root-account-mfa-enabled. Like the iam-user-mfa-enabled rule, this one checks that MFA is required for signing into the AWS console as the root user. The second factor reduces the risk of an attacker compromising the root user and gaining access to your entire infrastructure.
We’ve come up with mitigation strategies for the authentication and access control threats we identified. Now, let’s move on to the threats related to data exposure.
11.3 Protecting data
In our threat model, we identified the following threats:
While we will address these threats, we talked about another important point about data in our threat modeling exercise. That was that different data types can have different levels of sensitivity and require different security precautions. The example we mentioned before was that photo content might be more sensitive than photo metadata.
We’re going to have a lot of different standards of security that we apply here. To make this process more manageable, we can apply a data classification process. We can start by coming up with classifications and assigning all of our data types into one of those categories. Then, we can define and implement a set of mitigations for each classification.
11.3.1 Data classification
The first thing we’ll do here is come up with a set of classifications. A simple three-level data classification system that we can use has the following categories:
The categories are broken down in terms of the significance of exposure. The highly sensitive data category refers to information that would have significant impact if exposed. Photos of users with private accounts might be a good fit for this category. Exposure of this data is a significant privacy violation of the users and erodes trust in your application.
Sensitive data is anything that would have moderate impact if exposed. Certain types of photo metadata might fall into this category. For photos, the application stores the S3 object key as well as the ID of the user who uploaded it and the upload time. Exposing this information isn’t as significant as exposing photo content, but it’s still private information that you do not want to share publicly.
The final category, public data, refers to any content that would have no impact if it were released publicly. Usernames might fit into this category. Usernames are already accessible publicly in the application, and exposing usernames would have no additional impact.
Now that we have our categories and some examples, let’s assign different data types into these categories. The following table has data types, along with the data store, assigned to one of the three data classification levels. There isn’t necessarily a correct classification of the data, and it’s up to interpretation where these data types would fall.
Table 11.2 Data types broken down by classification
Let’s take these classifications and identify safeguards we can use to mitigate the threats to our data in the next section.
11.3.2 Highly sensitive data
This category represents the most sensitive data and has the biggest impact if exposed. This includes private photos, personally identifying information (PII), and follower/ followee relationships. What protections should we put in place for this data?
The first two threats we identified for highly sensitive data exposure were related to encryption of data at rest and in transit. Our first two rules for highly sensitive data could be that we require highly sensitive data to be encrypted at rest and transmitted only over secure transport protocols. For private photos, the data is stored in S3. For encryption at rest, we can configure default encryption for the S3 bucket where we store photos. The following command will update our bucket to encrypt new objects by default:
aws s3api put-bucket-encryption
--bucket my-bucket                        ①
--server-side-encryption-configuration
‘{"Rules": [{"ApplyServerSideEncryptionByDefault":
➥ {"SSEAlgorithm": "AES256"}}]}’
① Replace with the name of the bucket to encrypt.
For secure transport, we can use an S3 bucket policy. The aws:SecureTransport IAM condition lets us apply a rule based on whether or not the request uses a secure transport protocol. The following bucket policy will deny any requests to our photos bucket that don’t use secure transport:
{
  "Version": "2012-10-17",
  "Statement": [
    {
      "Action": "s3:*",                    ①
      "Effect": "Deny",                    ①
      "Principal": "*",                    ①
      "Resource": [
        "arn:aws:s3:::PhotosBucket",       ②
        "arn:aws:s3:::MyBucket/*"          ③
      ],
      "Condition": {
        "Bool": {
          "aws:SecureTransport": "false"   ④
        }
      }
    }
  ]
}
① Denies access to all S3 actions for all users that meet the condition
② Replace with your bucket ARN.
③ The two similar resource lines are both needed. The first is for bucket operations, and the second is for object operations.
④ This condition matches any actions that are not using a secure transport protocol.
We also have highly sensitive data stored in DynamoDB. This is the PII and the information on who is following whom. DynamoDB can be queried only over secure transports, so we don’t need to do anything additional to enforce encryption in transit. For encryption at rest, we can configure the table to automatically encrypt data with KMS. We can use the following command to create a table with encryption at rest enabled:
aws dynamodb create-table
  --table-name Followers
  --attribute-definitions
     AttributeName=Follower,AttributeType=S
     AttributeName=Followee,AttributeType=S
  --key-schema
     AttributeName=Follower,KeyType=HASH
     AttributeName=Followee,KeyType=RANGE
  --provisioned-throughput
     ReadCapacityUnits=10,WriteCapacityUnits=5
  --sse-specification Enabled=true,SSEType=KMS      ①
① This line enables encryption at rest with KMS.
Another threat we need to address is insufficient access logging of highly sensitive data. We talked earlier about how if there was unauthorized access of highly sensitive data and insufficient access logging, then we wouldn’t be able to identify the impact of the attack. Without logs, we might not even know that the attack took place.
Recall from chapter 7 that we can log access to DynamoDB tables and S3 buckets to CloudTrail. The actions that we’re interested in logging are considered data-plane operations, so we’ll need to take the additional step of enabling data-plane operation logging in our CloudTrail trail. Then, we’ll have access logs that we can view and audit when necessary.
One last threat that we identified for highly sensitive data is security misconfiguration issues. Since this is highly sensitive, and a security misconfiguration would have significant impact, this would be a good place to add monitoring to make sure we don’t have any misconfigurations. As we did with IAM admin access earlier, we can use Config rules to check for certain secure configurations here.
With highly sensitive data in S3, a common misconfiguration is making the bucket world readable. The s3-bucket-public-read-prohibited Config rule checks for this situation. If we enable this Config rule, we can get an alert whenever a bucket is made public, and we can fix it right away. Blocking public access isn’t the only security configuration though. We’re also interested in making sure that the data stores stay encrypted at rest and have backups or versioning. The following Config rules can provide monitoring for those cases (table 11.3).
Table 11.3 Config rules to monitor for security misconfiguration of highly sensitive data stored in S3 and DynamoDB
11.3.3 Sensitive data
For sensitive data, we’re talking about data that would have a moderate impact if it was exposed but not at the level of highly sensitive data. For this type of data, we have the same threats as with highly sensitive data, but we might not need to implement the same level of security measures, as the risk isn’t as high.
For encrypting the data, at rest and in transit, we still probably want to apply the same measures as with highly sensitive data. But for logging and monitoring, we can use less strict measures. For logging, we might not need the same level of access logging that we have for highly sensitive data. Rather than enabling data events for S3 and data-plane operation logging for DynamoDB, we could stick with just logging control-plane operations in CloudTrail. The control-plane operations are logged by default and will give us an audit trail for changes that were made to the configuration of our S3 buckets and DynamoDB tables. It doesn’t provide the same level of information, but it can still be used to identify certain kinds of attacks.
For monitoring of secure configuration, we might not need all of the same level of protections that we have for highly sensitive data. For example, you can imagine that certain sensitive data doesn’t have the same integrity requirements and wouldn’t need versioning or backups. The relevant Config rules for monitoring that would be unnecessary as well.
None of this is to say that you can’t go above and beyond and apply the highly sensitive data policies to sensitive data. You may actually want to enable point-in-time recovery, for example, on some sensitive, classified DynamoDB table for nonsecurity reasons. This is just defining minimum security standards for data types. It can act as a guide when you’re building and securing infrastructure and also as a checklist for performing security reviews or audits.
11.3.4 Public data
Public data is the least sensitive data that we store. This is usually information that’s publicly available anyway. If this data were exposed, it shouldn’t have any impact. We can get away with minimal required security configuration for these data stores, though it doesn’t hurt to apply the basics like encryption.
One thing we could focus on in this scenario is that we aren’t adding sensitive or highly sensitive data to these data stores. For example, in this application, we store public web assets in one S3 bucket. This is public data, and the bucket is publicly accessible to serve the site. We also store photos in a separate S3 bucket, a locked-down S3 bucket.
There’s a potential risk that we accidentally upload photos to the wrong bucket, and they end up being publicly accessible. We can mitigate this risk with tagging and bucket policies. Consider the S3 bucket policy in listing 11.1. This policy allows calling PutObject only if you also add the tag Classification/Public to that object. This would provide a second check against accidentally uploading photos to the wrong bucket. Not only would you have to specify the wrong bucket, you would also have to add a Classification/Public tag to your photo upload code, which should be a tip-off that something is wrong, as shown in the following listing.
Listing 11.1 Defending against sensitive data exposure with tags in policies
{
  "Version": "2012-10-17",
  "Statement": [
    {
      "Effect": "Allow",
      "Action": [
        "s3:PutObject"
      ],
      "Resource": [
        "arn:aws:s3:::awsexamplebucket1/*"
      ],
      "Principal":{
        "AWS":[
            "arn:aws:iam::account-number-without-hyphens:user/username"
         ]
       },
      "Condition": {
        "ForAllValues:StringLike": {
          "s3:RequestObjectTag/Classification": [
            "Public"
          ]
        },
        "ForAnyValue:StringLike": {
          "s3:RequestObjectTag/Classification": [
            "Public",
          ]
        }
      }
    }
  ]
}
You could also imagine doing this same kind of tag-based access control in the other direction—reads rather than writes. The APIs in our application are Lambda functions, which have an associated IAM role that they use for accessing other services. In the policies for these roles, you could restrict access to only the data classifications necessary for that API. For example, a search API might return only usernames, which we classified as public data. In the role for the Lambda function for that method, we could add a policy that limits access to only assets tagged Classification/Public. If this function then tried to access photos from S3, which would be tagged Classification/Sensitive, then the request would be denied.
11.4 Web application firewalls
There are two remaining threats that we identified in our threat model that we haven’t addressed. Those threats are
For both of these attacks, the best defense is typically made in the application code. Sanitizing untrusted input and escaping or encoding data when changing contexts go a long way toward preventing both of these attack vectors. But there’s still more that we can do.
Web application firewalls are a type of firewall that understands web traffic and filters based on the content of the request. Recall from chapter 6 that AWS WAF is a web application firewall from AWS that we can easily integrate with our API gateway. We can use AWS WAF to add a second layer of defense against cross-site scripting and injection threats, as well as many more that we haven’t talked about.
11.4.1 Cross-site scripting
AWS WAF provides a match type for cross-site scripting. This matches on values that are likely cross-site scripting attacks. A match type is used as part of a custom rule. The way custom rule creation works is that you specify which part of the request you want WAF to inspect, as well as the content type. Then, you select the match type—in this case, it would be Contains XSS Injection Attacks or XssMatchStatement if you’re using the API. After that, you can apply any appropriate text transformations that will be applied to the request before running the rule. Last, you select the action you want to take when the rule matches, which is usually to accept or reject the request. There’s also a Count option for the action, which records a metric of when this rule matches and doesn’t affect whether the request is accepted or rejected.
A sample configuration of the web ACL rule through CloudFormation or one of the APIs can be created using the JSON definition in the following listing.
Listing 11.2 Configuring a web ACL rule in JSON
{
  "Name": "Block_Cross_Site_Scripting",
  "Priority": 0,
  "Action": {
    "Block": {}
  },
  "VisibilityConfig": {
    "SampledRequestsEnabled": true,
    "CloudWatchMetricsEnabled": true,
    "MetricName": "Block_Cross_Site_Scripting"
  },
  "Statement": {
    "XssMatchStatement": {
      "FieldToMatch": {
        "Body": {}
      },
      "TextTransformations": [
        {
          "Type": "JS_DECODE",
          "Priority": 0
        }
      ]
    }
  }
}
To apply this rule to our application served by API gateway, we would first have to add this rule to a web ACL and associate that web ACL with our API gateway. Chapter 6 contains more in-depth steps for creating a web ACL with AWS WAF and associating it with different resources, including API Gateway.
11.4.2 Injection attacks
Like cross-site scripting, AWS WAF also provides a match statement for injection attacks. We can follow the same steps as before to create a rule that blocks injection attacks. The only difference is that we would use the SqliMatchStatement, or “Contains SQL Injection Attacks” match statement. Figure 11.6 shows the match statement configuration of this rule in the WAF UI. In the screenshot, you can see some of the options for configuring a SQL injection match rule. You can choose which part of the request you want to inspect, most likely the request body or the query string. You can also select a text transformation that allows you to preprocess the request before analyzing it. For example, if the query string is URL encoded, you can use a text transformation to decode the string before checking for a SQL injection match.

And the corresponding JSON definition of this rule is shown in the following listing.
Listing 11.3 Blocking SQL injection attacks with a web ACL rule
{
  "Name": "Block_SQL_Injection",
  "Priority": 0,
  "Action": {
    "Block": {}
  },
  "VisibilityConfig": {
    "SampledRequestsEnabled": true,
    "CloudWatchMetricsEnabled": true,
    "MetricName": "Block_SQL_Injection"
  },
  "Statement": {
    "SqliMatchStatement": {
      "FieldToMatch": {
        "Body": {}
      },
      "TextTransformations": [
        {
          "Type": "NONE",
          "Priority": 0
        }
      ]
    }
  }
}
You may have noticed that this is specifically for SQL injection attacks. Depending on the database you’re using, this may be fine. However, in our application we’re using DynamoDB, so SQL injection isn’t really relevant. Instead, we’re more concerned with NoSQL injection, specifically, ones crafted for DynamoDB. There isn’t an easy rule for this, but we can create one for specific scenarios.
Let’s consider the DynamoDB injection that we talked about earlier. A malicious user sent Name = :query_string OR Name as the SearchType parameter to a search request. By doing this, they are injecting in a DynamoDB filter expression. Since we expected the search type to be a word and contain only letters, we could match on requests that use : in the search type query parameter. The rule to do so is shown in figure 11.7.

Again, you can also use the JSON definition of this rule, shown in the following listing.
Listing 11.4 Blocking DynamoDB injection attacks with a web ACL rule
{
  "Name": "Block_DynamoDB_Injection",
  "Priority": 0,
  "Action": {
    "Block": {}
  },
  "VisibilityConfig": {
    "SampledRequestsEnabled": true,
    "CloudWatchMetricsEnabled": true,
    "MetricName": "Block_DynamoDB_Injection"
  },
  "Statement": {
    "ByteMatchStatement": {
      "FieldToMatch": {
        "SingleQueryArgument": {
          "Name": "search_type"
        }
      },
      "PositionalConstraint": "CONTAINS",
      "SearchString": ":",
      "TextTransformations": [
        {
          "Type": "URL_DECODE",
          "Priority": 0
        }
      ]
    }
  }
}
11.4.3 Scraping
So far we’ve primarily been focused on threats related to unauthorized access. But there are other kinds of threats that are malicious but not necessarily unauthorized. DoS is one example. A user may be authorized to make a particular request, but doing so in a certain way or at a particular frequency can become a problem. We’ve talked about denial of service in chapter 6, so I want to talk about a different threat here: scraping. Scraping is the process of automatically pulling data from your application. There are many benign reasons for scraping, but here we’re interested in malicious scraping. Imagine that for public users, their images and profiles can be seen without signing into the application. We might want this for any number of reasons; one could be that users are more likely to sign up if they can view some of the photos on the site first. However, this introduces a business risk if someone were to scrape all of the public images. Part of the value of our application is that we already have a lot of users and photos. If a malicious user can take all of our photos and put them onto a new site, we would lose some of our competitive advantage.
We can use a new feature of WAF to prevent this kind of activity. The feature is called Bot Control. Bot Control allows you to block traffic that AWS identifies as being from a bot. It also allows you to allow certain good bots. For example, you might want to allow search engine crawlers, like Google bot, access to your site. This way you can still drive traffic to your application through search engines.
Bot control is just another managed rule group you can add to your WAF web ACL. The web ACL definition in the following listing will enable Bot Control.
Listing 11.5 Enabling Bot Control with a web ACL rule
{
  "Name": "BotControl-WebACL",
  "Id": "...",
  "ARN": "...",
  "DefaultAction": {
    "Allow": {}
  },
  "Description": "BotControl-WebACL",
  "Rules": [
    {
      ...
    },
    {
       "Name": "BotControl-Example",
       "Priority": 5,
       "Statement": {
          "ManagedRuleGroupStatement": {
             "VendorName": "AWS",
             "Name": "AWSManagedRulesBotControlRuleSet"
          },
          "VisibilityConfig": {
             "SampledRequestsEnabled": true,
             "CloudWatchMetricsEnabled": true,
             "MetricName": "AWS-AWSBotControl-Example"
           }
        }
    ],
    "VisibilityConfig": {
      ...
    },
    "Capacity": 1496,
    "ManagedByFirewallManager": false
}
Once you have this web ACL running against your API gateway, all bot traffic should be blocked. In the AWS WAF console, you can see a dashboard that shows metrics around bot traffic and how much is blocked. Figure 11.8 shows an example of what this looks like.
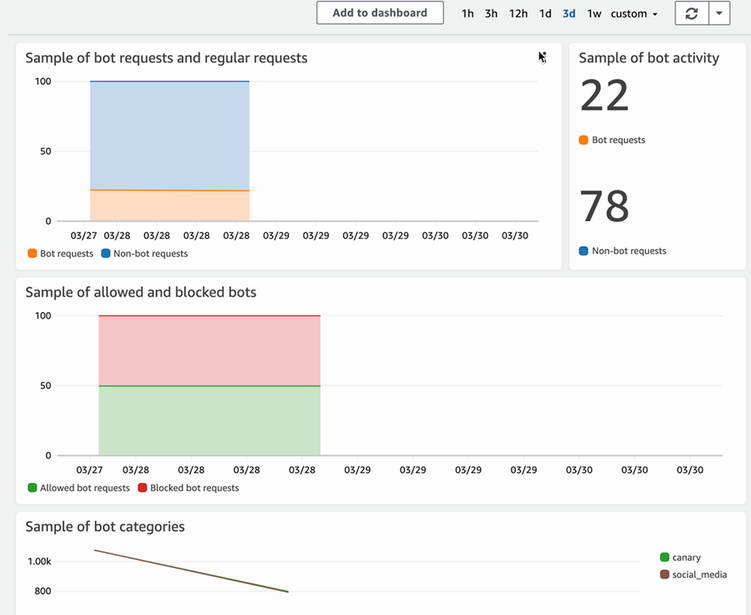
Figure 11.8 A sample dashboard for the Bot Control feature of AWS WAF, which shows high-level information about bot activity caught by the firewall
11.5 Implementing authentication and authorization end to end
We’ve talked through several common vulnerabilities in web applications and how we would secure them or mitigate the risk for our application. However, for all of these mitigations, we’ve assumed that we started with a somewhat secure setup, and we’re just patching up a few holes. That’s not always how it works though, and sometimes getting to that starting point can be more difficult. One place I’ve seen this especially is with authentication and authorization for an application. For the social media application we’ve been talking about, we mentioned that requests are sent to an API gateway backed by Lambda, and access is controlled by Cognito. Let’s see how we can set up an application like that.
11.5.1 Setting up Cognito
We’ll start with Cognito. To use Cognito for our application, we’ll first have to set up a user pool. This can be done using the wizard in the Amazon Cognito console, as shown in figure 11.9.

There are five steps to creating a user pool in the console, and we’ll go through the settings you can choose in each of those steps. The first step is configuring the sign-in experience. Here you’ll select which attribute you’ll use for signing in, and whether you’ll allow federated sign-in through another provider. In our case, we’re not going to use a federated provider, and our sign-in attribute will be email. These options are shown in figure 11.10.
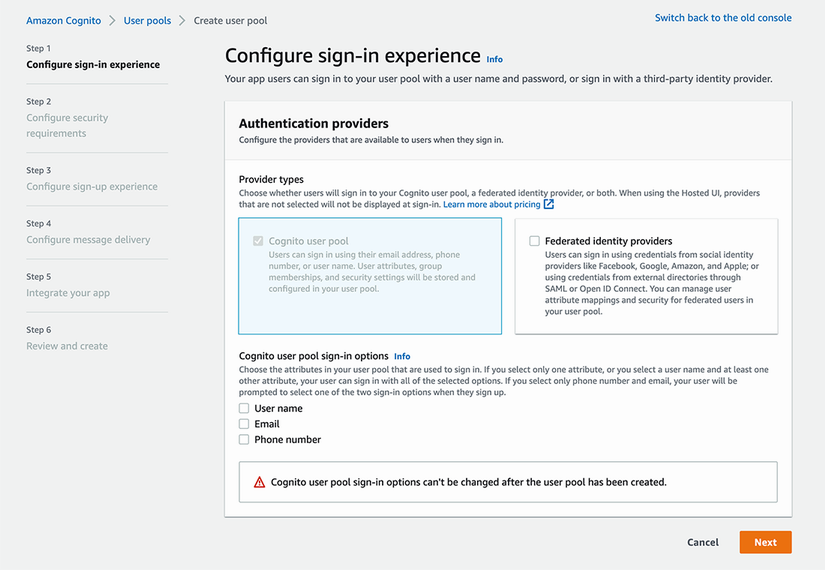
Figure 11.10 The first step in creating a Cognito user pool is selecting the authentication provider types and the sign-in attribute(s).
In step two, we select security options. The first option is the password policy. The default password policy enforces passwords to be at least eight characters and requires a number, a special character, and upper- and lowercase letters. It also expires temporary passwords in seven days. You can customize these settings, but we’ll stick with the default for our application. The next option is to configure MFA. For this application, we’re going to select the option for optional MFA with authenticator apps. Recall from earlier in this chapter that we can later change this to adaptive auth, which will let us require MFA for high-risk scenarios without requiring it for low-risk sign-in attempts. The last section in this step is configuring user account recovery. Here you can choose whether you want to allow a forgot-password flow in your application. We’ll enable this and select the option for recovery over email only. The other options are for SMS only, or both.
The next step is setting up the sign-up experience. Here we’ll choose a few options for how we want account registration to work. For our application, we’ll check the following options:
-
Enable self-registration. This option lets users register themselves. If this is not selected, the only way to create an account would be through federation or if an admin created a new account using the Cognito APIs.
-
Allow Cognito to automatically send messages to verify and confirm. This option will have Cognito send new users a verification code to confirm their account. Without this option, you’ll have to verify user accounts on your own.
-
Verify the following attributes: send email message and verify email address. This option tells Cognito to verify user email addresses. The other option is sending an SMS message to verify a phone number.
From there, we’ll move on to configuring message delivery. At this point we only see options for email message delivery, based on the settings we’ve chosen so far. However, if you had selected SMS for phone number verification or as an MFA option, then you would also see an SMS message delivery configuration here. For email configuration, we’ll choose to send email with Cognito. In production you would want to use Amazon SES to send email for higher volume and more choices for sender email addresses, but this option will make setup easier, and it can be changed later. You can select the region, sender email address, and reply-to address, but we’ll stick with the defaults for our application. This step in the Create User Pool wizard is also shown in figure 11.11.

Figure 11.11 When creating a Cognito user pool, you need to configure how messages are delivered for account registration, confirmation, and multi-factor auth.
Now, we get to the last step of choosing app-specific settings for the user pool. First, we set a name for the user pool. Then, we have a choice of using the hosted authentication pages. These are sign-up and sign-in pages hosted by Cognito that you can use for your application. You can even serve these under your custom domain. For this application, we’re going to enable the Cognito hosted UI, but we won’t use a custom domain to make it easier. The last piece of this step is choosing settings for your initial app client. We’re going to create a public client with the default settings. The only things you need to do are choose a name for the client, opt to generate a client secret, and set the allowed callback URLs. The callback URL is where Cognito will redirect after successful auth. We’ll use http://localhost as the callback URL for now, but we’ll change this later to an endpoint in our application.
Let’s test out the new user pool to verify that it’s working. In the Cognito console, you can navigate to your newly created user pool. Under the App Integration tab, go to the app client list. You should see the public client you made in step five of the user pool setup. There you can find the View Hosted UI button, which will take you to the sign-in page. Since we haven’t created an account yet, we’ll click on the sign-up link. Both the sign-in and sign-up pages are shown in figure 11.12.
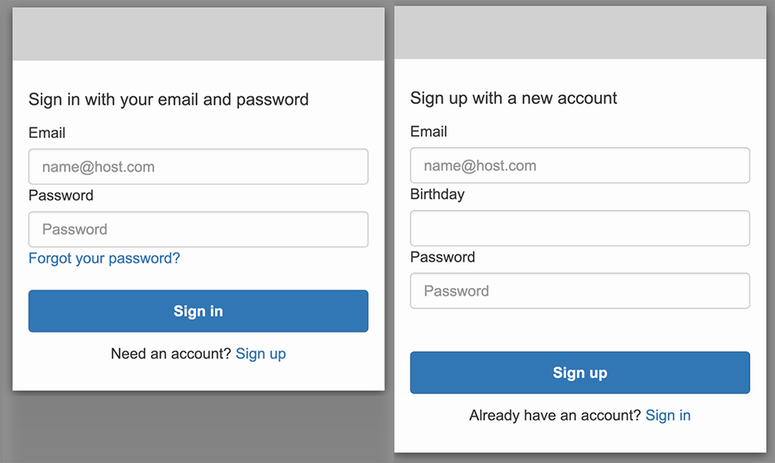
Try out the sign-up flow, and you should be taken to an email verification page. You should also have received an email with the verification code. Figure 11.13 shows the verification page and email that I received.

After you enter the verification code, you should be redirected to the callback URL you configured earlier, which was localhost:8080 if you followed the steps outlined. In the URL, you should also see a code parameter, which is the token that the client will use for auth to our application. For example, here’s the URL I was redirected to after registering: http://localhost:8080/?code=12345ab6-3f0b-4fb4-a6ee-1043793f979a. Now that you’ve registered, you can try the sign-in flow as well, and you should be redirected the same way. You should also see the new user show up in the Cognito console. Under the Users tab, you should see the new user you created, and the Confirmation Status column should show Confirmed, as in figure 11.14.

Figure 11.14 The Cognito console displaying the test user just created, showing that the email has been verified and the account is confirmed
11.5.2 Securing the API gateway endpoints
Now that we have a user pool, we can use it for authorization in our API gateway. To test this out, you can create an API gateway with a single GET method linked to a Lambda function. By default, the new API gateway method will have no authorizer set. The first thing we need to do is create a new authorizer. You can do this from the Authorizers tab in the left navigation bar.
To create a new authorizer, you need to choose a few settings. The first is whether this is a Lambda or Cognito authorizer. In our case, we’re using Cognito. The next option is for selecting the Cognito user pool you want to use. You should select the one we just created in the last section. Finally, set the token source as Authorization. This is the header you want Cognito to use to pass the token. You can leave the Token Validation option blank. The Create Authorizer flow is shown in figure 11.15.

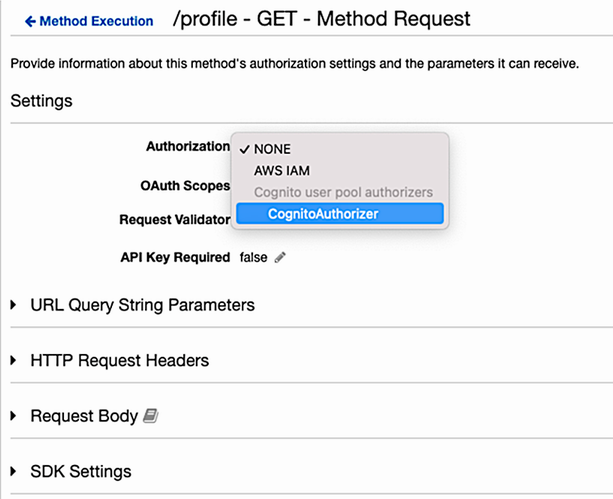
Once you’ve created the authorizer, you can use it in your API gateway. Go back to the Resources tab, and select the GET method you created. Select Method Request to change the authorization settings. Change the authorization field to the authorizer you just created, as is done in figure 11.16.
For these changes to take effect, you need to deploy the API. In the console, you can do this under Actions > API Actions > Deploy API. This will take you to the stage editor for the stage you just deployed to. At the top of this page, there’s an invoke URL for your API. Copy this URL. We can use cURL to test that the authorizer is working.
First, try just calling the endpoint without the authorization header, as shown in the following listing, and you should get an authorization error.
Listing 11.6 Testing an API gateway authorizer
$ curl https://xxxxxxxxxx.execute-api.us-west-2.
➥ amazonaws.com/Prod                             ①
Response: {"message":"Unauthorized"}
① Replace the URL with the invoke URL from API Gateway.
Now, try with the authorization header. Use the authorization token that was returned when you registered the test user with Cognito earlier. This should return a successful run of your Lambda function. If it does, then your Cognito authorizer is working, and only registered users can call your endpoint, as shown in the following listing.
Listing 11.7 Testing an API gateway authorizer with a Cognito auth token
$ curl https://xxxxxxxxxx.execute-api.us-west-2.
➥ amazonaws.com/Prod                  ①
   -H "Authorization: MY_AUTH_TOKEN"   ②
Response: "Hello, World!"              ③
① Replace the URL with the invoke URL from API Gateway.
② Replace MY_AUTH_TOKEN with the token you received from Cognito earlier.
③ The response should match whatever you expected from running your Lambda function.
Now, in your application, you can direct users to the Cognito hosted sign-up and sign-in flow. That will redirect users back to your application with an authorization code. Keep that code on the client side, and use it to authorize the user for your application endpoints.
Summary
-
Threat modeling helps to identify the most relevant, high-risk threats for your application.
-
Tools like common threat categories or threat acronyms like STRIDE can help you come up with potential threats quickly.
-
Categorizing threats helps to identify broad sets of mitigations or safeguards for your threats.
-
Classifying data can make it easier to define policies for data handling within an application.
-
Web application firewalls can provide a second line of defense against common attacks on web applications.
-
Amazon Cognito user pools can be used to authorize users for your application.