
Lesson 7: Using Patterns

You can easily create patterns in Illustrator and with some simple tweaking, you can rotate, scale, and reposition your patterns. In this lesson, you are introduced to the Pattern Options panel.
What you’ll learn in this lesson:
- • How to create a pattern
- • Editing a pattern
- • Using the Pattern Options panel
Starting up
Before starting, make sure that your tools and panels are consistent by resetting your workspace. See “Resetting Adobe Illustrator CC Preferences” in the Starting up section of this book.
You will work with several files from the ai07lessons folder in this lesson. Make sure that you have loaded the ailessons folder onto your hard drive from www.digitalclassroombooks.com/epub/illustratorcc. See “Loading lesson files” in the Starting up section of this book.
The Pattern Options panel makes creating patterns more manageable
Many designers and illustrators create patterns in Illustrator on a daily basis, but working with them in previous versions of the program was cumbersome at best. It was easy enough to create your objects, define the pattern, and then apply the pattern swatch to your illustration. But if you wanted to to edit the pattern it was difficult, and lining up a tiled repeat using a pattern swatch was often frustrating. In this lesson, you create a pattern and then edit it using the Pattern Options panel.
Creating a pattern
The Pattern Options panel offers a much greater level of control over your patterns. You can change the tile type, spacing, copies and more, depending on the settings you’ve chosen. You can dim copies of repeats (using a slider and percentage field) as you’re working on it, so you know you’re working on the original object. You can even interactively tweak the tiling using the Pattern Tile tool, which is accessible from within the panel itself.
To create a pattern in Illustrator:
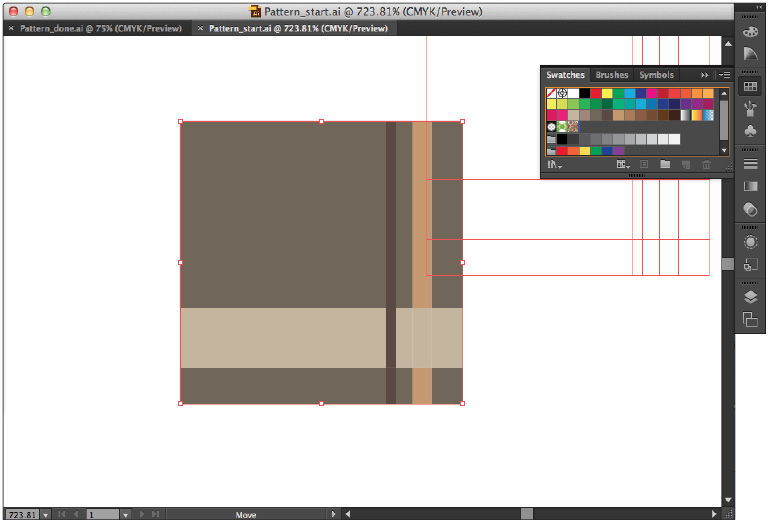
1 Choose File > Open, and open Pattern_start.ai from the ai07lessons folder. You create and apply a pattern to the jacket illustration in this exercise.
2 Choose File > Save As and save your file in the ai07lessons folder as Pattern_work.ai.
3 In the Save As dialog box, leave the file format set to Adobe Illustrator and click Save. When the Illustrator Options dialog box appears, click OK to keep all options at their default settings.
Typically you might use Illustrator’s drawing tools to create a pattern tile. For this lesson one has been created for you and stored in the upper left corner of the artboard.
4 Zoom in if necessary, and use the Selection tool to select all four pieces of the pattern tile.

Create a new pattern tile using Illustrator’s drawing tools.
5 To create the pattern swatch, choose Object > Pattern > Make.
Make a new pattern swatch from the tile using Object > Pattern > Make, or by dragging it into your Swatches.
6 Your pattern is now ready to be applied to the jacket.
 You can’t create a pattern tile from objects to which a pattern has already been applied. These objects will be rejected by the Swatches panel.
Applying a pattern
Once you’ve successfully created a pattern swatch from the tile you’ve created, you can use Illustrator’s Live Paint feature to easily apply it to your illustration.
To apply a pattern:
1 Choose View > Fit Artboard in Window to see the entire illustration, and click the jacket with the Selection tool to select it.
2 Select the Live Paint Bucket (![]() ) from the Tools panel hidden beneath the Shape Builder tool.
) from the Tools panel hidden beneath the Shape Builder tool.
3 In the Swatches panel, choose your newly-created pattern swatch by clicking it.
4 Move your cursor over the jacket, and when prompted, click once to create a Live Paint Group. The tiled pattern applies to the area of the jacket you’ve clicked on.
5 Continue to click with the Live Paint Bucket until all areas of the jacket are filled with your pattern. Note that the point of impact is the tip of the tool, not where the paint is dripping out of the bucket (as it was with earlier versions of Illustrator). Be careful not to click the strokes instead of the fills.

Apply your pattern to the illustration using the Live Paint Bucket tool.
6 Choose File > Save and keep this file open for the next part of the lesson.
 Be very careful not to click the strokes with the Live Paint Bucket tool. Zoom in very tight to avoid this common pitfall. You can undo any mistakes.
Editing a pattern swatch
Up to this point, the process you’ve used for creating and applying your pattern has been essentially the same as in previous versions. Unfortunately, the pattern swatch you’ve applied is much too large for the illustration, and needs to be edited. This is where you’ll start to see the benefits of using the Pattern Options panel.
To edit a pattern:
1 Double-click the pattern swatch you’ve created in the Swatches panel to access the Pattern Options panel, and to launch Isolated Pattern mode. You can also access these features by choosing Window > Pattern Options with your pattern swatch selected.
Experiment with different offsets and edit pattern contents with Pattern Options and Isolated Pattern mode.
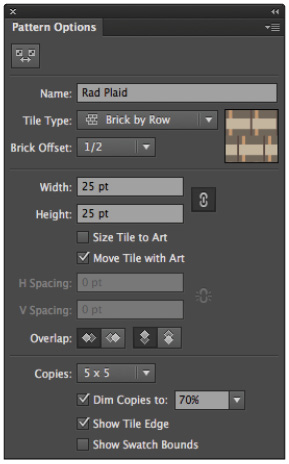
2 Inside the Pattern Options panel, type Rad Plaid into the Name field.
3 In the Tile Type pull-down, choose Brick by Row. The Tile Type options allow you to offset the position of your pattern tiles horizontally, vertically, or hexagonally. Choose 1/2 as the Brick Offset amount by row.
4 Click the Maintain Height and Width Proportions (![]() ) button to lock the width and height fields together proportionally. Then, in the Width field, type 25 pt, and press Tab to repeat the setting in the Height field. These settings will reduce the size of the objects within the pattern tile.
) button to lock the width and height fields together proportionally. Then, in the Width field, type 25 pt, and press Tab to repeat the setting in the Height field. These settings will reduce the size of the objects within the pattern tile.
 If the Width and Height fields are unavailable, uncheck the Size Tile to Art check box to allow customized sizing of the pattern tile’s contents. Activating Size Tile to Art will allow you to control horizontal and vertical spacing between the pattern tiles.
5 Alternatively, click the Pattern Tile Tool at the top of the panel (![]() ), and drag the pattern tile’s bounding handles to size the tile objects. Pressing and holding the Shift key will constrain the proportions as you drag.
), and drag the pattern tile’s bounding handles to size the tile objects. Pressing and holding the Shift key will constrain the proportions as you drag.
6 If your settings have caused an overlap of the pattern tiles, you can control this with the Overlap buttons below the Spacing fields. Leave this option at its default for this exercise.
7 Use the Copies pull-down to add repeats to your sample. Additional settings in this area control the visibility (dimming, edges and bounds) of these repeats. Again, leave these settings at their defaults for this exercise.
8 Accept your Pattern Options by clicking the Done button near the top of your document window. You will leave Isolated Pattern mode and return to your illustration, where you can see that your edits have been applied to the jacket illustration.
Editing a pattern in an object
The pattern swatch you’ve applied is a little too large for the parts of the illustration, and needs to be edited. To fix this you will use the Pattern Options panel.
To edit a pattern’s application numerically:
1 Use the Direct Selection tool to select the patterned fill of the jacket’s left lapel.
2 In the Tools panel, double-click the Rotate tool (![]() ) to access the Rotate dialog box.
) to access the Rotate dialog box.
3 Make sure that only the Transform Patterns check box (not Transform Objects) is checked, and check the Preview check box.

Transform the applied pattern numerically using the Rotate dialog box.
4 Enter 160 into the Angle field and click OK. You have rotated the pattern to match the angle of the lapel.
5 Repeat steps 1-5 to change the angle of the other lapel and the three pockets in the jacket illustration.
Editing a pattern's application visually
1 Using the Direct Selection tool, drag a marquee around the jacket to select it.
2 In the Tools panel, select the Scale tool (![]() ).
).
3 Press and hold the Tilde (~) and the Shift keys, and then drag from outside the illustration toward its center. The Tilde key restricts the scale transformation to the pattern, and the Shift key keeps the scaling proportional.

Pressing and holding the Tilde (~) key while dragging restricts any transformation to the pattern only.
4 Repeat step 3 until you are satisfied with the pattern scaling. For this example, the pattern was scaled down an additional 80%.
5 Choose File > Save and File > Close to save and close this file.
Self study
Experiment with some of the free patterns that come with Illustrator CC. Additional pattern swatches are available when you select the Swatch libraries button in the lower-left corner of the Swatches panel. Choose Patterns and then select from the listed sets.
Apply a new pattern to the jacket, and then experiment with changing the size and angle of your pattern. Also, open the Pattern Options panel and experiment with different designs and repeats.
Review
Questions
1 How can you easily create a pattern swatch?
2 What is one item that cannot be a pattern swatch?
3 What key can you press and hold to scale a pattern?
Answers
1 You can create a pattern swatch by clicking and dragging selected artwork into the Swatches panel.
2 You cannot make a pattern swatch from another pattern swatch.
3 You can press and hold the Tilde (~) key to scale your pattern and not affect the scale of the object that it is in.