
Lesson 10: Working with Symbols

Symbols make it easy to repeatedly use objects throughout an Illustrator project and even across multiple documents. Symbols can be imported, transformed, colored, and edited with the tools built into the Symbols panel, which you will discover in this lesson.
What you’ll learn in this lesson:
- • Creating and editing symbols
- • Importing a symbol library
- • Using the symbolism tools
- • Editing nested symbols
- • Saving symbol libraries
Starting up
Before starting, make sure that your tools and panels are consistent by resetting your workspace. See “Resetting Adobe Illustrator CC Preferences” in the Starting up section of this book.
You will work with several files from the ai10lessons folder in this lesson. Make sure that you have loaded the ailessons folder onto your hard drive from www.digitalclassroombooks.com/epub/illustratorcc. See “Loading lesson files” in the Starting up section of this book.
Cleaning out the symbol library
When you create a new Illustrator document, the Symbols panel is automatically populated with a group of default symbols. These symbols are useful for certain applications, but not for the purposes of this lesson, so you will remove them and import a group of symbols provided in the ai10lessons folder.
1 In Adobe Illustrator CC, choose File > Open. In the Open dialog box, navigate to the ai10lessons folder and select the ai1001_done.ai file. Select Open. The completed lesson file appears. You can just take a look at the final project file and choose File > Close, or you can keep it open for reference throughout the lesson.
2 Choose File > Open. In the Open dialog box, select the ai1001.ai file, and then click Open. This Illustrator file contains a logo that you will use to create and modify a group of symbols.
3 Once the file opens, click the Symbols button (![]() ) in the dock on the right side of the workspace to open the Symbols panel. Click to select the first symbol in the panel, a red sphere.
) in the dock on the right side of the workspace to open the Symbols panel. Click to select the first symbol in the panel, a red sphere.

Select the first symbol in the Symbols panel.
4 While pressing and holding the Shift key, click the last symbol listed in the panel, a magnifying glass. This also selects all the symbols between the first and last options.

Shift+clicking the last symbol selects all the symbols between the first and last symbols.
5 Click the Delete Symbol button (![]() ) in the lower-right corner of the Symbols panel to delete the default symbol library. A dialog box appears, asking you to confirm that you want to delete the selected symbols. Click Yes.
) in the lower-right corner of the Symbols panel to delete the default symbol library. A dialog box appears, asking you to confirm that you want to delete the selected symbols. Click Yes.
6 Choose File > Save As. In the Save As dialog box, name the file ai1001_work.ai and click Save. When the Illustrator Options dialog box appears, click OK. Keep the file open for the next part of the lesson.
Creating symbols
Once you have cleaned out the symbol library, you can begin to populate it with your own creations. You can make symbols from any piece of art that you create in Illustrator, and even from embedded bitmap graphics. The only limitation is that you can’t use linked graphics to create symbols. You have to embed them in order to create a symbol from them.
 You can embed a bitmap graphic into an Illustrator file by choosing File > Place, then selecting the image in the Links panel. After selecting the image in the Links panel, choose Embed Image from the Links panel menu.
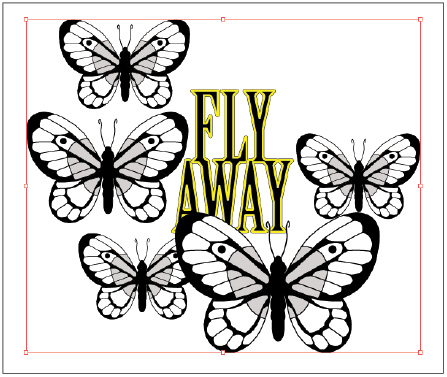
1 Use the Selection tool (![]() ) to select the Fly Away logo with the double (white/black) outline in the document. Drag and drop it into the now-empty Symbols panel. The Symbol Options dialog box appears.
) to select the Fly Away logo with the double (white/black) outline in the document. Drag and drop it into the now-empty Symbols panel. The Symbol Options dialog box appears.

Turn the Fly Away logo into a symbol by dragging it into the Symbols panel.
2 In the Symbol Options dialog box, type Fly Away Logo in the Name text field. Choose Movie Clip from the Type drop-down menu, and click the center point of the Registration bounding box. Click OK.

Determine the settings for the new symbol.
 With the exception of the Name text field, the options in this dialog box deal with how the symbol will be treated if imported into Flash.
The logo is now a symbol in your library, and the occurrence of the logo on the artboard is called a symbol instance. There is a parent-child relationship between the symbol in the library and its instances on the artboard. Any change to the parent, or master, symbol in your library cascades down to the children, or instances, on your artboard.
Editing symbols
The logo symbol that you have is not bad, but it is a good idea to test out various color combinations before settling on a final one. In order to experiment with variations of the symbol you have created, you will add a new symbol instance to the artboard, make it editable, modify it, and use it to create a new symbol.
1 From the Symbols panel, drag the logo symbol onto the artboard, creating an instance somewhere away from the other graphics that are already in the document.
2 Click the Break Link button located at the top of your screen in the Control panel. This process, called expanding, breaks the link of the instance to the parent and makes the instance fully editable. You can also break a symbol by clicking the Break Link to Symbol button (![]() ) at the bottom of the Symbols panel.
) at the bottom of the Symbols panel.

Break the symbol instance’s link to the master symbol to make the instance editable.
3 With the logo still selected, choose Object > Ungroup. When the symbol was expanded, it was automatically converted to a grouped object; ungrouping it allows you to edit the strokes around the text.
4 With the logo still selected, click the Appearance button (![]() ) in the dock to open the Appearance panel, and the double-click the Contents element. The Appearance panel tells you that you are working with a compound path that has a black fill color and two strokes, one white and one black, applied to it.
) in the dock to open the Appearance panel, and the double-click the Contents element. The Appearance panel tells you that you are working with a compound path that has a black fill color and two strokes, one white and one black, applied to it.
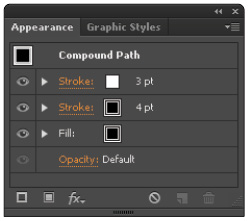
The Appearance panel details the selected symbol’s components.
5 In the Appearance panel, click the first listing, the white, 3-point outside stroke, to edit it. By selecting this listing, you’ve activated the color panel and stroke setting, both of which you can access and use to implement changes directly from the Appearance panel.
6 Click the Stroke color swatch next to the Stroke listing, and from the resulting Swatches panel, select the swatch named RGB Yellow.

The Appearance panel updates to reflect the change in the stroke’s color.
The stroke is now yellow.
7 Click the Symbols button (![]() ) in the dock to reopen the Symbols panel. Using the Selection tool (
) in the dock to reopen the Symbols panel. Using the Selection tool (![]() ), click and drag the new logo from the artboard to the Symbols panel.
), click and drag the new logo from the artboard to the Symbols panel.
8 In the resulting Symbol Options dialog box, type Fly Away Logo Yellow in the Name text field. Choose Movie Clip from the Type drop-down menu and select the center of the Registration bounding box. Click OK. You have just created another new symbol.
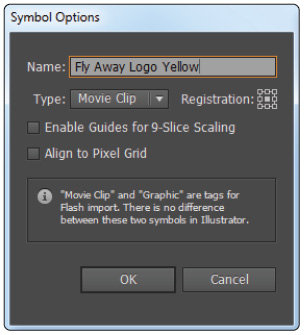
Name this symbol Fly Away Logo Yellow.
9 Choose File > Save to save your work.
Importing a symbol library
Symbols can be imported either from dedicated symbol libraries or regular Adobe Illustrator files. This is done from the Symbols panel menu.
1 In the upper-right corner of the Symbols panel, click the panel menu button (![]() ). From the menu that appears, choose Open Symbol Library > Other Library.
). From the menu that appears, choose Open Symbol Library > Other Library.
2 In the Select a Library to Open dialog box, navigate to the ai10lessons folder and select the butterflies.ai file. Click Open. A new panel named butterflies appears in the workspace.

A new butterflies panel full of butterfly symbols appears in your document.
 Symbol libraries are saved in the native .ai format. If you want to edit a library, all you need to do is open the file, add or remove content there, then resave the file over itself. External libraries like the one you just imported are not editable in your local document. For this reason, you must move the library contents into your Symbols panel.
3 Make sure that both the butterflies Library panel and the Symbols panel are visible at the same time. In the butterflies Library panel, Shift+click the first and last butterflies to select the panel’s entire contents.
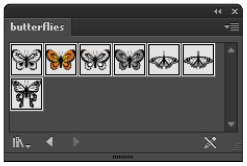
Select all the butterflies in the library.
4 Drag the selected contents from the butterflies Library panel to the Symbols panel. Once they are in the Symbols panel, they are treated exactly like the symbols you created locally.

Drag the symbols from the butterflies panel to the Symbols panel.
5 Close the butterflies Library panel, then choose File > Save to save your work.
Using the symbolism tools
As you have already seen, you can work with symbols by manually dragging them from the Symbols panel. Once they are on your artboard, you can move, rotate, and scale them individually using tools designed specifically for working with symbols. Now you will use these tools to add and manipulate symbols to create a new logo.
The symbolism tools allow you to create sets of symbol instances and then transform and edit them.
|
Icon |
Tool Name |
Use |
|
|
Symbol Sprayer |
The Symbol Sprayer tool can place multiple symbol instances, also known as a symbol set, on the artboard at once in a fashion like that of a spray paint can. You can edit symbol sets using the other symbolism tools. |
|
|
Symbol Shifter |
The Symbol Shifter tool moves symbol instances. |
|
|
Symbol Scruncher |
The Symbol Scruncher tool moves instances in a symbol set closer together or farther apart. |
|
|
Symbol Sizer |
The Symbol Sizer tool makes symbols in a set larger or smaller. |
|
|
Symbol Spinner |
The Symbol Spinner tool rotates symbols in a set. |
|
|
Symbol Stainer |
The Symbol Stainer tool colorizes symbols in a set. |
|
|
Symbol Screener |
The Symbol Screener tool adjusts the opacity of symbols. |
|
|
Symbol Styler |
The Symbol Styler tool is used to apply a style from the Graphic Styles panel to symbol instances. |
1 Open the Layers panel by choosing Window > Layers, or clicking the Layers button (![]() ) in the dock on the right side of the workspace.
) in the dock on the right side of the workspace.
2 So far in this lesson, you have been working on Layer 1, the default layer. Click the Create New Layer button (![]() ) at the bottom of the Layers panel. This creates Layer 2.
) at the bottom of the Layers panel. This creates Layer 2.
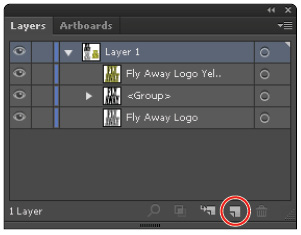
Create a new layer in the Layers panel.
3 Double-click the thumbnail for Layer 2 in the Layers panel to open the Layer Options dialog box. In the Name text field, type Logo. Leave all the other settings at their defaults and click OK.

Rename the layer.
4 Click the visibility icon (![]() ) to the left of Layer 1 in the Layers panel to toggle off the layer’s visibility. The document appears to be empty.
) to the left of Layer 1 in the Layers panel to toggle off the layer’s visibility. The document appears to be empty.
5 Open the Symbols panel by clicking its icon (![]() ) in the dock. Drag an instance of the Fly Away Logo Yellow symbol onto your artboard, then press Ctrl+Shift+A (Windows) or Command+Shift+A (Mac OS) to deselect the symbol instance.
) in the dock. Drag an instance of the Fly Away Logo Yellow symbol onto your artboard, then press Ctrl+Shift+A (Windows) or Command+Shift+A (Mac OS) to deselect the symbol instance.
 If you are not sure which symbol listed in the Symbols panel is the yellow logo, hold your cursor over each symbol and a tooltip appears with the symbol’s name.
6 Click and hold the Symbol Sprayer button (![]() ) in the Tools panel to view all eight available symbolism tools. To the right of the list of symbolism tools is a small tab. Click the tab to tear off these tools and turn them into a floating Symbolism Tools panel.
) in the Tools panel to view all eight available symbolism tools. To the right of the list of symbolism tools is a small tab. Click the tab to tear off these tools and turn them into a floating Symbolism Tools panel.
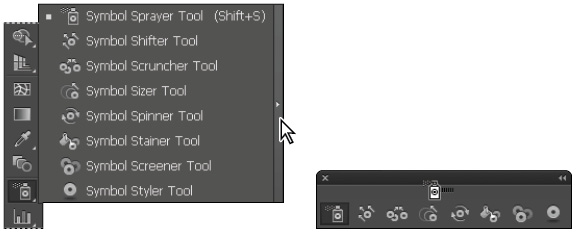
Click the tearoff tab to the right of the list of symbol tools to turn them into their own floating panel.
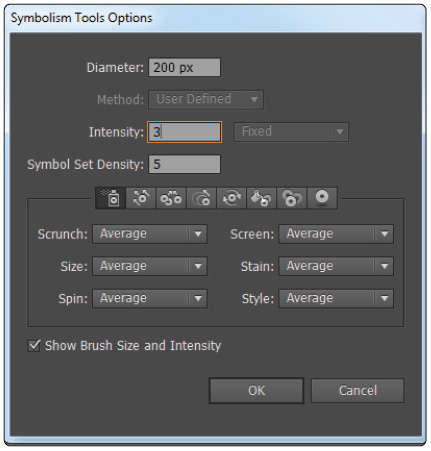
7 Double-click the Symbol Sprayer tool in the floating panel; this opens the Symbolism Tools Options dialog box. Change the intensity value to 3 by typing 3 into the text field. The intensity value specifies the rate at which the symbol sprayer creates symbols. Leave all other values at their defaults and click OK.
Set options for your symbolism tools.
 The symbolism tools all share a common options dialog box. The area at the top of the dialog box allows you to change the overall parameters of the brush that the tools use, while the field at the bottom of the dialog box allows you to view and edit the parameters of each individual tool.
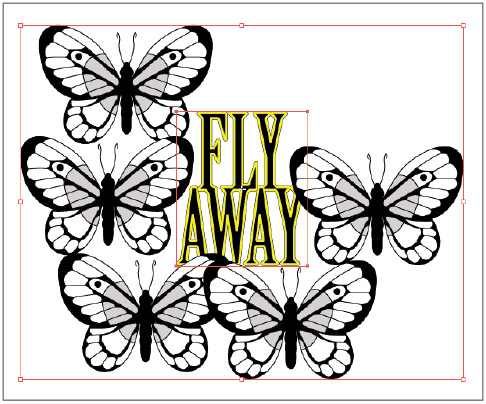
8 In the Symbols panel, select the butterfly symbol named butterfly_03. Notice your cursor, which now resembles a miniature spray paint can with a circular perimeter surrounding it. Click and drag from above and to the right of the logo symbol in a sweeping semi-circle around it. This creates a symbol set of multiple butterflies.

Use the Symbol Sprayer tool to create a butterfly symbol set.
 Depending on how long you press and hold your mouse, you might end up with more or fewer symbol instances than you see in the figure above. You can add symbol instances to the artboard by single-clicking where you’d like to add individual instances.
9 Double-click the Symbol Shifter tool (![]() ) in the floating Symbolism Tools panel. In the Symbolism Tools Options dialog box, type 8 in the Intensity value text field. This increases the strength of the tool and allows you to move the symbol instances more easily. Click OK.
) in the floating Symbolism Tools panel. In the Symbolism Tools Options dialog box, type 8 in the Intensity value text field. This increases the strength of the tool and allows you to move the symbol instances more easily. Click OK.
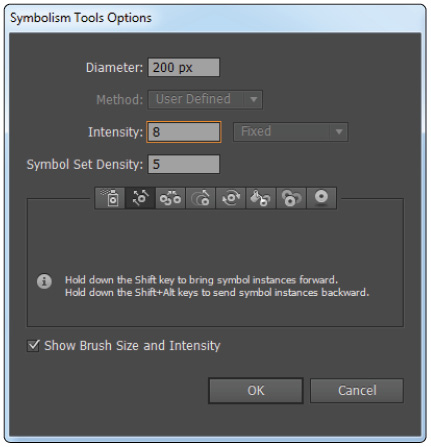
Set the intensity of the Symbol Shifter tool to 8.
10 Use the Symbol Shifter tool to click and drag on the individual symbol instances, positioning the butterflies around the logo.
Position the butterflies around the logo.
11 Click the Symbol Sizer tool (![]() ) in the floating Symbolism Tools panel. Press and hold Alt (Windows) or Option (Mac OS) and click some of the butterflies to reduce their size. Keep some of the butterflies big and make some of them small so that each is a different size. The butterflies’ size variations, dependent on how long you click and hold with the tool, can add to the overall appearance of the logo.
) in the floating Symbolism Tools panel. Press and hold Alt (Windows) or Option (Mac OS) and click some of the butterflies to reduce their size. Keep some of the butterflies big and make some of them small so that each is a different size. The butterflies’ size variations, dependent on how long you click and hold with the tool, can add to the overall appearance of the logo.
Use the Symbol Sizer tool to adjust the butterflies’ sizes.
12 Click the Symbol Spinner tool (![]() ) in the floating Symbolism Tools panel. Click and drag on one of the butterflies. A red arrow appears along its body, demonstrating the angle and direction of the butterfly’s readjustment. When you’re happy with the butterfly’s position, release the mouse. Do the same for the remaining butterflies, positioning them around the logo so that they appear as if they are all flying along the same path around the logo.
) in the floating Symbolism Tools panel. Click and drag on one of the butterflies. A red arrow appears along its body, demonstrating the angle and direction of the butterfly’s readjustment. When you’re happy with the butterfly’s position, release the mouse. Do the same for the remaining butterflies, positioning them around the logo so that they appear as if they are all flying along the same path around the logo.

Use the Symbol Spinner tool to set the butterflies flying on the same path around the logo.
13 Activate the Symbol Shifter tool again. Click and drag each symbol instance to move all the butterflies closer together. Don’t worry if the butterflies overlap the logo.

Move the butterflies closer together.
14 With the Symbol set selected, choose Object > Arrange > Send to Back. This positions the butterflies behind the logo.
15 Activate the Selection tool (![]() ) from the Tools panel and choose Select > All, or use the keyboard shortcut Ctrl+A (Windows) or Command+A (Mac OS).
) from the Tools panel and choose Select > All, or use the keyboard shortcut Ctrl+A (Windows) or Command+A (Mac OS).
16 Click and drag the selected logo and symbol set into the Symbols panel. In the Symbol Options dialog box, type Logo & Butterflies into the Name text field and set the center anchor as the Registration point. Click OK. This creates a new symbol. This symbol is a bit different from the ones you have worked with previously, in that it has other symbols nested inside it.
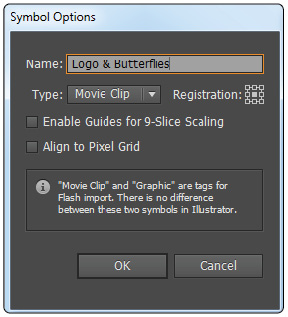
Edit the symbol options for the logo.
17 Choose File > Save to save your work. Keep the file open.
Editing nested symbols
Nested symbols form whenever you create a symbol using other symbol instances as components, as you did in the previous exercise.
1 Double-click the butterfly_03 symbol in the Symbols panel. This places a temporary instance of the symbol on the artboard in Symbol Editing Mode. This mode exists to make it easier to edit the content of symbols and groups.
2 Click the Fill color swatch in the Control panel and choose RGB Yellow, the same color you used to create an alternate version of the logo at the beginning of this lesson.
3 Select the Eyedropper tool (![]() ) from the Tools panel. The Eyedropper tool can sample appearance attributes and apply them to other objects.
) from the Tools panel. The Eyedropper tool can sample appearance attributes and apply them to other objects.
 The keyboard shortcut for the Eyedropper tool is I.
4 Alt+click (Windows) or Option+click (Mac OS) on all the gray-tinted interior parts of the butterfly wings, zooming in on the image if necessary.

Color part of the butterfly yellow.
5 Click the Exit Symbol Editing Mode button (![]() ) in the gray area at the upper-left corner of the artboard to return to the main artboard area. The butterflies are now also yellow, reflecting the change you just made to the parent symbol.
) in the gray area at the upper-left corner of the artboard to return to the main artboard area. The butterflies are now also yellow, reflecting the change you just made to the parent symbol.
6 Choose File > Save to save your work.
Replacing symbols
Another of Illustrator CC’s cool symbol features is the ability to swap an onstage symbol instance with another instance from the Symbols panel.
1 Switch to the Selection tool (![]() ) and double-click the instance of the Logo & Butterflies symbol on your artboard. You are now in Symbol Editing Mode.
) and double-click the instance of the Logo & Butterflies symbol on your artboard. You are now in Symbol Editing Mode.
2 Select the Fly Away Logo on your artboard. On the right side of the Control panel, click the Replace drop-down menu. Select the first Fly Away logo from the menu. The original Fly Away logo replaces the yellow-bordered symbol instance on the artboard.

Replace the yellow Fly Away Logo with the original one.
3 There is a variation of butterfly symbols in the library that might fit a little better with this new logo. Using the Selection tool, click the butterflies symbol set on the artboard.
4 Select the butterfly_04 symbol in the Symbols panel. From the Symbols panel menu, select Replace Symbol.

Replace the yellow butterfly you’ve used in the logo with another from the Symbols panel.
5 The new symbol replaces the instances of the original butterfly. All transformations that had been made to the original symbols in your set carry over to the new symbol instances. Click the Exit Symbol Editing Mode button (![]() ) in the upper-left corner of your screen then save the file by choosing File > Save.
) in the upper-left corner of your screen then save the file by choosing File > Save.

The new butterflies & logo symbol.
Saving symbol libraries
You can save symbol libraries for later use in other documents.
1 Click the panel menu button (![]() ) in the upper-right corner of the Symbols panel. Select Save Symbol Library from the Symbols panel menu.
) in the upper-right corner of the Symbols panel. Select Save Symbol Library from the Symbols panel menu.
2 In the Save Symbols as Library dialog box, navigate to the ai10lessons folder and type MySymbols.ai into the Save As text field.
3 Click Save to save the symbol library.
4 Choose File > Save to save your work.
Self study
Open a new file and import the butterflies.ai symbol library into it. Practice editing symbols from the library and creating new symbols from them.
Open the cartoonbot.ai file included in the ai10lessons folder. This is a robot character that has been divided into segments—arms, legs, a head, and so on. Practice creating symbols by converting each segment into a symbol.
Review
Questions
1 What types of objects can you convert into symbols?
2 Explain the relationship that exists between master symbols in the Symbols panel and their symbol instances on the artboard.
3 In what two places on the Illustrator interface do you have the option to replace one symbol on your artboard with another from the Symbols panel?
Answers
1 You can convert almost all Illustrator objects—shapes, groups, even embedded bitmap graphics—into symbols. The only limitation is that you can’t use linked graphics.
2 There is a parent-child relationship between the symbols in the Symbols panel and the symbol instances on the artboard. Any changes made to the parent object, either by editing it directly in the Symbols panel or by entering Symbol Editing Mode for the instance on the artboard, results in a change to the symbol instance on the artboard.
3 The two places on the Illustrator interface where there is an option to replace one symbol with another are:
a. When a symbol is selected, the Replace option appears in the Control panel.
b. When a symbol is highlighted and you click a new parent symbol in the Symbols panel, the Replace Symbol option is available in the Symbol panel menu.