Lesson 12: Exporting and Saving Files
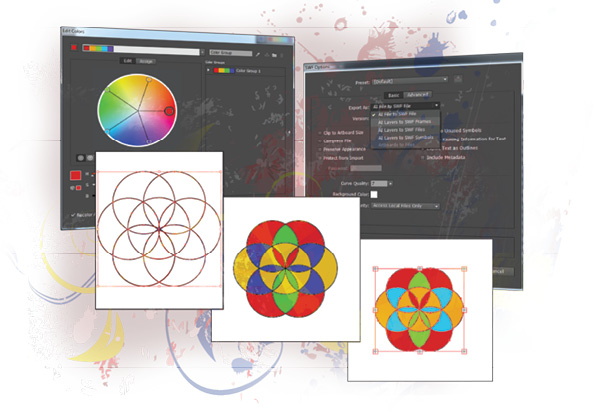
In this lesson, you will re-create a logo and then save and export the logo in a variety of different ways for use in print and online. You will save it as an Illustrator file, a PDF, and as a Flash animation.
What you’ll learn in this lesson:
- • Saving native Illustrator files
- • Saving a file in EPS format for use in layout applications
- • Saving a file as a PDF for distribution or review
- • Saving a file for use on the Web
Starting up
Before starting, make sure that your tools and panels are consistent by resetting your workspace. See “Resetting Adobe Illustrator CC Preferences” in the Starting up section of this book.
You will work with several files from the ai12lessons folder in this lesson. Make sure that you have loaded the ailessons folder onto your hard drive from www.digitalclassroombooks.com/epub/illustratorcc. See “Loading lesson files” in the Starting up section of this book.
Saving using the AI file format
The default Adobe Illustrator file format saves all the data needed to edit and work with your Illustrator documents. Layers, symbols, swatches, and graphic styles are all included when you save a file in the .ai format, and the file’s contents remain fully editable.
1 In Illustrator CC, choose File > Open. In the Open dialog box, navigate to the ai12lessons folder, and from the additional_files folder, select ai1201.jpg. Click Open. The file that opens is a low resolution JPEG that you will be re-creating. The first thing you should do is save it as a native .ai file, then you can start to modify it.
2 Choose File > Save As. In the Save As dialog box, navigate to the ai12lessons folder and type ai1201_work.ai in the Name text field. Click Save. The Illustrator Options dialog box appears.
The dialog box is divided into four editable sections: Version, Fonts, Options, and Transparency. Make sure that the Version drop-down menu is set to Illustrator CC. This menu allows you to set the version of Illustrator with which your files are compatible. Choosing an older version of Illustrator from this drop-down menu is called saving a legacy file. It is important to remember that legacy files do not support all the features of the current version of Illustrator.
3 Make sure that the Fonts text field is set to 100%. The Fonts area specifies when to embed the entire font as opposed to only the characters that are used in your document. If a font has 1000 characters and you only use 20 of them in your file, it is usually not worth using up the extra file space to include the entire font in your document. This file does not use any text, so leave this option unchanged.
4 Leave the checkboxes in the Options section at their defaults.
|
Adjustment |
Use |
|
Create PDF Compatible File |
Saves a PDF representation of the document in the Illustrator file. This option is used to make Illustrator compatible with other Adobe applications. |
|
Include Linked Files |
Embeds files that are linked to the artwork. If your document does not use any linked files then this option is grayed out. |
|
Embed ICC Profiles |
Embeds the color profile that Illustrator was using when your file was created and creates a color-managed document. |
|
Use Compression |
Uses lossless compression to compress the data in the Illustrator file, shrinking the Illustrator file size without sacrificing image quality. |
|
Save each artboard to a separate file |
Creates a separate Illustrator file for each artboard. If multiple artboards are not used, this option is grayed out. |
 By default, the Create PDF Compatible File and Use Compression options will be selected.
 The transparency section is grayed out unless you are saving to a version of Illustrator prior to Illustrator 9. When active, this area allows you to determine whether transparent areas of your document are discarded (to preserve the editibility of document paths) or maintained (to preserve the document’s appearance).
5 Click OK to save your new Illustrator file. Keep it open for the next part of the lesson.
Saving an illustration with layers
In this exercise, you will create a logo using the transform effect, then you will make three different versions of the logo on separate layers. Later on, you will generate a PDF that contains layers that you will mail to a fictitious client.
Making a template layer
The first thing you will do is make a template layer. A template layer automatically locks the layer, and dims the image to 50%. This makes it easier for you to rebuild a new logo over it, because of the color difference and the fact that when the layer is locked, it means that you can’t select the logo and move it by accident.
1 Open the Layers panel by choosing Window > Layers or by pressing the Layers button () in the dock on the right side of the workspace.
2 Double-click the thumbnail for Layer 1 in the Layers panel. The Layer Options dialog box appears. In the Name text field, type template to rename the layer, then select the Template check box to automatically convert this layer to a template layer. Click OK.
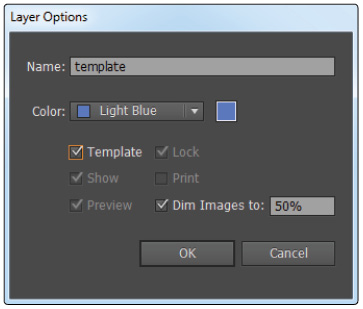
Converting a layer into a template layer.
You can now make a new layer on which you can work.
3 In the Layers panel, click the panel menu button () and select New Layer from the list. When the Layer Options dialog box appears, type working in the Name text field and click OK.
4 From the Tools panel, select the Ellipse tool (). The Ellipse tool might be hidden under the Rectangle tool (![]() ). If this is the case, click and hold the Rectangle tool to reveal the other hidden tools and choose the Ellipse tool.
). If this is the case, click and hold the Rectangle tool to reveal the other hidden tools and choose the Ellipse tool.
The first circle you will draw is the bottom-left circle. You will then use the Transform Effect to make all the other circles.
5 In the Control panel at the top of the workspace, choose None () from the Fill drop-down menu and make sure that the Stroke is set to black.
6 Start by pressing and holding the Alt (Windows) or Option (Mac OS) key to make your reference point centered, then click in the center of the bottom-left circle and drag down and to the right to make the circle bigger. Don’t let go of the mouse.
7 While still pressing and holding the Alt/Option key, press and hold the Shift key to make your ellipse a perfect circle.
8 If the circle is not aligned, you can press and hold the spacebar to move the object you are drawing.
9 Now you can let go of the mouse. If necessary, use the Selection tool (![]() ) from the Tools panel to move the circle into place.
) from the Tools panel to move the circle into place.
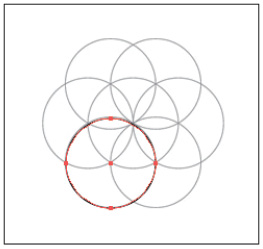
Drawing the first circle.
Using the Transform Effect
Instead of copying and pasting this circle, then manually positioning it, you will use the Transform Effect to do the work for you. The Transform Effect allows you to move, scale, and rotate, while making copies of any given object.
1 Make sure the circle is still selected. If necessary, click the circle using the Selection tool (![]() ).
).
2 Open the Appearance panel by choosing Window > Appearance or by pressing the Appearance button () in the dock on the right side of the workspace. In the Appearance panel, select the stroke.
3 Click the Add New Effect button () and choose Distort & Transform > Transform.
The Transform Effects dialog box opens. You need to have six circles around the center circle that you have not yet defined. Since you already have 1 circle, you will need 5 more that rotate around the center circle.
4 In the Copies text field, type 5.
5 Under Rotate, type 60 in the Angle text field.
6 Make sure Preview is checked and drag the Move Horizontal slider to the right. When you release the mouse, you’ll see the effect take place. Now type 43 pt in the Horizontal text field. Click OK.
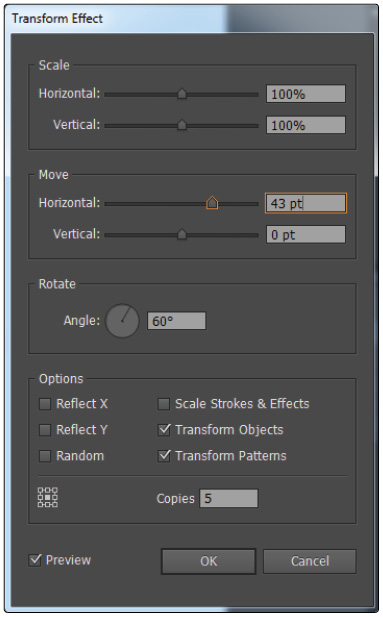
Choosing the correct settings for the transform.
Duplicating a Stroke
You will now duplicate a stroke to make the center circle.
1 Make sure the Stroke is selected in the Appearance panel and click the Duplicate Selected Item button (![]() ).
).
2 Now that you have a duplicate Stroke, you will change the Transform options for your top Stroke. Click the arrow next to the top Stroke, and click the Transform text that appears.
3 The Transform Effect dialog box appears. In the copies text field, change the number to 1. In the Move section, change the Horizontal text field to 21 pt and in the Vertical text field type -38. Select the Preview check box to view the change. You should now have the center circle. Click OK.

The settings for the second transform.
Now that you have the logo completed, you will get the file ready to be made into a layered PDF.
4 Choose File > Save to save your work.
Saving different versions of the logo onto separate layers
Now that you have made the logo, it is time to save it onto different layers and colorize it.
Expanding appearance
The logo itself is just two strokes with Transform applied to each stroke. In order for you to colorize the logo, you will need to reduce the logo down to paths.
1 Choose View > Outline. Notice that your illustration is just one path.
2 Choose View > Preview. This takes you back into Preview mode.
3 Choose Select > All to make sure your artwork is selected, then choose Object > Expand Appearance.
4 Choose View > Outline. Notice that the entire illustration appears as paths.
5 Choose View > Preview. This takes you back into Preview mode.
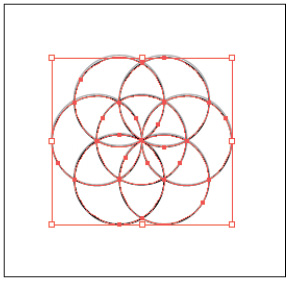
The artwork expanded.
Saving the first version
Now for a little layer management.
1 Open the Layers panel by choosing Window > Layers or by pressing the Layers button () in the dock.
2 Select the template layer and drag the layer to the Delete Selection button (![]() ) at the bottom of the panel. You no longer need the template layer.
) at the bottom of the panel. You no longer need the template layer.
If a dialog box appears stating that the template layer contains artwork and asks if you want to delete it, choose Yes.
3 Double-click the text working in the Layers panel. When the text appears highlighted, type Version 1 in the text field and press Enter (Windows) or Return (Mac OS).

Renaming layers.
4 Click the Layers panel menu button () and choose Duplicate “Version 1.”
5 Double-click the Version 1 copy layer and when the text appears highlighted, type Version 2 in the Name text field. Press Enter/Return.
6 Click the visibility icon () to the left of the Version 1 layer to hide the layer. Now that Version 1 is on its own hidden layer, you can change the look of Version 2.
7 Choose File > Save.
Using Live Paint
The easiest way to colorize all the individual pieces of this logo is to make this logo a Live Paint Group. You will then be able to colorize this logo with the Live Paint Bucket tool.
1 Make sure the logo is still selected. If necessary, choose Select > All. Select the Version 2 layer to make sure you are working on it.
2 Choose Object > Live Paint > Make.
3 From the Tools panel, choose the Live Paint Bucket tool (), which is hidden in the Shape Builder tool (![]() ).
).
4 Double-click the Fill color in the Tools panel and choose any color from the Color Picker dialog box, then click OK.
5 Randomly click the Live Paint Bucket tool in any section of the logo. You might want to color the object symmetrically on corresponding sides for a better overall look.
Using the Color Guide panel
Since you created this document from a jpeg, there are no colors in the Swatches panel. You will use the color guide to pick colors that are in harmony with your current color, then you can add them to your Swatches panel.
1 Choose Window > Color Guide or click the Color Guide button (![]() ) in the dock to open the Color Guide panel.
) in the dock to open the Color Guide panel.
2 If necessary, click the Set Base Color to the Current Color button in the upper-left of the Color Guide panel to display the correct harmony rule colors. Click the Harmony Rules drop-down menu at the top of the panel to view all the Harmony Rules for the initial color you picked. Choose any Harmony Rule from the list.
3 Click the Color Guide panel menu button () and choose Save Colors as Swatches. The colors are added to the Swatches panel as a color group.
4 Make sure the image is deselected by choosing Select > Deselect, then open the Swatches panel by pressing the Swatches button (![]() ) in the dock. Choose a color from the new color group created in the last step.
) in the dock. Choose a color from the new color group created in the last step.
5 Now you can use your left and right arrows on the keyboard, with the Live Paint Bucket tool selected and colorize the artwork any way you would like.
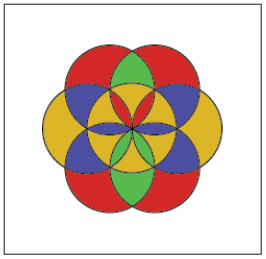
Your finished Version 2 should look something like this.
Saving the third version
1 Open the Layers panel and with the Version 2 layer still selected, click the Layers panel menu button () and choose Duplicate ‘Version 2.’
2 Double-click the Version 2 copy layer, and when the type appears highlighted, type Version 3 in the text field and press Enter (Windows) or Return (Mac OS).
3 Click the visibility icon () to the left of the Version 2 layer to hide the layer. Now that Version 2 is on its own hidden layer, you can change the look of Version 3.
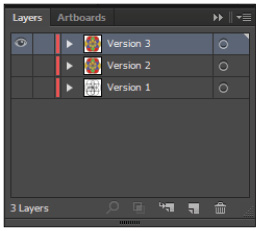
Your layers should look something like this.
4 Choose File > Save.
Using Recolor Artwork
Perhaps you want to apply more one option before you send your illustration off to a client. You will now use Recolor Artwork to change the color.
1 Select the Version 3 layer in the Layers panel and choose Select > All.
2 Open the Color Guide panel by pressing the Color Guide button (![]() ) in the dock. In the Color Guide panel, click the Color Guide panel menu button () and choose Edit Colors.
) in the dock. In the Color Guide panel, click the Color Guide panel menu button () and choose Edit Colors.
3 At the top of the dialog box, choose any harmony rule from the drop-down menu. Make sure that Recolor Art is checked in the bottom-left of the dialog box. When you find a color scheme you like, click OK, and if prompted, save any changes to the swatch group.
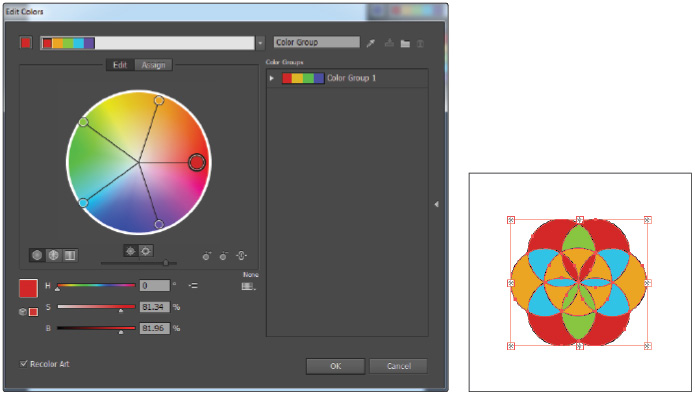
Recoloring Artwork for the third version.
4 Choose File > Save.
Saving a layered PDF
Adobe created the Portable Document Format (PDF) as a universal document distribution format. PDF has become the de facto standard for the distribution and exchange of forms and electronic documents around the world. Since you created a file with multiple layers, you can export it as a PDF, so that a client can look through the layers within the PDF and choose which illustration they like best.
1 Choose File > Save As. In the Save As dialog box, select Adobe PDF (.pdf) from the Save as type (Windows) or Format (Mac OS) drop-down menu. The Name text field automatically adds the .pdf extension to the existing file name. Click Save. The Save Adobe PDF dialog box appears.
2 Choose [High Quality Print] from the Adobe PDF Preset drop-down menu. This changes the PDF settings to create a file that is optimized for printing on a desktop printer. Unless you have a specific reason for altering the settings of the PDF, it is best to work with one of the provided presets.

Choose [High Quality Print] from the Preset drop-down menu.
3 Choose Acrobat 8 (PDF 1.7) from the Compatibility drop-down menu. The Create Acrobat Layers from Top-Level Layers check box becomes active. Click the check box to enable this option, which allows the PDF file to create PDF layers from your top-level Illustrator layers.
A practical application of creating PDF layers from Illustrator would be a situation where different illustration variations were saved on different layers. You are using it to view separate illustrations. The PDF viewer could then view the different project versions by turning layers on and off.
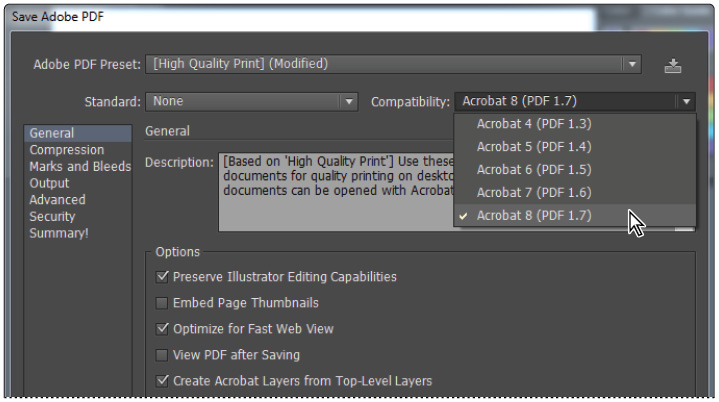
Choose Acrobat 8 (PDF 1.7) from the Compatibility drop-down menu.
4 Click the Save PDF button to save your changes and create your PDF file. Choose File > Close.
Now, when the client opens the PDF, they can view the different layers, even if they only have the free Adobe Reader.
Integration with other applications
One of the Adobe Creative Suite’s greatest strengths is the integration between the individual applications.
Exporting for Photoshop
Illustrator has two ways of integrating with Adobe Photoshop. The first is Illustrator’s ability to export files in the Adobe Photoshop (.psd) format. The second is Photoshop’s ability to open and place the native Illustrator file format.
Integrating with InDesign
There are two ways in which you can use Adobe Illustrator files in Adobe InDesign:
- • Illustrator files can be copied in Illustrator and pasted directly into InDesign. When brought into InDesign in this fashion, Illustrator files remain completely editable.
- • InDesign also has the ability to import Illustrator files using the Place command.
Integrating with Flash
Illustrator can export files in the Adobe Flash .swf format for publishing on the Web. Also, Illustrator artwork can be imported or pasted into the Flash authoring environment.
Integrating with Microsoft Expression Blend (XAML)
Native Adobe Illustrator files can be opened and edited in Expression Blend. In Expression Blend, choose File> Import Abode Illustrator File.
Integrating with Premiere and After Effects
If you are working with the applications of the Adobe Creative Cloud you can easily import native Illustrator files into both After Effects and Premiere for use in motion graphics and video projects.
Saving as EPS
Next you will save this logo as an EPS, if you needed to import this logo into an older version of QuarkXPress or another program that can’t import native Illustrator files. For this exercise, you can view any one of the three layer versions you created.
The Encapsulated Post Script (EPS) file format is an image format used primarily in the print industry. The EPS format supports both bitmap and vector information, and is ideal for situations in which you have to take artwork from Illustrator into applications, such as Quark, that don’t support native Illustrator file import. Virtually all graphic and word processing programs accept imported EPS artwork. Two important facts to note about EPS files: because they are based on the Postscript language, they can contain both bitmap and vector graphics; and they do not support transparency.
In other words, EPS is an outdated and flawed file format (from the early 1990s), fraught with peril and pitfalls for today’s workflows with Creative Cloud integration, especially when transparency is involved.
1 Choose File > Open. In the Open dialog box, navigate to the ai12lessons folder and select ai1201_work.ai. Click Open.
2 Choose File > Save As. In the Save As dialog box, select Illustrator EPS (.EPS) from the Save as type (Windows) or Format (Mac OS) drop-down menu. The Name text field automatically adds the .eps extension to the existing file name. Click Save, and the EPS Options dialog box opens.
3 Set the Version to Illustrator CS3 EPS. The Version option allows you to specify the version of Illustrator with which you want your new EPS file to be compatible. When you save the EPS file to a legacy version, you lose some editing features.
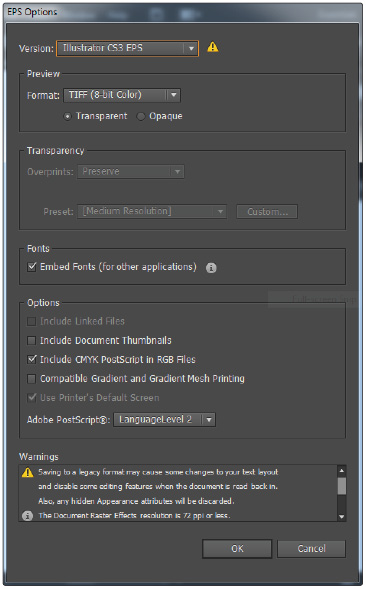
The EPS Options dialog box.
4 Leave the Preview Format section at its defaults. The Preview Format settings determine the appearance of the preview image that is saved with your EPS file. Preview images are used in applications that cannot display EPS files.
5 Leave all other settings at their defaults. Click OK to save your EPS file. Keep it open.
A warning dialog box will appear informing you that saving to a legacy format (CS4 or earlier) might cause some changes in the document. This warning appears whenever you save an Illustrator file to a legacy format. Click OK or Yes to continue.
 The settings in the Save As dialog box are reset to the default configuration every time a new file is created. When a file is opened and re-saved, the settings in the dialog box are based on the previously set options for that file.
Saving for the Web
Illustrator’s Save for Web functionality allows you to optimize Illustrator artwork for the Web. Because of the nature of web browsers, only a few file formats can be displayed on the Internet. While you always want to keep your working files in the native Illustrator format, you have to optimize your images before they can be displayed on the Web. In this exercise, you will save a file in the .gif format, which is a good format for limited color artwork like logos and motifs. Since the .gif format supports transparency, you won’t get a white box around your logo like you would with a .jpeg.
Keep in mind that the PNG-24 format also supports transparency. If you are planning to use your graphics for UI design elements in a program such as Microsoft’s Expression Blend, you will want to save in the PNG format, since Expression Blend does not accept the GIF format.
 For simple graphics, Illustrator CC has a handy “Save for Microsoft Office” command on the File Menu, which will save a PNG-24 file that might be ready to plug & play with Microsoft PowerPoint, Word, etc.
1 With the ai1201_work.ai file open, choose File > Save for Web to open the Save for Web dialog box. You can view any one of the three layer versions for this exercise.
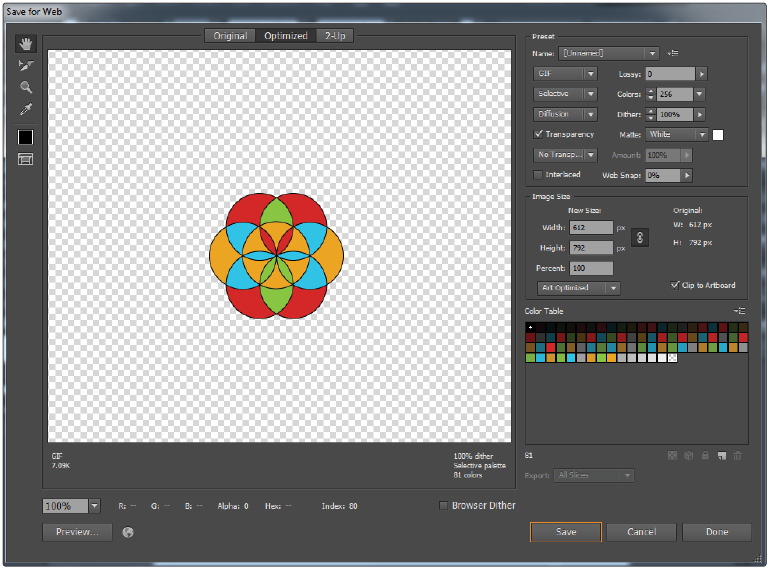
The Save for Web dialog box.
2 Select GIF from the Optimized file format drop-down menu in the preset area on the right of the dialog box.
3 In the Colors drop-down menu, select 32. The GIF format allows the image to contain a maximum of 256 colors, which is what makes it unsuitable for saving photographs and other imagery with continuous tones of color. The logo in this example contains a smaller number of colors, so saving the additional color information only adds to the file size without providing any improvement in the appearance of the image. Note that even though the logo contains only 6 colors, if we restrict the GIF too much, the edges of the image will appear blocky and unattractive.
4 Make sure that the Transparency check box is selected. This will allow your GIF image to have transparent areas. Leave all other settings at their defaults.
5 Click Save. In the Save dialog box, navigate to the ai12lessons folder and click Save to complete the process.
Making a Flash animation
You can make basic Flash animations right inside Adobe Illustrator. In this next exercise, you will make your logo rotate, then save it as a Flash .swf file. Illustrator does not have a timeline, so to animate an object, you need to either do it using layers or by using blends. You will use layers to convert the layers into SWF frames.
1 Make sure you still have the ai1201_work.ai file open. You can animate any version of your logo, just make sure none of the other layers are visible. Non-visible layers will not be animated.
2 Choose the Selection tool (![]() ) from the Tools panel and select the image.
) from the Tools panel and select the image.
3 Double-click the Rotate tool () in the Tools panel. In the Rotate dialog box that appears, type 20 in the Angle text field, then click Copy.

Rotate the illustration 20 degrees.
4 Now you have two copies of the illustration. To animate the rotation 360 degrees, you will need 16 more copies. (18 illustrations × 20 degrees = 360 degrees.)
5 Instead of using the Rotate tool 16 more times, press and hold the Ctrl key (Windows) or the Command key (Mac OS) and press the D key 16 times. This shortcut accesses Object > Transform > Transform Again.
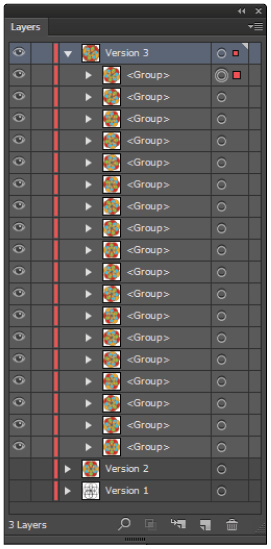
Use the shortcut key Ctrl+D to create 16 more instances.
Because Illustrator can animate only top-level layers, you need to release the sublayers in sequence so that they become their own layers. You will then drag them above the top layer, because that layer is really just a holder for all the sublayers. Next, you will delete that holder layer, and you will be ready to animate.
6 If necessary, click the arrow to the left of the layer name to expand the sublayers. Select all the sublayers in the Version 3 sublayer by clicking the targeting circle to the immediate right of the Version 3 layer.
7 Click the Layers panel menu button () and choose Release to Layers (Sequence).
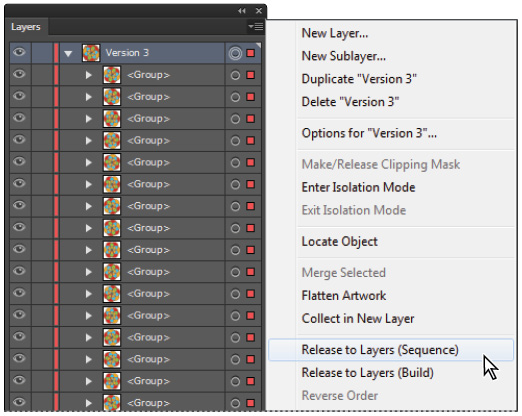
Releasing Layers to a sequence.
Now that the layers are released, they should be numbered 4–21. This means you have all 18 versions you need.
8 Select Layer 4 through Layer 21 by clicking the first one, pressing and holding Shift, and then clicking the last one. Drag these layers above the Version 3 layer.
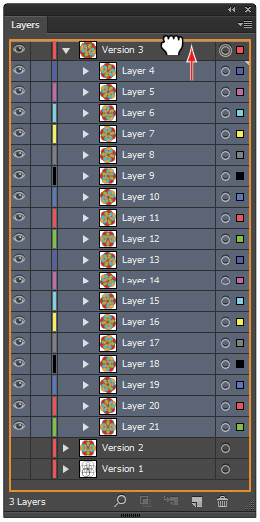
Moving the sublayers to top-level layers.
9 You can now select the Version 3 layer and click the Delete Selection button (![]() ) to delete the layer. The Version 3 layer was a holder layer, which is not needed after you released the layers to sequence.
) to delete the layer. The Version 3 layer was a holder layer, which is not needed after you released the layers to sequence.
Now you’re ready to animate the illustration.
Exporting a Flash animation
 Flash files are not supported on Apple iOS devices such as the iPad and iPhone, or most mobile devices. Adobe has discontinued development of Flash support for mobile devices.
1 Choose File > Export.
2 In the Export dialog box, choose Flash (*.SWF) from the Save as type (Windows) or Format (Mac OS) drop-down menu. Navigate to the ai12lessons folder and click Save (Windows) or Export (Mac OS).
3 In the SWF Options dialog box, choose AI Layers to SWF Frames from the Export As drop-down menu.

The Basic SWF Option for export.
4 Click the Advanced button in the top-right of the dialog box and select the Looping check box. This will rotate your logo for infinity.
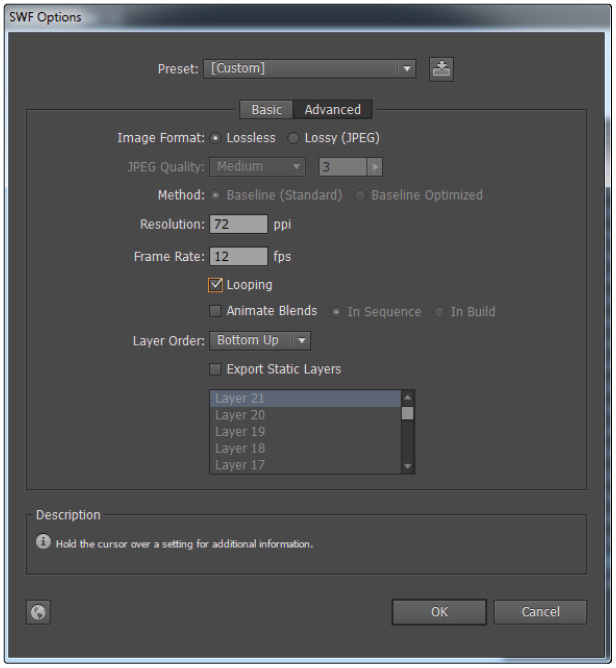
The Advanced SWF Options.
5 Click OK. Now you can open and play your animation by double-clicking it if you have the Adobe Flash Player. If not, you should be able to open it in any browser window, such as Safari or Internet Explorer, to see your animation.
6 Choose File > Close. If asked to save the file, choose No.
|
File Format |
Name |
Description |
Export Command |
|
AI |
Adobe Illustrator |
Illustrator native format, used for representing single-page vector-based drawings. Also available in AIT (Template) format. |
File > Save |
|
|
Portable Document Format |
Captures formatting information from a variety of applications, making it possible to send formatted documents and have them appear on the recipient’s monitor or printer as they were intended. |
File > Save |
|
EPS |
Encapsulated PostScript |
Standard file format for importing and exporting PostScript files. |
File > Save |
|
FXG |
Flash XML Graphics |
Format based on a subset of MXML, the XML-based programming language used by the FLEX framework. |
File > Save |
|
SVG |
Scalable Vector Graphics |
Vector format that produces high-quality, interactive web graphics. Also offers SVGZ (Compressed) format. |
File > Save |
|
DWG |
AutoCAD Drawing |
Standard file format for saving vector graphics created in AutoCAD. |
File > Export |
|
DXF |
AutoCAD Interchange File |
Drawing interchange format for exporting AutoCAD drawings to or importing drawings from other applications. |
File > Export |
|
(W)BMP |
Bitmap Picture |
Standard Windows image format for low-resolution printing and web applications. |
File > Export |
|
EMF |
Enhanced Metafile |
Windows interchange format for exporting vector graphics data. |
File > Export |
|
SWF |
Flash |
Vector-based graphics format for creating interactive, animated web graphics. |
File > Export |
|
JPG |
Joint Photographic Experts Group |
Standard format for displaying photographic images over the Web. |
File > Export, File > Save for Web |
|
PCT |
(Mac) Picture |
Used with Mac OS graphics and page-layout applications to transfer images between applications. |
File > Export |
|
PSD |
Photoshop Document |
Standard (native) Photoshop export format. |
File > Export |
|
PNG |
Portable Network Graphics |
Lossless compression and display of images on the Web in 8- or 24-bit formats. |
File > Export, File > Save for Web |
|
TGA |
Targa |
For use on systems that use the Truevision® video board. |
File > Export |
|
TXT |
Text Format |
Exports text in an illustration to a text file. |
File > Export |
|
TIF |
Tagged-Image File Format |
Flexible bitmap image format supported by most paint, image-editing, and page-layout applications. |
File > Export |
|
WMF |
Windows Metafile |
Exchanges files from 16-bit Windows drawing and layout programs. |
File > Export |
|
GIF |
Graphics Interchange Format |
Used for web graphics that allow an image to reference a palette of up to 256 colors from the 24-bit RGB color space. |
File > Save for Web |
Self study
Open one of the Illustrator files you saved from one of the other lessons in this book, and practice saving it as a PDF and EPS file. Try re-coloring the artwork on a saved copy layer. Then view the layers in the PDF.
Review
Questions
1 What does the Create PDF Compatible File in the Save As Illustrator Options dialog box do?
2 What does EPS stand for, and where is it primarily used?
3 Which web graphics format is best for saving an image with continuous tones of color, without transparency, and compatible with most web browsers?
4 Can you create a Flash animation in Illustrator?
Answers
1 The Create PDF Compatible File option saves a PDF representation of the document in the Illustrator file. This option is used to make Illustrator files compatible with other Adobe applications.
2 EPS stands for Encapsulated Post Script. It is a legacy file format used primarily in the print industry.
3 The JPEG format is best for continuous tone imagery, does not support transparency, and is compatible with the majority of common web browsers.
4 Yes, you can export layer or blend-based SWF files from Illustrator.
