
Lesson 9: Organizing your Illustrations with Layers

Complex illustrations with many components can make it more difficult to work with and select individual components. In this lesson, you will discover how to use Illustrator CC’s Layers panel to organize and manage your illustrations.
What you’ll learn in this lesson:
- • Selecting items on a layer
- • Locking and hiding layers
- • Creating new layers
- • Moving items between layers
- • Organizing layers
Starting up
Before starting, make sure that your tools and panels are consistent by resetting your workspace. See “Resetting Adobe Illustrator CC Preferences” in the Starting up section of this book.
You will work with several files from the ai09lessons folder in this lesson. Make sure that you have loaded the ailessons folder onto your hard drive from www.digitalclassroombooks.com/epub/illustratorcc. See “Loading lesson files” in the Starting up section of this book.
Getting to know the Layers panel
Whether you deliberately work with layers or not, every time you create, import, or paste items in an Illustrator document, you are placing those items on a layer. The default layer that is in every new Illustrator document is called Layer 1. The order in which you add new elements to the document determines their arrangement on Layer 1. The latest additions appear on top of the earlier ones; this is called the stacking order. Just like stacking sheets of paper on your desk, the first one placed appears on the bottom of the stack and the most recent one placed is positioned on the top of the stack. The Layers panel allows you to select an item or items in an illustration, change their stacking order, show or hide them, and lock them. The following exercise will familiarize you with the Layers panel.
1 Launch Adobe Illustrator CC, if it is not already open. Choose File > Open. In the Open dialog box, navigate to the ai09lessons folder and select the ai0901_done.ai file. Click Open.
2 Visually, the artboard of this done file will remain the same as your start file, but, if you choose Window > Layers, you see that there are three named layers in this document. You will start with a one-layered document and add additional named layers, as well as take advantage of other layer tips and tricks, throughout this lesson.
3 You can choose to leave this finished document open, or choose File > Close to close it now. If you are asked to save this file, choose No.
4 Choose File > Open. In the Open dialog box, navigate to the ai09lessons folder and select the ai0901.ai file. Click Open.
5 Choose File > Save As. In the Save As dialog box, navigate to the ai09lessons folder and type ai0901_work.ai in the Name text field. Click Save, then click OK when the Illustrator Options dialog box appears.
6 Click the Layers button (![]() ) in the dock on the right side of the workspace to open the Layers panel.
) in the dock on the right side of the workspace to open the Layers panel.

A. Visibility column. B. Edit column. C. Selection color column. D. Disclosure triangle. E. Target column. F. Panel menu. G. Locate Object. H. Make/Release Clipping Mask. I. Create New Sublayer. J. Create New Layer. K. Delete Selection.
7 Click the visibility icon (![]() ) in the Visibility column to the left of Layer 1; all the items that reside on that layer disappear from the workspace. Click in the box once more to make the pieces visible again.
) in the Visibility column to the left of Layer 1; all the items that reside on that layer disappear from the workspace. Click in the box once more to make the pieces visible again.
8 Click the empty box to the right of the visibility icon in the Edit column of the Layers panel. The padlock icon (![]() ) appears. This locks all the items on the layer, making it impossible to select or edit them. Click the padlock icon again to unlock the items on the layer.
) appears. This locks all the items on the layer, making it impossible to select or edit them. Click the padlock icon again to unlock the items on the layer.
9 To the right of the padlock icon is the Selection Color column. The color listed in this column is the color assigned to identify the items on this layer. Each object on the layer will have its frame edges and bounding box appear in the layer color when the item is selected.
 When new layers are created, the layer colors are assigned in sequence down the list of Adobe system colors. There are 27 named colors to choose from, or you can select Other and specify additional color options. Layer colors can help you to visually categorize graphic elements at a glance. You can change the layer colors to fit your own visual system of organizing.
10 To the right of the Selection Color column is the disclosure triangle. Click the disclosure triangle to see all the individual and grouped items (sublayers) that make up the illustration.
 Compound paths, while made up of multiple paths, show up as one item in the Layers panel. Masked items also appear as a sublayer in the Layers panel. The clipping mask and the clipped elements can be revealed by opening the disclosure triangle of the masked group.

Click the triangle to see the layers and sublayers.
Using layers to organize your illustrations
Now that you’ve been introduced to the Layers panel, you’ll take a look at how you can use these tools to organize the different components of your illustration. This makes it easier to edit the illustration as it becomes more complex. First you will select items, change their stacking order, and then lock, hide, group, and rename them.
1 Make sure that the disclosure triangle next to Layer 1 in the Layers panel faces downward and that all the illustration’s paths are displayed. Click the Click to Target icon (![]() ) to the far right of any sublayer in the Target column. As you click each item’s Target column, notice that the item is selected in your illustration. To select multiple items, press and hold the Shift key on your keyboard as you click in each corresponding Target column. To select non-consecutive items, press and hold the Control key (Windows) or the Command key (Mac OS) as you click in each corresponding Target column Deselect any items you have selected by pressing Ctrl+Shift+A (Windows) or Command+Shift+A (Mac OS).
) to the far right of any sublayer in the Target column. As you click each item’s Target column, notice that the item is selected in your illustration. To select multiple items, press and hold the Shift key on your keyboard as you click in each corresponding Target column. To select non-consecutive items, press and hold the Control key (Windows) or the Command key (Mac OS) as you click in each corresponding Target column Deselect any items you have selected by pressing Ctrl+Shift+A (Windows) or Command+Shift+A (Mac OS).
2 Click the Click to Target icon (![]() ) belonging to the sublayer named Bubble Group. This selects all the items on the Bubble Group sublayer and shows the items in the workspace with a light-blue bounding box. The Target column allows you to select items or groups of items directly from your Layers panel. Notice that a color box (
) belonging to the sublayer named Bubble Group. This selects all the items on the Bubble Group sublayer and shows the items in the workspace with a light-blue bounding box. The Target column allows you to select items or groups of items directly from your Layers panel. Notice that a color box (![]() ) now appears in the active selection column to the right of the Target column. This shows you that these items are selected in the Layers panel and on the artboard.
) now appears in the active selection column to the right of the Target column. This shows you that these items are selected in the Layers panel and on the artboard.
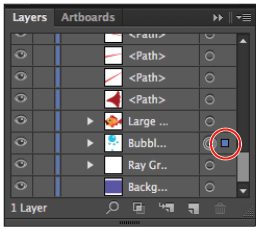
The selection color box.
3 With the Bubble Group sublayer still selected, click and drag the Bubble Group sublayer down in the Layers panel until you see a white line appear between the Ray Group and Background sublayers. Once you see the white line that indicates the stacking order position of the layer, release the mouse. The bubbles are now arranged beneath the rays in the illustration, but above the picture’s background.
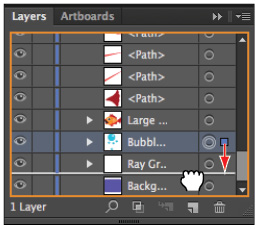
Move the bubble layer.
You have now changed the stacking order of those items in the illustration.
Using the Layers panel to make selections
Now that you’ve seen how easy it is to select items in your illustration using the Layers panel Target column, you will use the Edit and Visibility columns to make selections without affecting the locked or hidden sublayers.
1 In the Layers panel, click the empty (Toggles Lock) box in the Edit column to the left of the Background, Bubble Group, and Ray Group sublayers to lock each of those layers. Click the visibility icon (![]() ) in the Visibility column to the far left of the Large Fish Group sublayer to hide the items on that layer.
) in the Visibility column to the far left of the Large Fish Group sublayer to hide the items on that layer.
2 Choose Select > All or use the keyboard shortcut Ctrl+A (Windows) or Command+A (Mac OS). Even though you instructed Illustrator to select all the items in the illustration, none of the locked or hidden items are selected.

Items that are locked or hidden in the Layers panel are unaffected by the Select All action.
3 Choose Object > Group. Notice that all the selected items are now in a new sublayer in the Layers panel, named <Group>. The new Group sublayer has its own disclosure triangle that shows you all the items that make up that group.
4 Double-click the <Group> sublayer’s thumbnail in the Layers panel. In the Layer Options dialog box that appears, type Small Fish Group in the Name text field, then click OK. The Group sublayer is now named Small Fish Group in the Layers panel.
5 Click the visibility icon (![]() ) in the Visibility column of the Large Fish Group sublayer to turn on the layer’s visibility, then click the padlock icons for the Background, Bubble Group, and Ray Group sublayers to unlock them.
) in the Visibility column of the Large Fish Group sublayer to turn on the layer’s visibility, then click the padlock icons for the Background, Bubble Group, and Ray Group sublayers to unlock them.
6 Choose File > Save to save your work. Keep the file open for the next exercise.
Creating new layers and moving items between layers
Now that you have grouped all the small items in your illustration, you will further organize them by creating separate layers for these grouped items. You will rename Layer 1 and create two new layers, one for each fish. You will then select the large and small fish separately, and move them each to their appropriate layer.
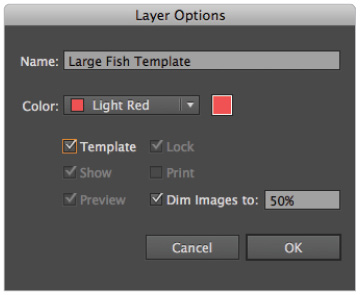
1 Double-click the thumbnail for Layer 1 in the Layers panel. In the Layers Options dialog box that appears, type Background Shape in the Name text field to rename this layer.
You can also change the layer selection color, convert the layer into a template, lock a layer, show or hide a layer, make a layer non-printing, turn off a layer’s preview, or dim a layer in this dialog box.
The Print check box in the Layer Options dialog box controls whether an image is included not just when output to paper, but also when exported to another file format. When this box is unchecked, the image is not included in the printout or export. In some export formats, like PDF, the layer controls are retained in the exported file. Depending on the exported file format, the non-printing graphic might be dropped from the resulting file. You don’t want to make any changes now, so click OK.
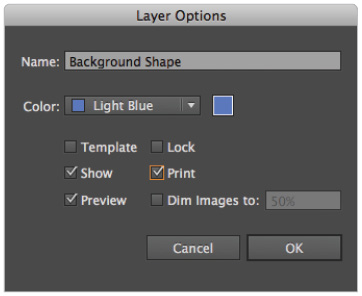
The Layer Options dialog box.
 Checking/unchecking the Lock check box in the Layer Options dialog box has the same effect as toggling the Edit column in the Layers panel. Checking/unchecking the Show check box here is the same as clicking in the Visibility column in the Layers panel.
2 To create a new layer, click the Create New Layer button (![]() ) at the bottom of the Layers panel. A new layer named Layer 2 is now situated above the Background Shape layer. Change this default layer name to something more descriptive to keep your layers clearly organized. Double-click the Layer 2 thumbnail, and in the Layer Options dialog box, type Large Fish in the Name text field. Click OK.
) at the bottom of the Layers panel. A new layer named Layer 2 is now situated above the Background Shape layer. Change this default layer name to something more descriptive to keep your layers clearly organized. Double-click the Layer 2 thumbnail, and in the Layer Options dialog box, type Large Fish in the Name text field. Click OK.
3 You can avoid the extra step of having to change the default name of the newly-created layer by bringing up the Layer Options dialog box right away. It is more efficient to name your new layers at the same time as they are created. This time, press and hold the Alt (Windows) or Option (Mac OS) key on your keyboard while you click the Create New Layer button. The Layer Options dialog box appears, allowing you to name the layer as it’s created. In the Layer Options dialog box, type Small Fish in the Name text field, then click OK. The Small Fish layer is listed above the Large Fish layer in the Layers panel.
 In Illustrator CC, you can name a layer directly in the Layers panel, without having to open the Layer Options dialog box: double-click the layer’s name in the Layers panel, and when it’s highlighted, type in a new name. Then press the Enter or Return key to accept the change.
When you draw, place, or paste an object onto the Illustrator artboard, a new sublayer is created for it. This new sublayer appears in the active layer and at the very top of the stacking order within the active layer.
Rather than create layers in an arbitrary order and then have to arrange them as desired, you can build the stacking order of your graphics on-the-fly. Position new graphics and groups in the layer sequence as intended by targeting the layer immediately below where you want the new item to appear.
4 Select the Small Fish Group sublayer (listed beneath the Background Shape layer) by clicking the Click to Target icon (![]() ) in the Target column. When the color box (
) in the Target column. When the color box (![]() ) appears in the active selection column, click and drag the square to the Small Fish layer and release the mouse. Once you release the mouse, the selection square and the color of the bounding box change to green to match the selection color of the Small Fish layer.
) appears in the active selection column, click and drag the square to the Small Fish layer and release the mouse. Once you release the mouse, the selection square and the color of the bounding box change to green to match the selection color of the Small Fish layer.
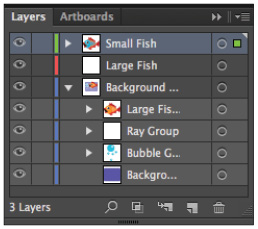
Once an item is moved from one layer to another, its active selection square and bounding box color change to the selection color of the new layer.
5 Click to target the Large Fish Group sublayer (also beneath the Background Shape layer heading), then click and drag its color box to the Large Fish layer. You have now transferred the features of one piece of a containing layer to its own separate layer.
6 Choose File > Save, then choose File > Close to close the file.
Paste remembers layers
A convenient way to keep your layers organized is to use the Paste Remembers Layers option, accessed from the Layers panel menu. With this option, the clipboard holds not just the Illustrator artwork, but also information about the layer it originated on.
The Paste Remembers Layers option determines where artwork is pasted into the layer stack. When unchecked, the pasted artwork lands on whatever layer is active. When checked, artwork is pasted into the same layer it was copied from, no matter which layer is active in the Layers panel.
Having Illustrator keep track of the layers while you move items can let you work a little faster and more loosely, since you don’t have to pay as much attention to the active layer while cutting and pasting items.
Where Paste Remembers Layers really gets powerful is working between documents. When pasting into a different file, artwork is automatically placed into a layer of the same name, and creates a new one of the correct name if necessary. It’s a great way to transfer your carefully-named layer structure from one file to another, instead of ending up with lots of default-named layers.

The Paste Remembers Layers option (accessed via the Layers panel menu) retains information about where the layer artwork originated from.
Template layers
Template layers are locked, nonprinting layers that you can use to manually trace images. Template layers can come in handy when you want to trace a raster image by hand or you want to create artwork from the scan of a mock-up design. Template layers are dimmed so that you can easily see any paths you draw over the layer. When that illustration is placed in a layout application, like InDesign or QuarkXPress, the template layer does not show or print. Template layers can be created in two ways:
The most common way to create a template layer is upon import, while placing raster artwork into Illustrator as a template. Select File > Place. In the Place dialog box, select the artwork you want to import and select the Template check box in the lower-left corner; then click Place. The file is placed on a locked layer and is dimmed to 50 percent by default, so that you can clearly see any paths you draw over it.
The second way to create a template layer is to convert an existing artwork layer into a template. Double-click a layer name in the Layers panel. In the Layer Options dialog box that appears, select the Template check box and click OK. The layers icon in the Visibility column changes from the Visibility icon (![]() ) to a Template icon (
) to a Template icon (![]() ), and the layer is automatically locked. If you convert vector artwork to a template layer, it will not be dimmed.
), and the layer is automatically locked. If you convert vector artwork to a template layer, it will not be dimmed.
Converting a layer to a template layer allows you to manually trace an image with ease.
Try converting the Large Fish layer to a template layer and trace it manually, using any combination of the path and shape drawing tools.
Self study
Create another layer for another sea creature. Import a raster graphic or scanned image as a template layer, and manually trace over it to build a multi-layered graphic contained within the sea creature layer group. Comp another version of the undersea artwork by hiding the Large Fish layer and showing the sea creature in the same position, so that only one is visible for output.
Review
Questions
1 How do you hide a layer?
2 How do you move an item or items from one layer to another?
3 How do you change the selection color for a layer?
Answers
1 Do the following to hide a layer: in the Layers panel, click the visibility icon (![]() ) corresponding to the layer you would like to hide.
) corresponding to the layer you would like to hide.
2 To move items from one layer to another, click or Shift+click the Click to Target icon (![]() ) in the Target column of the items you want to move. Then click and drag the layer’s color box to the new layer.
) in the Target column of the items you want to move. Then click and drag the layer’s color box to the new layer.
3 To change the selection color for a layer, double-click the layer’s thumbnail in the Layers panel. Then, in the Layer Options dialog box, choose a new color from the Color drop-down menu.