
Before we start the design of the network, we will review the existing network switches that are installed by default. When you install the VMware Workstation, there are three switches installed by default. These are the following:
- VMnet0
- VMnet1
- VMnet8
The VMnet0 switch is the Bridged switch, and it is the one that is connected to the physical network. That is not what we normally will configure in our test architecture. This is because the connection requires that there be a connected network to obtain an IP address from, and a DHCP server available. Another reason for not using the physical connection is the fact that it is the connection to the network, and as such, we could inadvertently direct an attack into the network and this could result in us attacking someone that we do not have permission to test. Furthermore, this connection is often connected to the Internet. An example of the VMnet0 switch is shown in the following image.
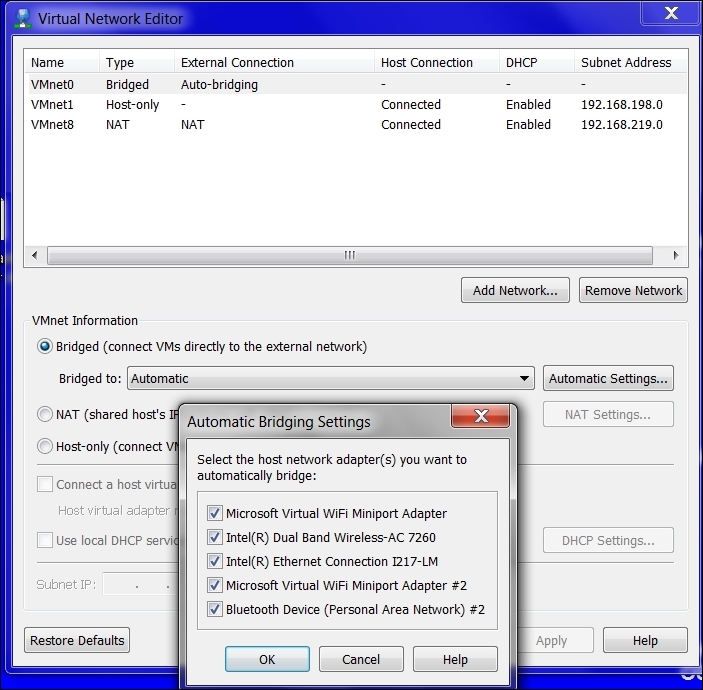
An important thing to note from the image is the fact that you can bridge the VMnet0 switch to a specific interface, this can be a good thing to do, since the tool automatically bridges by default to all of the interfaces on the machine. Again, in most cases, we will not use this switch since there is always a danger of attacking a network that we did not intend to attack. If you do want to connect a number of computers in your testing, then the Bridged setting is the best way to do that. You can bridge to the one interface that is connected to the other machines and help ensure that the network is isolated.
This switch is dedicated to the host only configuration, and using this, we can isolate the network traffic to within the host and virtual machine only. This is the preferred method of performing your testing; however, if an Internet connection is required, then this configuration is not the recommended way to design the networks. Having said that, when we create multiple switches and a number of different layers of an architecture, then this and other switches we create will be the method we use for isolation across the architecture. Another nice feature of the switch is that the segment is provided a DHCP server by default. This allows us to connect and create network cards and connect to the switch and receive network configuration parameters without manually entering them. An example of the VMnet1 switch and the configuration is shown in the following image:

The ease with which we can change the IP address and customize the DHCP server is another reason we have chosen VMware Workstation.
This is the most common switch we will use, because it allows us to share the physical network connection with the host while remaining at a private address shielded from the external network. The biggest benefit of this is that we can access the Internet. This configuration is known as the Network Address Translation (NAT); as mentioned earlier, it is the most common switch that we will use. When we expand our network to include the layers to represent an enterprise architecture, this is the switch that will connect us to the perimeter so that we can place a machine external to our architecture and emulate a true attack from the external segment. An example of this switch is shown in the following image:

A thing to note here is the fact that we can customize and configure port forwarding. This allows us to limit the ports that a machine can receive traffic to at the virtual switch level. We do this for both TCP and UDP ports, so effectively we can custom configure our environment to restrict port traffic just like what we can achieve with a firewall. One of the ways we might use this is when we know we have a vulnerability on the application running on port 902, rather than test everything on the machine. We can restrict all of the traffic and only allow the traffic to the specific port that we want to test. We can do all of this without taking the extra time to set up a firewall and then a rule to only allow traffic to our selected port. It is not something that is common, but it can allow us to standup a quick list of allowed ports to a target virtual machine and then test it.
The last thing we will discuss within the design is the concept of Folders. This used to be referred to as Teams; however, in the latest versions of VMware Workstation, they are now known as Folders. While this technically is not the network design, it is important to explain the power that Folders provides us for our designs. We can use this to power on all of the machines at the same time, well, not actually at the same time; the tool uses a 10 second delay when powering the machines on. You can also power on a selected number of machines using the Ctrl key and click on the machine you want to power on. Once you have selected the machines to power on, and pressed the play button, it is just a matter of time until they are powered on. An example of Folder with machines contained within is shown in the following image:
