
With the default configuration of the VMware Workstation, we can create a multiple layer design. If we counted the VMnet0 switch, then we could architect three segments, but, since we have discussed the downside of doing this, we will just use the first two switches to set the initial phase of the architecture for the book. As we continue, we will add additional switches until we have the final design of the network that we wish to achieve.
We have a number of choices when it comes to installing Kali, and the one we select is largely a personal preference; the preferred method as a tester is to install the machine from the iso image, because that will provide you with the most control over the configuration of the machine. This method can also present challenges, but for the most part, it should not be too painful. Kali can be downloaded from http://www.kali.org, and once you are there, you have a number of options for the installation. The preferred option is to download the 64-bit version iso image, as it allows you to take advantage of more available RAM.
Once you have downloaded and verified the image, you will mount the iso image in the VMware Workstation and this will allow us to boot it and complete the installation process as follows:
- Start the VMware Workstation on your host machine.
- Click on File | New Virtual Machine.
- Accept the default settings and click on Next.
- In the next window, select Installer disc image file (iso).
- Browse for the
isoimage you downloaded and click on Next. - Leave the default Linux, and click on the drop-down window, and select Debian7.x 64-bit.

- Enter a name for the virtual machine as Kali Linux Attacker.
- You can change the location that it is saved to, but I recommend that you leave it at the default and click on Next.

- In the next window, change the Maximum disk size to 80.0.
- This might seem like a large number, but it is better to do this now and not later. We will not be allocating the space for this, so it is ok to set it at a high number. The other setting that is of interest is the storing of the virtual disk; we will leave this at the default. Then, click on Next.

- Before you click on Finish, set up the hardware. Click on Customize Hardware.
- We want to customize the network cards and also set the RAM that we want for the virtual machine. The more RAM you set, the better. This is something that is largely dependent on the amount of RAM you have available. If possible, dedicate a minimum of 2 GB to the machine. For our example, we are going to set 4 GB.
- Once you have set the RAM, click on Add | Network Adapter | Next.
- Select the Host only radio button, then click on Finish.
- Close the configuration window by clicking on Close.
- If there is an option to Power on this virtual machine after creation, clear the checkmark and click on Finish.

- This will open up the virtual machine in the VMware Workstation, and it will provide you with the opportunity to review your settings. Once the settings have been reviewed, click on Power on this virtual machine.
At this point, we created the virtual machine, configured the hardware, and defined the structure of the machine with respect to the network cards, the physical RAM, and the size of the hard drive. At this point, the machine is now ready. We just have to boot the machine and install the software the same as if it were a separate machine. Another powerful benefit of virtualization. Perform the following steps:
- Click into the window and select the Graphical install.
- On the next screen, select your language and then your location. Click on Continue.
- Select your keyboard and click on Continue.
- This will start the install process. The install will detect the two network interfaces and properly select the
eth0interface. Leave it at the default and click on Continue. - You will be prompted whether or not to continue without a default route; click on Yes and then click on Continue.
- This is because we will let the VMware provide this information when the machine boots. Do this also for the name servers and the domain name. We are not installing the software on a physical machine, so we can bypass these steps. Accept the hostname (or change it if you desire to use another name) and click on Continue.
- The next thing you need to do is enter a password for the root user. Make sure you remember it and click on Continue.

- Configure the clock to match your time zone and click on Continue.
- Since we are in a virtual environment, accept the default for the disk and click on Continue.
- Read all of the messages and click on Continue. Finish partitioning and write the changes to the disk. You will have to select Yes to complete the process. Then, you will see the installation of the system taking place.
- When you are prompted for a network mirror, select No and then click on Continue.
- Accept the default and install the GRUB boot loader and click on Continue.
- Select the hard disk, and then click on Continue.
- If all goes well, you should get the completion message. Click on Continue.

- Once the machine boots, login with the username of root and the password you created during the installation.
We now have a complete install of the Kali 2.0 software in a virtual machine environment; moreover, we have a complete penetration testing framework that will allow us to conduct a wide variety of penetration testing techniques. At this time, we are ready to continue with the configuration of the machine, and the ever so important capability of installing the VMware tools. Let's get started now!
- We are now ready to update the software and then install VMware tools. Open a terminal window and enter:
# apt-get update
# apt-get dist-upgrade
- Once this has completed, it is time to install the VMware tools. This can be a bit of a challenge, but it does make our lives much easier when working with virtual machines. At the time of this writing, the Kali Linux distribution used the 3.18 kernel. Attempt to install the Linux headers with the following command:
# apt-get install linux-headers-$(uname –r) - If you get a message to the effect that the headers are not found, we can continue on to the next step. If the headers are installed, then note the path in case the VMware tools installation does not find them. Click on VM | Install VMware Tools, and, once the CD is mounted, double-click on the CD icon to open the folder. Right-click on the VMware Tools archive and select Extract To....

- Browse to the root folder and extract the files by clicking on Extract.

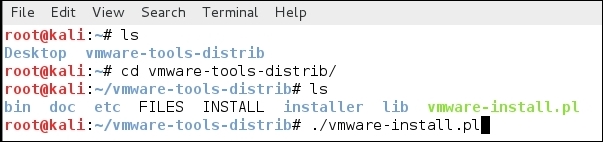
- Once the tools have extracted, navigate to the folder, and enter:
# cd vmware-tools-distrib
# ./vmware-install.pl
- The installer will ask questions; accept all of the defaults until you get to the valid header path. If it does not find it, you can enter the one from earlier; alternatively, the best bet is to enter no.

- Accept the rest of the defaults, and the tools should complete the installation. Reboot the system. Once it comes online, login and then click View | Fit Guest Now. You should now have a larger screen, which means that the tool is installed correctly.

- You now should have your Kali Linux machine installed and configured with the VMware tools.