
Armitage makes pivoting trivial. We know that there is another network available to us from the compromised Windows machine, and now it is just a matter of being able to scan the network and launch attacks from this system. There are manual methods of accomplishing this, but the simplest is to right-click on the graphical representation of the target machine in Armitage and select your Meterpreter | Pivoting | Setup option:

You will be presented with a menu to select your pivot point. Select 192.168.50.0 and click on Add Pivot:

This will add the proper route information to allow you to perform scanning and other attacks through the victim machine. Let's give it a try:
- Select your compromised Windows machine.
- At the top navigation bar, choose Hosts | MSF Scans.
- Type in
192.168.50.0/24and continue. This may take some time. - Review the findings and choose Find Attacks from the top Attacks menu selection.
You should see something similar to the following screenshot:
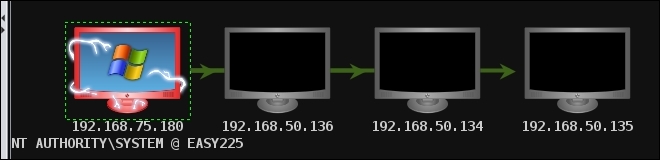
Right-click on your new found hosts and select scan to pull over more information about the system. The green lines provide guidance on which systems your pivot points are going through. This can be especially useful when dealing with large, diverse networks.
The newer the operating system, the bigger the challenge will be to get a remote type of exploit without some form of client interaction. An example of this is the commercial tool output of a scan that was conducted against Windows 8.1. As you review the scan, bear in mind that the firewall had to be disabled to even get the tool to attempt exploitation, and even though the scanner reported there were some vulnerabilities that could be exploited, there was no success with this. This is documented in the following image:
