
5 Pathways to Editing in Elements
In earlier editions of Photoshop Elements all editing and enhancement actions were centered around the tools and features in the Full Edit workspace. More recently Elements has provided the photographer with several different levels of editing to choose from. In the last edition we were introduced to a new option, the Guided Edit, which combines both instructions and tools in a single panel. All editing approaches have their own strengths and challenges and in this chapter I will overview each option in turn. In addition I will introduce the advanced concept of ‘non-destructive editing’ using some of Elements most powerful tools and a couple of features that we sneakily borrow from Photoshop. So let’s get started!
The options can be grouped around five different approaches to the task:
• Automatic,
• Semi-automatic,
• Manual,
• Guided edits,
• Non-destructive and
• Photoshop assisted.
Automatic editing
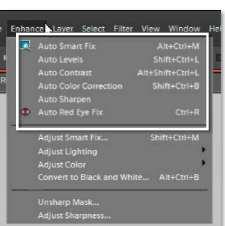
• Simple control using Auto Smart Fix, Auto Color, Auto Levels, Auto Contrast, Auto Sharpen and Auto Red Eye Fix
• Rotate left or right options
• Manual cropping
• Changes applied automatically
• New users start here for good, quick results
• Automatic control of: contrast, color, shadow and highlight detail and sharpness.
Automatic editing
The simplest tools are almost always fully automatic with the user having little control over the final results. These are the types of color, contrast, brightness and sharpness controls that are available in the Photo Browser either via option in the Edit menu, from the right-click pop-up menu or displayed in the new Fix panel on the right of the Organizer workspace. These options provide a great place to start if you are new to digital photography and want good results quickly and easily, but experienced users will find the lack of control frustrating.

Automatic editing options>> The range of auto enhance options in versions 6.0 and 7.0 of Photoshop Elements includes Auto Color, Auto Levels, Auto Contrast and Auto Sharpen options as well as Auto Smart Fix and Auto Red Eye Fix features found in the previous version. The features are grouped in the new Fix panel and include Rotate buttons and a new Crop option.
5.01 Auto Smart Fix
Suitable for Elements – 7.0, 6.0, 5.0, 4.0, 3.0 | Difficulty level – Basic Related techniques – 5.02, 5.03
The Auto Smart Fix feature enhances both the lighting and color in your picture automatically. The command is used to balance the picture hues and improve the overall shadow and highlight detail. Most images are changed drastically using this tool. In some cases the changes can be too extreme. If this occurs, the effect should be reversed using the Edit > Undo command and the more controllable version of the tool – Adjust Smart Fix – used instead. Adjust Smart Fix is located in the Editor workspace.
5.02 Auto Red Eye Fix
Suitable for Elements – 7.0, 6.0, 5.0, 4.0 | Difficulty level – Basic Related techniques – 5.01, 5.03
One of the possible side effects of using the inbuilt flash on your compact digital camera is the appearance of red eyes in the subject. Elements has always had great options for correcting this problem and the current release is no different containing a specific Red Eye Removal tool. First introduced in Elements 5.0 was the ability to automatically detect the presence of red eye in a photo and then correct the problem. The feature cleverly checks out the metadata attached to the photo to see if flash was used to record the image before searching for the problem eyes and automatically correcting the red hue. This feature can also be applied when transferring images from camera to computer by selecting the Automatically Fix Red Eyes option in the Photo Downloader.
5.03 Other auto options
Suitable for Elements – 7.0, 6.0 Difficulty level – Basic | Related techniques – 5.01, 5.02
In Photoshop Elements 6.0 and 7.0 four auto enhance options that were previously only available in the Enhance menu of the Edit workspace, have been added to the new Fix pane in the Organizer. Unlike the Auto Smart Fix option which enhances several different image characteristics in the one action, features like Auto Levels, Auto Contrast, Auto Sharpen, and Auto Color Correction generally concentrate on adjusting just one aspect of the photo, providing more specific and controllable changes to your photo.

Auto Smart Fix >> The Auto Smart Fix feature enhances color, brightness, shadow and highlight detail automatically.

Auto Red Eye Fix >> The Auto Red Eye Fix feature searches for and corrects the red eyes caused by on-camera flash.
| Quick guide to the Fix panel’s auto enhance feature | |
| Correction needed | Feature to use |
| Low contrast problem | Auto Contrast |
| High contrast problem | Auto Contrast |
| Color cast problem | Auto Color Correction or Auto Levels |
| Color cast and contrast problem | Auto Levels |
| Sharpness or clarity problem | Auto Sharpen |
Auto Contrast is designed to correct images that are either too contrasty (black and white) or too flat (dull and lifeless). Unlike the Auto Levels feature, Auto Contrast ensures that the brightest and darkest pixels in the picture (irrespective of their colors) are converted to pure white and black. In doing so all the tones in between are expanded or contracted to fit.
Auto Color concentrates on correcting the color in the midtones of the picture and adjusting the contrast by reassigning the brightest and darkest pixels to white and black.
Auto Levels is similar to Auto Contrast in that it maps the brightest and darkest parts of the image to white and black but differs in that each individual color channel is treated separately. In the process of mapping the tones (adjusting the contrast) in the red, green and blue channels, dominant color casts can be neutralized.
Auto Sharpen applies a set amount of sharpening to the photo. Most photographers prefer to be able to adjust the degree of sharpening that is applied to their images and so would avoid using this auto feature in favor of a more manual approach involving the Editor: Enhance > Adjust Sharpness filter.
Sometimes such automatic fixes do not produce the results that you expect. In these scenarios use the Undo (Edit > Undo) command to reverse the changes and try one of the manual correction tools detailed in the next section.

Auto option examples >> (a) Original uncorrected image.
(b) After applying Auto Levels.
(c) After applying Auto Contrast.
(d) After applying Auto Color Correction.
(e) After Auto Color and Auto Sharpen
Auto option also found Edit >> The Fix panel’s auto features can also be found in the Enhance menu of the Full Edit or Quick Fix workspaces.
Automating editing of several pictures at once
It’s true that shooting digital has meant that many photographers have saved the time that they used to spend in the darkroom processing their images. The flip side to this coin is that now we while away the hours in on-screen production instead. Surely with all the power of the modern computer and flexibility of Elements there must be quicker ways to process files. Well yes there is!
5.04 Processing multiple files
Suitable for Elements – 7.0, 6.0, 5.0, 4.0, 3.0 | Difficulty level – Basic Related techniques – 5.05, 5.06
Photoshop Elements users are able to automate a variety of editing functions with the Process Multiple Files feature located in the File menu of the Full Edit workspace. The feature is like a dedicated batch processing tool that can name, size, enhance, label and save in a specific file format a group of photos stored in a folder or selected via the file browser or Open Files.
The dialog’s options include:
Source – Files to be processed can be stored in a single folder, the files currently open in the workspace, pictures in the Project Bin or images multi-selected in the file browser.
Destination – Sets the location where processed files will be saved.
File naming – Options for naming or renaming of selected files including a range of preset naming styles.
Image Size – Specify size and resolution changes after choosing the unit of measure to work with from the drop-down menu. Proportions can be constrained.
File type – Select the file format that processed files will be saved or converted to.
Quick Fix enhancement- Use the options here to apply automatic enhancement of the files being processed.
Add Labels – Add caption or file name labels to each of the processed files. Also contains an option for watermarking the pictures.

Batch processing of files >> Elements users can automate the application of basic enhancement and editing features to a group of files using the Process Multiple Files feature located in the Full Edit workspace.
After setting the options for each of the sections in the dialog press the OK button to process the pictures.
5.05 Multi-selection editing
Suitable for Elements – 7.0, 6.0, 5.0, 4.0, 3.0 | Difficulty level – Basic | Related techniques – 5.04, 5.06
Another method of applying automatic changes to several photos at once is to multi-select photos in the Photo Browser workspace then choose an editing option from the right-click popup menu or the new Fix panel. There are a multitude of options available using this approach, all of which provide quick editing changes to the selected photos. For best results always apply critical edits and enhancements manually, but multi-select edits are particularly useful if you want to process a bunch of files quickly. The added bonus is that the edited versions of the pictures are not saved over the original file, but rather they are kept in a Version Set, so that it is always possible to extract the original file, or reverse the enhancement changes, if need be.
Keystrokes for fast edits of multi-selected photos
| Rotate Photos 90°Left – Ctrl + Left | Auto Smart Fix – Ctrl + Alt + M |
| Rotate Photos 90°Right – Ctrl + Right | Auto Red Eye Fix – Ctrl + R |

Auto enhance several files >> The editing and enhancement options located on the right-click menu or the new Fix panel in the Photo Browser workspace can be just as easily applied to several photos that have been multi-selected as to a single picture
This method is a quick and easy means of making automatic changes to a group of photos.
5.06 Bulk Red Eye fixing
Suitable for Elements – 6, 5.0, 4.0 | Difficulty level – Basic Related techniques – 5.04, 5.05
As well as being able to apply the Auto Red Eye Fix feature to individual photos this correction option is also available in the Adobe Photo Downloader dialog. So now it is possible to download pictures from your camera, or import them from a folder, and at the same time be searching the images for red eye and correcting it when it is present. This is a great time saver if you regularly photograph with on-camera flash but as always for the absolute best results apply the Red Eye Fix yourself manually.
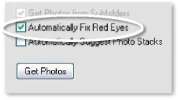
Auto Red Eye Fix >> The Auto Red Eye fix option is also available in dialogs that are used to import or download pictures onto your computer. Selecting this option instructs Elements to search and correct any occurrence of red eye in the photos you are loading into the Organizer workspace.
Semi-automatic editing
The second level of features sits in the middle ground between total user control and total program control over the editing results. The tools in this group are primarily available in the Quick Fix editor but also encompass some of the more automatic or easy-to-use controls available in the Full Edit workspace. Move to these tools once you feel more confident with the digital photography process as a whole (downloading, making some changes, saving and then printing) and find yourself wanting to do more with your pictures. Again, for the advanced user the tools listed here will provide a degree of frustration as the amount of control over the results is still limited.
5.07 Using the Quick Fix Editor
Suitable for Elements – 7.0, 6.0, 5.0, 4.0, 3.0 | Difficulty level – Basic Related techniques – 5.08, 5.09
The Quick Fix Editor contains a reduced tool and feature set designed to facilitate the fast application of the most frequent of all enhancement activities undertaken by the digital photographer.
The Zoom, Hand, Crop tools and the Quick Selection Tool and Selection Brush are located in a small toolbar to the left of the screen and are available for standard image editing changes; the fixed Palette Bin, to the right, contains the necessary features to alter and correct the lighting, color and sharpness of your pictures. Rotate buttons are located at the bottom of the dialog. Three new retouch tools have been added to the red eye removal brush and positioned at the bottom of the pane on the right side of the workspace.
You can choose to apply each image change automatically, via the Auto button, or manually using the supplied sliders. This approach provides both convenience and speed when needed, with the option of a manual override for those difficult editing tasks.
The adjustment features are arranged in a fashion that provides a model enhancement workflow to follow – simply move from the top to the bottom of the tools starting with smart fixing, working through lighting and color alterations, applying sharpening and, lastly, paint on retouching to specific areas of the photo.
There is no doubt that for making speedy adjustments of your favorite images with the option of some override control, the Quick Fix editor is a great place to start. And the best thing of all is you can see the before and after results of your changes on screen via the zoomable preview windows.
Semi-auto editing summary
• Middle-level control using the features in the Quick Fix and Full Edit workspaces
• Some changes applied automatically, others via a user controlled slider
• New users progress here with experience and understanding
• Control of: cropping, rotation, contrast, color, saturation, hue, temperature, tint, shadow and highlight detail, red eye, midtone contrast and sharpening.

The Quick Fix Editor >> The Quick Fix editor combines the major automatic enhancing tools with manual override slider controls, great before and after preview pictures and now three new retouch tools in addition to the red eye removal tool.
5.08 Adjust Smart Fix
Suitable for Elements-7.0, 6.0, 5.0, 4.0, 3.0 Difficulty level – Basic Related techniques-5.01, 5.03

Auto Smart Fix >> The Adust Smart Fix option provides a sider control for the auto enhancement effect applied by the feature.
The Adjust Smart Fix (Editor: Enhance > Adjust Smart Fix) version of the Auto Smart Fix feature provides the same control over color, shadow and highlight detail but with the addition of a slider control that determines the strength of the enhancement changes. Moving the slider from left to right will gradually increase the amount of correction applied to your picture. This approach provides much more control over the enhancement process and is a preferable way to work with all but the most general photos.
The Auto button, also located in the dialog, automatically applies a fix amount of 100% and provides a similar result to selecting Enhance > Auto Smart Fix.
Manual editing
The next approach to editing includes tools and features designed to give the user professional control over their editing and enhancement tasks. Many of the features detailed here are very similar to, and in some cases exactly the same as, those found in the Photoshop itself. These tools provide the best quality changes available with Elements, but they do require a greater level of understanding and knowledge to use effectively.
The extra editing and enhancement power of these tools comes at a cost of the user bearing all responsibility for the end results. Whereas the automatic nature of many of the features found in the other two groups means that bad results are rare, misusing or over-applying the tools found here can actually make your picture worse. This shouldn’t stop you from venturing into these waters, but it does mean that it is a good idea to apply these tools cautiously rather than with a heavy hand. In fact once most users develop a good level of understanding and skill with the manual tools and features in the Full Edit workspace they seldom return to using automatic enhancement options, preferring to remain in complete control over the pixels in their pictures.
5.09 The Full Edit workspace
Suitable for Elements – 7.0, 6.0, 5.0, 4.0, 3.0, 2.0, 1.0 | Difficulty level – Basic Related techniques – 5.07
The Full Edit contains the features and tools used for the most sophisticated of the three different editing pathways provided in Elements. The groups of tools included in this workspace are designed to give the user professional control over all their editing and enhancement tasks.
Manual Editing Summary
• Sophisticated control using the features in the Full Edit workspace
• Most editing changes applied manually via settings input by the user
• Great for complex editing and enhancement tasks performed by more experienced users
• The most control of all the major editing and enhancing of your digital photographs.

Manual Option >> The manual versions of many automatic or semi-automatic enhancement features are located in the lower part of the Enhance menu.
As well as providing manual versions of all the automatic enhancement options that we have looked at so far, the Full Edit workspace also includes tools that enable the user to isolate where and how the editing changes are applied to photos. For this reason most advanced techniques detailed in the ensuing chapters of this book make use of the extensive tool and feature set provided in this Editor workspace.
The Full Edit >> Advanced editing and enhancement techniques are generally applied in the Full Edit workspace.
Auto/manual feature equivalents
| Auto/manual feature equivalents | |
| Automatic feature | Manual equivalents |
| Auto Levels | Levels or Shadows/Highlights or Brightness/Contrast or Adjust Color Curves |
| Auto Color Correction | Remove Color Cast or Color Variations or Adjust Color For Skin Tones |
| Auto Contrast | Levels or Shadows/Highlights or Brightness/Contrast or Adjust Color Curves |
| Auto Red Eye Fix | Red Eye Removal Tool |
| Auto Smart Fix | Levels or Shadows/Highlights or Brightness/Contrast or Adjust Color Curves together with Remove Color Cast or Color Variations or Adjust Color For Skin Tones |
| Auto Sharpen | Unsharp Mask or Adjust Sharpness |
Manual Choice >> Photoshop Elements provides manual alternatives for all its automatic and semi-automatic editing options. This table summarizes the specific manual features that can be used as alternatives.
Three Editing Modes in Elements plus one Online
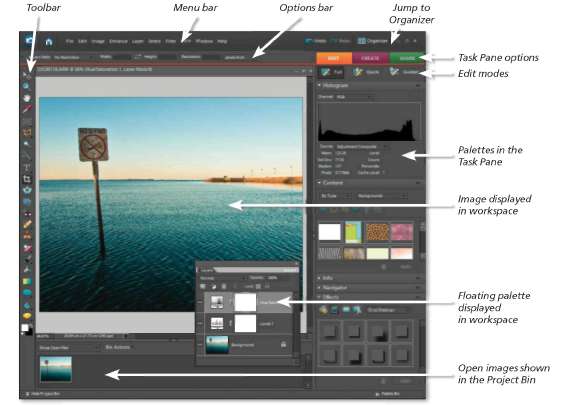
The Guided Edit workspace was introduced into Elements in version 6. This mode combines the step-by-step instructions that used to be found in the How To feature with the direct enhancement control of the Quick Fix edit space. As part of the interface changes that also occured in Photoshop Elements 6, the guys at Adobe grouped features, tools and options into several task headings. The Task Pane and the associated headings are displayed on the right of the Element’s workspaces with different options available in each. In the Edit workspace these include Edit, Create and Share, where as in the Organizer the choices include Organize, Fix, Create and Share. With all the management, editing, enhancement, and production options now available in Elements the inclusion of these task based headings helps the user navigate through the various phases of photographic workflow.

Three edit option >> version 6.0 the Guided edit mode was added to help users with their enhancement activities.
In the Edit workspace, Elements users have the luxury of three different ways of conducting their enhancement activities. Once you have selected the Edit heading you can then choose between Full Edit, Quick Fix and Guided Edit workspaces. New for Photoshop Elements 7.0 is the ability to perform simple editing tasks online via the tools and function available at Photoshop.com. Though these ‘web’ tools do not provide the level of manual control available in the Full edit workspace, they do provide a very usable alternative to many of the enhancement options available in Quick and Guided edit modes. When linked with Online Albums any changes made in the webspace are reflected in the duplicated photos stored in the Organizer..
We have already looked at the Full Edit and Quick Fix workspaces so let’s now turn our attention to the newly created Guided Edit option.
5.10 Guided Edits
Suitable for Elements – 7.0, 6.0 | Difficulty level – Basic
Selecting the Guided tab from the Edit task pane displays a list of the tutorials that ship with Elements. Clicking a tutorial heading will reveal subheadings for specific topics. Selecting a heading topic will display a set of instructions together with associated buttons and controls. For instance, in the example on the next page, two Rotate buttons (rotate left and rotate right) are displayed in the panel. Clicking either of these buttons will perform the same action as selecting the same options from the Image > Rotate menu.
Guided edit is best used for learning how to use new tools and techniques or, as is the case with the new Photomerge Faces and Group Shot options, as a way to step through complex techniques.
The Guided Activities > Guide for Editing a Photo entry contains a collection of guided edits that are useful when correcting images. These include crop, lighten, darken, touch up and sharpen.
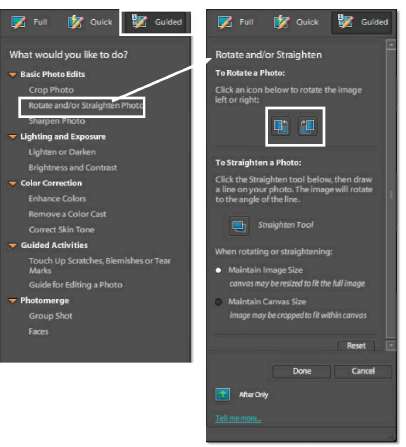
Guided Edits >> The Guided edit workspace combines step-by-step instruction with embedded enhancement or edit controls.
5.11 Enhancing via Photoshop.com
Suitable for Elements – 7.0 | Difficulty level – Basic
The partnership between Photoshop Elements and Photoshop.com goes way beyond merely providing a space on the web to view the pictures that you process in Elements. Because Photoshop. com grew out of Photoshop Express the site also contains simple editing features such as the ability to crop, resize, auto correct, alter white balance, adjust highlights, boost color, tint and distort photos.
To adjust an image online, click onto the My Photos heading first and then navigate to the photo. You can look for the photos visually by selecting an Album entry or Library heading on the left of the screen and then scrolling through the thumbnails in the main workspace. Alternatively, you can locate the photo by typing a search term into the Search box at the top right of the workspace and then hitting the Enter key. Photoshop.com tries to match the search term with album and file names, tags associated with the photos and picture captions.
Once you have located the photo, clicking on the picture’s thumbnail switches the workspace to the edit mode and displays the photo as large as possible within the window. All the adjustments that can be applied to the photo, are grouped under three headings Basics, Tuning and Effects on the left.
For most options, when an adjustment is selected from the list, a series of thumbnails displaying varying degrees of application for the adjustment are displayed above the image. Clicking a thumbnail will preview a change to the photo. With some adjustments a slider control is also provided below the thumbnails for finer control. One thumbnail of the group will be displayed with a curved yellow arrow. Click this entry to reset the photo to the way it was before selecting the current adjustment. Click the green tick (top right) to save the current adjustment changes and click the red cross to cancel the alterations.
Despite the preview being updated to reflect the changes that you have made, the adjustments are not actually applied to the image until they are saved upon exiting the Editing mode. This way of working allows you to revert the photo to its original state by clicking the Reset All button at the bottom of the window. Also contained at the bottom of the editing window is the View Original image which allows you to see how the photo looked before your adjustments. Hold down the button to see the before image, let go of the button to return the picture to its current state.

Enhancing at Photoshop.com >> All image adjustments performed in Photoshop.com are undertaken in the Editing mode pictured to the left.

Synchronized Updatin >> For photos that you have edited, and are part of a synchronized album, clicking the Save button updates the image at Photoshop.com (1) and in your Photoshop Elements catalog (2).
Some enhancement options, such as Red-Eye Removal and Touchup, require the user to interact directly with the image. With these tools you will need to click on or paint over the parts of the photo that you want to change. The Touchup tool in particular is very useful as it provides a way to remove small dust marks and spots from your photo. Once selected, you simply click and drag a circle around the dust mark and then let the mouse button go. Automatically the dust spot is removed. If the result didn’t work as you expected, just click the circular orange arrow icon at the top right of the window. This is the Reset button and pressing it will remove all your retouching changes, allowing you to start again.
Once you are satisfied with your changes, you can saved the altered photo by clicking the blue Save button at the bottom of the editing window. This action will update the photo in the Photoshop.com library and will also update the picture in your Photoshop Elements Catalog if the picture belongs to an Album that is set for Backup/Synchronization.
Non-destructive editing, the professional’s choice
Though not strictly an editing mode in itself, the idea of making changes to your images in a nondestructive fashion is key to all professional workflows. For this reason I feel that it is appropriate to introduce the idea here. When digital photography was in its infancy, all changes made to the photo were applied directly to the original pixels captured by the camera or scanner. At the time, the abilities of the software and hardware allowed frustratingly few alternatives to this destructive way of working.
For me, as a photographer who trained when film was king, I found the idea of changing my captured image rather distressing, as I would never have altered, cut, or intentionally marked my negatives, so why should I have to work this way when opting for a digital workflow. This would lead me to make countless copies of my original images to ensure that I had at least one copy of the primary capture file to refer to at all times.
Thankfully times have changed and digital photography is now well out of ‘short trousers’ and software and hardware has developed to a stage where many of the editing activities we regularly carry out in Photoshop Elements can be executed non-destructively, that is, without altering the pixels of the captured file.
Throughout the rest of the text I will use non-destructive editing and enhancement techniques wherever possible, but to get you up to speed, here I introduce a selection of tools, techniques and features that can be employed to enhance your images non-destructively.
5.12 Adjustment Layers
Suitable for Elements – 7.0, 6.0, 5.0, 4.0, 3.0, 2.0, 1.0 | Difficulty level – Basic
These special layers alter the look of the layers that are arranged below them in the layers stack. They act as a filter through which the lower layers are viewed. You can use adjustment layers to perform many of the enhancement tasks that you would normally apply directly to an image layer without changing the image itself. When you choose to use an Adjustment Layer rather than applying the enhancement change directly to the image you are choosing to work non-destructively.
Creating an adjustment layer adds a new entry to the layers palette just above the active layer. The adjustment layer entry contains two thumbnails – the Layer Thumbnail on the left and the Layer Mask thumbnail on the right. Double clicking the Layer Thumbnail will display the adjustment layer’s dialog. For instance, in the case of a Levels adjustment layer, double clicking the thumbnail will display the Levels dialog. This provides the user with the ability to make adjustments to existing settings, or even rest the dialog, at any time. The Layer Mask is used to customize where and how the adjustment layer’s changes are applied. See Technique 5.15 for more details.
Elements contains eight different types of adjustment layers which are grouped together with the fill layers under the Create Adjustment Layer button in the Layers palette. The same options can also be found in the Layer > New Adjustment Layer menu. They are:
Levels – Adjusts the tones in the picture.
Brightness/Contrast – Lightens, darkens and controls contrast.
Hue/Saturation – Changes the color and strength of color in photos.
Gradient Map – Changes the photo so that all the tones are mapped to the values of a selected gradient.

Adjustment Layers >> Photoshop Elements contains eight different adjustment layers.

Adjustment applied downwards >> Adjustment layers alter the look of the image layers that are positioned below them in the layers palette.
Photo Filter – Reproduces the color changes of traditional photo filters.
Invert – Reverses all the tones in a picture, producing a negative effect.
Threshold – Converts the picture to pure black and white with no grays present at all.
Posterize – Reduces the total number of colors in a picture and creates a flat paint (or poster-like effect.
Placing an adjustment layer at the top of a stack of layers will ensure that the editing changes will be applied to the content of all the layers beneath. If instead of changing all the lower layers you want to restrict the effects of the adjustment layer to a single layer then after selecting the adjustment layer, pick the Group with Previous option from the Layer menu. This will indent the adjustment layer in the palette and, more importantly, ‘group’ the adjustment with the layer immediately below it. This technique is an important one as it changes the way that adjustment layers work and allows their non-destructive editing powers to be applied to individual image layers only.

Restricting adjustments to a single layer >> To link the changes made via an adjustment layer to a single layer only, make sure that the adjustment layer is directly above the image layer to be changed and then with the adjustment layer active, choose Layer > Group with Previous, or Ctrl + G.
Pro Tip: Alt-click on the border between a layer and the one below it to Group With Previous
5.13 Select and adjust in one stroke
Suitable for Elements – 7.0 | Difficulty level – Basic
One of the major changes introduced in Photoshop Elements 7.0 is the ability to select and make changes with the one tool. The new Smart Brush tool brings a whole new level of ease to the process of changing specific areas of your photo. By combining the selecting abilities of the Quick Selection tool and the enhancement options available via adjustment layers, the Adobe engineers have created a new way to change the look of your photos.
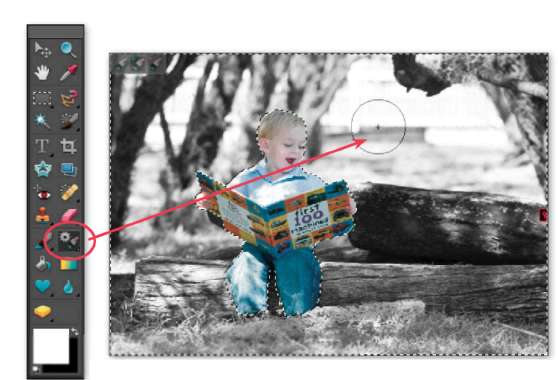
Smart Brush Tool >> After selecting the enhancement type, here I used one of the convert to black and white options, all you need to do is paint over the parts of the photo that you want to change. If the tool selects too much of the photo, switch to the Subtract from Selection mode (hold down the Alt key) and paint over the unwanted change to remove it.
Unlike the traditional way of applying adjustments where the user must first make a selection and then apply the adjustment, the Smart Brush Tool creates the selection and applies the adjustment as the user paints over the image. You can select the type of adjustment that will be applied with the tool from a list of over 65 that ships with Elements. These presets are grouped under general headings in the Preset Chooser located in the options bar. Here you will find options for altering image characteristics such as color, tone and saturation as well as subject based enhancements such as brightening teeth or making a dull sky bluer and, of course, a bunch of special effects changes. Preset entries can be displayed in a list or thumbnail form by selecting one of the options displayed when pressing the double sideways arrows in the top left of the Presets window.
The Smart Brush Tool is only available in Full editor workspace.
Feature Summary
1 With the Smart Brush tool active, go to the Options Bar and select the type of enhancement from the Preset Chooser pop-up menu.
2 Now paint over the areas that you wish to select and enhance.
3 After the first selection area is drawn, the tool’s mode automatically changes to Add to Selection so that you can include extra areas in the selection
4 Subtract from the selection by painting over new areas after switching to the Subtract from Selection mode using the buttons in the Options Bar or the floating palette at the top right of the photo.
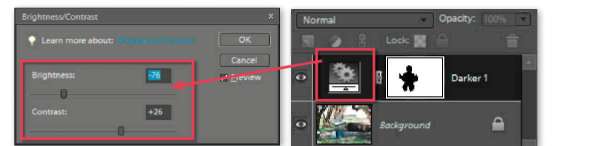
Fine-tuning Smart Brush Tools effects >> With some Smart Brush Tool entries the actual settings used for making the image adjustments can be edited. In this example, double-clicking on the thumbnail on the left of the entry displays the Brightness/Contrast dialog. In the dialog you can change the settings used for the adjustment.
When you paint on a photo with the Smart Brush Tool, Elements creates a new Adjustment Layer and adds it to the layer stack with a mask based on the painted selection. Cool! We get the power of masked adjustment layers without any of the pain of creating them manually, but how do we alter Smart Brush Tool effects once they are added?
To alter the strength of a Smart Brush Effect: Changing the strength of the effect is a simple matter of selecting the Smart Brush Tool entry in the layers palette and then adjusting the Opacity slider at the top right of the palette. The lower the opacity number the more subtle the effect.
To change how the effect combines with the picture: Photoshop Elements controls how the contents of two layers are mixed together via the Blend Mode setting. Elements uses this setting to adjust how the Smart Brush Tool layer interacts with the background or image layer. To change Blend Modes just select a new entry from the drop down list at the top left of the layers palette.
To change the settings of the effect itself: As all Smart Brush Tool effects are based on masked adjustment layers, to change the style of the effects, it should be possible to double-click on the layer thumbnail and simply change the settings in the dialog that appears. For most Smart Brush Tool adjustments this is true (check out the Lighting options) as they are built upon Elements Adjustment Layers, but this is not always the case as some effects are based on features that are only available in Photoshop itself. If you try to adjust these you will get a warning notice saying that it is not possible to tweak the settings.
5.14 ‘All Layers’ tool options
Suitable for Elements – 7.0, 6.0, 5.0, 4.0, 3.0, 2.0, 1.0 | Difficulty level – Basic
Removing dust and scratches is a regular correction activity for digital photographers, irrespective of if they are working on scanned historical photos, or recently captured portraits, where the client wants slight skin blemishes disguised. These changes are often performed with Elements’ features such as the Clone Stamp tool, Spot Healing and Healing Brushes on the main or background layer. Working this way changes the original pixels forever. A non-destructive work around that provides the same results, makes use of the All Layers’ options of these tools to keep the changes in a separate retouching layer that sits above the background.

ND retouching >> By using the All Layers option available with tools like the Clone Stamo and Spot Healing brush it is possible to remove dust and scratches from images without changing the original pixels.
To use this technique start by creating a new layer above the background layer. Rename this layer Retouching. Next select the layer to make sure that it is active and choose the desired tool from the Elements’ toolbar. Before commencing the repair work, select the All Layers option in the tool’s options bar. Now proceed to use the tool normally. The retouching changes though stored in a separate layer are seamlessly blended with the background. For specific restoration and retouching techniques turn to Chapter 8 and 9.
5.15 Blend Modes
Suitable for Elements – 7.0, 6.0, 5.0, 4.0, 3.0, 2.0, 1.0 | Difficulty level – Basic
As we have seen with the Smart Brush Tool the way that individual layers interact with other layers in the stack is determined by the blending mode setting. By default the layer’s mode is set to Normal, which causes the picture content on the upper layer to obscure the picture parts beneath, but Photoshop Elements has many other ways (modes) to control how these pixels interact.
Called ‘blend modes’, the different options provide a variety of ways to control the mixing, blending and general interaction of the layer content. The modes are grouped into several different categories based on the type of changes that they make. The layer blend modes are located in the drop-down menu at the top left of the Layers palette. Blend modes can also be applied to the painting and drawing tools via a drop-down menu in the tool’s options bar. For a complete list of the Blend Modes available in Photoshop Elements go to the Appendix at the end of this book.
So how can blend modes help us when it comes to altering out images non-destructively? By providing us with a range of ways to mix the image content from two layers, Blend Modes increase our ability to edit and enhance without changing original pixels. Let’s take the example of coloring a grayscale image to simulate the look of a hand colored photo of old. You may first think that the task is a simple one, select the color, choose the Brush tool and then paint over the grayscale background layer. Do this and you will get a paint stroke of solid color, that obscures all the detail of the original image. Not the look that we are wanting! However, if you change the Brush’s Blend Mode (using the drop-down menu in the tool’s option bar) to Color then the tool magically applies color in direct proportion as tone of the background image. All detail is retained in the underlying image, but this detail is colored the hue of the foreground swatch. This is the magic of the Color Blend Mode.

Blend Models in action >> By painting into a separate layer whose Blend Mode has been changed to Color you have the ability to tint the grayscale image while still retaining the original capture in the background layer.
Note: Keep in mind that the grayscale image needs to be in RGB Color mode to be tintable.
That said, in applying the coloring directly to the background layer we are destructively altering the primary pixels. So let’s rework the technique so that it still uses the Blend Mode but protects the original image. Start by creating a new layer to house the color changes. Next change the Blend Mode of the layer to Color. Select the foreground color and then the Brush tool. Make sure that the Blend Mode of the Brush is back to the default setting (Normal). With the new color changes layer selected, paint over the image. Notice that the same coloring effect is produced but this time the Blend Mode change is applied to the layer not the Brush.
5.16 Layer Masking
Suitable for Elements – 7.0, 6.0, 5.0, 4.0, 3.0, 2.0, 1.0 | Difficulty level – Basic
As we have already seen each time you add a fill or adjustment layer to an image two thumbnails are created in the Layers palette. The one on the left controls the settings for the adjustment layer. The thumbnail on the right represents the layer’s mask that controls how the adjustment is applied to the picture.
The mask is a grayscale image. When it’s colored white no part of the adjustment layer’s effects are masked or held back from the picture below. The full changes are applied to the image. Conversely if the mask thumbnail is totally black then none of the layer’s effects are applied to the picture. Shades of gray equate to various levels of transparency. In this way, the enhancement changes produced via an adjustment, or fill layer, can be selectively applied, or merged, with the layers beneath by painting (in black and white and gray) onto the layer mask.

Masking >> Modifying the mask associated with adjustment layers provides the option to customize where the effects of the layer are applied to the image layer. Using varying levels of gray will also change the strength of the enhancement effect. A darker gray will produce less noticeable changes whereas a light gray will allow more of the adjustment layer’s effects to be seen.
By default the layer mask is set to white so that the adjustment effect is fully applied. To customize the application of the effect, click onto the Layer Mask thumbnail (so that there is a second line border surround in the thumbnail), select the Brush tool and choose black, white or gray as the foreground color. Now paint over the surface of the image. Notice that the adjustment layer effect is reduced or eliminated in the areas where you paint with gray or black. Also notice that the mask thumbnail now displays the painted strokes. It is also worth noting that preselecting an area before creating the adjustment layer will result in a Mask the shape and size of the selection.
Many professionals use masks on a regular basis to help customize the application of adjustment layer changes and also for governing how the picture parts in separate image layers interact. Though Photoshop Elements doesn’t contain all the masking power that its bigger brother Photoshop does, customizing adjustment layers is no problem and, with a simple ‘work around’ (see Technique 5.14), it is also possible to provide more masking functionality than is generally available to the Elements user.
5.17 Duplicate layers
Suitable for Elements – 7.0, 6.0, 5.0, 4.0, 3.0, 2.0, 1.0 | Difficulty level – Basic
In situations where none of the above techniques can be used to edit non-destructively it will be necessary to use other means to preserve the integrity of the original file. A clear example of this is when it comes time to add some sharpening to your photos. Now by design, applying a sharpening filter will pretty much change all the pixels in your photo in order to increase the clarity of the picture, which makes the action very destructive and one that should be avoided. So what other route can we take to provide the same results?
Well the simplest way is to duplicate the image layer, and then apply the sharpening filter to the copy, rather than the original layer. This way the primary pixels (in the original image layer) are protected and displaying the sharpened result is a simple matter of ensuring that it resides at the top of the layer stack. Alternatively the original can be hidden from view (click the ‘eye’ icon on the left of the layer entry).

Editing Layers copies >> When there is no other option than apply editing changes directly to the image layer then the best way to ensure that your original pixels are protected is to duplicate the image layer and execute the changes on the copy (a). With multi-layer documents use the Copy Merge command to duplicate the contents of all layers first before applying the editing changes to the merge layer (b).
In the case of a document that contains multiple image layers or a combination of image and adjustment layers some photographers would merge all the image layers before copying the resultant layer and applying the sharpen filter. The act of merging means that you will lose the ability to change the settings in the adjustment layers or edit any of the image layers independently. So forget the Layer > Merge Layers command, instead select the whole document using the Select > Select All command and then copy the contents of all the layers to memory by choosing the Copy Merged option from the Edit menu. Next select the uppermost layer in the layer stack and select Edit > Paste. This action inserts a new layer at the top of the stack that is the combination of all the layers in the document. This layer can then be filtered without fear of damaging the original photo.
![]() Secret Pro’s Tip: Instead of doing the select all, copy merged, paste to top of stack steps, pros simply add a new empty layer at the top of the stack and then do Shift-Alt-Control + E which is a undocumented Stamp Visible command that unfortunately has no menu equivalent.
Secret Pro’s Tip: Instead of doing the select all, copy merged, paste to top of stack steps, pros simply add a new empty layer at the top of the stack and then do Shift-Alt-Control + E which is a undocumented Stamp Visible command that unfortunately has no menu equivalent.
Giving Elements a helping hand
It is true that Photoshop Elements contains a dazzling array of editing and enhancement tools. In fact, many would say that if you can’t find a tool to perform the changes you desire, then you are not really trying. But as we have seen, just having the right tool to hand is not the whole story, it is also important to ensure that you are able to use the tools in a way that preserves the pixels first captured, and produces the best quality enhancements possible. This often means using the tools we have in ways that perhaps were not envisaged when the features were first designed. The next few techniques extend the editing abilities of Photoshop Elements beyond the standard workflow approaches advocated in most texts. These options may not need to be used with every photo, but they will certainly come in handy with specific enhancement tasks and will become an important technique in your editing kit bag.

Photoshop features in Elements >> Users can add to the functionality of Elements by opening Photoshop documents (a) containing Photoshop only adjustment layers (e.g. Curves, Selective Color, Black and White and Color Balance) and then dragging these layers to their Element documents (b). The adjustment layer’s enhancements will be applied to the document, but the settings for these layers can not be altered in Elements.
5.18 Borrowing Photoshop features
Suitable for Elements – 7.0, 6.0, 5.0, 4.0, 3.0, 2.0, 1.0 | Difficulty level – Basic
Because of the professional nature of Photoshop, it contains a range of high level features and tools that are not available in Elements. This said, both Photoshop and Elements contain a range of tools and features and technology in common and much of the nuts and bolts that sit behind the scenes are shared by both programs. This cross over leads to an interesting situation where some features that are Photoshop only can be borrow to be used, in a limited way, in Elements.
We have been talking about the importance of Adjustment Layers as a way of non-destructive enhancing and, as you would expect, Photoshop contains more adjustment layer options than Elements. Of interest to us particularly are the Curves, Color Balance, Selective Color and the new Black and White adjustment layers. Though these features can’t be invoked or Adjusted in Elements, a Photoshop document containing the layers can be opened in the program. The Adjustment layers can be seen as separate entries in the layers palette, but for the most part, the settings can’t be adjusted, Black and White is an exception, but more on this later. When this scenario is coupled with the fact that Photoshop adjustment layers can be dragged from one document to another, users end up with the ability to apply non Elements based adjustment layers to Elements documents. Cool!
In practice, I created several documents in Photoshop containing Adjustment Layers with a variety of settings, but no image data. I then open these files in Elements and drag the required adjustment layer from the Photoshop document to the Elements file and hey presto, the enhancement is applied. Now that is fine for me, as I have both Photoshop and Elements on my machine, but I know that most readers do not have this luxury, so for this reason I have created several different Photoshop documents that are available from the book’s website that you can use for your own projects.

Photoshop donor documents >> The book’s website contains several documents created in Photoshop that can be used to donate Photoshop only adjustment layers to your Elements document.
(a) Photoshop-Selective-Color.psd
(b) Photoshop-Convert-to-graypsd
(c) Photoshop-Curves.psd
(d) Photoshop-Split-Tones.psd
Photoshop donor documents
The book’s website contains four key Photoshop donor documents (the files containing adjustment layers which can be dragged to Elements documents) designed to be used for specific enhancement activities. Each document includes multiple layers for a single adjustment feature. The settings for each layer differ providing a bunch of preset enhancement options that can be applied to Elements documents by simply dragging and dropping the layer to the Elements files. The donor documents include:
Photoshop-Selective-Color.psd– For boosting or reducing specific colors using the Selective Color Adjustment layer.
Photoshop-Convert-to-Gray.psd –Monochrome conversions using the Black and White feature.
Photoshop-Curves.psd –Curves based adjustment of the tones in your photos.
Photoshop-Split-Tones.psd –Sophisticated split toning effects using Photoshop’s Color Balance adjustment layer to separately tone highlights and shadows.
5.19 Advanced layer masks
Suitable for Elements – 7.0, 6.0, 5.0, 4.0, 3.0, 2.0, 1.0 | Difficulty level – Basic
Along with extra adjustment layers Photoshop also contains advanced masking options that are not available in Elements. We have already see how it is possible to use the masks associated with Adjustment Layers to customize where the layer’s effects are applied, well, Photoshop allows users to use masks with image layers to provide the same level of customization when montaging. When a mask is attached to an image layer, it can be used to adjust which parts of the upper layer are visible, and which parts are hidden from view allowing the contents of the layer beneath to show through. This is a very handy function as it is provides non-destructive montage abilities. Elements users can access such masking abilities by highjacking the mask associated with an adjustment layer and use it with an image layer.

Image layer marks>> Though not designed for this purpose it is possible to use the Layer Masks associated with adjustment layers to mask image layers. In the example above the sky from the upper image layer is HomeSite with the foreground detail from the layer below using the layer mask in the Levels adjustment layer. For this to occur the adjustment layer needs to be created with no settings and then the upper image layer is Grouped with the adjustment layer.
The process involves adding an adjustment layer, with no settings applied, to the layers stack in between the two image layers to be montaged. Next the upper image layer is grouped with the no-settings adjustment layer. This action essentially links the image layer with the mask of the adjustment layer. As the mask by default is white, the upper image layer is displayed in full, but paint onto the layer mask with a black (or gray) brush and details of the lower layer will be revealed. By using black, white and gray paint strokes on the mask it is possible to non-destructively mix the contents of the two image layers. Look for examples of this technique throughout the next chapters.