
Need to save time? Of course you do. Well, we can all use a little assistance. Keyframe Assistants make it easier to get work done fast. Learn how to how to fine-tune your animations and quickly achieve advanced effects. Whether it’s to generate keyframes or quickly align layers, these built-in tools can give you back valuable time. Other powerful tools like parenting and Auto-Orientation allow you to animate difficult relationships without getting keyframe intensive.
This chapter will help you save time by making several common tasks easier. We’ll also open up the door to some new tools and new uses that will help you get more done.
Yummy. These keyframe assistants are like candy. They can definitely be overused but you can always tweak the default values
Ease assistants allow you to quickly change keyframe interpolation method and velocity.
![]() Click on the keyframe where you’d like to apply ease.
Click on the keyframe where you’d like to apply ease.
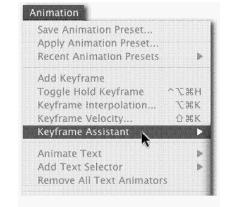
![]() Choose Animation > keyframe Assistant>and choose one of the following
Choose Animation > keyframe Assistant>and choose one of the following
![]() Let’s see this assistant in motion.
Let’s see this assistant in motion.
![]() Select a layer, and make two simple linear position keyframes.
Select a layer, and make two simple linear position keyframes.
![]() Do a RAM preview (hit Zero on the numeric keypad) to see the movement. Notice that the object moves at a constant rate.
Do a RAM preview (hit Zero on the numeric keypad) to see the movement. Notice that the object moves at a constant rate.
![]() Select the end keyframe and choose AnirnatioOKeyframe AssistanOEasy Ease In. Notice that the shape of the keyframe changes.
Select the end keyframe and choose AnirnatioOKeyframe AssistanOEasy Ease In. Notice that the shape of the keyframe changes.
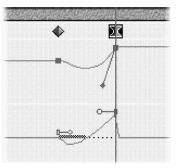
![]() Trigger RAM Preview again and notice that the layer’s rate of movement slightly slows down as it reaches the second keyframe. The original rate of movement is slightly faster at the beginning point, then slows until finally stopping on the second keyframe. The spatial interpolation is still linear but the temporal interpolation is now Bezier. Notice that the motion path has a greater density of dots towards the second keyframe, meaning that velocity (or rate of movement) differs over time and velocity slows where there are more dots.
Trigger RAM Preview again and notice that the layer’s rate of movement slightly slows down as it reaches the second keyframe. The original rate of movement is slightly faster at the beginning point, then slows until finally stopping on the second keyframe. The spatial interpolation is still linear but the temporal interpolation is now Bezier. Notice that the motion path has a greater density of dots towards the second keyframe, meaning that velocity (or rate of movement) differs over time and velocity slows where there are more dots.

Want to reach your Ease assistants faster? Try these handy keyboard shortcuts.
| Easy Ease | F9 | |
| Easy Ease In | Shift+F9 | |
| Easy Ease out | Cmd+Shift+F9 (Ctrl+Shift+F9) | |
If you are running After Effects on Mac 0 s 10.3, be sure to change your default Exposé settings. If you don’t, 0 s X will show all open windows.

This assistant is new to AE6. Previously you could use motion math or a third party plug-in like Trapcode’s Sound Keys, but now, using audio amplitude to control other properties is native.
![]() Make sure you have at least one layer with audio.
Make sure you have at least one layer with audio.
![]() Set your work area to the length you want to generate keyframes.
Set your work area to the length you want to generate keyframes.
![]() Choose Animation > Keyframe Assistant>convert Audio to Keyframes.
Choose Animation > Keyframe Assistant>convert Audio to Keyframes.
![]() A new layer will be generated called Audio Amplitude.
A new layer will be generated called Audio Amplitude.
![]() Select this layer and press U to reveal animating properties
Select this layer and press U to reveal animating properties
![]() After you reveal animated or modified properties, you’ll see the assistant has created amplitude keyframes for the Left, Right, and Both Channels of the audio layer (or layers). Using a true stereo file will produce the best results as the left and right channels will vary. If you are getting the same amplitude levels for both left and right channels, you could disable them (by hitting the stopwatch) and just use Both Channels’ keyframes
After you reveal animated or modified properties, you’ll see the assistant has created amplitude keyframes for the Left, Right, and Both Channels of the audio layer (or layers). Using a true stereo file will produce the best results as the left and right channels will vary. If you are getting the same amplitude levels for both left and right channels, you could disable them (by hitting the stopwatch) and just use Both Channels’ keyframes
![]() Now you can take a property of any layer or effect applied to that layer and use an expression to link the property to the audio amplitude. Amplitude tends to be low so you should add a multiplier at the end of your expression-like this Comp layer (“Audio Amplitude”) .effect(“Right Channel”) (“S1ider”)*lO.
Now you can take a property of any layer or effect applied to that layer and use an expression to link the property to the audio amplitude. Amplitude tends to be low so you should add a multiplier at the end of your expression-like this Comp layer (“Audio Amplitude”) .effect(“Right Channel”) (“S1ider”)*lO.

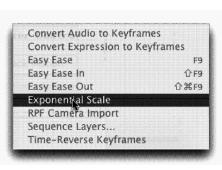
Convert Expression to Keyframes
You’ve written (or maybe just used) the perfect expression. Would you like more control over keyframe interpolation? Would you like to lock the expression in, AND speed up your render times? Then convert the expression to keyframes.
![]() Click on the expression you want to convert.
Click on the expression you want to convert.
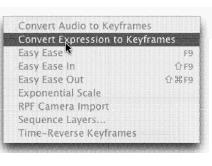
![]() Choose Animation >Keyframe Assistant> convert Expression to Keyframes
Choose Animation >Keyframe Assistant> convert Expression to Keyframes
![]() Continue to modify keyframes as you see fit.
Continue to modify keyframes as you see fit.
The Sequence Layers’ command is such a handy assistant to manage multiple layers. It’s also a great way to get multiple footage items sequenced.
![]() Select the layers you want to sequence by selecting one, and then shift clicking or Cmd+clicking (Ctrl+clicking) on other layers to select them. The first layer you selected remains in its initial time position and the other layers will move to new positions in the timeline, depending on the order in which you selected them.
Select the layers you want to sequence by selecting one, and then shift clicking or Cmd+clicking (Ctrl+clicking) on other layers to select them. The first layer you selected remains in its initial time position and the other layers will move to new positions in the timeline, depending on the order in which you selected them.
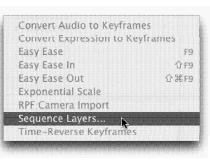
![]() Choose Animation >Keyframe Assistant>Sequence Layers.
Choose Animation >Keyframe Assistant>Sequence Layers.
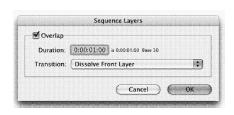
The Sequence Layers command also gives you the ability to dissolve between shots.5 Perform the Sequence Layers command as previously described. In the dialog box you have a few choices on overlapping the layers.
• You can select whether the layers overlap, and if so, how long they overlap.
• You can also choose to have the layers cut to another or dissolve between layers by adjusting the transition setting.
• Dissolve Front Layer when you want to dissolve between full-screen opaque items such as video or film footage.
• Cross Dissolve Front and Back Layers works well for items that have transparent areas (such as text or logos). This option causes both layers to fade and will show the background layer through.
You can make a nice stop motion animation with sequence layers and an Illustrator file.
In Illustrator create a drawing in a layer
![]() Duplicate the layer, and modify it moving lines or segments.
Duplicate the layer, and modify it moving lines or segments.
![]() Repeat step one or more times ending up with a file where every layer contains a progression.
Repeat step one or more times ending up with a file where every layer contains a progression.
![]() Name your layers with numbers..
Name your layers with numbers..
![]() In AE, go to File>Import> File and import that file as Composition Cropped Layers
In AE, go to File>Import> File and import that file as Composition Cropped Layers
![]() Open the composition, select all the layers, go to 2 seconds in the timeline, and press Option+] (At+]) to trim the layers.
Open the composition, select all the layers, go to 2 seconds in the timeline, and press Option+] (At+]) to trim the layers.
![]() Choose Animation>Assistants> Sequence Layers.
Choose Animation>Assistants> Sequence Layers.
![]() Press Cmd+I (Ctrl+K) to access Composition Settings and change the duration of your comp to at east 40 seconds RAM Preview.
Press Cmd+I (Ctrl+K) to access Composition Settings and change the duration of your comp to at east 40 seconds RAM Preview.

Gather ′Round for the Slideshow
The Sequence Layers command is useful for creating a slideshow from a series of stills.
![]() Select all of the stills you’d like to sequence.
Select all of the stills you’d like to sequence.
![]() Drag the stills on the new comp icon in the bottom of the project window.
Drag the stills on the new comp icon in the bottom of the project window.
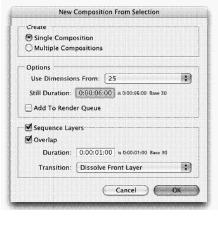
![]() Choose single composition.
Choose single composition.
![]() Specify which dimensions if the files differ.
Specify which dimensions if the files differ.
![]() Select the duration for the stills here.
Select the duration for the stills here.
![]() Decide if you want to sequence the layers and if they should overlap. Use the Dissolve Front Layer option if you’d like to fade between shots.
Decide if you want to sequence the layers and if they should overlap. Use the Dissolve Front Layer option if you’d like to fade between shots.
![]() Click OK.
Click OK.
Have you ever animated a scale from say 100 percent to 0 percent and have it look a bit off when you preview the animation? The human eye will pick up that the object appears to scale more quickly at the end of the scale. Mathematically it’s taking the same amount of time to scale from 100 percent to 50 percent as it is to scale from 50 percent to 0 percent. Perceptually though, your eyes see more change occurring in the last half of the scale.
If you are using the Pro version of After Effects, take advantage of the Exponential Scale keyframe assistant.
![]() To fix this shift click on your two scale keyframes to select them.
To fix this shift click on your two scale keyframes to select them.
![]() Go to Animation >Keyframe Assistant> Exponential Scale. This assistant will take a while to generate the new keyframes. This keyframe assistant speeds up the time spent on small degrees of change and elongates the time where more change is occurring creating an exponential curve..
Go to Animation >Keyframe Assistant> Exponential Scale. This assistant will take a while to generate the new keyframes. This keyframe assistant speeds up the time spent on small degrees of change and elongates the time where more change is occurring creating an exponential curve..
It’s a logarithm!
At any point you can select a range of keyframes and reverse their order. You can also select and reverse keyframes across multiple layers and properties.
![]() Select a range of keyframes by shift+clicking or lassoing around a range of keyframes.
Select a range of keyframes by shift+clicking or lassoing around a range of keyframes.
![]() Choose Animation>keyframe Assistant>Time-Reverse Keyframes..
Choose Animation>keyframe Assistant>Time-Reverse Keyframes..

The fundamental premise of After Effects is change over space and time. You effect change by applying keyframes. How those keyframes relate to each other is the basis of any animation. By default, After Effects is set to use linear keyframes, so there's a constant rate of change between keyframes. But a few simple shortcuts can quickly change keyframe types.
• Cmd+Click (Ctrl+Click) on a linear keyframe to change it to an Auto Bezier Keyframe. The keyframe will go from diamond shape to a circle and the motion will be slightly smoother. The timing or your animation is the same but the rate at which your object is moving has been slightly altered.
• Option+Cmd+H (Alt+Ctrl+H) to change any keyframe into a Hold Keyframe. Hold keyframes will hold a property value until another value is reached in the timeline.
• If you want to check what kind of keyframe you are dealing with, or if you want to switch which kind of keyframe to use launch the Keyframe Interpolation dialog box. To adjust keyframes manually choose Animation>Keyframe Interpolation or press Option+Cmd+I <(Alt+Ctrl+I<) to view your temporal and spatial interpolation.

When adjusting the Bezier handles on a keyframe, it is possible that you can “break your handles. If you want them to join again, try the following:
• Go to your interpolation dialog box. Context click on the keyframe for the floating menu, and change your Bezier Keyframe to a Continuous Beziern rn Keyframe.
• Option Double Click on the Keyframe for the Keyframe Velocity Box and check the Continuous Bezier Box.
• Bezier Keyframes have different incoming and outgoing velocities (broken handles) while Continuous Bezier Keyframes have the same incoming and outgoing velocities (joined handles).

The best way to understand what’s going with your keyframes is to click the triangle next to the keyframes you’ve set. This will open up the Speed (or Velocity) Graph.
• Position and Anchor Point keyframes are spatial and will show the speed graph.
• Keyframes for Opacity, Rotation, or Scale, will show both a velocity graph (to show the rate of change) and a value graph (to show you degree of change).
• When you select a keyframe, you’ll see blue handles, sort of like the Bezier handles on a motion path, which you can drag around.
• Dragging these handles up increases speed or velocity.
• Dragging these handles down decreases speed or velocity.
When you use the Ease Assistants After Effects is applying a 33.3 percent ease in the original velocity to the velocities of a keyframe. To see the numeric Keyframe velocity Option+Double Click on a keyframe, or press Shift+Cmd+K(Shift+Ctrl+K). You can modify incoming and outgoing influence and speed in this palette. You want precision? You've got it.

Draw Your Animation with Motion Sketch
Motion Sketch records the position of a layer and the speed at which you draw. It's great for when you want a layer to have an organic feel to it, or if you want your layer to follow a path that would be difficult to draw with the pen tool.
![]() Make sure your composition window is at 100 percent or higher magnification.
Make sure your composition window is at 100 percent or higher magnification.
![]() Set your work area to the time you want to sketch for.
Set your work area to the time you want to sketch for.
![]() Select the layer you want to animate, then go to Window>Motion Sketch. Although you can use your mouse to draw the path, Motion Sketch works best with a graphics tablet and pen. For snappier response, choose to show a wireframe of the layer. You may need to show the background for references your draw.
Select the layer you want to animate, then go to Window>Motion Sketch. Although you can use your mouse to draw the path, Motion Sketch works best with a graphics tablet and pen. For snappier response, choose to show a wireframe of the layer. You may need to show the background for references your draw.
The capture speed is quite important. If you set the capture to 100 percent and your work area is 4 seconds, you will have 4 seconds to draw your path. If your capture rate is 50 percent you will only have 2 seconds in which to draw, but if your capture is 200 percent, you will have eight seconds to draw your path. Whatever capture rate you choose, your path will still play back realtime in four seconds.
You'll find, as you use Motion Sketch, that it is hard to draw a path in realtime, and you may choose to capture above 100 percent.
If you have an audio layer that you are tying to sync movement with, make sure your audio button is turned on in your Time Controls Window to hear it as you capture.

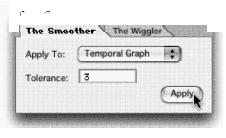
Continuing the tradition of goofy names for cool tools, we introduce the Smoother (What’s next? The Jiggler and Tumbler?) The Smoother is used quite often in conjunction with Motion Sketch as sketching creates a lot of keyframes. You can also use it to reduce other generated keyframes from the Wiggler or Third Party Assistants.
![]() On the layer you just motion sketched, click the position property name to select all of the position keyframes.
On the layer you just motion sketched, click the position property name to select all of the position keyframes.
![]() Go to Window <The Smoother. In this case you’ll be smoothing the spatial path but the smoother can also be used on temporal keyframes like Opacity or Rotation.
Go to Window <The Smoother. In this case you’ll be smoothing the spatial path but the smoother can also be used on temporal keyframes like Opacity or Rotation.
![]() The tolerance defines how great (in pixels) the smoothed keyframes can vary from the original path. The higher the tolerance, the smoother the path. You may want to repeat the smoothing multiple times at a low value until the desired result is achieved.
The tolerance defines how great (in pixels) the smoothed keyframes can vary from the original path. The higher the tolerance, the smoother the path. You may want to repeat the smoothing multiple times at a low value until the desired result is achieved.
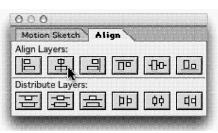
You could spend time eyeballing position but why when you can use the Align & Distribute Palette? You need least two layers to align and you need at least three layers to contribute
![]() Select the layers and choose Window >Align & Distribute.
Select the layers and choose Window >Align & Distribute.
![]() Choose the icon representing the type of alignment or distribution you want..
Choose the icon representing the type of alignment or distribution you want..
You can track the motion of an object in a layer and then use the tracking keyframes generated to control the position of another object. The Tracker in AE6 is faster and stronger than ever before.
![]() Select your motion source layer, and choose Window>Tracker Controls. Select Track Motion. This will open the layer in the layer window and give you a tracking region. You need to find an area to track (high contrast, circles) such as with stabilization.
Select your motion source layer, and choose Window>Tracker Controls. Select Track Motion. This will open the layer in the layer window and give you a tracking region. You need to find an area to track (high contrast, circles) such as with stabilization.
![]() Name your tracker in the Options Bar, and click OK. Once back in the Tracker Palette, hit the play button to analyze the track for the length of the comp. Scroll through the timeline to preview the analysis. If you find your tracker drifting, you can try resizing or moving the regions, and re-analyzing from that time. Nudge the regions, frame by frame, using the arrow keys..
Name your tracker in the Options Bar, and click OK. Once back in the Tracker Palette, hit the play button to analyze the track for the length of the comp. Scroll through the timeline to preview the analysis. If you find your tracker drifting, you can try resizing or moving the regions, and re-analyzing from that time. Nudge the regions, frame by frame, using the arrow keys..
![]() Try changing the Options. Track Luminance if your footage is high contrast or track Saturation if it is colorful. If you can't get good results going forward then start your track at the end of the footage and work backwards. When you are happy with your data, hit Apply. Go back into the Composition window, and do a RAM Preview to proof your track. Try using The Smoother to improve a track.
Try changing the Options. Track Luminance if your footage is high contrast or track Saturation if it is colorful. If you can't get good results going forward then start your track at the end of the footage and work backwards. When you are happy with your data, hit Apply. Go back into the Composition window, and do a RAM Preview to proof your track. Try using The Smoother to improve a track.

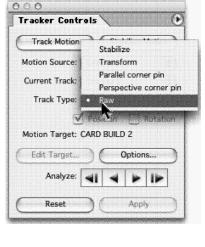
If you are unsure what layer you want to attach the tracking data to, or want to apply the data at a later time, choose Raw from the Tracking Type menu bar. The tracking data is stored in the motion source layer, where later on, you can use expressions to link a target layer.
If you have a layer in your composition that you want to attach to your tracking data, the tracker will default to using Transform as the Tracking Type. Transform tracks position and/or rotation with one-track point for position or two for rotation. Choose the layer you want to apply the data to in the Edit Target bar.
If your tracking gives you less than satisfactory results, give some of these options a try. While they’ll take longer to process, you may get better results.
• You may want to track position and rotation, which will give you two tracking regions positioned diagonally. If the footage is interlaced, try tracking fields. If the shot has a lot of movement, try going to the final frame and tracking in reverse
Try modifying the options by clicking the Options Button above the play button in the tracker controls palette. In AE 6.0, you need to click Options again near the tracker plug-in selector.
• In AE 6.5, the tracker window is simplified and you only need to click Options once..
• You can choose to track the RGB, Luminance, or Saturation Channels of a region.
• Try enhancing your footage by temporarily blurring or sharpening it. (The blur or sharpen is only for tracking and not actually applied to the layer).
• You can track using subpixel positioning where the tracker analyzes position between pixels, and you can tell After Effects to guess at the closest position with the Extrapolate Motion if Confidence is Below -%. The extrapolate option is handy for when your tracking feature becomes temporarily hidden.

Following Tracks: 2D Auto Orientation
As an object moves along its path, you have two choices. Either the object maintains its orientation, or the object rotates to follow the path. Think of this animation as similar to a roller coaster car on its track.
![]() Select a layer for which you have already created position keyframes
Select a layer for which you have already created position keyframes
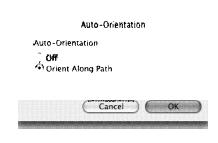
![]() Choose Layer < Transform < Auto Orient or press Cmd+Option+O (Ctrl+Alt+O)..
Choose Layer < Transform < Auto Orient or press Cmd+Option+O (Ctrl+Alt+O)..
![]() Choose Orient Along Path, and to deactivate it choose Off.
Choose Orient Along Path, and to deactivate it choose Off.
![]() You will find this incredibly useful when you are animating insects, unidentified flying objects, bobsleds, or any other object that needs to follow a curved path.
You will find this incredibly useful when you are animating insects, unidentified flying objects, bobsleds, or any other object that needs to follow a curved path.
Look at Me: 3D Auto Orientation
The best thing about Auto Orienting 3D layers is that you can orient them toward a you are animating a camera, move through layers in 3D space, select your layers, and camera. After Effects is not a true 3D program and layers in 3D space are flat. When choose Layer < Transform < Auto Orient or press Cmd+Option+O (Ctrl+Alt+O). Choose Orient Towards Camera to have your layers turn as the camera moves through them. This gives the illusion that the layers have some dimension.

Stay on Targets: Multipoint Motion Tracking (Pro)
You can track more than a single point in a footage layer. If you wanted to replace a billboard, sign, or doorway in a clip you would use one of After Effect’s multi-point trackers. These options are grayed out unless you have another layer in the composition to apply the data to.
• Parallel Corner Pinning, which is actually three-point tracking, is used to track things that stay parallel to the shot where you do not need to track perspective. If you have a perfect zoom into a window you would use Parallel Corner Pinning, for example.
• Perspective Corner Pinning is four-point tracking, and is used to simulate the distortion that occurs with perspective. This type of corner pinning is perfect for billboards, book covers, or any sort of four-cornered object with perspective skew.
• With both types of multi-point tracking the attach points mark the placement of the corner points. You can place the feature and search regions away from the attach points over areas with better contrast variations than there may be on whatever you are tying to cover up.

When animating cameras, you may want to Auto Orient the Cameras to their Point Of Interest. This way, as the camera moves in space, its focus never wanders.
![]() Select a camera.
Select a camera.
![]() Choose Layer <Transform <Auto Orient or press Cmd+Option+O (Ctrl+AlttO).
Choose Layer <Transform <Auto Orient or press Cmd+Option+O (Ctrl+AlttO).
![]() Choose Orient Towards Point of Interest, and to deactivate it, choose Off.
Choose Orient Towards Point of Interest, and to deactivate it, choose Off.

After animating the position of a layer, you may decide that you want your rate of movement to be constant. You could fiddle with the speed graph by moving your keyframes closer together, or further apart to produce a flat velocity line, but why do that when there is a much easier method?
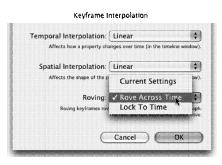
Roving keyframes, which are only available for spatial properties, were designed to do just this. Select all the keyframes you want to rove, and do one of the following:
• Go to Animation < Keyframe Interpolation, or press Cmd+Option+K (Ctrl+Alt+K) and, from the roving keyframe menu bar, choose Rove Across time. Notice your keyframes become auto Bezier except for the first and last..
• Alternately, open up the Speed Graph. and click on one of the boxes under any keyframe. Notice how the speed becomes a flat line indicating that it is constant. The keyframe shape has also changed to auto Bezier except for the first and last keyframes.
The first and last keyframes of the spatial property can never rove as they determine the intermediary keyframes’ speed and time. This is great because when you want animation to occur over a shorter or longer time, just select the first or last keyframe and drag it closer to a linear keyframe to speed up the animation, or further away to elongate it. Notice how all your roving keyframes maintain the same constant speed.
New to After Effects 6 is the Auto-trace option. You can convert the alpha, luminance, red, green, or blue channels of a layer to one or more masks. Once you have a mask, you can apply any mask-based effects.
Auto Trace is work-area sensitive so adjust your timeline accordingly. Instead of dragging the work area tabs, hit B to begin the workspace, and N to end it.
![]() Select your layer and choose Layer>Auto-trace to bring up the options box.
Select your layer and choose Layer>Auto-trace to bring up the options box.
![]() For a less detailed trace, increase your pixel tolerance; for more detail, decrease tolerance. More detail means more time.
For a less detailed trace, increase your pixel tolerance; for more detail, decrease tolerance. More detail means more time.
![]() Threshold is used to determine where to draw the mask, and is really intended only for layers without an alpha. Values over the percentage you enter are mapped to white, and made opaque. Values under the threshold are mapped to black, and are made transparent.
Threshold is used to determine where to draw the mask, and is really intended only for layers without an alpha. Values over the percentage you enter are mapped to white, and made opaque. Values under the threshold are mapped to black, and are made transparent.
![]() You may find it useful to blur the image a few pixels before tracing. This will generate a mask with fewer points.
You may find it useful to blur the image a few pixels before tracing. This will generate a mask with fewer points.

If you’d like better results with the new Auto-trace command, take these extra steps before running the command.
• If you are trying to trace a part of a layer, first mask out the areas you do not intend to trace. This will increase tracing speed and avoid unwanted masks.
• If you are using a channel to trace your masks, you may want to apply an effect, which increases the contrast of that channel like levels, channel mixer, or brightness/contrast.

Healthy ParentKhiId Relationships
There was once a time in AE where you had to precompose and/or nest layers to group them but no longer! A parent layer assigns its transformations (all except opacity) to its child layer. The child is still independent of the parent though, and can have its own animations applied.
Think of it like your right arm (or left, if you prefer). Your fingers can wiggle on their own, yet they are parented to your hand. If the hand moves, the fingers move. Likewise, the hand is parented to the arm, if it were to swing outward, the hand (and fingers) would follow. And lastly, the arm is parented to your body. Where the body goes, the arm goes, and hence the hand, and likewise the fingers. One parent can control many layers but a child can only have one parent.
• If you don’t see a Parent Column in the timeline, contextual click on the top of any column and choose Columns<Parent..
• Use the Pickwhip to drag and select, or manually choose a parent by clicking on None.
• If you are assigning a parent to many layers, select multiple layers and select a parent for one of them. The parenting will be applied to all selected layers.
• Parenting can not be animated. If you want to stop parenting at any time, you need to split the layer, and assign None as a parent to the split.

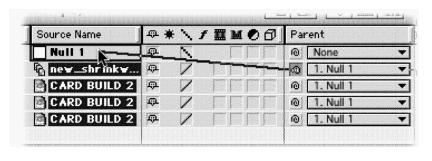
Come to Me: Parenting Using Null Objects
There are times when you will need to group layers, and you don't necessarily have a parent layer in mind. This is particularly true when working with 3D layers, and you want them to follow an object.
![]() Go to Layer>New >Null Object. Nulls are invisible but have all the transform properties of a regular layer..
Go to Layer>New >Null Object. Nulls are invisible but have all the transform properties of a regular layer..
![]() Select all of the layers you want to parent by shift clicking to select a range or Cmd+click (Ctrl+click) to select noncontiguous layers.
Select all of the layers you want to parent by shift clicking to select a range or Cmd+click (Ctrl+click) to select noncontiguous layers.
![]() In the parent column, choose Null1 or use the pickwhip.
In the parent column, choose Null1 or use the pickwhip.
![]() Now you can set keyframes on one layer to control a group of layers. This is especially great when you want several layers to rotate around a point in space.
Now you can set keyframes on one layer to control a group of layers. This is especially great when you want several layers to rotate around a point in space.
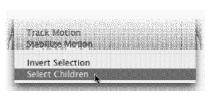
Wouldn’t it be nice to be able to quickly grab a layer an`d all its children (sort of a digital minivan)? This way you could move their stacking order or flip a single 3D switch. Well in AE 6.5 you can! Simply contextual click on a parent layer and choose Select v) Children. Instant family reunion time.
After Effects 6.0 allowed you to save filter combos as Effect Favorites. This was helpful, but didn’t cover all the needs. But hey it wouldn’t be an upgrade if there weren’t changes for the better.
After Effects 6.5 introduces the concept of animation presets which allow you to save and reuse just about any animation.
Animation presets can contain:
• Effects
• Properties
• Property Groups
• Settings
• Keyframes
• Expressions


Animation presets can be applied to their originating comp or at any point in the future. That’s because the presets are actually stored to a separate file on your hard drive (much like Photoshop Actions).
• If you save animation presets in the Favorites folder, they’ll appear in the Effects s & Presets Window.
• Be sure to back up your presets folder or a reinstall could blow away all of your custom work.
• All previous favorites from earlier versions are promoted to animation presets.
To create and save an animation preset:
![]() Choose the properties, property group, or effects (or any combo of these) that you want to keep and reuse.
Choose the properties, property group, or effects (or any combo of these) that you want to keep and reuse.
![]() Choose AnimationXave Animation Preset or click the Save Animation button in the Effects & Presets palette.
Choose AnimationXave Animation Preset or click the Save Animation button in the Effects & Presets palette.
![]() Give your preset a descriptive name and then add the extension .ffx
Give your preset a descriptive name and then add the extension .ffx
![]() Place the preset into the Favorite folder and if you’d like you can create subfolders to organize your effects. These subfolders will show up in the Effects & Presets palette.
Place the preset into the Favorite folder and if you’d like you can create subfolders to organize your effects. These subfolders will show up in the Effects & Presets palette.