

The Timeline is where all of the action happens. It’s the window that gets your art from start to finish. The more you know about its nuances, the better your results will be.
In this chapter, we’ll show you how to get the most out of your timeline, how to take advantage of its power, and how to do some tricks that will make.. .well.. .doing tricks easier.
The timeline in AE has always been flexible. And with After Effects 6.5, it has become a contortionist, bending over backward to make your life easier. Once you get comfortable with pre-composing, editing, resizing, and-well, you get the picture-you’ll be the envy of designers everywhere.
Often you will need to segment a layer. This might be for compositing purposes, such as making an object orbit around another. Other times it will make certain effects, such as Shatter. easier to control.

To split a layer, use the following steps:
![]() To split a layer, place the position indicator at the desired time.
To split a layer, place the position indicator at the desired time.
![]() Select the layer to be split by highlighting it.
Select the layer to be split by highlighting it.
![]() Press Cmd+Shift+D (Ctrl+Shift+D).
Press Cmd+Shift+D (Ctrl+Shift+D).
Layer Markers can come in handy when leaving notes to yourself within a composition. You can save time by adding the marker and calling up its dialog box with one key combination.
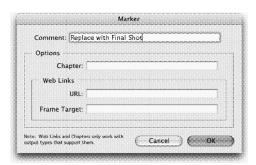
![]() To add a Layer Marker with dialog, press Option+* (the multiply symbol) on the numeric keypad.
To add a Layer Marker with dialog, press Option+* (the multiply symbol) on the numeric keypad.
![]() You can now add a comment, chapter marker, or Web link to your composition.
You can now add a comment, chapter marker, or Web link to your composition.
![]() Click OK when finished.
Click OK when finished.
Under AE 6.5 you can now add layer markers while previewing in the Layer Window!
• This is an advantage as there are no previews to cache.
• Markers will also carry to multiple compositions when you add the footage item.
Next time you need to work on a layer, try these two shortcuts.
• On the numeric keypad, type the number of the layer you want to work with. For digits greater than 9, be sure to type the numbers quickly with no gap.
• Press X to Scroll the selected layer to the top of the Timeline view.

Whether you run on a Mac or a PC, you need a two-button mouse with a scroll wheel to get the most out of After Effects 6.5. Powerful navigation shortcuts are now at your fingertips.
• The mouse wheel will scroll vertically in the Composition, Layer, or Footage Windows.
• Hold the shift key to scroll horizontally in the Timeline and Project windows.
• Hold the Option (Alt) key down to zoom around your mouse point in the Composition, Layer, or Footage windows. In the timeline, this shortcut lets you zoom in time.
• The Option (Alt) key will also zoom you around a selected track or mask point.
You don’t have to have a window active, just hover over the window you want to pan, tilt, or zoom.
If you’ve ever been zoomed in on your Timeline, you know how easy it is to misplace the Current Time Indicator. You could Zoom the Timeline back out to find it, or scroll left or right as you search. But there’s an easier way. (You knew we’d say that). Press D to scroll your Timeline View to the Current Time Indicator.

Need to get a better look at your Timeline? You can quickly zoom in and out from the keyboard. Press = (equal sign) to Zoom In. Press - (minus sign) to Zoom Out. We just remember that the zoom in key has a plus sign on it.
Need an even closer view of your Timeline? The tightest view you can have is a frame level view. Why bother adjusting the Zoom slider, or even tapping the = key multiple times? You can toggle between a frame level view and your current zoom level by tapping the ; (semicolon) key.

Want to quickly pick a layer to work with? Just type its number on the numeric keypad. Type a single digit for layers 1-9. For higher levels, type the layer number such as 1 and 5 for 15.

You just finished previewing your comp and it looks great, except for that one layer. A couple of quick tweaks to its keyframes and it would be perfect. You’ll soon get tired of twirling down through each effect just to get to your keyframes. The fast way is to press 2 U to toggle your Uber Animating Keyframes’ view. Because we need all the help we can get, we think of this shortcut as U for User Keyframes.

There are five key components to animating a layer in After Effects. Fortunately, Adobe put these properties at your fingertips.
• Press A to Twirl down the Anchor Point.
• Press P to Twirl down the Position.
• Press R to Twirl down the Rotation.
• Press S to Twirl down the Scale.
• Press T to Tkirl down the Opacity. (Think transparency.)

The following modifier keys also come in handy.
• Hold down the Shift key to display additional properties after selecting the first.
• Hold down the Option key to display a property and add a keyframe at the Current Time Indicator. On a PC, hold down Alt+Shift+ the shortcut letter (A, P,R,S or T) to achieve the same action.

Need to select multiple keyframes? Here are a few tips to make it easier.
• Select all keyframes associated with a property by clicking on that property's name in the timeline.
• Add to that selection by Shift+Clicking on additional properties.
• Lasso visible keyframes in the Timeline window.
• Select all visible keyframes by pressing Cmd+Option+A (Ctrl+Alt+A).
• In 6.5 you can also deselect keyframes (while still leaving the layer highlighted. Press Cmd+Option+Shift+A (Ctrl+Alt+Shift+A) to deselect only keyframes and groups.

By now you've likely discovered that your arrow keys can be used to nudge footage in the Comp Window. Did you know that you can nudge in the timeline as well? Selected layers can be slid foiward and backward from the keyboard.
• To Nudge a layer earlier, press OptiontPage Up (Alt+Page Up).
• To Nudge a layer later, press OptiontPage Down (Alt+Page Down).
• To Nudge a layer to even earlier frames, press Option+Shift+Page Up (Alt+Shift+Page Up).
• To Nudge a layer to even later frames, press Option+Shift+Page Down (Alt+Shift+ Page Down).
Missing a beat? Do your elements seem just a little out of sync? A gentle nudge to a keyframe may be the answer. Select the desired keyframe by clicking on it.
• To Nudge a keyframe earlier, press Option+Left Arrow (Alt+Left Arrow).
• To Nudge a keyframe later, press Option+Right Arrow (Alt+Right Arrow).
• To Nudge a keyframe even earlier, press Option+Shift+Left Arrow (Alt+Shift+Left Arrow).
• To Nudge a keyframe even later, press Option+Shift+Right Arrow (Alt+Shift+Right Arrow).

At any point of time, you can step inside a pre-composition. By Option+double-clicking on a pre-comp, you can step inside. Any changes made to the pre-comp will be reflected in all compositions for which the pre-comp is a part.

A layer can have two names, the one it comes in with, and the one you give it. Why is this useful? It all boils down to you keeping control. Perhaps you have added a footage item five times into your composition. If every layer was called Shot 1, you might get confused. We would.
![]() Highlight the layer to rename it.
Highlight the layer to rename it.
![]() Press Return (Enter).
Press Return (Enter).
![]() Type the new name..
Type the new name..
![]() Press Return (Enter) to apply the name, or click on another layer.
Press Return (Enter) to apply the name, or click on another layer.
If you'd like to toggle between all of the Source Names and the Layer Names, click the name field at the top of the timeline.

You are your own worst enemy, so protect your comp. Want to avoid accidentally deleting or modifying a layer? Lock It! You can quickly lock a selected layer by pressing Cmd+L (Ctrl+L). But what if you change your mind? You can’t use the same shortcut because locked layers cannot be selected. Here’s what to do instead. Press Cmd+Shift+L (Ctrl+Shift+L) to Unlock All Layers.
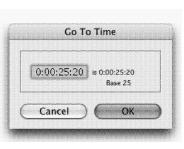
There are two ways to invoke moving the current time indicator, and that is, by clicking on the time counter in the timeline, or by pressing Cmd+G (Ctrl+G). Once the dialog box is open, there’s a lot you can do with it.
• Type in the time you’d like to go to. There is no need to type colons for the time. For example, you can just put 415 to move to the four and a half second mark using NTSC 29.97 fps counting.
• You can move forward a relative amount from your current position; simply type an amount such as +20 to move 20 frames forward.
• Conversely, you can move backward in time, but the phrasing is a little tricky. Open the Go To Time box and type in +-45 frames to move back 45 frames. While it seems confusing at first, you are saying “Add a negative adjustment to the current time.”
• If you want to pre-roll an effect, you need to move to a time before your composition begins. Type in negative three seconds (-300) in the Go To Time box, your current time indicator. This way, particle effects or those that need to ‘ramp up’ have adequate time to begin.
Under After Effects 6.5, the Current Time field can also be scrubbed allowing you to shuttle through the timeline.

Have you ever wished for the power to tweak scale right from the keyboard? No twirling down three layers just to access the Scale sliders? You can adjust layer size quickly using the numeric keypad.
• To nudge scale larger, press Cmd+the plus sign on the numeric keypad (Ctrl+the plus sign on the numeric keypad).
• To nudge scale smaller press Cmd+the minus sign on the numeric keypad (Ctrl+the minus sign on the numeric keypad).
Add the Shift key to the above combinations to scale more quickly.

Want to get all your selected tracks lined up at the starting line? This will ensure a clean start to your composition and avoid any flash frames.
![]() Select any layers you want to align. You can Shift+Click to select a range of layers, or Cmd+Click (Ctrl+Click) to select noncontiguous layers.
Select any layers you want to align. You can Shift+Click to select a range of layers, or Cmd+Click (Ctrl+Click) to select noncontiguous layers.
![]() To align your layers to the start of the Comp, press Option+HOME (Alt+Home).
To align your layers to the start of the Comp, press Option+HOME (Alt+Home).
Alternately, this trick can work to line things up at the end of the comp as well. Just substitute Option+End (Alt+End) to align all layers to the rear of the comp.

Need to move the in point or out point of a layer? No problem. You can avoid numeric entry all together and harness the power of the keyboard.
![]() Place the Current Time indicator at the desired time.
Place the Current Time indicator at the desired time.
![]() To Set the Time In, press the [ (left bracket) key. Or, To Set the Time Out, press the ] (right bracket) key.
To Set the Time In, press the [ (left bracket) key. Or, To Set the Time Out, press the ] (right bracket) key.
Using this method, you can set either an in or an out point, but not both.
Want to set both your in and out points for a layer? This can easily be accomplished in the Timeline Window.
![]() Place the Current Time indicator at the desired time.
Place the Current Time indicator at the desired time.
![]() To set the Time In, press the [ (left bracket) key. This will move the in-point to the Current Time indicator. If you’d like to trim earlier material, press Option+[ (Alt+[ ) to Time Trim the in point.
To set the Time In, press the [ (left bracket) key. This will move the in-point to the Current Time indicator. If you’d like to trim earlier material, press Option+[ (Alt+[ ) to Time Trim the in point.
![]() Move the Current Time indicator to the desired end time.
Move the Current Time indicator to the desired end time.
![]() To set the Time Trim for the out point, press Option+] (Alt+]).
To set the Time Trim for the out point, press Option+] (Alt+]).

Need to move your Current Time Indicator around? It’s easy to make small moves if you know the key combos. Be careful not to just tap the arrow keys, however. By themselves, the arrow keys nudge your footage in the composition window.
| FUNCTION | MAC | PC |
| Time Step Forward | Cmd+Right Arrow or PgDn | Ctrl+Right Arrow or PgDn |
| Time Step Forward More | Shift+Cmd+Right Arrow or Shift+PgDn | Shift+Ctrl+Right Arrow or |
| Shift+PgDn | ||
| Time Step Back | Cmd+LeftArrow or PgUp | Ctrl+Left Arrow or PgUp |
| Time Step Back More | Shift+Cmd+Left Arrow or Shift+PgUp | Shift+Ctrl+Left Arrow or Shift+PgUp |

When you go on a trip, do you just throw everything into your suitcase? Your toothbrush and toothpaste in the same compartment with your swimsuit, running shoes, dress shirts? If you do, I’m sure you’ve had a few surprises after the gorillas have thrown your bags around a bit. The organized traveler uses several small bags and pouches to keep belongings intact and looking their best. The same holds true in After Effects.
If your timeline has more than 20 layers, you should really consider organizing it better. Precomposing allows you to take several layers and put them into a new composition. They still live in your timeline, but are far easier to manage and track. To Re-Compose, simply highlight the desired layers and press Shift+Cmd+C (Shift+Ctrl+C).
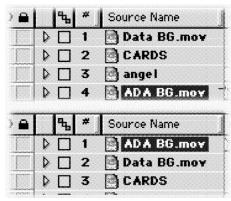
Have a lot of layers in your timeline? Of course you do, you’re smart and talented enough to be reading this advanced book. Wouldn’t it be nice to make a little more room in your timeline to see things? Harness the Shy layers feature to dramatically cut down on vertical scrolling.
![]() To designate a layer as shy, click on the little “Kilroy” icon on each layer you want to hide.
To designate a layer as shy, click on the little “Kilroy” icon on each layer you want to hide.
![]() At the top of the timeline click the Shy (Kilroy) icon.
At the top of the timeline click the Shy (Kilroy) icon.
![]() All shy layers will disappear from the timeline view. They will, however, continue to affect the composition, and their results will show up in the Comp Window.
All shy layers will disappear from the timeline view. They will, however, continue to affect the composition, and their results will show up in the Comp Window.
![]() At any time, you can reveal all shy layers by clicking on the Shy icon at the top of the timeline.
At any time, you can reveal all shy layers by clicking on the Shy icon at the top of the timeline.
Need to quickly move to the start (or end) of a layer? Press I to jump to the In point of a layer, or 0 to jump to the Out point. Remember though, if a layer starts or ends outside of your composition’s time range, you won’t see the playhead (content) in After Effects.
If running AE 6.5, there’s additional shortcuts between in and out points in your comp.
• Press Cmd+Shift+Option+Right Arrow (Ctrl+Shift+Alt+Right Arrow) to move to the next in or out point
• Press Cmd+Shift+Option+Left Arrow (Ctrl+Shift+Alt+Left Arrow) to move to the previous in or out point

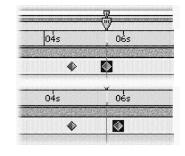
One of After Effects’ least understood (and coolest) features has to be time remapping. Simply put, this awesome feature allows you to move frames of video around like they were keyframes.
![]() Select the layer you want to remap.
Select the layer you want to remap.
![]() Choose Layer>Enable Time Remapping or press Cmd+Option+T (Ctrl+Alt+T).
Choose Layer>Enable Time Remapping or press Cmd+Option+T (Ctrl+Alt+T).
![]() You will now see a keyframe for the first frame of video and the last. You also now have the ability to extend the trim handle at the end of the shot indefinitely, but it will just create a freeze frame at the end of the video track.
You will now see a keyframe for the first frame of video and the last. You also now have the ability to extend the trim handle at the end of the shot indefinitely, but it will just create a freeze frame at the end of the video track.
![]() You can drag keyframes apart to slow the speed of motion; conversely you can shorten the distance between keyframes to speed the shot. Alternately, adjust the velocity controls up or down, and AE will automatically adjust the spacing of your keyframes.
You can drag keyframes apart to slow the speed of motion; conversely you can shorten the distance between keyframes to speed the shot. Alternately, adjust the velocity controls up or down, and AE will automatically adjust the spacing of your keyframes.
![]() Additional keyframes can be added to create complex, variable speed-motion effects. Once added, keyframes can have their time value manipulated. For example, you can adjust values to an earlier time to create a rewind effect.
Additional keyframes can be added to create complex, variable speed-motion effects. Once added, keyframes can have their time value manipulated. For example, you can adjust values to an earlier time to create a rewind effect.
![]() To improve transitions in speed, use keyframe assistants for ease, or manually adjust the Bezier controls.
To improve transitions in speed, use keyframe assistants for ease, or manually adjust the Bezier controls.
![]() If time values are remapped, you must enable frame blending for best results. Be sure to enable it globally at the top of the timeline and for the time remapped layers. Do not enable time remapping on other layers as it increases render time. Only footage layers, or precomps, can have their values remapped.
If time values are remapped, you must enable frame blending for best results. Be sure to enable it globally at the top of the timeline and for the time remapped layers. Do not enable time remapping on other layers as it increases render time. Only footage layers, or precomps, can have their values remapped.

Want to quickly switch a layer’s playback direction? Press Cmd+Option+R (Ctrl+Alt+R) to switch the playback direction. The key advantage to this method is thal a layer’s in and out points are preserved.

Have you ever tried to scale a really huge layer? Unless you like scaling in the Timeline, you’ve probably zoomed way out to 25 percent just so you can find the scale handles. Next time, try holding down the Option key (Alt key) and drag it anywhere within the layer in the Comp window. Drag toward the center to scale in; drag away from the center to scale out.
While dragging layers around is often a valid option, it’s not the fastest way to put a layer at the top of an SO-layer composition, especially if it’s near the bottom. There are several keyboard shortcuts that will come in handy.
• To bring a layer to the front, press Cmd+Shift+] (Ctrl+Shift+]).
• To bring a layer to the back, press Cmd+Shift+[ (Ctrl+Shift+[).
• To move a layer one spot closer to the top, press Cmd+] (Ctrl+]).
• To move a layer one spot farther back, press Cmd+[ (Ctrl+[).

When dragging layers in the timeline, hold down the Shift key. This will invoke snapping to things like heads of clips and visible keyframes.

While duplicating a layer is often as simple as pressing Cmd+D (Ctrl+D), sometimes you'll get unexpected results. If you want to duplicate a layer, you may accidentally end up duplicating a mask, or an effect applied to that layer. To avoid cloning mishaps, do this:
Press F2 to deselect all items. Click on the layer name you want to duplicate. Press Cmd+D (Ctrl+D).
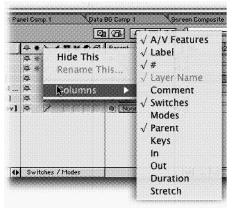
There are several Optional Panels available in the timeline. If you'd like to add or subtract headings, simply Control click on any column heading, and pick from the list. If you don't like the column order, drag them left or right to new positions.