
Audio provides more than 70 percent of the experience when watching a video or movie. If the picture is less than perfect but the audio is clear, people will watch. Conversely, if the audio is poor and the picture is great, they’ll get weary of fighting to hear and give up.
After Effects is NOT an audio powerhouse, but it does have some powerful tools to tie your effects into your audio mix. Read on to learn how to get the best sound out of (and into) After Effects.

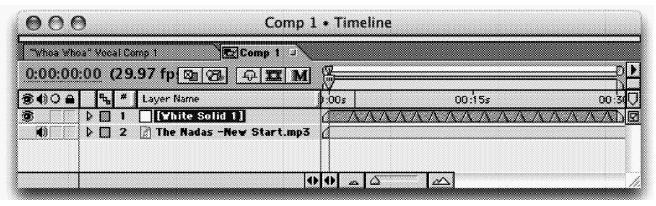
This is our favorite way to sync keyframes to an audio track. If you can tap your finger to the music, you can achieve better keyframing.
![]() Add a Solid Layer to hold your keyframes by pressing Cmd+Y (Ctrl+Y). Leave this layer selected.
Add a Solid Layer to hold your keyframes by pressing Cmd+Y (Ctrl+Y). Leave this layer selected.
![]() Set your preview area for the segment of audio you'd like to keyframe.
Set your preview area for the segment of audio you'd like to keyframe.
![]() Be certain the Audio button is highlighted in the Time Controls Window.
Be certain the Audio button is highlighted in the Time Controls Window.
![]() Start the RAM preview.
Start the RAM preview.
![]() To add a Layer Marker, press the Multiply symbol (*) on the numeric keypad. Continue to tape out each audio event you'd like to sync to.
To add a Layer Marker, press the Multiply symbol (*) on the numeric keypad. Continue to tape out each audio event you'd like to sync to.
![]() When the Preview is finished, all of the Layer Markers will appear.
When the Preview is finished, all of the Layer Markers will appear.
![]() To move between markers, use the J and I< keys to move left or right respectively.
To move between markers, use the J and I< keys to move left or right respectively.
You know there’s audio in your composition. You put it there yourself! Yet every time you RAM preview, there’s no audio to be heard. Be sure to check your speaker icon in the Time Controls window. If it’s off, it’s off. We know this sounds simple, but it’s the little things that tick us off when jamming on deadline.

Want to animate a Monty Python-style talking head? Sure you do (and you can probably quote at least one third of Monty Python and the Holy Grail.)
![]() Place your audio on one layer, and above it, place the head with its mouth and lower jaw erased.
Place your audio on one layer, and above it, place the head with its mouth and lower jaw erased.
![]() On the top layer, place the mouth and lower jaw by itself.
On the top layer, place the mouth and lower jaw by itself.
![]() Select the mouth/jaw layer and invoke Motion Sketch from the Window menu
Select the mouth/jaw layer and invoke Motion Sketch from the Window menu
![]() Click the Start Capture button in the Motion Sketch palette.
Click the Start Capture button in the Motion Sketch palette.
![]() Gently start to drag the mouth/jaw layer in the Comp window. As soon as you start dragging, the audio will play back. As it plays, drag the mouth up and down in synch with the dialogue. AE will automatically add the keyframes.
Gently start to drag the mouth/jaw layer in the Comp window. As soon as you start dragging, the audio will play back. As it plays, drag the mouth up and down in synch with the dialogue. AE will automatically add the keyframes.
![]() When you’re done, you can use the Smoother (Window>The Smoother) to reduce the number of keyframes for a tweaked animation.
When you’re done, you can use the Smoother (Window>The Smoother) to reduce the number of keyframes for a tweaked animation.

You can access your Audio controls for a selected Layer by tapping L (for Audio Levels). While there, feel free to click in the timeline just below the Audio Waveform. Your cursor should change to a double-ended arrow, which will allow you to resize the window for larger waveforms.

Our favorite way to rip, upload, and convert music or Sound Effects from stock music CDs is to use iTunes. We all know music CDs are recorded at a sampling rate of 44.1 kHz. After Effects and most digital formats love to work at a sampling rate of 48kHz. Yes, you can use the lower rate, but your preview times will be slower.

Here’s all you need to do.
![]() Open iTunes, which is available for both Mac and PC for free.
Open iTunes, which is available for both Mac and PC for free.
![]() Open Preferences under the Edit menu.
Open Preferences under the Edit menu.
![]() Click on the importing icon on the toolbar.
Click on the importing icon on the toolbar.
![]() Under Import, select AIFF or WAV encoder.
Under Import, select AIFF or WAV encoder.
![]() Now click on the advanced icon on the menu bar.
Now click on the advanced icon on the menu bar.
Once you have set up your preferences, just ”rip and roll” every time you need to grab a music cut. Fast, easy, elegant, and of course, cool.
If you need to edit audio extensively, do it outside of After Effects, which is not an audio rn editing program. There are several excellent alternatives available from many manufacturers. A moderate editing audio editing application may run you $99-$299, but its power and speed will be worth it. You don’t use Photoshop to edit video do you?

To hear the audio in your comp, preview it by loading it into RAM. You have several options.
Option 1: Use your RAM preview. Mark the work area off and make sure the speaker icon is highlighted. Click the Preview button to initiate the preview. Using this method, the video track is also previewed so you will have to wait for effects to process. This can be time-consuming and will often result in shorter preview areas, as your RAM will be used up on video effects.
Option 2:You can preview just the audio tracks by pressing the decimal (period) key on the numeric keypad. If you are on a PowerBook, depress the Num Lock key to enable it. Audio will be previewed based on your preview preferences. By default, this is set to 8:00, but you can change this by accessing After Effects>Preferences>Previews (Edit>Preferences>Previews).
Option 3: You can choose to do an audio preview of just the work area. Simply press Option+decimal (Alt+decimal) to preview the entire work area.

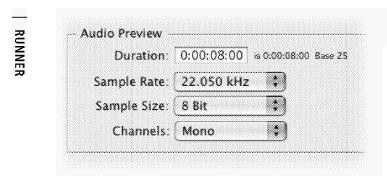
Want more control over audio previews? Adjust your preferences. The preview settings affect all aspects of audio previews, but have no impact on your renders. To access the audio controls, choose After Effects>Preferences>Previews (Edit>Preferences>Previews). The more you reduce audio overhead, the faster you can preview.
Duration. This setting controls how much audio is previewed when you invoke an audio only preview.
Sample Rate. Higher sample rates are used for professional audio. With that said, you likely do not need to hear 48kHz of audio for a preview. A rate of 22kHz (or even 1lkHz) should be more than adequate for preview purposes.
Sample Size. After Effects supports 8-bit and 16-bit audio. While it is important to render all 16-bits, 8 bits is adequate for preview purposes.
Channels. Do you have multiple speakers on your system, or are you using a single builtin speaker? In most cases, mono previews are adequate.
Want to actually hear the audio while you’re dragging through your timeline? Simply hold down the Cmd key (Ctrl) while dragging, and you will hear your audio. While not as good as a full preview, it can help you find your place quickly. You can improve audio scrubbing by turning off the visibility for layers with video or processor intensive effects.

When you were growing up, you might’ve wondered what all those backward messages were all about on your records, and this might have tempted you to reverse an audio clip. While it may have been cool when you were young, its highly unlikely you want it to happen in your After Effects compositions. If you change the speed or direction of a video clip, its audio file will also change. This may result in the unexpected.
![]() Before changing the speed or direction of a video track that has audio in the comp, you must duplicate the track. Press Cmd+D (Ctrl+D) to duplicate selected tracks.
Before changing the speed or direction of a video track that has audio in the comp, you must duplicate the track. Press Cmd+D (Ctrl+D) to duplicate selected tracks.
![]() Turn the visibility icons off on the tracks that have been unaffected by speed changes. These will be your audio only.
Turn the visibility icons off on the tracks that have been unaffected by speed changes. These will be your audio only.
![]() To avoid confusion, move your audio only tacks to the bottom of the composition, and lock them to prevent changes in position or visibility.
To avoid confusion, move your audio only tacks to the bottom of the composition, and lock them to prevent changes in position or visibility.
![]() On tracks that have speed changes applied, disable the audio by clicking on the speaker icon.
On tracks that have speed changes applied, disable the audio by clicking on the speaker icon.

When creating a composition for use with DV material, mix the audio to -12 db. If going to digi-beta, then -18 or -20 db. But don’t forget that music and sound effects on Audio CDs are usually mixed to -0db. (Yes we meant to say minus before the zero. That’s because music CDs are mixed and compressed so they sound nice and loud in your car; they peak right below Zero db.)
Whenever you use music from a CD, remember to pull its levels down so they hit the appropriate (-12 or -2Odb) target levels.

While our MP3 collection is impressive (and legal), it is useless for work in After Effects because MP3 files use heavy compression to reduce file size. When you throw away 90 percent of the information, then try to render out to a new format, you get problems. MP3 files will result in pops and clicks in the audio track. Don't use them for more than a temp track. If you had hopes of using AAC or WMA files, they won't even load.
The best solution is to stick with AIFF or WAV and encode at the settings you are going to use for final file output. You can convert an AAC or MP3 file to a .mov or .aiff file with QuickTime Pro. QuickTime Pro is actually a great program to have and well worth $30. For more information or to download the cross-platform pro player, go to
http://www.apple.com/quicktime.

Changing the velocity of a layer will change the pitch of that layer's audio. As pitch rises, volume will too. If you speed a track up over 200 percent, you will likely get screeching in the audio track. Adjust track volume using Levels. You can find Audio Levels in the Audio property area, or highlight the track and adjust volume with the Audio Palette.

After Effects 6 has a new assistant designed to generate audio keyframes. It sounds great, in theory, until you try to use it. The problem is that the Convert Audio to Keyframes Assistant simply translates the entire audio track to new keyframes. Sure, it splits up the channels, and gives you a combo channel, but it only tracks amplitude.
This generates too many keyframes with very little focus. What would you think if we didn’t offer an alternate solution? Here’s one that involves a little pre- and postprocessing.
![]() To focus those keyframes, try the High-Low Pass effect (Pro Only). This filter essentially acts as a dam, and blocks frequencies above or below a specified point. For example a Low Pass filter set to 200 kHz will only allow the lowest drums to pass through. If you don’t own Pro, use the inferior Bass & Treble Effect.
To focus those keyframes, try the High-Low Pass effect (Pro Only). This filter essentially acts as a dam, and blocks frequencies above or below a specified point. For example a Low Pass filter set to 200 kHz will only allow the lowest drums to pass through. If you don’t own Pro, use the inferior Bass & Treble Effect.
![]() To further refine the area of focus, use two High-Low Pass Effects. Apply the Low Pass filter first, allowing only sounds below a certain frequency through. This will clip the top parts of the sound. Then follow up with a High Pass filter set to a frequency lower than the first effect. This will drop all sounds below the set frequency, and enable you to specify a range that only allows vocals through.
To further refine the area of focus, use two High-Low Pass Effects. Apply the Low Pass filter first, allowing only sounds below a certain frequency through. This will clip the top parts of the sound. Then follow up with a High Pass filter set to a frequency lower than the first effect. This will drop all sounds below the set frequency, and enable you to specify a range that only allows vocals through.
![]() Highlight the audio track that you have prepped. Select AnimatiorOKeyframe AssistantXonvert Audio to Keyframes. If you have a long sequence (or a slow machine), it’s worthwhile to stretch your legs for a few minutes. This assistant can take a while to run.
Highlight the audio track that you have prepped. Select AnimatiorOKeyframe AssistantXonvert Audio to Keyframes. If you have a long sequence (or a slow machine), it’s worthwhile to stretch your legs for a few minutes. This assistant can take a while to run.
![]() If you twirl down the parameters on the new track, you’ll discover its generated temporal keyframes (and a lot of them at that). This is a great place to use the Smoother (Window>The Smoother). Select the keyframes in question, and apply smoothness with a tolerance setting between 1.5 and 6 (depending on complexity of keyframes). You now have keyframes that are more useful.
If you twirl down the parameters on the new track, you’ll discover its generated temporal keyframes (and a lot of them at that). This is a great place to use the Smoother (Window>The Smoother). Select the keyframes in question, and apply smoothness with a tolerance setting between 1.5 and 6 (depending on complexity of keyframes). You now have keyframes that are more useful.


You’ve used the keyframe assistant to convert your audio track to keyframes. Now what? The easiest answer (don’t be scared) is to write an expression. To get a full grasp of expressions, be sure to look at Chapter 13. Here’s a simple expression to tie the scale of a layer to the beat of audio.
![]() Generate audio keyframes, as described in the previous section-It’s Got a Great Beat.
Generate audio keyframes, as described in the previous section-It’s Got a Great Beat.
![]() Highlight the layer to be animated. Press S for Scale. If it is a Text Layer in AE6, choose Animate>Animate TexOScale.
Highlight the layer to be animated. Press S for Scale. If it is a Text Layer in AE6, choose Animate>Animate TexOScale.
![]() Enable an expression by selecting Animate>Add Expression or pressing Option+Shift+= (Alt+Shift+=).
Enable an expression by selecting Animate>Add Expression or pressing Option+Shift+= (Alt+Shift+=).
![]() From the Expressions submenu, choose Property > value. Property>Value..
From the Expressions submenu, choose Property > value. Property>Value..
![]() As the text appears to grow, multiply the value by a decimal, such as .25.
As the text appears to grow, multiply the value by a decimal, such as .25.
![]() Expose the keyframes on the Audio Amplitude Layer. Select the Layer, and press U (for user keyframes).
Expose the keyframes on the Audio Amplitude Layer. Select the Layer, and press U (for user keyframes).
![]() Use the Pickwhip (looks like the @ symbol) to drag it to the desired keyframes.
Use the Pickwhip (looks like the @ symbol) to drag it to the desired keyframes.
![]() Check your expression, which should look like this: ~alue~~.25~~thisComp.layer(“AAumdipoli tude”). effect(“Left Channel”)( “Slider”).
Check your expression, which should look like this: ~alue~~.25~~thisComp.layer(“AAumdipoli tude”). effect(“Left Channel”)( “Slider”).
![]() Preview the work area to test your animation.
Preview the work area to test your animation.
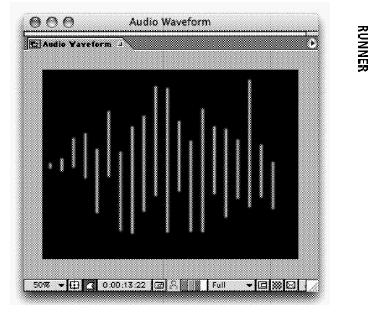
After Effects offers great effects for creating visual elements from your soundtrack. Audio Spectrum displays the magnitude of frequencies within a user-specified range. Audio Waveform, on the other hand, displays the waveform amplitude.
![]() Create a new solid to hold the effect, or apply it directly to a layer.
Create a new solid to hold the effect, or apply it directly to a layer.
![]() You must specify which layer to use for audio. Choose the affected layer, or specify a new audio source from the Audio Layer pull-down menu.
You must specify which layer to use for audio. Choose the affected layer, or specify a new audio source from the Audio Layer pull-down menu.
![]() Adjust the several options to create exciting motion graphic elements. Settings of importance include:
Adjust the several options to create exciting motion graphic elements. Settings of importance include:
• Start Point, End Point: Where the effect occurs.
• Start Frequency, End Frequency. Specifies which area of the music to focus on, and specifies the range in hertz.
• Maximum Height. Turn it up for a more pronounced effect.
• Thickness & Softness. You should be in high quality mode to accurately judge how to set these sliders.
• Hue Interpolation. Introduces variety into colors used.
• Display Options. Choose how to display frequencies; you can use Analog Lines, or Analog Dots.
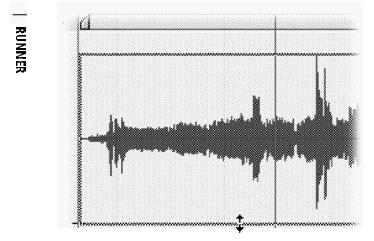
Want to see your waveforms in the timeline, Tap LL (think ‘Lots of Levels’ and not Cool J. You’ll be able to ‘see’ your sound a little better. Want to see more? Simply click on the gray line below the audio waveform and pull down. Size to Taste. Now you can just see where those keyframes are going to go, can’t you? If you do want to view your waveform it’s best to zoom in on the Timeline. Generating a waveform can be CPU intensive and may even cause AE to quit.
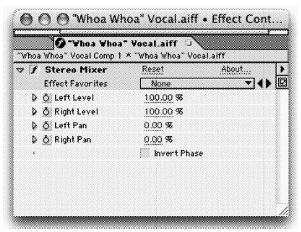
Have you ever had a problem where some (or all) of your sound seems to come from only one speaker? Chances are, that’s because you have mono files that are incorrectly interpreted or captured. You may also have received audio that was panned during the edit session. An annoying problem, but easy to fix. Apply the Stereo Mixer Effect (EffecOAudioXtereo Mixer). You can now correctly pan your audio tracks so the sounds are properly balanced. Conversely, you can use this effect to create stereo panning effects as well for a more “surrounding” experience.
Just like video footage layer, you can also time remap audio. This can be useful to create sound effects or gradual speed changes in the sound.
![]() Select the audio footage layer in the timeline.
Select the audio footage layer in the timeline.
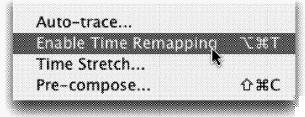
![]() Choose Layer>Enable Time Remapping or press Cmd+Option+T (Ctrl+Alt+T).
Choose Layer>Enable Time Remapping or press Cmd+Option+T (Ctrl+Alt+T).
![]() You can now add keyframes and adjust their spacing for variable time effects.
You can now add keyframes and adjust their spacing for variable time effects.

By default, After Effects does not include audio in your renders, you must tell AE that m you want audio in your rendered project. In the render queue, be sure to check the output module’s settings and check the audio box. Remember, most digital sources use a sample rate of 48 kHz by default these days.

Ever render a file and forget to check the audio render box in your Render Queue? Don’t be embarrassed, happens all the time. What’s a motion graphic artist on a deadline to do? If you have QuickTime Pro, the fix is easy.
![]() Render out just the audio only track. It should be the same duration as the movie file that needs audio.
Render out just the audio only track. It should be the same duration as the movie file that needs audio.
![]() Open both files using QuickTime Pro.
Open both files using QuickTime Pro.
![]() In the Audio file, press Cmd+A (Ctrl A) to select all.
In the Audio file, press Cmd+A (Ctrl A) to select all.
![]() Copy the Audio file to your clipboard by pressing Cmd+C (Ctrl+C).
Copy the Audio file to your clipboard by pressing Cmd+C (Ctrl+C).
![]() Switch to the new movie and position your playback head at the start of the movie..
Switch to the new movie and position your playback head at the start of the movie..
![]() Choose Edit Add Scaled (Option+Shift+Cmd+V) (Alt+Shift+Ctrl+V) to add the audio track to the movie.
Choose Edit Add Scaled (Option+Shift+Cmd+V) (Alt+Shift+Ctrl+V) to add the audio track to the movie.
![]() Choose Save As to save the file. By default, the audio is linked (dependent) so you must keep the audio track around. If you want to create a new clip, choose to make the file self-contained.
Choose Save As to save the file. By default, the audio is linked (dependent) so you must keep the audio track around. If you want to create a new clip, choose to make the file self-contained.